🦷 ICDAS II: Coronal Primary Caries Overview
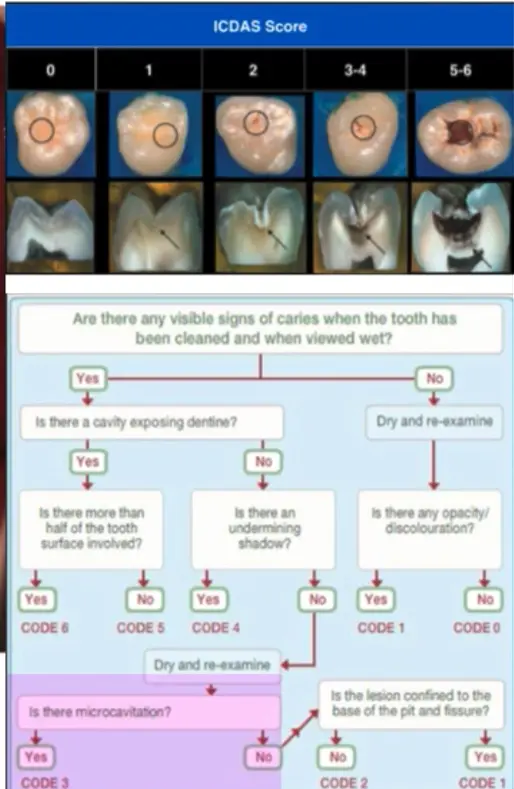
The ICDAS system uses a seven-point scale (0–6) to classify the severity of caries based on visual and tactile changes.
| Code | Classification | Visual/Clinical Change |
|---|---|---|
| 0 | Sound | No change in translucency after 5 seconds of air drying. |
| 1 | Initial (First Visual) | No change when wet; opacity/discoloration visible only after air drying. |
| 2 | Initial (Distinct) | Opacity or brown discoloration visible when wet; wider than the pit/fissure. |
| 3 | Moderate (Breakdown) | Localized enamel breakdown; no visible dentin; loss of surface integrity. |
| 4 | Moderate (Shadow) | Dark shadow (grey, blue, or brown) visible through enamel from the underlying dentin. |
| 5 | Extensive (Cavity) | Distinct cavity with visible dentin; cavitation in opaque/discolored enamel. |
| 6 | Extensive (Deep) | Extensive cavity; deep and wide; dentin clearly visible on walls and base. |
🔍 Activity Assessment: Active vs. Inactive Lesions
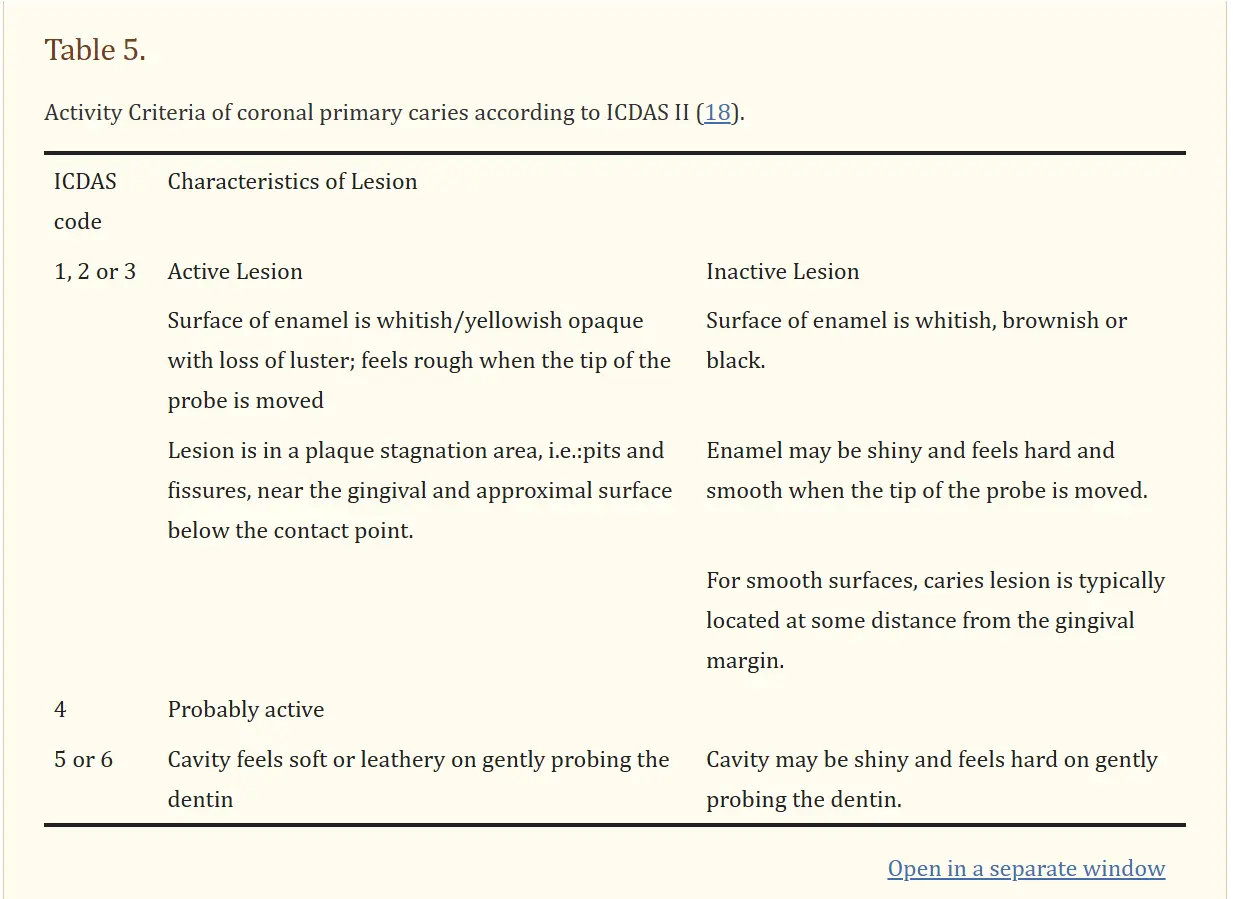
Determining if a lesion is “active” is crucial for treatment planning. Use the following criteria for different ICDAS levels:
ICDAS 1, 2, or 3
-
Active: Enamel is whitish/yellowish, opaque, and has a loss of luster. Surface feels rough with a probe. Usually located in plaque stagnation areas (pits, fissures, near gingival margin).
-
Inactive: Enamel is whitish, brownish, or black. Surface is shiny, feels hard and smooth. Typically located at some distance from the gingival margin on smooth surfaces.
ICDAS 5 or 6
-
Active: Cavity feels soft or leathery upon gentle probing of the dentin.
-
Inactive: Cavity may be shiny and feels hard upon gentle probing of the dentin.
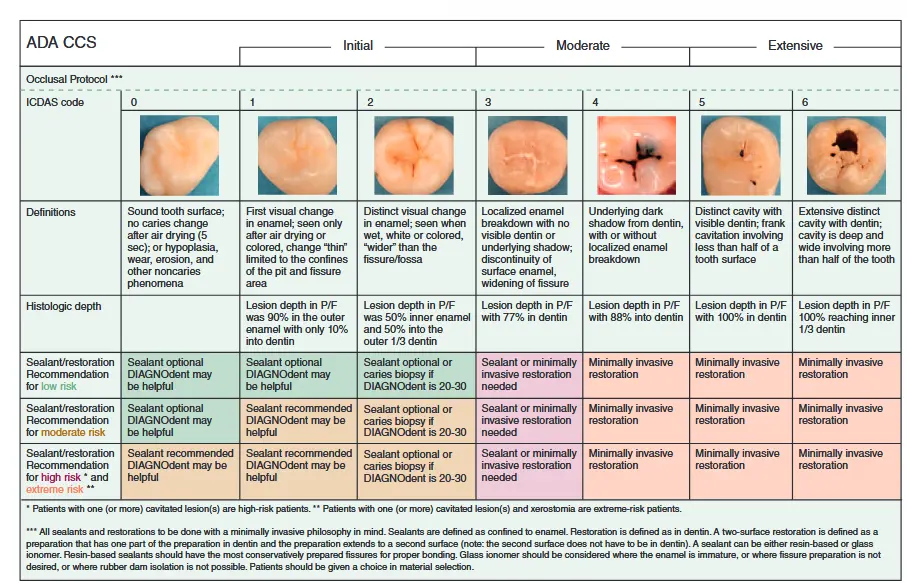
📋 ADA Caries Classification System (CCS) Reference Table
_S
| ADA CCS | Initial | Initial | Initial | Moderate | Moderate | Extensive | Extensive |
|---|---|---|---|---|---|---|---|
| ICDAS Code | 0 | 1 | 2 | 3 | 4 | 5 | 6 |
| Definitions | Sound tooth surface; no caries change after air drying (5 sec); or hypoplasia, wear, erosion, etc. | First visual change in enamel; seen only after air drying or colored; change “thin” limited to pit/fissure. | Distinct visual change in enamel; seen when wet, white or colored; “wider” than fissure/fossa. | Localized enamel breakdown with no visible dentin or underlying shadow; widening of fissure. | Underlying dark shadow from dentin, with or without localized enamel breakdown. | Distinct cavity with visible dentin; frank cavitation involving less than half of a surface. | Extensive distinct cavity with dentin; cavity is deep and wide involving more than half of tooth. |
| Histologic Depth | Lesion depth in P/F was 90% in outer enamel with 10% into dentin. | Lesion depth in P/F was 50% inner enamel and 50% outer 1/3 dentin. | Lesion depth in P/F with 77% in dentin. | Lesion depth in P/F with 88% into dentin. | Lesion depth in P/F with 100% in dentin. | Lesion depth in P/F 100% reaching inner 1/3 dentin. | |
| Rec: Low Risk | Sealant optional; DIAGNOdent helpful. | Sealant optional; DIAGNOdent helpful. | Sealant optional or caries biopsy if DIAGNOdent 20-30. | Sealant or minimally invasive restoration needed. | Minimally invasive restoration. | Minimally invasive restoration. | Minimally invasive restoration. |
| Rec: Mod Risk | Sealant optional; DIAGNOdent helpful. | Sealant recommended; DIAGNOdent helpful. | Sealant optional or caries biopsy if DIAGNOdent 20-30. | Sealant or minimally invasive restoration needed. | Minimally invasive restoration. | Minimally invasive restoration. | Minimally invasive restoration. |
| Rec: High/Ext Risk | Sealant recommended; DIAGNOdent helpful. | Sealant recommended; DIAGNOdent helpful. | Sealant optional or caries biopsy if DIAGNOdent 20-30. | Sealant or minimally invasive restoration needed. | Minimally invasive restoration. | Minimally invasive restoration. | Minimally invasive restoration. |
📑 Cheat Sheet: Pits/Fissures vs. Smooth Surfaces
This comparison helps distinguish how the same ICDAS code may present differently depending on the tooth anatomy.
| ICDAS | Pits and Fissures (Occlusal) | Smooth Surfaces (Proximal/Free) |
|---|---|---|
| 0 | No change after 5s air drying. | No change after 5s air drying. |
| 1 | Opacity/discoloration limited to the pit/fissure area (visible only after drying). | Opacity visible from buccal/lingual or gingival margin (visible only after drying). |
| 2 | Discoloration wider than the fissure; visible even when wet. | Opacity/discoloration visible when wet. On proximal surfaces, may see a shadow through the marginal ridge. |
| 3 | Loss of tooth structure within the pit/fissure; no dentin visible. | Loss of enamel integrity (buccal/lingual) or surface integrity near gingival margin; no dentin visible. |
| 4 | Shadow visible through intact enamel; can be grey, blue, or brown. | Shadow visible through marginal ridge, buccal, or lingual walls. |
| 5 | Cavitation exposing dentin beneath the enamel. | Cavitation with exposed dentin; visible on the surface. |
| 6 | Deep/wide cavity; dentin clearly visible in walls and base. | Extensive loss of structure; involves at least half the surface; may reach the pulp. |
💡 Key Takeaway for Diagnosis
-
The “Wet vs. Dry” Test: For Codes 1 and 2, the primary differentiator is whether you can see the lesion while the tooth is wet. If it disappears when wet and only appears after 5 seconds of air drying, it is Code 1.
-
The “Shadow” (Code 4): This is often easier to see when the tooth is wet. It represents a lesion that has reached the dentin but has not yet caused a full “hole” or cavitation (Code 5).
-
The “Half-Surface” Rule: For Code 6 on smooth surfaces, the lesion is characterized by involving at least 50% of the tooth surface.