Surgical Extractions and Minor Oral Surgery1
This section covers the principles and techniques associated with surgical extractions and minor oral surgery procedures.
Lecture Clarifications
- Asepsis requirements are enhanced compared to simple exodontia
- Wound healing principles will be expanded in periodontology lectures
- Suture selection should be based on clinical need rather than habit
- Complications management covers both general dental and specialist perspectives
Learning Outcomes2
Upon completion of this module, students should be able to:
- Describe indications for surgical asepsis techniques
- Describe a basic overview of wound healing
- Perform the basic steps to raise a simulated mucoperiosteal flap
- Discuss advantages and rationales for suture selection
- Explain common surgical complications and understand principles of management
- Gain awareness of surgical extractions for future rotations (e.g., retained roots, impacted teeth), though there is no immediate expectation to raise flaps for impacted wisdom teeth at this stage
Recommended Reading
Primary Textbook3
Fragiskos, Fragiskos D, Oral Surgery (Springer Berlin Heidelberg, 2007)
- Available online via UWA
- Written over a long period by an author who not only describes but illustrates procedures with clinical photography
- It is considered the best resource for clarifying oral surgery concepts
Medical Considerations
Key Patient History Factors4
- Diabetes: assess medications, glycemic control, and recent nutritional intake
- Assess control levels (Type 1 vs. Type 2); poorly controlled diabetics have poorer healing outcomes and higher infection risks
- Hypoglycemia Risk: Ensure insulin-dependent patients have eaten and taken medication appropriately to avoid skipping breakfast due to anxiety
- Cardiac health: evaluate for hypertension and ischaemic heart disease
- Pharmacological history: specifically anticoagulants
- Identify specific agents (e.g., Aspirin, Clopidogrel, dual antiplatelets)
- Management: Do not modify drug regimens independently; consult the patient's GP or specialist provider
- Neurological status: history of seizures or recent Transient Ischaemic Attack (TIA)
- History of recent seizures (potential stress triggers) or recent strokes/TIAs (impact on medications)
- Consider anxiolysis to reduce stress-induced risks
- Immune status: immunocompromised state due to disease or medications
- Caused by disease (e.g., certain cancers) or medication (e.g., Disease Modifying Antirheumatic Drugs)
- Expect potential post-operative healing complications
- Steroid use: long-term use and risk of adrenal insufficiency
- Assess need for enhanced steroid cover to prevent adrenal insufficiency or adrenal crisis
- Consult medical providers regarding topping up doses
Clinical Consultation5
- If in doubt regarding a patient’s medical status, speak to the patient’s GP or specialist physician for professional advice.
- Clinicians are part of the patient's care team but should not make unilateral decisions on changing medical regimens without appropriate advice
Perioperative Infection Control
Enhanced Precautions6
- Sterile gloves
- Surgical hand hygiene
- Sterile drapes
Clean vs. Sterile Setup
While simple exodontia uses a clean setup (similar to general restorative work), surgical procedures require enhanced precautions (sterile setup) as defined by the ADA.
- Sterile irrigation solutions (note the distinction between irrigation and injection solutions)
- Surgical cap
Clinical Indications
Enhanced precautions must be applied during:
- Elevation of a mucoperiosteal flap
- Surgical penetration of bone
Clinical Threshold
These precautions kick in specifically when the procedure moves beyond simple extraction into surgical manipulation of soft tissue flaps or bone.
Source: ADA Infection Prevention and Control 5th Edition, 2025
Sharps Management
Clinician Responsibility7
- The clinician who has used a disposable sharp item is responsible for its immediate safe management and disposal after use.
- Responsibility applies regardless of clinic setting, such as Clinic 1 versus Clinic 5 or the Extraction Block.
- Per OHCWA guidelines: Dispose of needles as soon as they have been used.
- Follow established protocols with Ash Jenker.
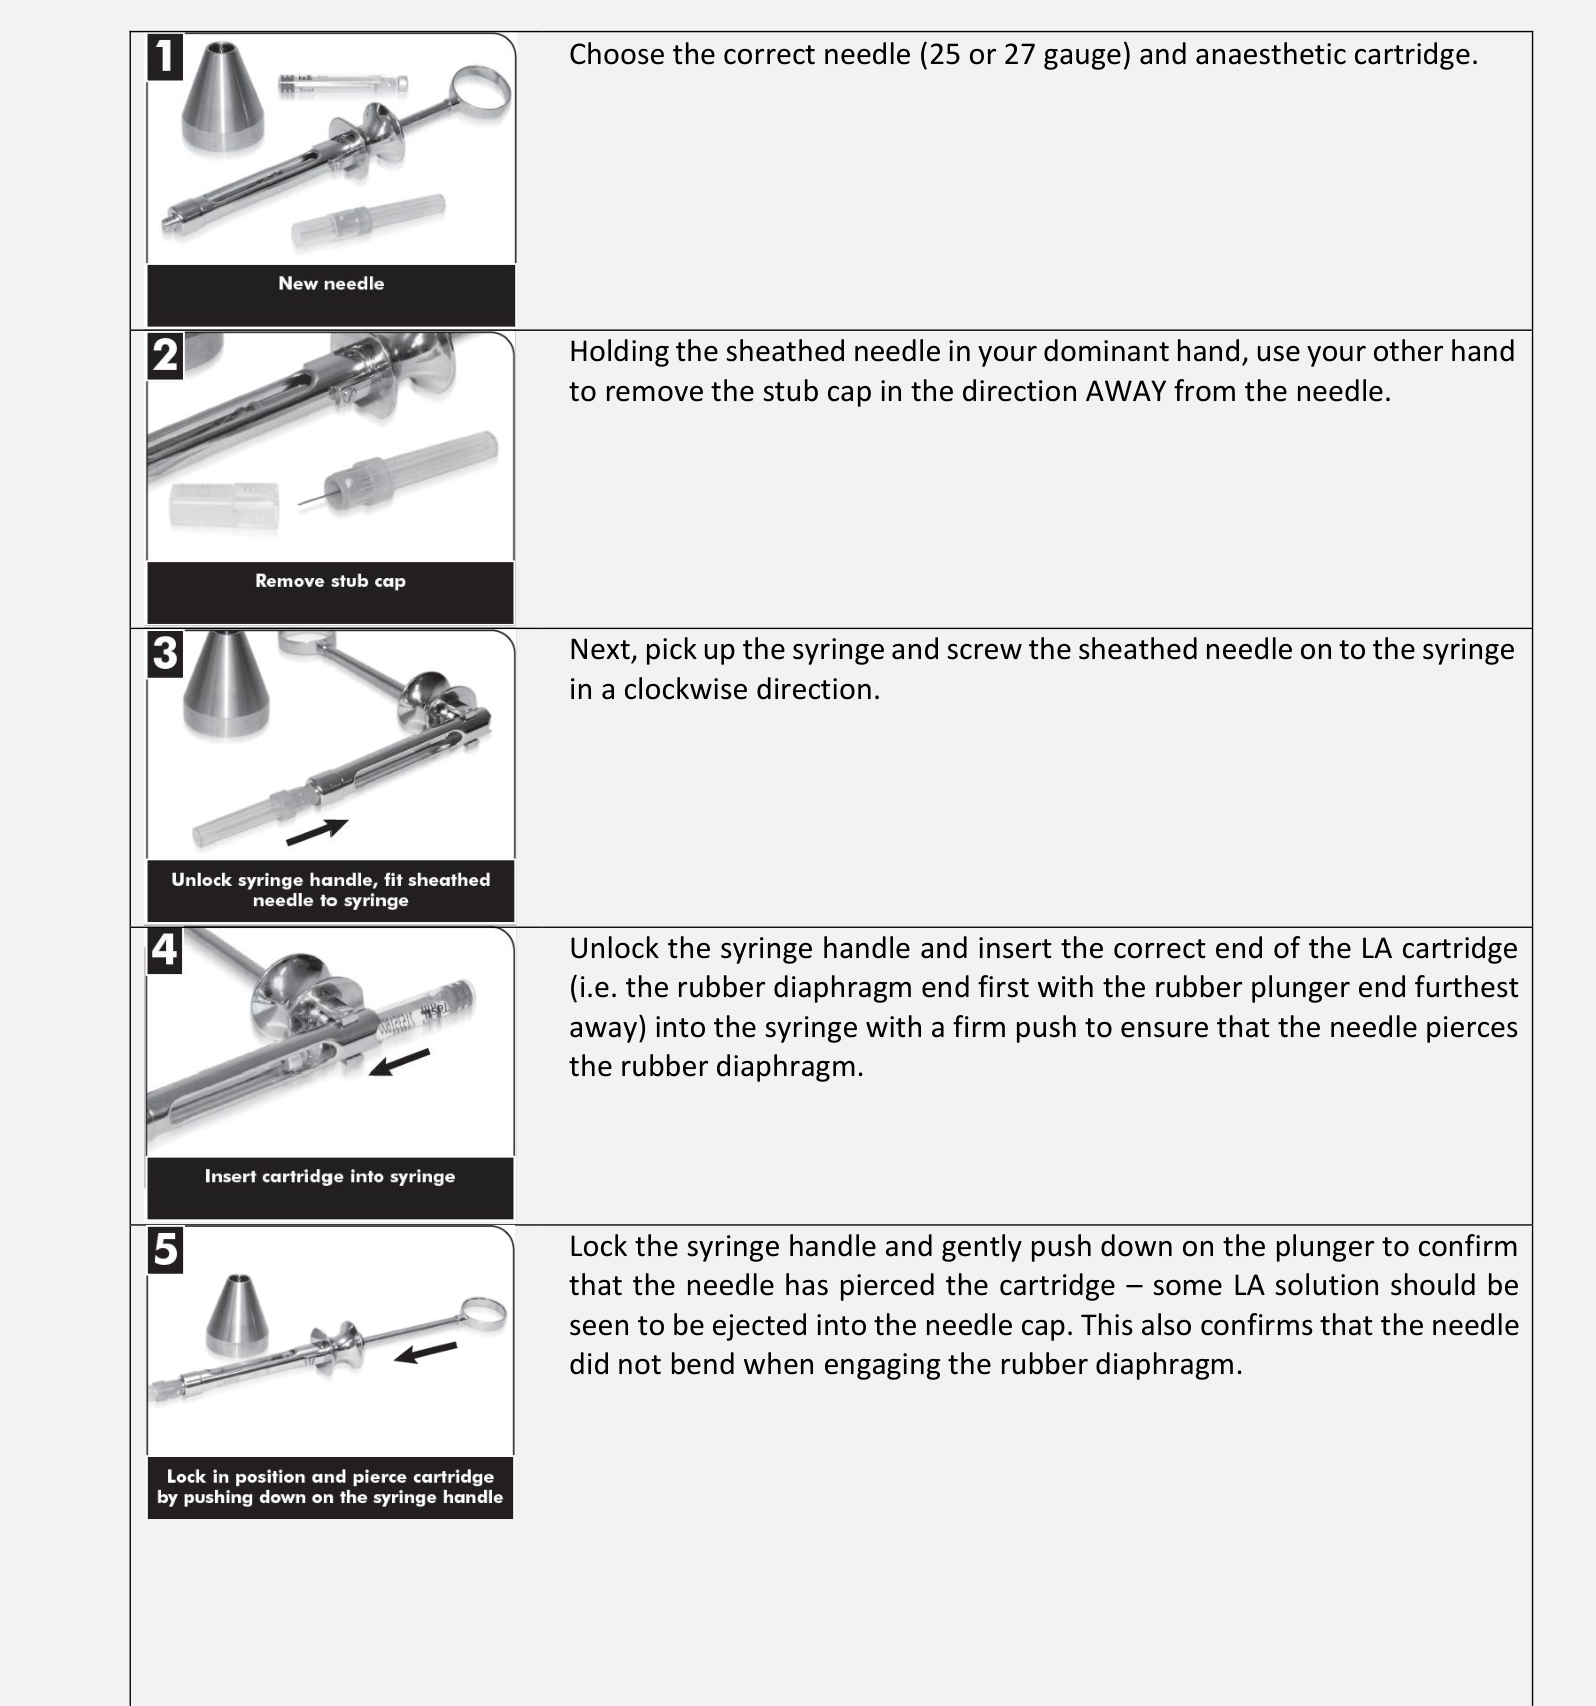
- Choose the correct needle (25 or 27 gauge) and anaesthetic cartridge.
- Holding the sheathed needle in your dominant hand, use your other hand to remove the stub cap in the direction AWAY from the needle.
- Pick up the syringe and screw the sheathed needle onto the syringe in a clockwise direction.
- Unlock the syringe handle and insert the correct end of the LA cartridge (rubber diaphragm end first) into the syringe with a firm push to ensure the needle pierces the diaphragm.
- Lock the syringe handle and gently push the plunger to confirm the needle has pierced the cartridge; LA solution should be visible in the needle cap. This also confirms the needle is not bent.
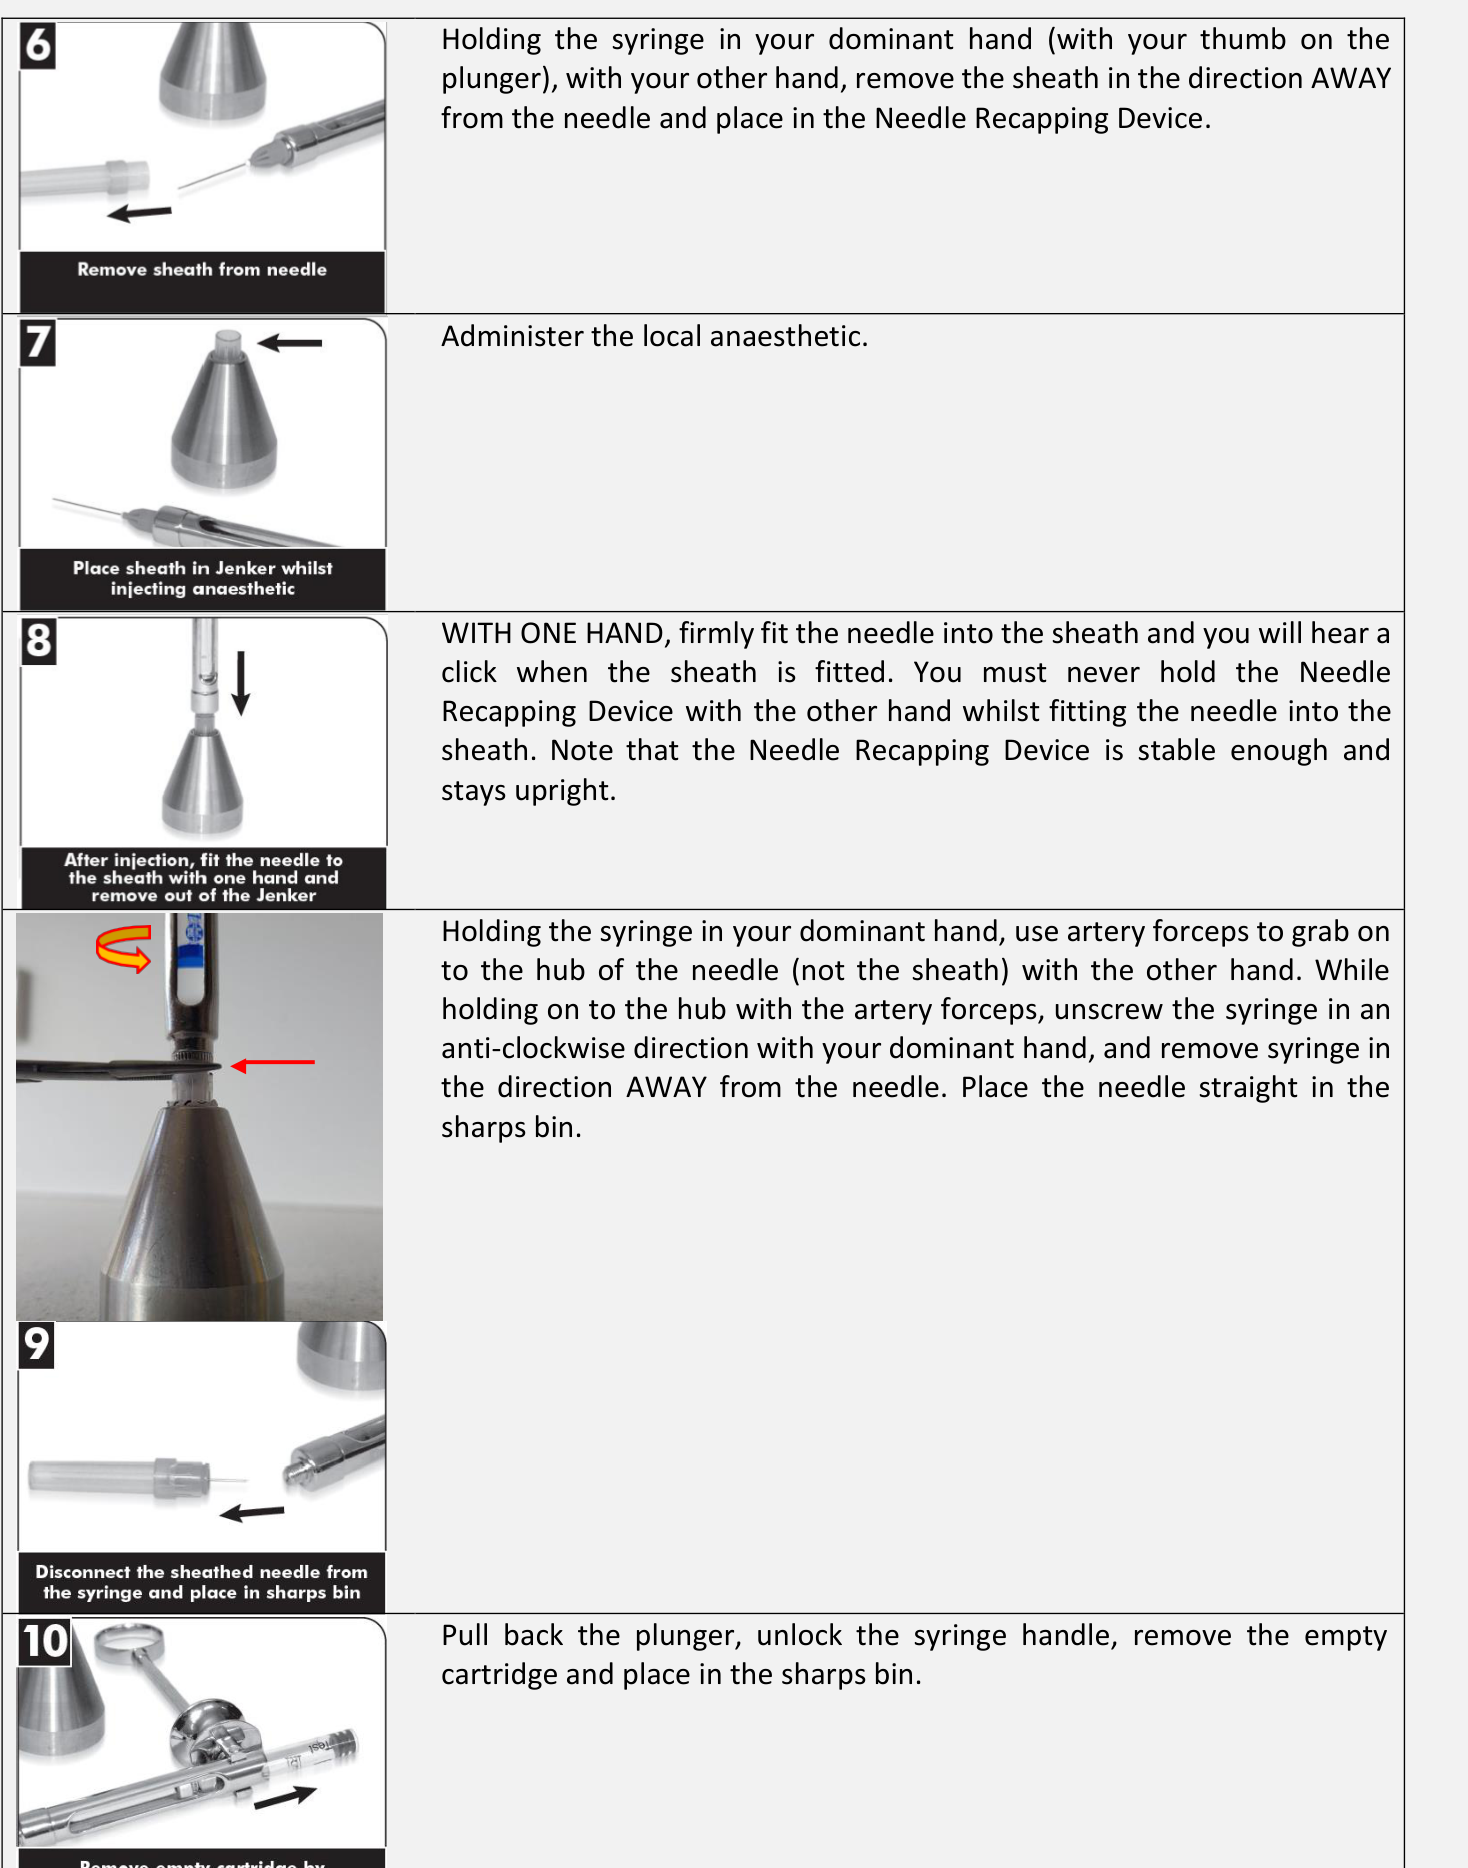
- Holding the syringe in your dominant hand (thumb on plunger), use the other hand to remove the sheath in the direction AWAY from the needle and place it in the Needle Recapping Device.
- Administer the local anaesthetic.
- Recapping: WITH ONE HAND, firmly fit the needle into the sheath until it clicks. Never hold the Needle Recapping Device with the other hand during this process.
- Disassembly: Holding the syringe in your dominant hand, use artery forceps to grab the hub of the needle (not the sheath). Unscrew the syringe anti-clockwise and remove it in the direction AWAY from the needle. Place the needle directly in the sharps bin.
- Pull back the plunger, unlock the syringe handle, remove the empty cartridge, and place it in the sharps bin.
Safe Assembly and Disassembly of Local Anaesthetic8
 |  |
Scalpel Blade Management9
Additional sharps are present during surgical extractions, specifically scalpel blades:
- Blades must be placed in a KNOWN location if they are intended for re-use during the procedure.
- In theatre settings: Use a kidney dish.
- In private practice: Use a disposable tray to hold sharps.
- Consider disposal immediately once the item is no longer required.
- Disposal method depends on the equipment used (disposable handle vs. disposable blade with reusable holder).
- Mounting: Open packet from non-sharp end, match bevel on blade with handle, ensure blade seats into cutout until it clicks.
- Dismounting Method 1 (Needle Holders): Grip blade at blunt end, bend slightly to disengage, slide forward away from people.
- Dismounting Method 2 (Blade Flasks): Use designated removal devices that lock blade away automatically, often featuring capacity counters.
Instructional Resources10
- Refer to video demonstrations regarding scalpel blade insertion, removal, and flask usage.
Suture Needle Safety11
-
Suture needles represent additional sharps in surgical extractions.
-
Adhere to established safe mounting and unmounting protocols.
-
At OHCWA, minimize direct handling of the needle and avoid placing hands in the path of the sharp.
-
Use tweezers to hold the needle until proficient to minimize finger handling.
-
Common cause of injury includes nervousness or shaking hands leading to incorrect finger placement.
-
Note: There has been an increased number of sharp injuries reported in 2025.
-
==Poor perfusion examples include smoking or excessive local anesthetic causing vasoconstriction.
-
Iatrogenic injury includes rough tissue handling, lacerations, or torn flaps leading to poorer outcomes.
-
==Even with perfect technique, this loss affects future prosthetics such as dentures, bridges, and implants.
-
Socket preservation involves placing bone graft material to stabilize the blood clot and mitigate resorption.
-
==Primary intention examples include raising a flap for wisdom teeth and suturing it back.
-
Secondary intention examples include dehiscence or biopsies where only hemostasis is secured.
-
Wound Healing12
Wound healing is a complex biological process that restores the integrity of tissues following injury or surgical intervention.
Soft Tissue Wound Healing
 |  |
 |
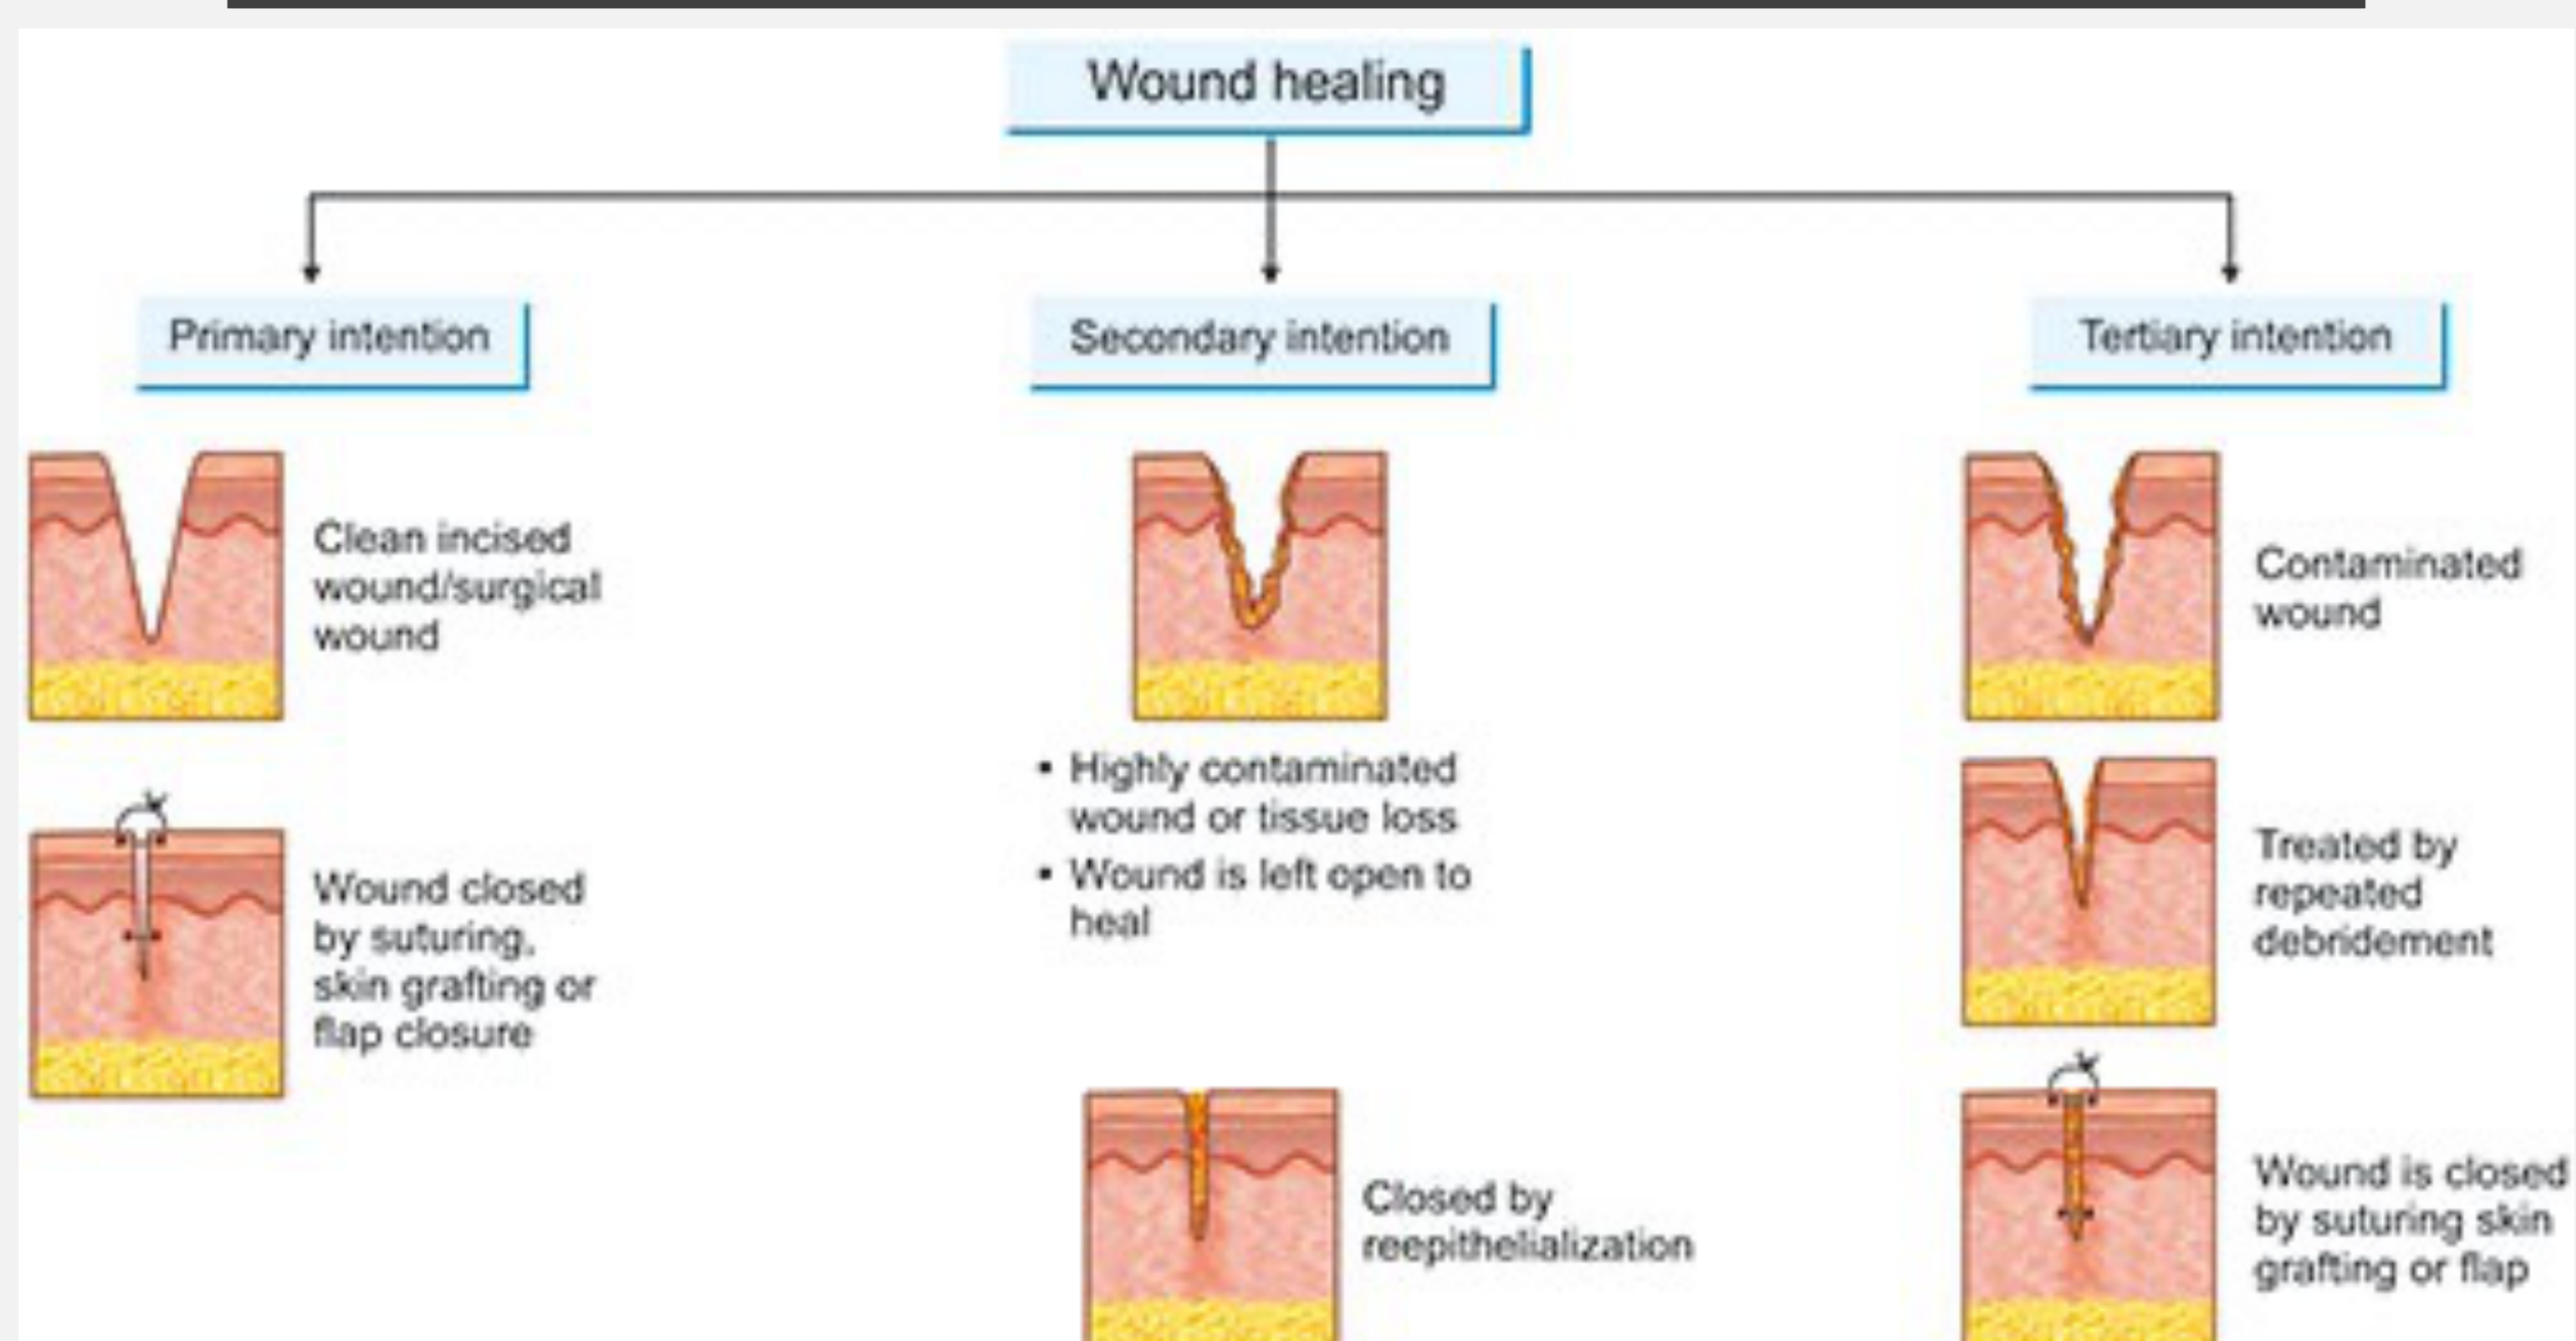
Classifications of Wound Closure13
- Primary Intention
- Characteristic of clean incised wounds or surgical wounds.
- The wound is closed by suturing, skin grafting, or flap closure.
- Biological outcome: Regeneration is greater than fibrosis.
- Secondary Intention
- Occurs in wounds with significant tissue loss or high levels of contamination.
- The wound is left open to heal.
- Closed via the process of re-epithelialization.
- Biological outcome: Fibrosis is greater than regeneration.
- Tertiary Intention (Delayed Primary Closure)
- Utilized for contaminated wounds.
- Treated initially by repeated debridement.
- The wound is eventually closed by suturing, skin grafting, or flap closure.
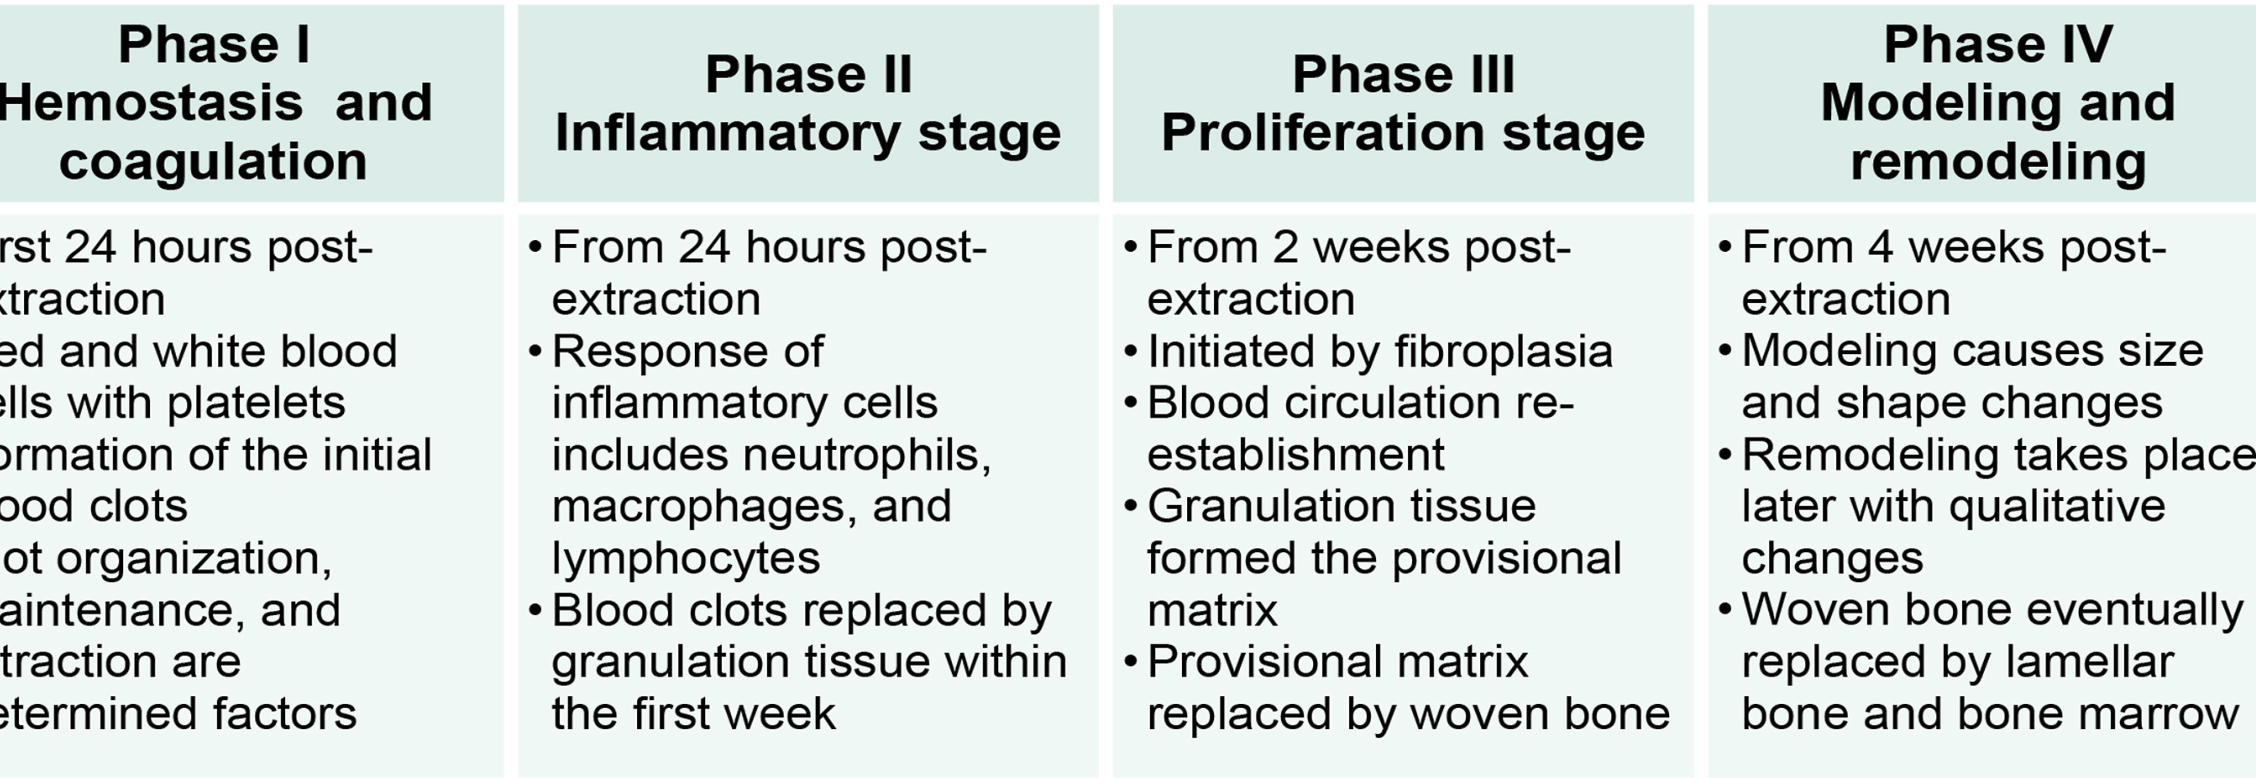
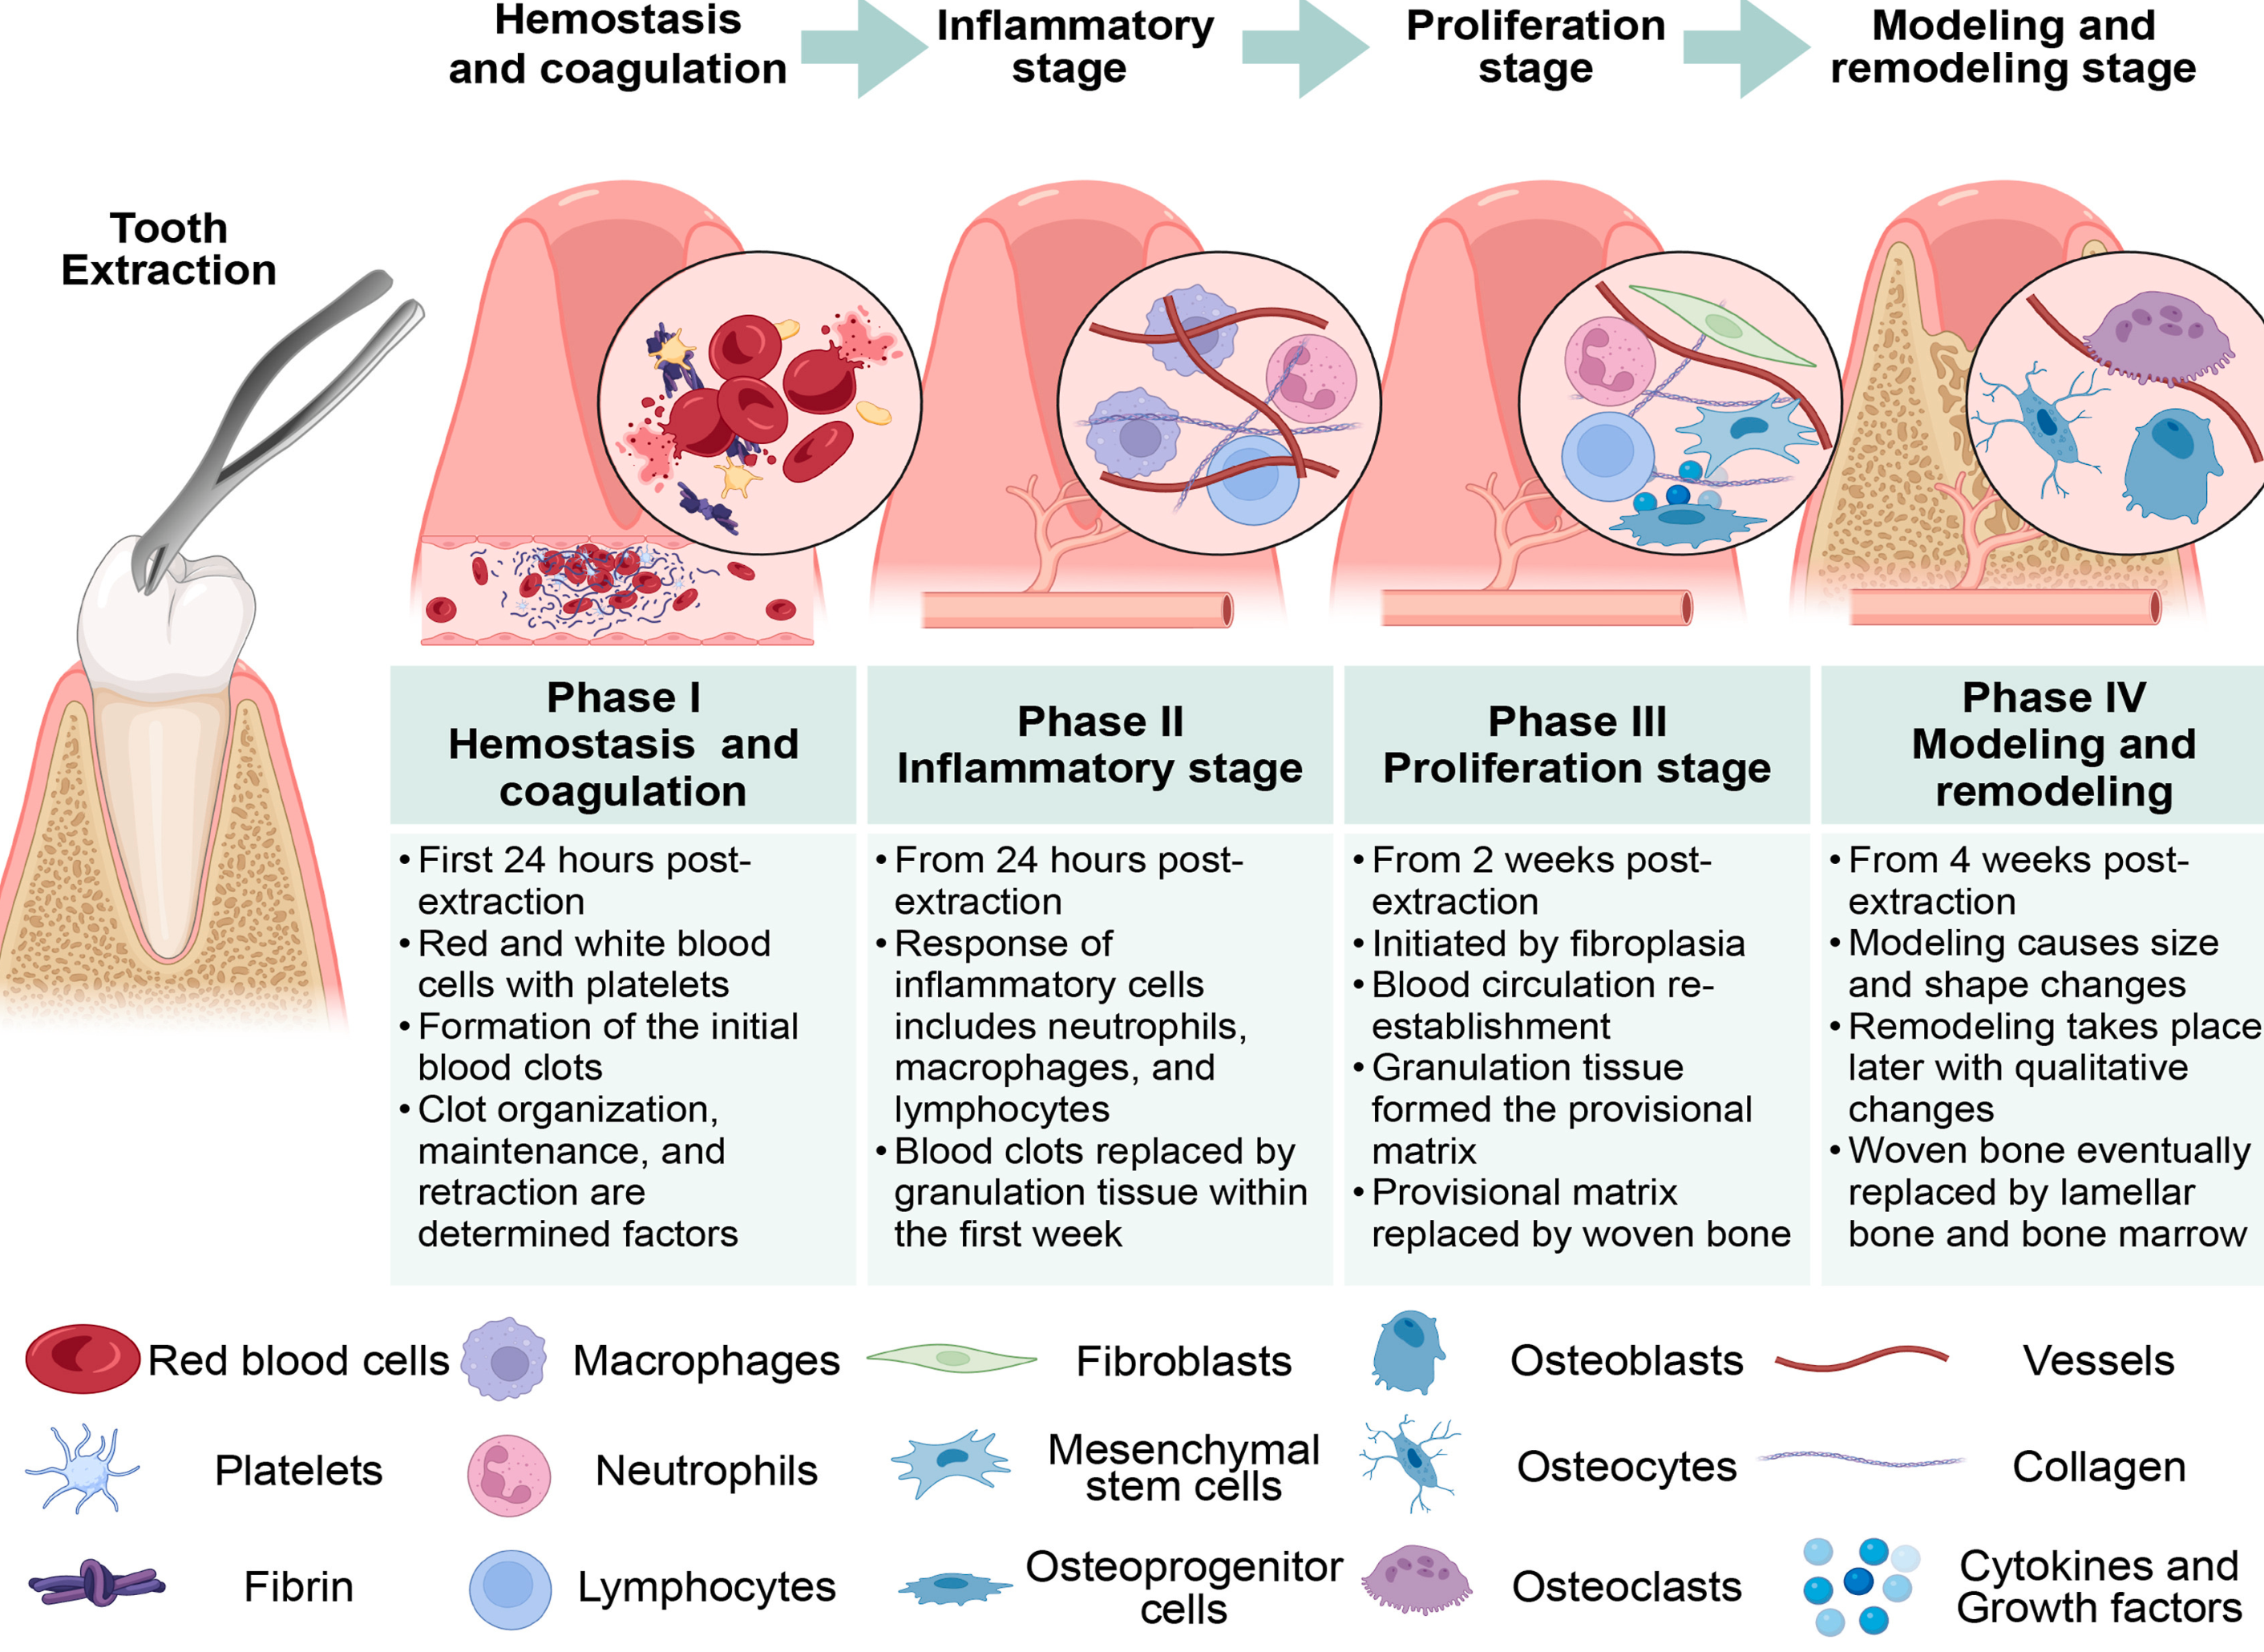
Phases of Extraction Socket Healing14
-
Phase I: Hemostasis and Coagulation
- Timeline: First 24 hours post-extraction.
- Key Components: Red and white blood cells, platelets, and fibrin.
- Process: Formation of the initial blood clots. Clot organization, maintenance, and retraction are determining factors for successful healing.
-
Phase II: Inflammatory Stage
- Timeline: From 24 hours post-extraction.
- Key Components: Neutrophils, macrophages, and lymphocytes.
- Process: Response of inflammatory cells. Blood clots are replaced by granulation tissue within the first week.
-
Phase III: Proliferation Stage
- Timeline: From 2 weeks post-extraction.
- Key Components: Fibroblasts, mesenchymal stem cells, and osteoprogenitor cells.
- Process: Initiated by fibroplasia and the re-establishment of blood circulation. Granulation tissue forms a provisional matrix, which is subsequently replaced by woven bone.
-
Phase IV: Modeling and Remodeling
- Timeline: From 4 weeks post-extraction.
- Key Components: Osteoblasts, osteocytes, osteoclasts, vessels, collagen, cytokines, and growth factors.
- Process: Modeling causes changes in size and shape. Remodeling occurs later with qualitative changes where woven bone is eventually replaced by lamellar bone and bone marrow.
Clinical Significance
- ==Processes begin immediately post-extraction.
- Understanding these phases helps identify where complications like infection or dry socket interrupt the healing process.
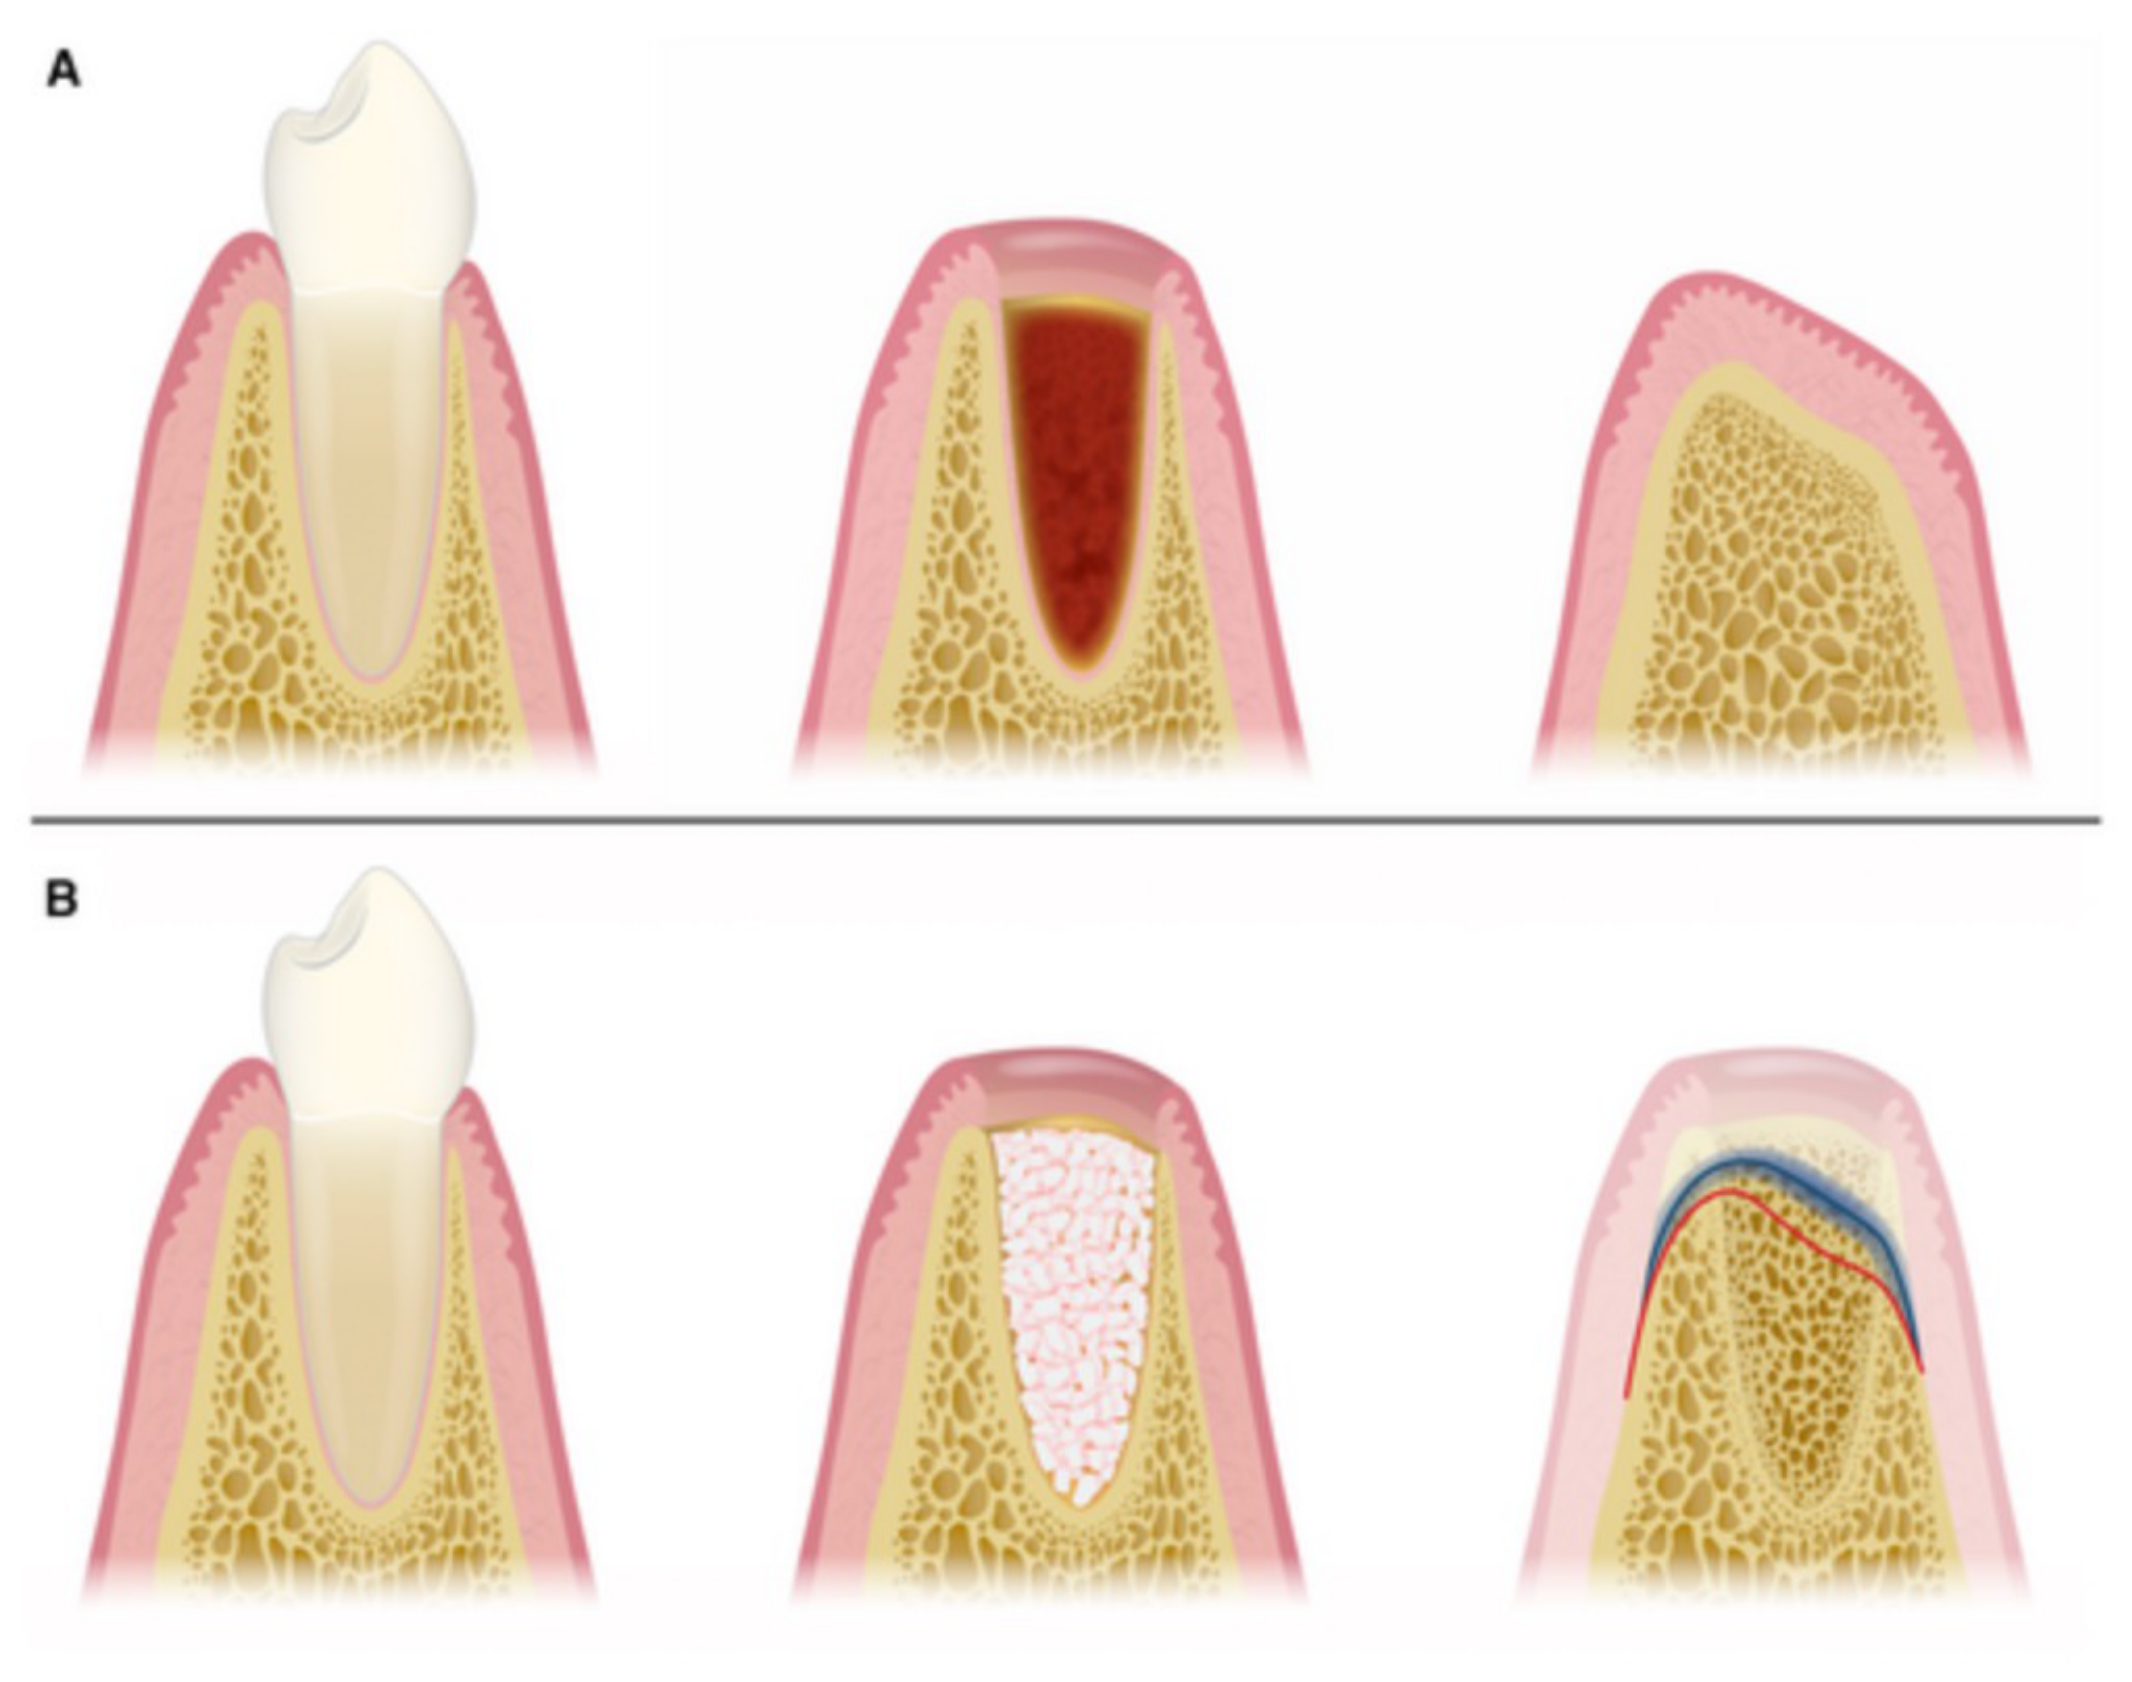
Socket Healing1516
Alveolar Ridge Alterations17
Following tooth extraction, the alveolar ridge undergoes natural resorptive changes:
- Horizontal Bone Loss: Average of 3.4 mm.
- Vertical Bone Loss: Average of 1.33 mm on the buccal aspect and 0.5 mm on the lingual aspect.
Clinical Considerations
Socket preservation techniques using synthetic materials may help to mitigate these resorptive effects and maintain ridge dimensions for future restorative procedures.
Socket healing is a physiological process that results in volumetric changes to the alveolar bone. The efficiency and outcome of this process are influenced by several variables:
- Local Factors: Presence of infection and poor tissue perfusion.
- Systemic Factors: Hormonal balance, stress levels, blood glucose regulation, and nutritional deficiencies.
- Iatrogenic Factors: Degree of tissue trauma during the surgical procedure.
Further detailed information regarding tissue management and bone response will be covered in subsequent Periodontology lectures.
Indications for Surgical Treatment18
Surgical intervention is indicated in various clinical scenarios where standard non-surgical approaches are insufficient or inappropriate. Key indications include:
-
Anticipation of a difficult extraction
-
Management of impacted, retained, or buried teeth and roots
-
Pathological management, such as cyst enucleation or marsupialization
-
Pre-prosthetic surgery to prepare the oral environment for dental appliances
-
Difficult Extractions: Impacted teeth, retained roots, bulbous/divergent roots, or teeth with partial mucosal coverage and discharge
-
Pathology Management: Periapical areas >5mm on radiograph may be cystic
-
Enucleation: Removal of a cyst in its entirety (scraping from bone cavity)
-
Marsupialization: Disrupting the cyst lining to decompress hydrostatic pressure, used for large cysts to avoid massive defects

Pre-Prosthetic Surgery
 |  |
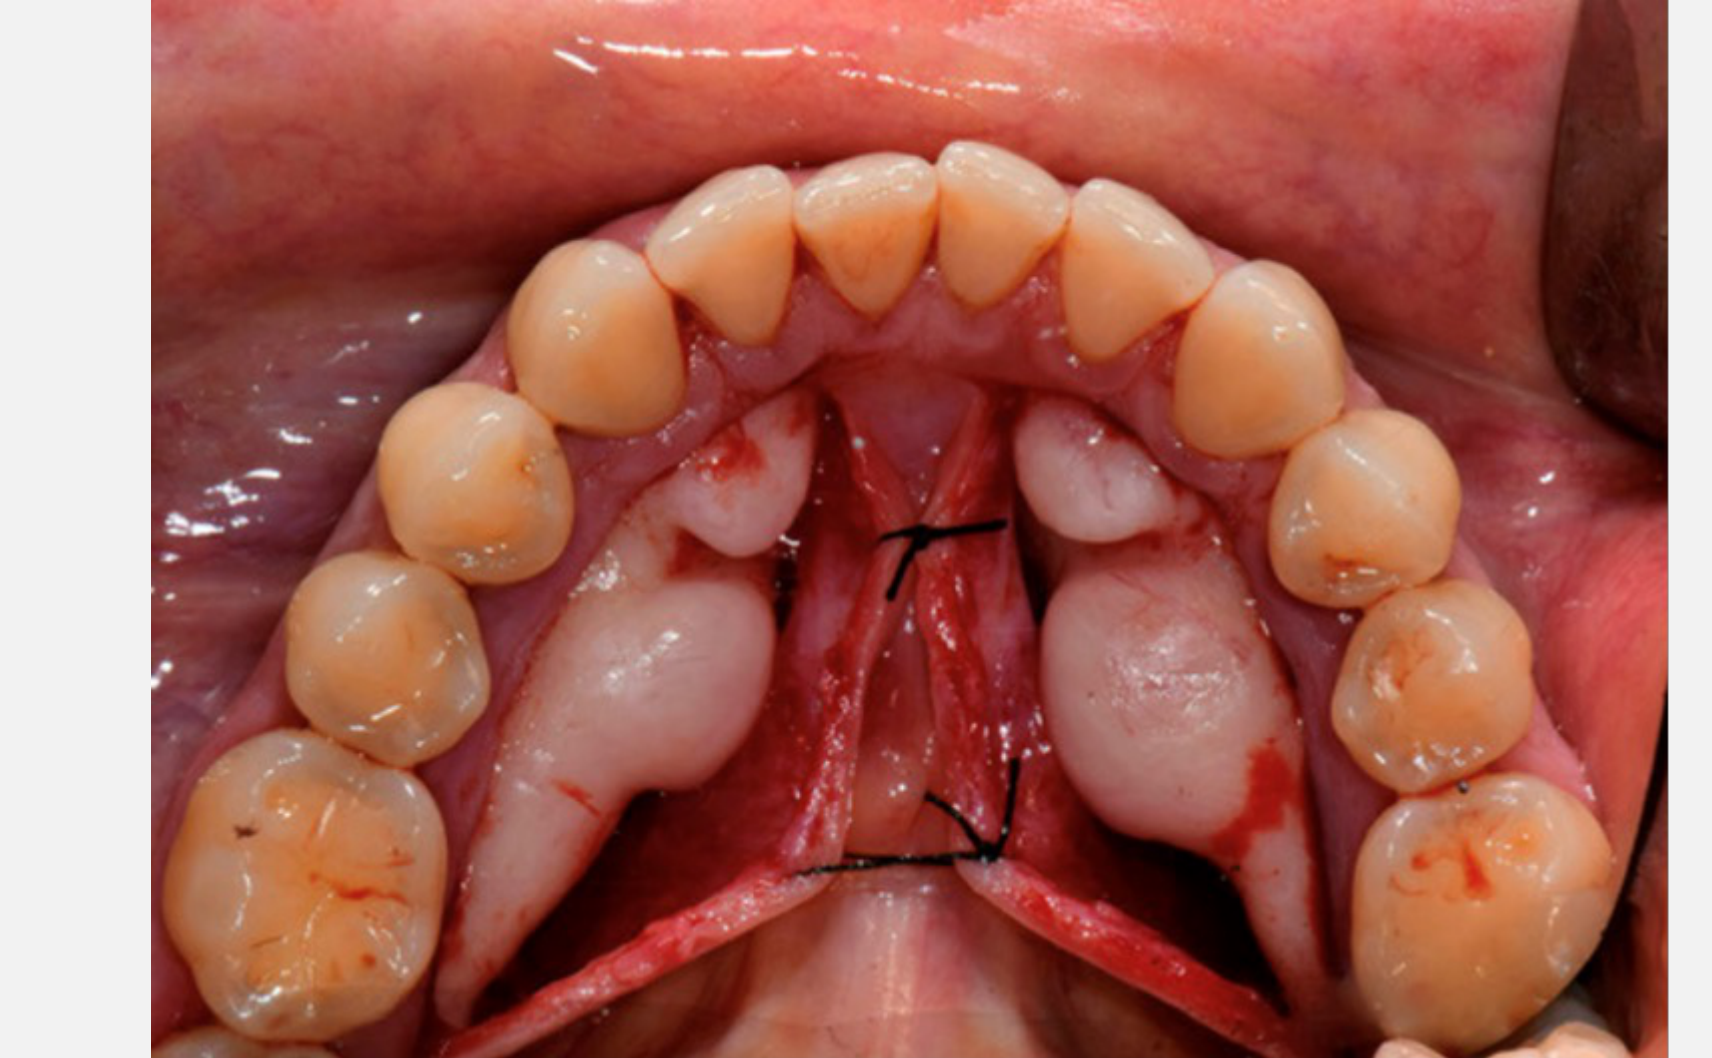 | 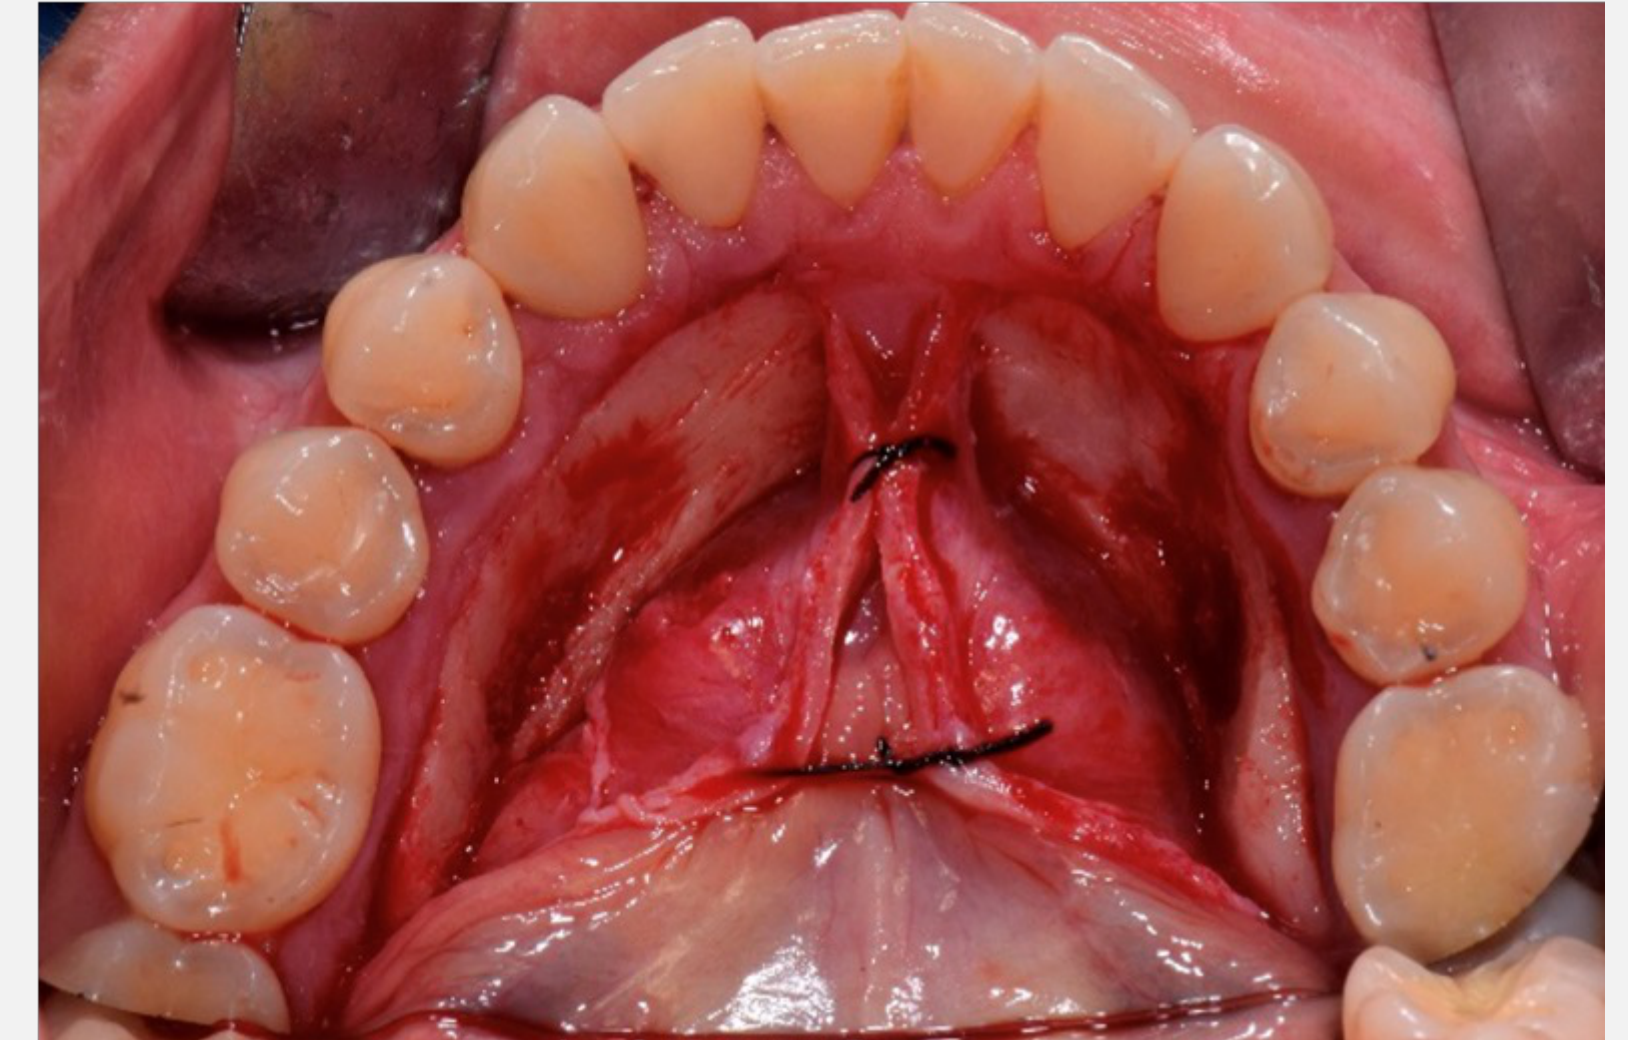 |
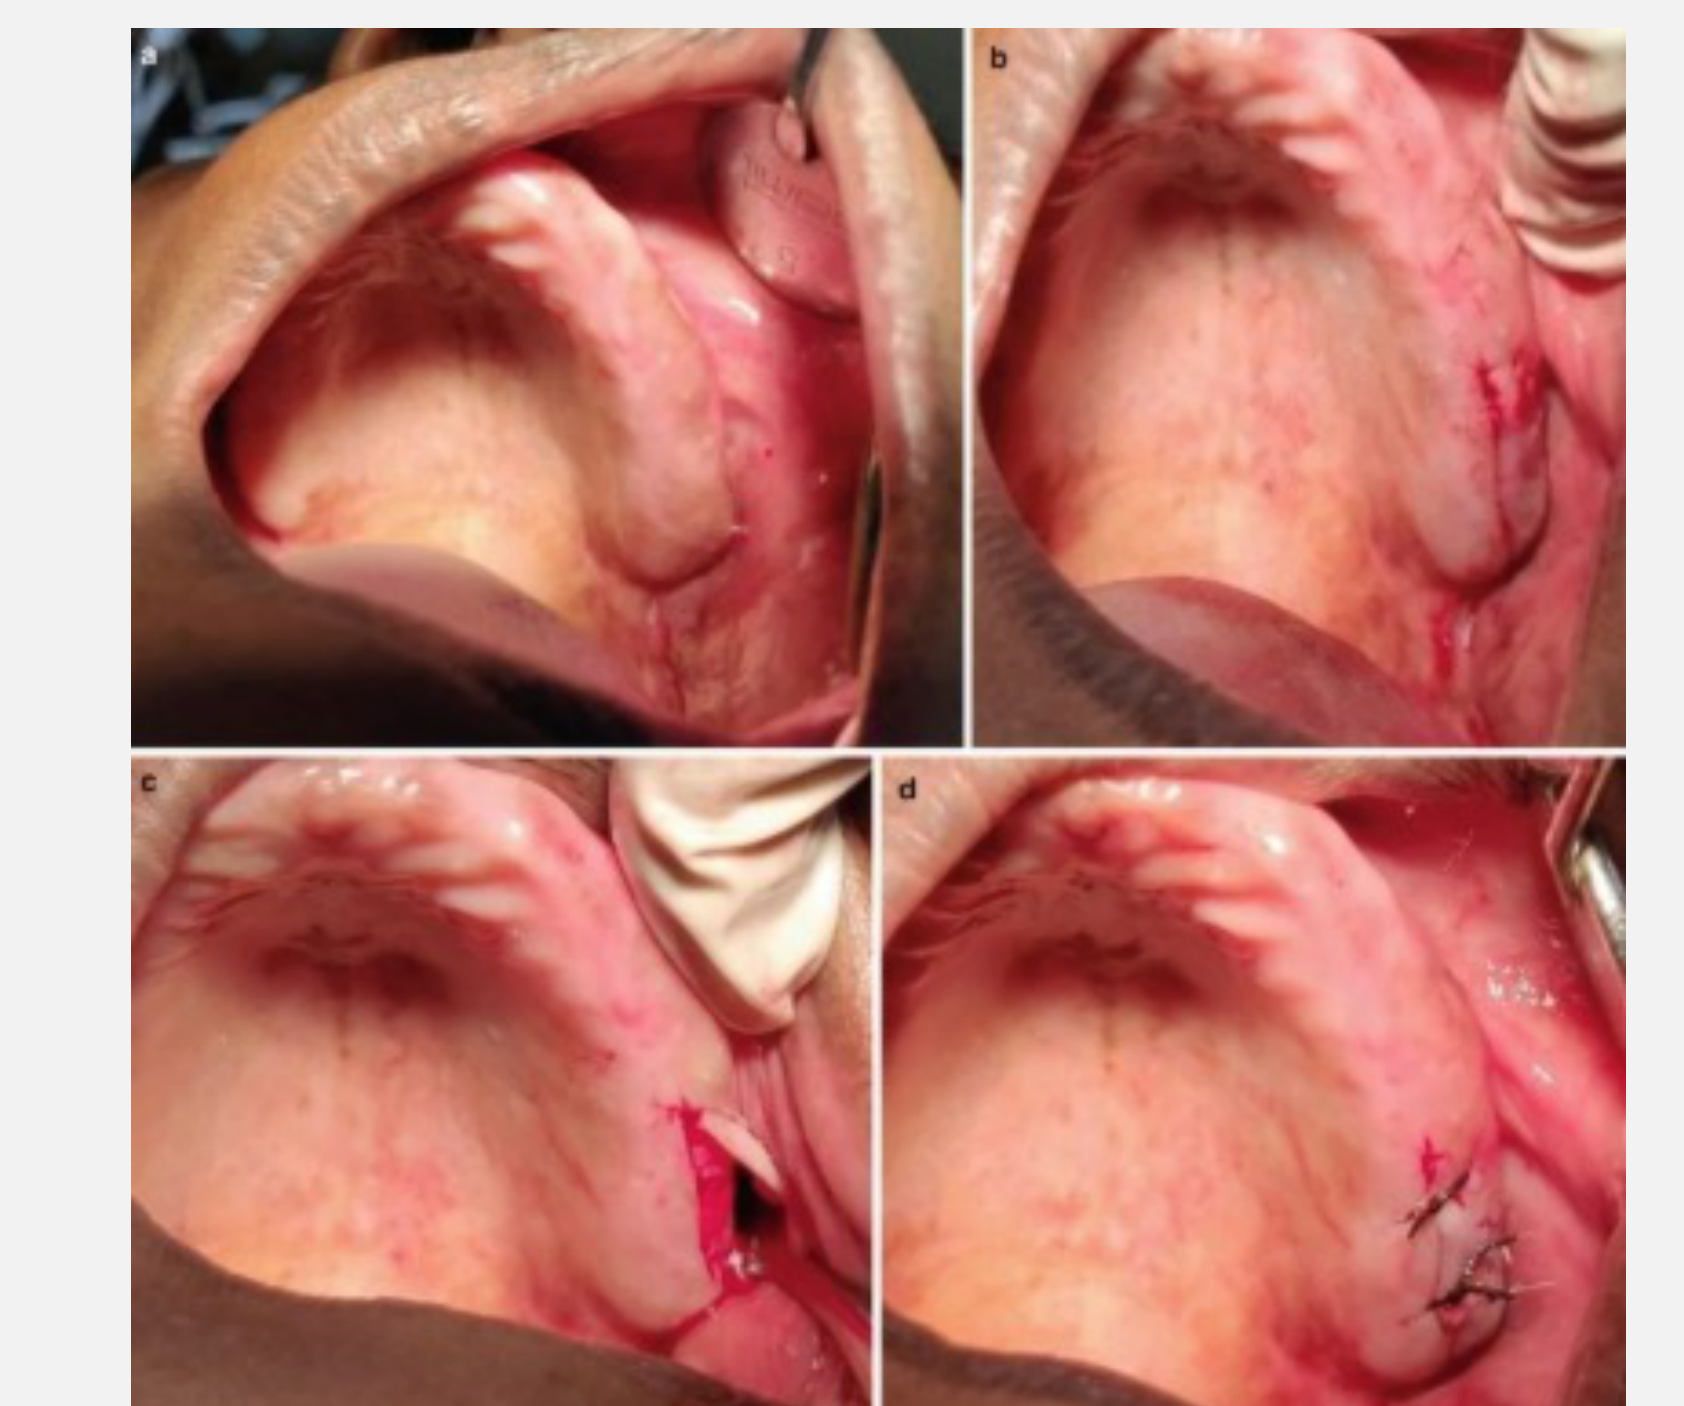
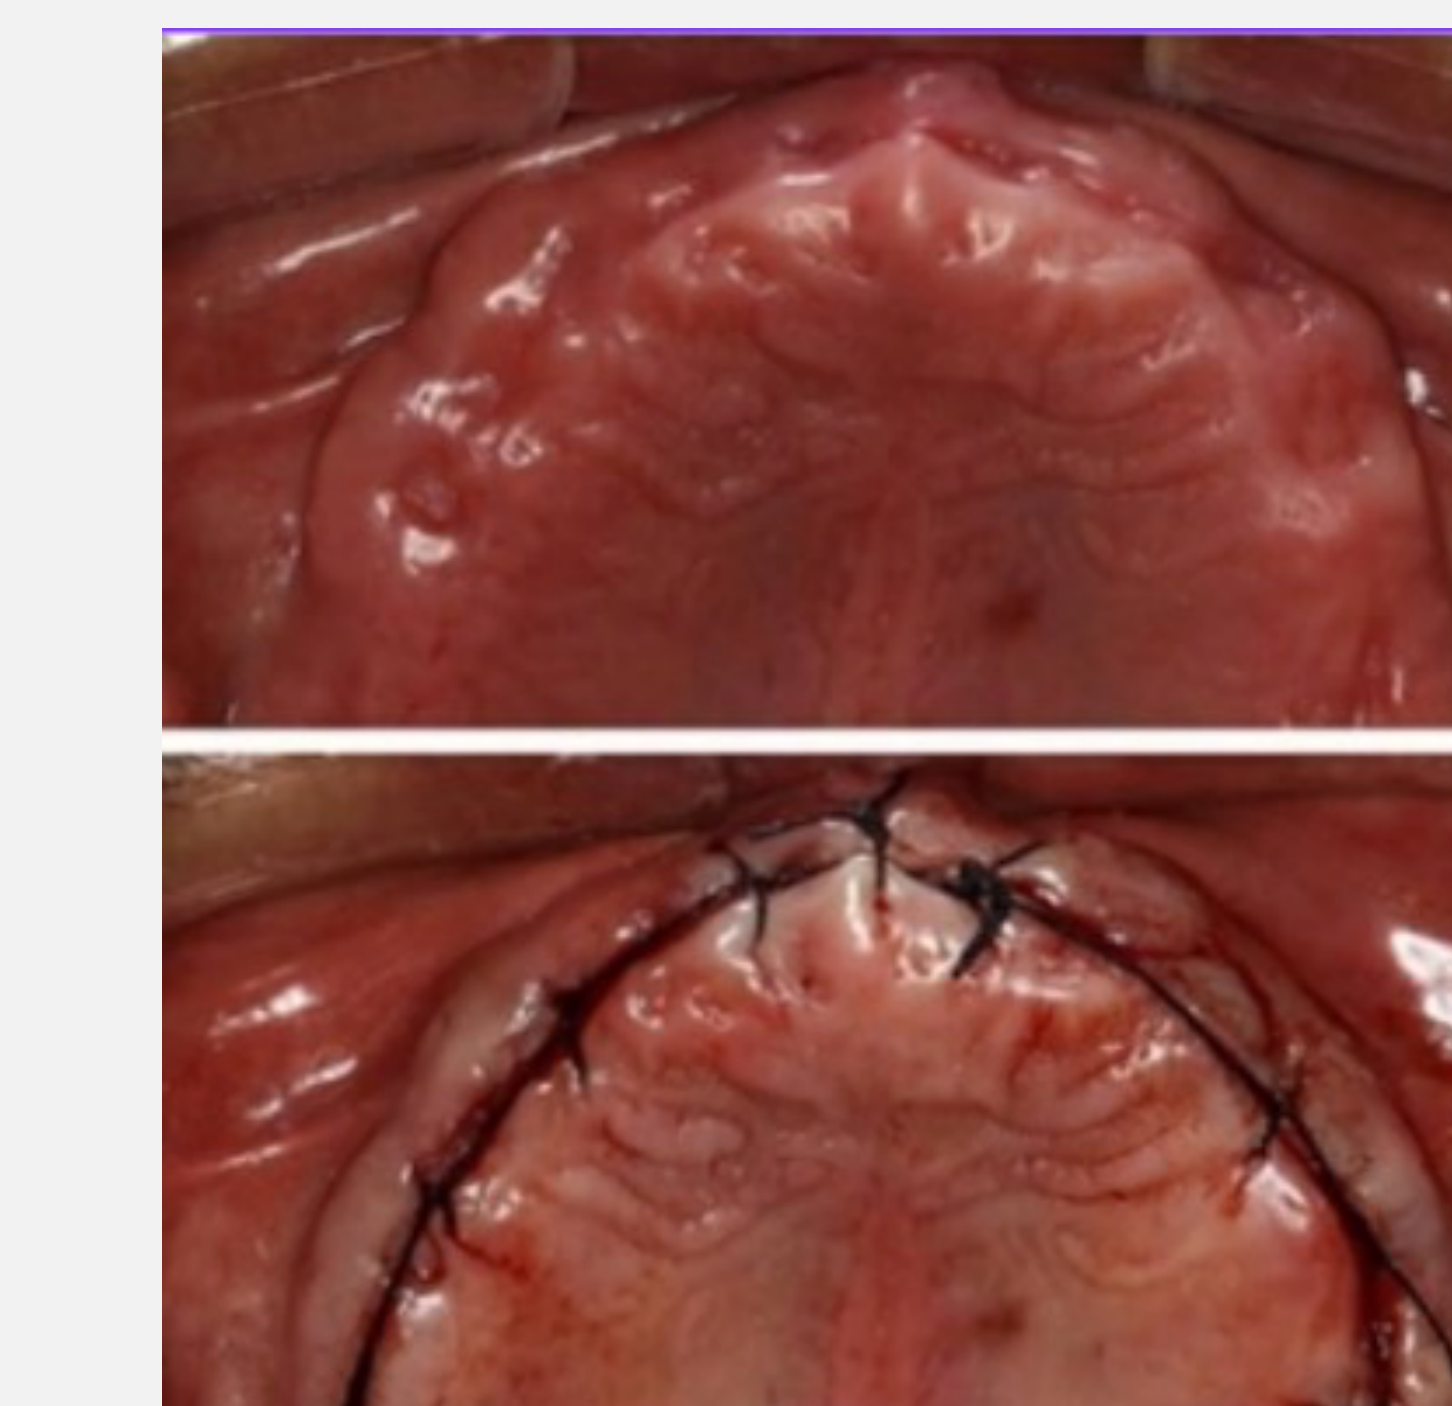
Definition and Purpose19
Pre-prosthetic surgery refers to surgical procedures performed prior to the construction of a prosthesis. The primary objectives of these procedures are to:
-
Alveolectomy: Smoothing knobbly post-extraction sites
-
Tuberosity Reduction: Reducing bulky tuberosities to prevent undercuts affecting denture retention
-
Exostosis Removal: Removing bony growths causing trauma or pain (less common due to swelling)
-
Assist in the overall function of the prosthesis
-
Improve patient comfort while wearing the appliance
Clinical Considerations and Risks20
It is important to note that pre-prosthetic surgery is not a common procedure. The infrequency of these operations is primarily due to the associated surgical risks.
- Usually reserved for patients who cannot have implants and rely on dentures
- Involves significant swelling and discomfort
Case Study Reference
- Sorrentino, D., Lombardi, N., Battilana, C., Decani, S., Henin, D., & Rossi, V. (2019). Treatment of Symptomatic Mandibular Tori: A Case Report. Proceedings, 35(1), 75. https://doi.org/10.3390/proceedings2019035075
Case Study: Knobbly Ridge Affecting Denture Fit
Scenario: A patient had extractions six months prior and was fitted with a denture. The patient returned constantly complaining of rubbing. Finding: The post-extraction sites (e.g., 13-15 region) were lumpy/knobbly, preventing a comfortable denture seal. Management: A flap was raised, the bone was reprofiled (alveolectomy), and the flap was repositioned.
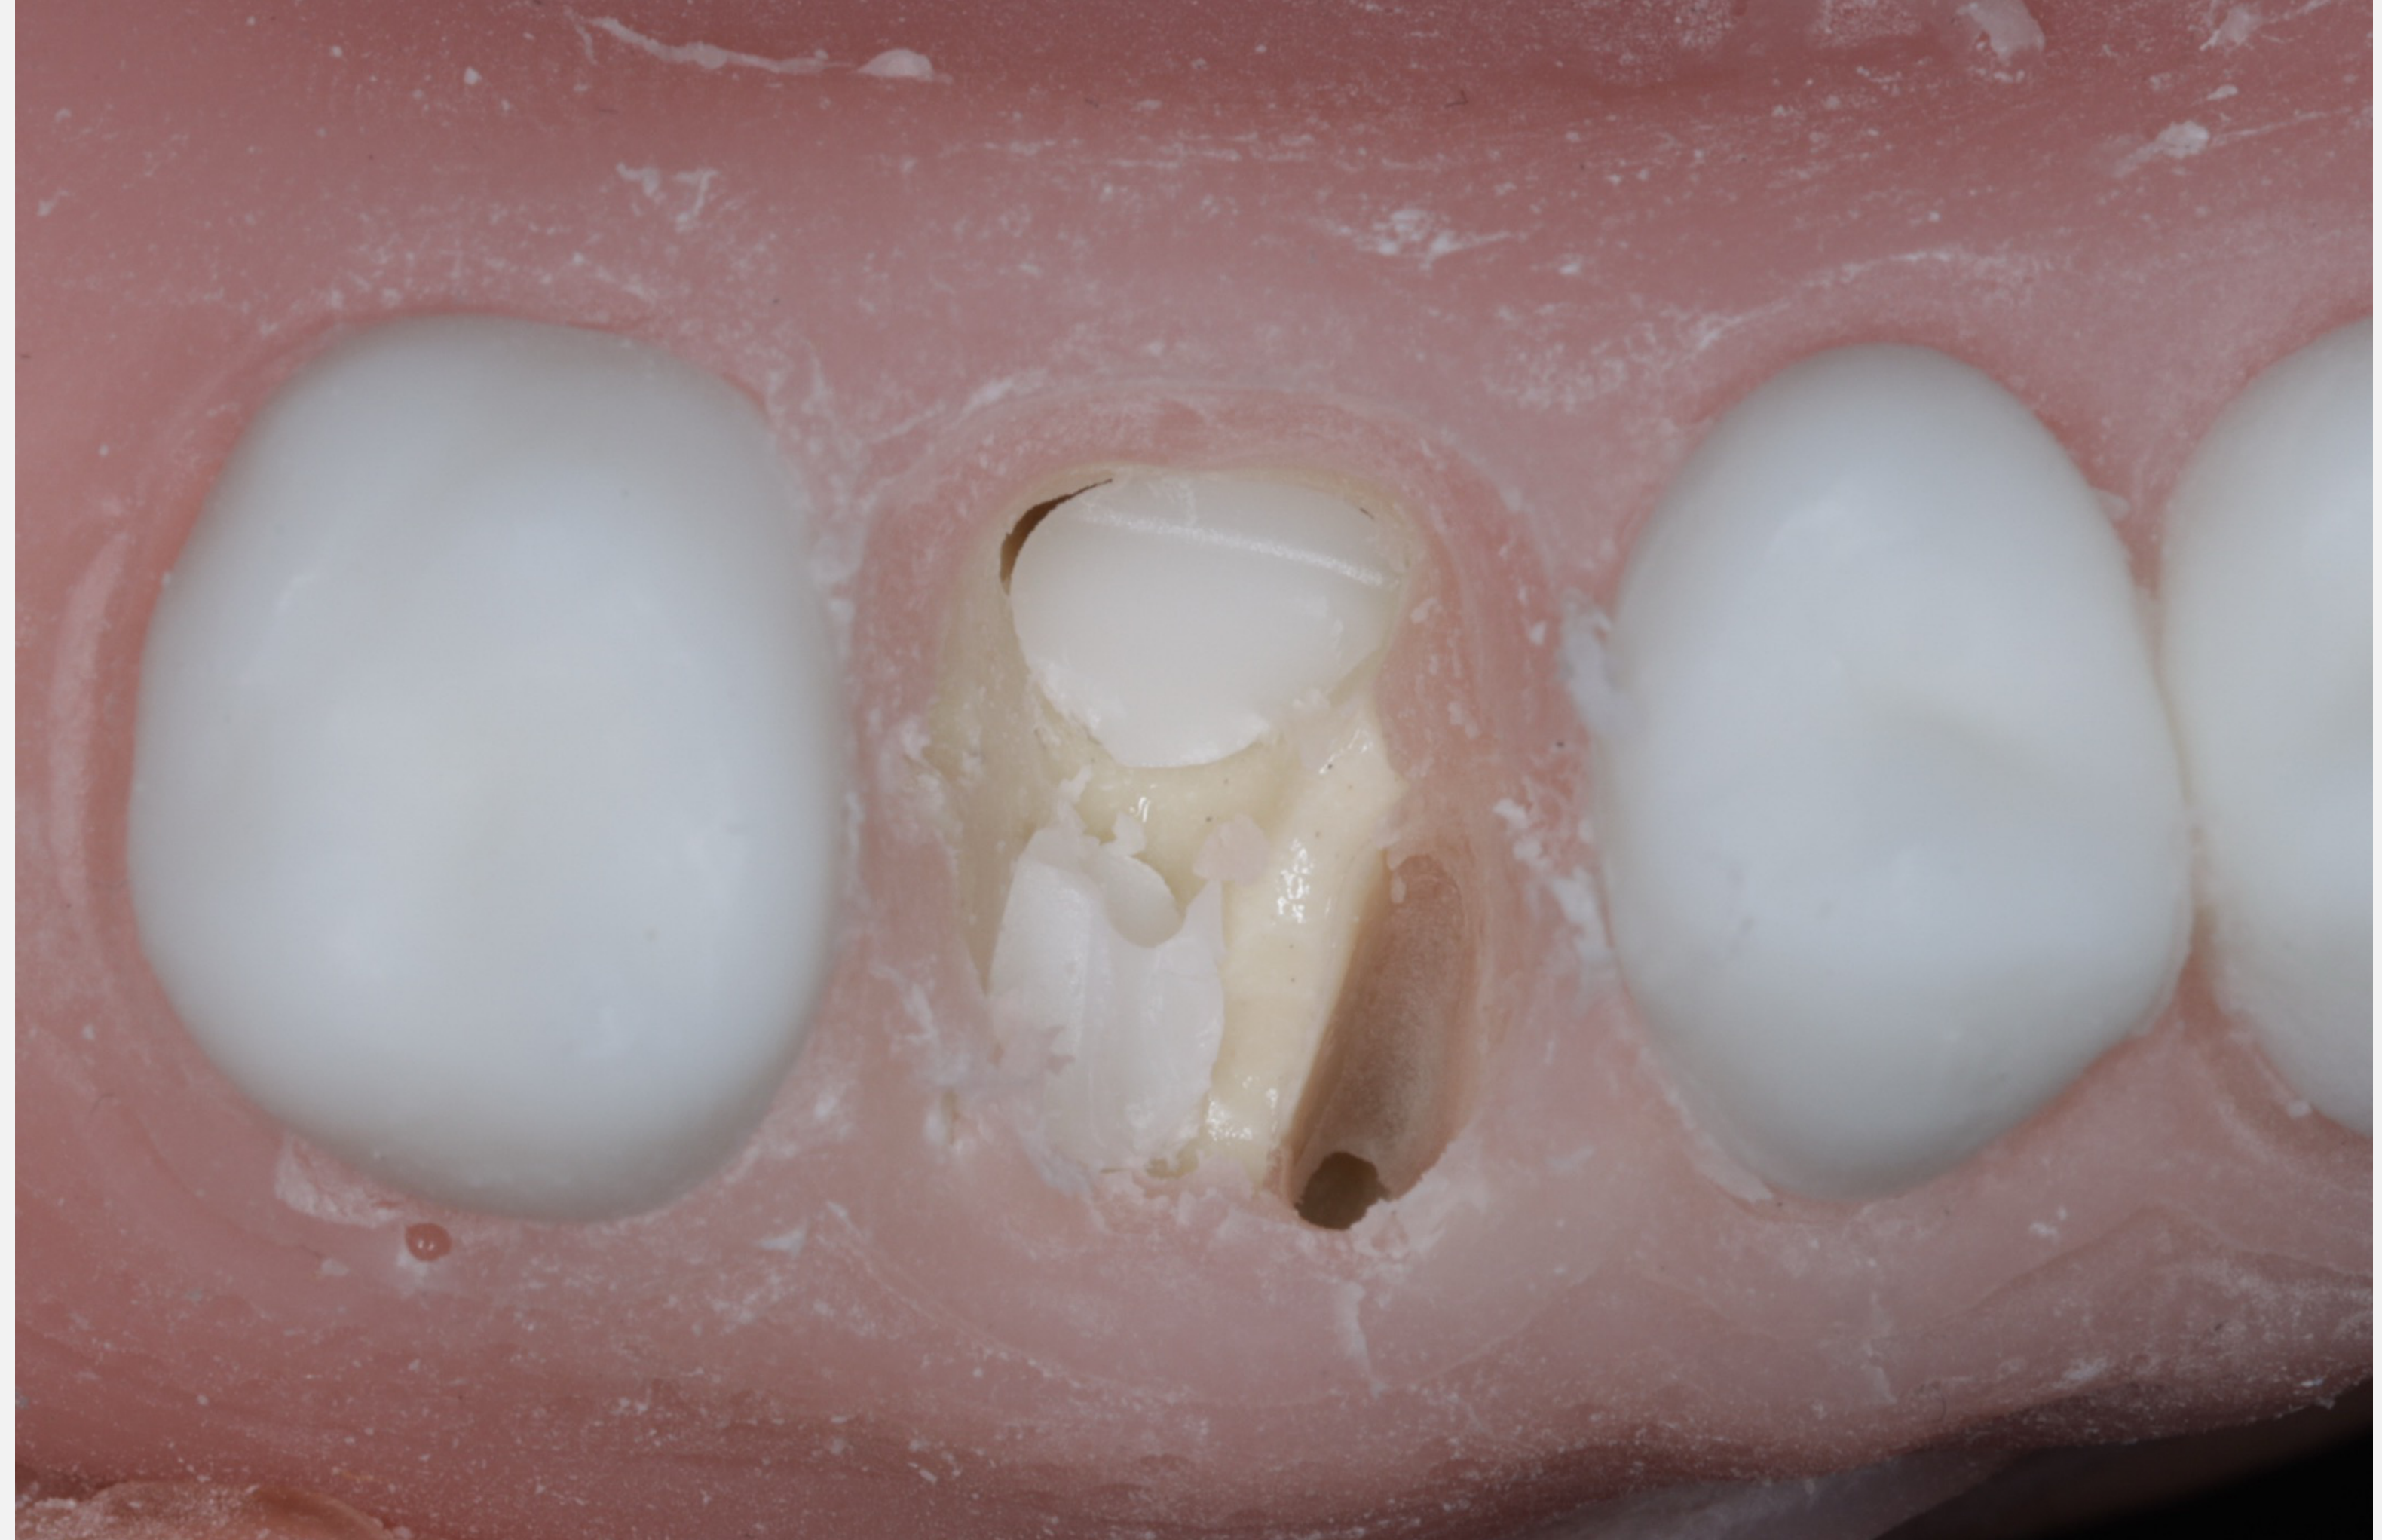
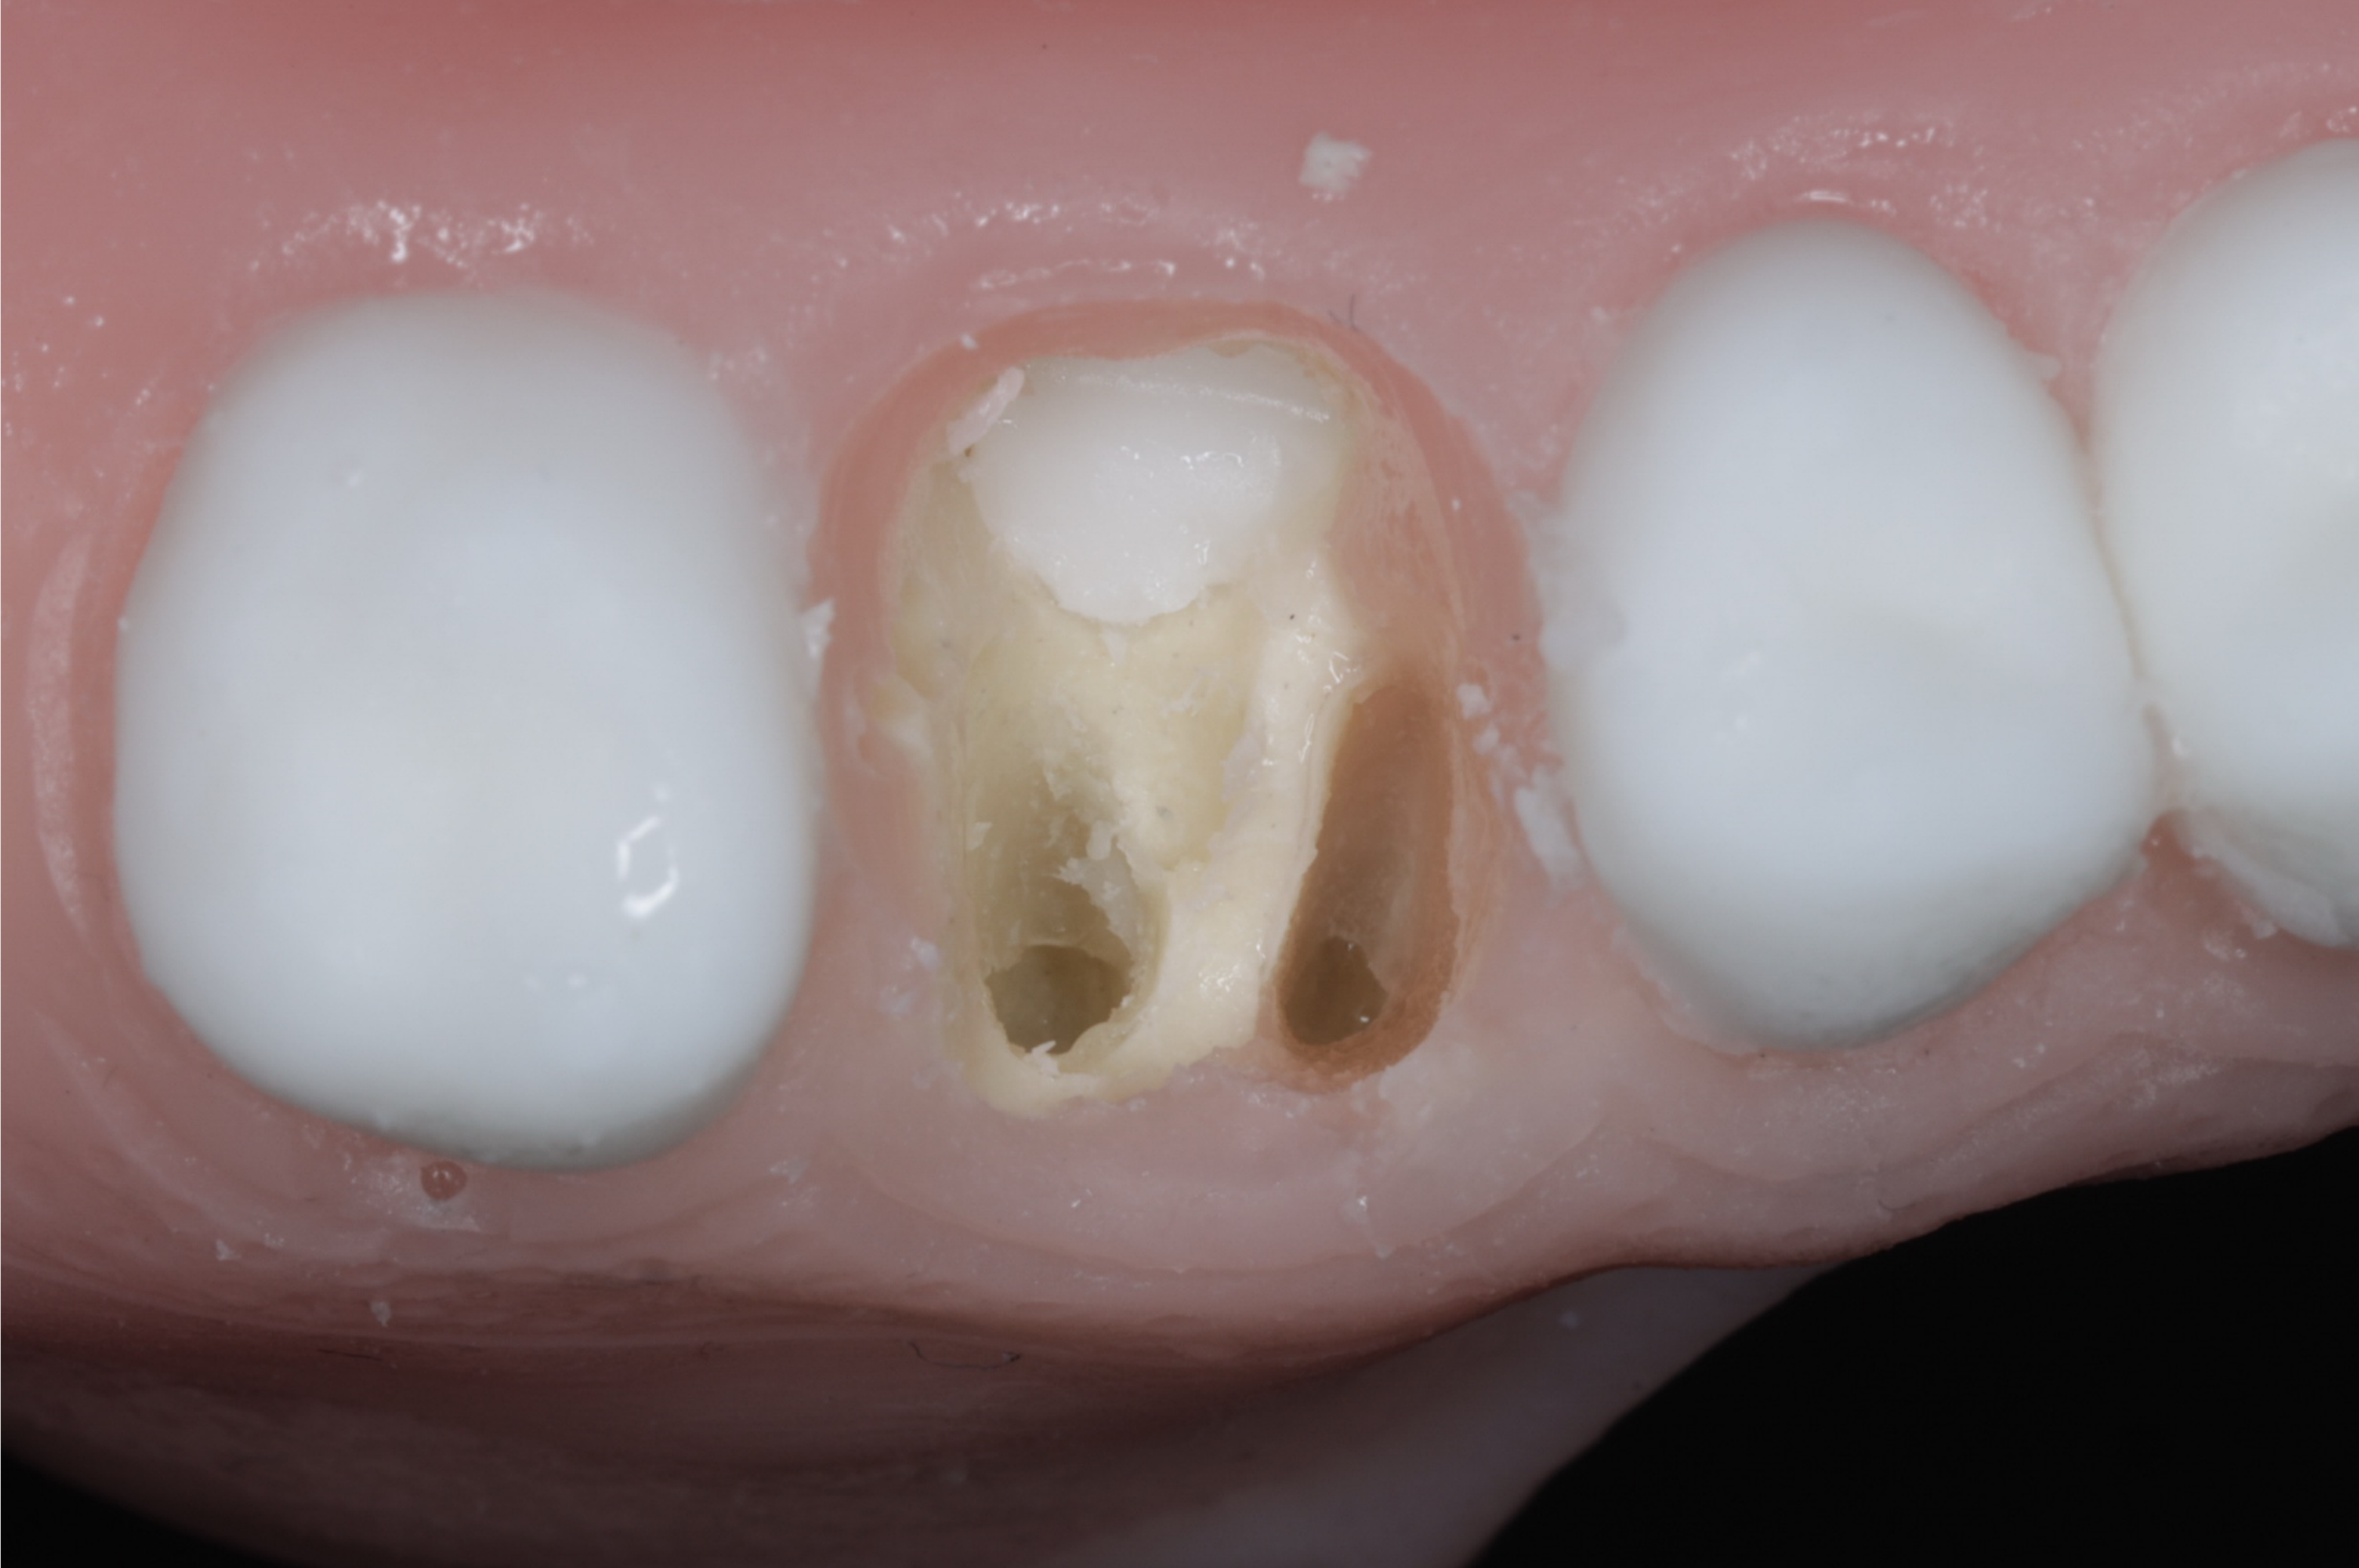
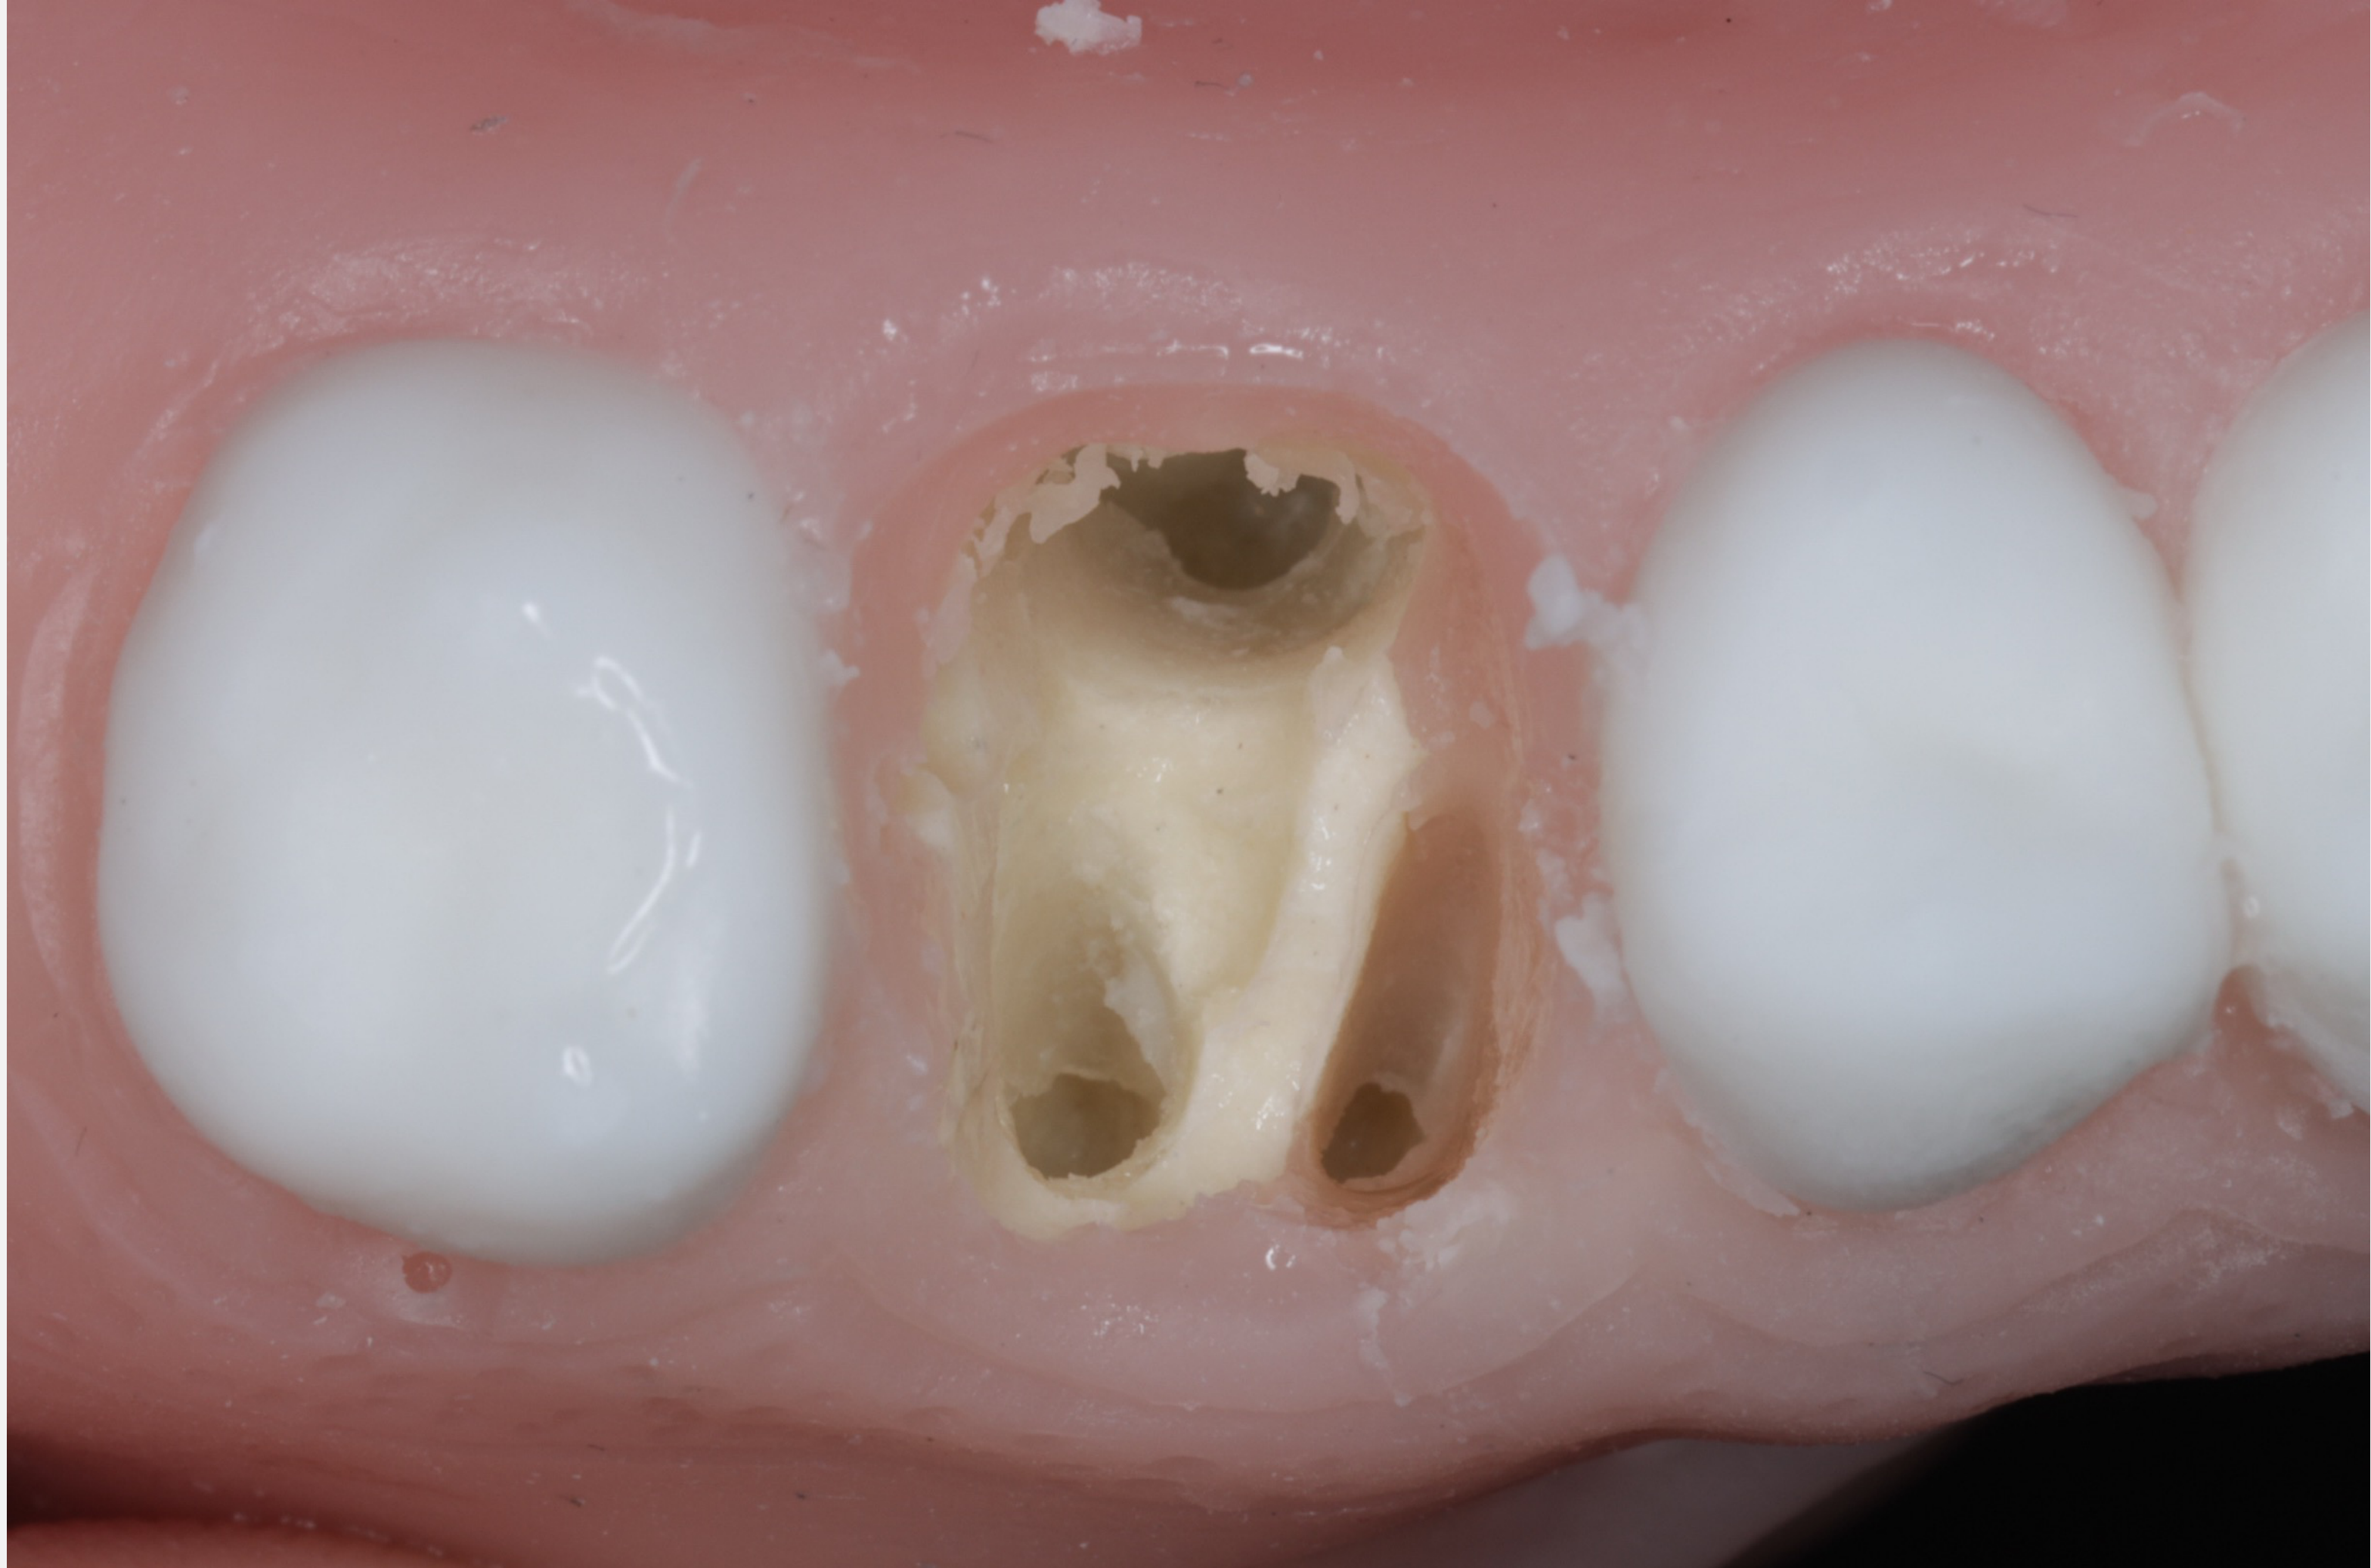
Flapless Sectioning21222324
 |  |  |
 |  |  |
 |  |
Overview of Item 31425
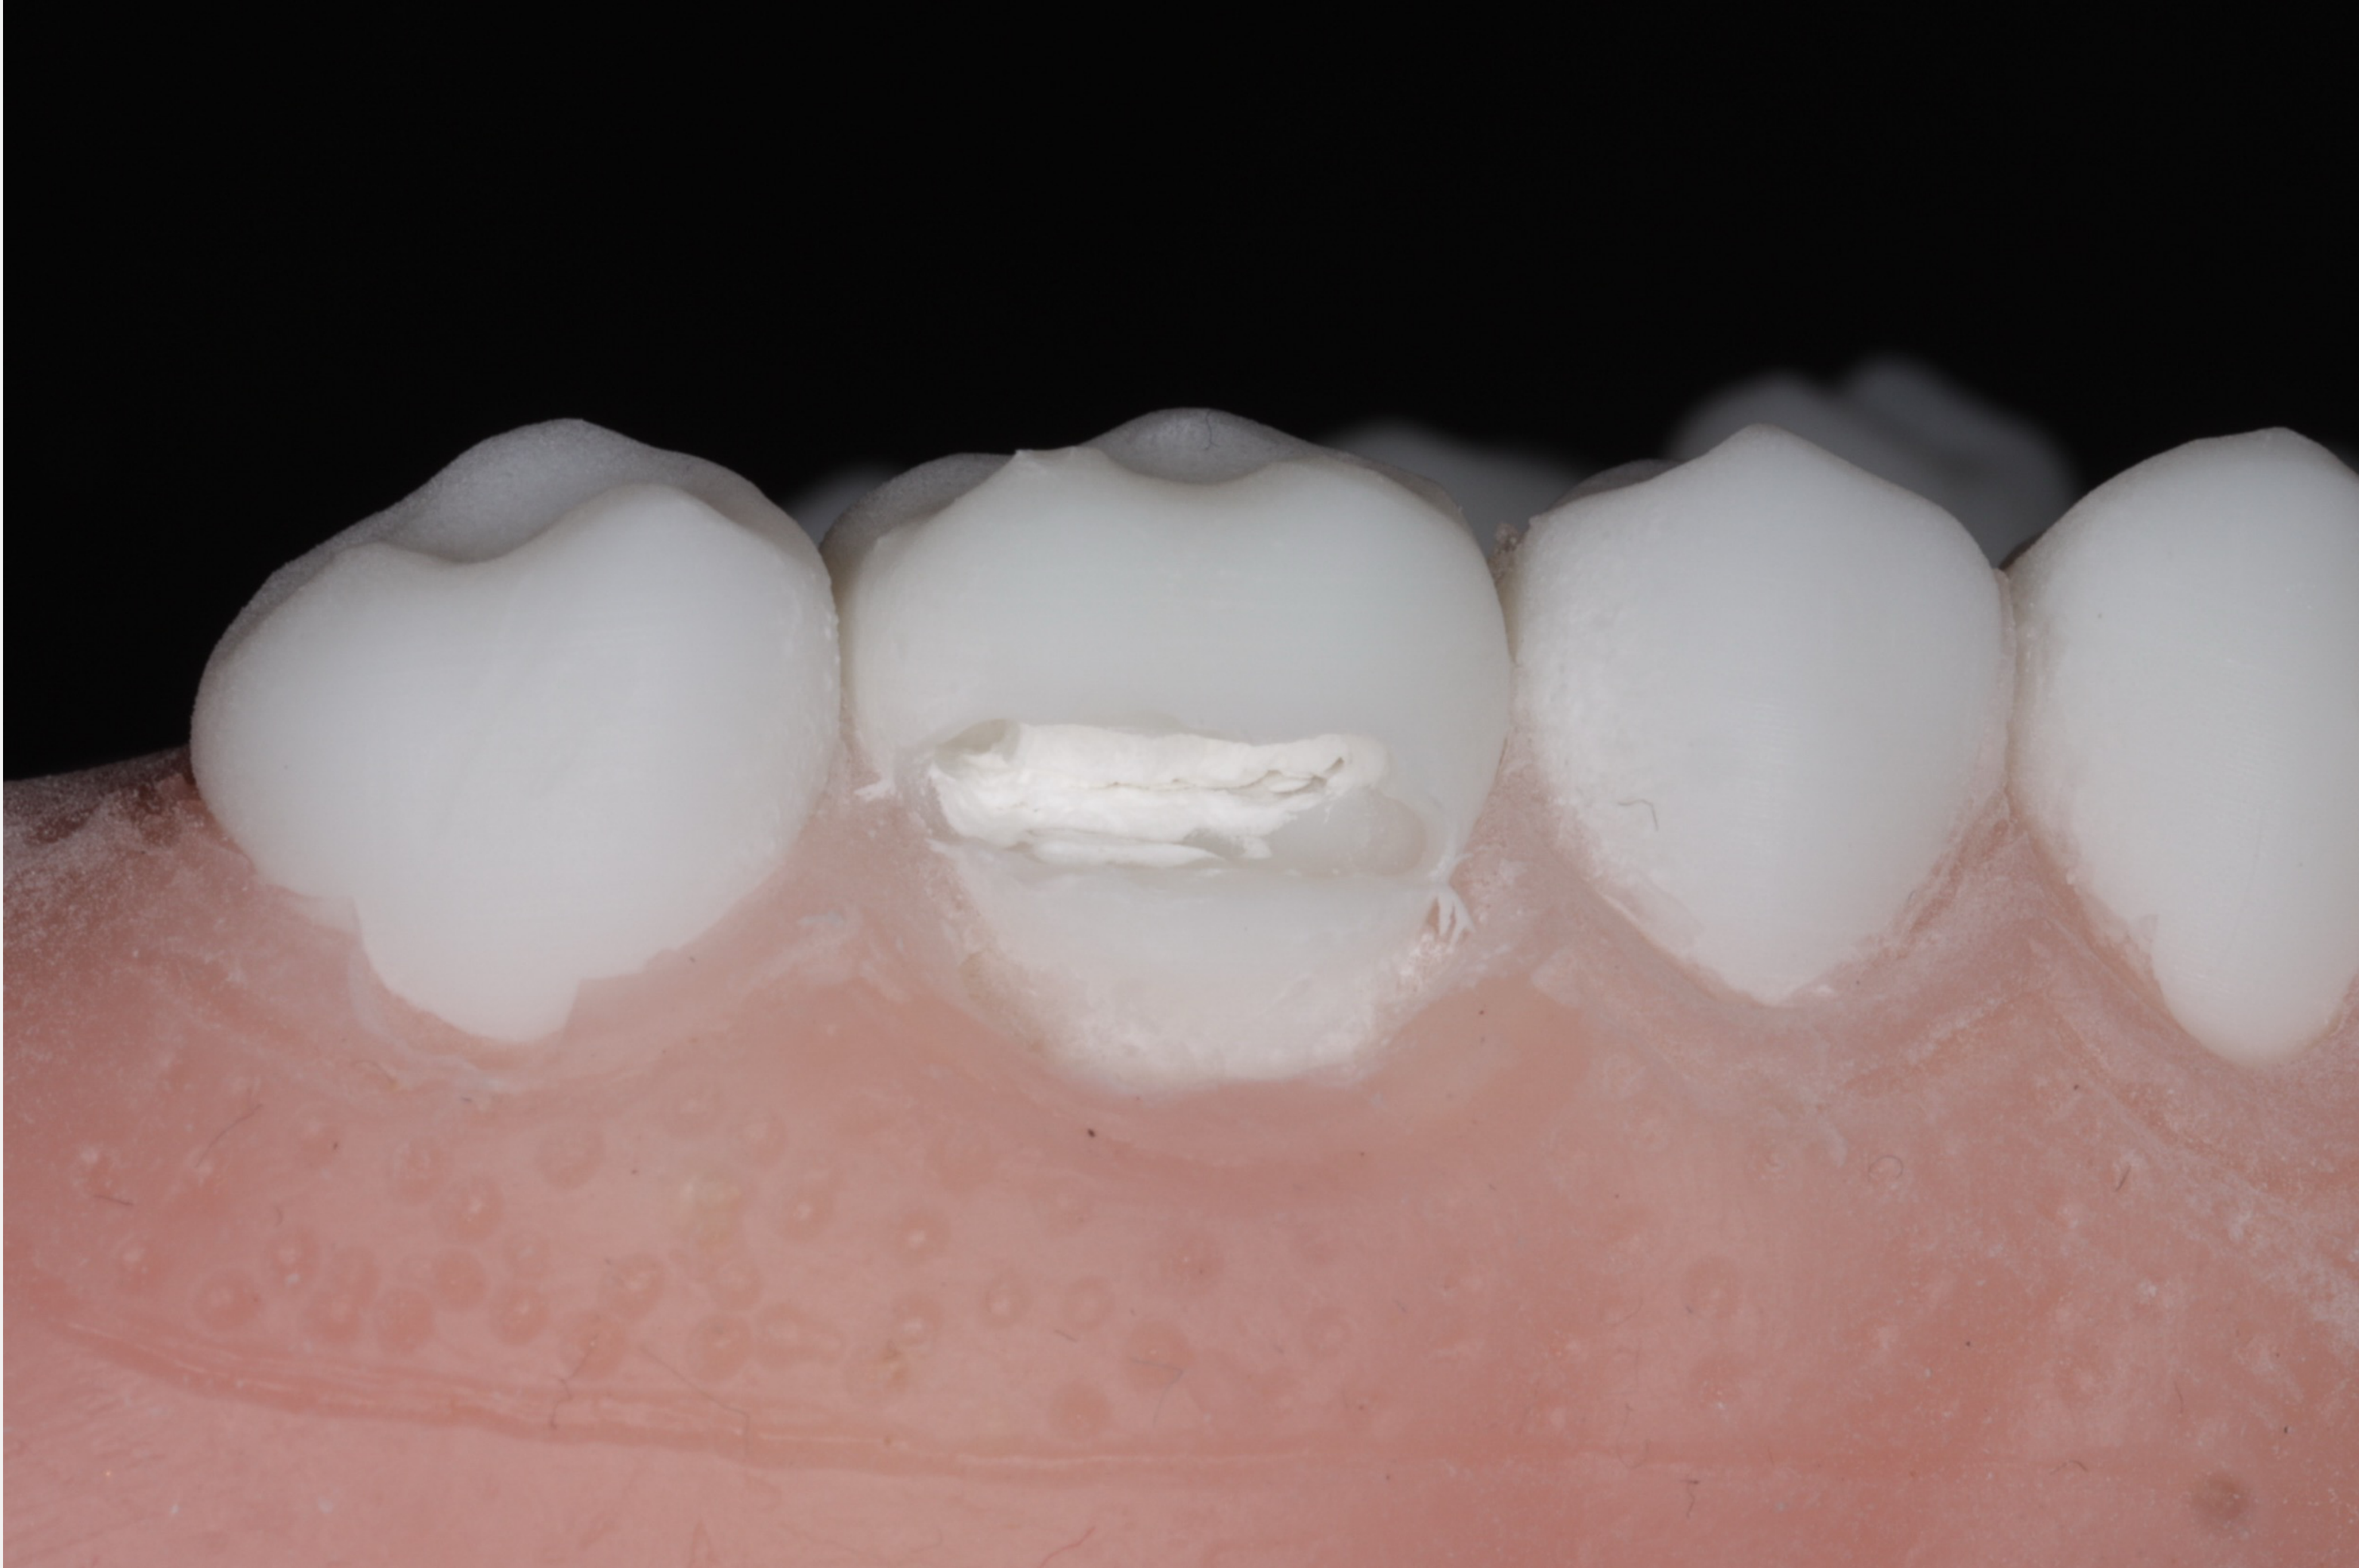
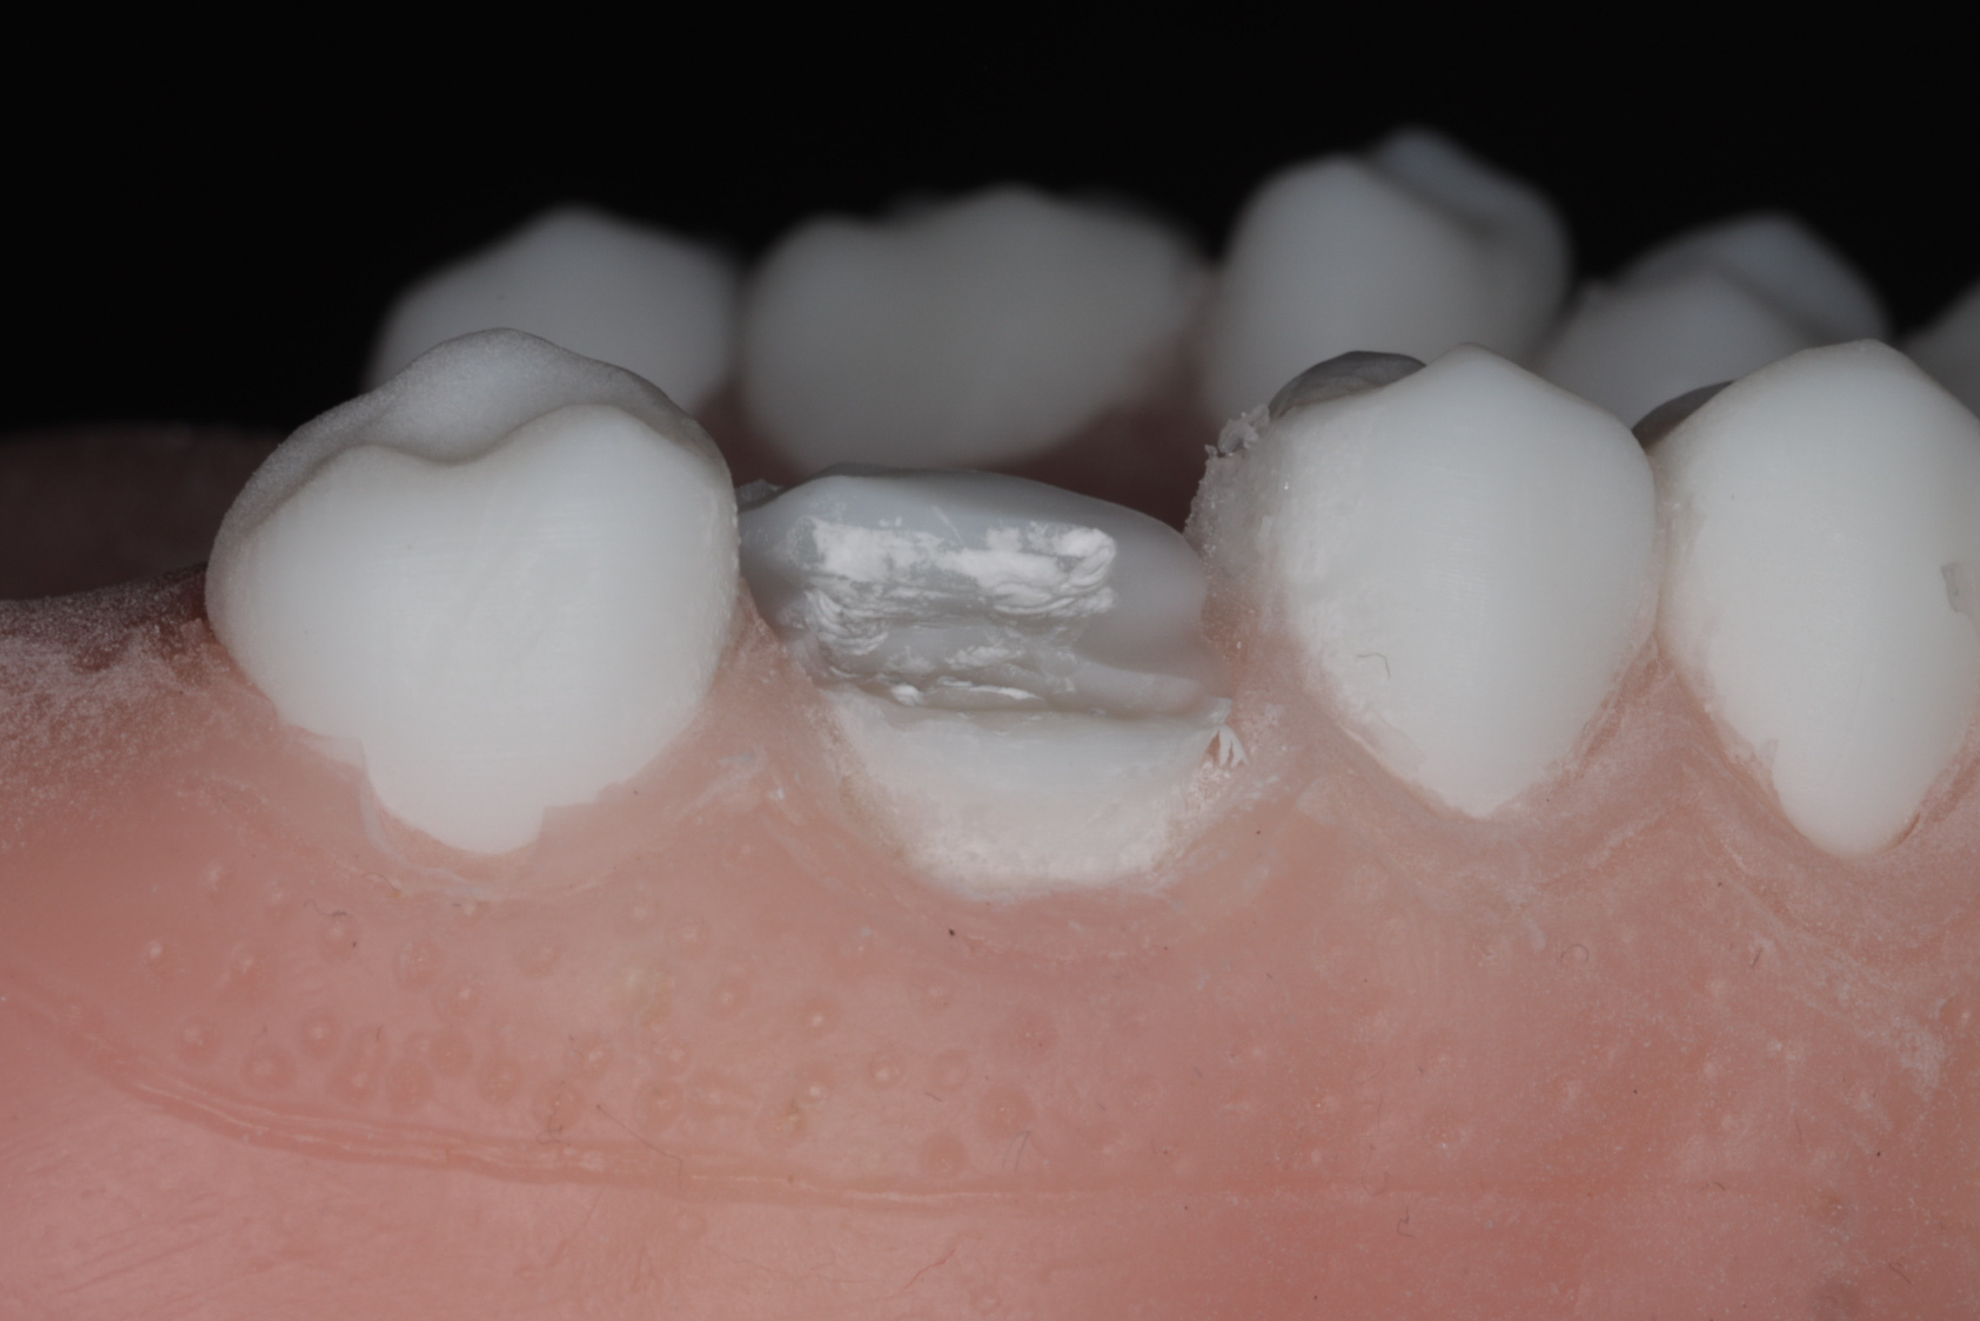
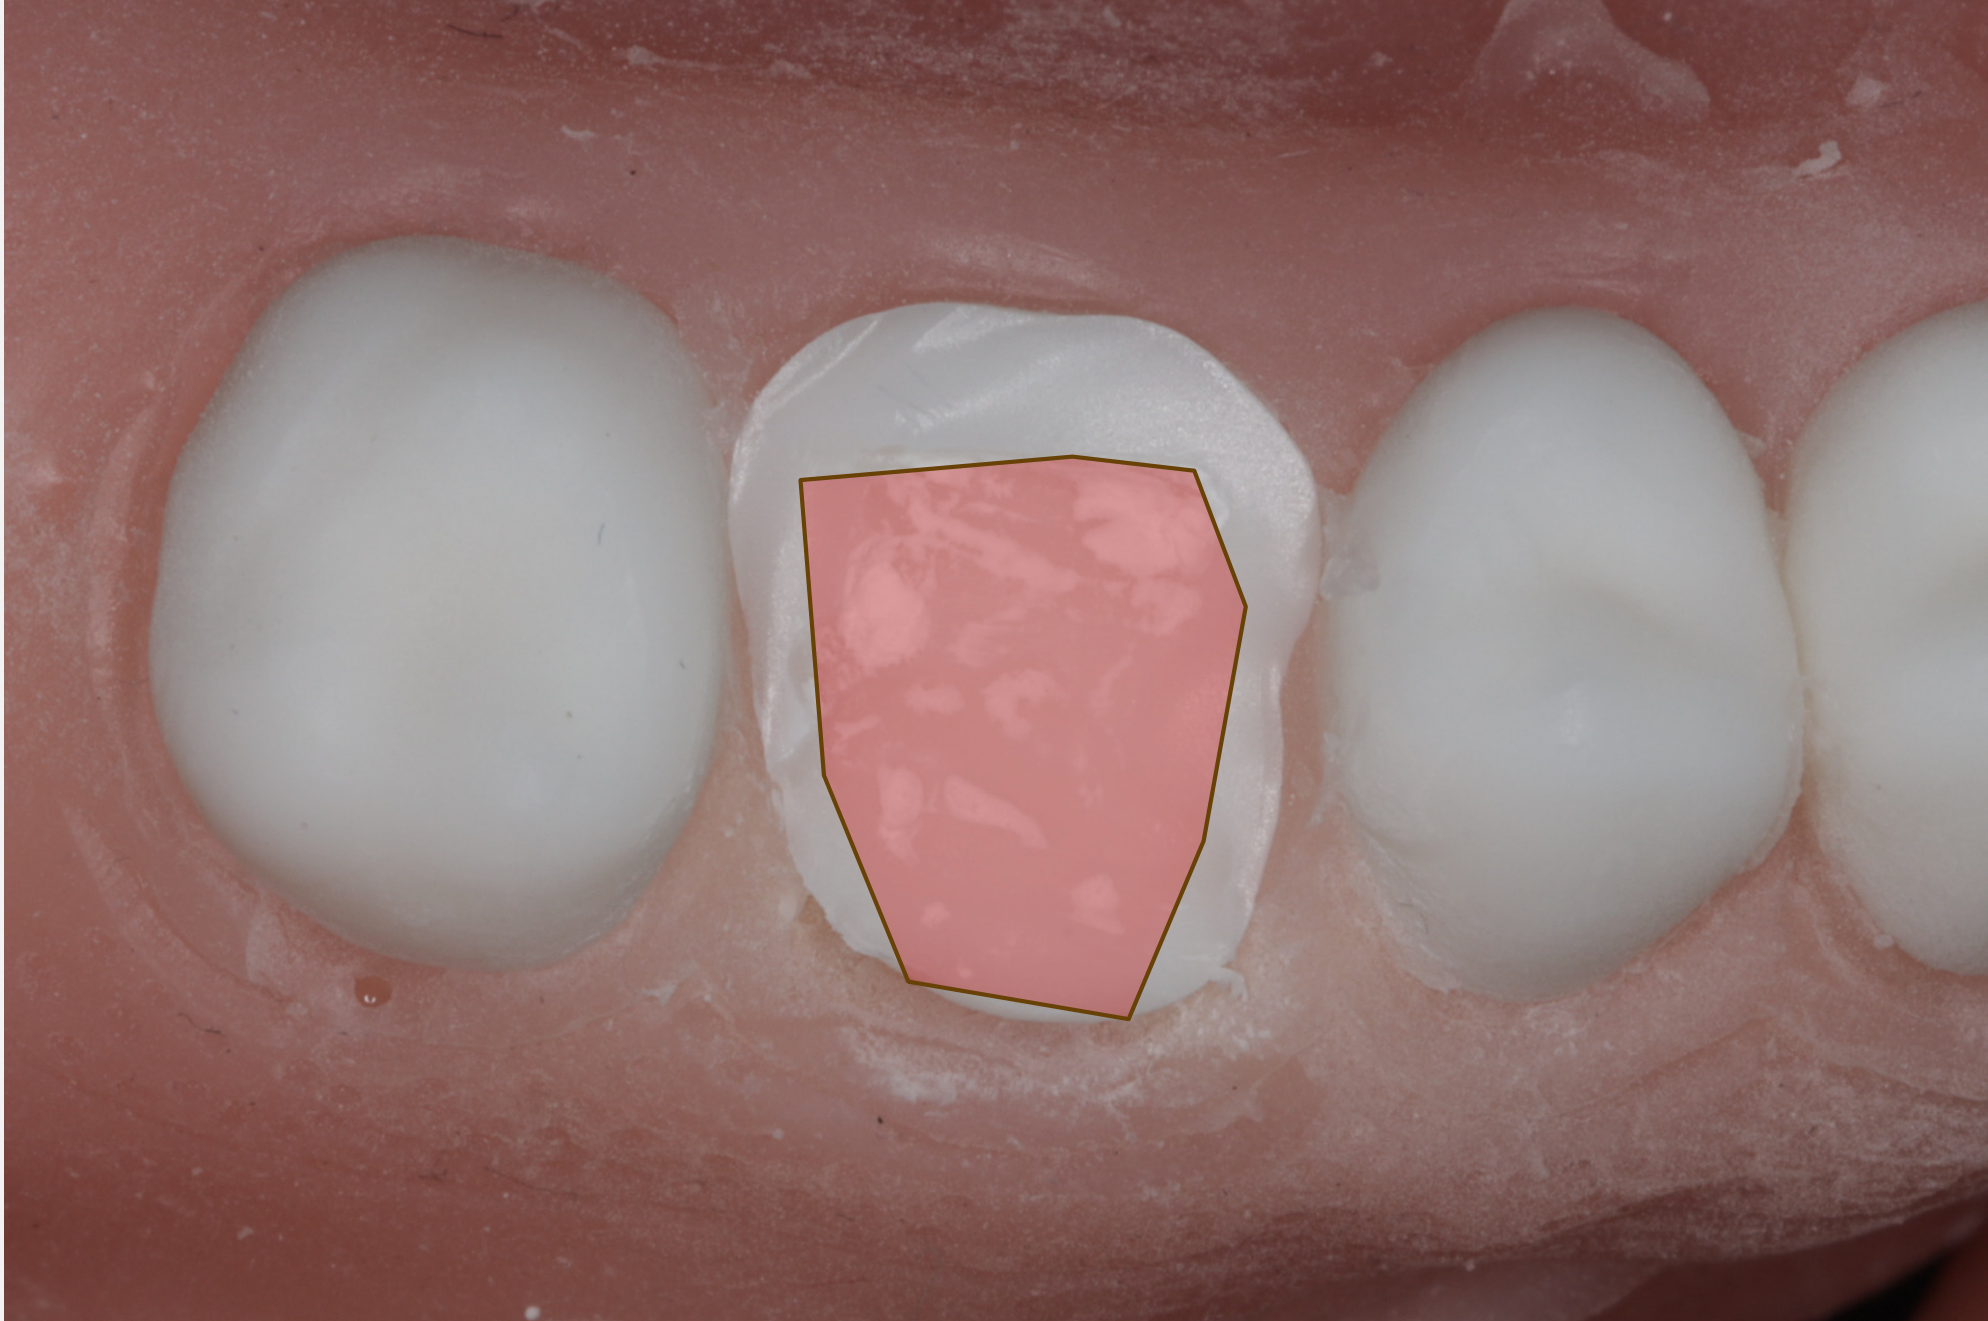
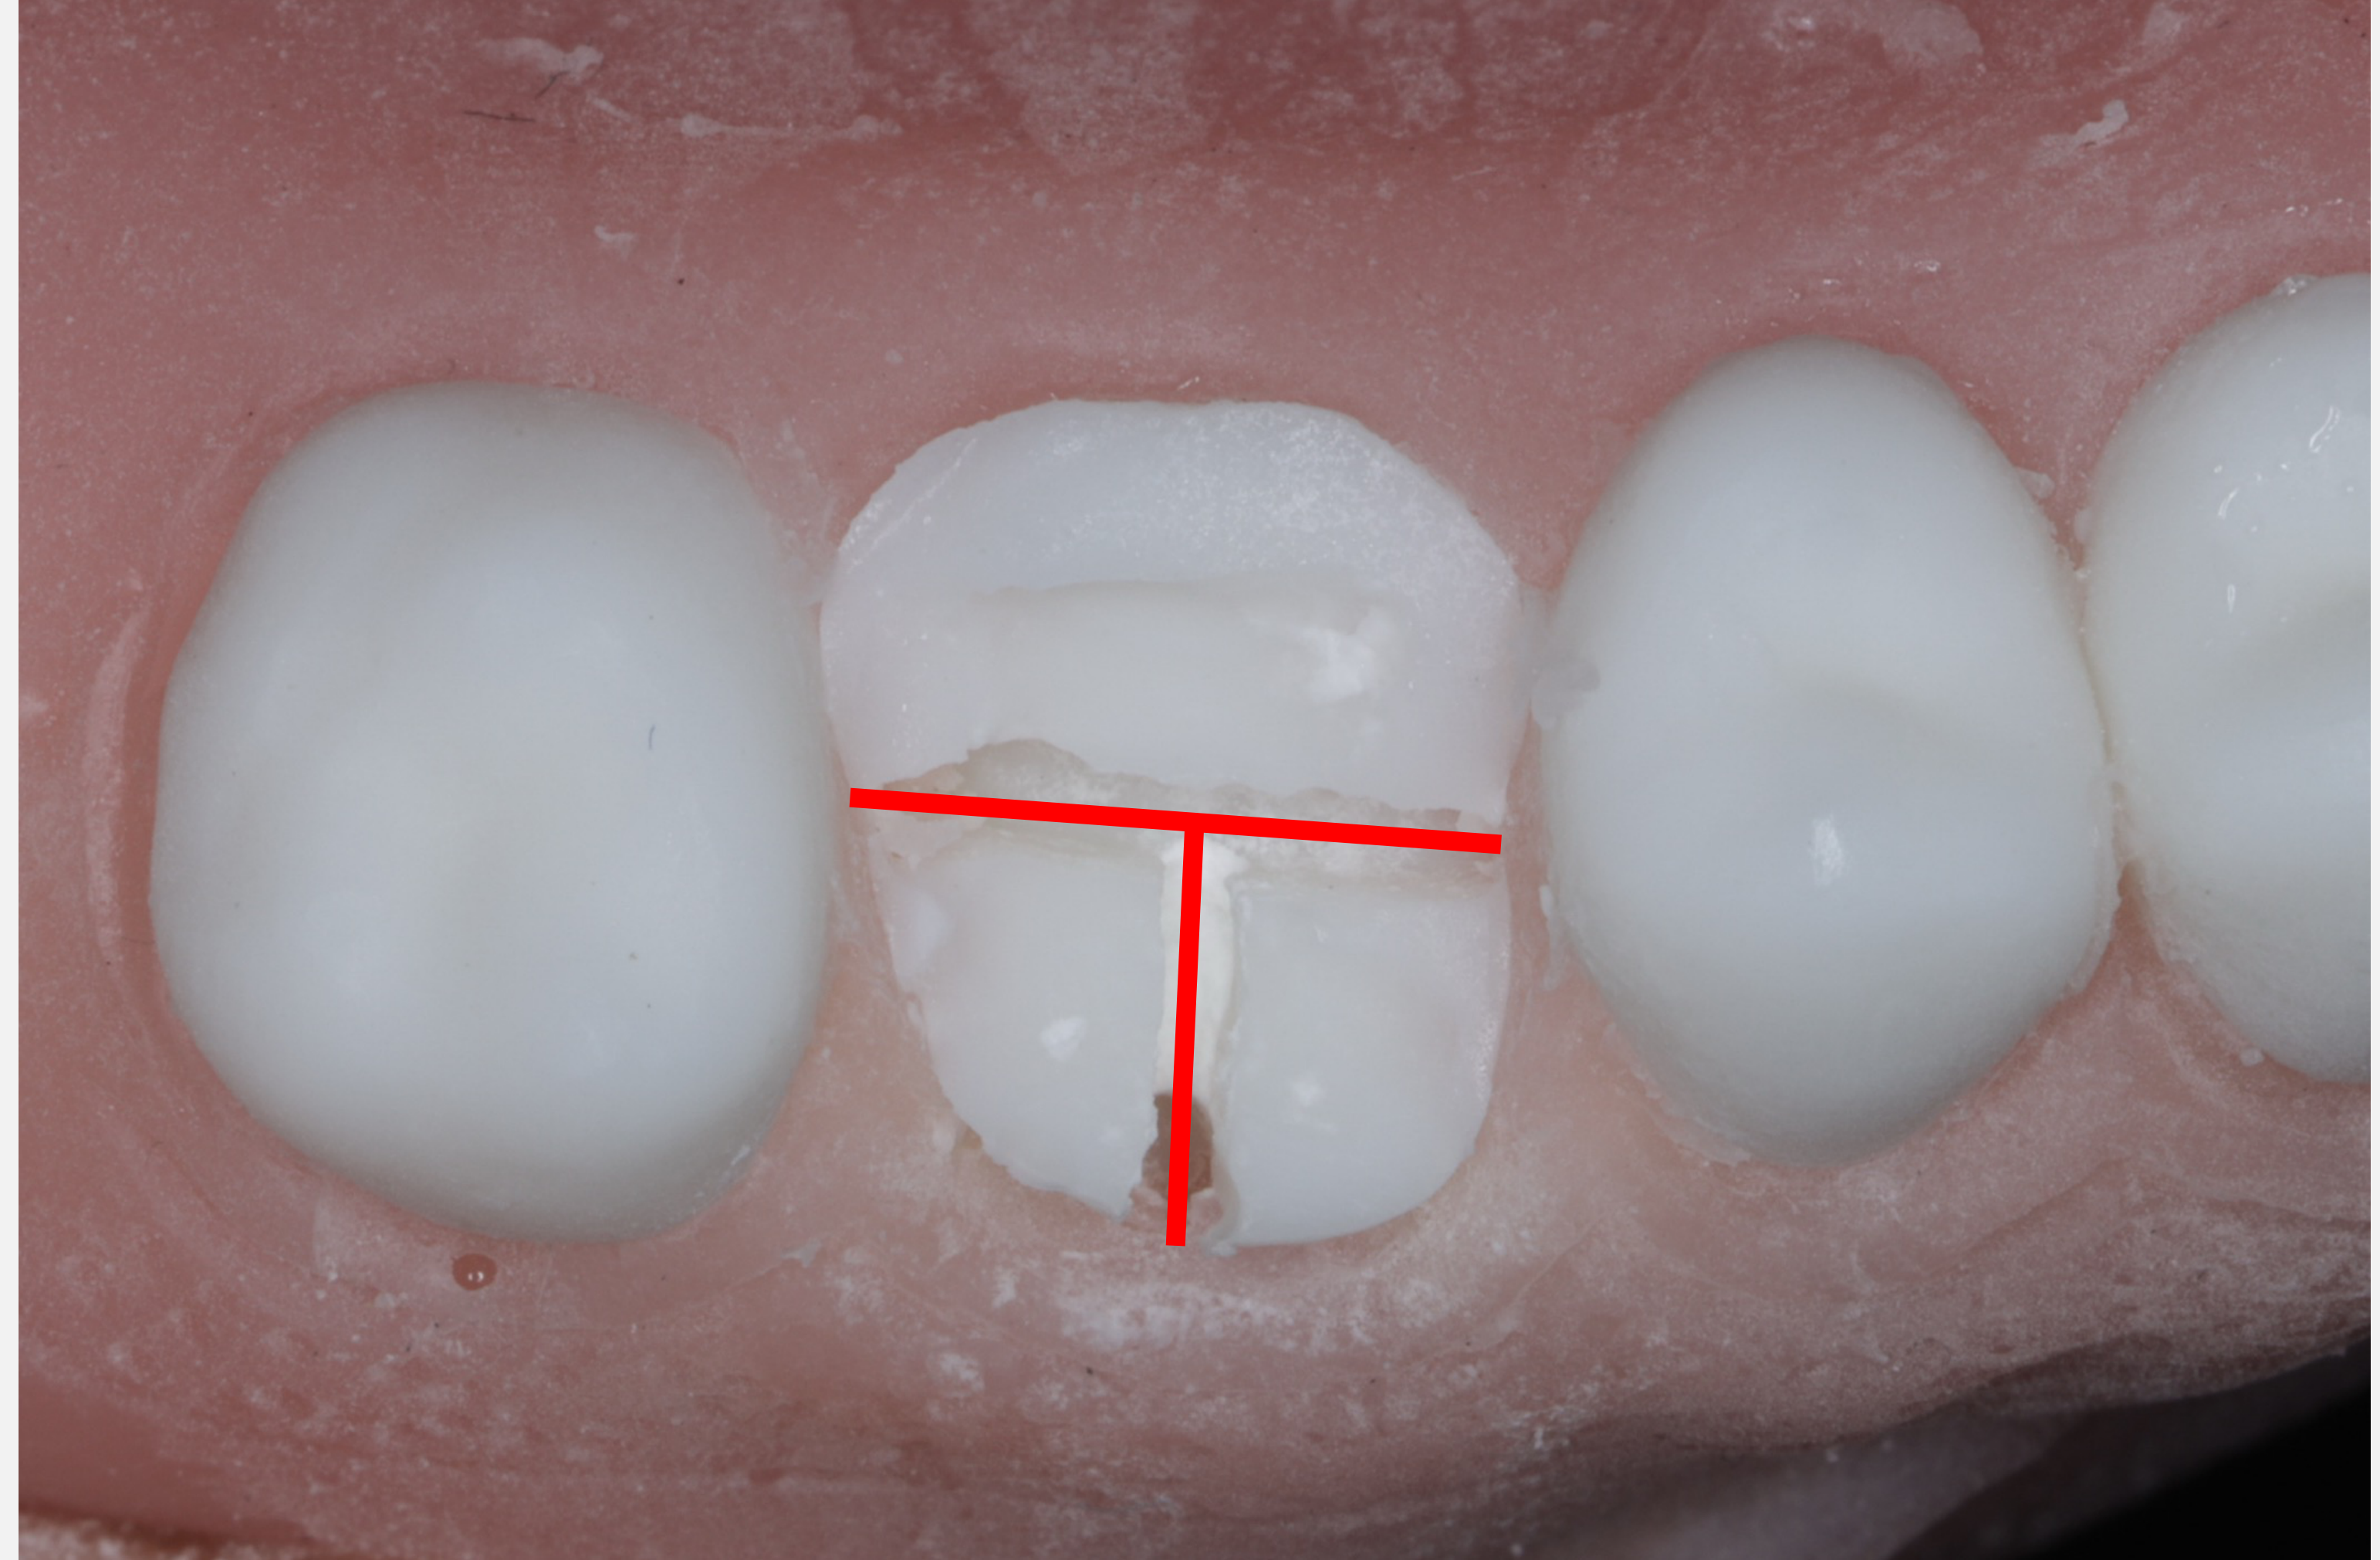
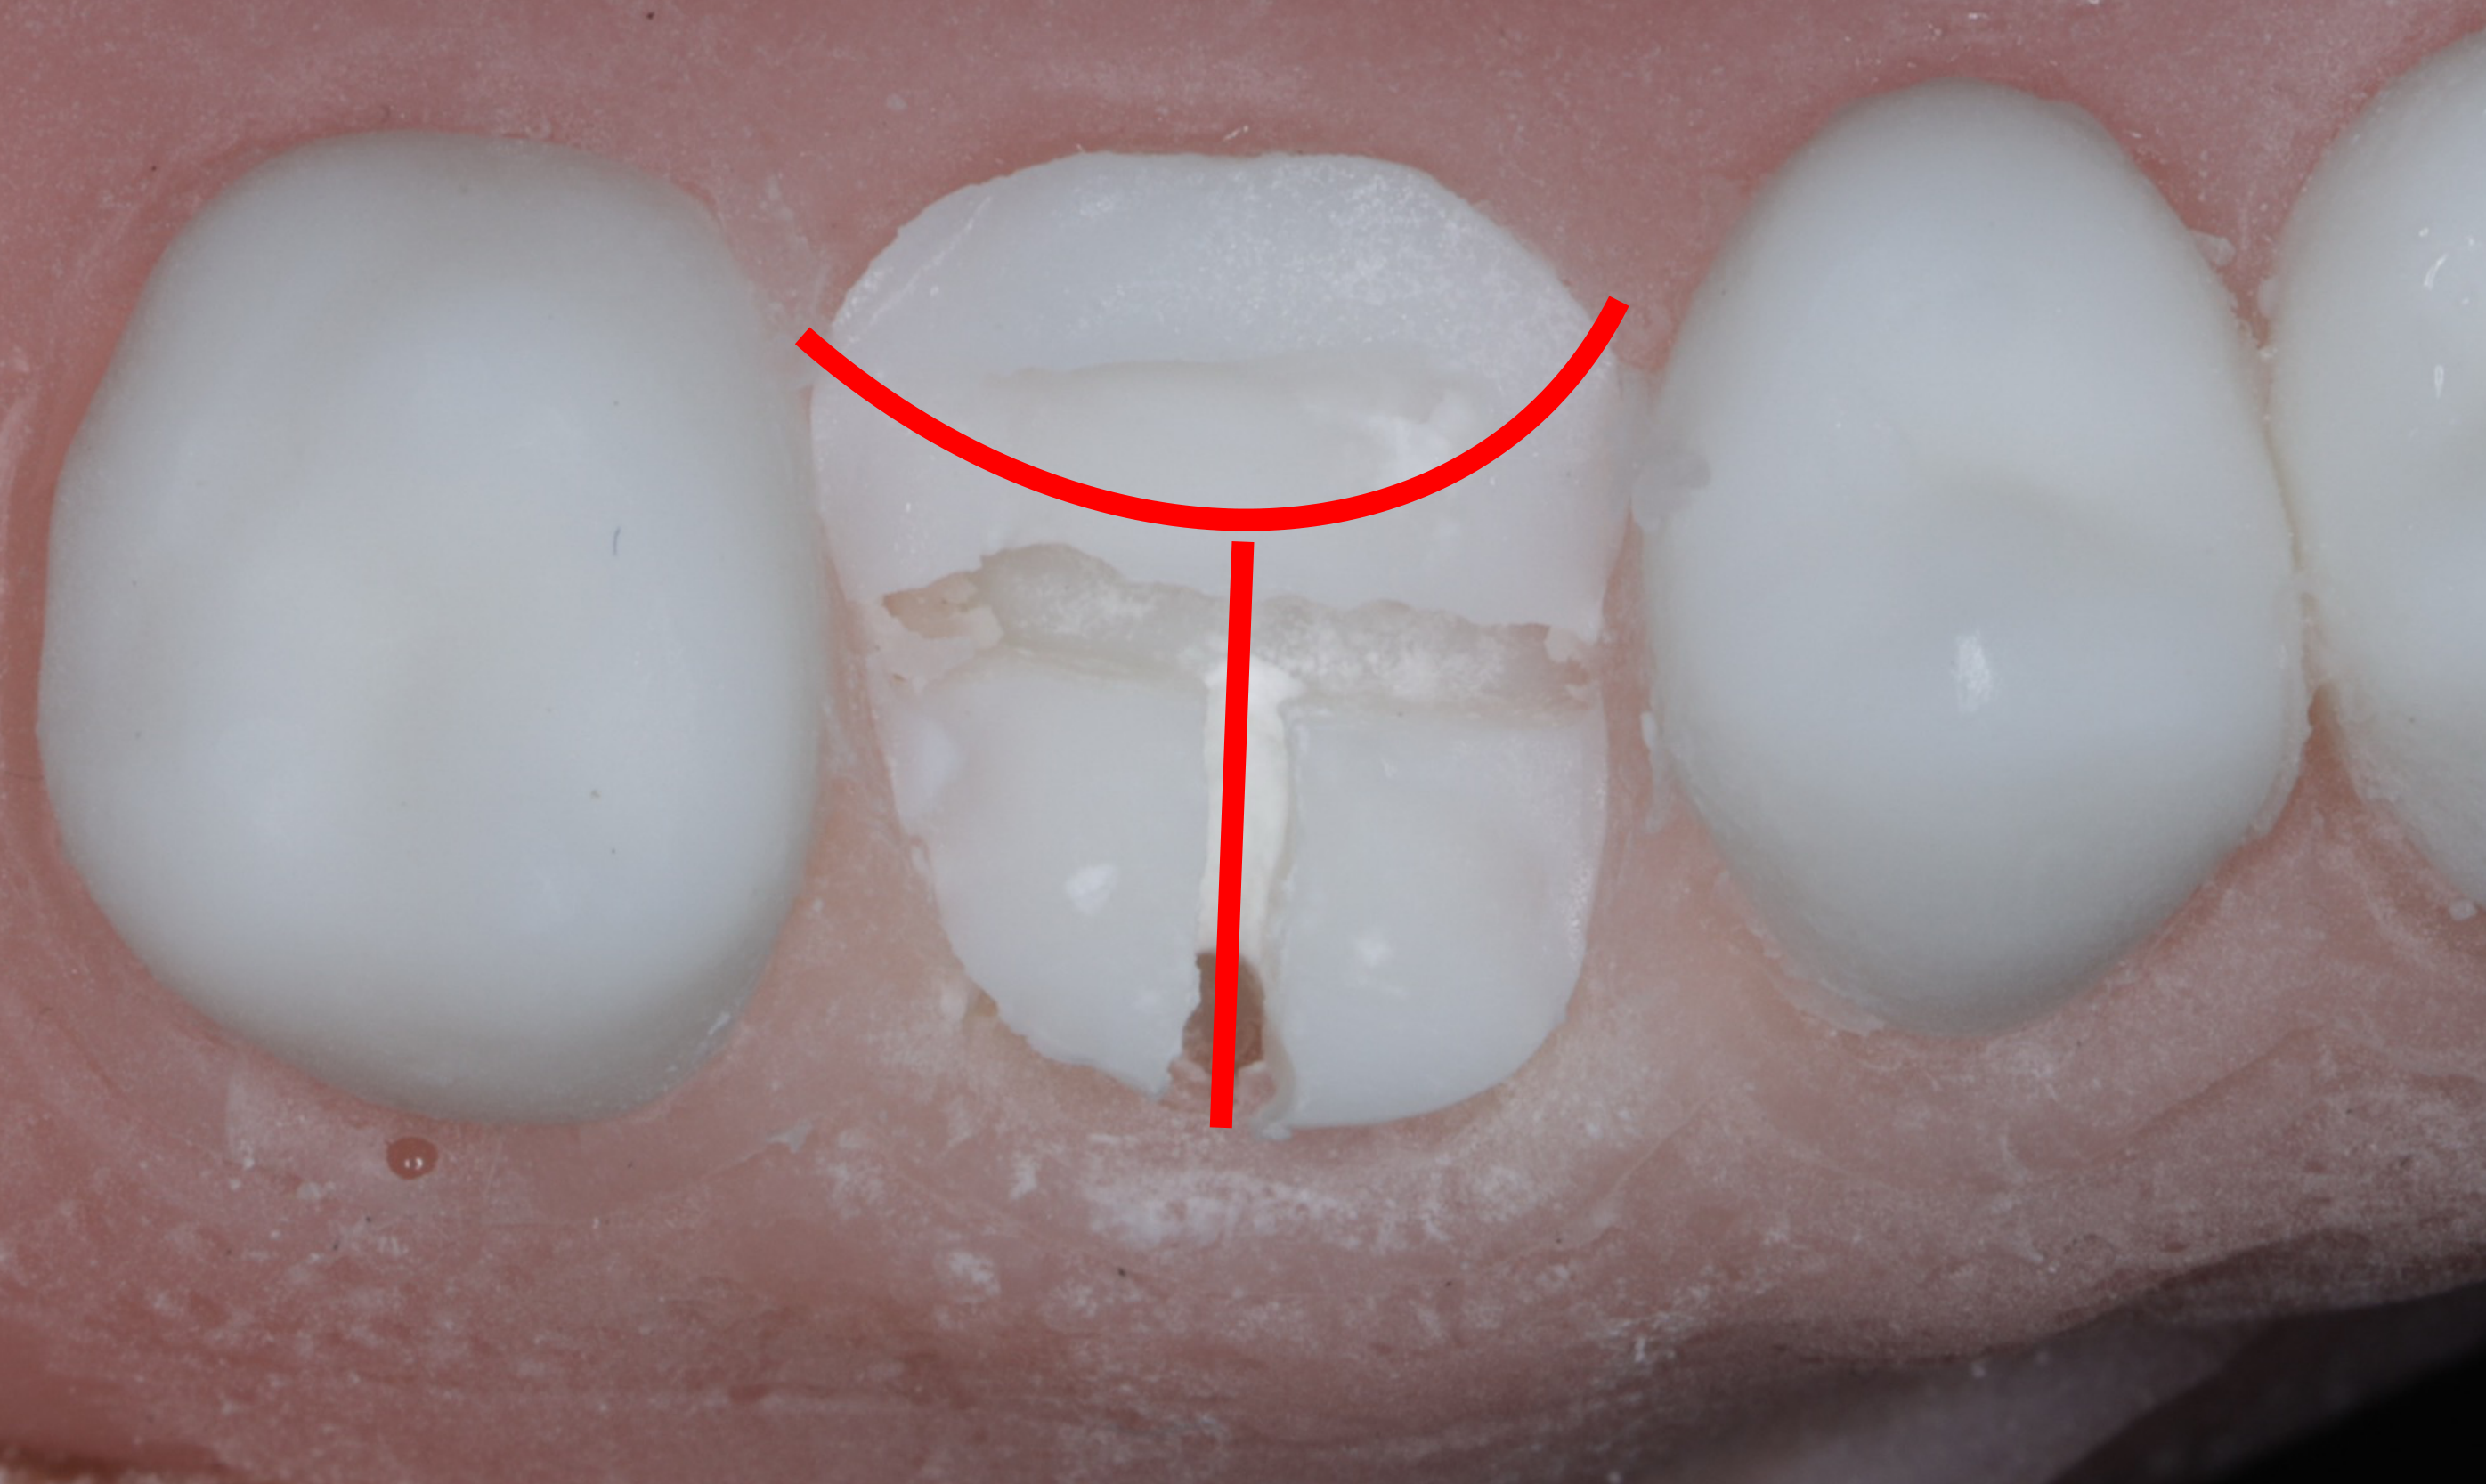
Flapless sectioning is a surgical technique utilized to facilitate the removal of teeth while minimizing trauma to the surrounding tissues.
- ADA Code: Item 314 refers to sectional extraction.
Rationale for Sectioning Teeth26
-
Anatomical Indications:
- Complex root anatomy, such as divergent roots.
- Situations presenting a higher risk of surgical complications.
- Presence of gross caries resulting in a lack of adequate purchase points for traditional extraction.
- Risk Reduction: Proximity to maxillary sinus to avoid Oro-Antral Communication.
-
Long-term Clinical Goals:
- Minimizing surgical trauma and associated bone loss.
- Facilitating socket preservation techniques.
- Preparing the site for future prosthetic replacements, such as bridges or dental implants.
- Keeping the buccal plate intact is crucial for socket preservation.
Instruments Required
Handpiece Selection27
- Restorative High-Speed Handpiece:
- May be used with a coarse diamond bur only if it is absolutely certain that no flap will be raised.
- Caution: Must not section fully through the tooth; the bur must not contact the bone.
- Use a long shank crown-type bur.
- Straight Surgical Handpiece:
- Used with a surgical bur if there is any uncertainty regarding the status of the attached gingival tissue.
- Prevents air emphysema.
- Used with a surgical bur if there is any uncertainty regarding the status of the attached gingival tissue.
- Bur Types:
- Round or flat fissure burs may be used based on clinician preference.
- Irrigation:
- Manual irrigation using saline is required.
Extraction Instruments
- Elevators:
- Used for propagating the fracture after initial sectioning.
- Forceps:
- Fine variation forceps are typically used for the removal of individual roots.
- Cowhorn forceps may be elected as a tool to assist in the sectioning process.
- Luxators: Used for retrieving individual roots.
Initial Sectioning Depth28
Section approximately 80% of the way through the crown of the tooth to prepare for elevation.
- Keep the bur entirely inside the tooth structure.
- Aim to reach the level of the pulp chamber as a visual guide.
Crown Elevation and Pulp Exposure29
- Elevate the crown segment off the tooth; in a natural (non-plastic) tooth, this action will expose the pulp chamber.
- The bur should penetrate into the crown and then be moved in a ‘sweeping’ motion to create the necessary space for elevation.
- Maxillary Molars: Generally three roots (Mesiobuccal, Distobuccal, Palatal).
- Sectioning Patterns: Straight (90 degrees to bifurcation) or Curved (avoid adjacent teeth).
- Separation: Use an elevator in the trough until a "click" is heard.
Root Removal30
Following the successful sectioning and removal of the crown, elevate and remove the remaining roots individually.
- Treat sectioned roots as individual single-rooted teeth.
- Goal: Intact socket with intact bifurcation and buccal wall.
- Pre-operative Imaging: Essential to check for fused roots or anatomical variations.
Surgical Extraction with Flaps31
Surgical extraction involves specific clinical procedures to access and remove teeth or fragments that cannot be extracted by conventional means. This typically includes:
- Elevation of a full-thickness mucoperiosteal flap
- Management of isolated fragments, such as retained roots
- Surgical penetration or removal of bone to facilitate access
Principles of Full Thickness Mucoperiosteal Flap Design
Clinical Considerations for Flap Design32
When designing a full-thickness mucoperiosteal flap, the surgical field requirements dictate the flap’s dimensions. Practitioners must also plan for how the flap will be closed upon completion of the procedure.
Essential Design Criteria
To ensure adequate healing and visibility, the following principles should be followed:
- Broad Base: The base of the flap must be wider than the free margin to maintain an adequate blood supply.
- Incision Technique: Incisions should be made perpendicular to the mucosa and extend through the periosteum down to the bone.
- Tissue Preservation: Efforts should be made to minimize trauma to the interdental papillae.
- Never divide a papilla in half; incisions should be clearly on one side.
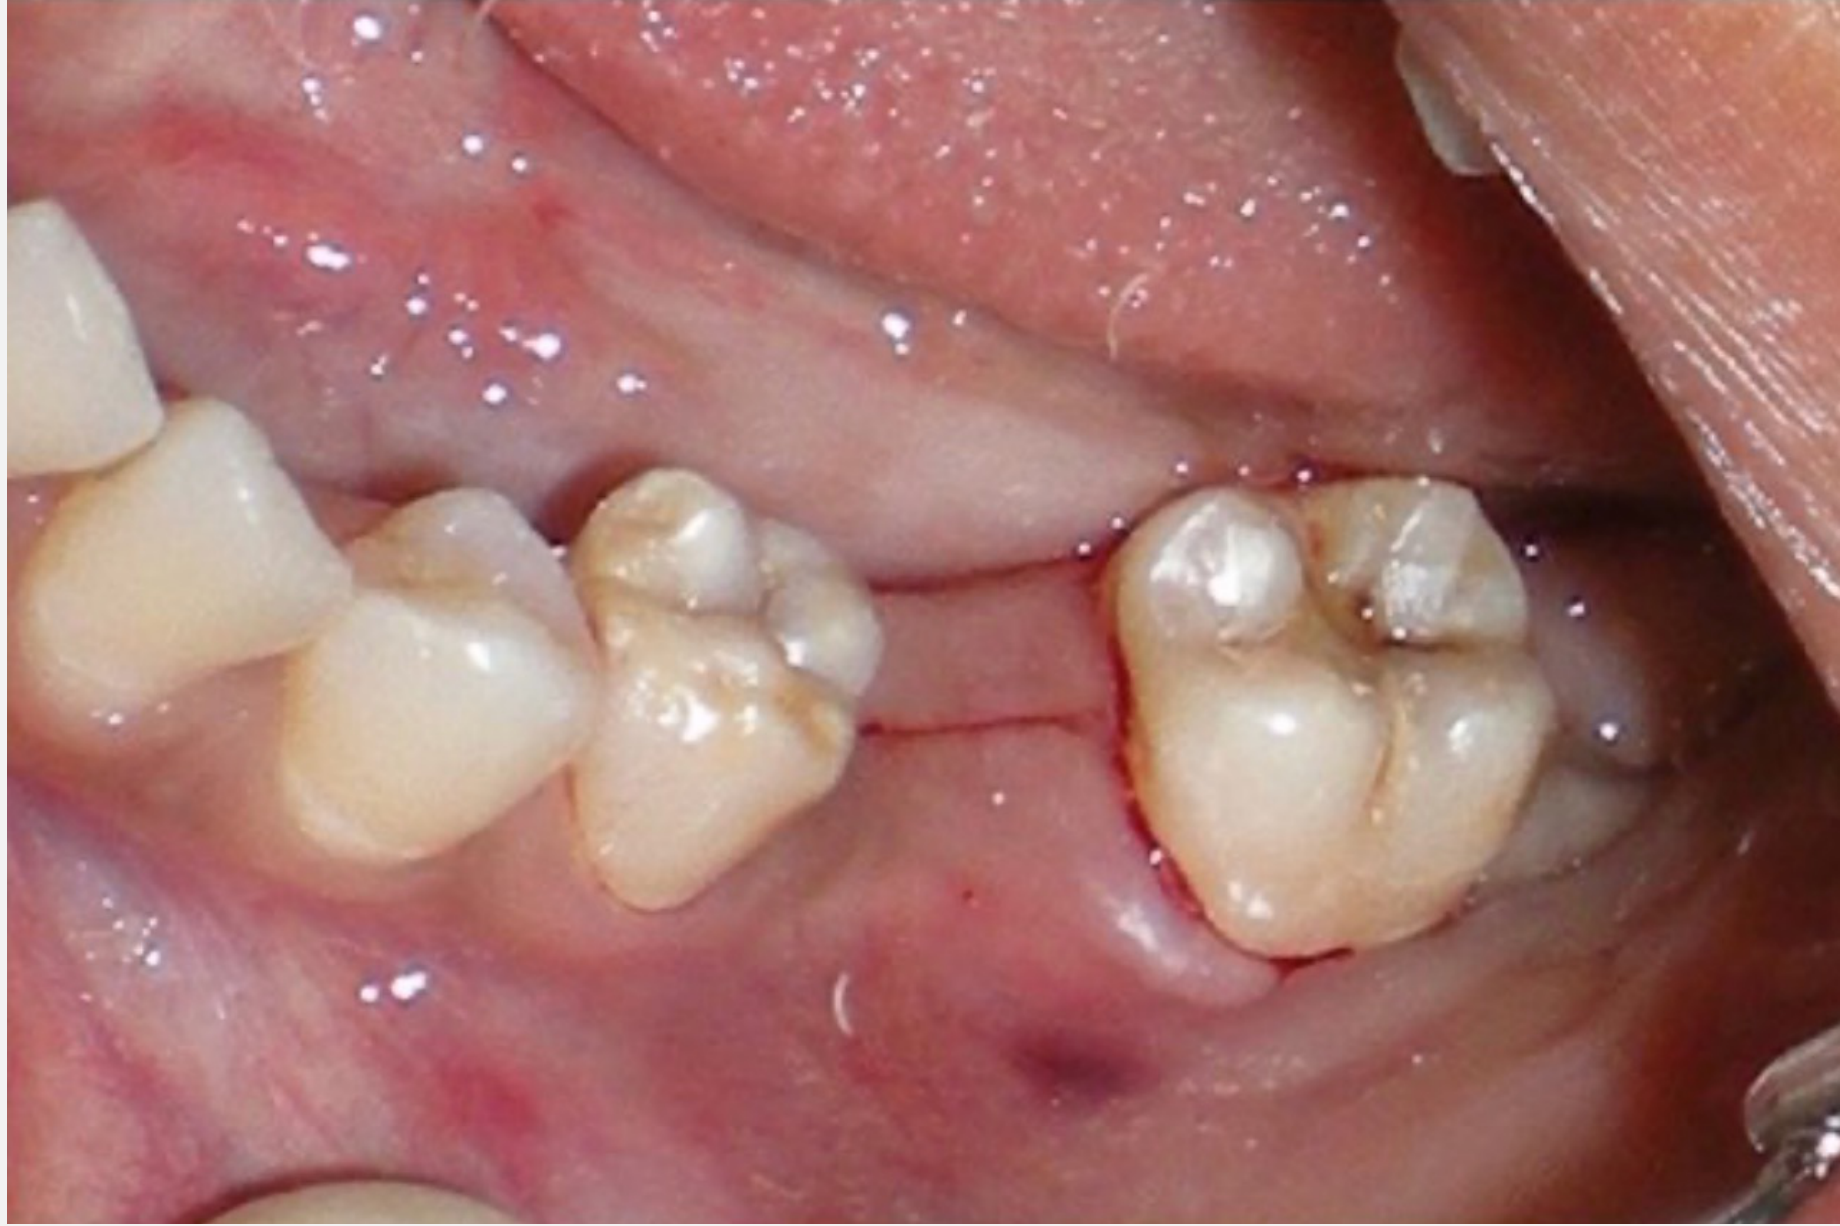
Flap Designs3334
This section covers various flap designs utilized in minor oral surgery to provide access to the surgical site.
Instructional videos demonstrate the clinical techniques for raising different types of mucoperiosteal flaps.
 |  |
 |
Specialized Flap Applications35
Specific flap designs are selected based on the clinical indication:
- Crestal Flaps: Often utilized for implant placement or accessing the alveolar ridge.
- Retained Roots: Flap design is modified to locate and retrieve buried root fragments.
- Implants: Specific considerations for early loading and partially edentulous posterior arches.
- Envelope Flap (One-sided): Incision along the sulcus in one sweeping motion. Simplest to close but prone to tearing if not extended far enough.
- Triangle Flap (Two-sided): Sulcular incision plus one relieving incision (mesial or distal). Provides better retraction and access; less likely to tear.
- Trapezoid Flap (Three-sided): Mesial and distal relieving incisions. Provides maximum access but creates twice the work for closure (two relieving incisions to suture).
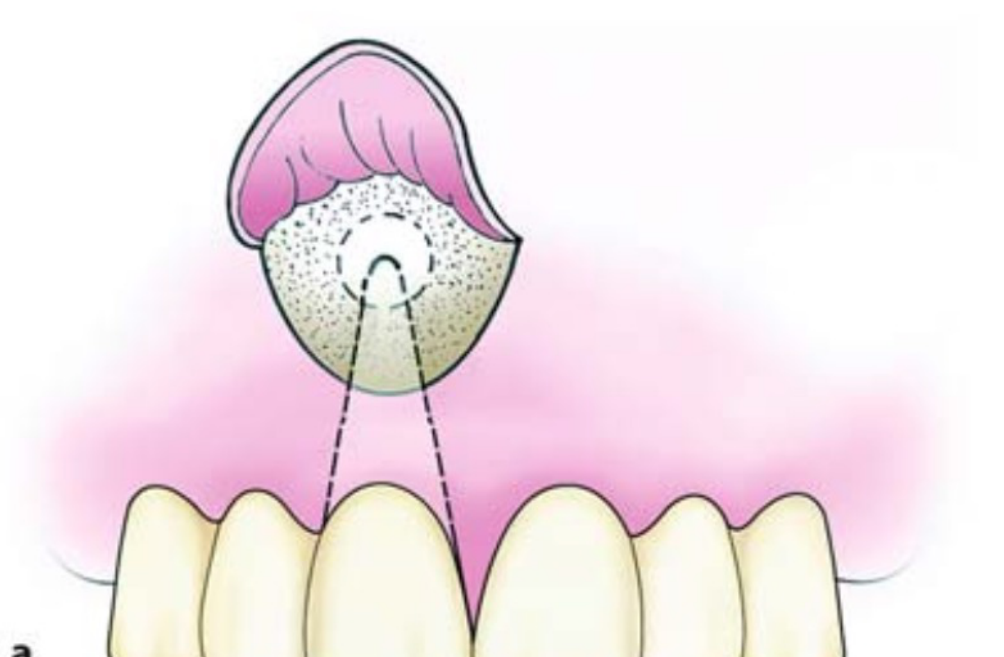
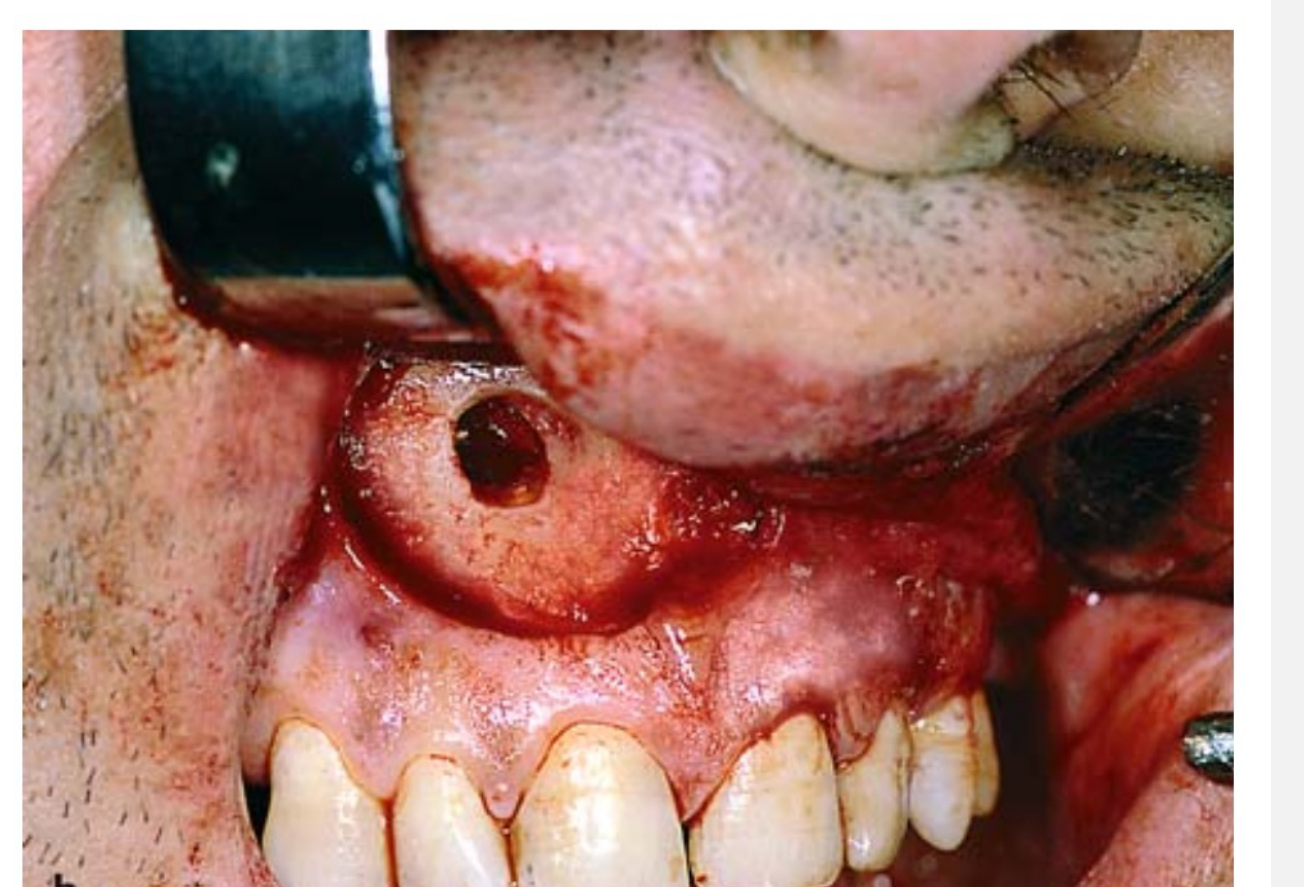
Semilunar Flaps36
The semilunar flap is a specific design used in various minor oral surgical procedures:
- Indications:
- Apicoectomies
- Removal of small cysts
- Retrieval of root tips
- Characteristics: A curved incision that avoids the gingival margin, providing localized access to the periapical area
- Heals with a "smiley face" scar on the gingiva..
Additional Flap Types37
- Crestal Flaps
- Semilunar Flaps
- Pedicled Flaps: These are specifically utilized for the closure of Oro-Antral Communications (OAC).
Flap and Bone Removal with or Without Sectioning3839
This section details the methods for bone removal and the potential need for tooth sectioning during surgical extractions.
Indications for Bone Removal40
Bone removal may be necessary when a tooth is grossly carious or when dealing with a retained root fragment where key landmarks or purchase points cannot be identified.
- Priority: Remove bone mesially or distally first. Buccal bone removal is lower priority (increases defect).
- Never remove palatal bone (safety concerns).
Surgical Approach
- Procedure: Raise a full-thickness mucoperiosteal flap and remove bone at the mesial, distal, or buccal aspects.
- Objective: The primary goal is to create sufficient space to elevate the tooth; excessive bone removal should be avoided
- Be judicious but decisive. "Stroking" the bone removes little and causes heat; positive removal minimizes total bone loss..
- Healing Considerations: Bone removal can negatively impact healing outcomes, potentially leading to larger buccal defects or periodontal complications.
Irrigation Requirements41
Manual irrigation is a critical component of bone removal to ensure:
- Debris Clearance: Washing out surgical fragments and bone dust.
- Thermal Control: Keeping the bone cool to prevent thermal damage
- Most clinics do not have auto-irrigating surgical motors. Assistants must dribble/squirt water onto the bur..
Thermal Thresholds
Maintaining low temperatures is vital for bone viability. Research has demonstrated that bone necrosis occurs if the temperature exceeds 47 degrees Celsius for a duration of 1 minute or more.
- Smelling burning bone indicates it is "cooked" (60-80°C).
- Necrosis leads to poor healing outcomes.
Demonstration video illustrating the technique for bone removal using a surgical model.
Management of Different Tooth Morphologies42
- Single-Rooted Teeth: Bone is removed until enough space is created to either elevate the tooth or grasp it with forceps.
- Multi-Rooted Teeth: Practitioners must decide between:
- Direct elevation/grasping with forceps.
- Sectioning the roots to facilitate individual removal.
Equipment Safety
Once a mucoperiosteal flap has been raised, only the straight handpiece should be used for bone removal or sectioning to prevent surgical complications such as surgical emphysema.
- If bone is penetrated during sectioning, the procedure becomes surgical/sterile.
Post-Extraction Protocol43
After all fragments have been successfully removed, the following steps should be completed:
- Verification: Ensure that all apices are intact and accounted for.
- Inspection: Carefully inspect the socket walls for any remaining debris or abnormalities.
- Debridement: Perform curettage and irrigation to remove granulation tissue and promote healthy healing
Curettage Debate
- Granuloma: If a periapical granuloma is present, it may detach with the tooth or remain in the socket.
- Debate: Some advocate curetting everything to reduce infection; others argue against scraping periodontal ligament cells that promote healing.
- Recommendation: A clean out and wash is generally advocated to remove rotten tooth bits, but literature varies. .
- ==45 cm:== Standard for single sockets.
- ==75 cm:== Used for multiple teeth (e.g., four wisdom teeth). Using 75cm for a single suture is wasteful.
-
Monofilament: Has "shape memory" (coils), making handling harder.
-
Multifilament: Braided (like rope). Wicks bacteria.
-
Silk: Non-absorbable, natural. Falling out of favor in practice (requires removal appointment) but common in teaching due to cost.
-
PTFE/Prolene: Non-absorbable synthetic. Low tissue reactivity, often used in implant surgery to reduce inflammation.
- Vicryl (Polyglactin 910): Lasts months (general surgery).
- Vicryl Rapide: Loses 50% strength in 10-14 days. Ideal for oral mucosa which heals fast. Prevents long-term wicking of bacteria.
- PDS (Polydioxanone): Lasts very long. Used in OMFS for internal reconnection, not typically intra-orally.
-
USP System Logic: 3-0 is smaller than 1. 7-0 is extremely small.
-
Diameter Variation: A 3-0 USP may differ slightly in diameter (e.g., 0.2mm vs 0.4mm) from a metric equivalent, affecting drag.
Advanced Suturing44
Advanced suturing techniques and materials for surgical extractions and minor oral surgery.
Suture Materials
 |  |  |
 | 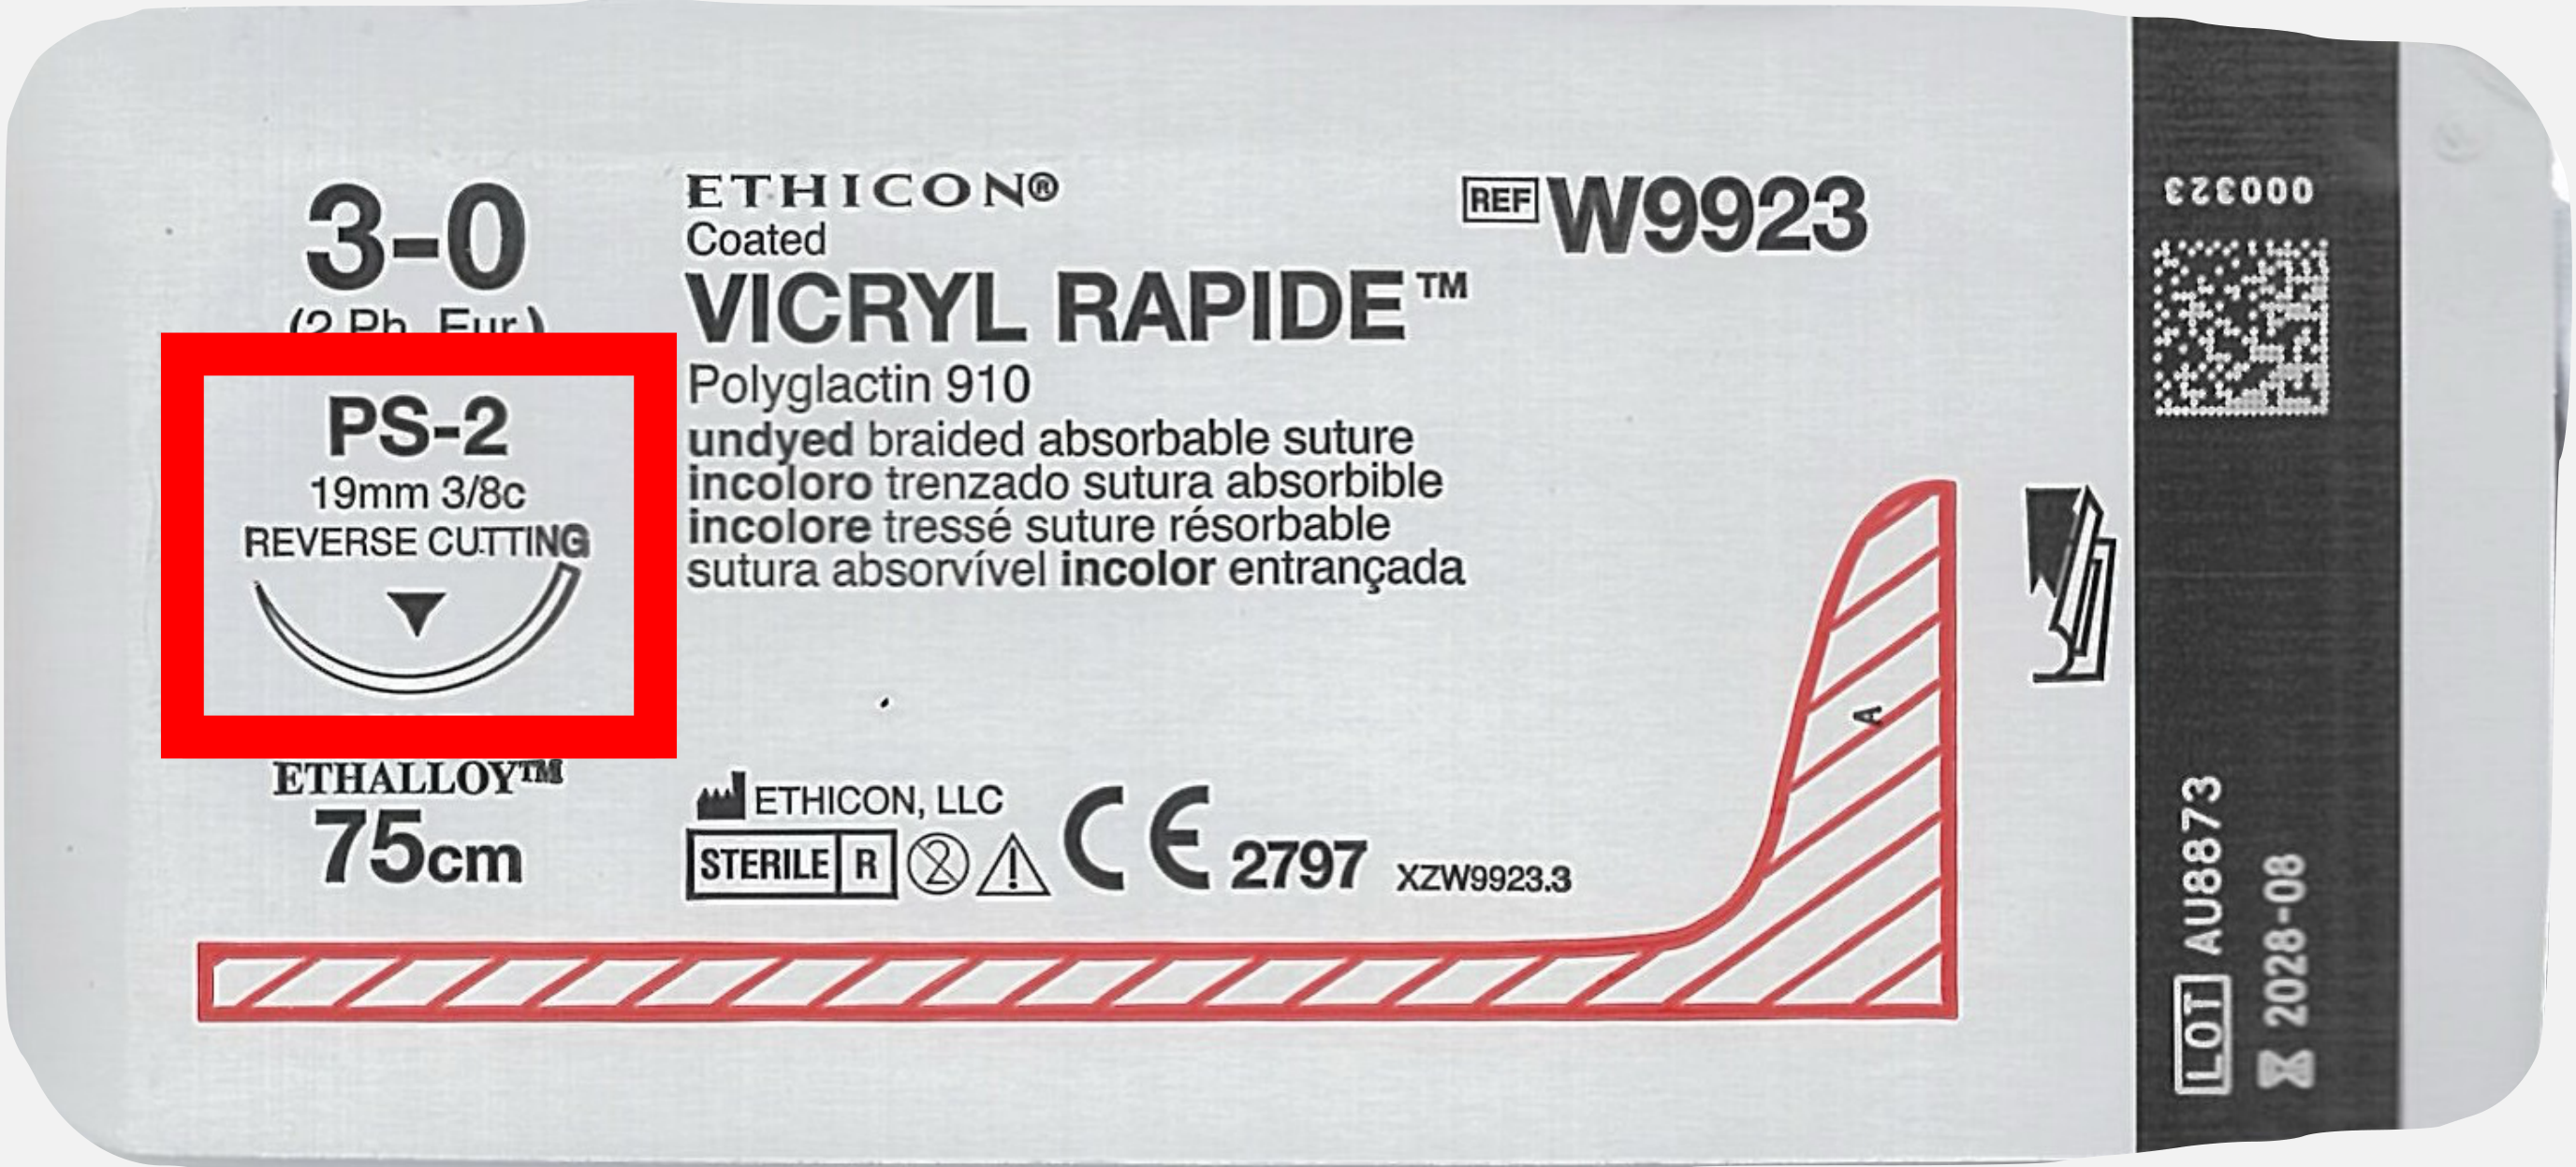 | 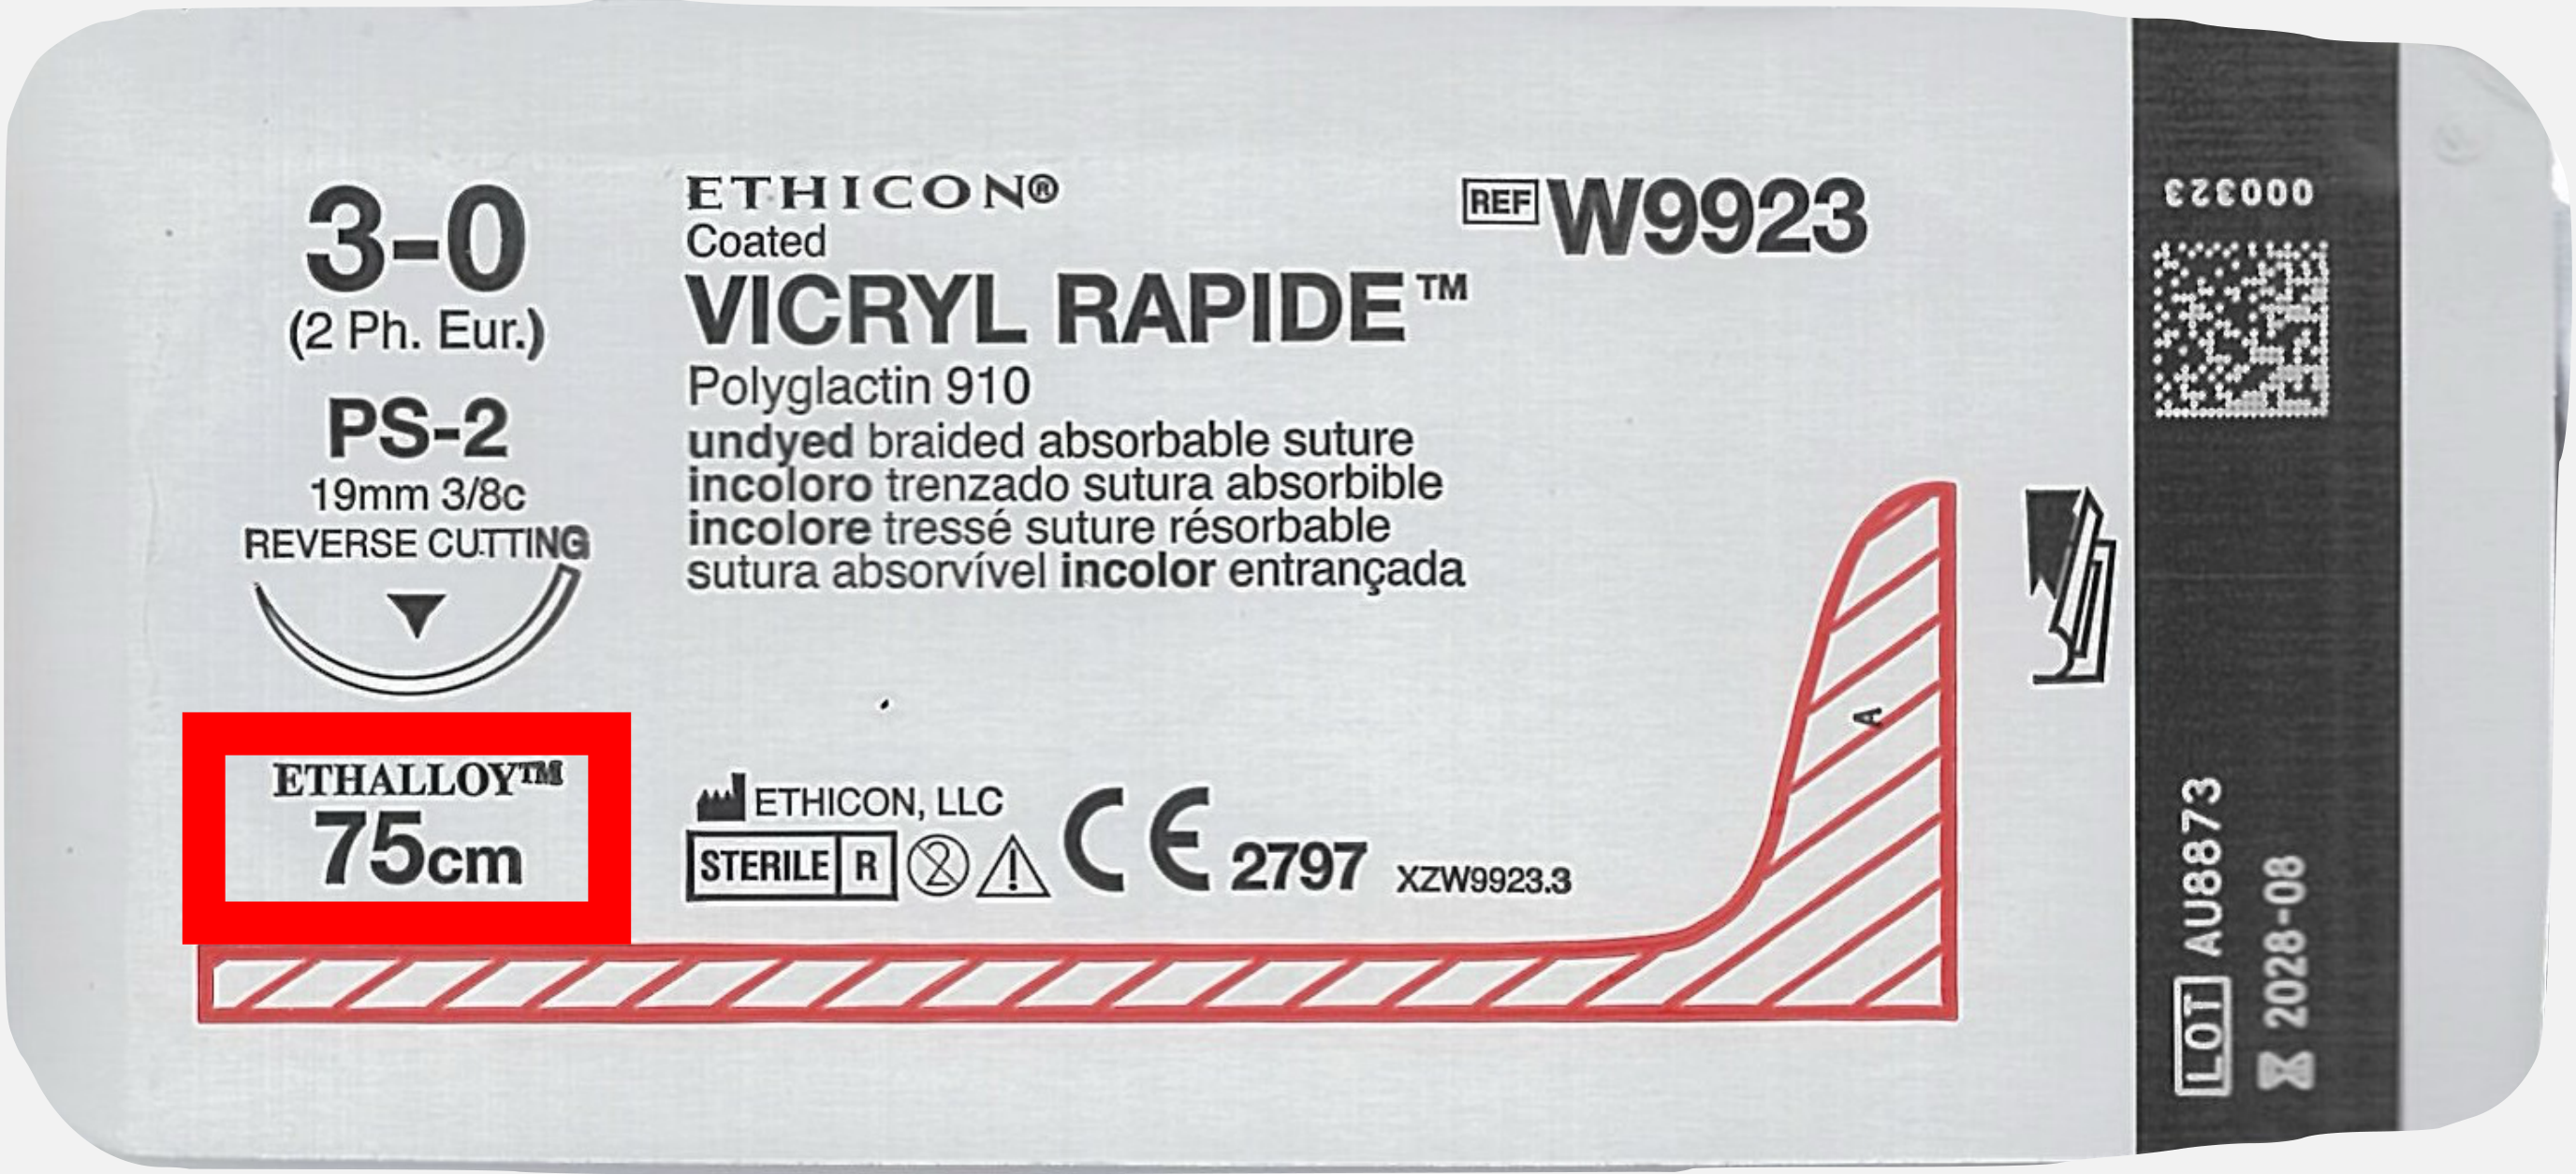 |
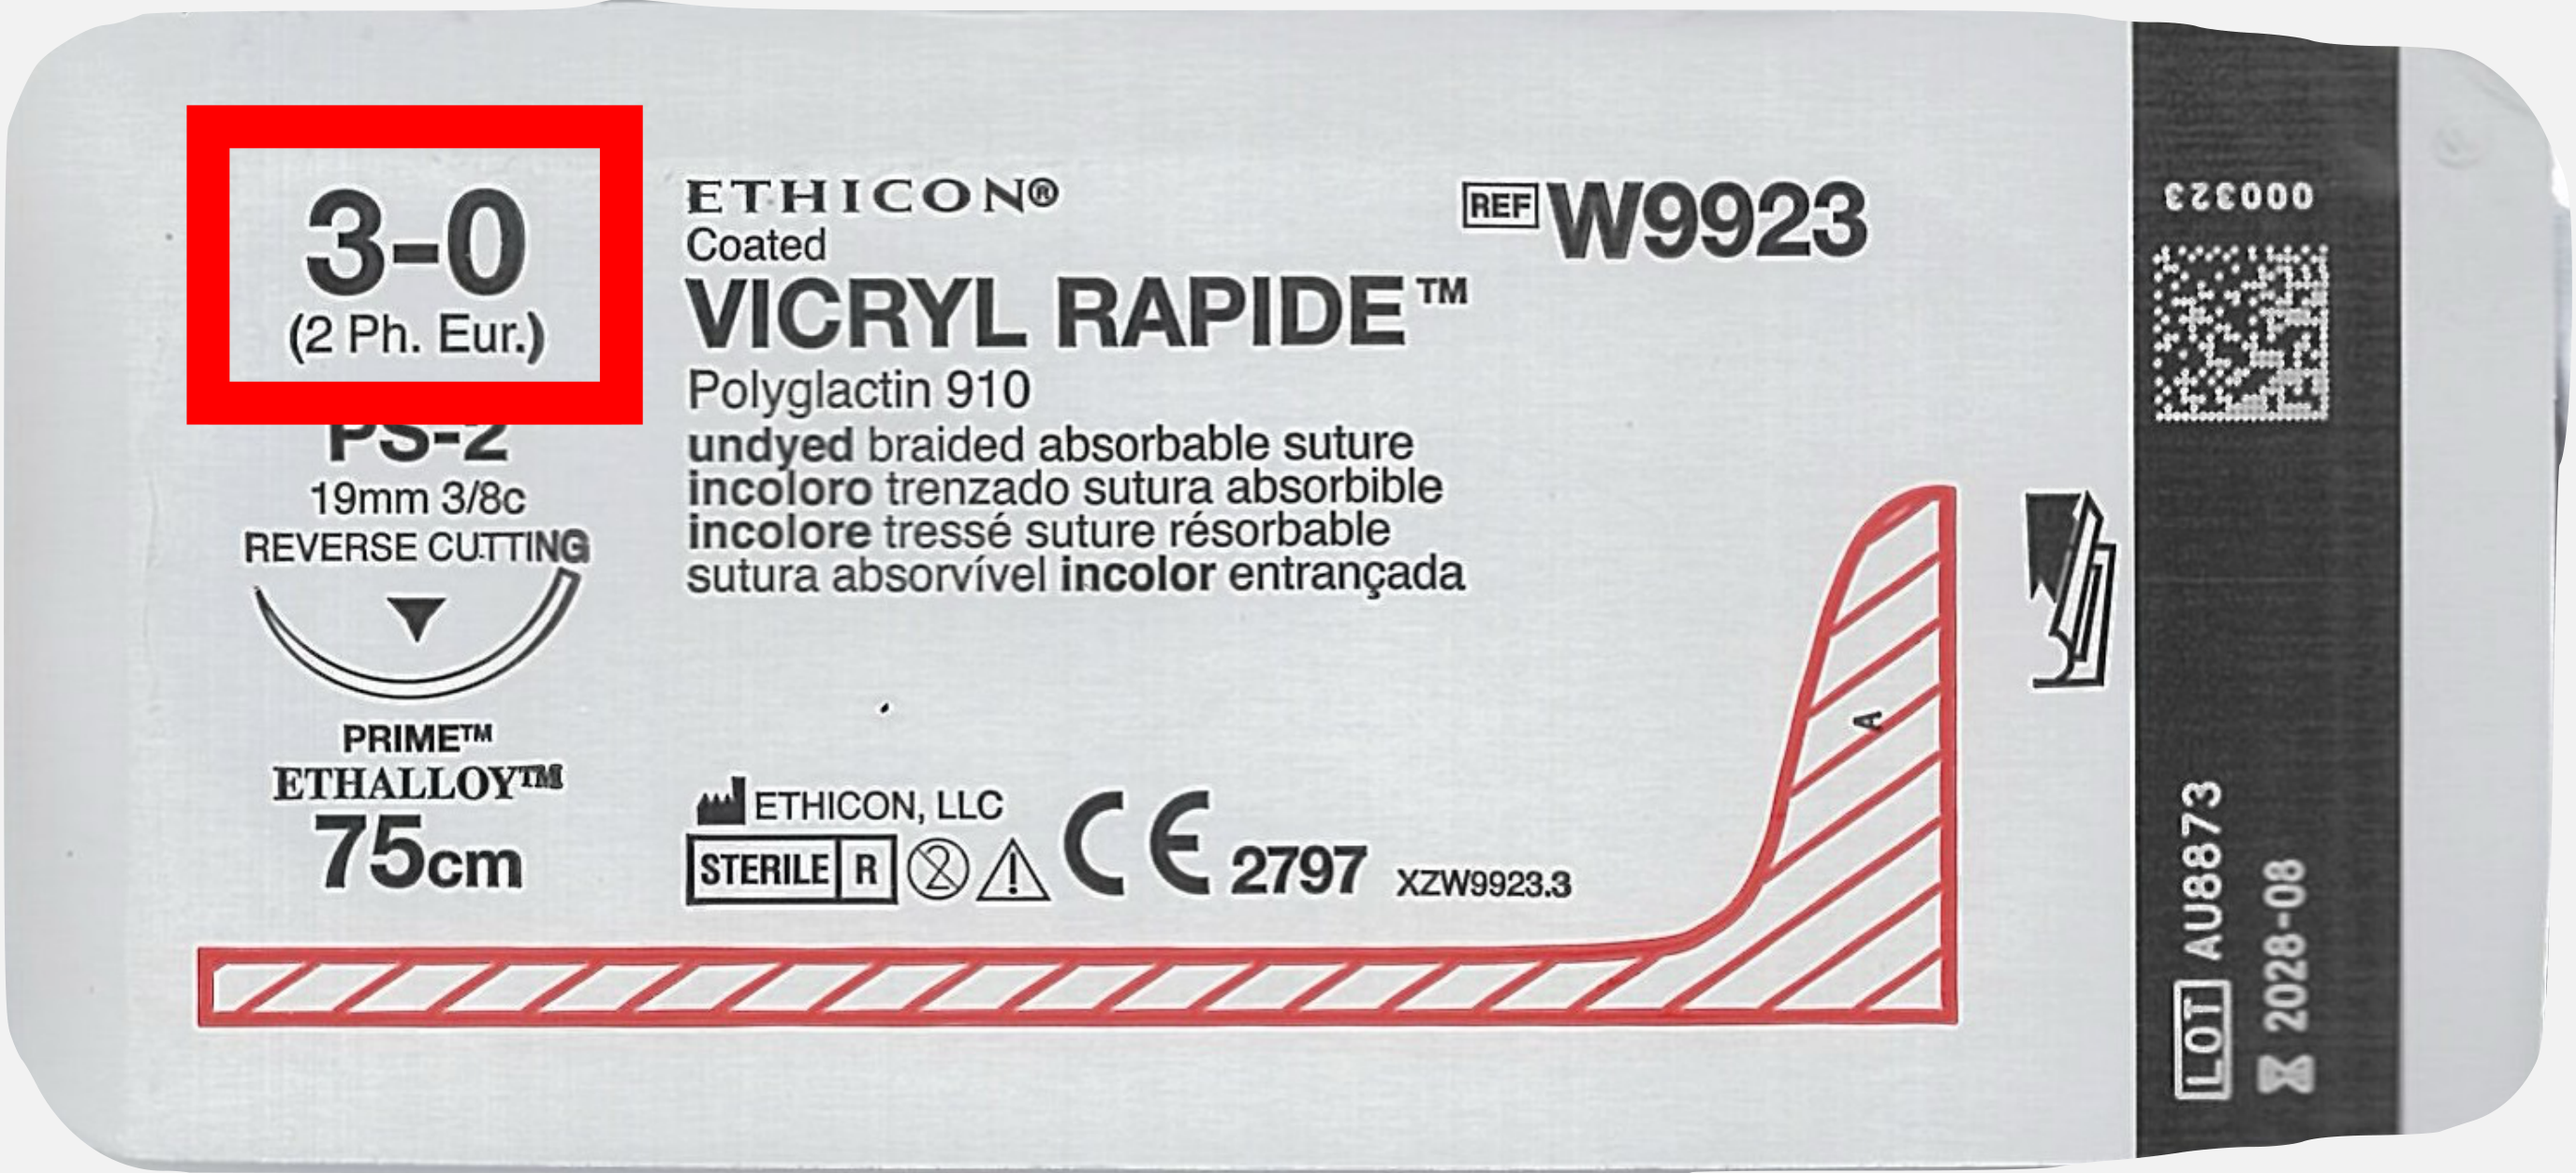
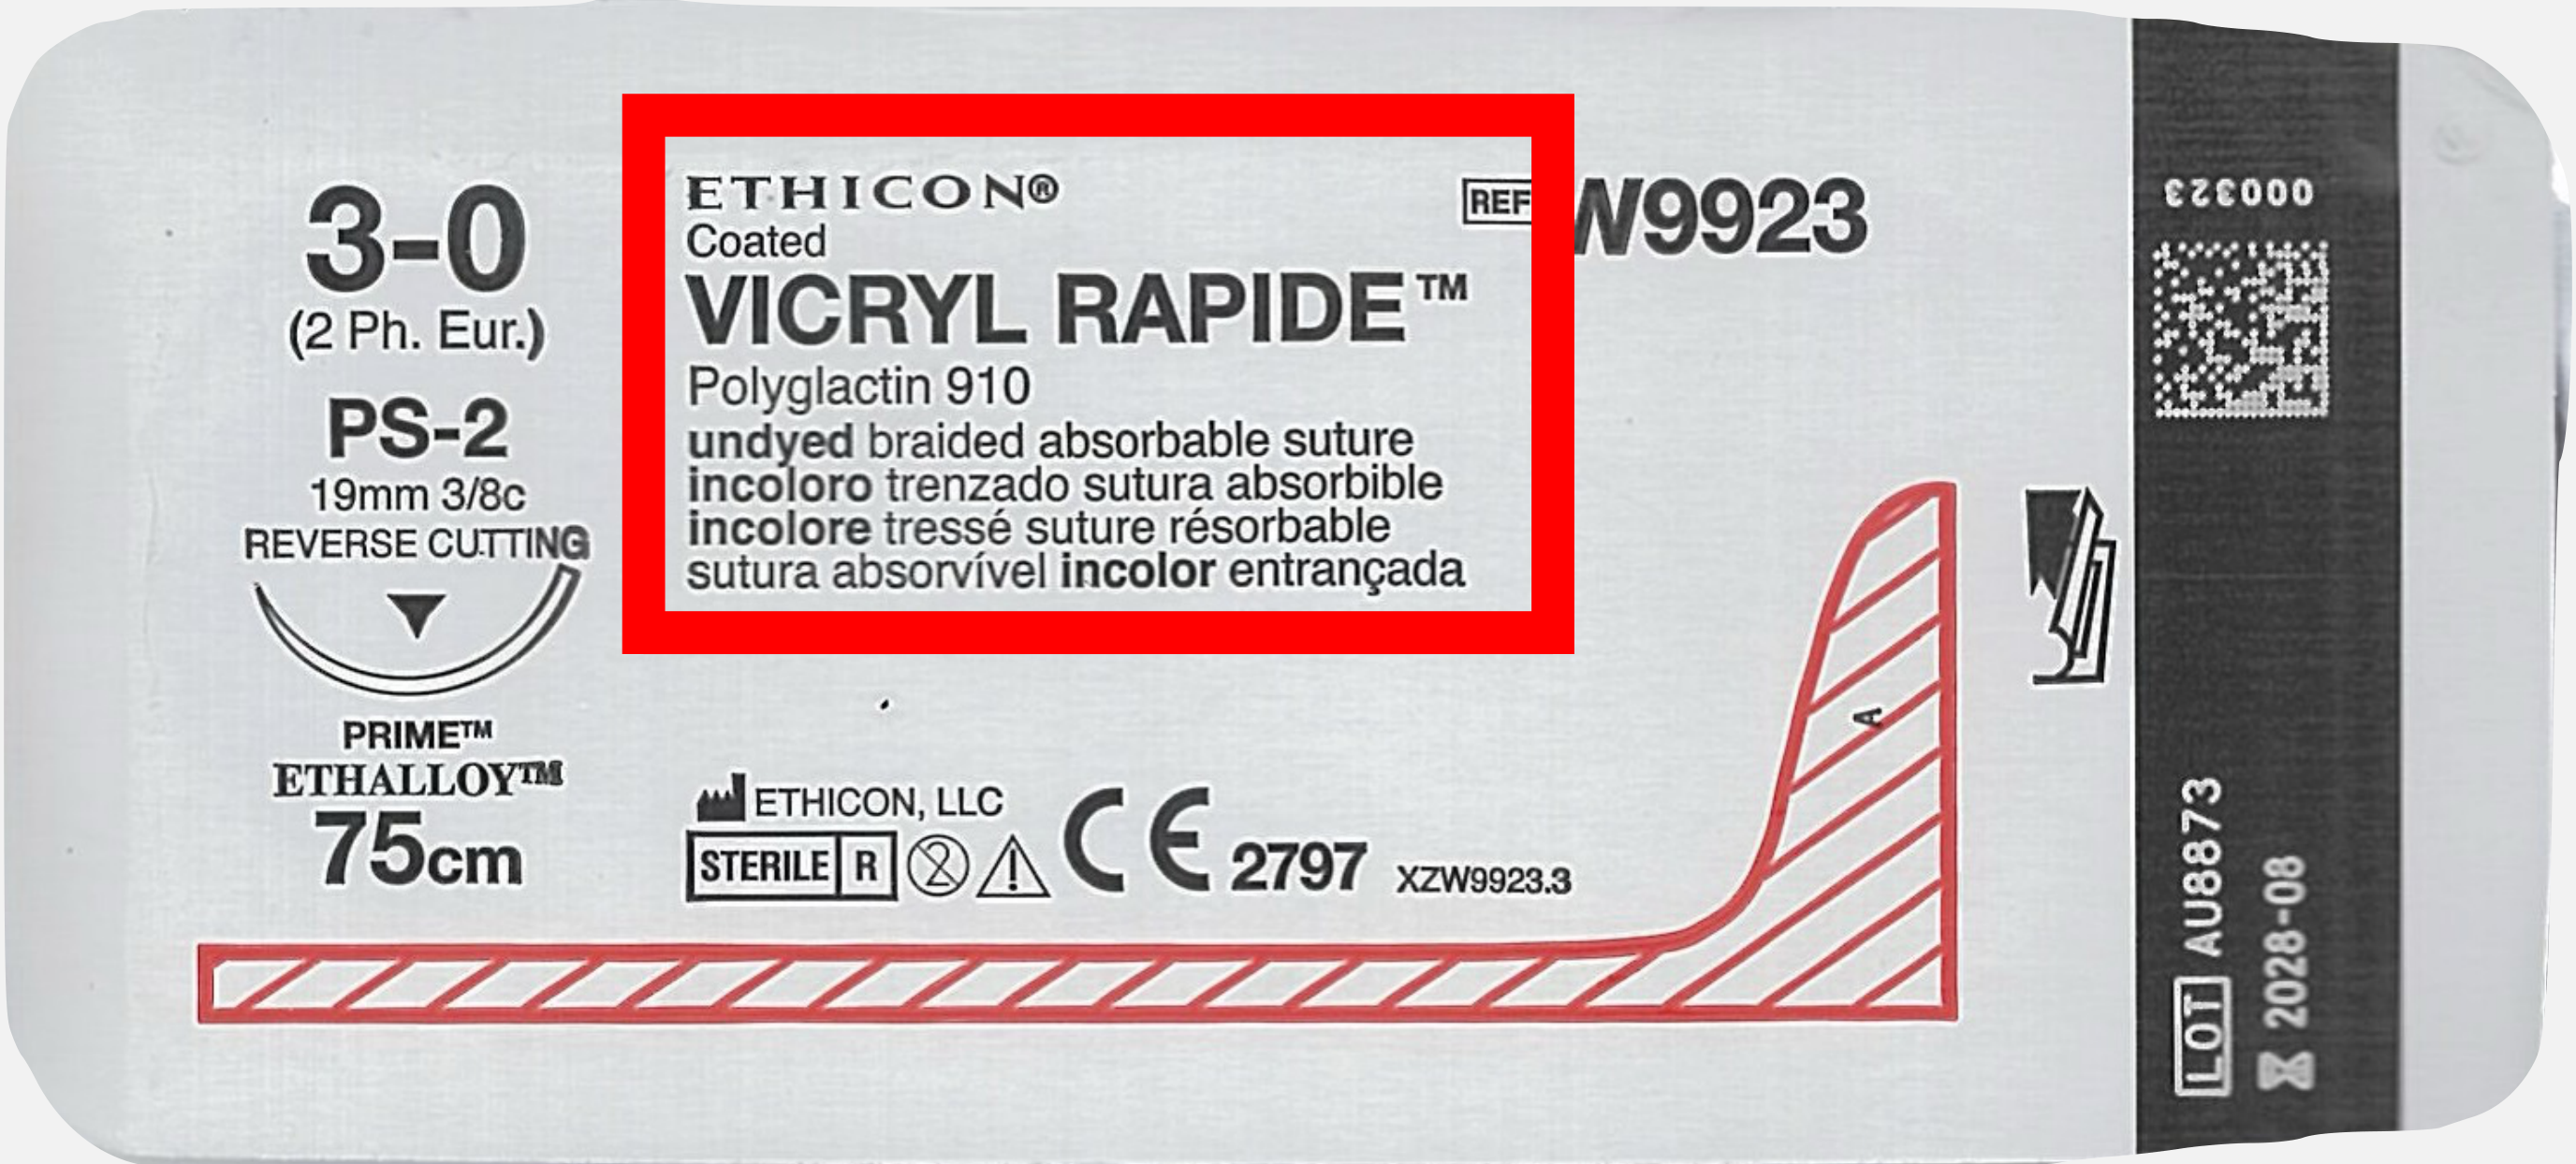
Anatomy of a Suture Packet45
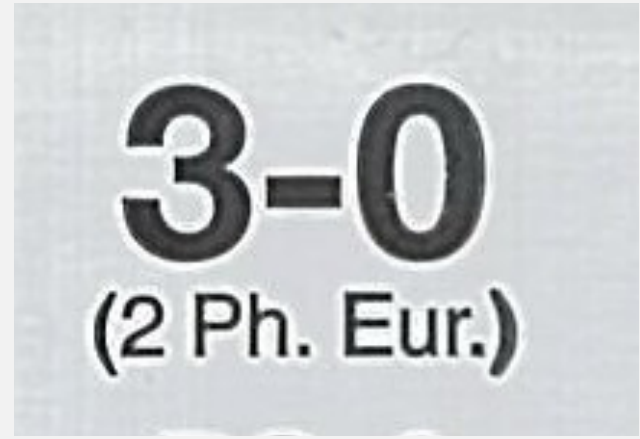
- Size: 3-0 (2 Ph. Eur.)
- Product Name: VICRYL RAPIDE™ (Polyglactin 910)
- Type: Undyed braided absorbable suture
- Needle Specifications:
- PS-2
- 19mm 3/8c
- Reverse Cutting
- Material Technology: PRIME™ ETHALLOY™
- Length: 75cm
- Reference Number: W9923
- Lot Number: AU8873
- Expiry: 2028-08
Thread Size
Evolution of Sizing
- Initially, suture threads were based on large sizes: 0, 1, 2, 3, 4, etc.
- As technology improved, threads became smaller without losing tensile strength.
- To accommodate sizes smaller than 0, a “zero” numbering system was developed:
- 00 (2 zeroes = 2/0)
- 000 (3 zeroes = 3/0)
- 0000 (4 zeroes = 4/0)
- And so on.
Measurement Standards
There are two primary standards used to classify suture diameter:
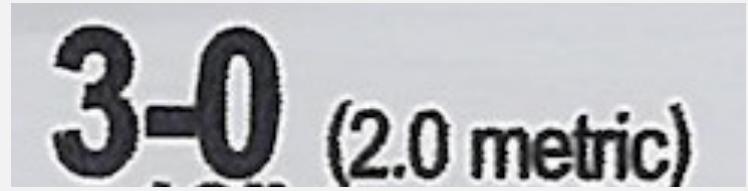
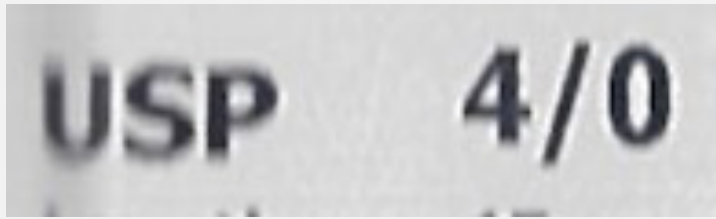
- USP (United States Pharmacopoeia): e.g., 4/0 or 3-0.
- Ph. Eur. // Metric (European Pharmacopoeia): e.g., 2 or 3.
Examples of Labeling:
- USP 4/0
- 3-0 (2 Ph. Eur.)
- 3-0 (2.0 metric)
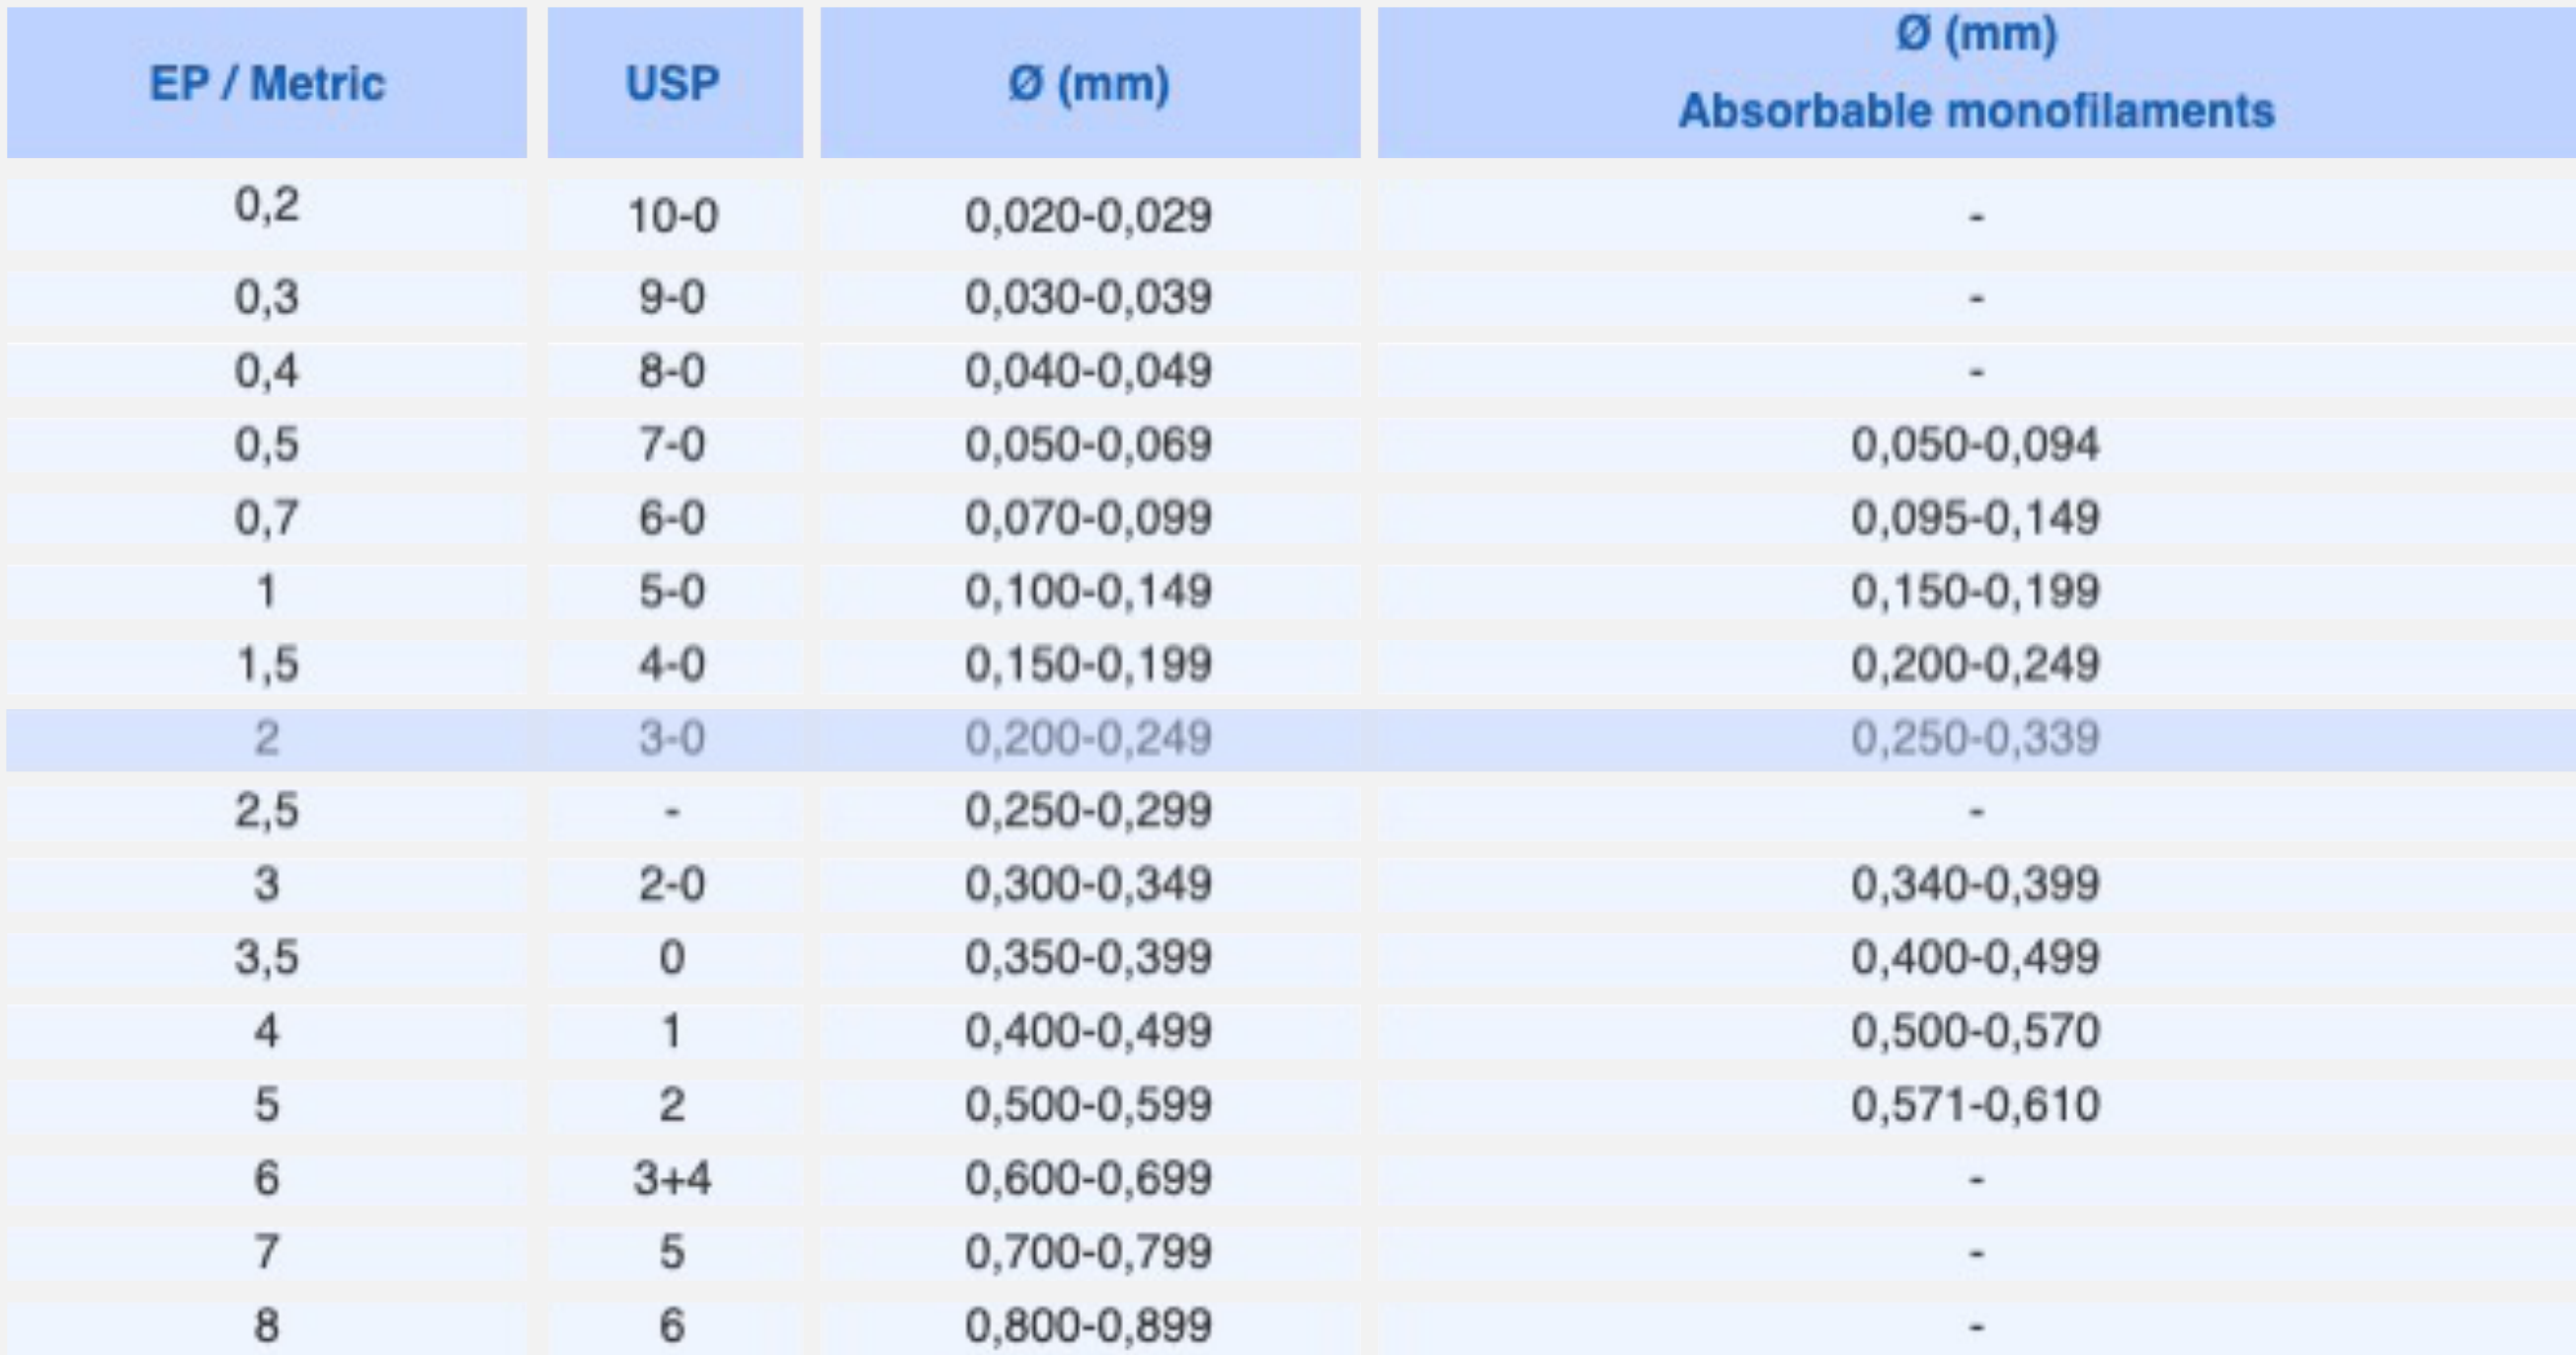
Suture Diameter Comparison Table
| EP / Metric | USP | Ø (mm) Standard | Ø (mm) Absorbable Monofilaments |
|---|---|---|---|
| 0.2 | 10-0 | 0.020–0.029 | - |
| 0.3 | 9-0 | 0.030–0.039 | - |
| 0.4 | 8-0 | 0.040–0.049 | - |
| 0.5 | 7-0 | 0.050–0.069 | 0.050–0.094 |
| 0.7 | 6-0 | 0.070–0.099 | 0.095–0.149 |
| 1 | 5-0 | 0.100–0.149 | 0.150–0.199 |
| 1.5 | 4-0 | 0.150–0.199 | 0.200–0.249 |
| 2 | 3-0 | 0.200–0.249 | 0.250–0.339 |
| 2.5 | - | 0.250–0.299 | - |
| 3 | 2-0 | 0.300–0.349 | 0.340–0.399 |
| 3.5 | 0 | 0.350–0.399 | 0.400–0.499 |
| 4 | 1 | 0.400–0.499 | 0.500–0.570 |
| 5 | 2 | 0.500–0.599 | 0.571–0.610 |
| 6 | 3+4 | 0.600–0.699 | - |
| 7 | 5 | 0.700–0.799 | - |
| 8 | 6 | 0.800–0.899 | - |
 |  |
 |  |
Suture Packet Reference (Detailed)46
- Size: 3-0 (2 Ph. Eur.)
- Material: Coated VICRYL RAPIDE™ (Polyglactin 910)
- Structure: Undyed braided absorbable
- Needle: PS-2, 19mm 3/8c, Reverse Cutting
- Technology: PRIME™ / ETHALLOY™
- Length: 75cm
- Manufacturer: ETHICON, LLC
- Reference: REF W9923
- Lot: AU8873
- Expiry: 2028-08
Absorbable Dental Suture Materials47
Synthetic
- Polyglactin 910 (Vicryl / Vicryl Rapide)
- Polydioxanone (PDS)
Natural
-
Gut (including Chromic Gut)
- Gut (formerly Catgut): Derived from cow serosa.
- Chromic Gut: Coated to last longer.
- Consideration: Animal-based product; check for patient religious/cultural objections.
Dental Suture Classification48
Absorbable
- Synthetic:
- Polyglactin 910 (Vicryl/rapide)
- Polydioxanone (PDS)
- Natural:
- (Chromic) Gut
Non-absorbable
- Synthetic:
- Polypropylene (Prolene)
- PTFE
- Natural:
- Silk
Thread Structure
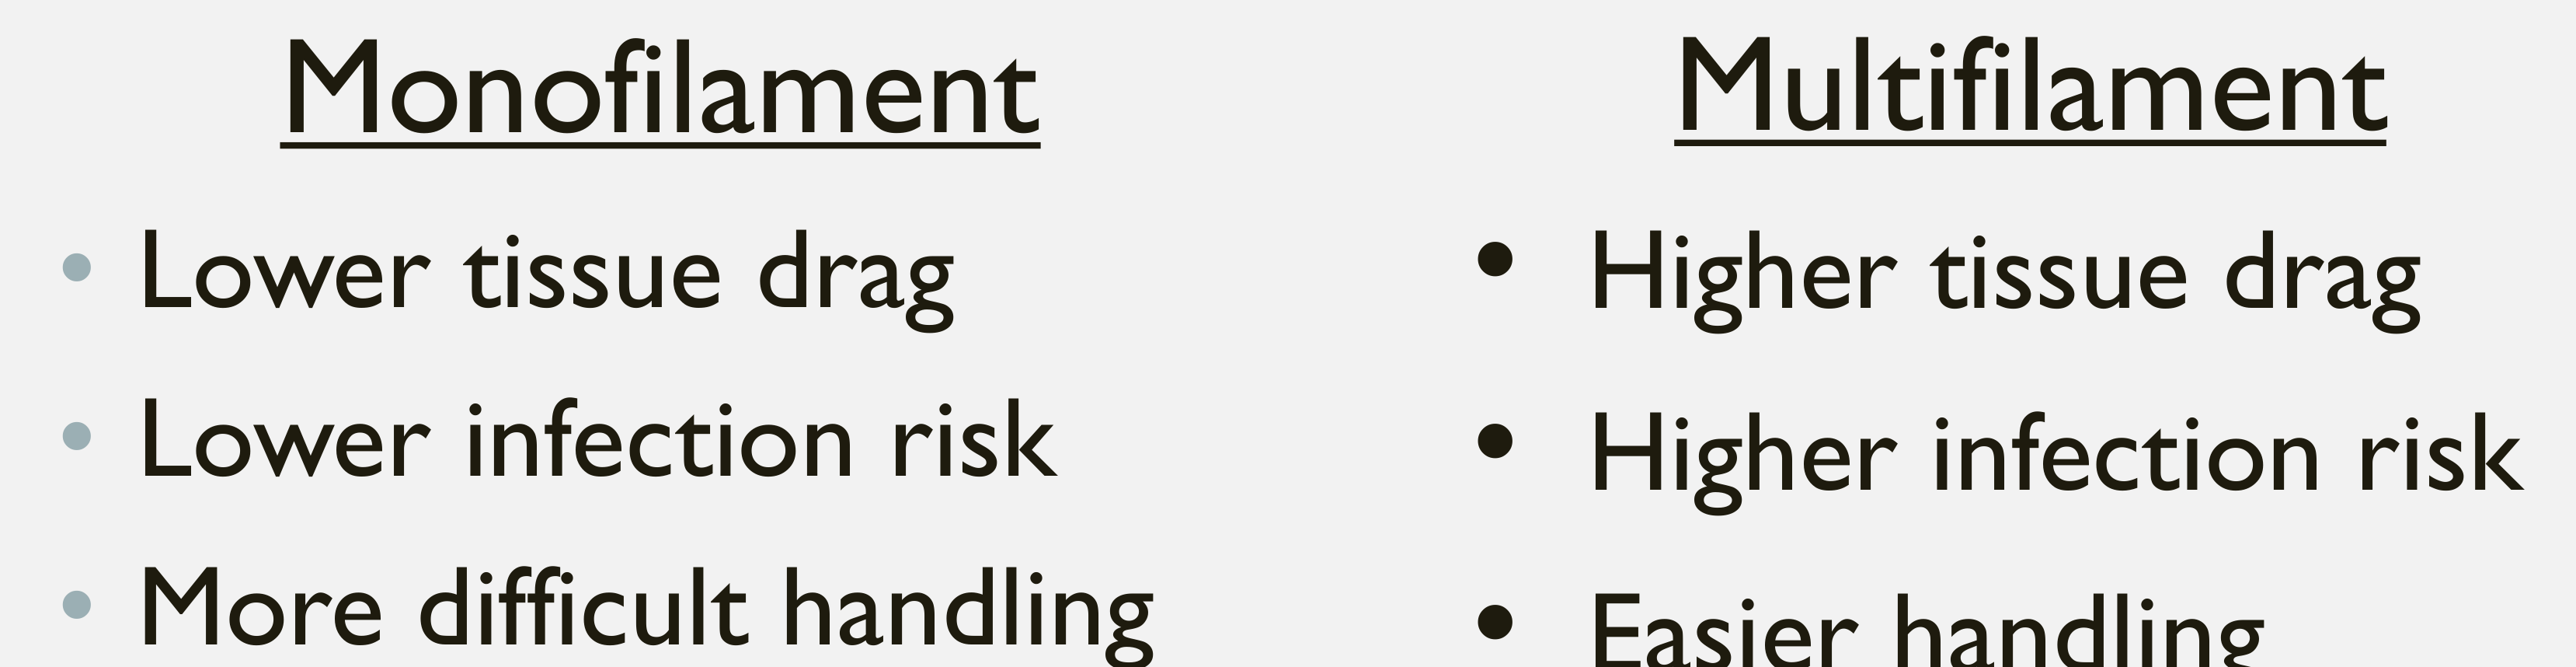
Comparison of Thread Structures
| Monofilament | Multifilament |
|---|---|
| - Lower tissue drag | - Higher tissue drag |
| - Lower infection risk | - Higher infection risk |
| - More difficult handling | - Easier handling |
 |  |
Suture Specifications Summary49
- Identification: 3-0 (2 Ph. Eur.)
- Material: Coated VICRYL RAPIDE™ (Polyglactin 910)
- Needle: PS-2, 19mm 3/8c, Reverse Cutting
- Length: 75cm
- Sterility: Sterile R (Gamma Irradiation)
- Reference: W9923
- Lot: AU8873
- Expiry: 2028-08
Needle Types
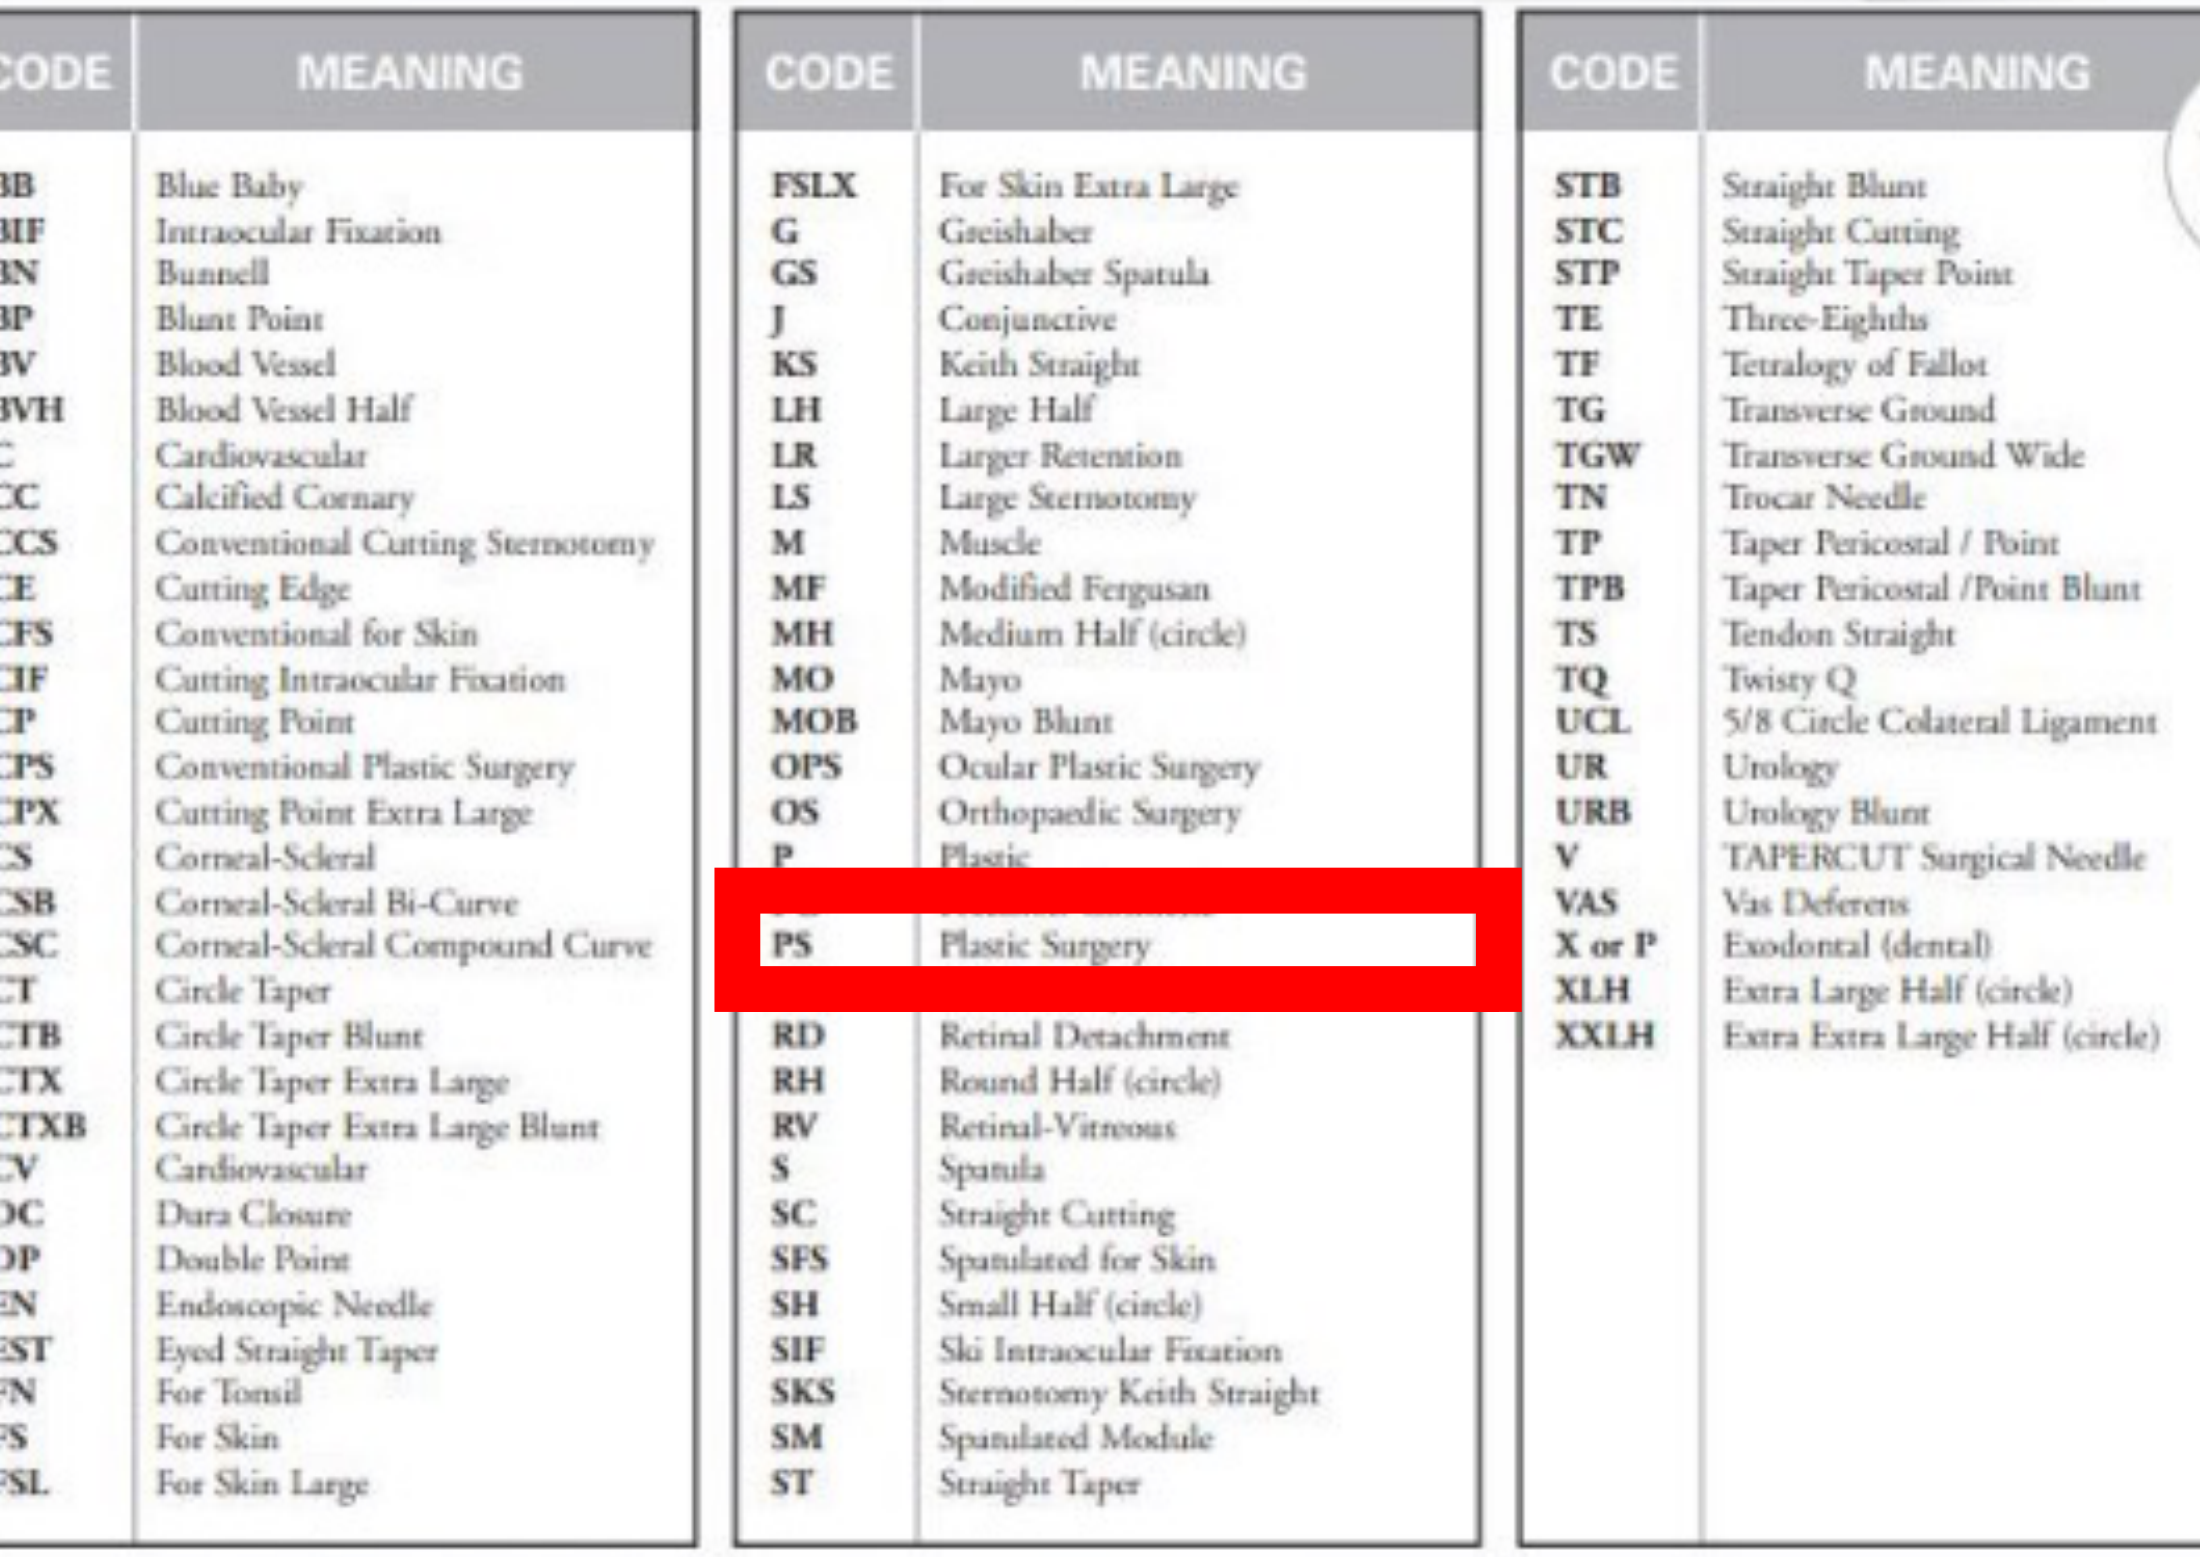
Atraumatic Needle Codes and Meanings
| Code | Meaning | Code | Meaning |
|---|---|---|---|
| PS | Plastic Surgery | X or P | Esodontal (dental) |
| BB | Blue Baby | FSLX | For Skin Extra Large |
| BF | Intraocular Fixation | G | Greishaber |
| BN | Bunnell | GS | Greishaber Spatula |
| BP | Blunt Point | J | Conjunctive |
| BV | Blood Vessel | KS | Keith Straight |
| C | Cardiovascular | LH | Large Half |
| CC | Calcified Coronary | LS | Large Stermotomy |
| CE | Cutting Edge | M | Muscle |
| CFS | Conventional for Skin | MH | Medium Half (circle) |
| CP | Cutting Point | OS | Orthopaedic Surgery |
| CS | Corneal-Scleral | P | Plastic |
| CT | Circle Taper | RD | Retinal Detachment |
| CV | Cardiovascular | S | Spatula |
| DC | Dura Closure | SC | Straight Cutting |
| FS | For Skin | SH | Small Half (circle) |
| FSL | For Skin Large | V | TAPER CUT Surgical Needle |
Atraumatic Needle Overview
This section covers the design and application of atraumatic needles used in surgical procedures.
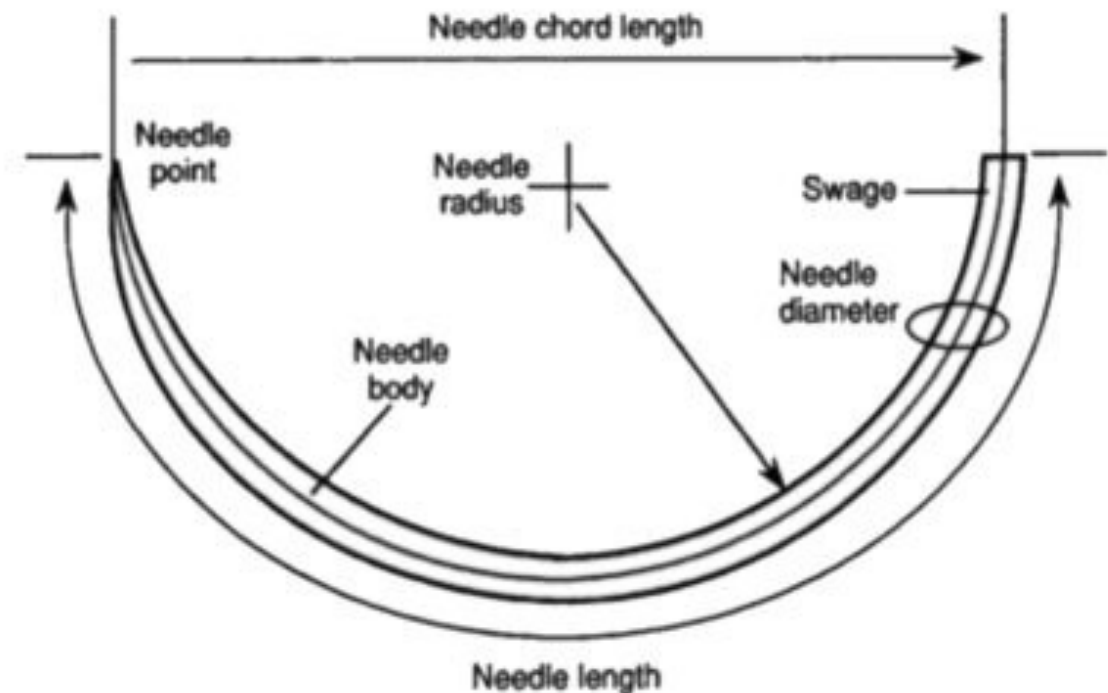
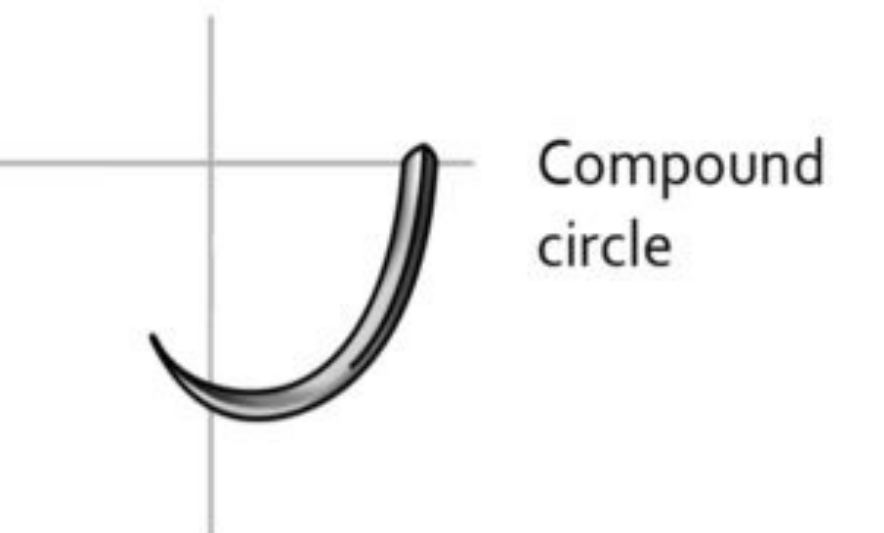
Needle Shape
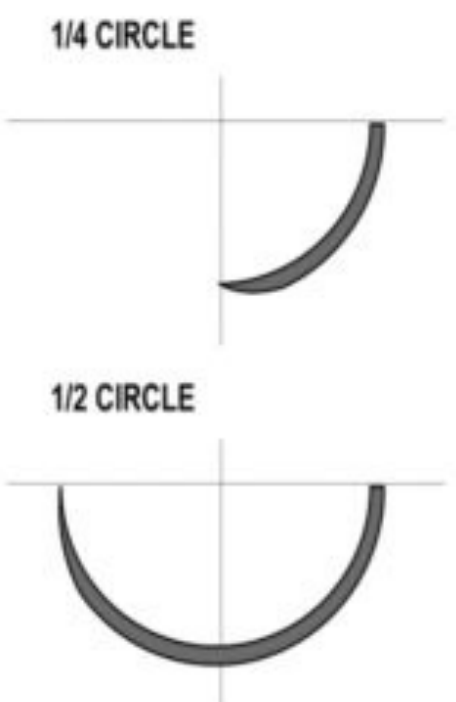
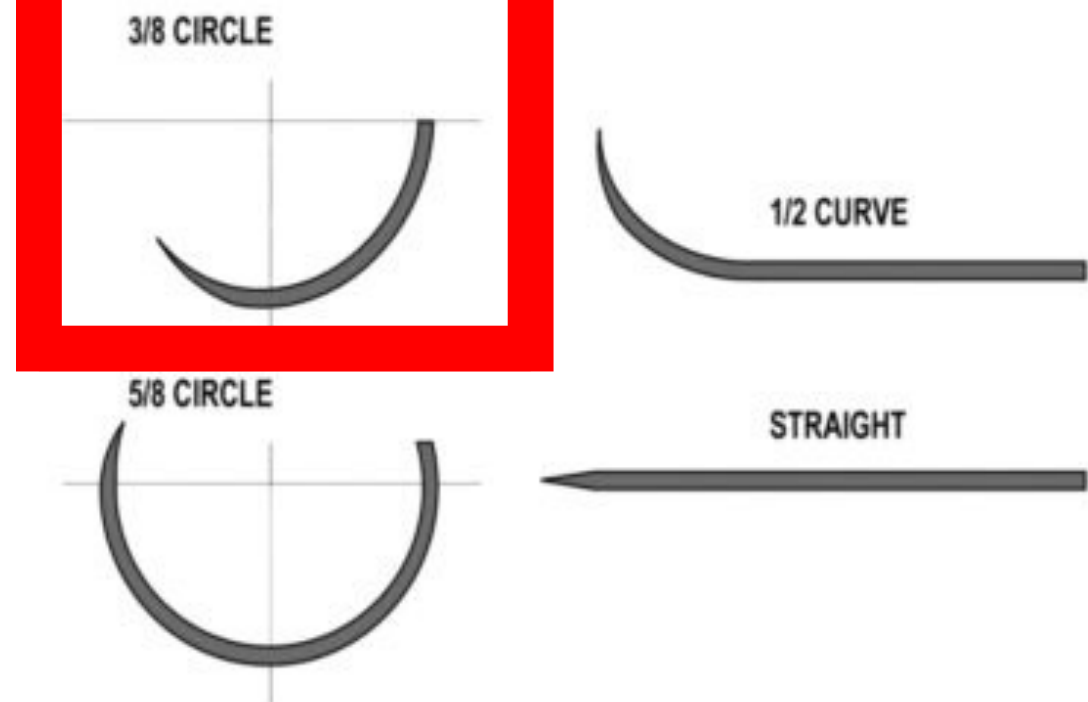
- 3/8 Circle: Most common in dentistry.
- 1/2 Circle: Requires larger hand rotation.
- Compound Circle: Varying curvature (abdominal surgery), rare in dentistry.
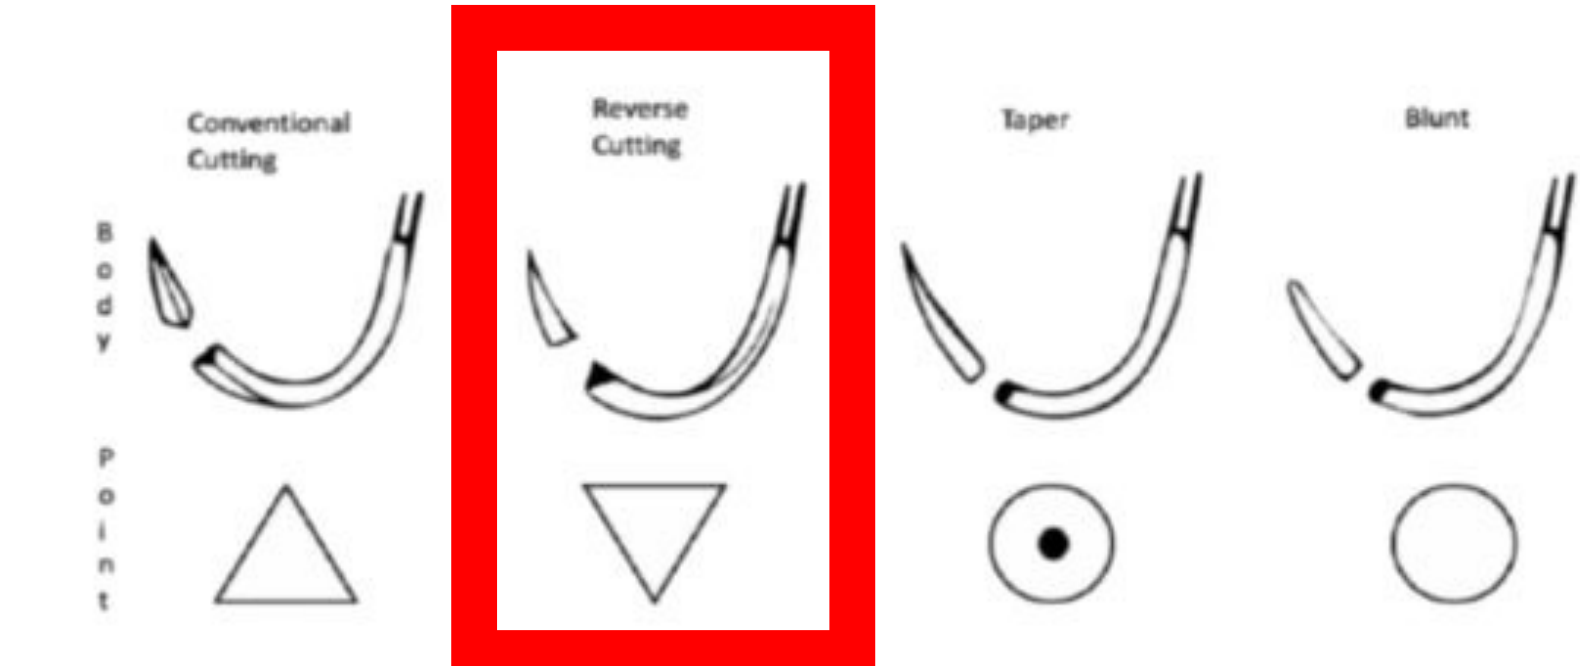
Needle Point
- Reverse Cutting: Flat top, cutting edge on bottom. Preferred for dentistry. Prevents tearing through tissue under vertical pressure.
- Cutting: Triangular with pointy top. Prone to tearing tissue (“cheese-wiring”).
- Round Bodied: No cutting edge. Rotates in needle holder, difficult to grip.
Needle Size
Ranges from 11mm (tiny) to 26mm. Mismatched sizes cause handling difficulties.
 |  |  |
 |  |  |
Suture Packet Data50
- Size: 3-0 (2 Ph. Eur.)
- Material: VICRYL RAPIDE™ (Polyglactin 910)
- Needle: PS-2, 19mm 3/8c Reverse Cutting
- Length: 75cm
- Reference: W9923
- Lot: AU8873
- Expiry: 2028-08
Suture Length
Standard Suture Lengths
Commonly available lengths for surgical procedures include:
- 30” or 75cm
- 18” or 45cm
Selection depends on the specific clinical application and surgical site requirements.

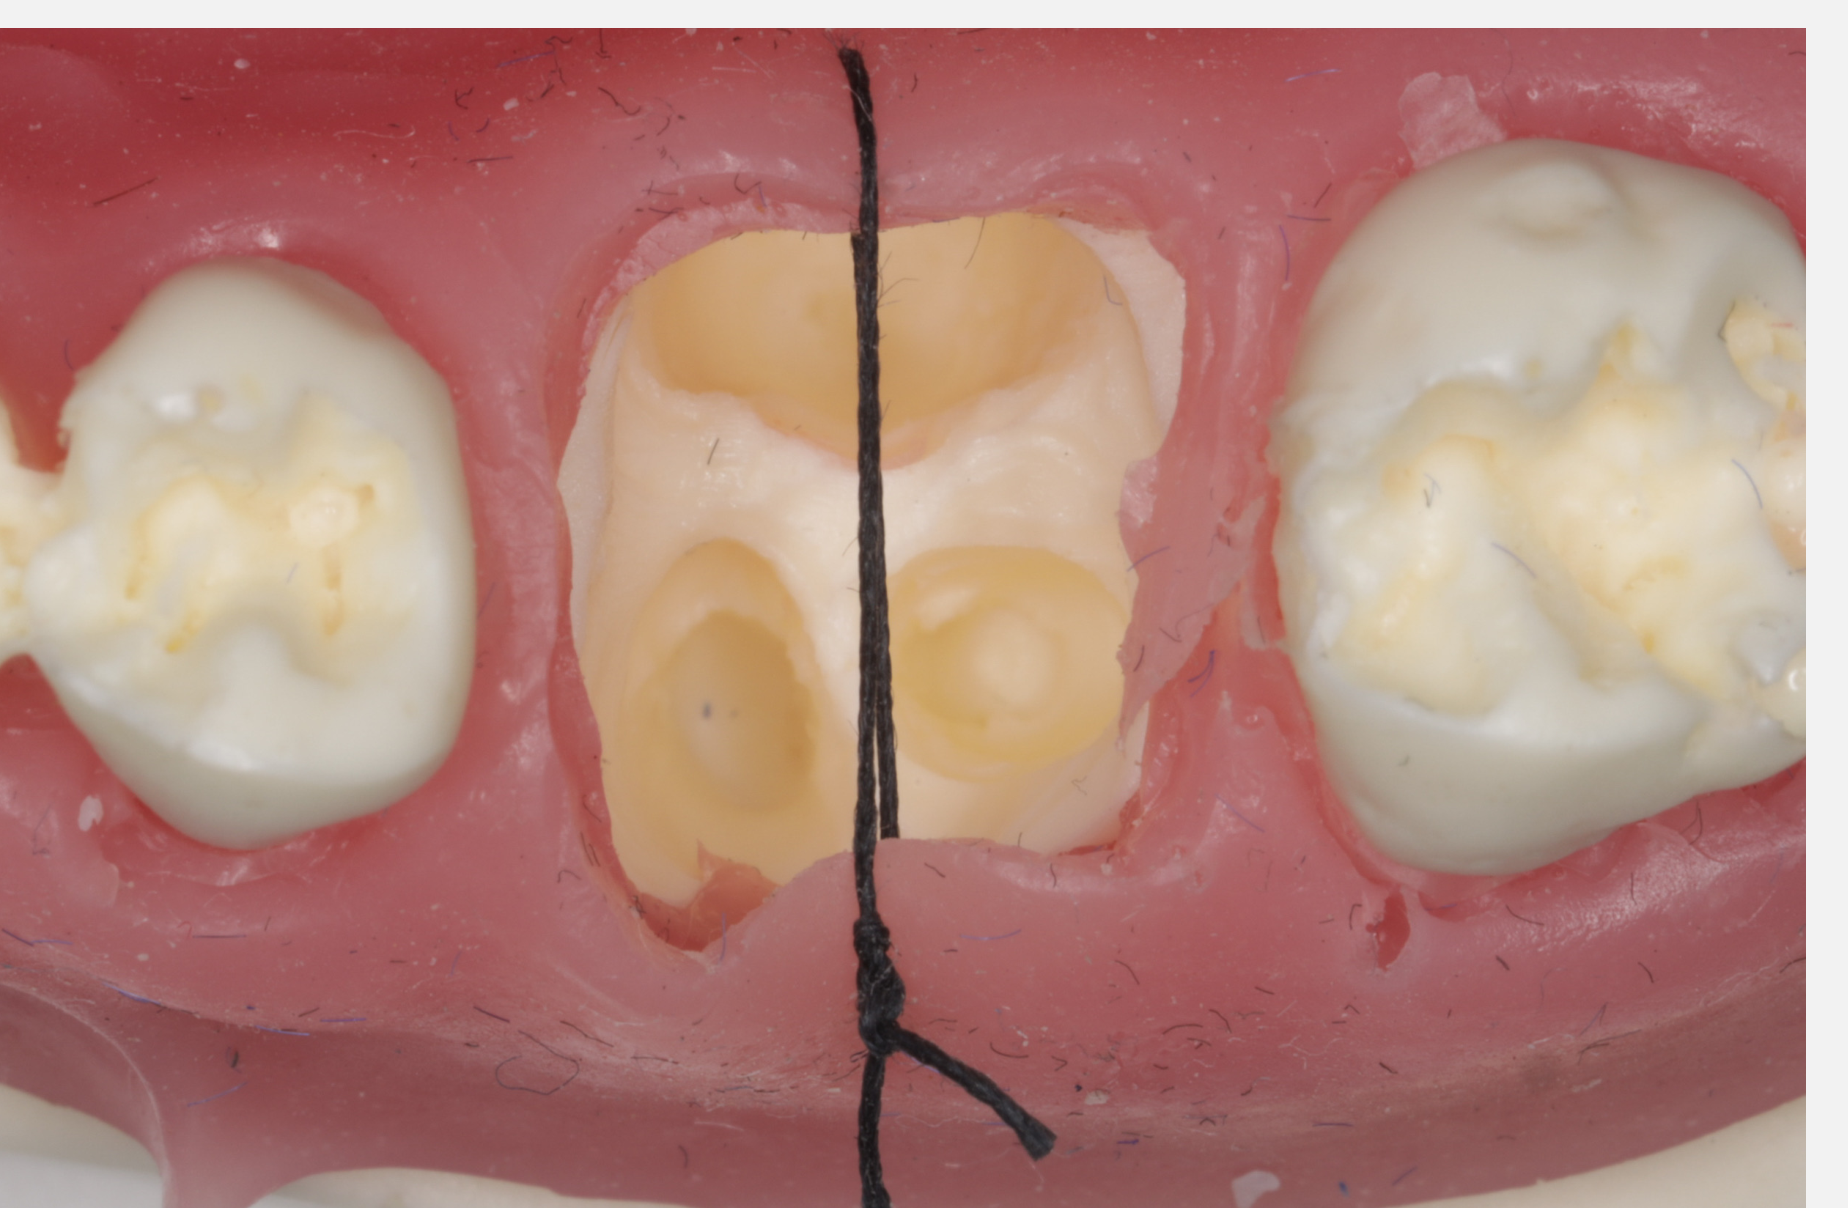
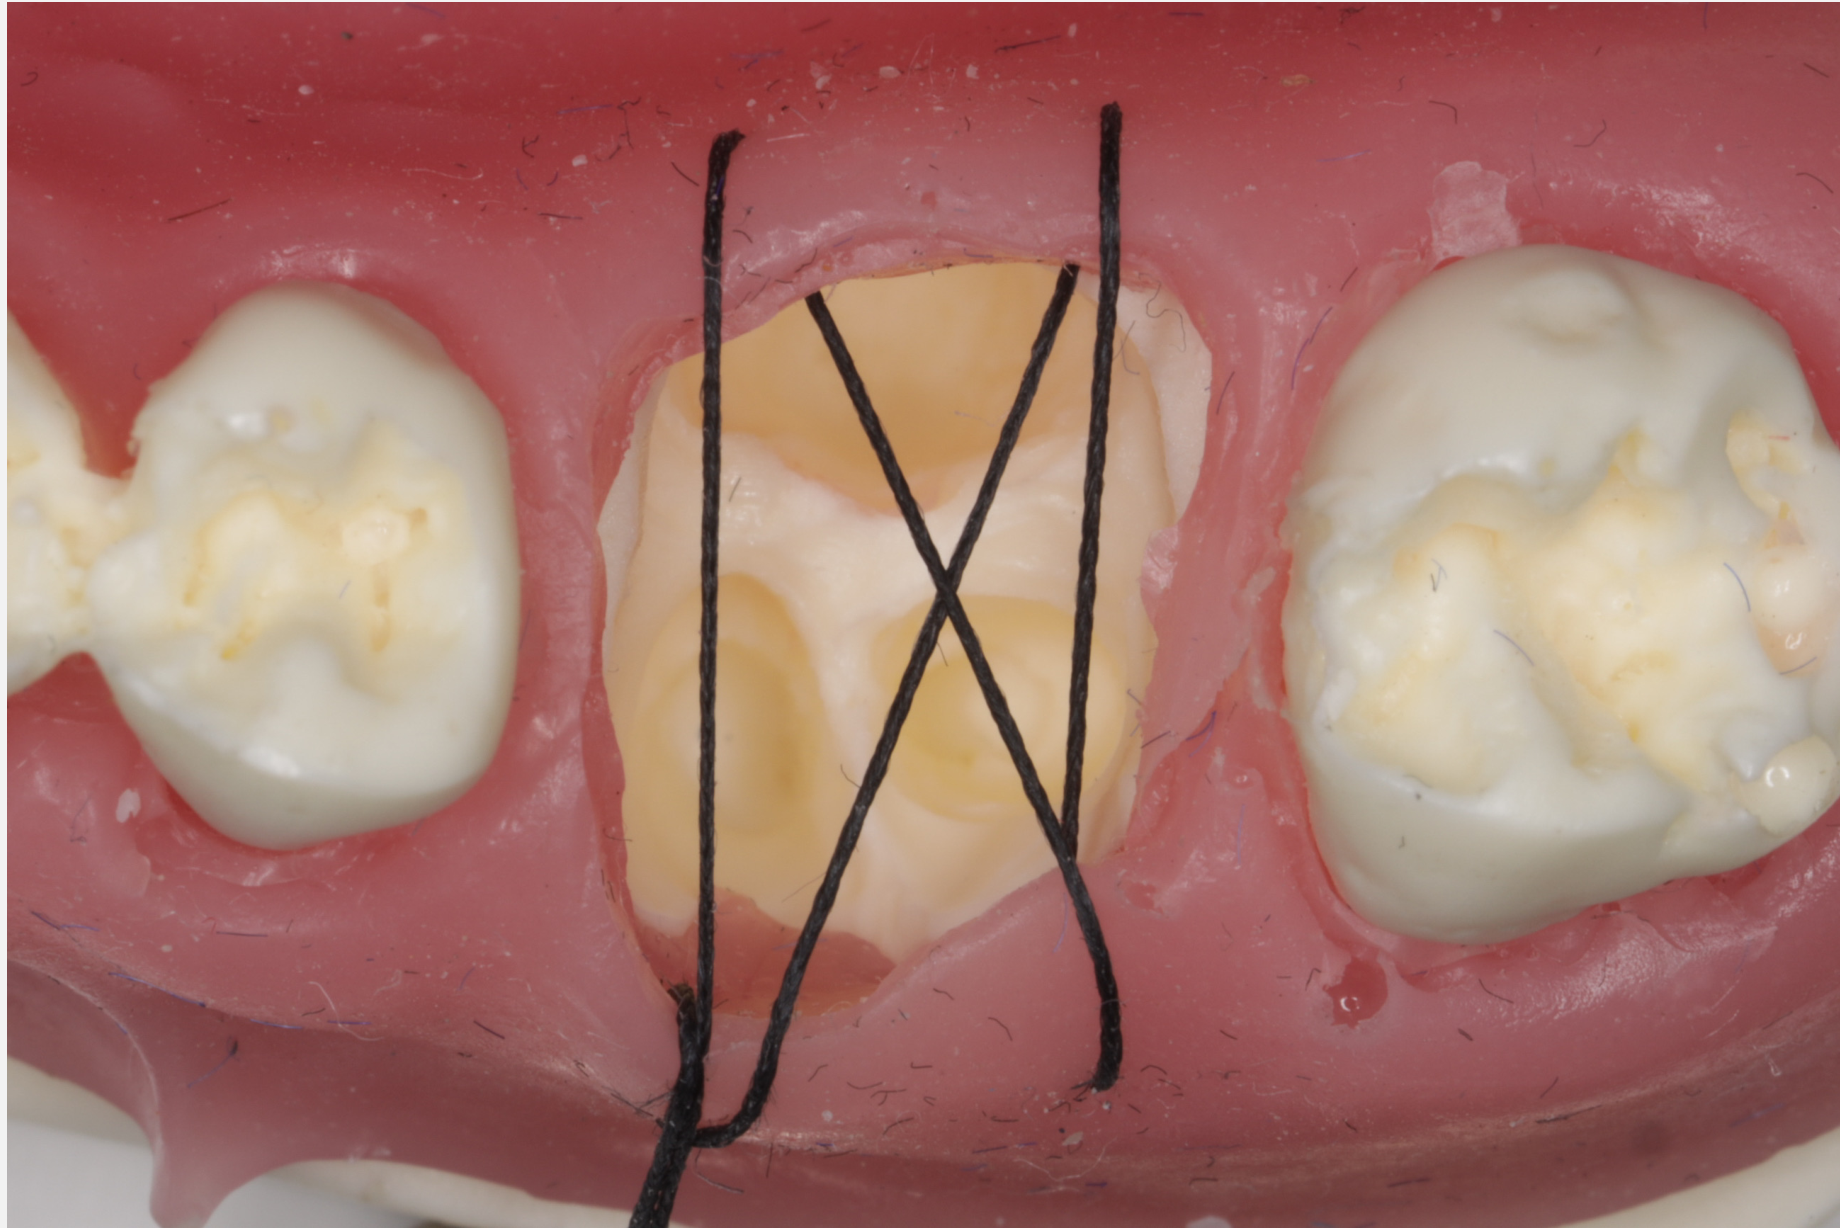
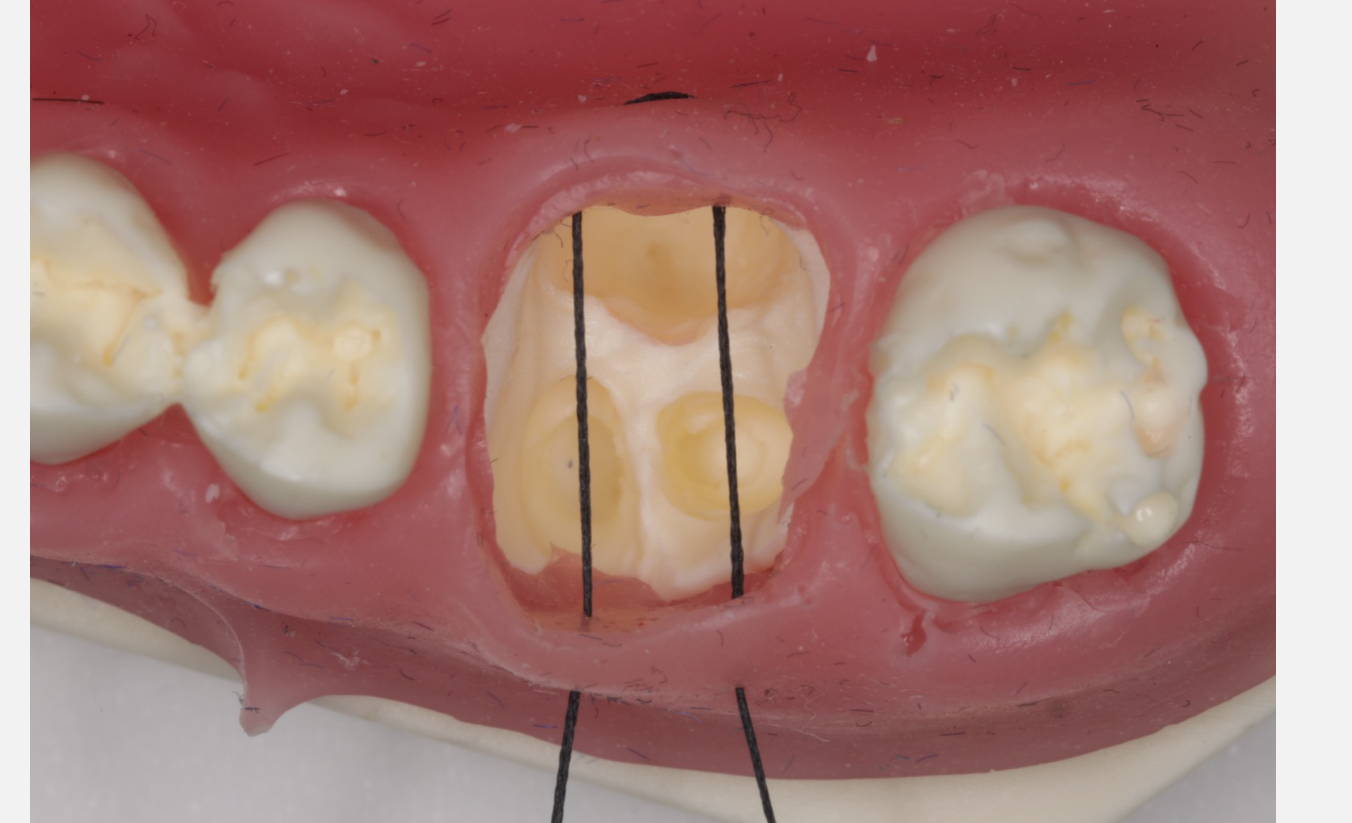
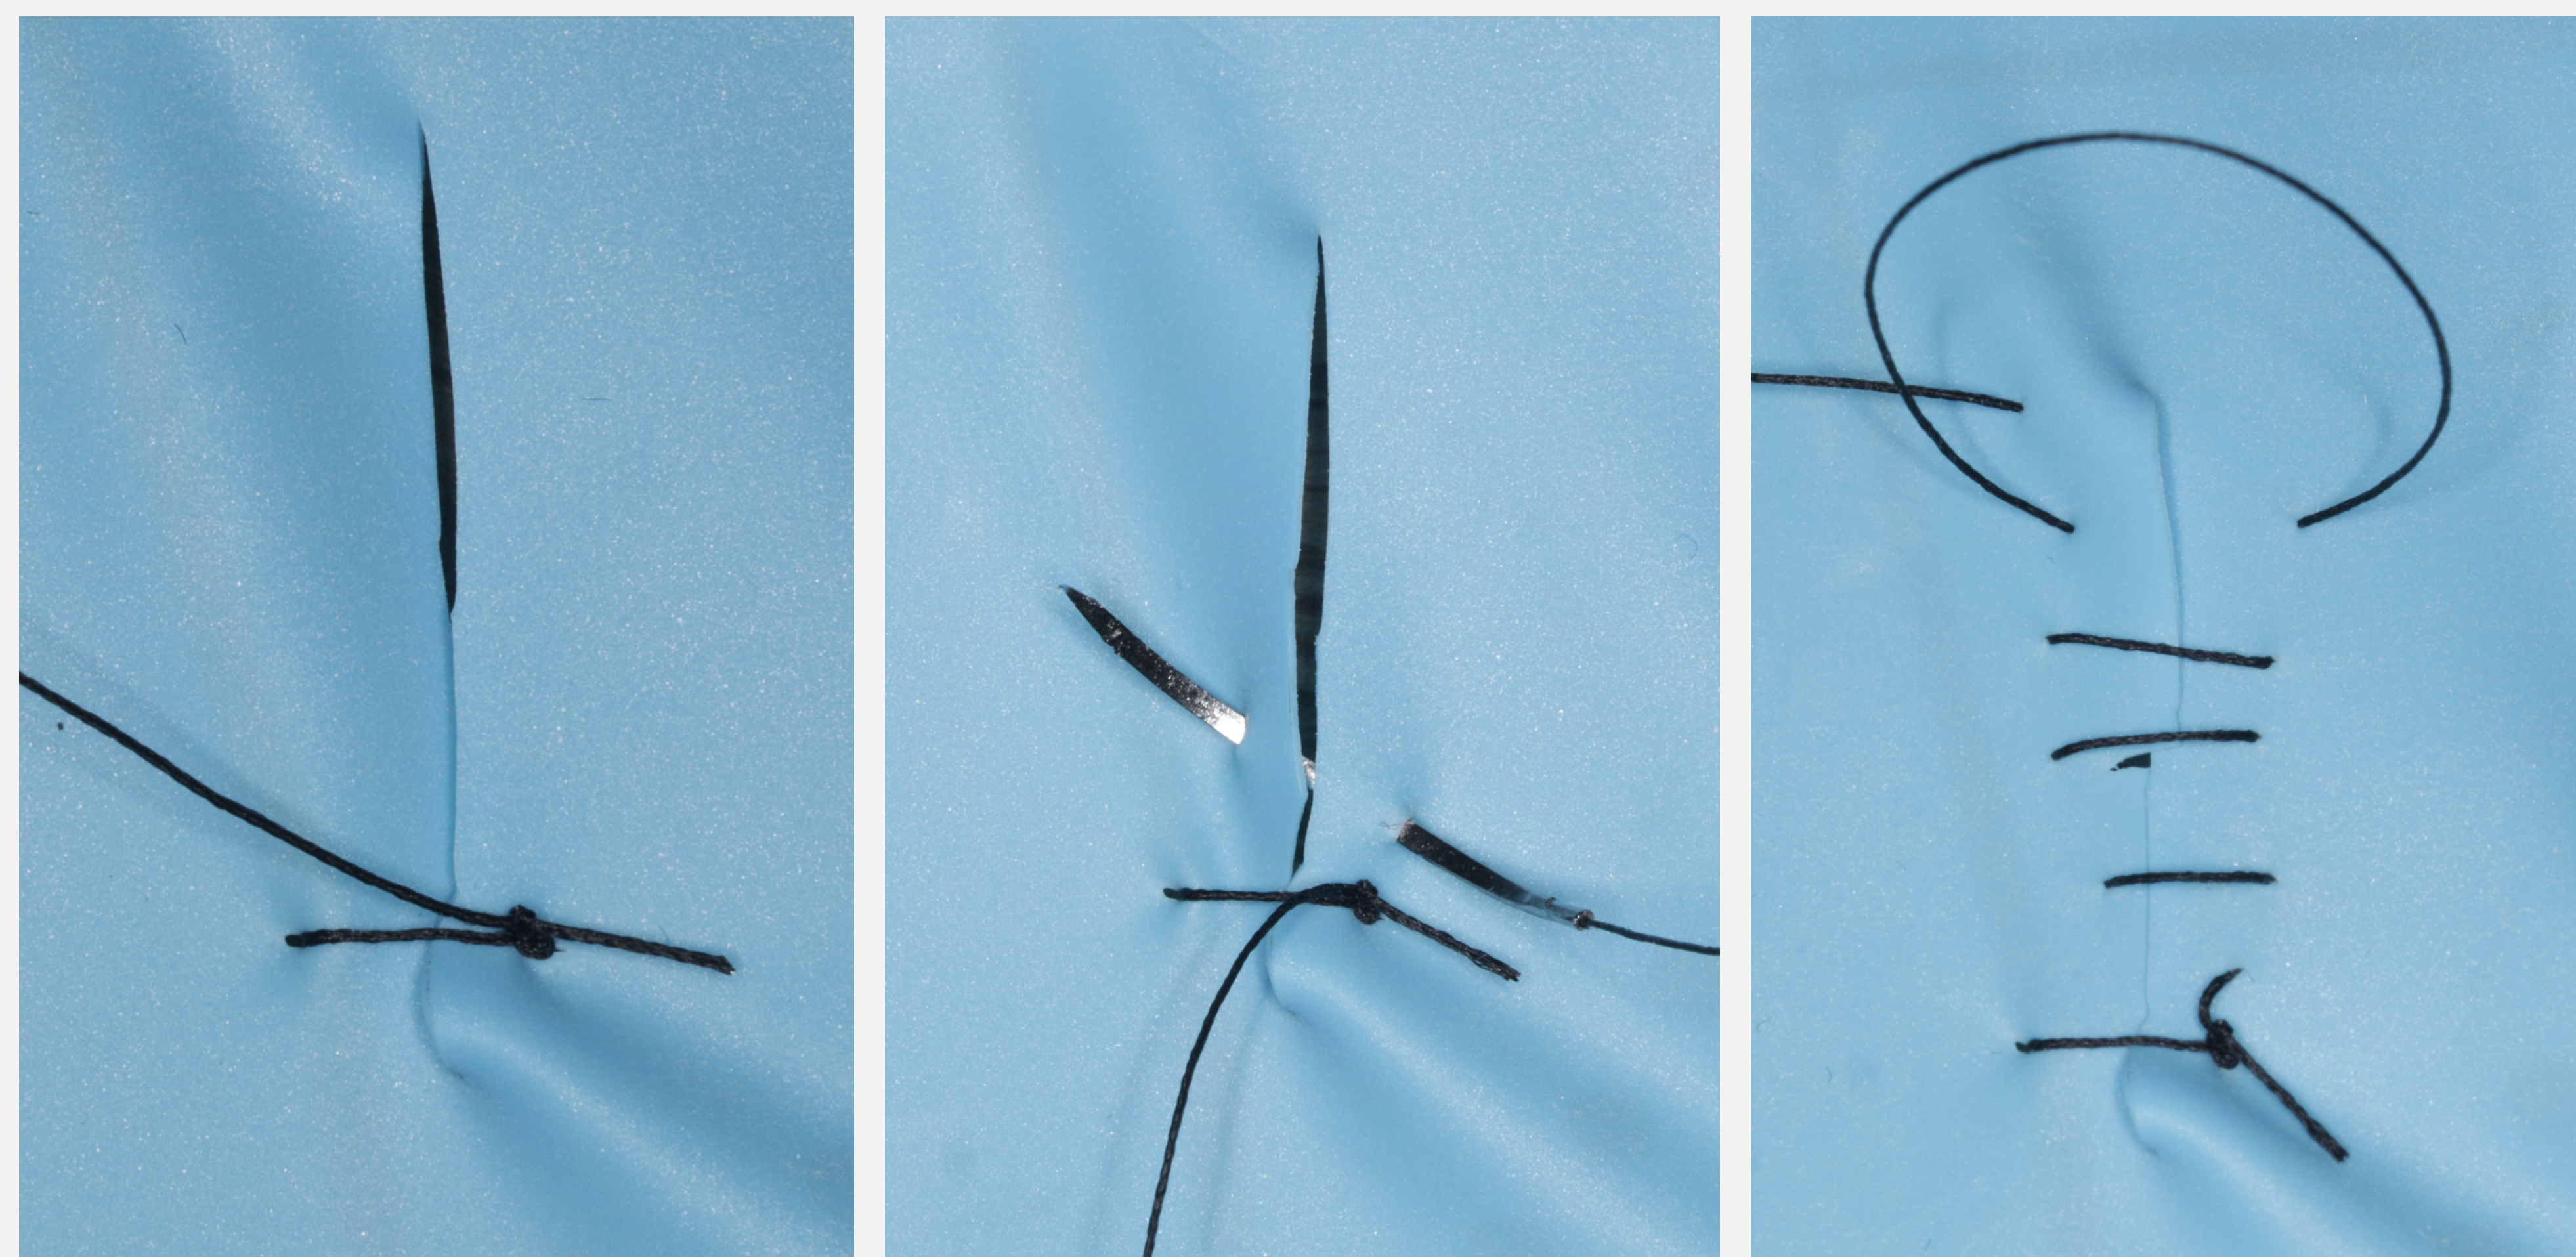
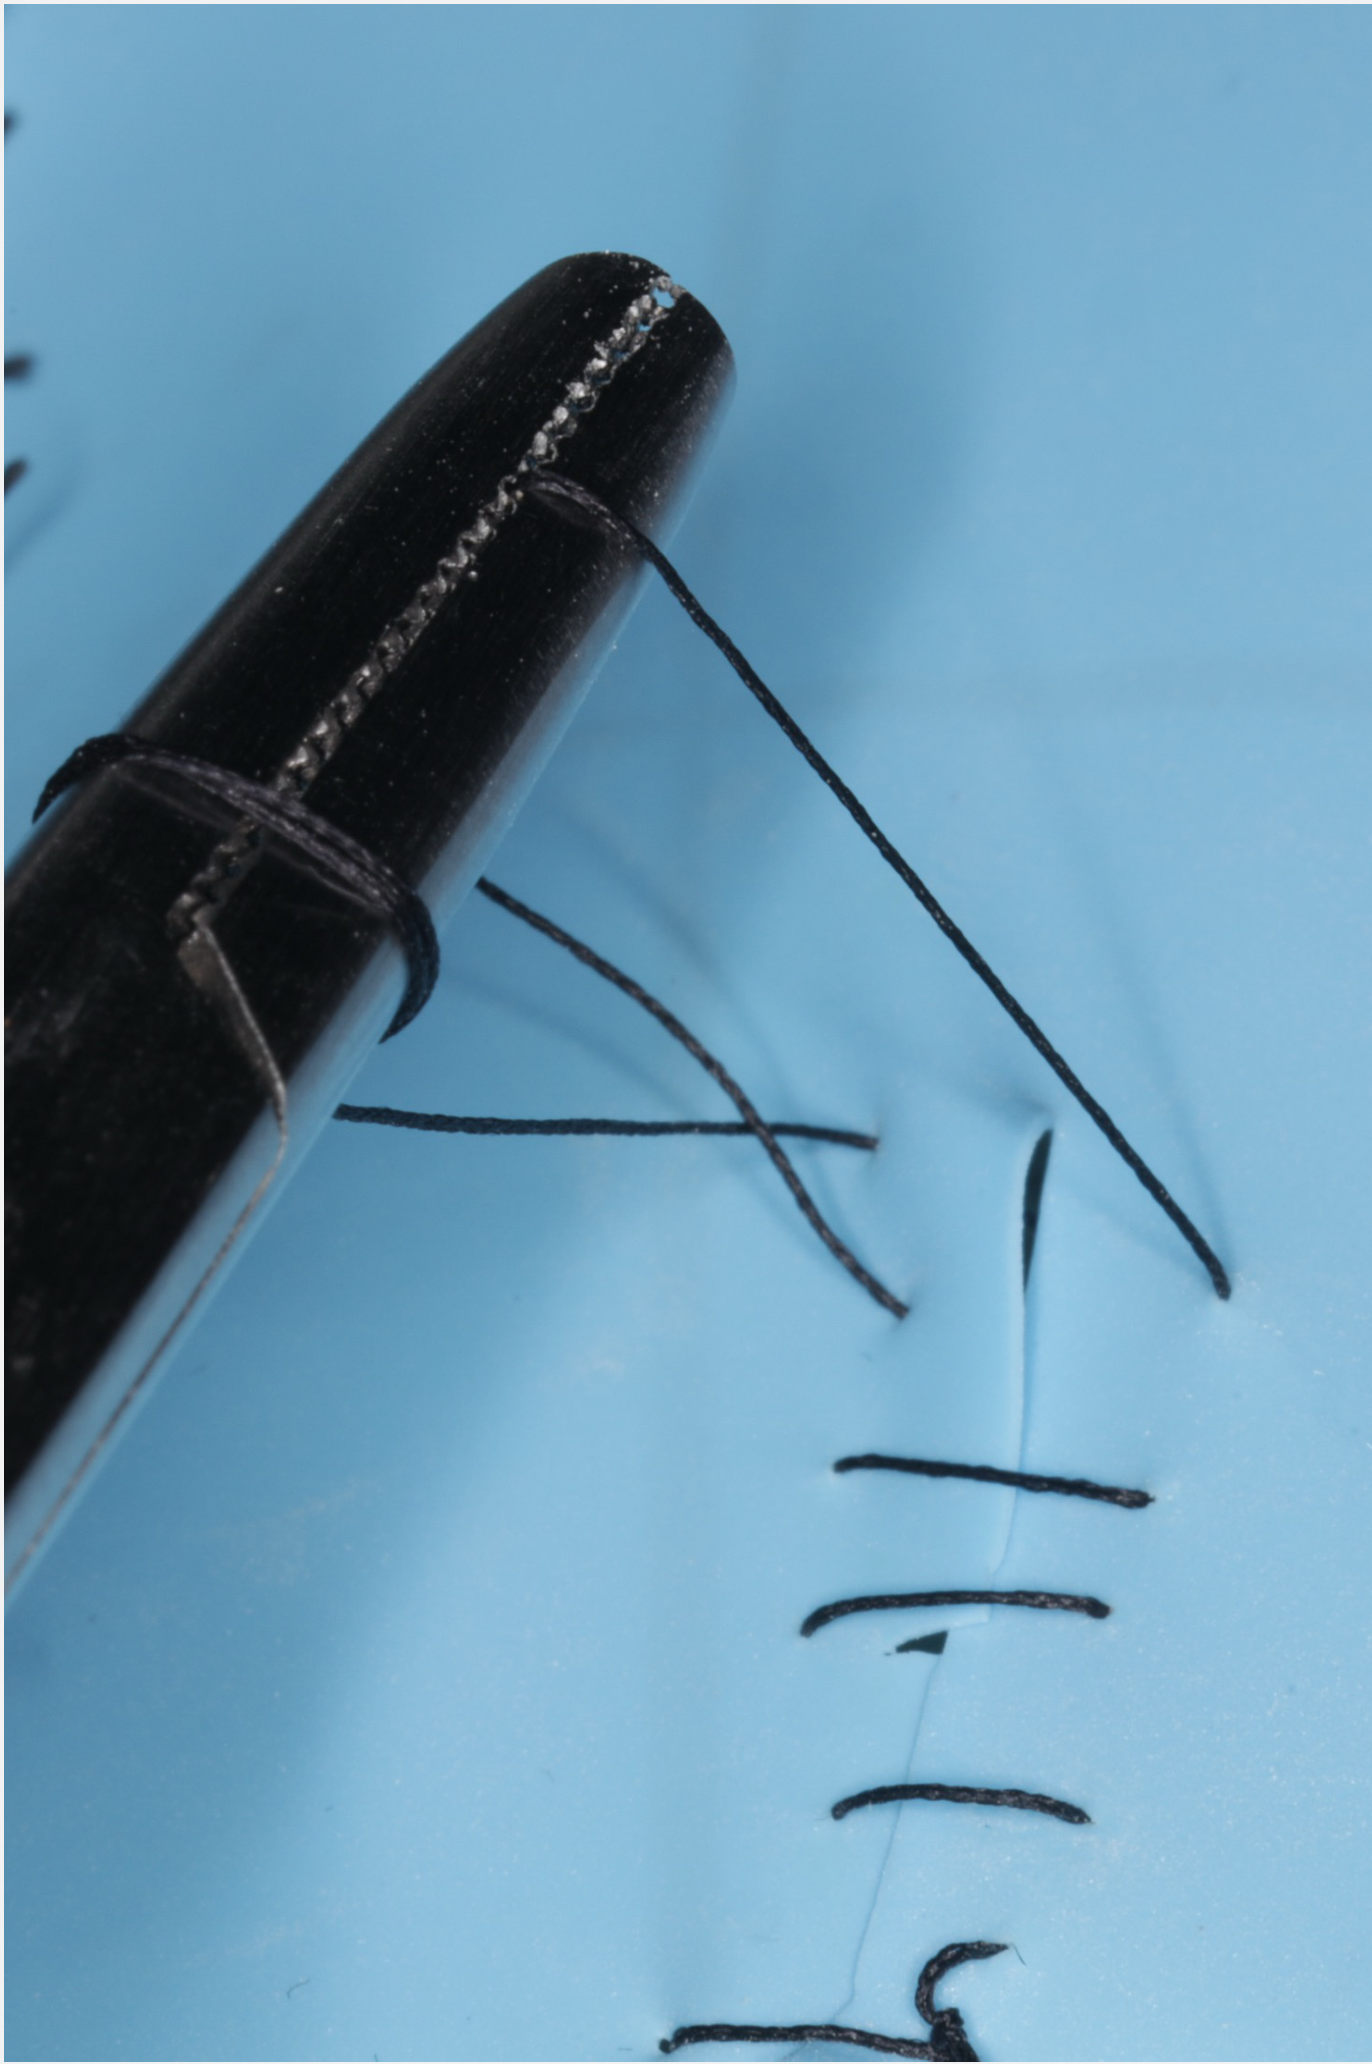
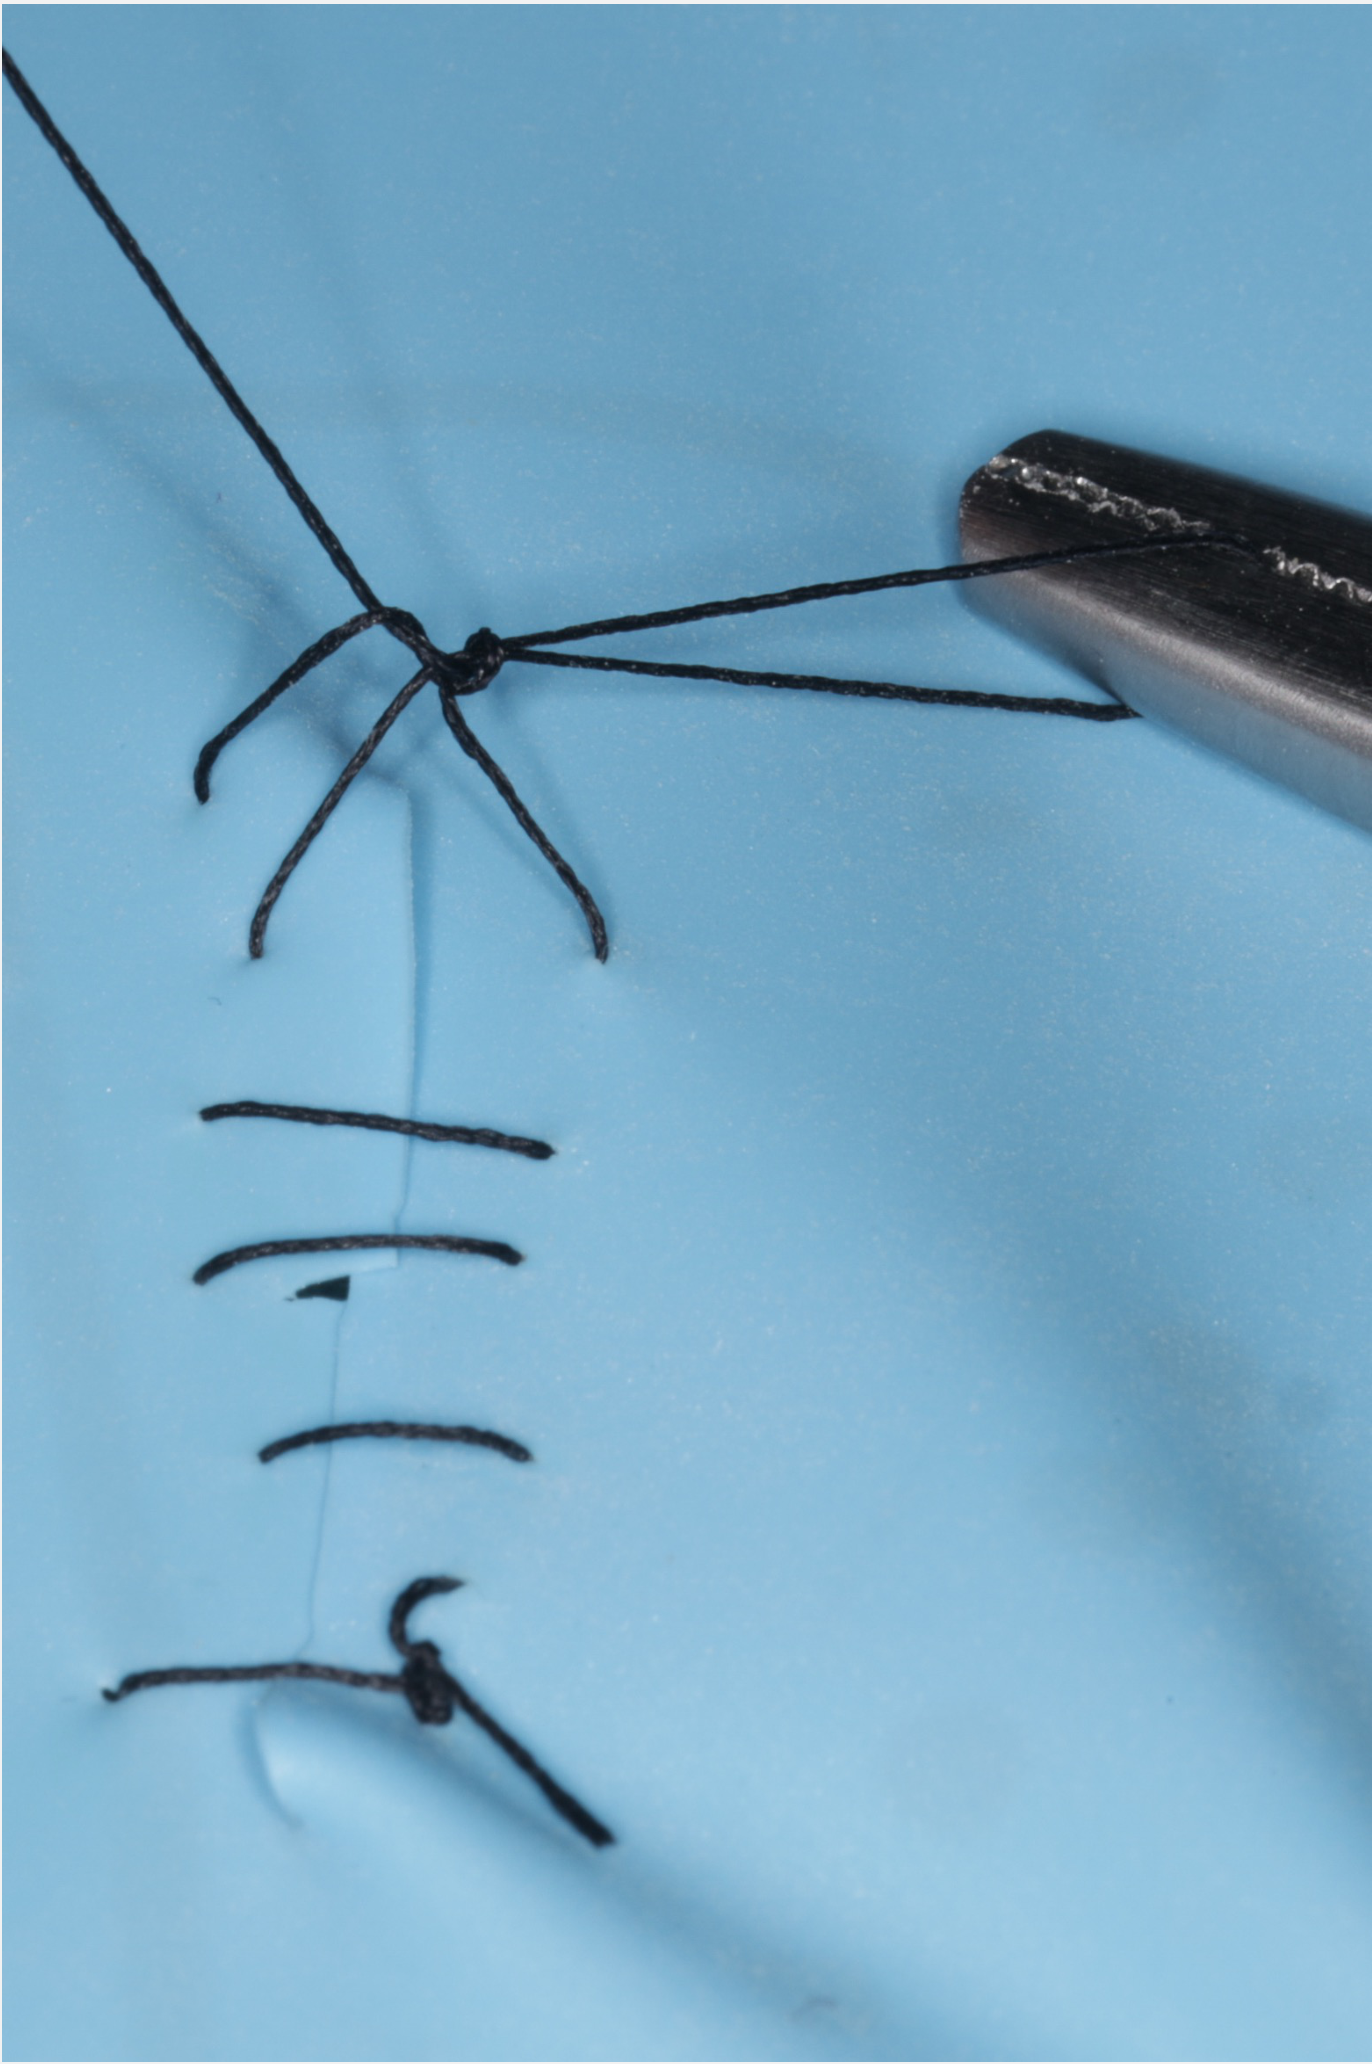
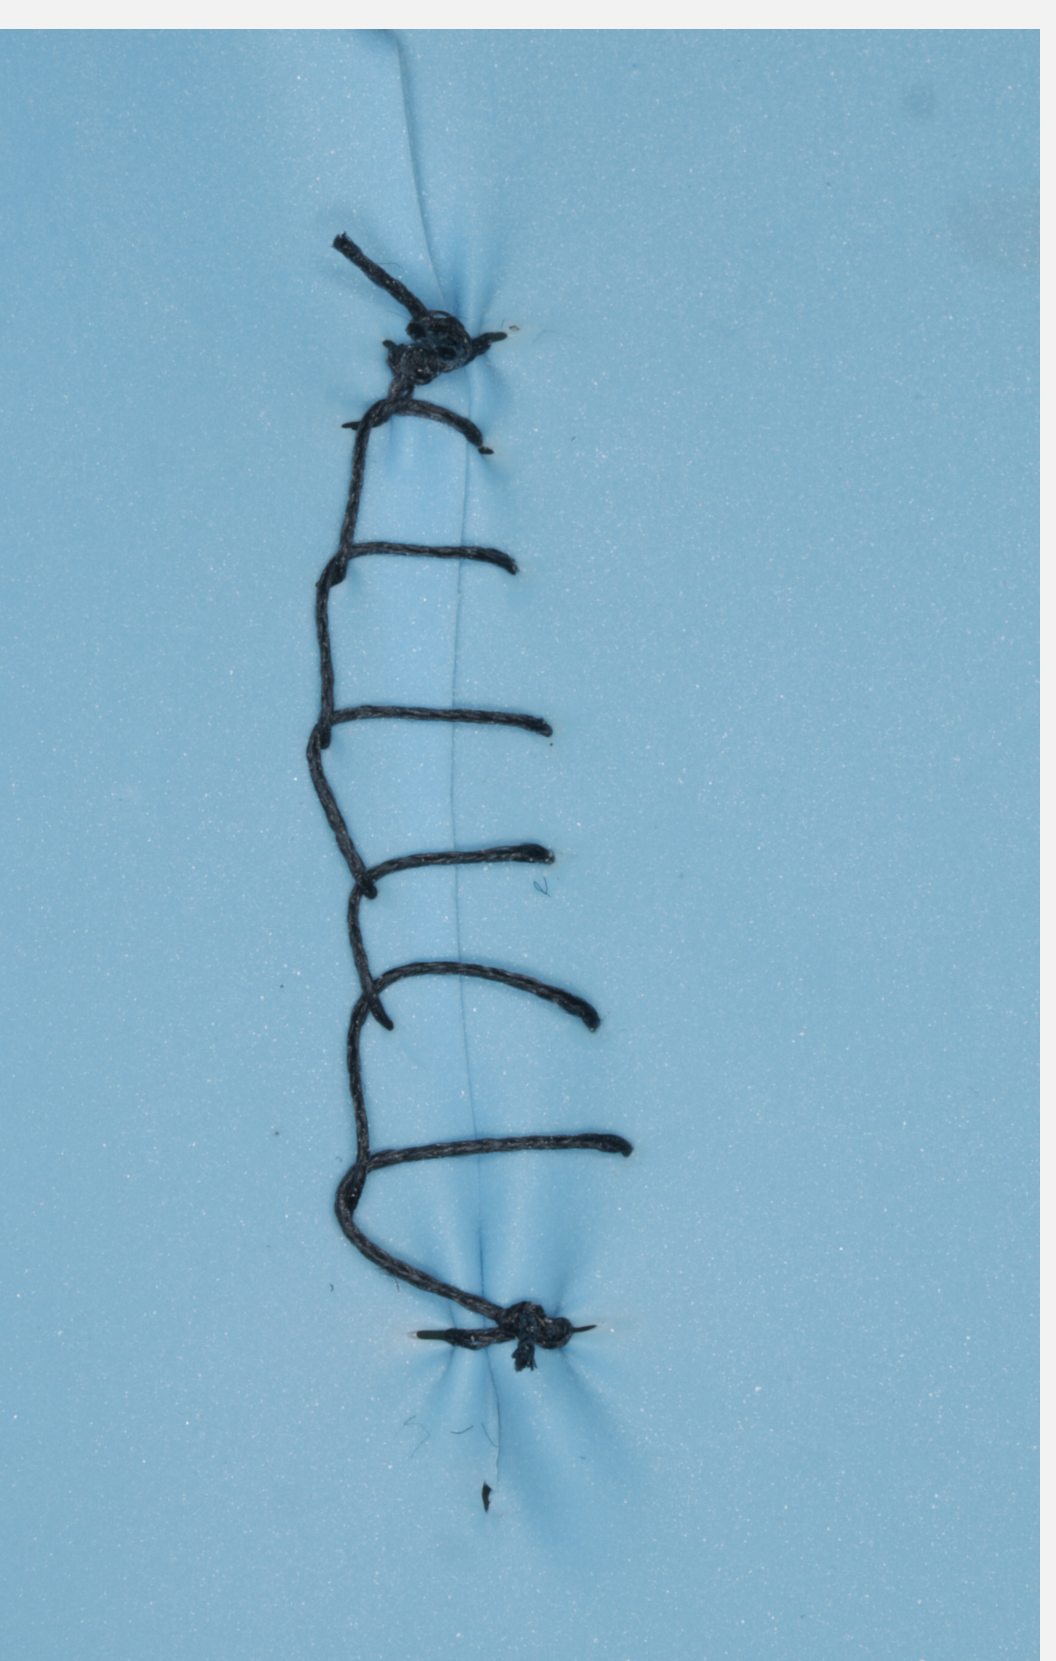
Common Suture Knots515253
 |  |  |
 |  |  |
 |  |  |
 |  |  |
Simple Interrupted Suture54
The simple interrupted suture is a fundamental technique used in dental surgery for wound closure.
- Key Feature: Freestanding entity (if one fails, others hold).
Horizontal Mattress Suture55
This technique is utilized for eversion of wound edges and providing significant tension relief across the surgical site.
- Technique: Entry and exit points in the same horizontal plane.
- Benefit: Provides good compression.
- Challenge: Technically harder (requires passing buccal-lingual then lingual-buccal).
Vertical Mattress Suture56
The vertical mattress suture is effective for deep and superficial closure, ensuring excellent edge adaptation and eversion.
- Application: Entry and exit points in the vertical plane. Used in perio surgery or to re-approximate pillars.
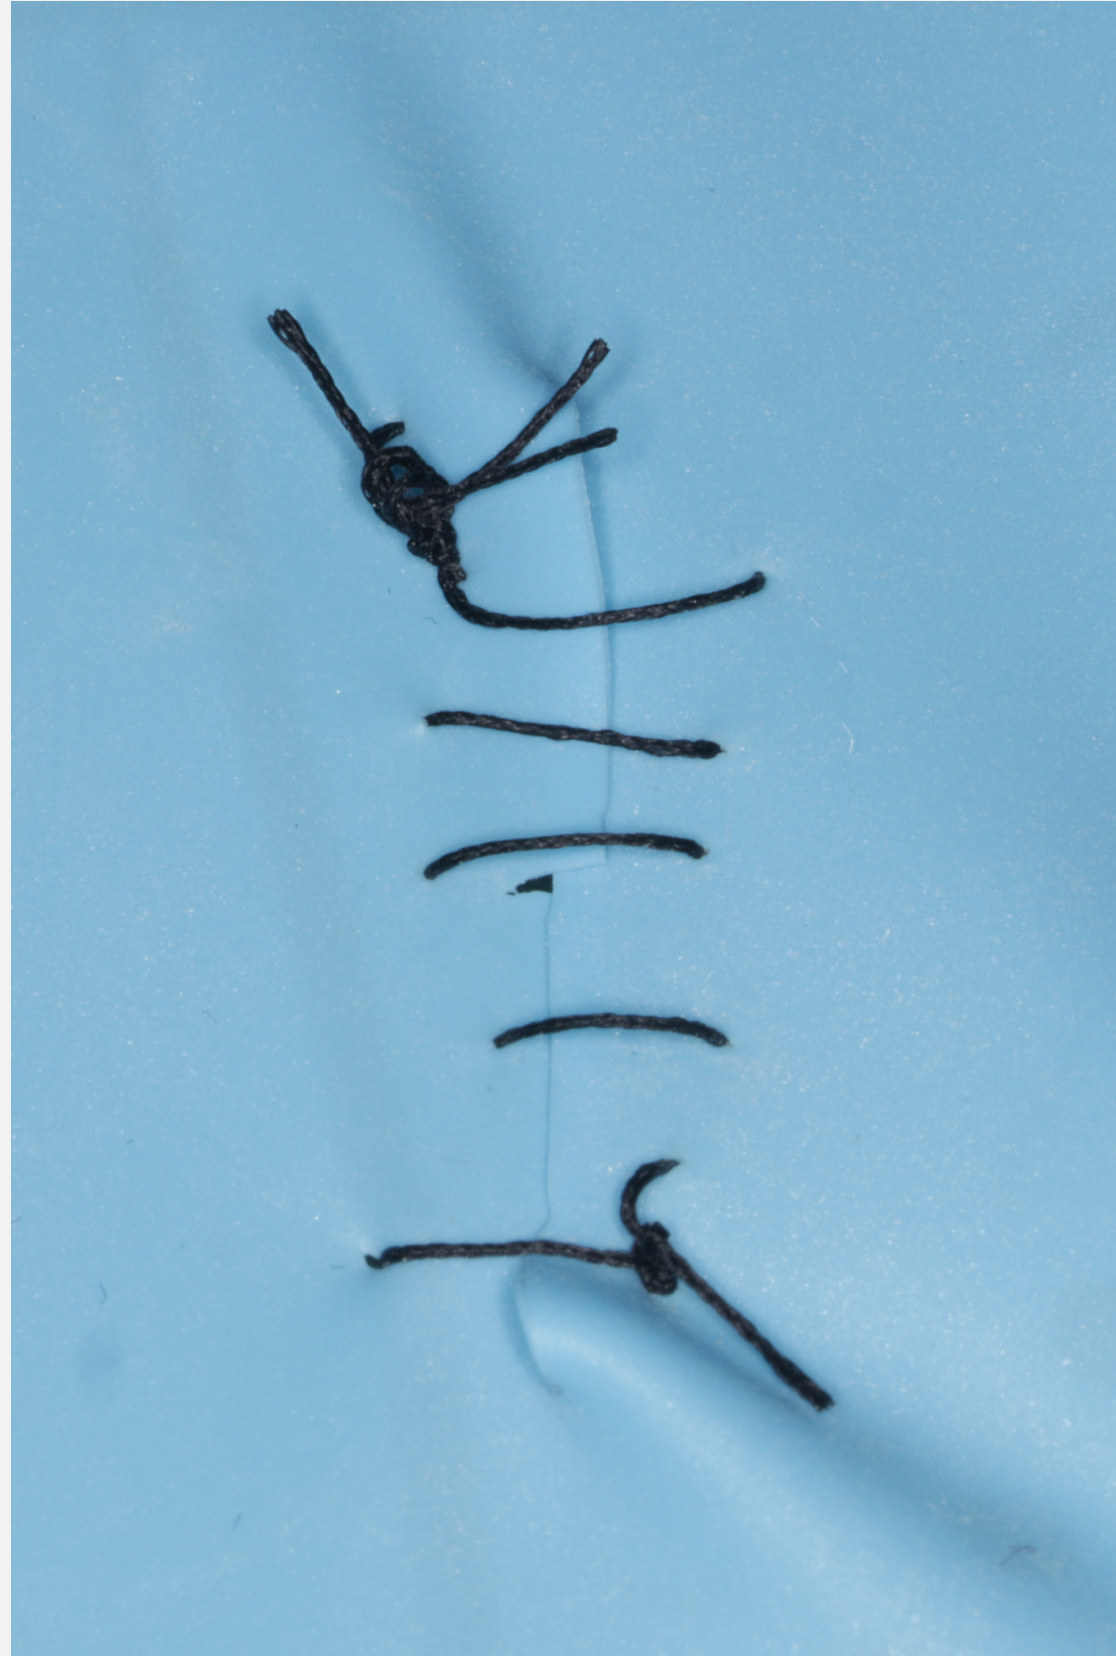
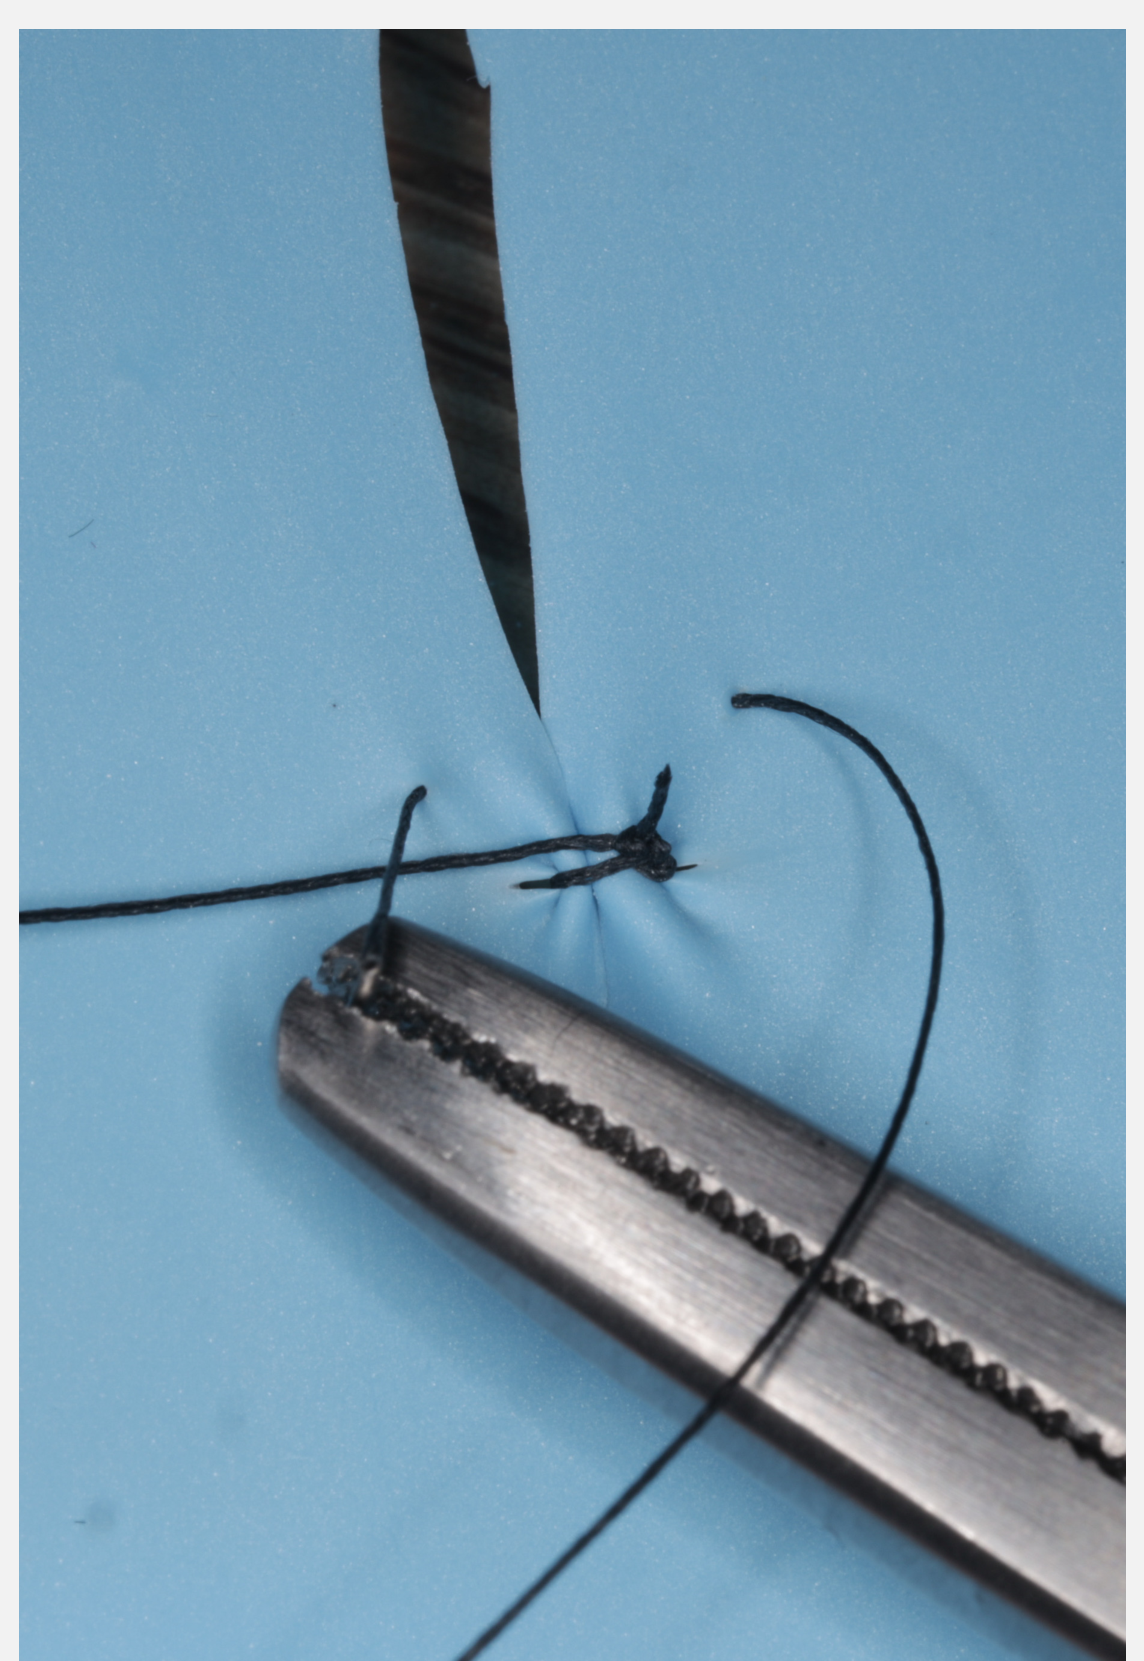
Continuous Suture57
A continuous (running) suture technique allows for rapid closure of long incisions using a single strand of suture material.
Continuous Suture Technique
- Economical: Useful for multiple teeth in a row.
- Start: Begin with a simple interrupted (assistant cuts short end only).
- Angle: 45 degrees creates horizontal stitches; 90 degrees creates angled stitches.
- Termination: Leave the last loop open. Use the loop as the “free end” to tie off the knot (tripod effect).
- Risk: If the knot fails or thread breaks, the entire suture line unravels.
Continuous Locking Suture58
This variation of the continuous suture provides additional stability by locking each pass, preventing the “accordion effect” and
- ==Detachment:== The thread is crimped into the needle. Repeated gripping at the crimp site can uncrimp it, causing the needle to detach from the thread inside the tissue. maintaining tension along the suture line.
- Technique: Pull the needle through the loop created at each stitch.
- Benefit: Creates a locking mechanism, adding friction and reassurance against unraveling.
Troubleshooting Suturing
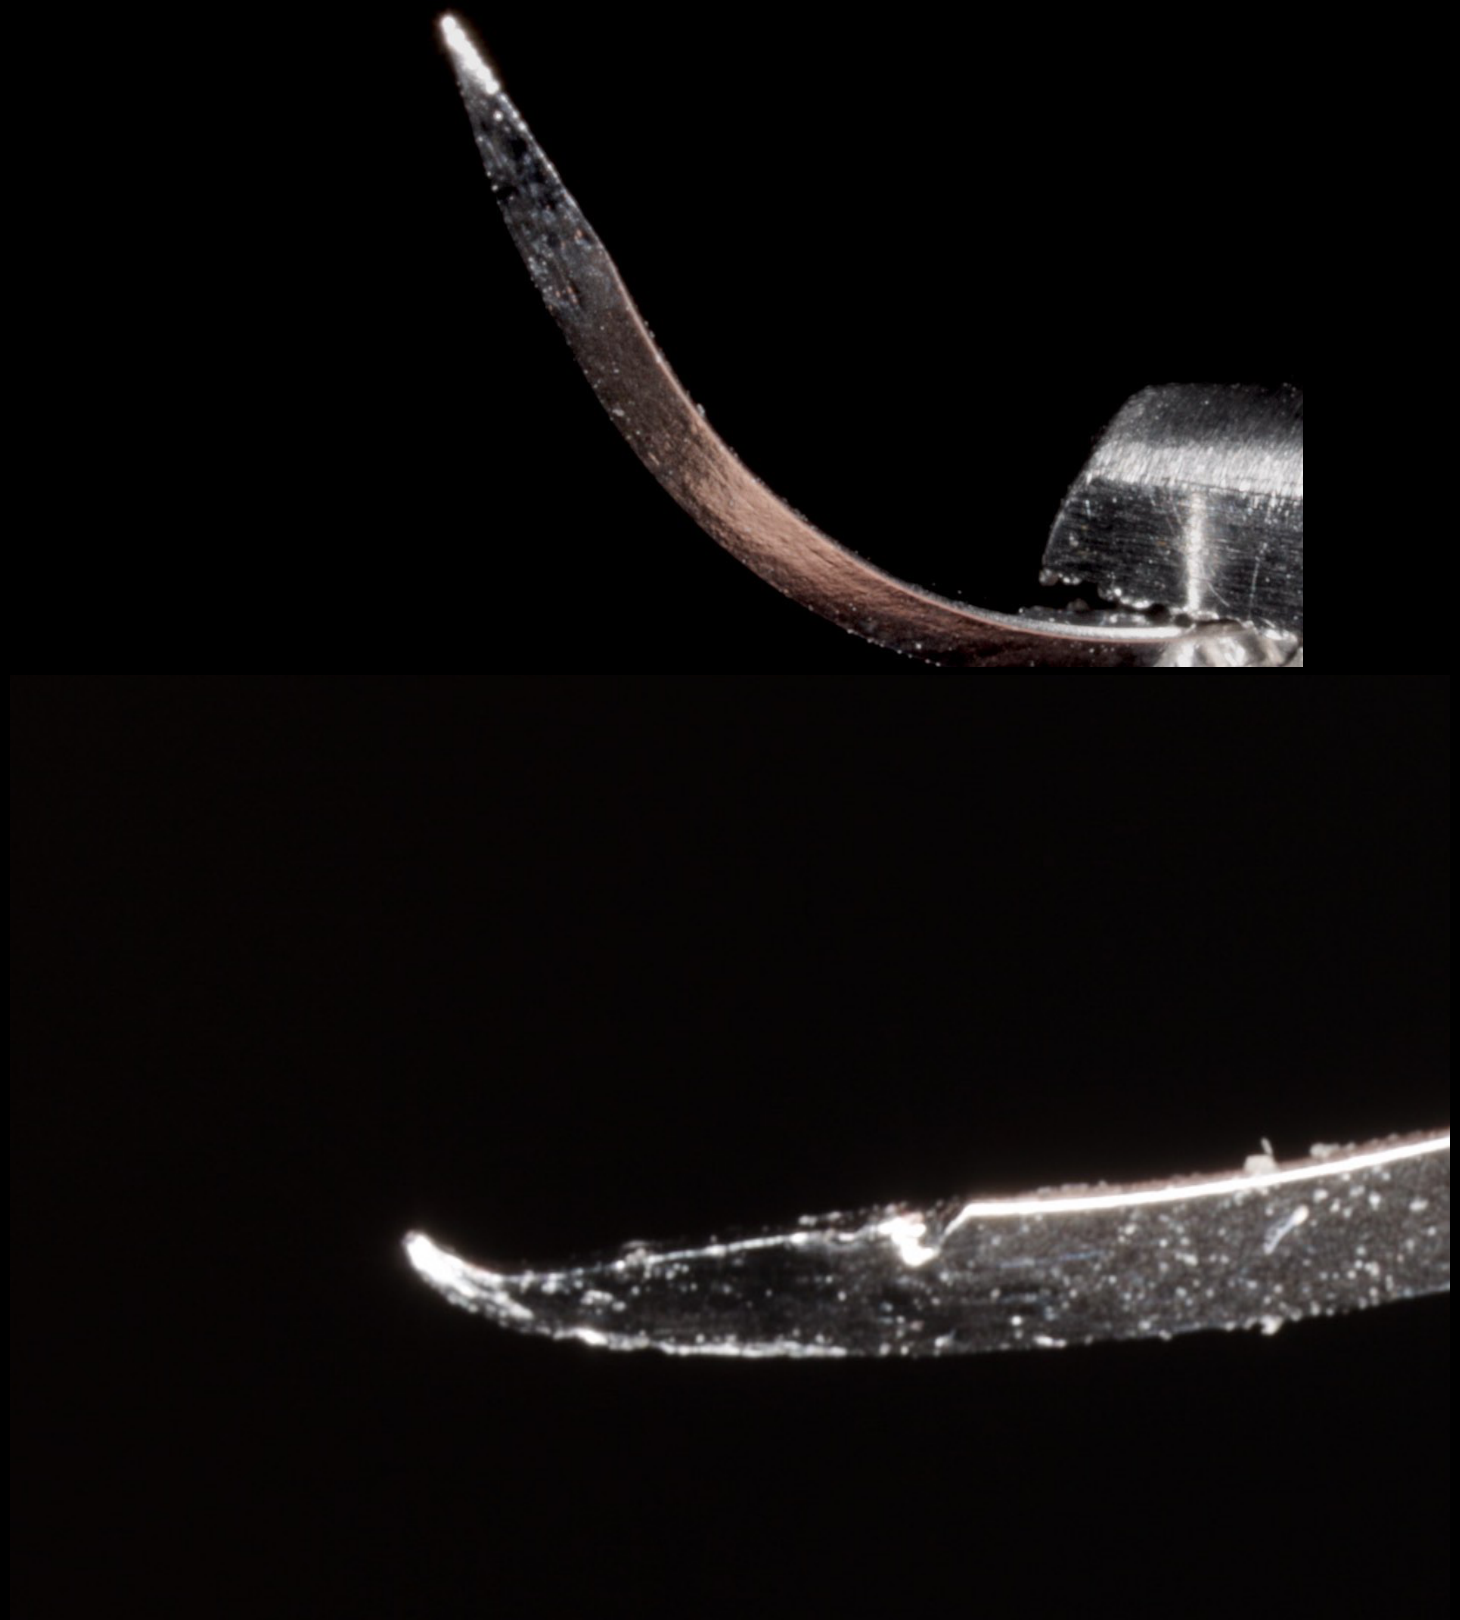 | 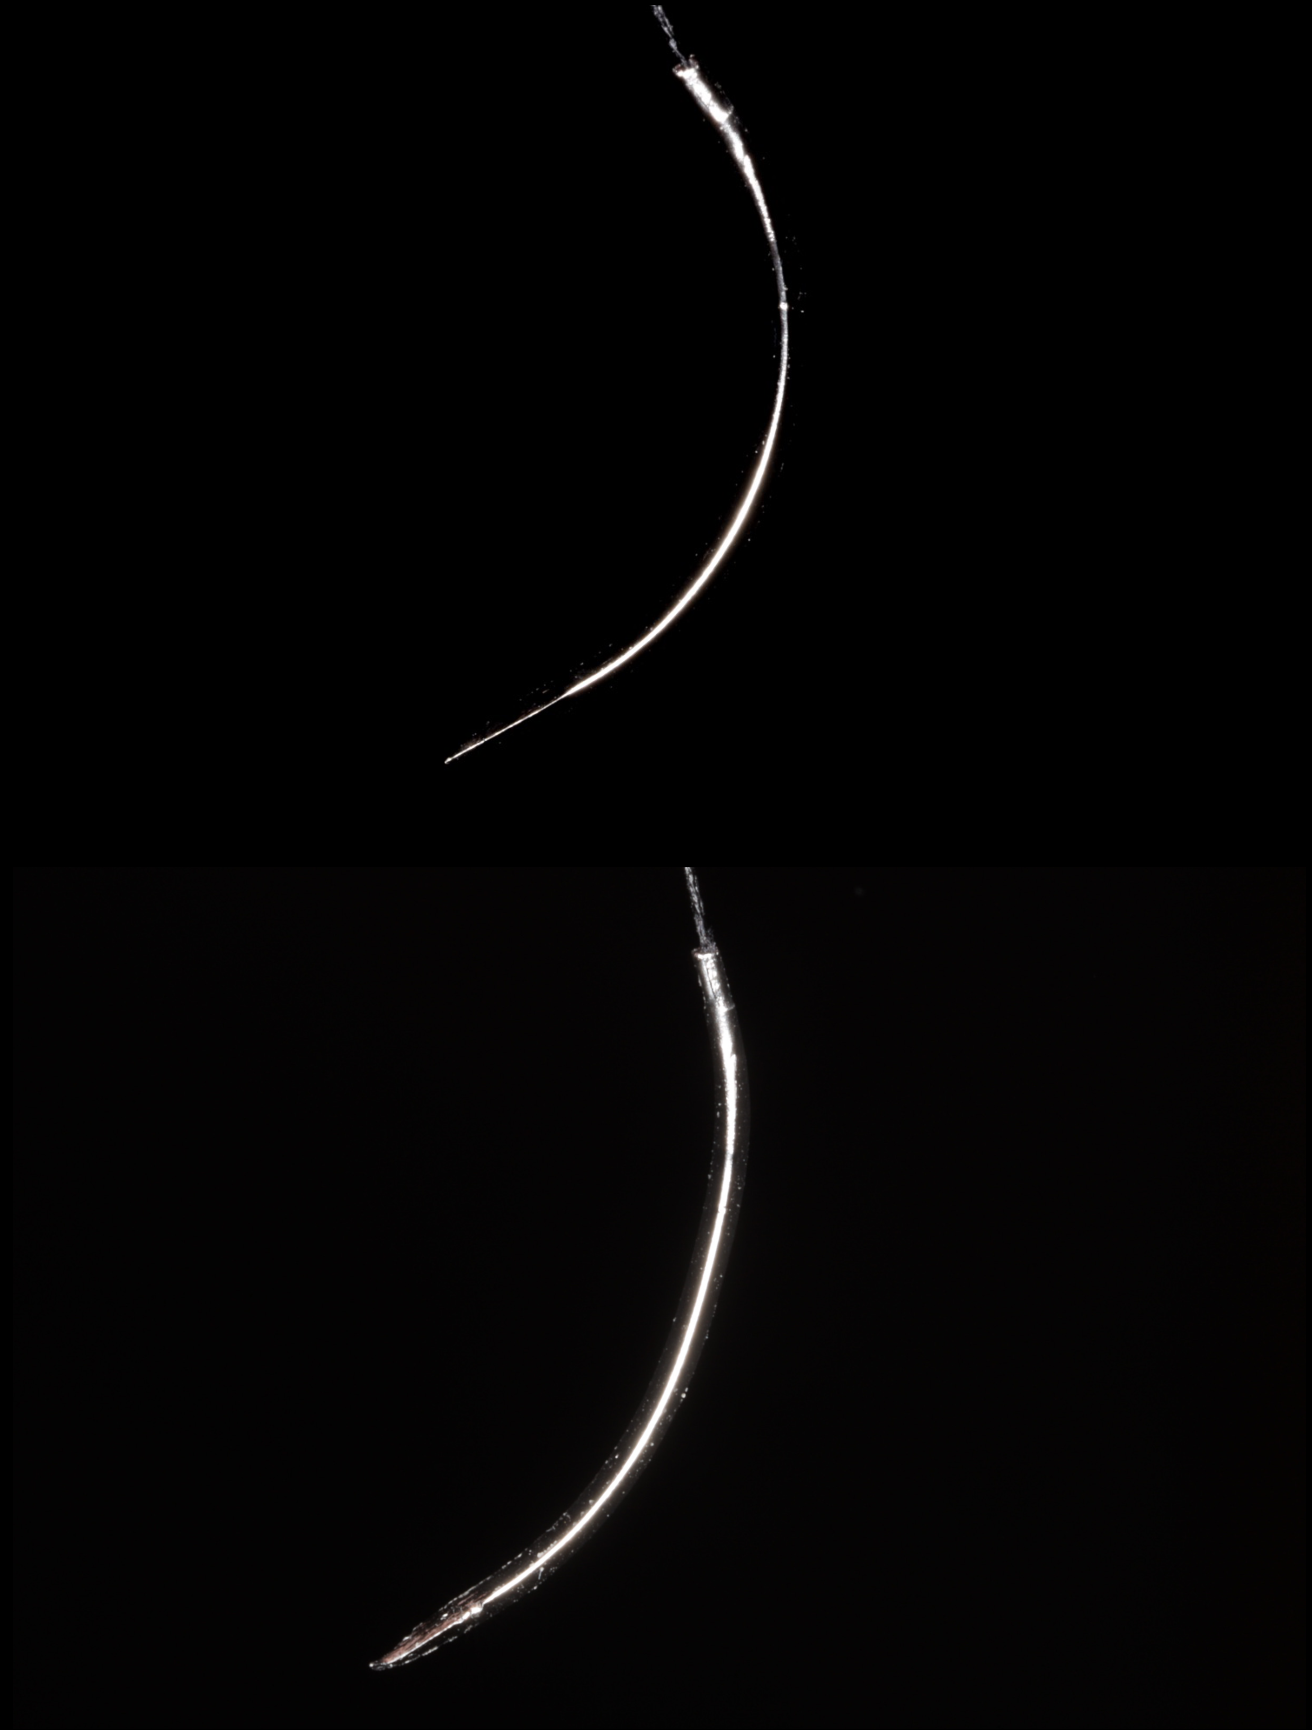 |
Needle Integrity Issues59
-
Blunting of the needle: Loss of the sharp point, making penetration through tough tissue difficult and increasing trauma
- Cause: Hitting bone multiple times dulls the needle.
- Action: Switch needles if resistance increases..
Needle Deformation and Wear60
-
Blunting of the needle
-
Straightening of the needle: Occurs when excessive force is applied or when the needle is not appropriate for the tissue density.
- Cause: Gripping small needles (11mm/16mm) repeatedly with wide needle holders can straighten the tip, creating an inadvertent compound curve.
Mechanical Obstructions61
-
Blunting of the needle
-
Straightening of the needle
-
High friction between the thread and needle driver: This is usually caused by dried or drying blood on the instruments or suture material.
- Description: Blood drying on the suture/thread creates friction (“coated in syrup”).
- Fix: Dunk needle holders in saline and run fingers along the thread to lubricate.
Knot Security and Handling62
-
Blunting of the needle
-
Straightening of the needle
-
High friction between the thread and needle driver
-
Loose knots: Failure to maintain proper tension or incorrect knot-tying technique leading to potential wound dehiscence.
- Action: If a knot does not hold tissue down, it is useless. Cut and redo.
- Cause: Friction preventing cinching, or poor technique.
Tissue and Structural Failures63
-
Blunting of the needle
-
Straightening of the needle
-
High friction between the thread and needle driver
-
Loose knots
-
Pulling through: The suture material cuts through the tissue (cheese-wiring) due to excessive tension or fragile tissue quality
- Cause: Bites too close to the margin (<2mm) or through inflamed/friable tissue.
- Bone Obstruction Fix: If bone prevents a 2-3mm bite, peel mucosa back with an elevator to find tissue, or adjust bite location..
Complication Management64
This section covers the identification and management of common surgical complications encountered during and after dental extractions.
Bleeding
Immediate Assessment and Management65
- Keep calm.
- Assess flow rate (minor vs. major).
- Ensure suctioning; blood is a gastric irritant.
- Identify the cause: extraction socket ooze or minor artery during bone removal?
- Pack sterile gauze into the socket and hold down (clinician pressure is often more reliable than patient biting)
- Pressure buys time - allow time to think
- If an arterial bleed is identified, use curved mosquito artery forceps with gauze to apply specific pressure
Pressure Application
Pressure application depends on the specific cause. If the bleeding is from an extraction site:
- Visualize the source of bleeding.
- Have the patient bite on thick gauze.
- Instruct patient to bite on gauze for 5 minutes
- If bleeding persists after packing/stitching, consider removing packing, inspecting, and restarting compression/suturing
- Apply firm digital pressure or pressure with an instrument.
- Consider packing with a haemostatic agent and suturing.
- Consider the use of bone wax.
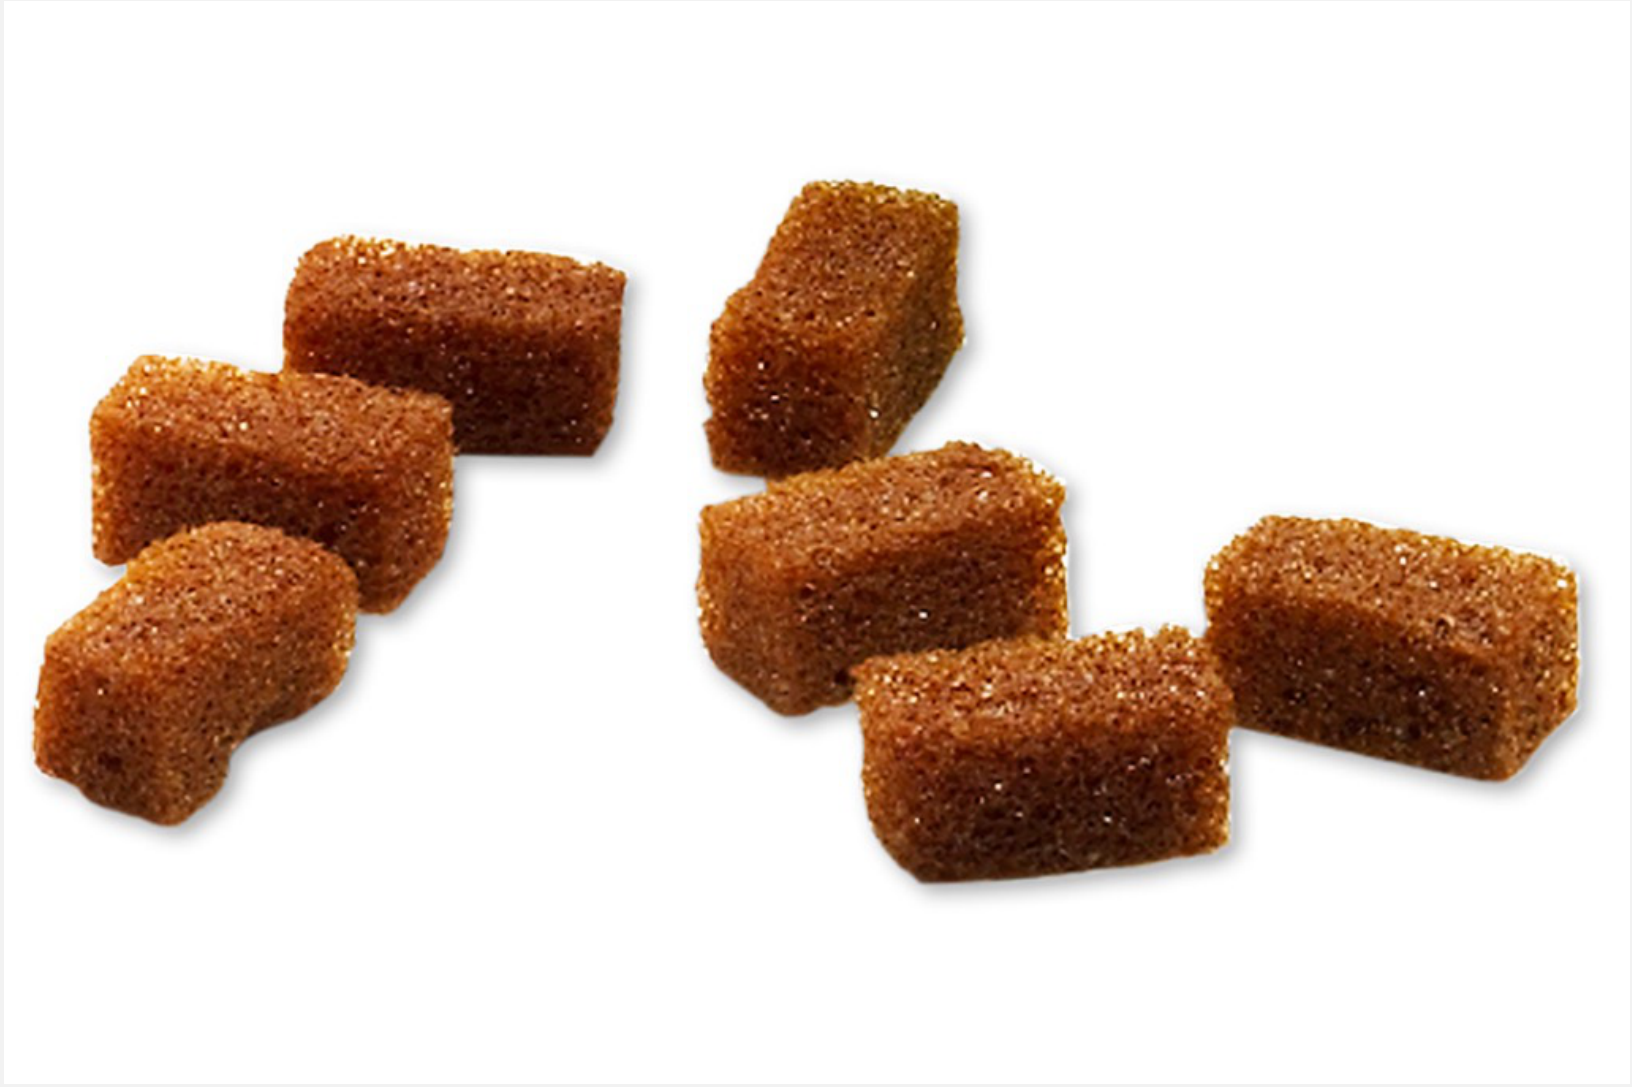
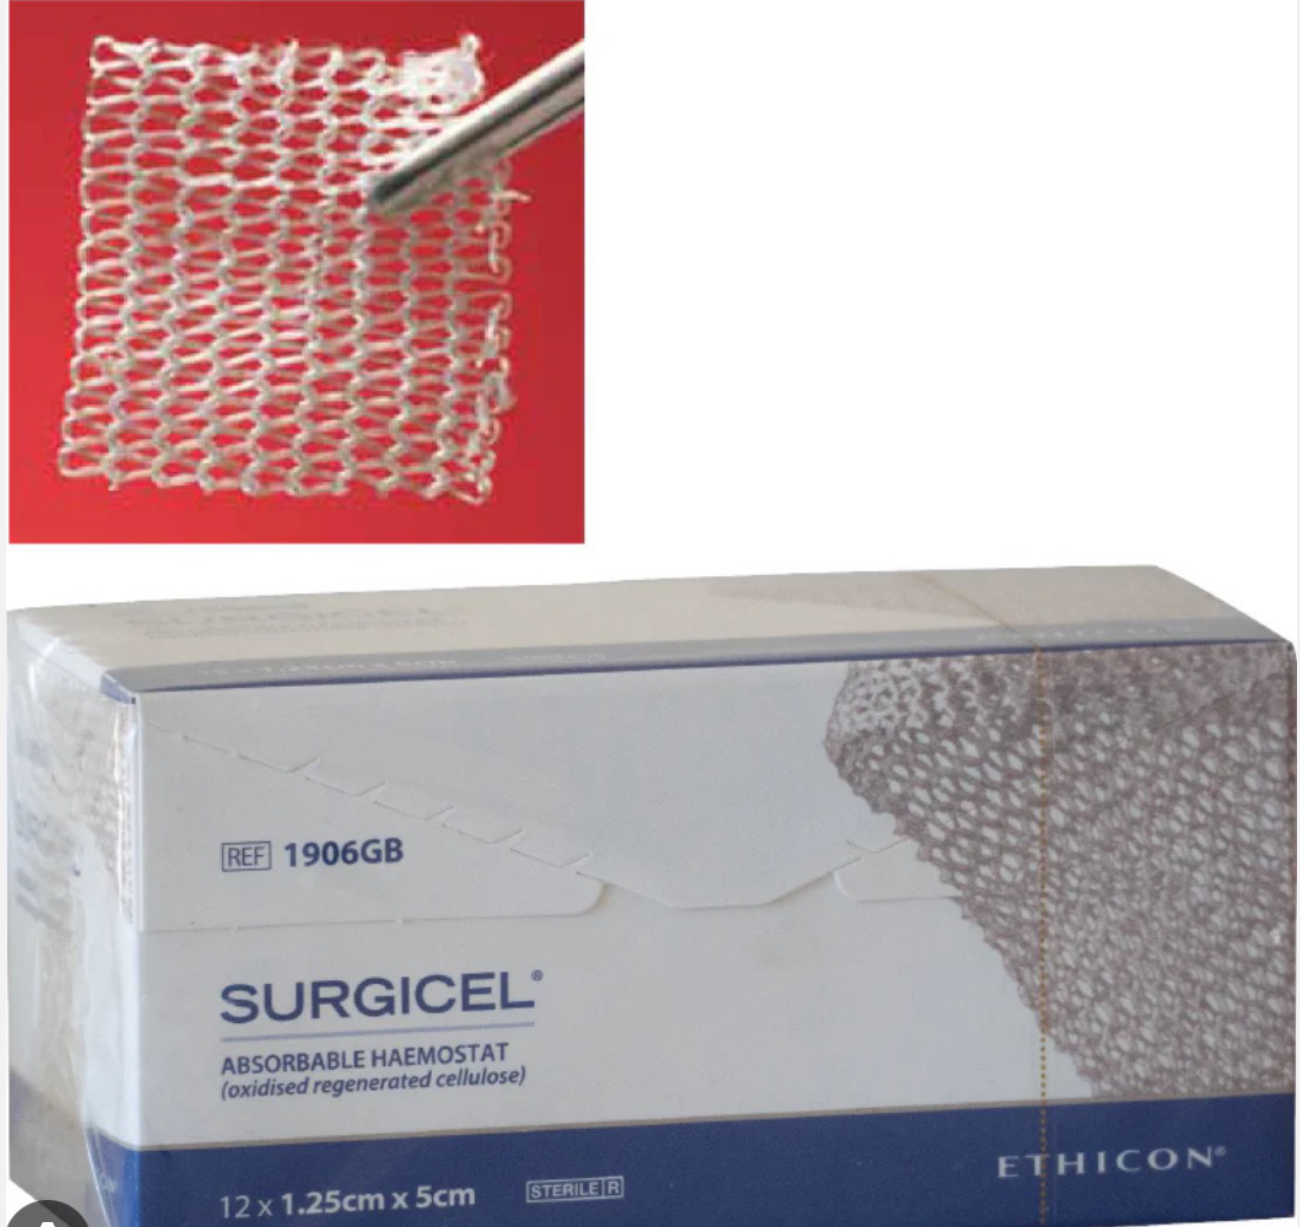
Haemostatic Agents
 |  |  |
 |  |
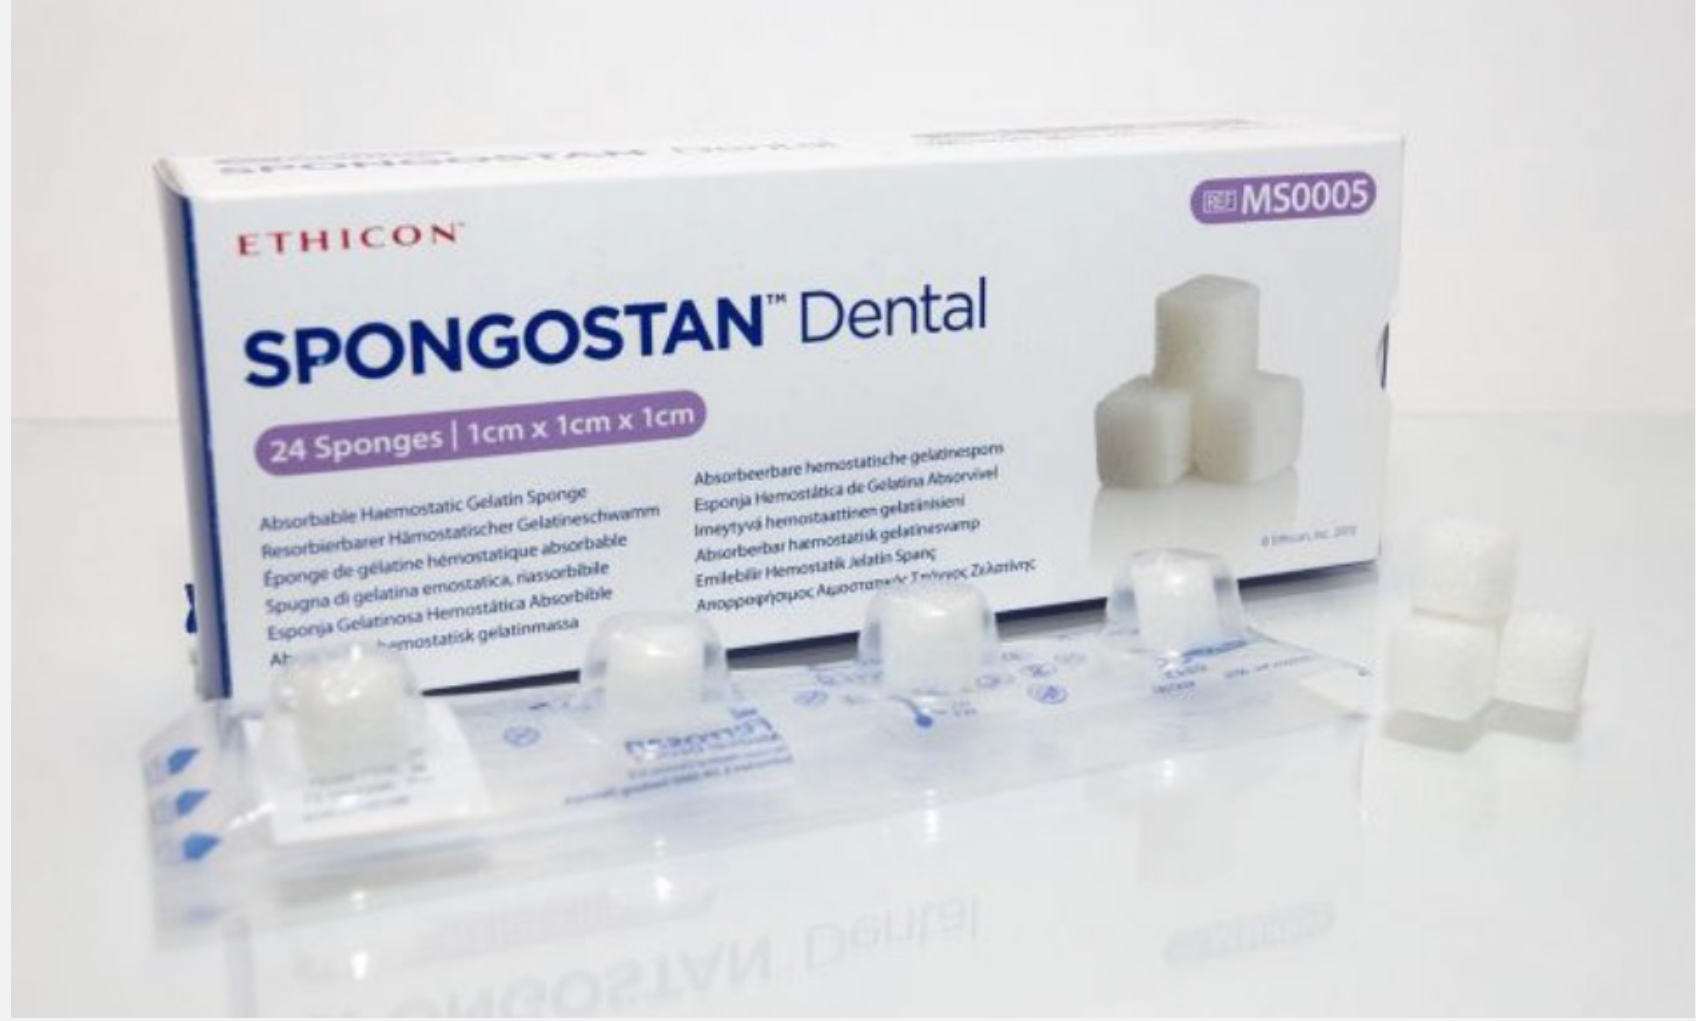
Spongostan66
- Off-white sponge.
- Porcine gelatin sponge matrix.
- Comes in sterile blister pack
- Provides scaffolding to structure the clot.
- Used at OHCWA.
Gelatamp67
- Available in several varieties; the version containing colloidal silver is most common.
- Gelatine sponge provides a scaffold.
- Colloidal silver provides a broad antibacterial effect.
- Brown sponge colour
- Non-sterile but clean
- Anecdotally reduces dry socket/infection rates
Surgicel68
- Oxidised regenerated cellulose.
- Plant-based material.
- Comes in sheets
- Do not compress before placement (holds more blood)
- Acts as a matrix for platelet adhesion and aggregation.
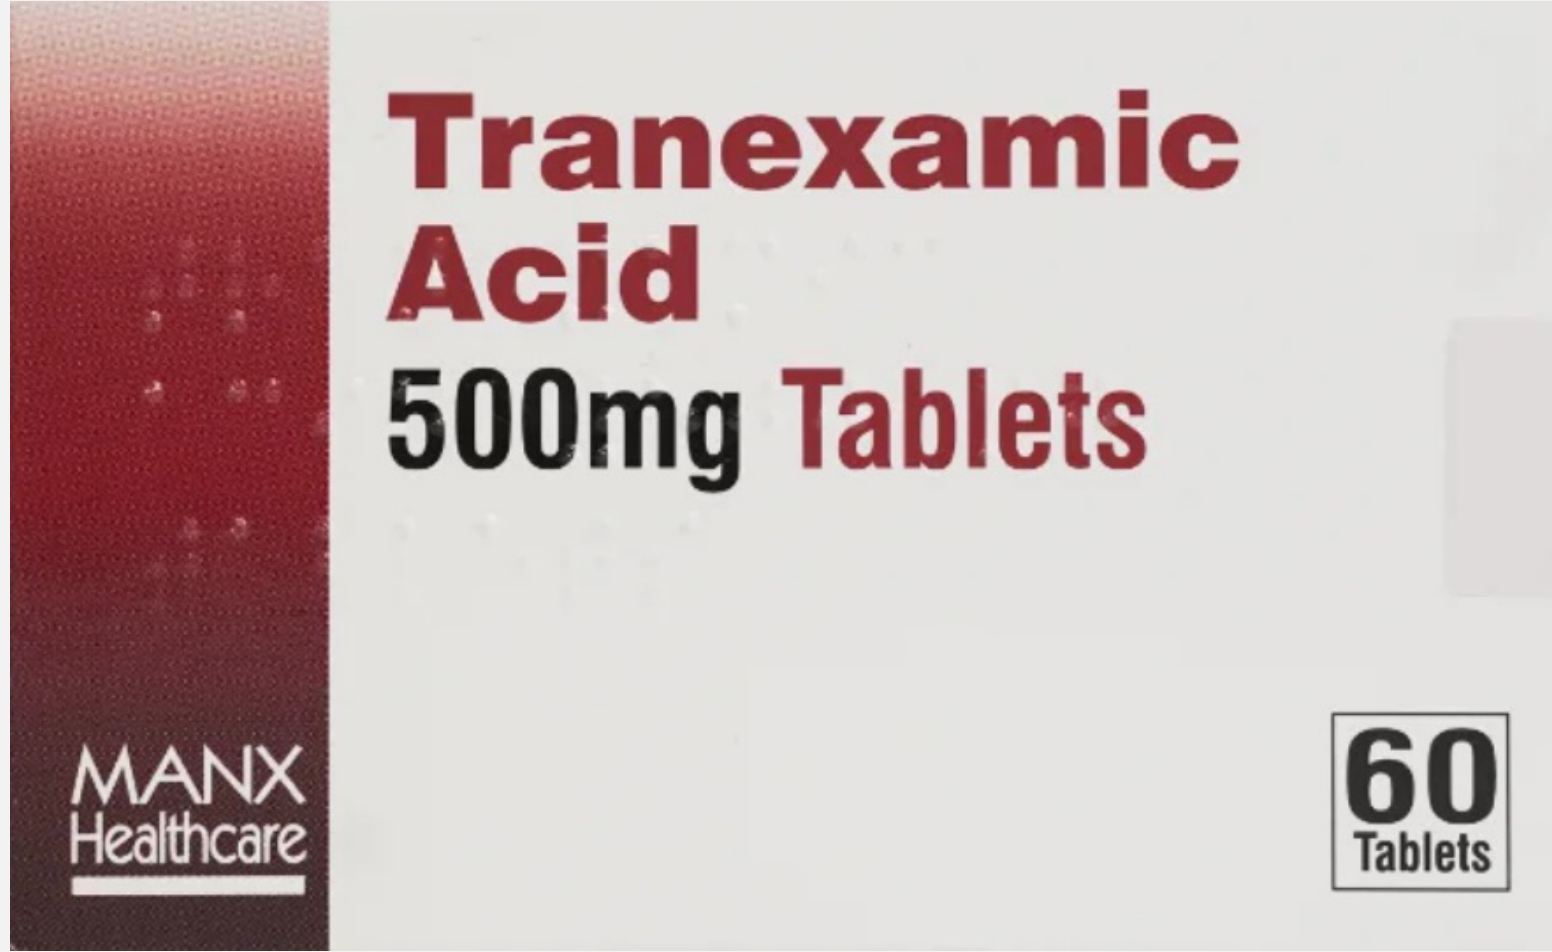
Tranexamic Acid69
- Anti-fibrinolytic agent.
- Dental Administration Guidelines:
- Tablet is NOT TAKEN ORALLY.
- Tablet is crushed and dispersed into 10mL water (5% solution).
- 500mg tablet dosage
- Dentists should not prescribe oral tablets for systemic effect unless directed by a specialist (e.g., haematology plan)
- Use: Gauze soaked in solution with pressure applied to the wound OR gentle rinses for 2 minutes QDS for 2-5 days post-operatively.
- Instruction: Do not spit out; gently dribble out.
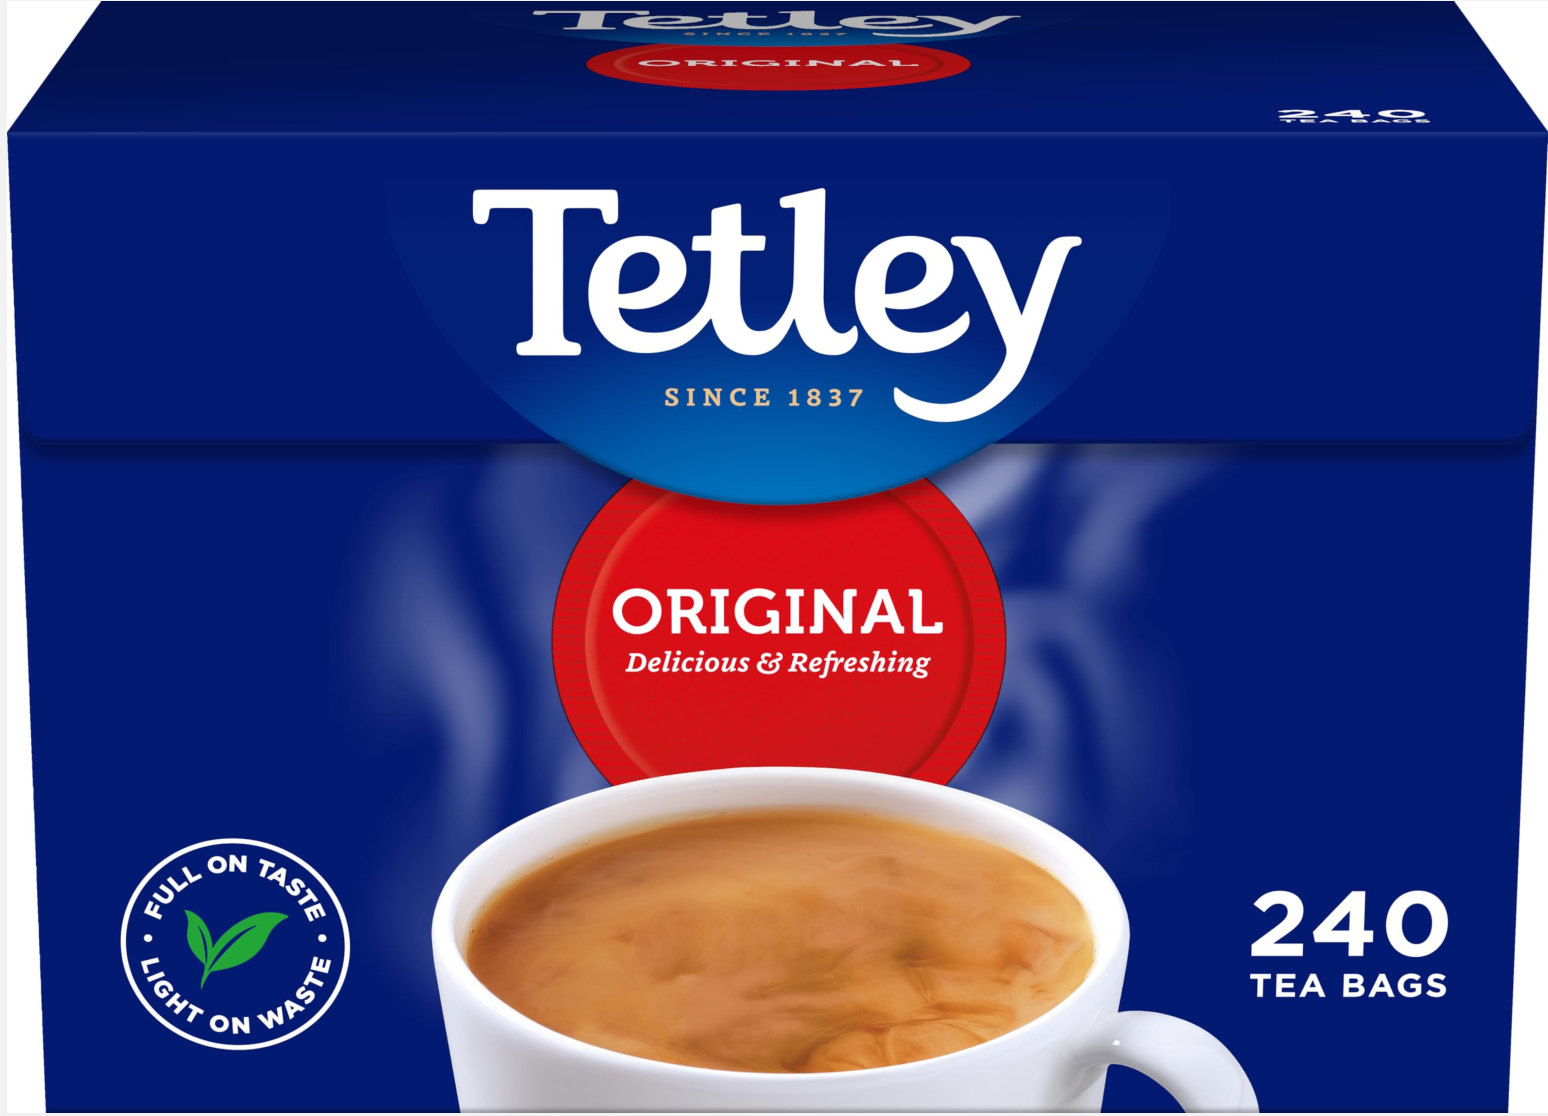
Tea Bags (Home Remedy)70
- Preparation: Steeped in boiling water for 3-5 minutes and allowed to cool.
- Application: Patient bites on the bag, applying pressure to the wound.
- Mechanism: Natural tannins help vasoconstriction.
- Utility: Good verbal advice for patients calling from home.
Surgical Emphysema71
- Caused by the extrusion of air into tissues.
- Prevention:
- DO NOT use front exhausting handpieces if a mucoperiosteal flap is raised.
- DO NOT use a triple syringe to dry the surface if a mucoperiosteal flap is raised
- Use surgical handpieces (reverse vent) or avoid air-driven tools when flaps are raised.
- Management:
- Usually self-limiting as air is reabsorbed by tissues.
- Reabsorbed in few days
- Antibiotics are debated but often prescribed due to bacteria introduction
- Consider the benefit of antibiotics.
Retained Root
Assessment Criteria72
- Consider size and pathology present.
- Size: Generally accepted as okay if under 3mm (though no definitive evidence exists).
- May be left to avoid excessive damage
- Pathology: Ensure no periapical lesion was present pre-operatively.
Retrieval Considerations
- Consider use of a root pick.
- Evaluate proximity of anatomy (e.g., maxillary sinus) and risk of displacement.
- Also consider inferior dental canal
- Root pick is fine and spindly
- May require bone removal around the edge
- Consider bone removal to create space for instruments.
Lost Root or Tooth
Immediate Actions73
- Stop and assess the likely location of the fragment.
- Do not blindly dig
- If pushed out of sight, stop
- Pack and suture to make the patient safe before explaining the error
- Posterior lower tooth: Check the lingual aspect; see if it is visible with gentle pressure.
- Upper tooth: Determine if it has entered the sinus (fully or partially).
Retrieval and Referral
- If easily visible: GENTLY attempt retrieval.
- If not easily seen or retrieval is not possible:
- Stabilise the patient (e.g., suture) and explain the situation.
- Seek advice from a senior colleague or principal dentist.
- Contact local OMFS rooms or the local OMS department on-call registrar for advice.
Case Example: Lost Root
Upper 4 root pushed under the sinus. Referred to OMFS; imaging showed it was under (not in) the sinus and could be left. Specific referral contacts include Royal Perth and Fiona Stanley on-call registrars.
Wrong Tooth Extraction
Prevention74
- DO NOT DO.
- Utilize a correct site surgery checklist.
- Confirm the site with the dental nurse.
- Confirm with referral letter immediately before starting
- High risk: confusing 4s and 5s in orthodontic extractions
Management of Errors
- Most likely to occur with orthodontic extractions (healthy teeth with no obvious caries).
- Explain the error to the patient, parents, or guardian.
- If orthodontic extractions are involved, speak to the orthodontist immediately.
- DO NOT remove the correct tooth until the plan is reviewed; the orthodontist may be able to modify the treatment plan
Case Study: Wrong Tooth Extraction
Orthodontist requested upper 4s and lower 5s. Clinician extracted all 4s. Management involved consulting the orthodontist to adjust the plan rather than extracting more teeth immediately. .
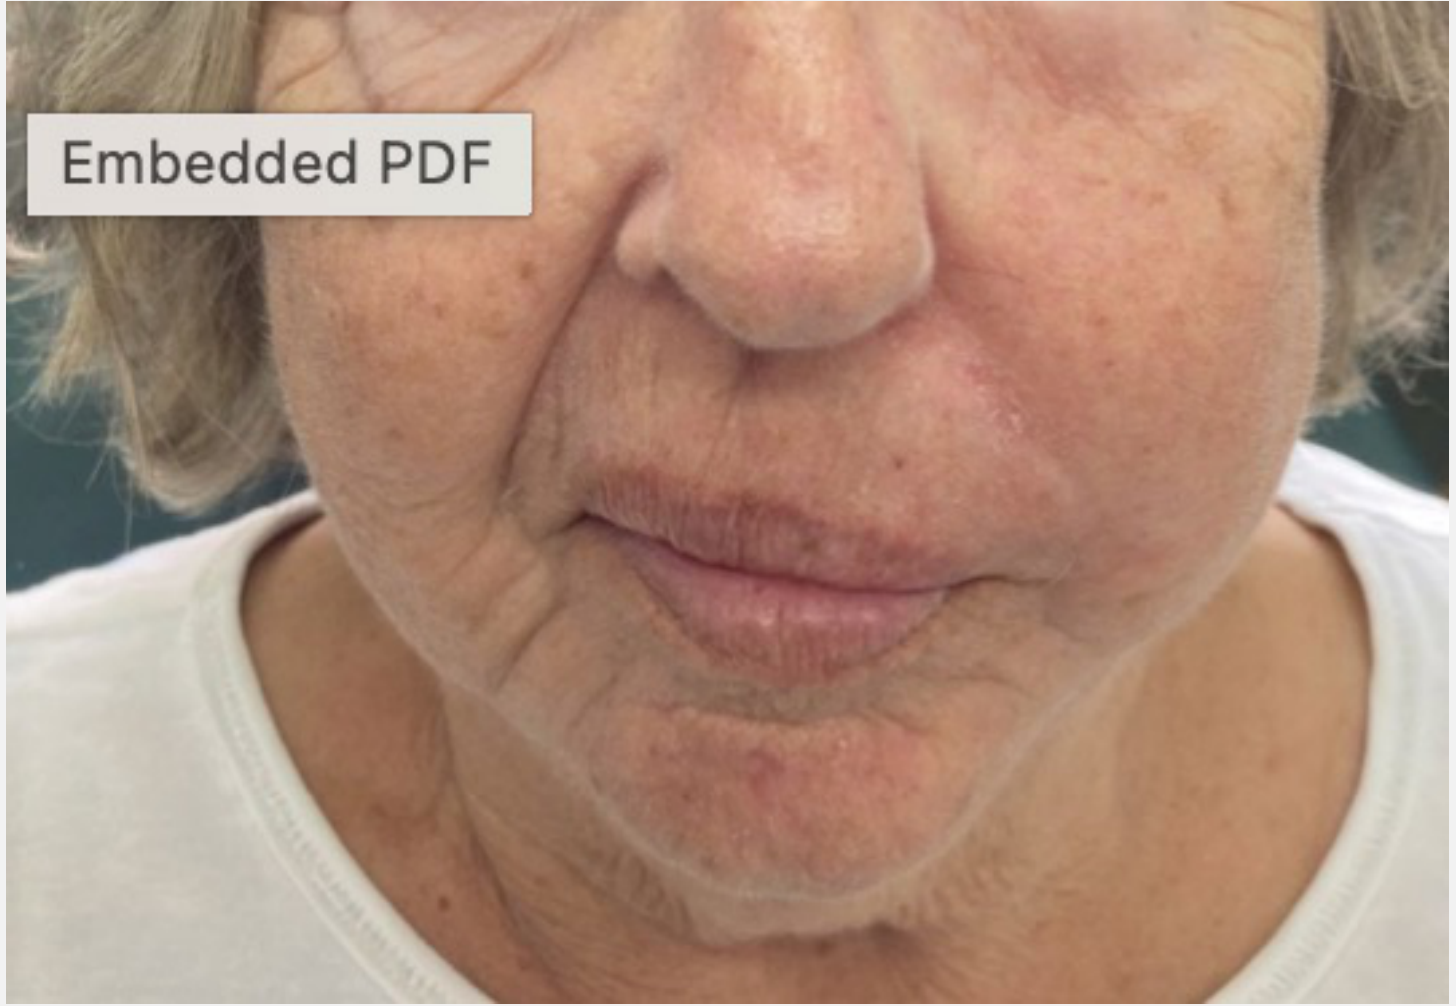
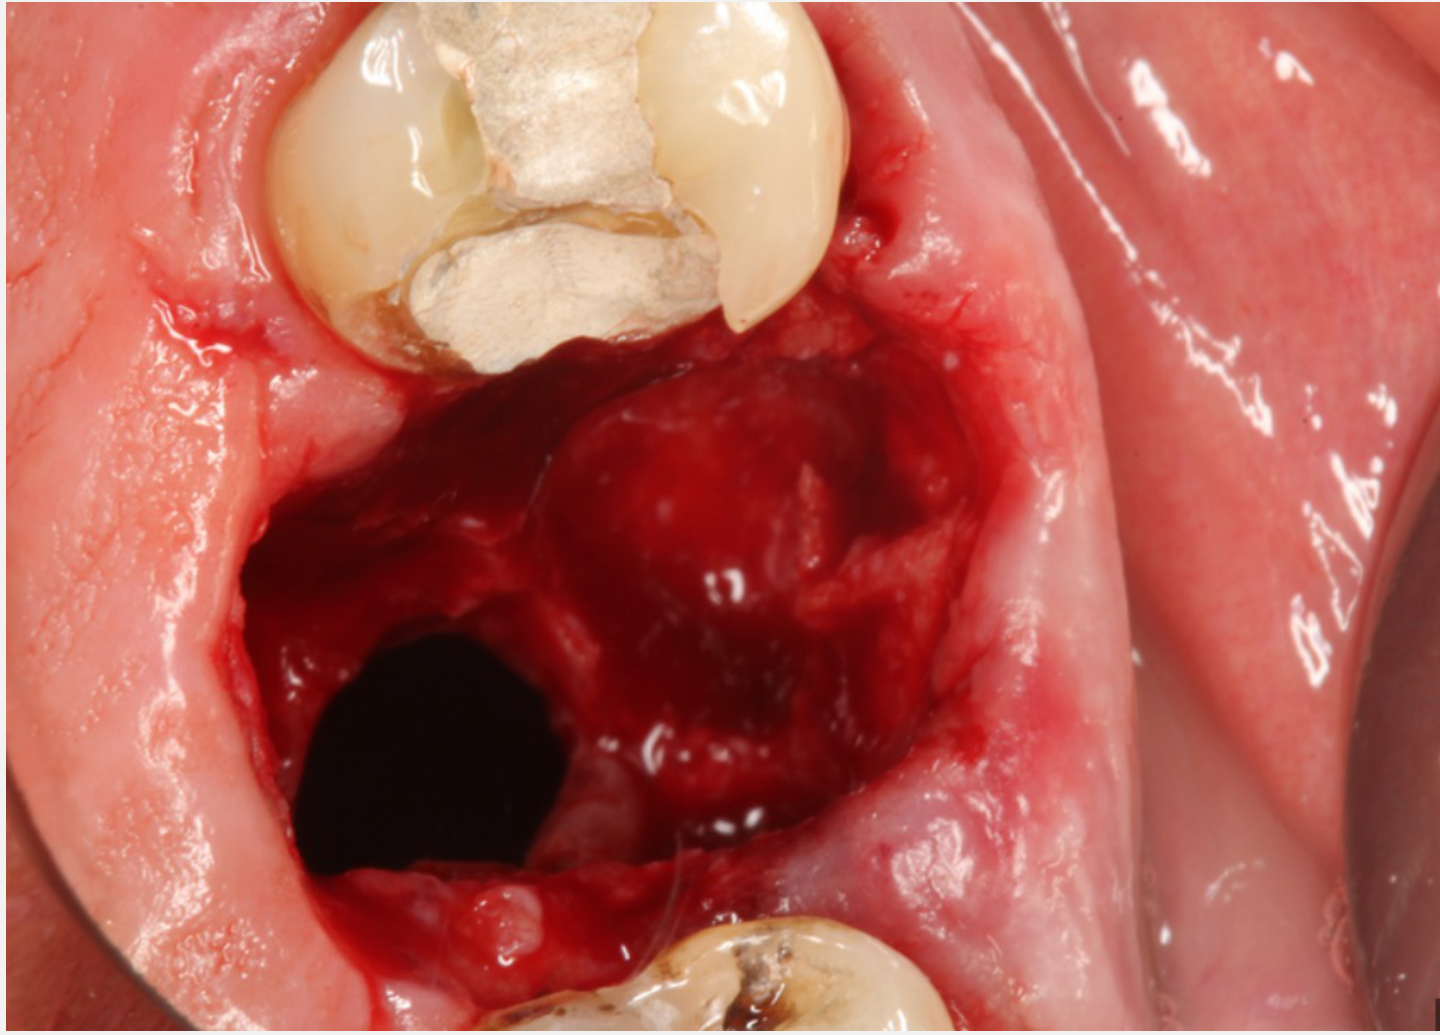
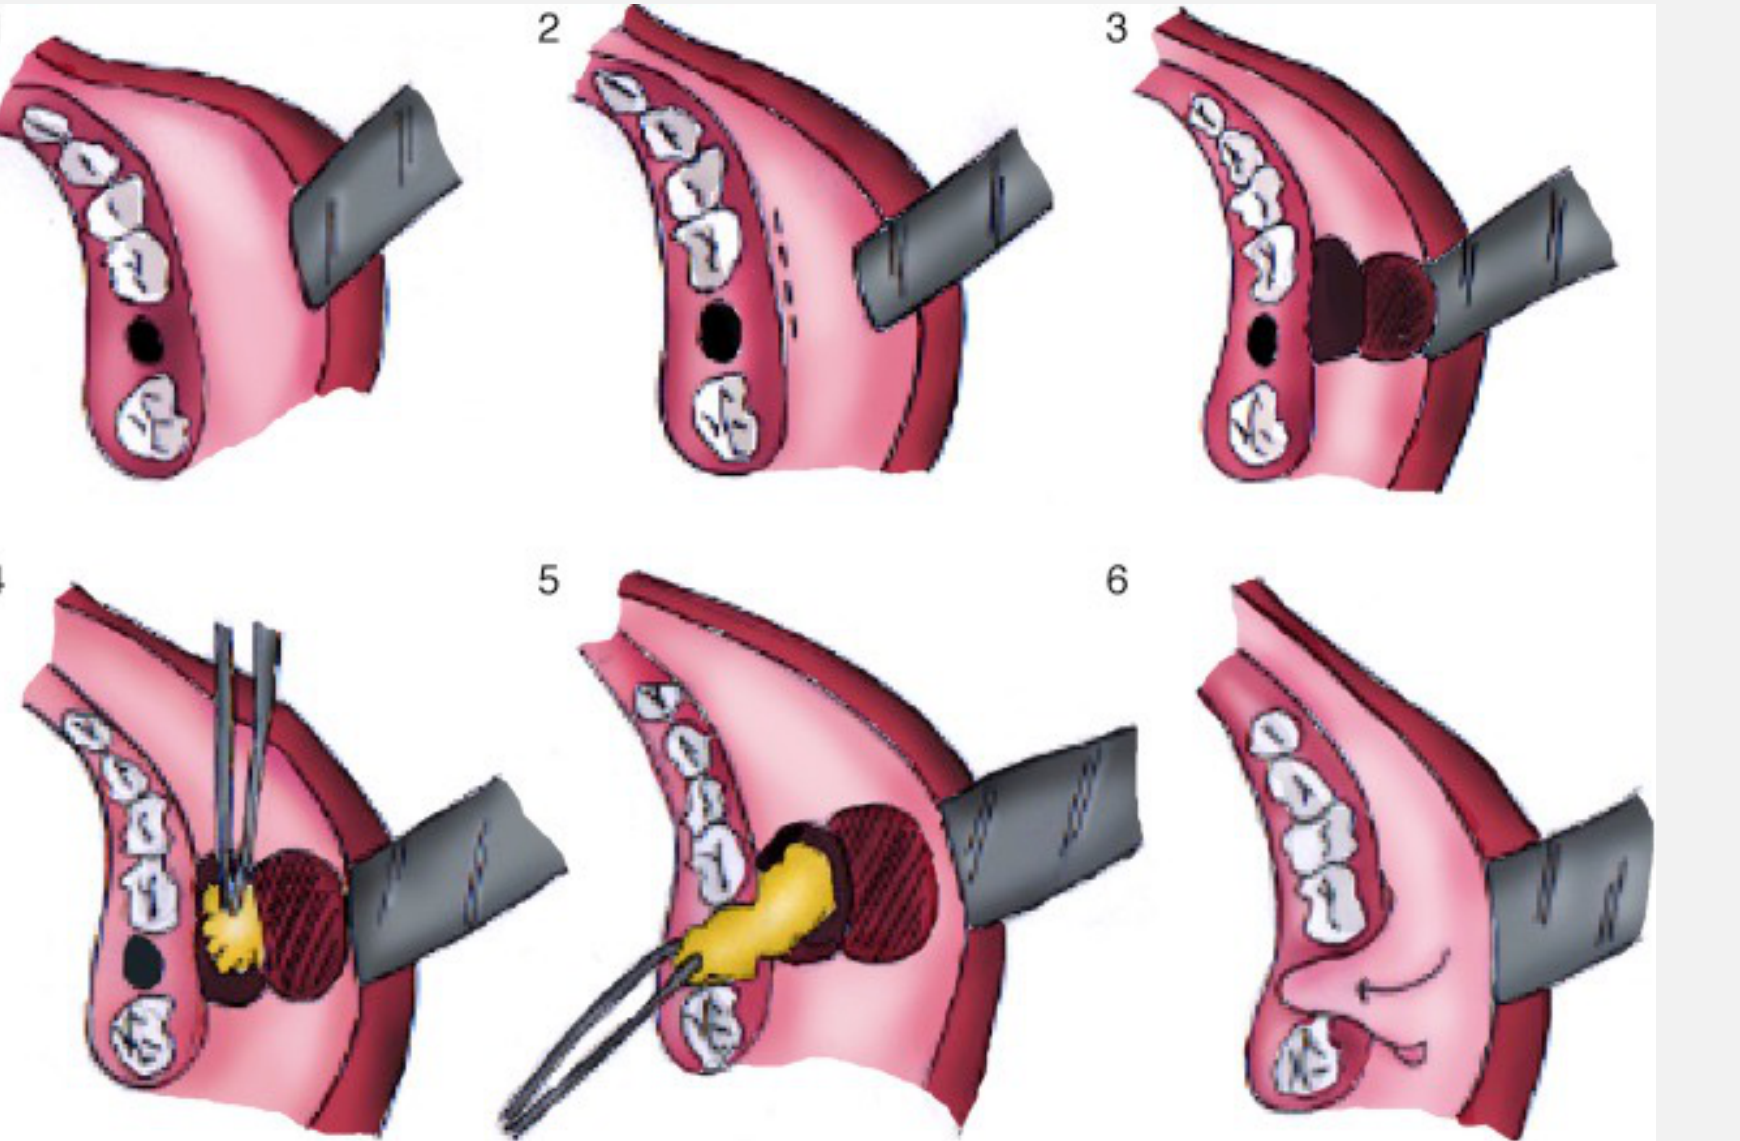
Oro Antral Communication and Fistula75
 |  |  |
 |  |
Definitions76
- Oro-antral communication (OAC): An unnatural communication between the maxillary sinus and the oral cavity.
- Oro-antral fistula (OAF): A chronic form where epithelium infiltrates and lines the communication
- OAC requires breach of both bone and Schneiderian membrane
- OAF defined as OAC present for >48 hours.
Anatomical Considerations
- Layers at the base of high-risk sockets include bone and the sinus lining (Schneiderian membrane).
- Both must be breached for a communication to exist.
- It is possible to remove the bony base without perforating the membrane.
- Formal closure is required if the communication is over 2mm.
Diagnosis77
- Pre-operative assessment.
- Post-extraction assessment of the tooth and socket.
- Valsalva maneuver.
- Contraindication: Do not perform Valsalva maneuver (nose hold + blow) as it can convert a non-communication into a communication by blowing out the membrane
- Bubbling of blood in the socket.
- Large communications are usually obvious.
Management Protocols78
Small Communications (<2mm):
- Use a haemostatic agent.
- Suture over the socket.
- Sinus precautions for 2 weeks: No nose-blowing, no drinking through a straw, and no closed-mouth sneezing.
- Sneeze with mouth open
- Prescription: Oxymetazoline nasal spray (500mcg/mL), 1-2 sprays TDS for 5 days.
- Review after 2 weeks to ensure closure.
**Large Communications (>3mm):
- Threshold changed: >2mm requires surgical closure and referral to OMFS**
- Depending on size, use haemostatic agent and suture. If very large, consider leaving open once haemostasis is achieved.
- Refer to an experienced colleague or OMF Surgeon.
- Contact specialist rooms for specific management/referral instructions.
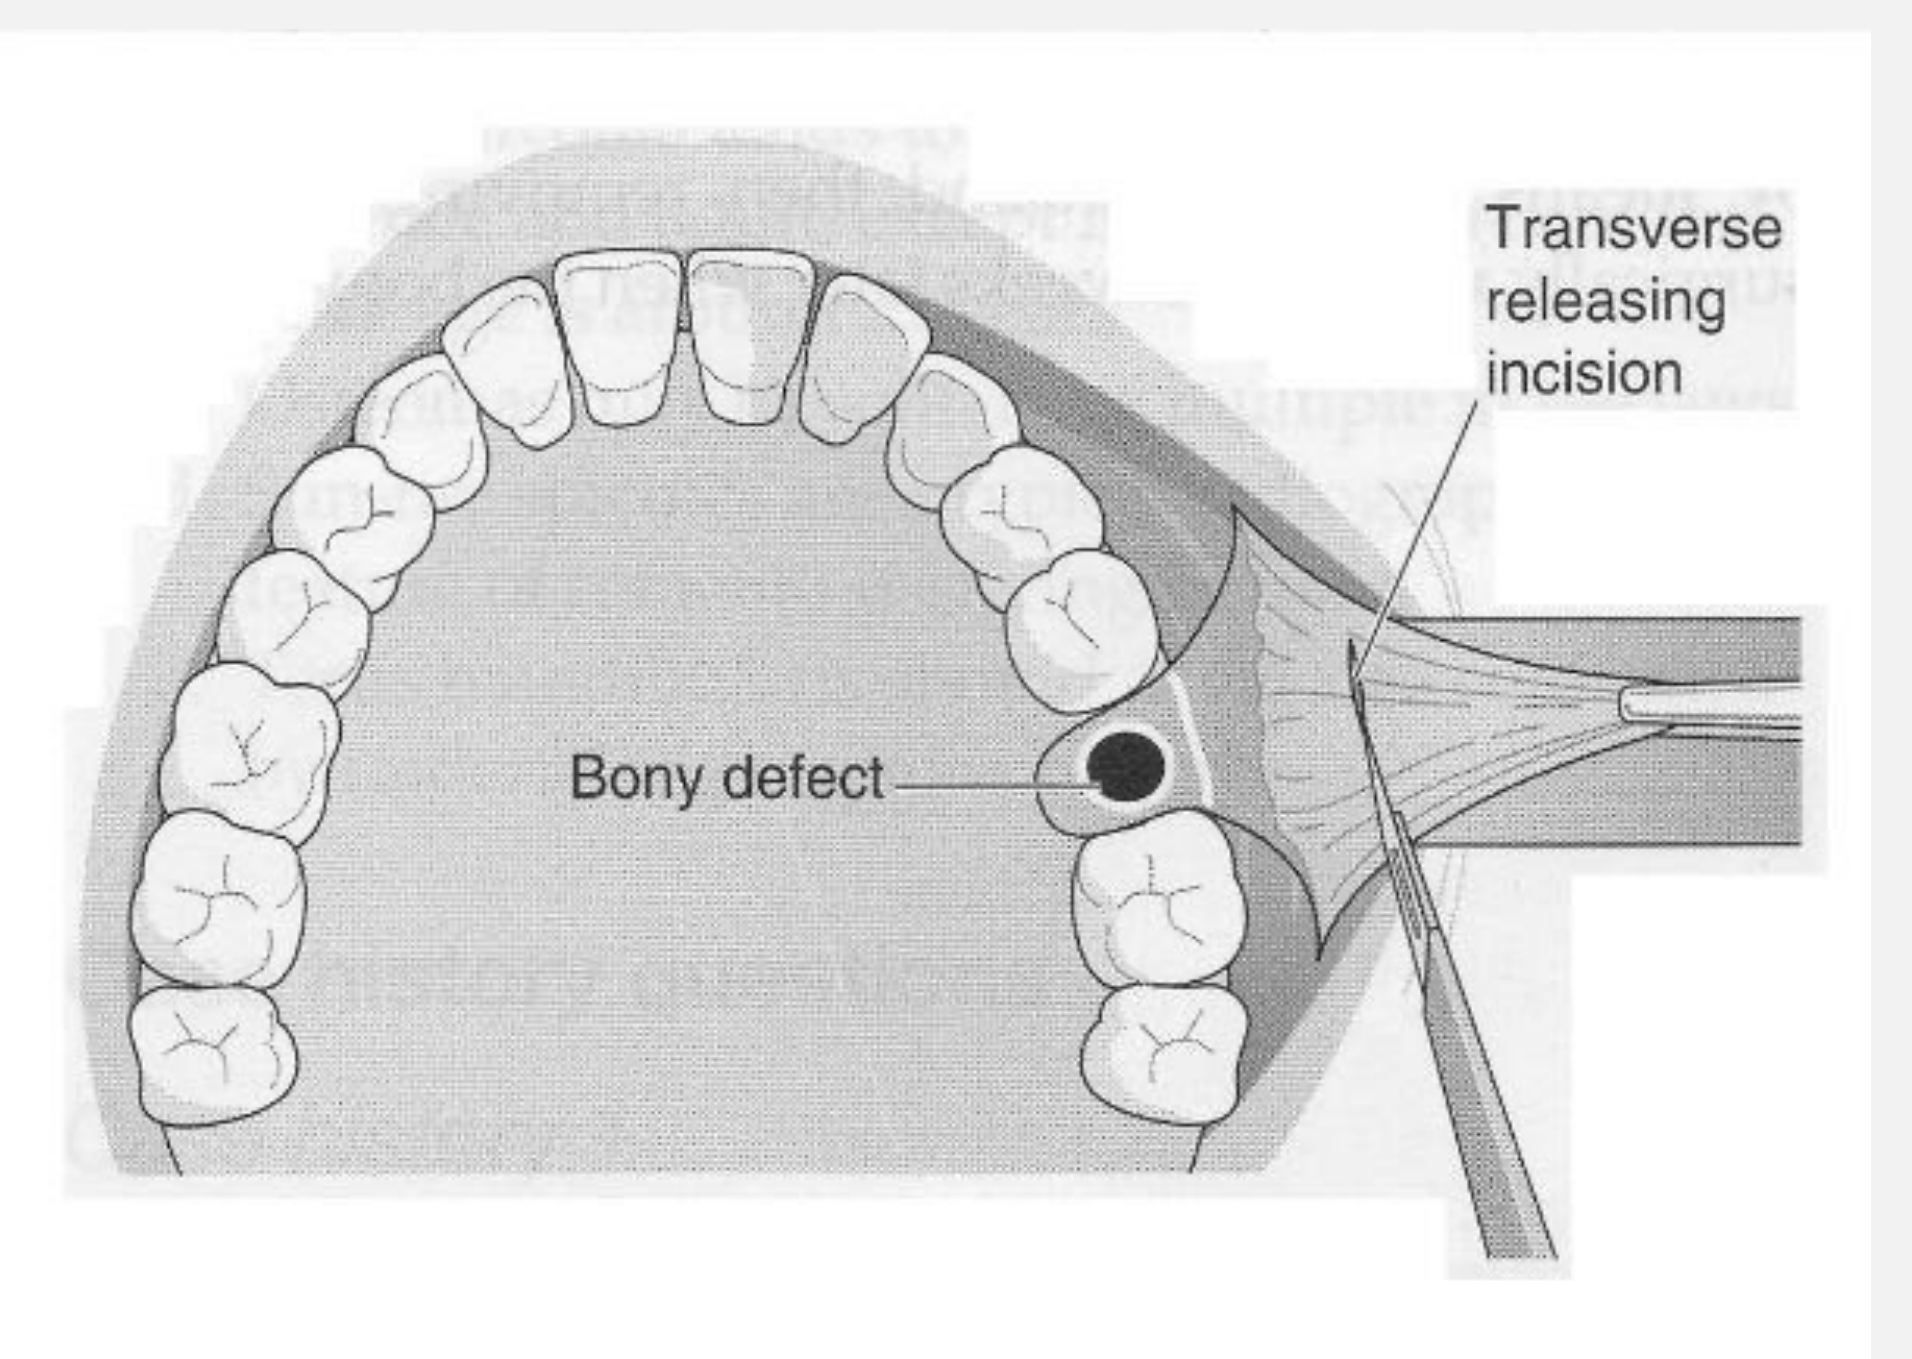
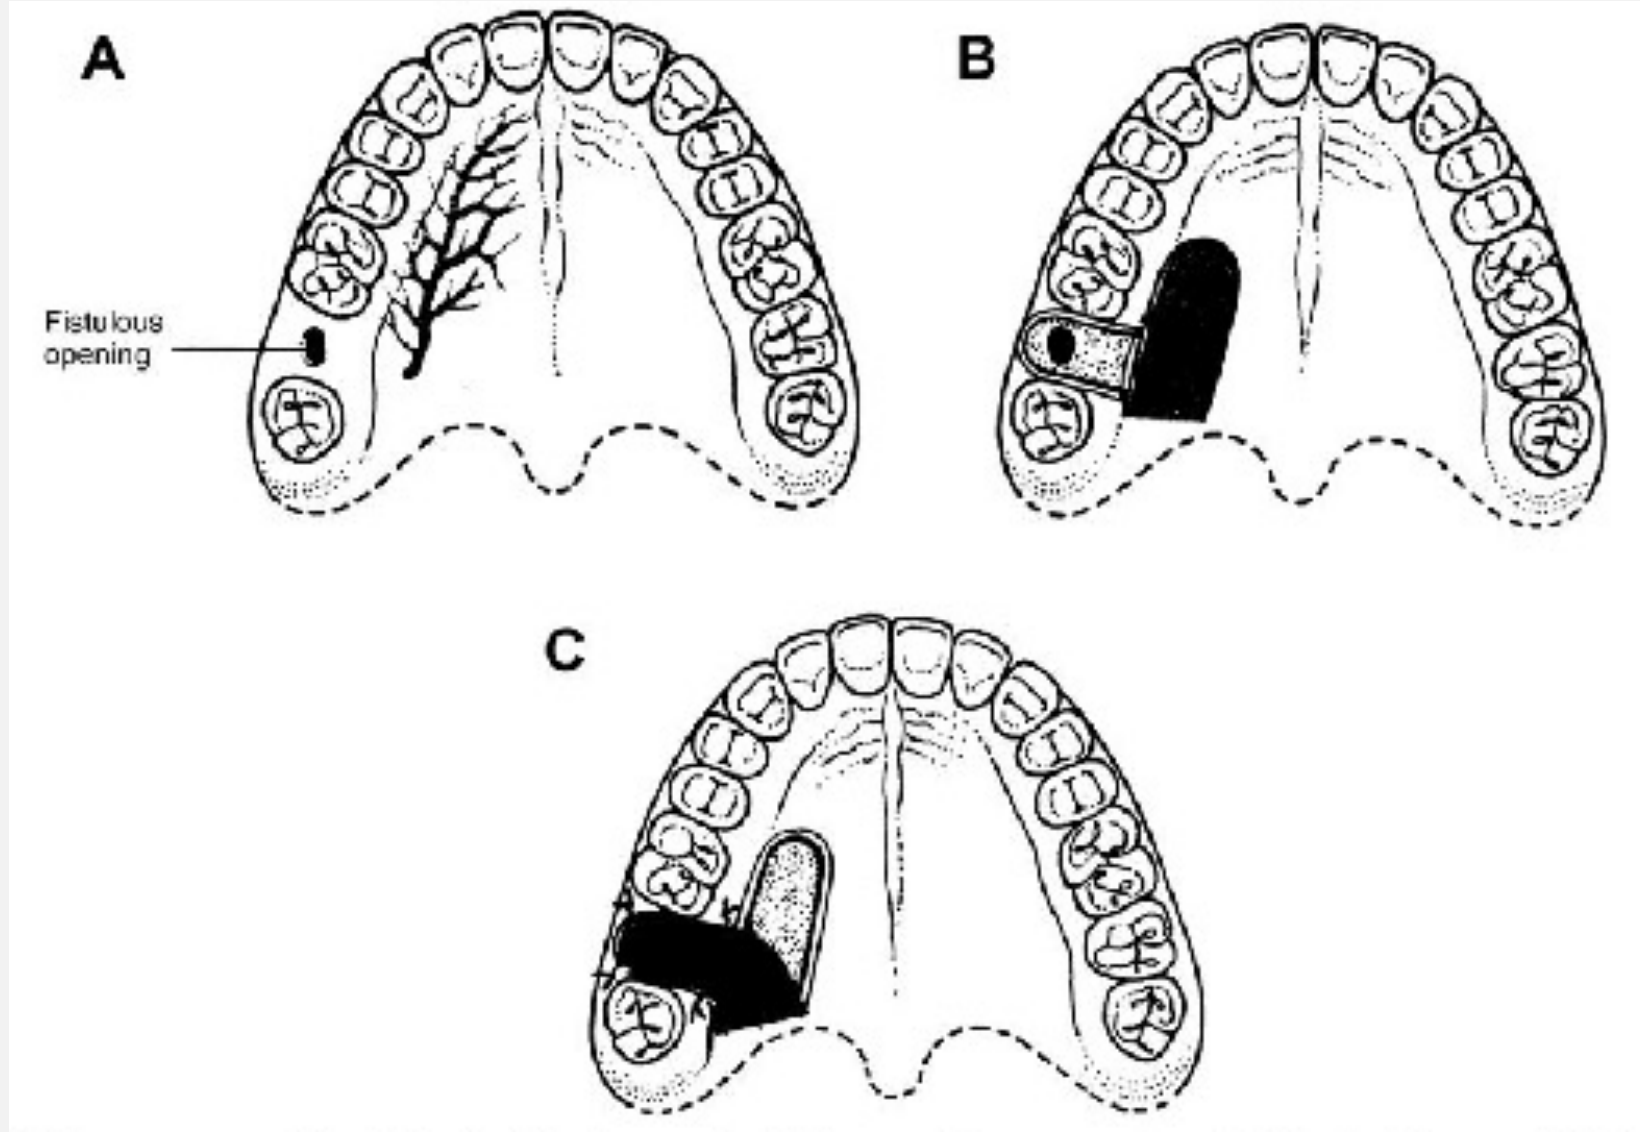
Surgical Closure Options79
- Buccal advancement flap.
- Raise 3-sided flap, score periosteum (transverse releasing incision) to release tension
- Risks reducing buccal sulcus depth
Surgical Closure Options (Continued)80
-
Buccal advancement flap
-
**Palatal rotational flap
-
Pedicle flap from palate rotated 90 degrees
-
Preserves sulcus depth but leaves palatal donor site to heal by secondary intention (painful)
-
Backup option**
-
Buccal advancement
-
Palatal rotational
-
**Buccal fat pad (Bichat’s fat pad
-
Herniate fat pad over defect
-
Well-perfused, epithelializes well
-
Often covered by a buccal advancement flap for a two-layer closure
-
Surgical closure may alter sulcus depth or architecture, affecting future implant or denture options)**
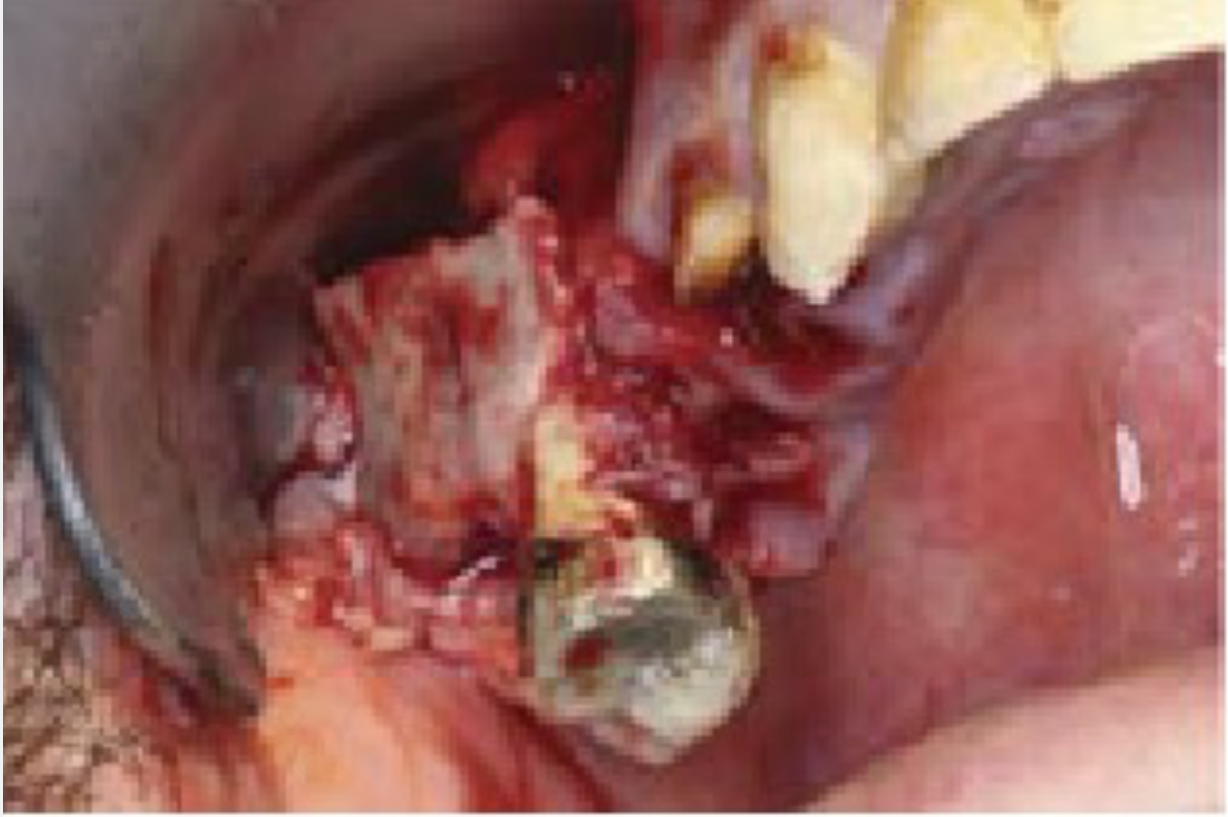
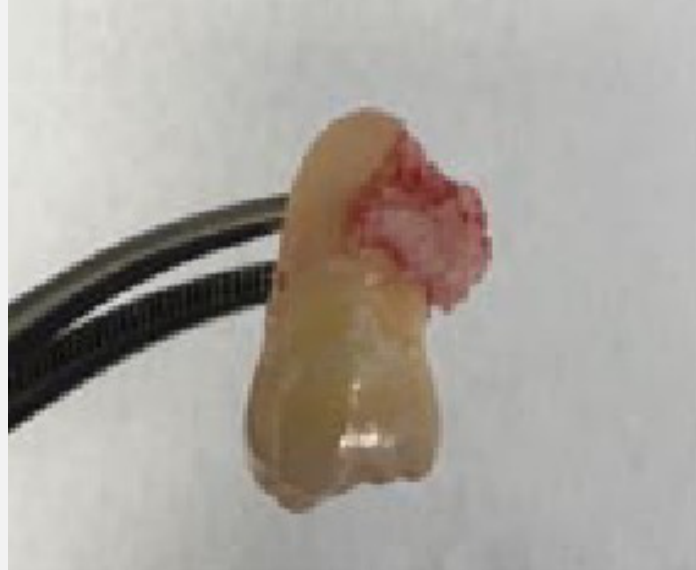
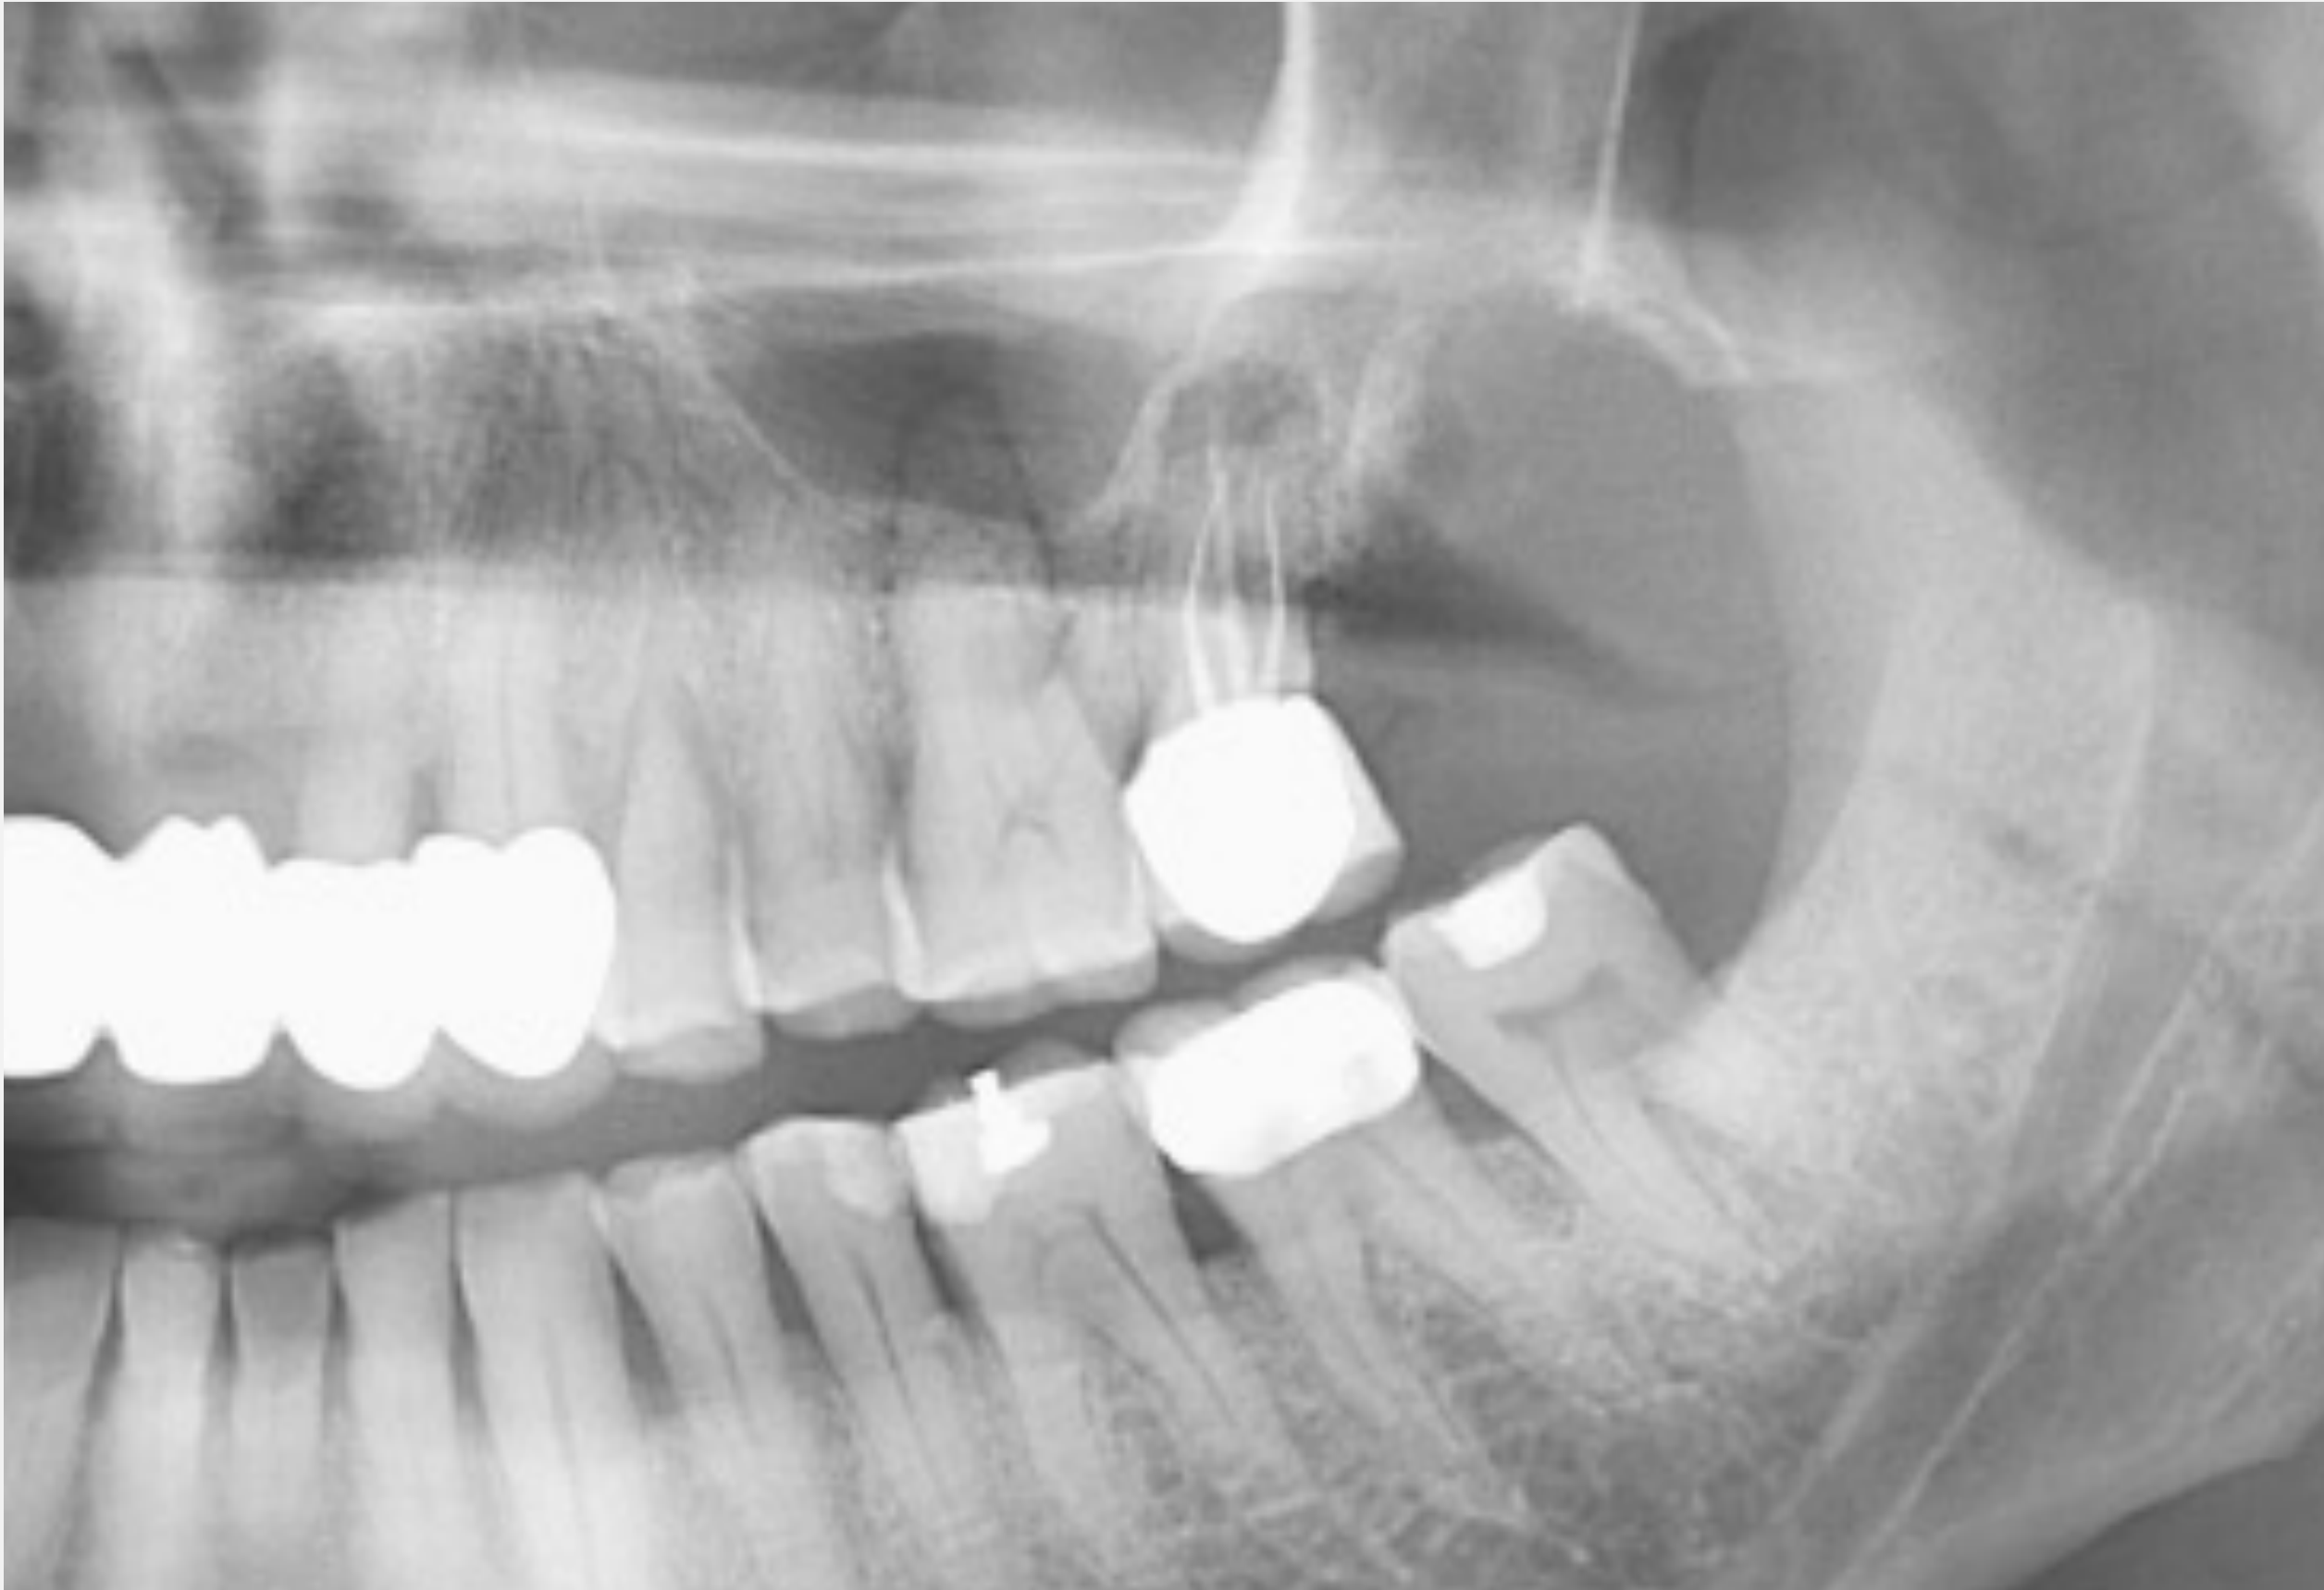
Fractured Tuberosity81
 |  |
 |  |
High Risk Factors82
- Divergent, bulbous, or ankylosed roots.
- Lone standing molars.
- Maxillary 3rd molars.
- Older patients.
- Long-standing teeth
- Excessive forces during extraction.
- Unsupported extraction technique.
- Lack of finger support during extraction
Clinical Signs83
- Loud cracking noise.
- Sudden loud crunch or crack
- Palatal mucosal tear.
- Blanching of palatal mucosa (blood flow impact)
- Tooth becomes very loose but does not come out
- Mobile alveolar segment.
- Excessive bleeding.
Management Strategies84
- Small fractures: May be considered an incidental finding.
- Segment Dissection: Dissect the segment from the mucosa to prevent further soft tissue trauma.
- Removal: The tooth is removed, and the mobile segment is either stabilised or removed.
- Splinting:
- Abandon the extraction.
- Stabilise the fracture with the tooth in situ.
- Methods: Composite wire splint or Essix retainer.
- Splint for 6-8 weeks to allow fibrous union
- Treat like a bony fracture
- Refer to OMFS - surgeon will section the tooth and trough bone to remove tooth while leaving bony segments in place
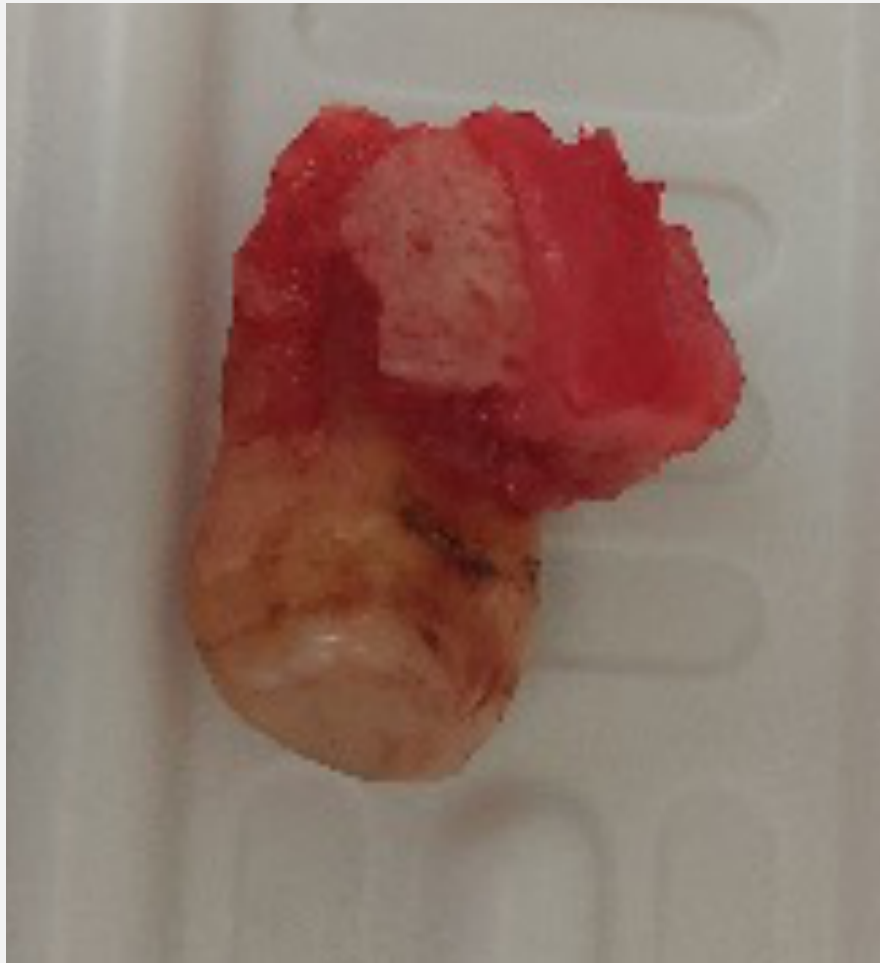
Visual documentation of clinical cases involving fractured segments and extracted specimens.
Case Study: Fractured Tuberosity
Maxillary third molar extraction where a large segment of tuberosity fractured. If removed, it causes functional disability and sinus communication. Stabilization is key.
Alveolar Osteitis Dry Socket85
 |  |  |
 |  |
MRONJ/ORN86
- Content to follow in subsequent sessions.
Pathophysiology87
- Failure or premature loss of the blood clot.
- Involves increased fibrinolysis and impaired scaffold formation.
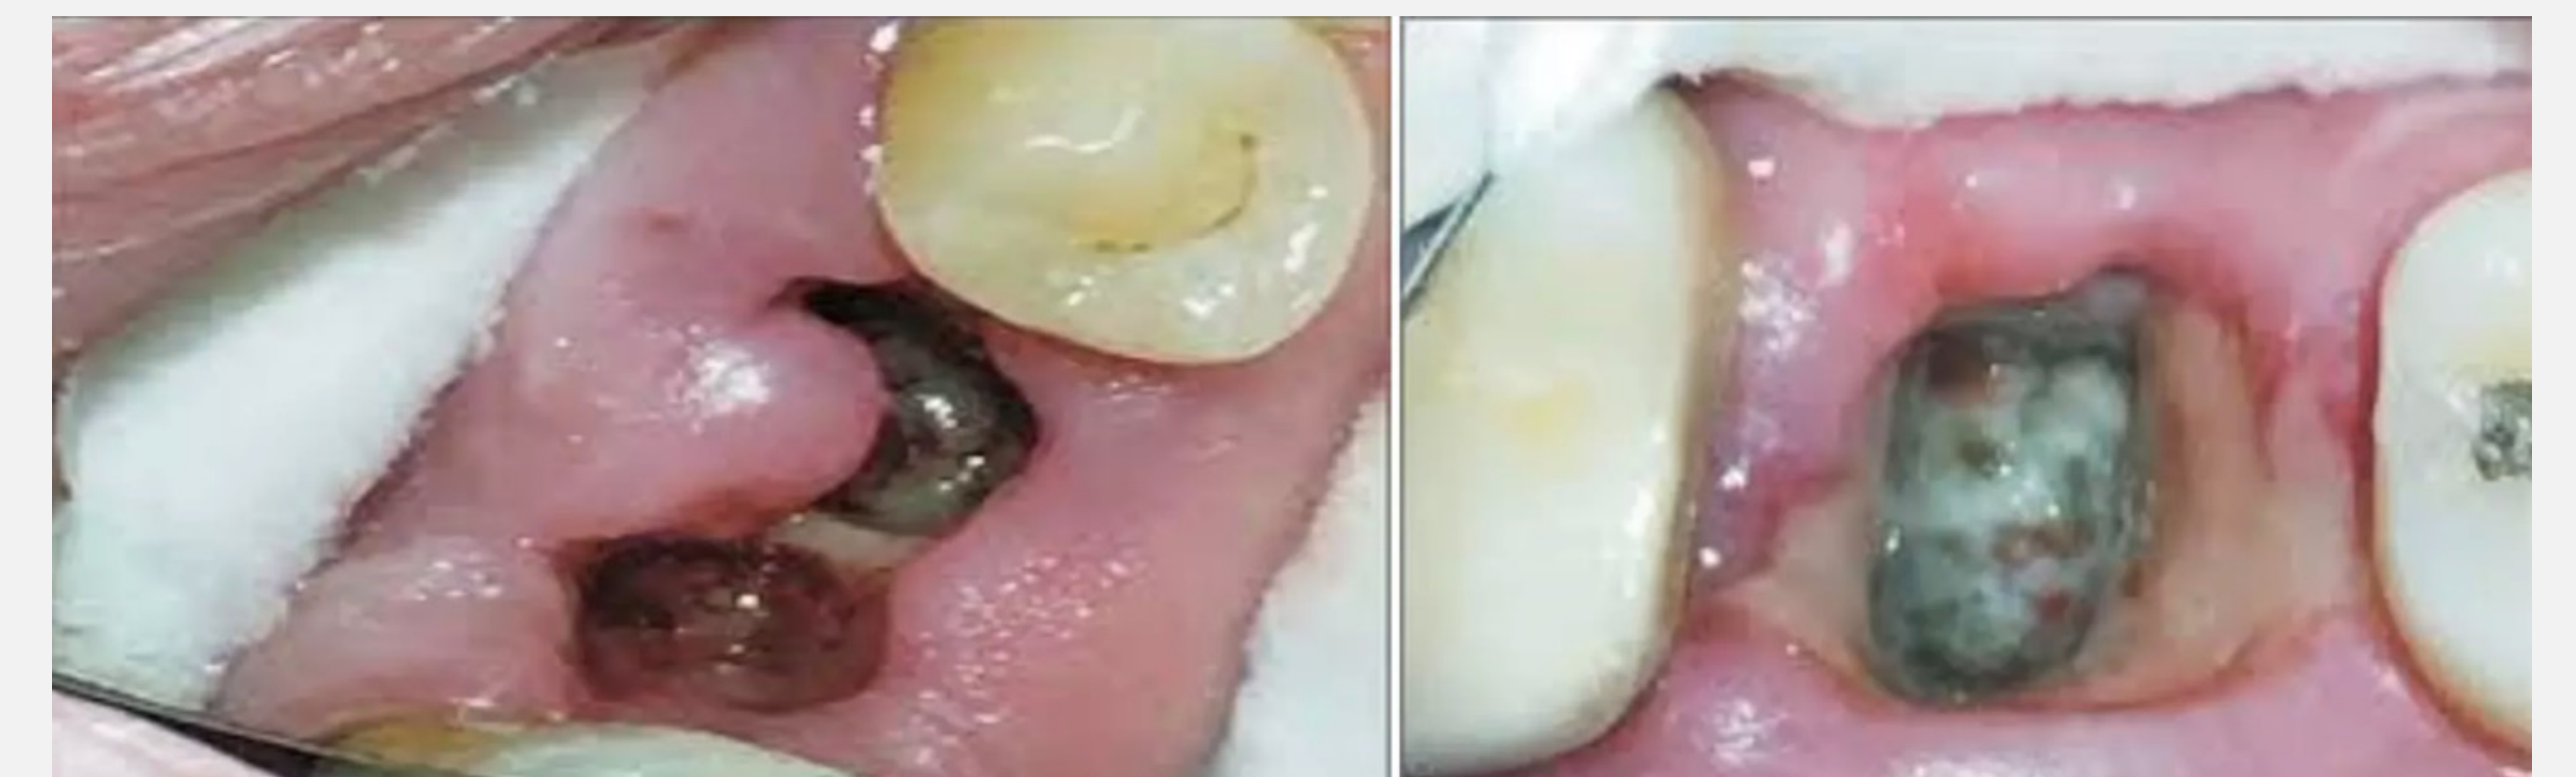
- Appearance: Exposed bone (white/grey), empty socket, foul smell
- Symptoms: Severe throbbing pain, often intensifying suddenly
Risk Factors
- Smoking.
- Oral contraceptive use.
- Traumatic extraction (heavy forces).
[Page intentionally left blank or contains no unique text content]
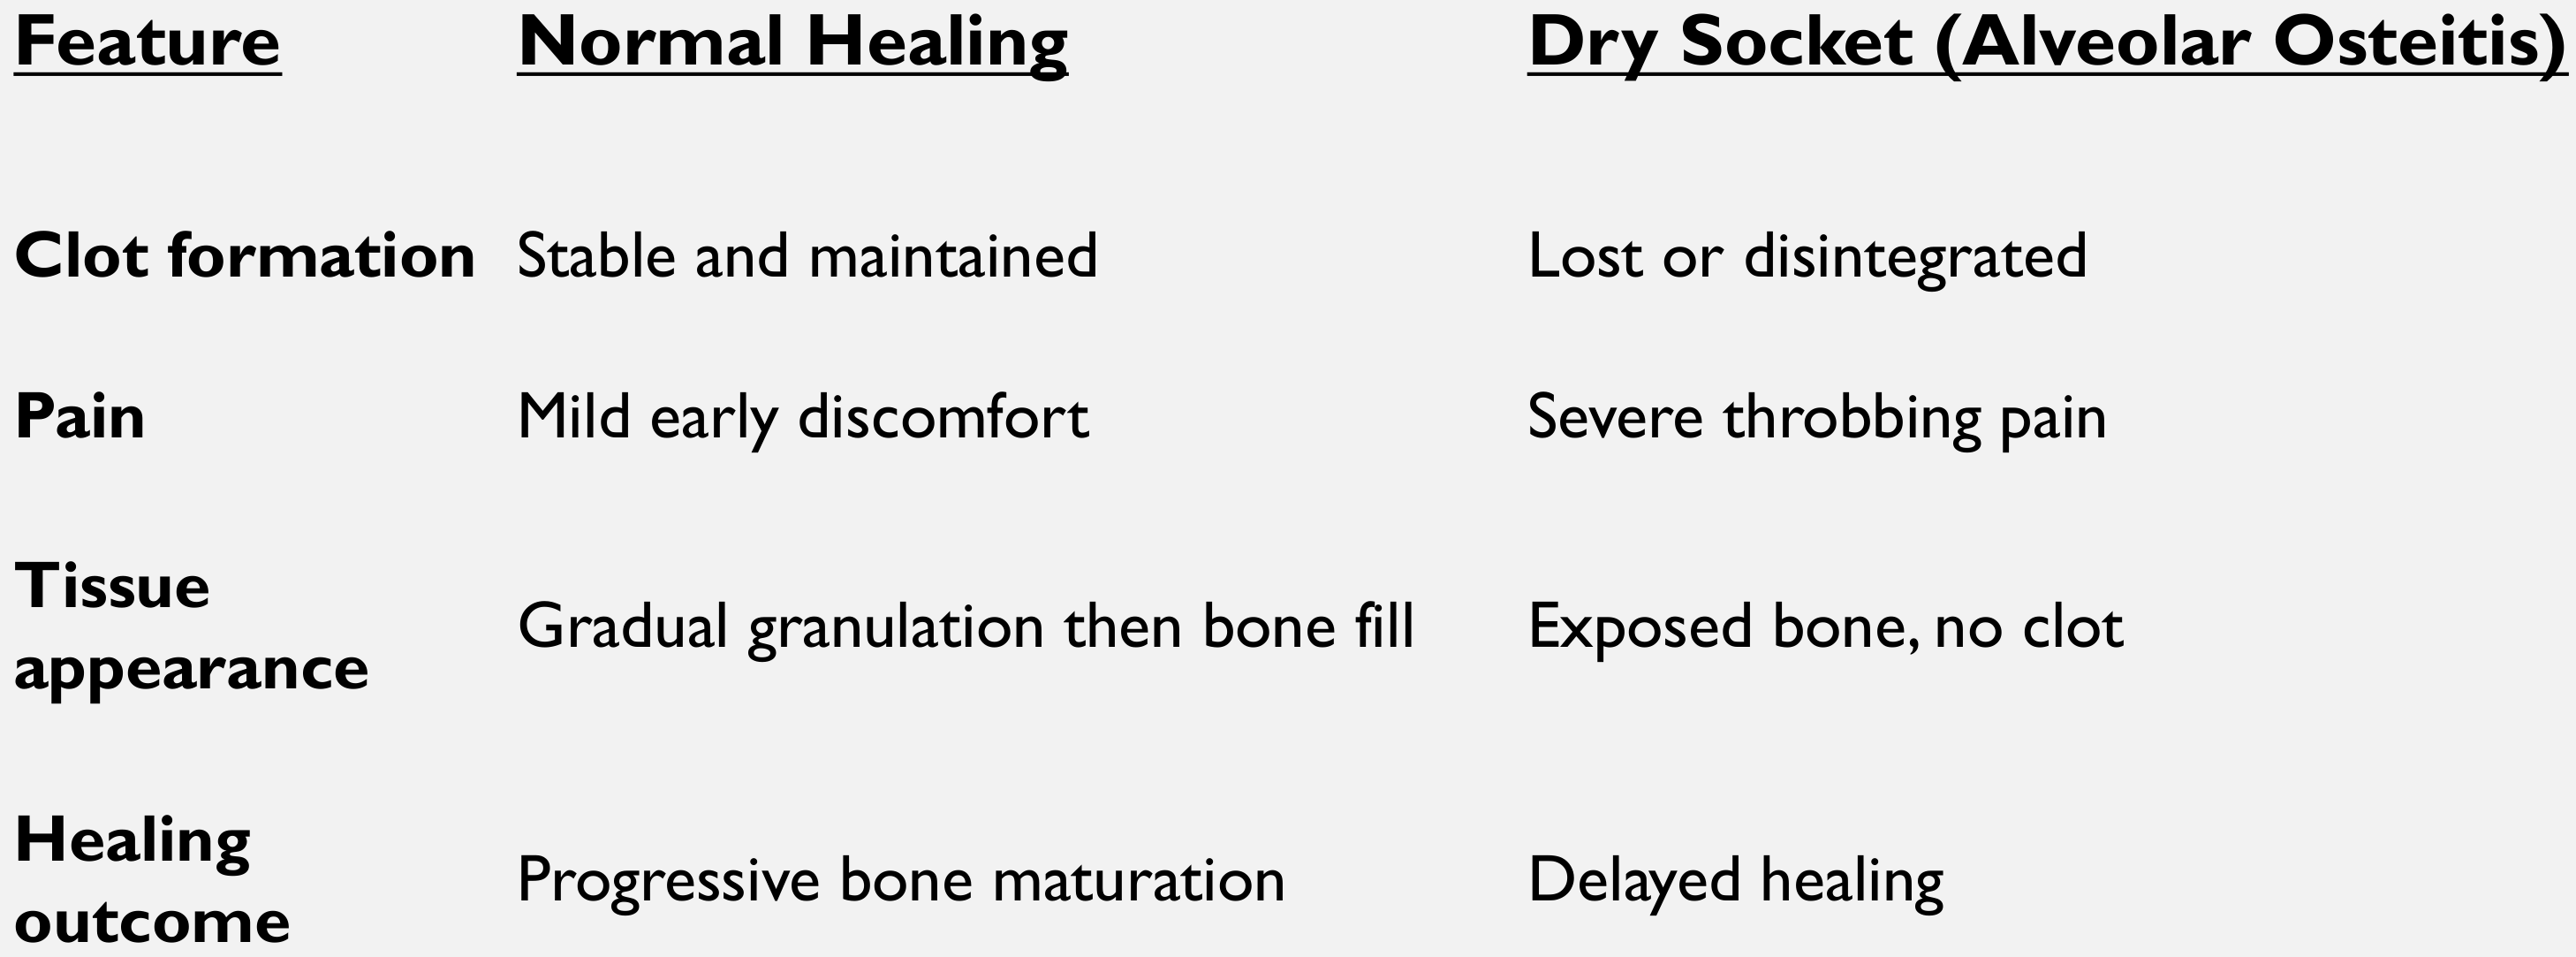
Clinical Comparison88
| Feature | Normal Healing | Dry Socket (Alveolar Osteitis) |
|---|---|---|
| Clot formation | Stable and maintained | Lost or disintegrated |
| Pain | Mild early discomfort | Severe throbbing pain |
| Tissue appearance | Gradual granulation then bone fill | Exposed bone, no clot |
| Healing outcome | Progressive bone maturation | Delayed healing |
Treatment and Care89
- Irrigation: Use saline (exercise caution with CHX
- Chlorhexidine avoided due to sensitivity risks
- Do not rinse vigorously over the area
- Dry socket is not an infection).
- Obtundent Dressing (Alveogyl):
- Should remain in place for 24-72 hours.
- Note: It is not resorbable. If suturing, it must be removed prior to soft tissue closure.
- Can be sutured in (requires removal appointment) or left to fall out
- Post-operative Care: Wound care and smoking cessation.
- Antibiotics: Not indicated unless there is evidence of underlying spreading infection.
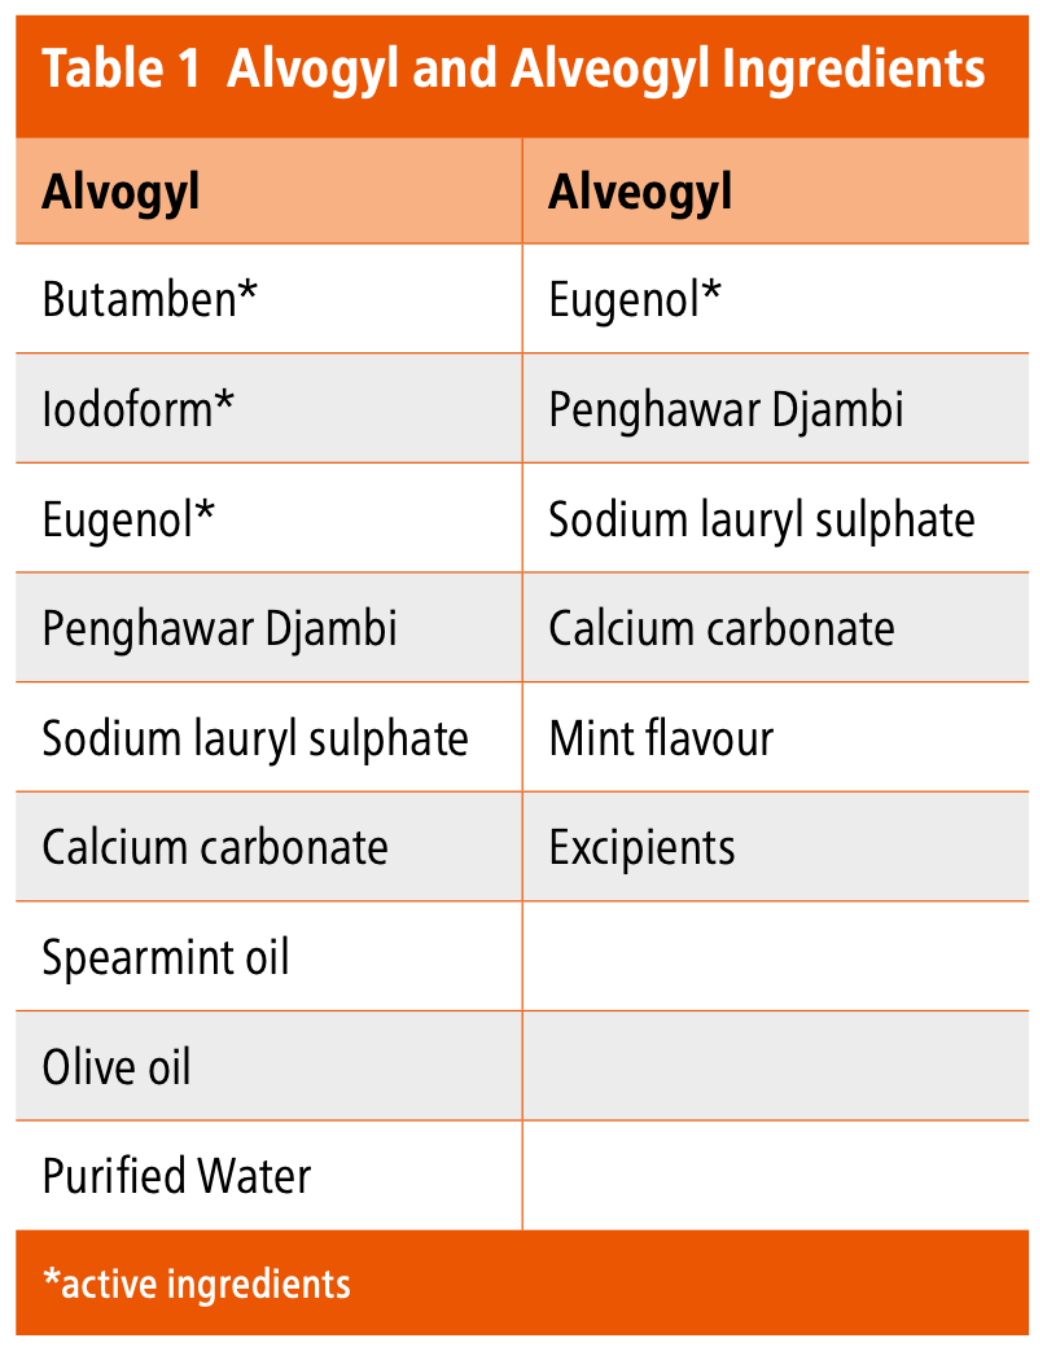
Comparison of Alvogyl and Alveogyl Ingredients90
| Alvogyll | Alveogyl |
|---|---|
| Butamben* | Eugenol* |
| Iodoform* | Penghawar Djambi |
| Eugenol* | Sodium lauryl sulphate |
| Penghawar Djambi | Calcium carbonate |
| Sodium lauryl sulphate | Mint flavour |
| Calcium carbonate | Excipients |
| Spearmint oil | |
| Olive oil | |
| Purified Water |
*Denotes active ingredients.
Product Update
Historical: Previously contained Iodoform. Current (Post-2020): Product renamed Alveogyl. Iodoform removed. Active Ingredient: Primarily Eugenol (anti-inflammatory), with some SLS, calcium carbonate, and mint flavoring.
Practical Activities
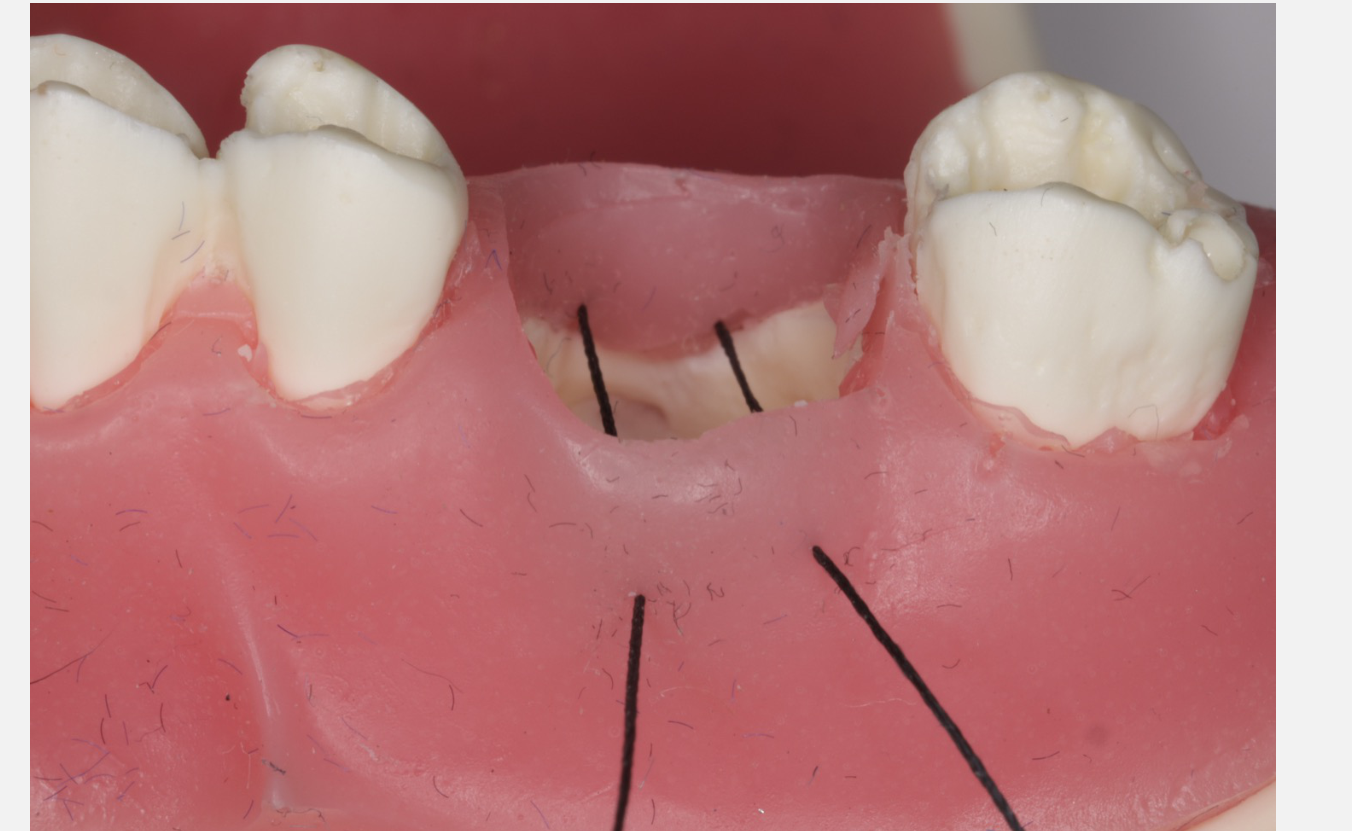
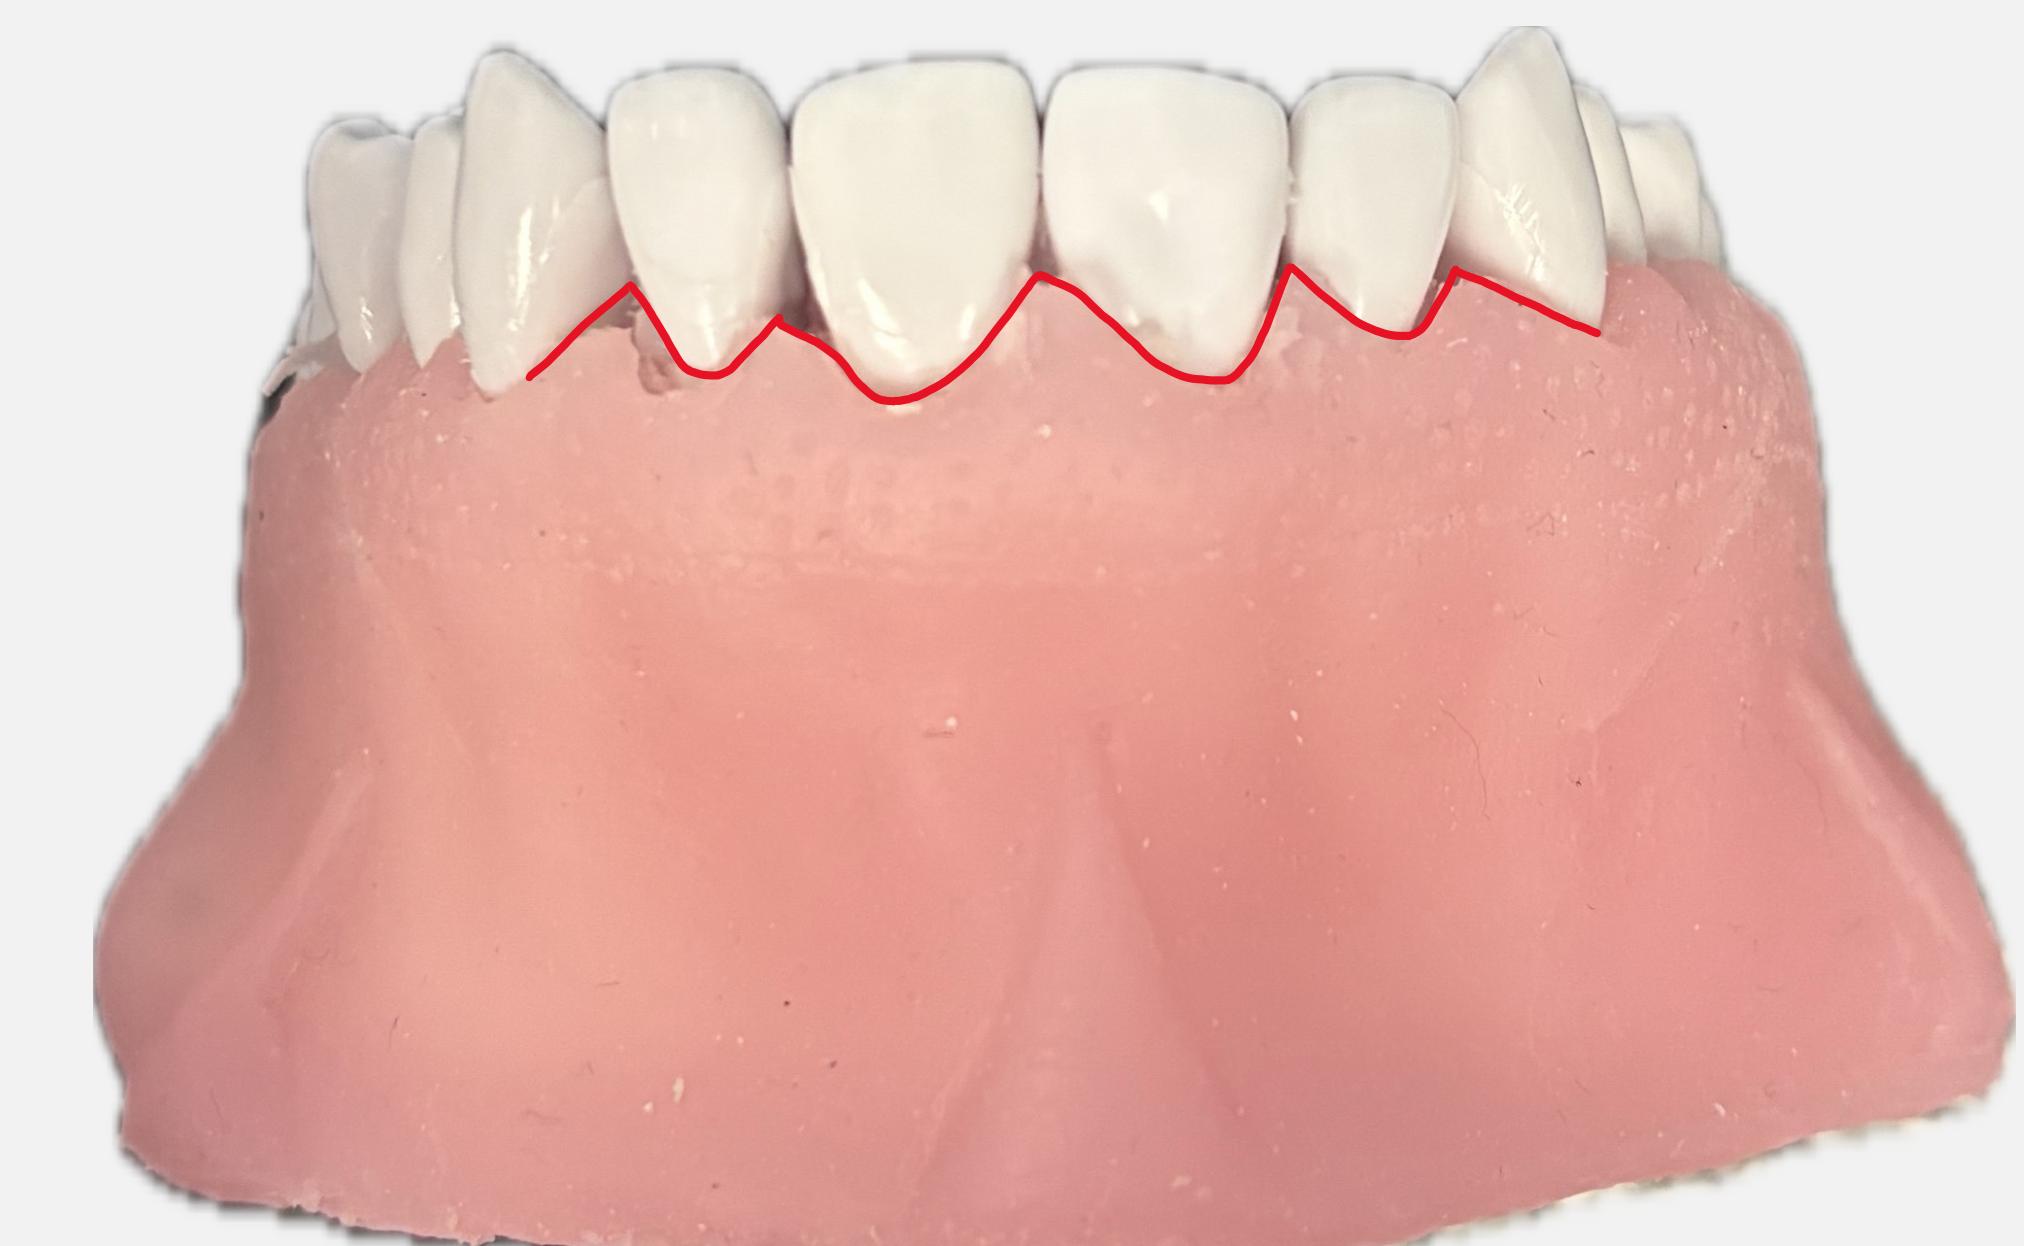
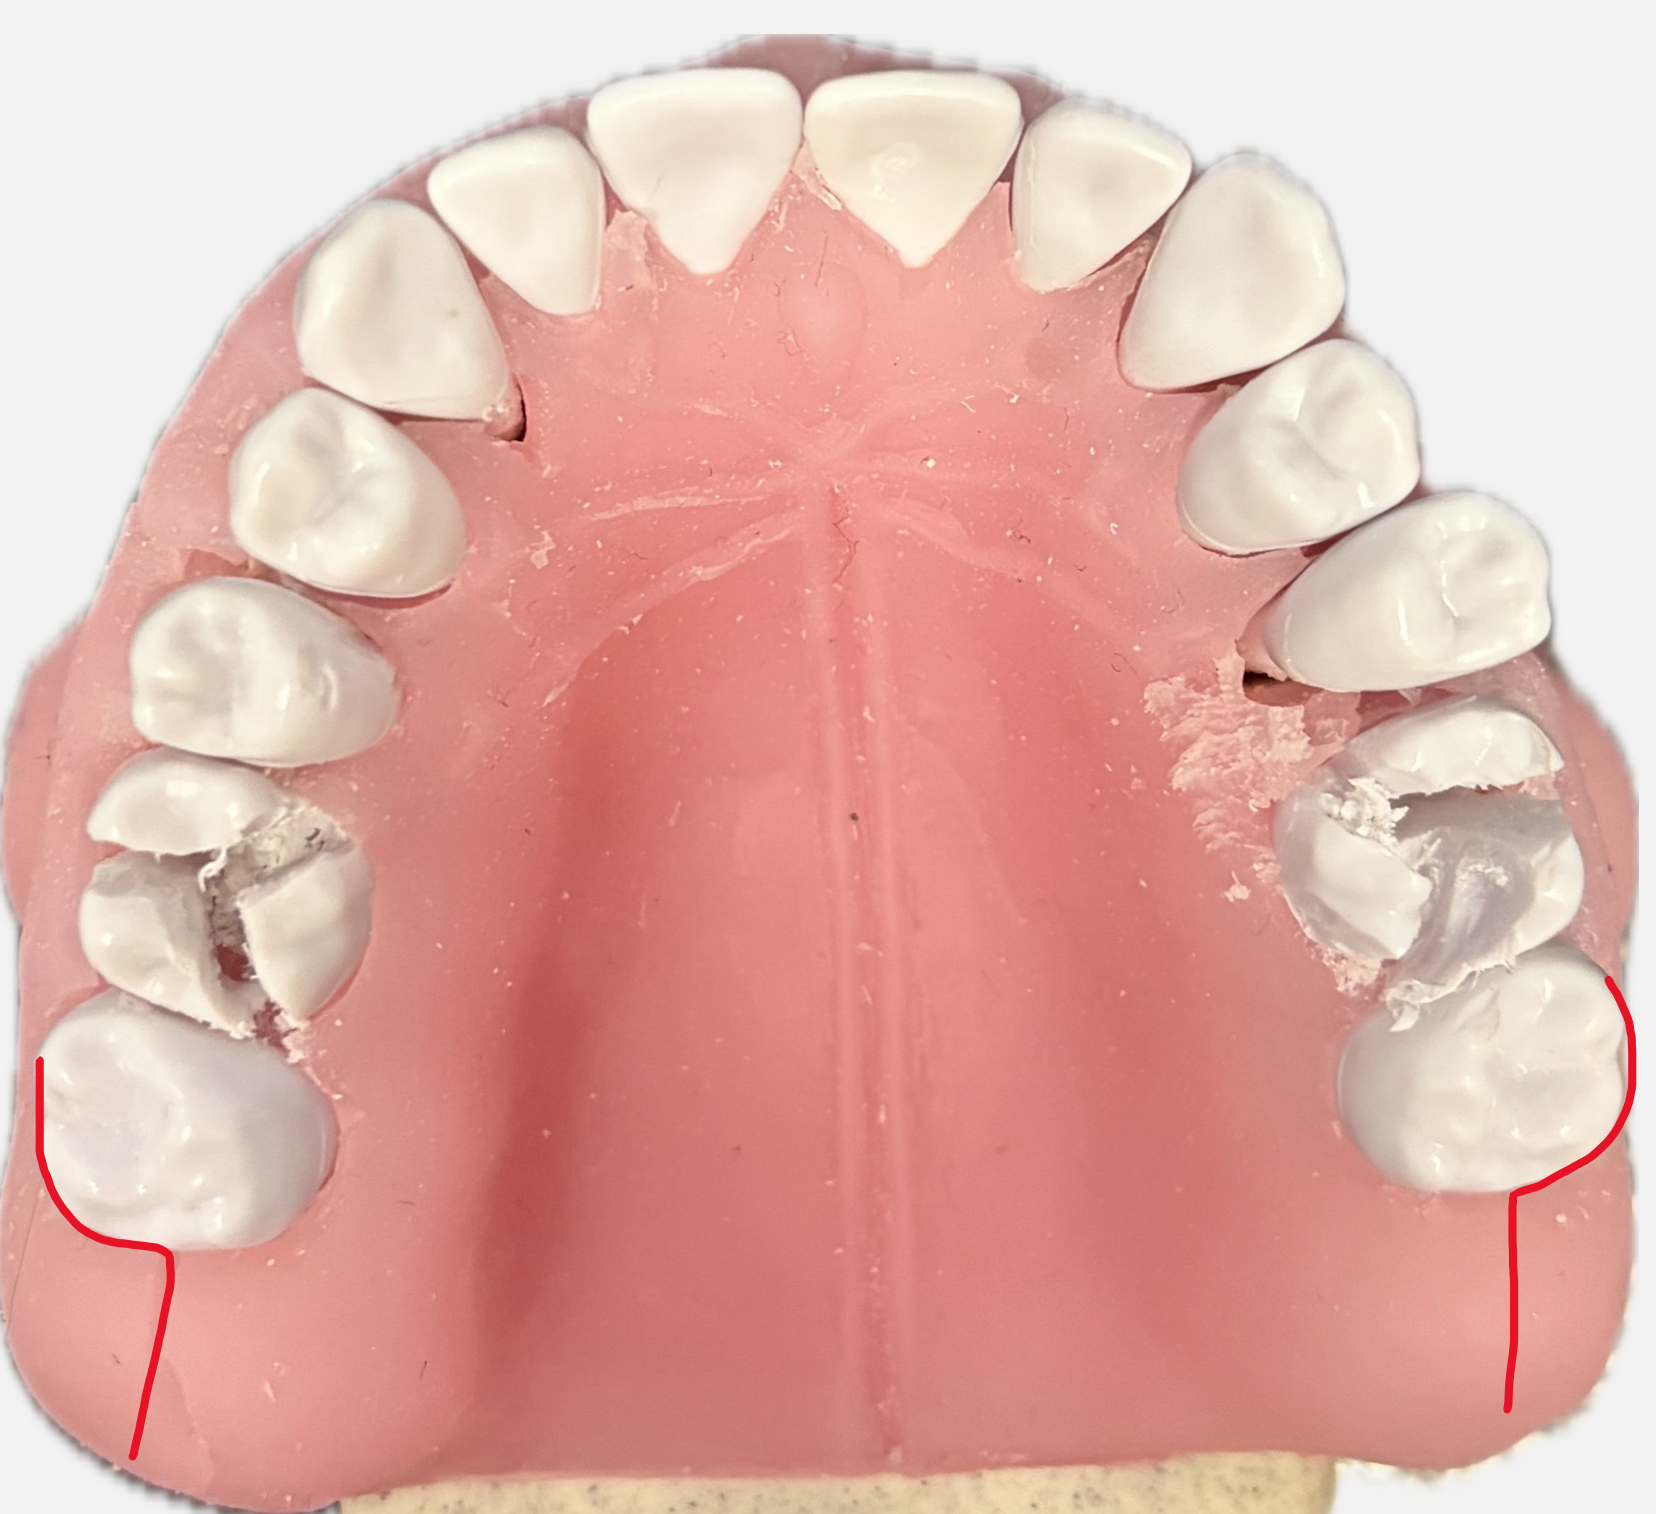
This activity focuses on the surgical technique for raising a full thickness mucoperiosteal flap.
Activity 1 Raising a Flap9192
 |  |
Group Procedures and Techniques93
- Student 1: Raise a full thickness envelope flap across the 12-22 region.
- Students 2 and 3:
- Place a sulcular incision around the 7.
- Extend the incision by moving the blade along the crest in a distal direction.
- Use the periosteal elevator to retract the tissue.
- Setup: Groups of three using extraction models (last session for these models)
- Instruments: Periosteal Elevators (Howarth, Freer, Maltz) - use smooth rounded end only
- Scalpel: Run blade around mucosa carefully
- Posterior incision extends to 8 region (simulating impacted wisdom tooth access)
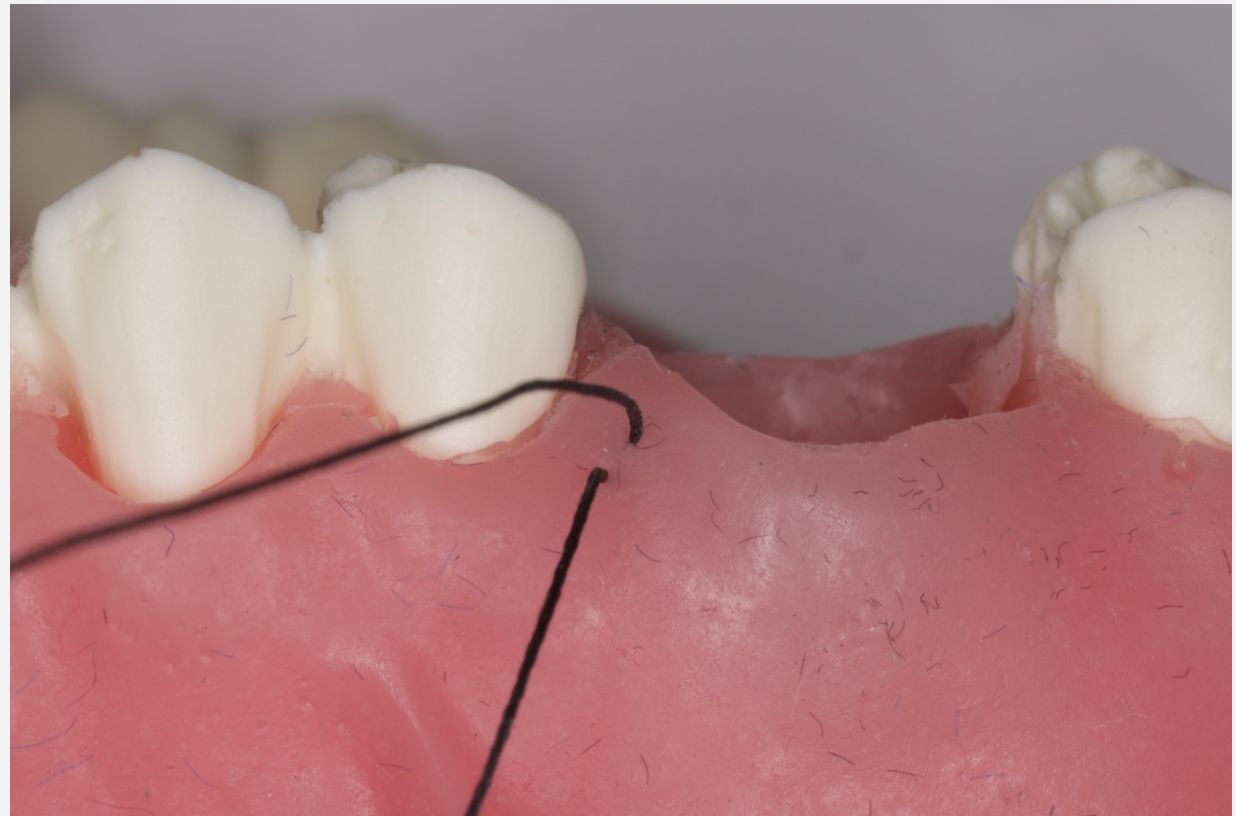
Activity 2 Continuous Suturing949596
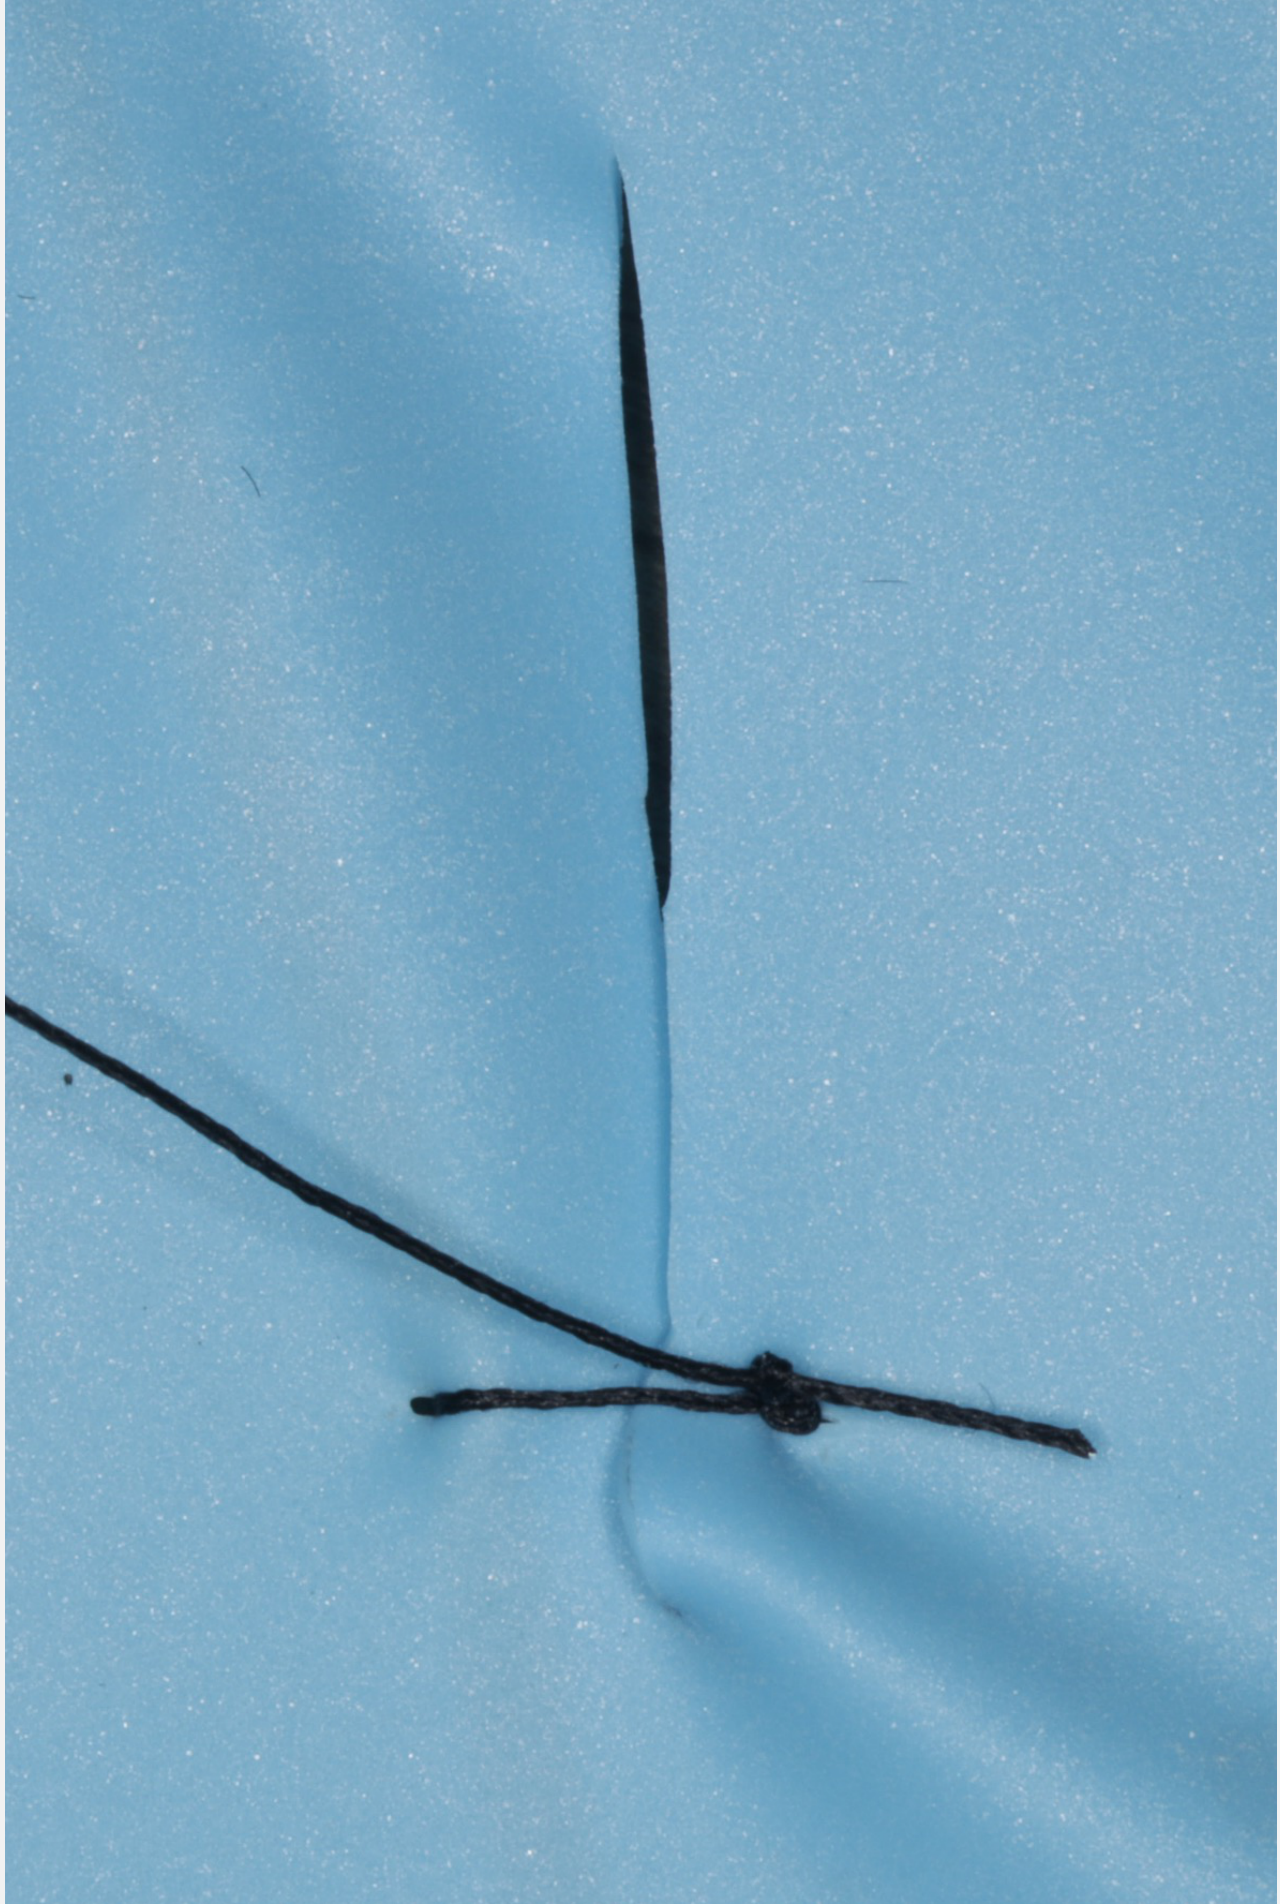
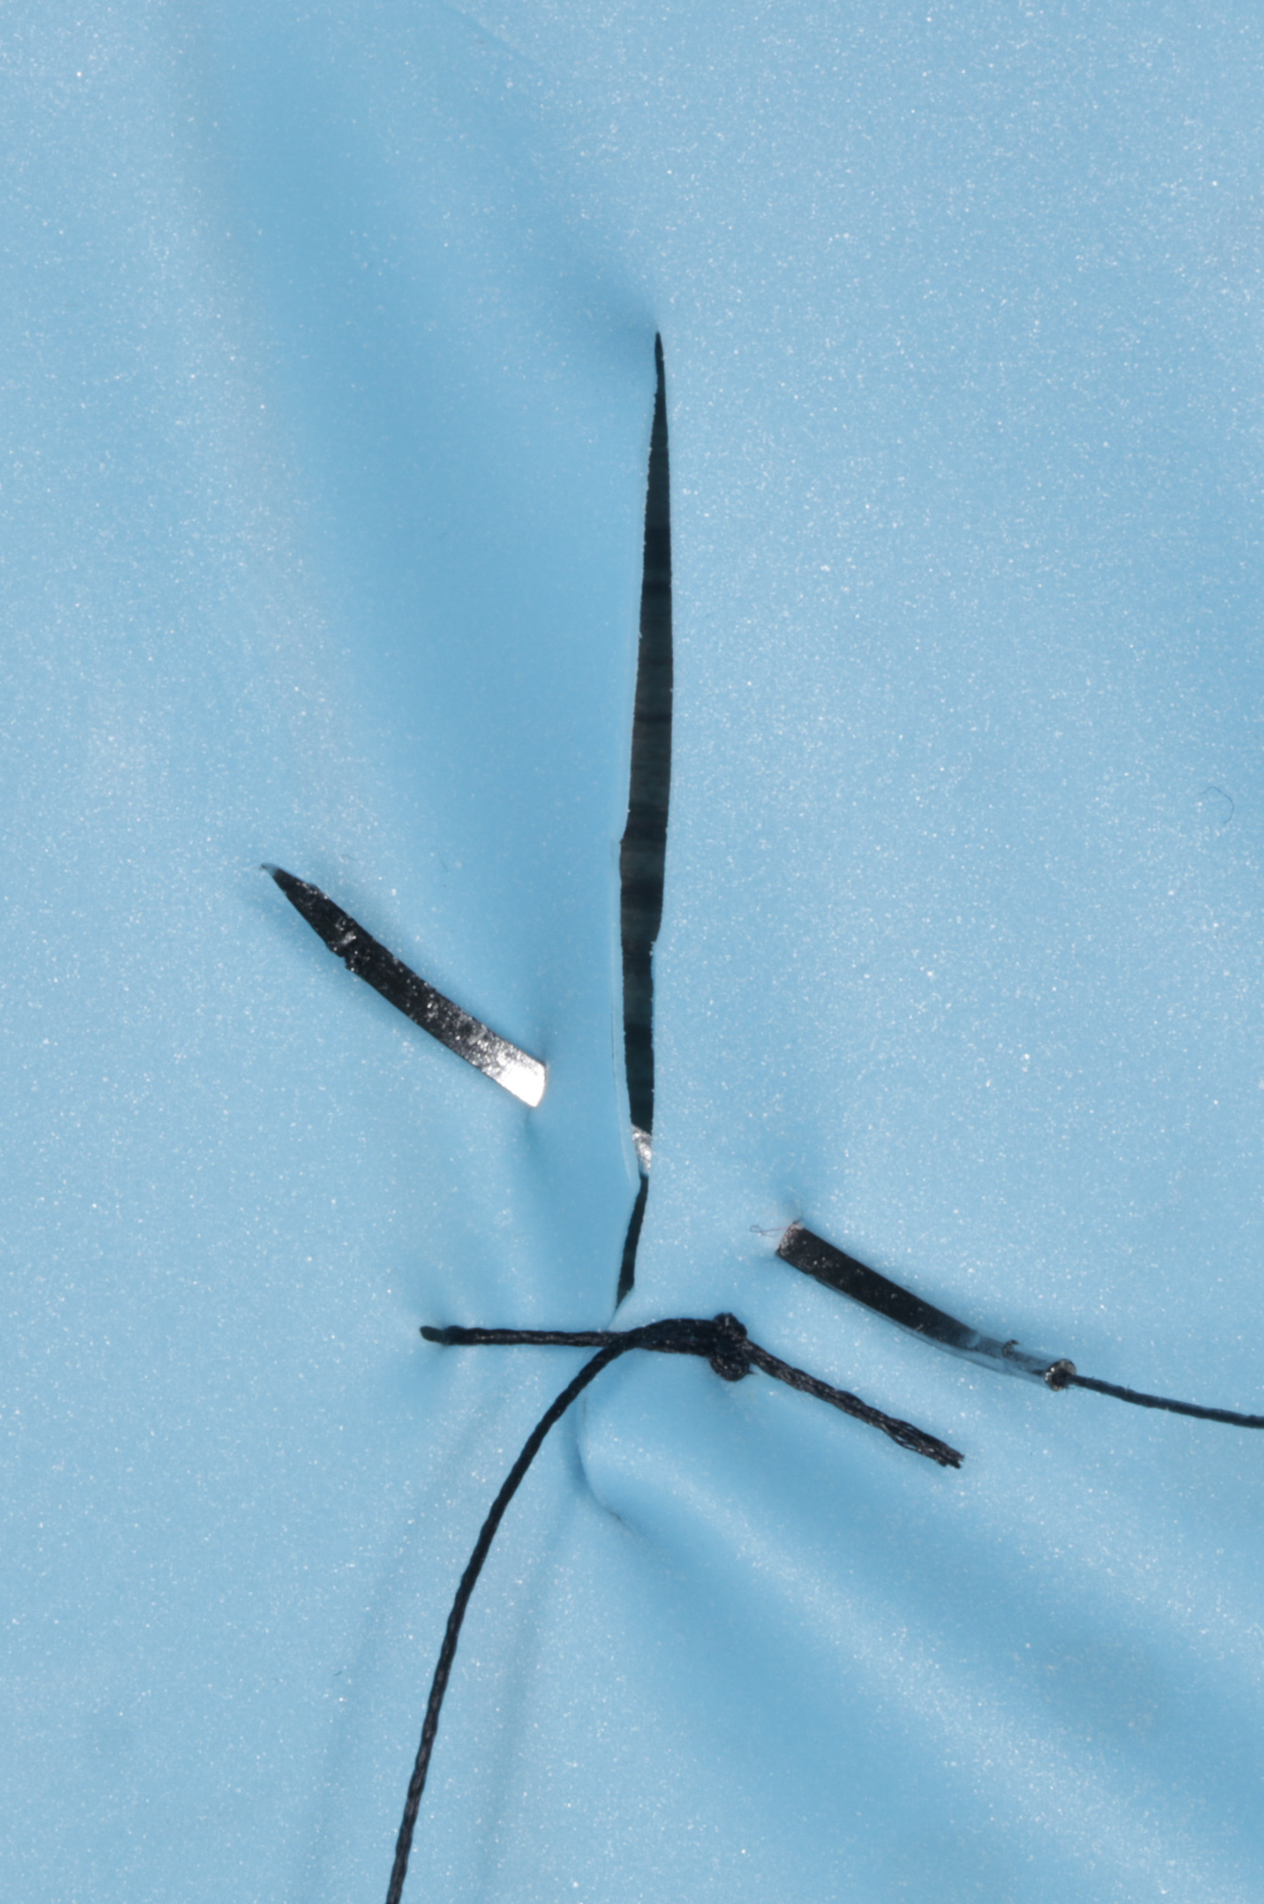
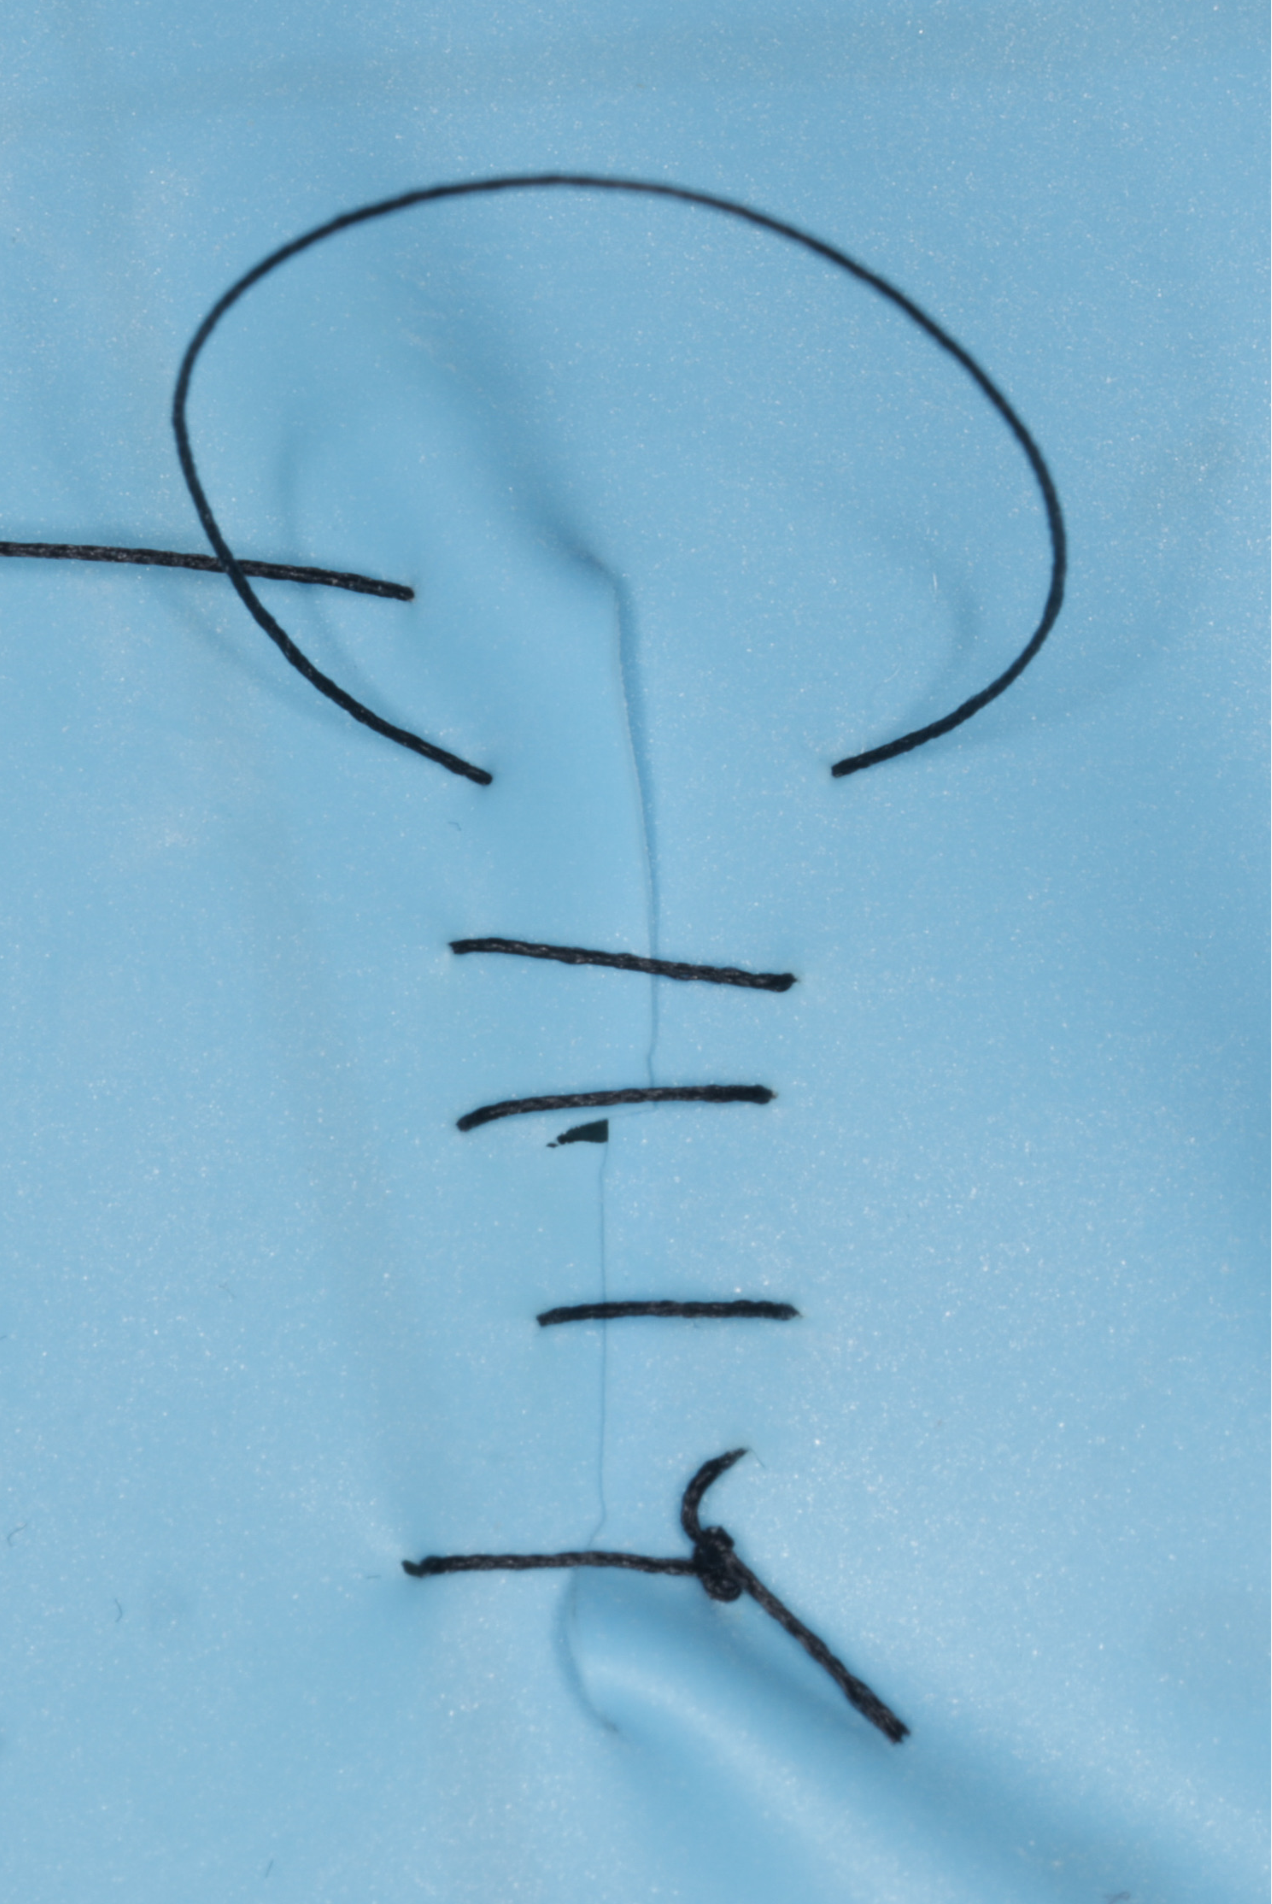
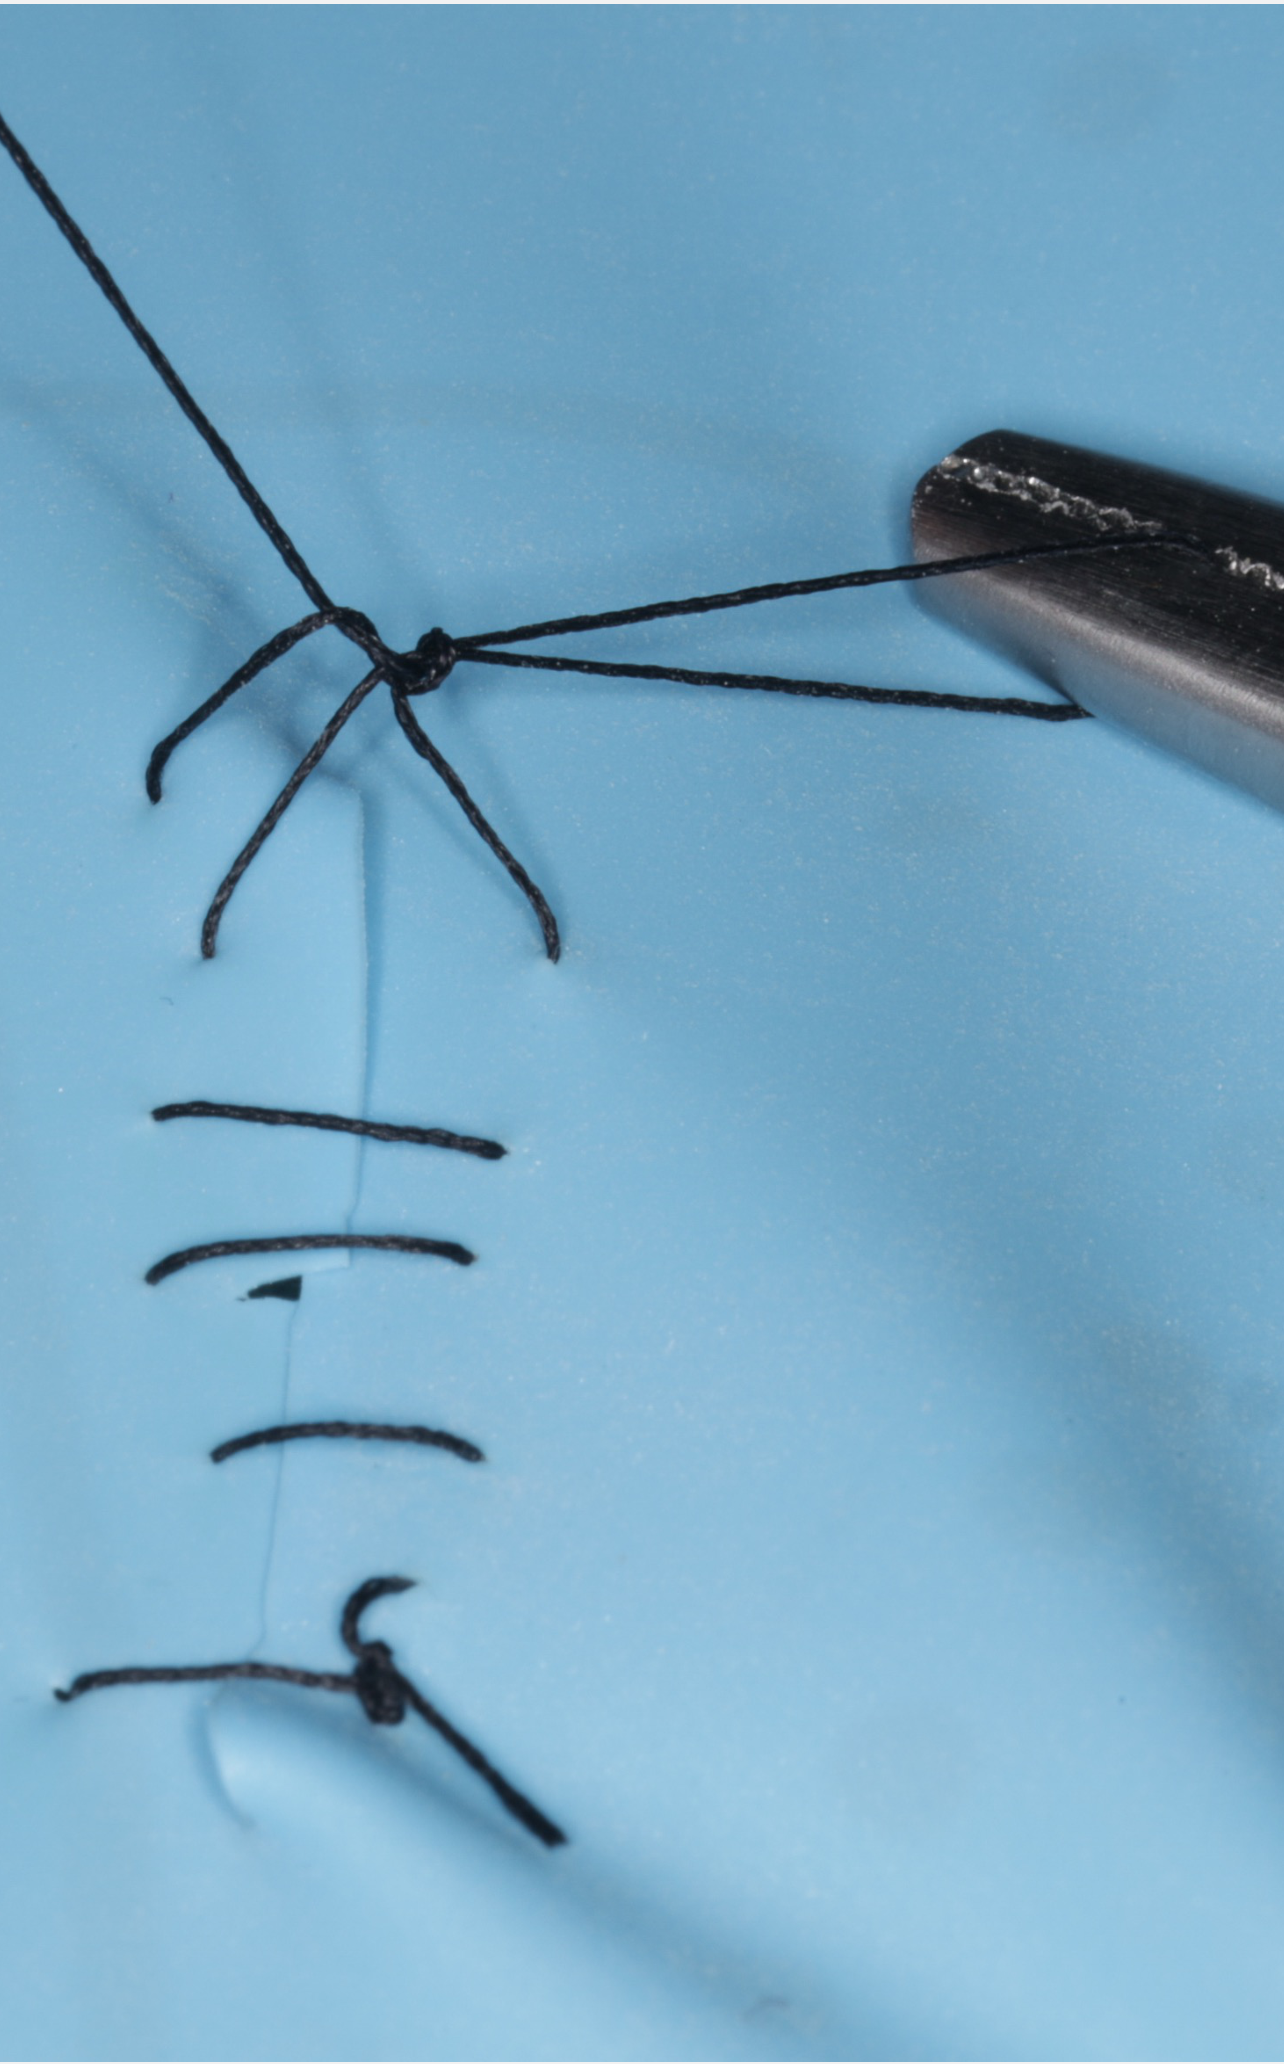
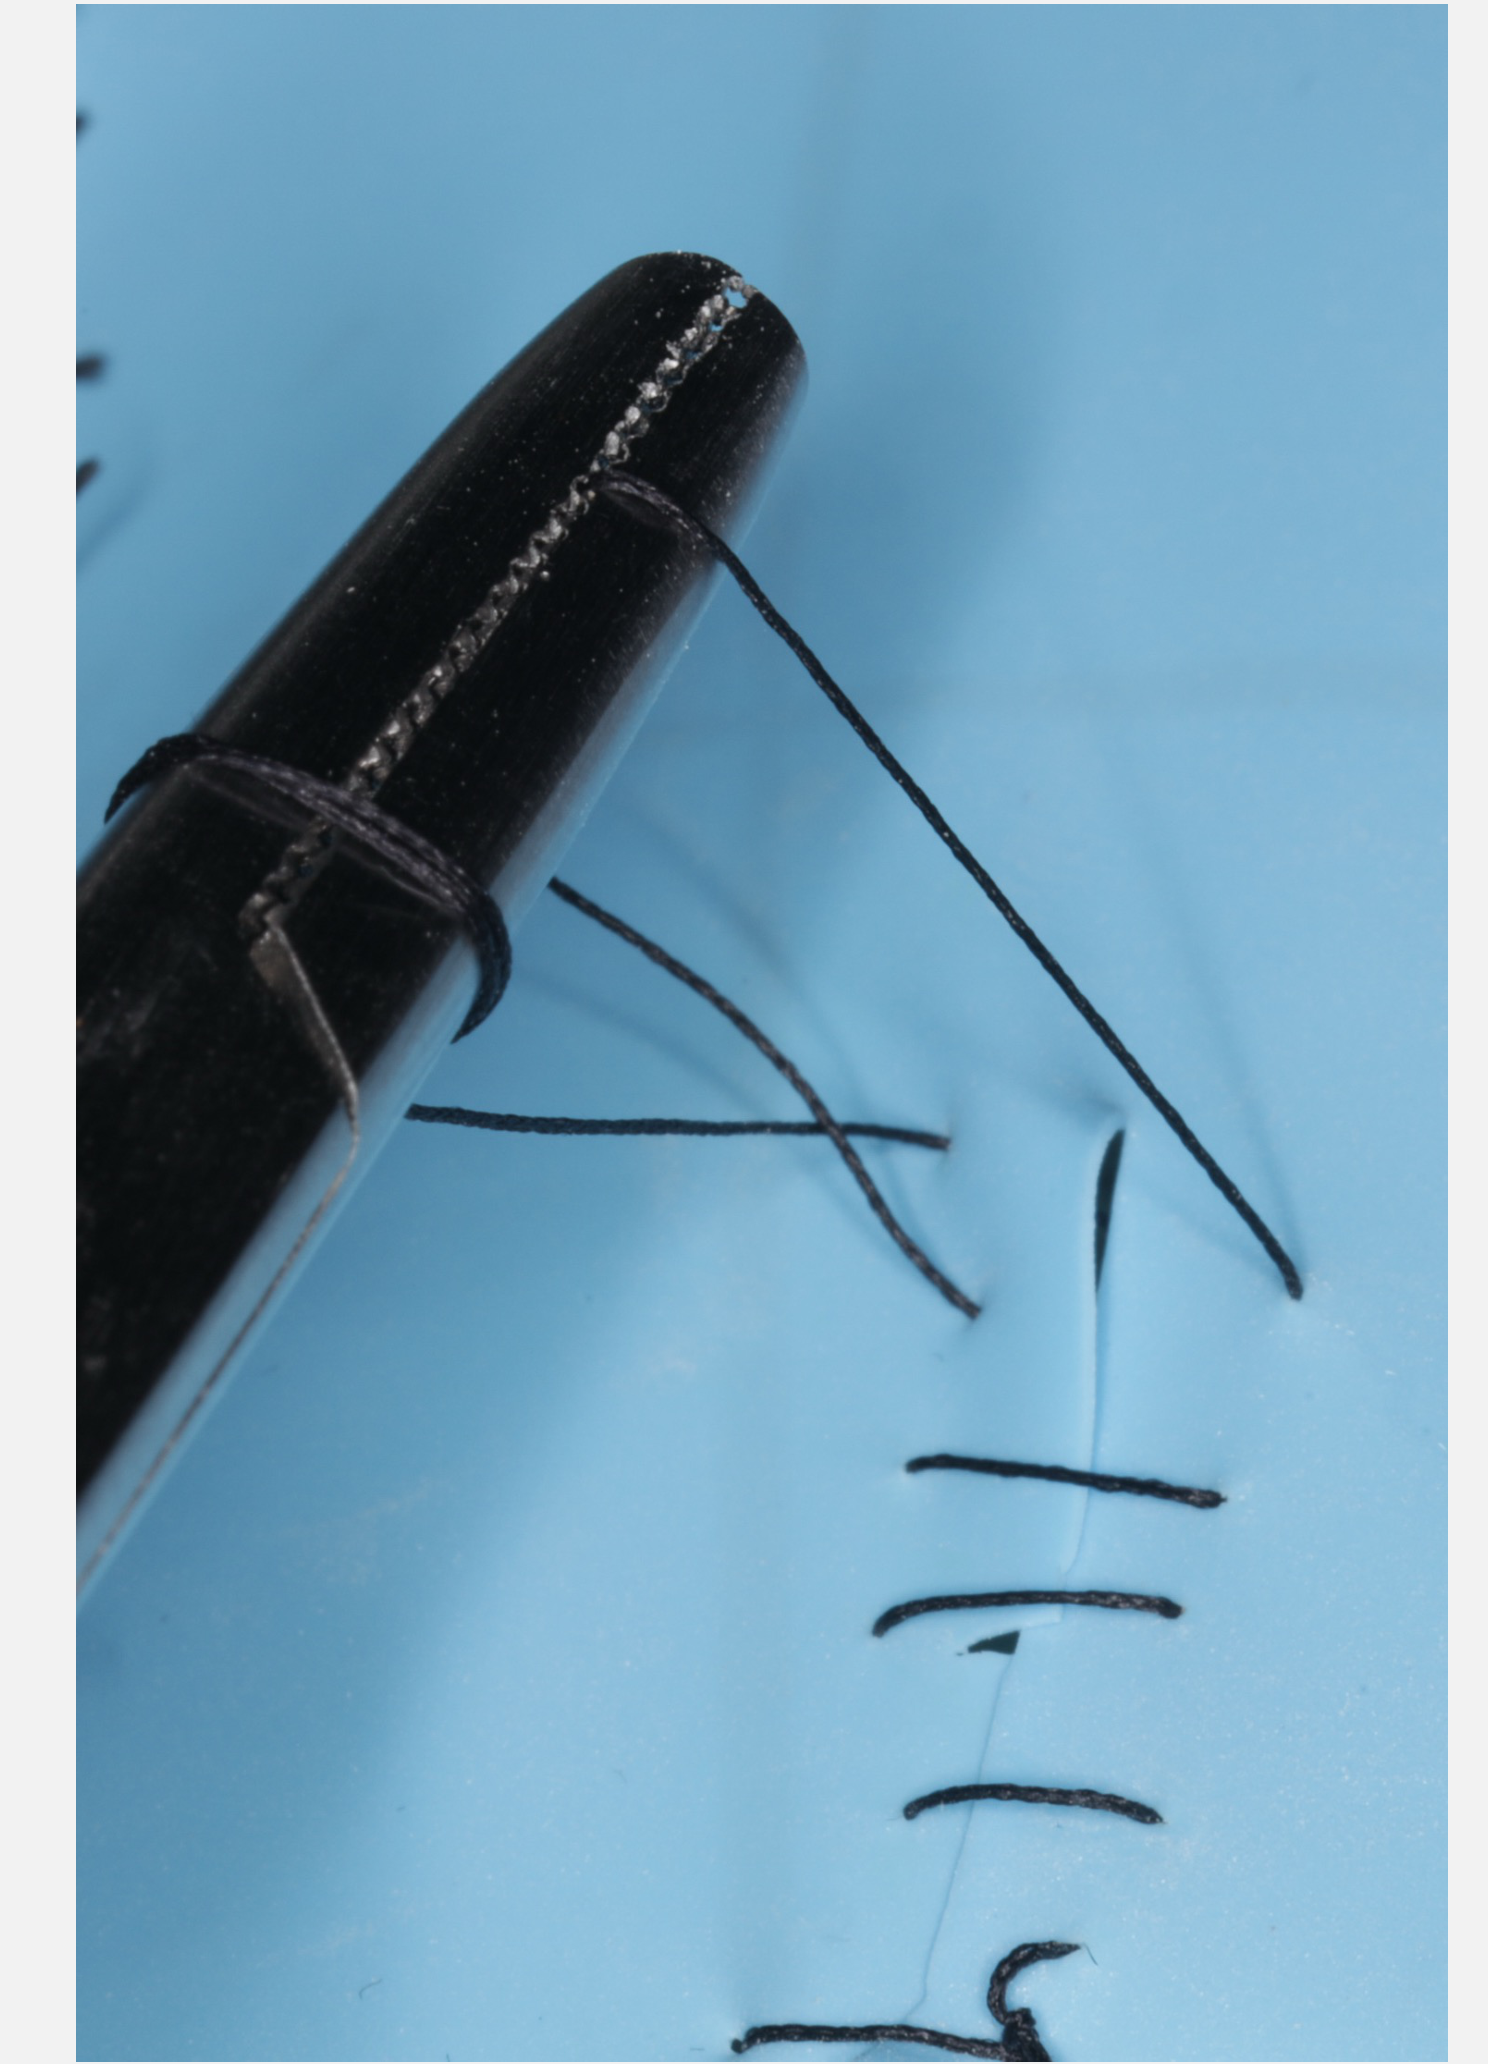
This activity involves practicing the technique of continuous suturing.
 |  |  |
 |  |
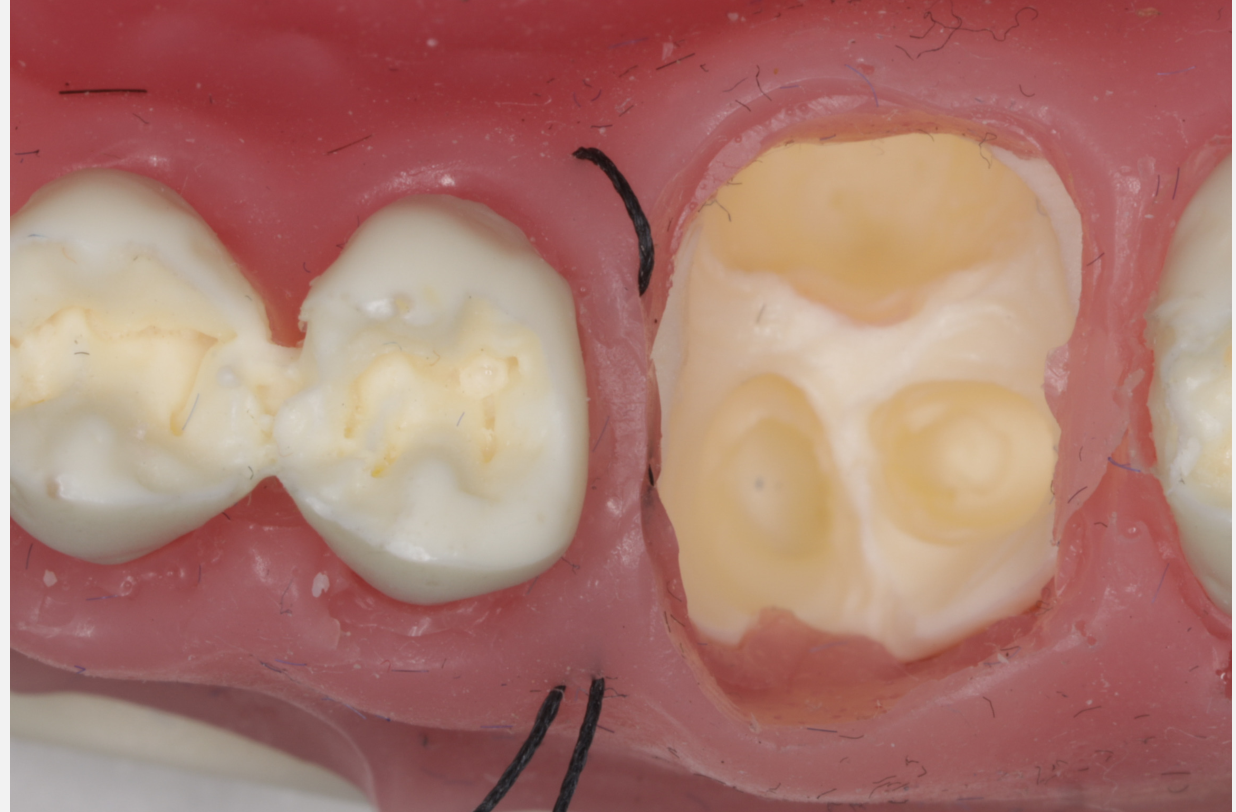
Preparation and Extraction97
- Remove all anterior teeth from 5 to 5.
- Note that teeth 3, 4, and 5 were extracted previously and should be easily removed.
- This procedure simulates a clinical situation similar to an anterior clearance.
Suturing Technique
Close the wound using continuous suturing. Each participant will perform the following steps:
- Start with a simple interrupted suture.
- Perform three passes with the suture material.
- Lock the suture off to secure the closure.
- Focus on needle handling and avoiding bone contact
- Bite size should be 2-3mm from margin
Footnotes
-
Original PDF page 1: W1 Surgical Extraction Workshop, p.1 ↩
-
Original PDF page 2: W1 Surgical Extraction Workshop, p.2 ↩
-
Original PDF page 3: W1 Surgical Extraction Workshop, p.3 ↩
-
Original PDF page 4: W1 Surgical Extraction Workshop, p.4 ↩
-
Original PDF page 5: W1 Surgical Extraction Workshop, p.5 ↩
-
Original PDF page 6: W1 Surgical Extraction Workshop, p.6 ↩
-
Original PDF page 7: W1 Surgical Extraction Workshop, p.7 ↩
-
Original PDF page 8: W1 Surgical Extraction Workshop, p.8 ↩
-
Original PDF page 9: W1 Surgical Extraction Workshop, p.9 ↩
-
Original PDF page 10: W1 Surgical Extraction Workshop, p.10 ↩
-
Original PDF page 11: W1 Surgical Extraction Workshop, p.11 ↩
-
Original PDF page 12: W1 Surgical Extraction Workshop, p.12 ↩
-
Original PDF page 13: W1 Surgical Extraction Workshop, p.13 ↩
-
Original PDF page 14: W1 Surgical Extraction Workshop, p.14 ↩
-
Original PDF page 16: W1 Surgical Extraction Workshop, p.16 ↩
-
Original PDF page 17: W1 Surgical Extraction Workshop, p.17 ↩
-
Original PDF page 15: W1 Surgical Extraction Workshop, p.15 ↩
-
Original PDF page 18: W1 Surgical Extraction Workshop, p.18 ↩
-
Original PDF page 19: W1 Surgical Extraction Workshop, p.19 ↩
-
Original PDF page 20: W1 Surgical Extraction Workshop, p.20 ↩
-
Original PDF page 26: W1 Surgical Extraction Workshop, p.26 ↩
-
Original PDF page 27: W1 Surgical Extraction Workshop, p.27 ↩
-
Original PDF page 29: W1 Surgical Extraction Workshop, p.29 ↩
-
Original PDF page 30: W1 Surgical Extraction Workshop, p.30 ↩
-
Original PDF page 21: W1 Surgical Extraction Workshop, p.21 ↩
-
Original PDF page 22: W1 Surgical Extraction Workshop, p.22 ↩
-
Original PDF page 23: W1 Surgical Extraction Workshop, p.23 ↩
-
Original PDF page 24: W1 Surgical Extraction Workshop, p.24 ↩
-
Original PDF page 25: W1 Surgical Extraction Workshop, p.25 ↩
-
Original PDF page 28: W1 Surgical Extraction Workshop, p.28 ↩
-
Original PDF page 31: W1 Surgical Extraction Workshop, p.31 ↩
-
Original PDF page 32: W1 Surgical Extraction Workshop, p.32 ↩
-
Original PDF page 33: W1 Surgical Extraction Workshop, p.33 ↩
-
Original PDF page 34: W1 Surgical Extraction Workshop, p.34 ↩
-
Original PDF page 35: W1 Surgical Extraction Workshop, p.35 ↩
-
Original PDF page 36: W1 Surgical Extraction Workshop, p.36 ↩
-
Original PDF page 37: W1 Surgical Extraction Workshop, p.37 ↩
-
Original PDF page 38: W1 Surgical Extraction Workshop, p.38 ↩
-
Original PDF page 41: W1 Surgical Extraction Workshop, p.41 ↩
-
Original PDF page 39: W1 Surgical Extraction Workshop, p.39 ↩
-
Original PDF page 40: W1 Surgical Extraction Workshop, p.40 ↩
-
Original PDF page 42: W1 Surgical Extraction Workshop, p.42 ↩
-
Original PDF page 43: W1 Surgical Extraction Workshop, p.43 ↩
-
Original PDF page 44: W1 Surgical Extraction Workshop, p.44 ↩
-
Original PDF page 45: W1 Surgical Extraction Workshop, p.45 ↩
-
Original PDF page 49: W1 Surgical Extraction Workshop, p.49 ↩
-
Original PDF page 50: W1 Surgical Extraction Workshop, p.50 ↩
-
Original PDF page 51: W1 Surgical Extraction Workshop, p.51 ↩
-
Original PDF page 53: W1 Surgical Extraction Workshop, p.53 ↩
-
Original PDF page 56: W1 Surgical Extraction Workshop, p.56 ↩
-
Original PDF page 59: W1 Surgical Extraction Workshop, p.59 ↩
-
Original PDF page 63: W1 Surgical Extraction Workshop, p.63 ↩
-
Original PDF page 64: W1 Surgical Extraction Workshop, p.64 ↩
-
Original PDF page 58: W1 Surgical Extraction Workshop, p.58 ↩
-
Original PDF page 60: W1 Surgical Extraction Workshop, p.60 ↩
-
Original PDF page 61: W1 Surgical Extraction Workshop, p.61 ↩
-
Original PDF page 62: W1 Surgical Extraction Workshop, p.62 ↩
-
Original PDF page 65: W1 Surgical Extraction Workshop, p.65 ↩
-
Original PDF page 66: W1 Surgical Extraction Workshop, p.66 ↩
-
Original PDF page 67: W1 Surgical Extraction Workshop, p.67 ↩
-
Original PDF page 68: W1 Surgical Extraction Workshop, p.68 ↩
-
Original PDF page 69: W1 Surgical Extraction Workshop, p.69 ↩
-
Original PDF page 70: W1 Surgical Extraction Workshop, p.70 ↩
-
Original PDF page 71: W1 Surgical Extraction Workshop, p.71 ↩
-
Original PDF page 72: W1 Surgical Extraction Workshop, p.72 ↩
-
Original PDF page 73: W1 Surgical Extraction Workshop, p.73 ↩
-
Original PDF page 74: W1 Surgical Extraction Workshop, p.74 ↩
-
Original PDF page 75: W1 Surgical Extraction Workshop, p.75 ↩
-
Original PDF page 76: W1 Surgical Extraction Workshop, p.76 ↩
-
Original PDF page 77: W1 Surgical Extraction Workshop, p.77 ↩
-
Original PDF page 78: W1 Surgical Extraction Workshop, p.78 ↩
-
Original PDF page 79: W1 Surgical Extraction Workshop, p.79 ↩
-
Original PDF page 80: W1 Surgical Extraction Workshop, p.80 ↩
-
Original PDF page 81: W1 Surgical Extraction Workshop, p.81 ↩
-
Original PDF page 87: W1 Surgical Extraction Workshop, p.87 ↩
-
Original PDF page 82: W1 Surgical Extraction Workshop, p.82 ↩
-
Original PDF page 83: W1 Surgical Extraction Workshop, p.83 ↩
-
Original PDF page 84: W1 Surgical Extraction Workshop, p.84 ↩
-
Original PDF page 85: W1 Surgical Extraction Workshop, p.85 ↩
-
Original PDF page 86: W1 Surgical Extraction Workshop, p.86 ↩
-
Original PDF page 91: W1 Surgical Extraction Workshop, p.91 ↩
-
Original PDF page 88: W1 Surgical Extraction Workshop, p.88 ↩
-
Original PDF page 89: W1 Surgical Extraction Workshop, p.89 ↩
-
Original PDF page 90: W1 Surgical Extraction Workshop, p.90 ↩
-
Original PDF page 94: W1 Surgical Extraction Workshop, p.94 ↩
-
Original PDF page 92: W1 Surgical Extraction Workshop, p.92 ↩
-
Original PDF page 93: W1 Surgical Extraction Workshop, p.93 ↩
-
Original PDF page 95: W1 Surgical Extraction Workshop, p.95 ↩
-
Original PDF page 96: W1 Surgical Extraction Workshop, p.96 ↩
-
Original PDF page 97: W1 Surgical Extraction Workshop, p.97 ↩
-
Original PDF page 98: W1 Surgical Extraction Workshop, p.98 ↩
-
Original PDF page 100: W1 Surgical Extraction Workshop, p.100 ↩
-
Original PDF page 99: W1 Surgical Extraction Workshop, p.99 ↩
-
Original PDF page 101: W1 Surgical Extraction Workshop, p.101 ↩
-
Original PDF page 103: W1 Surgical Extraction Workshop, p.103 ↩
-
Original PDF page 104: W1 Surgical Extraction Workshop, p.104 ↩
-
Original PDF page 102: W1 Surgical Extraction Workshop, p.102 ↩