Orthodontic Practical Exercises Workbook
Course Information1
- Unit: DENT5310 - Integrated Dental Practice 1
- Module: Orthodontics Module (Pre-Clinical Programme)
- Period: Semester 1, 2026
Teaching Staff
- Module Coordinator: A/P J Mike Razza
- Supervisors:
- Dr Richard Lee
- Dr Steve Naoum
- Dr Daniel Fernandes
- Post-Graduate Registrars
Student Identification
- Student Name: ______________________________
- Student ID: ________________________________
Introduction and Course Overview
Purpose of the Manual2
This manual supplements the didactic teaching and texts currently used in the DMD course. Orthodontic treatment comes in a range of complexities, most of which need to be treated at a specialist level. It is important to learn the essential aspects of clinical and laboratory procedures and the relevance of each stage. With a good understanding of the fundamentals, it will be clearer what the technical and clinical issues are, and to know when treatment is beneficial for the patient and when a specialist referral is required.
The orthodontic practical exercises simulate clinical circumstances as closely as possible. It is important that students obtain the understanding to appreciate the relevance of what is being taught. This will allow students to apply these fundamentals in a clinical environment.
Learning Resources and Preparation
This manual allows the student to review each of the practical exercises, learning outcomes, materials, and equipment required to complete each practical task. It is recommended that students preview each stage in advance to facilitate and reinforce the learning experience.
Logbook and Record Keeping
The manual is used as a logbook, which will record the continual assessment and show that all practical tasks have been completed to meet the required standard.
It is the student’s responsibility to keep all records up to date and to ensure that the manual always remains within the school. The manual is to be present for all teaching sessions, enabling the teaching staff to provide feedback and comments as required.
Assessment Criteria
The practical exercises are assessed as Clinically Acceptable or Unsatisfactory. Each practical exercise will need to be completed to a clinically satisfactory level. If a student cannot achieve a satisfactory level of competency within the scheduled time, extra sessions may be provided for remediation.
Table of Contents3
- Anatomy Review: Identification of Anatomical Landmarks and structures
- UNC Level II and III - Growth and Development
- Practical Exercise - Facial Form Analysis and Facial Profile Analysis
- Practical Exercise Cephalometrics
- A. Cephalometric illustrative tracings
- B. Cephalometrics glossary
- Practical Exercise - Space Analysis and Model Analysis
Anatomy Review4
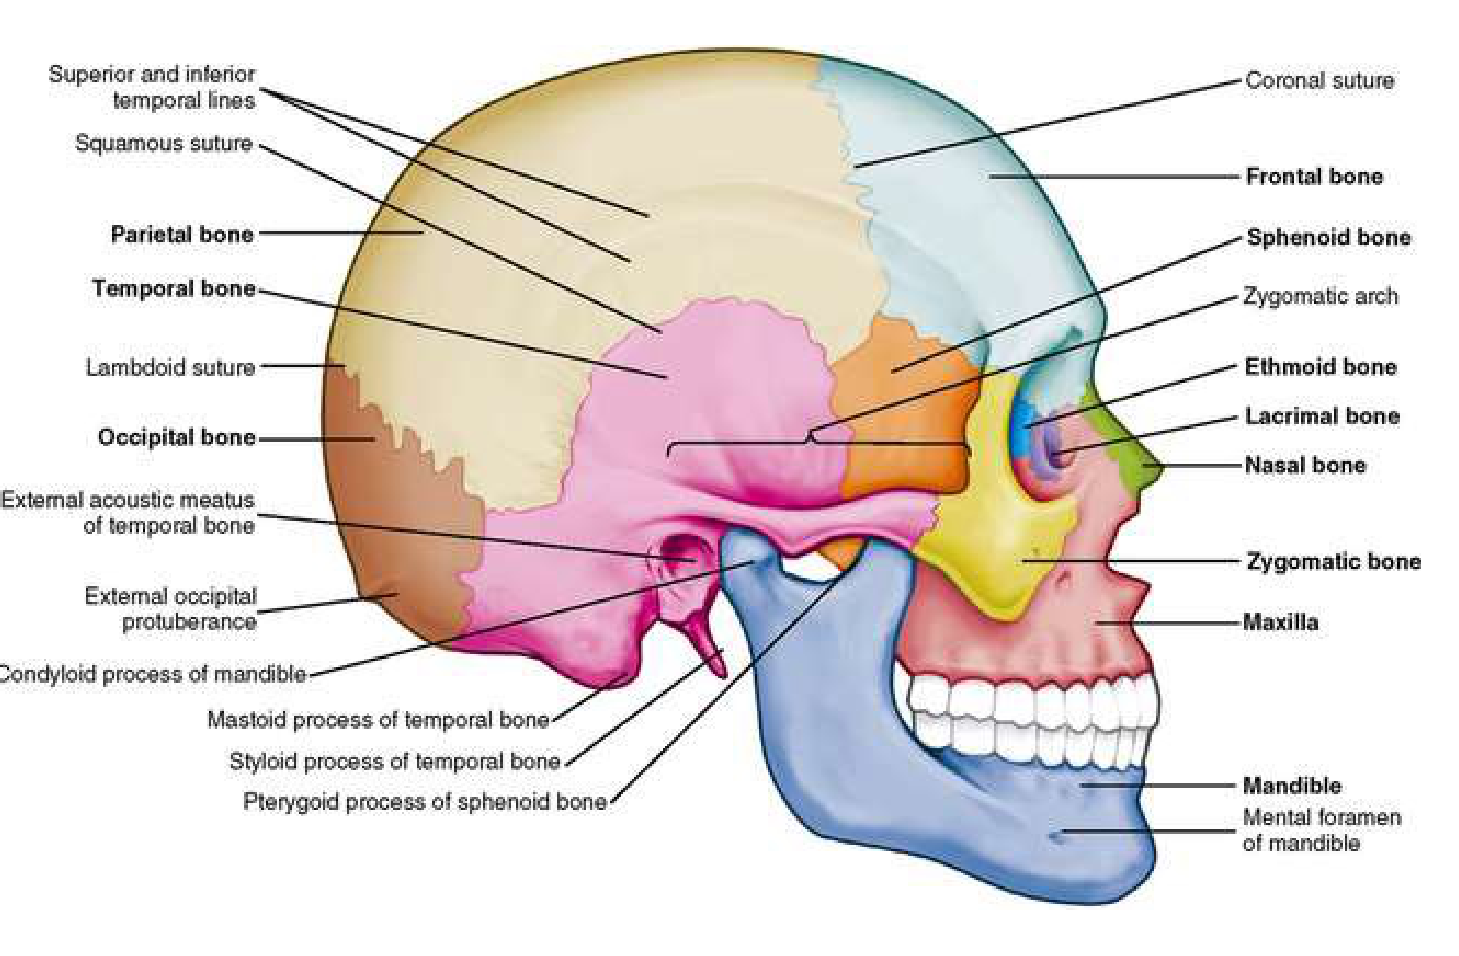
Prior to the clinical examination, it is necessary to review the significant and major aspects of oral anatomy, including:
- Osteology of the face
- Osteology of the jaws
- Major soft tissue structures of the mouth
- Muscles of facial expression
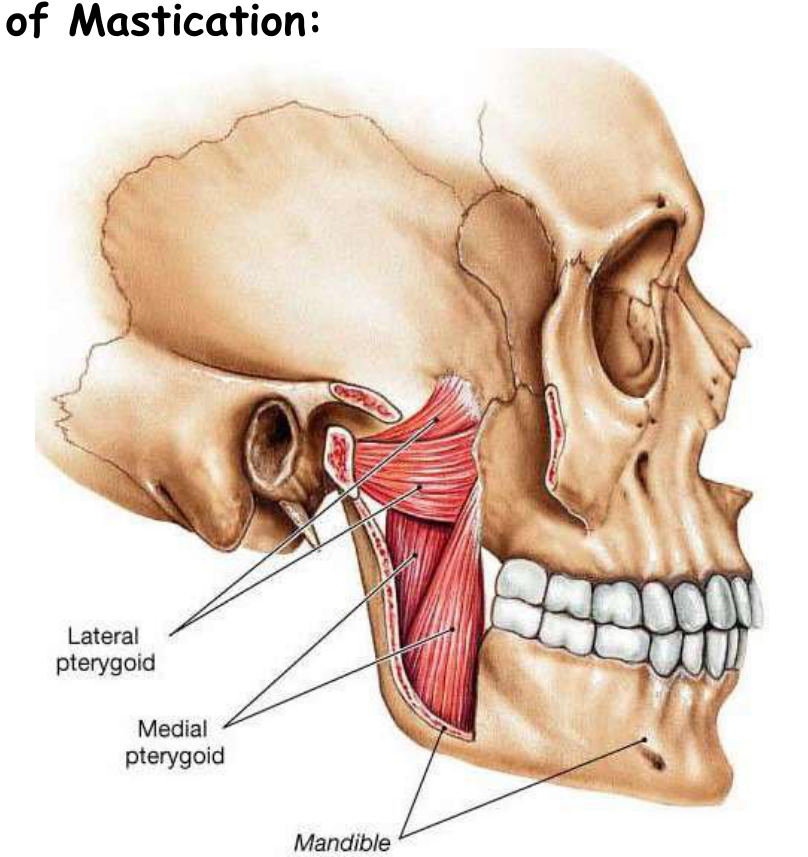
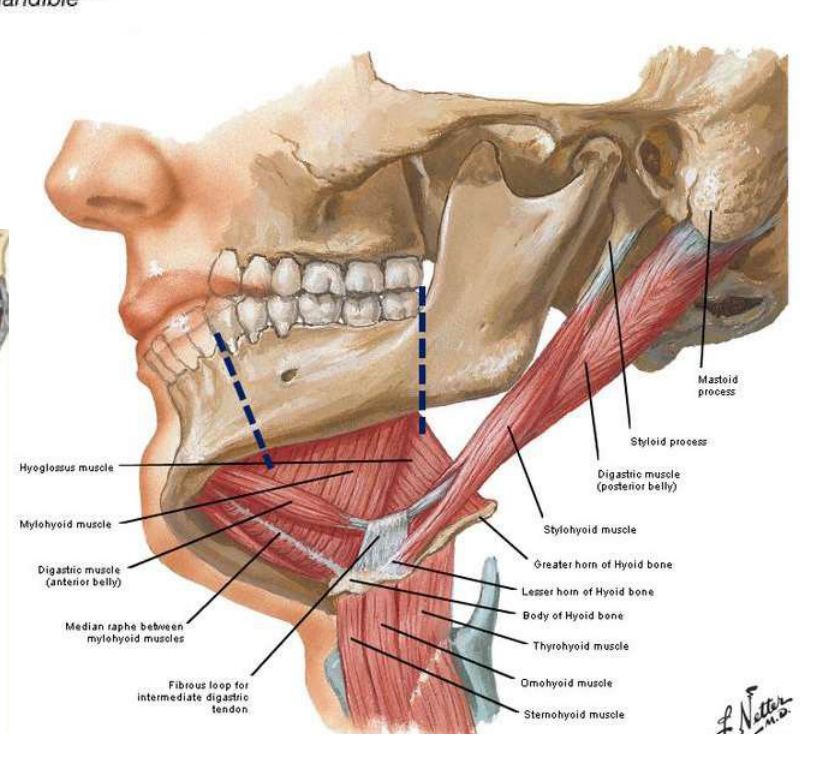
- Major muscles of mastication
- Anatomy and function of the Temporo-mandibular joint
- Anatomical features of the edentulous mouth
It is important to become familiar with these features to get the maximum benefit out of each stage.
During your evaluation of the edentulous cast, the visualisation of the relationship of the anatomical structures should enhance the appreciation of the clinical significance of these structures.
Osteology of the Face567
 |  |
 |  |
Frontal View8

Major Muscles of Mastication9101112
Key - page 13
 |  |  |
 | 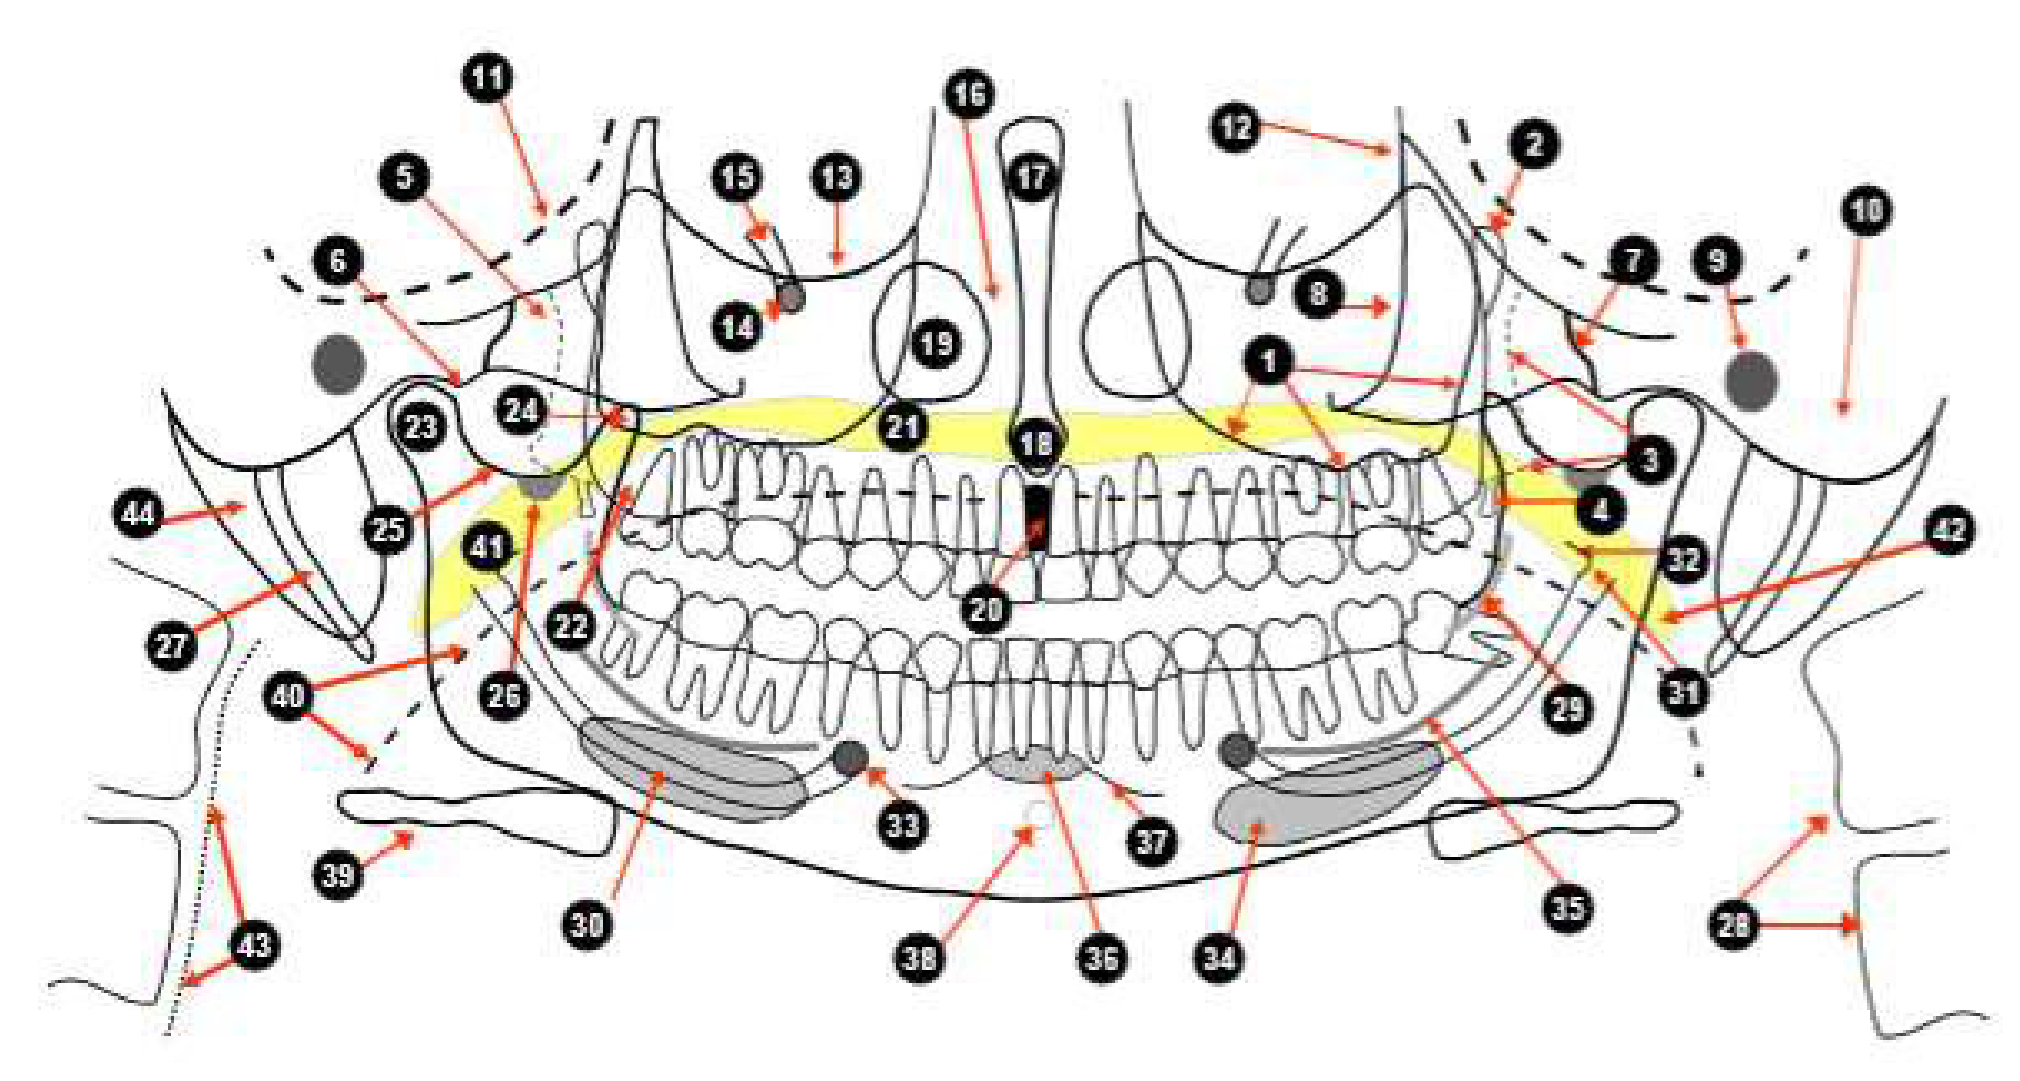 | 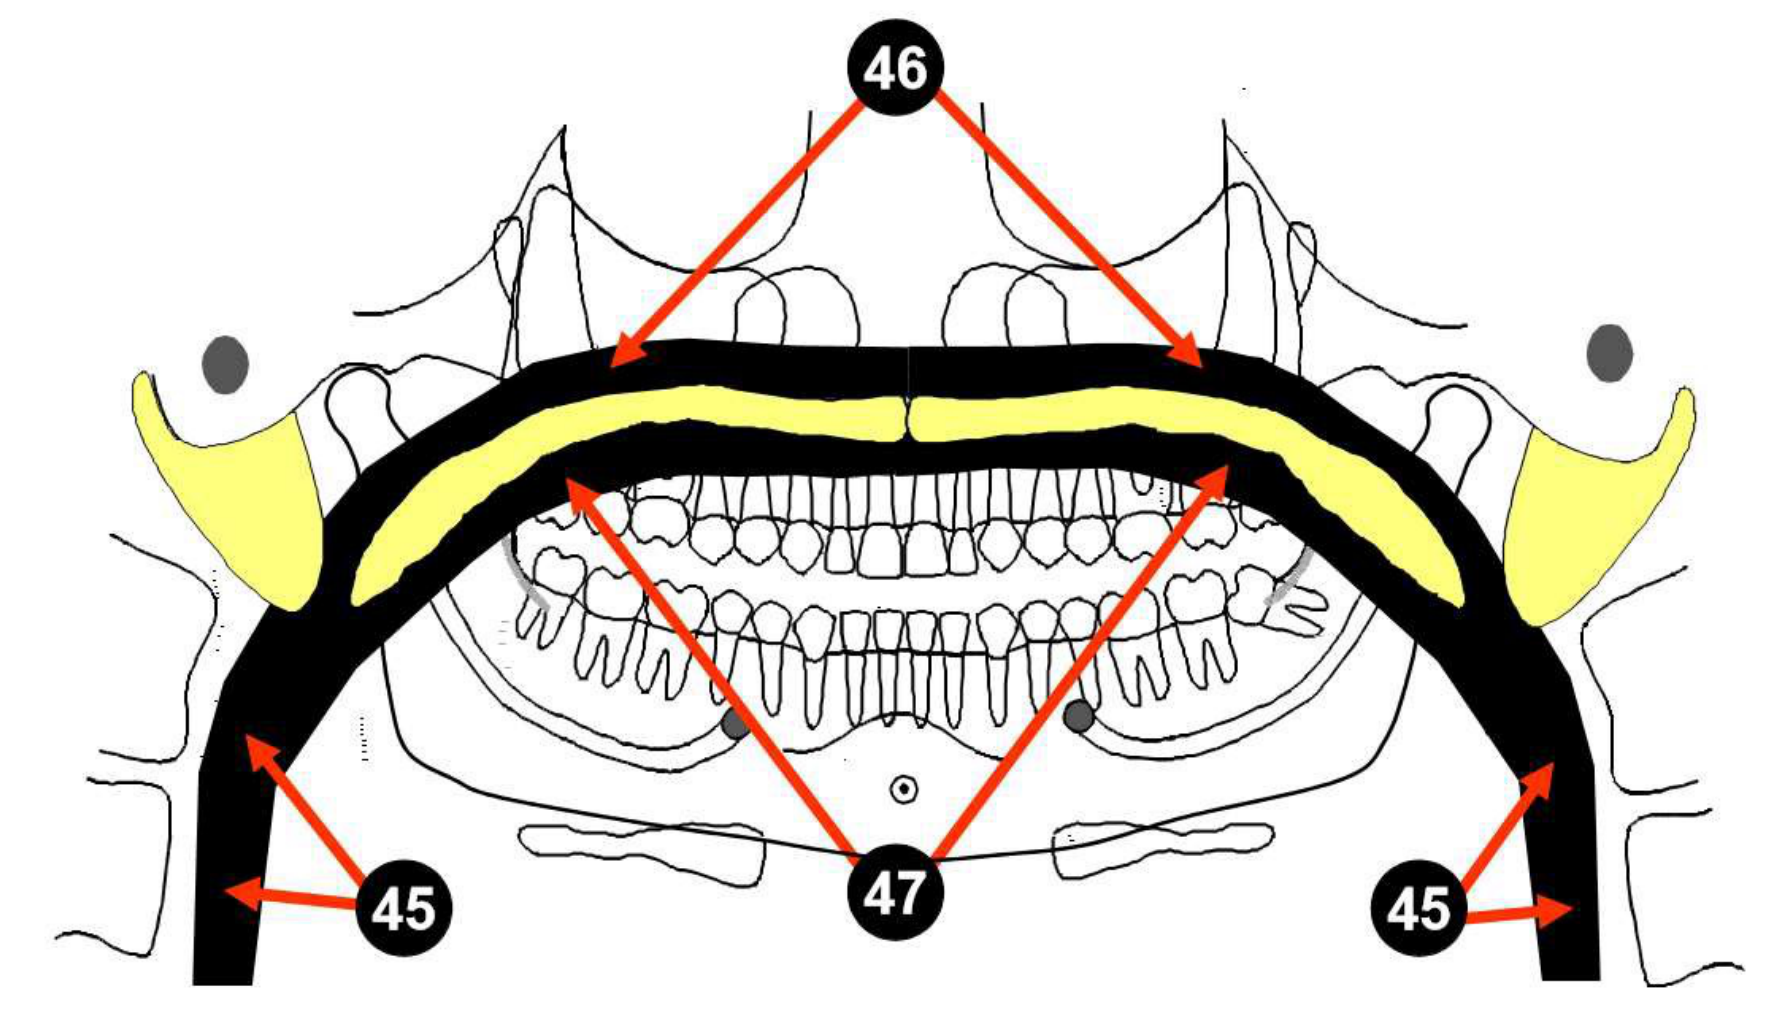 |
Panoramic Anatomy Key
- maxillary sinus
- pterygomaxillary fissure
- pterygoid plates
- hamulus
- zygomatic arch
- articular eminence
- zygomaticotemporal suture
- zygomatic process
- external auditory meatus
- mastoid process
- middle cranial fossa
- lateral border of the orbit
- infraorbital ridge
- infraorbital foramen
- infraorbital canal
- nasal fossa
- nasal septum
- anterior nasal spine
- inferior concha
- incisive foramen
- hard palate
- maxillary tuberosity
- condyle
- coronoid process
- sigmoid notch
- medial sigmoid depression
- styloid process
- cervical vertebrae
- external oblique ridge
- mandibular canal
- mandibular foramen
- lingula
- mental foramen
- submandibular gland fossa
- internal oblique ridge
- mental fossa
- mental ridges
- genial tubercles
- hyoid bone
- tongue
- soft palate
- uvula
- posterior pharyngeal wall
- ear lobe
- glossopharyngeal air space
- nasopharyngeal air space
- palatoglossal air space
Exercise 1. Anatomy Review13
I have completed a review the significant and major aspects of oral anatomy:
Signature ___________________
Date ___________________
Growth and Development
Exercise 2: UNC Level II and III - Growth and Development14
UNC Level II Unit A
I have opened and completed this on-line component:
- Signature: ___________________
- Date: ___________________
UNC Level II Unit B
I have opened and completed this on-line component:
- Signature: ___________________
- Date: ___________________
Facial Form and Profile Analysis
Analysis of facial proportions and dental-facial relationships is an essential step in the diagnosis of malocclusion. This individual exercise involves the use of simple diagnostic tools to assess the facial form of a patient.
Facial Form Analysis
Dentofacial Proportions15
Facial form analysis focuses on the evaluation of dentofacial proportions to establish a baseline for orthodontic diagnosis.
 |  |  |
 |  |
Frontal View Assessment16
- Frontal View
- Symmetry
- Vertical and Transverse Facial Proportions
- Tooth Display
- Facial and Dental Midlines
- Transverse Facial Prominence
- Vertical Facial Prominence
Smile and Dental Esthetics
- Anterior Tooth Display
- Posterior Tooth Display: Buccal Corridors
- Smile Arch
Complete the following Facial Form Analysis for your two patients:
Clinical Judgment Criteria17
-
Facial Symmetry
- Within normal limit or asymmetric
- If present, location of asymmetry
-
Incisor Tooth Display
- OK, too little, or too much (excess gingiva)
-
Buccal Corridor Width
- OK, too little, or too much
-
Smile Arc
- OK, flat, or excessive

Summary
Summarize the facial form of your patient based on the observations above.
Facial Profile Analysis
Facial profile analysis has been referred to as “the poor man’s” Cephalometric Analysis. It is performed to identify underlying skeletal relationships and serves as an important diagnostic tool for identifying patients with severe dentofacial disproportion.
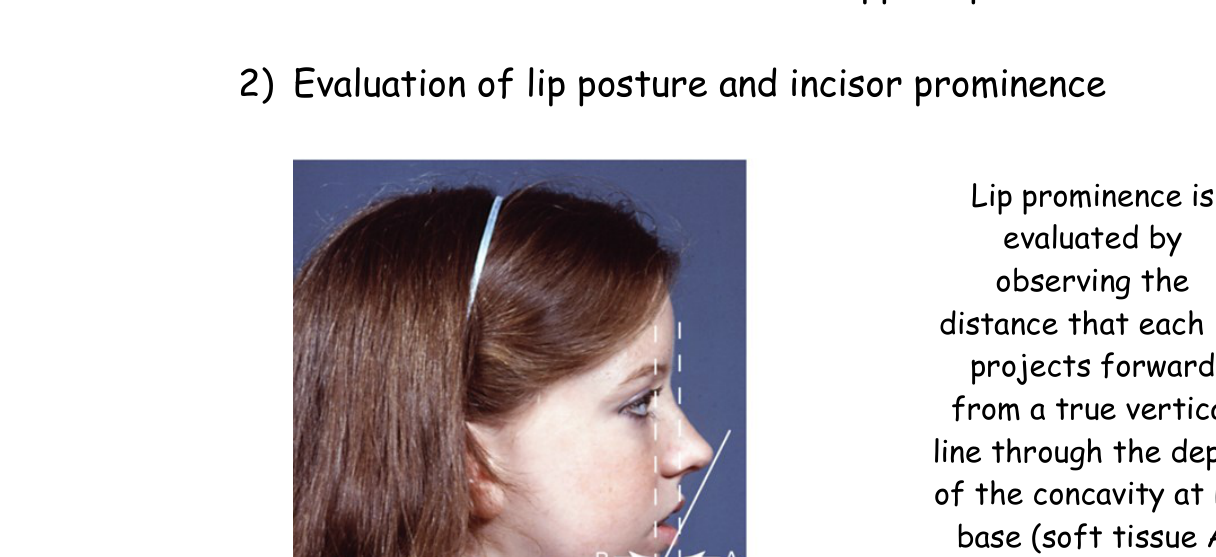
Goals of Facial Profile Analysis18
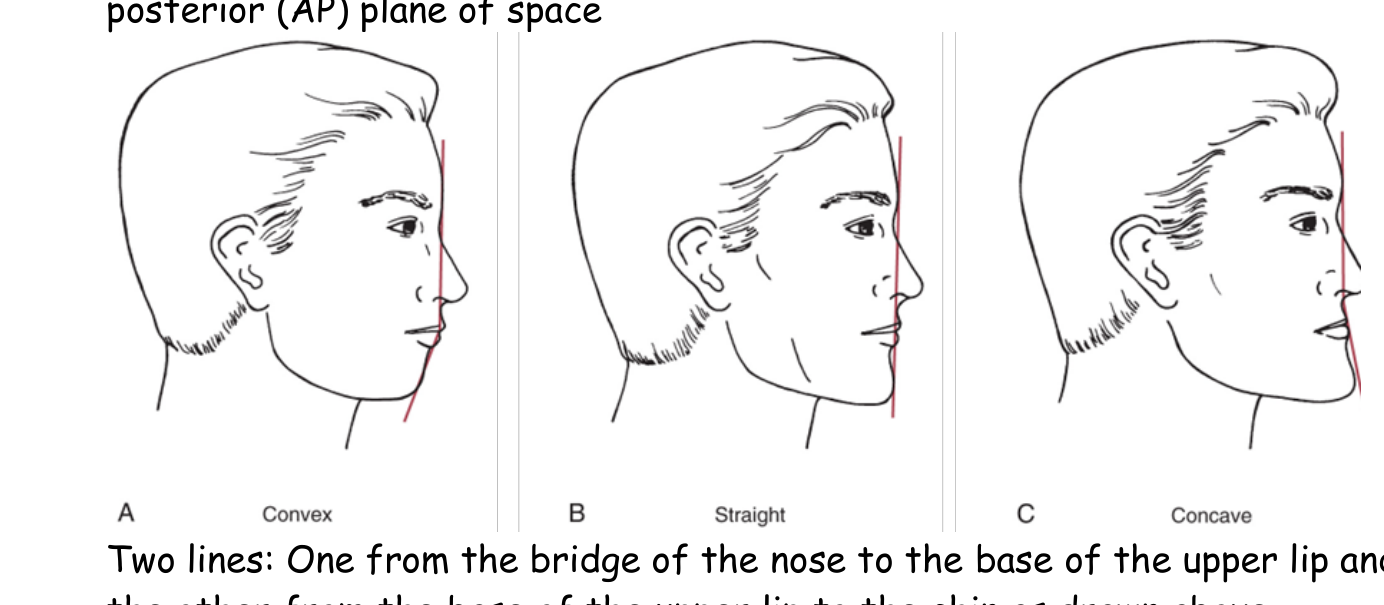
- Establishing whether the jaws are proportionately positioned in the anterior-posterior (AP) plane of space.
- Evaluation of lip posture and incisor prominence.
- Reevaluation of vertical facial proportions and evaluation of mandibular plane angle.
 |  |
Analysis Methodology
Using the right facial profile image for your patient, complete the analysis as follows:
- Anterior-Posterior (AP) Relationship: Draw two lines—one from the bridge of the nose to the base of the upper lip, and the other from the base of the upper lip to the chin.
- Lip Posture and Incisor Prominence:
- Evaluate lip prominence by observing the distance each lip projects forward from a true vertical line through the depth of the concavity at its base (soft tissue A and B points).
- Use the E-line to assess how the lip relates to the nose and chin.
Vertical Proportions19
- Reevaluation of vertical facial proportions and evaluation of mandibular plane angle.

Clinical Judgment Criteria
Complete the following for your two patients:
-
Antero-Posterior Skeletal Jaw Relationship
- Class I (Normal)
- Class II
- Class III
-
Vertical Skeletal Jaw Relationship
- Normal
- Long face
- Short face
-
Tooth Support for Lip (Lip Prominence)
- Excessive
- Normal
- Inadequate
Submission Requirements
- Format: Typewritten on A4 paper (Word or PDF document).
- Attachments: De-identified patient photographs.
- Submission Portal: University of Western Australia’s Learning Management System (Blackboard Turnitin) for unit DENT5310.
Assessment of Facial Analysis
Assessment Criteria20
| Criteria | Self-Assessment | Pass/Fail |
|---|---|---|
| Two (2) sets of correctly oriented de-identified patient diagnostic facial photographs | ||
| Facial form analysis has been accurately completed | ||
| Profile analysis has been accurately completed | ||
| Accuracy of self-assessment – recognition of clinical acceptability |

Exercise Status
- Repeat Exercise
- Modify Exercise
- Completed Exercise
Tutor Name and Signature: ____________________ Date: __________
File Name: Orthodontic Facial Form/Profile Analyses
Exercise 3 Submission Confirmation:
- Accurately completed and submitted online: ____________________
- Signature/Date: ____________________
Deadlines and Timing
- Expected time of completion: 30 minutes per assignment.
- Due date: 11:59 PM Thursday, 2nd April 2026
Cephalometrics Exercises
You must complete the computer teaching programs on cephalometric tracing and cephalometric superimposition. The online Cephalometrics quiz UNC on-line will test your proficiency of the following topics and is based on the self-instructional material and reading material:
- Identification of landmarks on a cephalometric radiograph
- Analysis of dentofacial proportions based on construction of reference planes and both linear and angular measurements
- Cranial base, maxillary and mandibular superimpositions
A detailed protocol for these topics is also provided below. The Cephalometrics on-line quiz is formative.
Tracing Procedures Reference and Study Aid21
Part 1. Techniques for cephalometric tracing and landmark identification
- Place the acetate paper, rough side up, exactly over the film, with the film oriented so the face is to the right. Tape them together, making sure the top and right side of the film and the tracing paper coincide.
- Follow the illustration as outlined in detail within orthodonticinstruction.com Level II Growth and Development Unit B – Diagnostic Procedures Cephalometric Tracing Techniques.
Part 2. Protocol for Cephalometric analysis
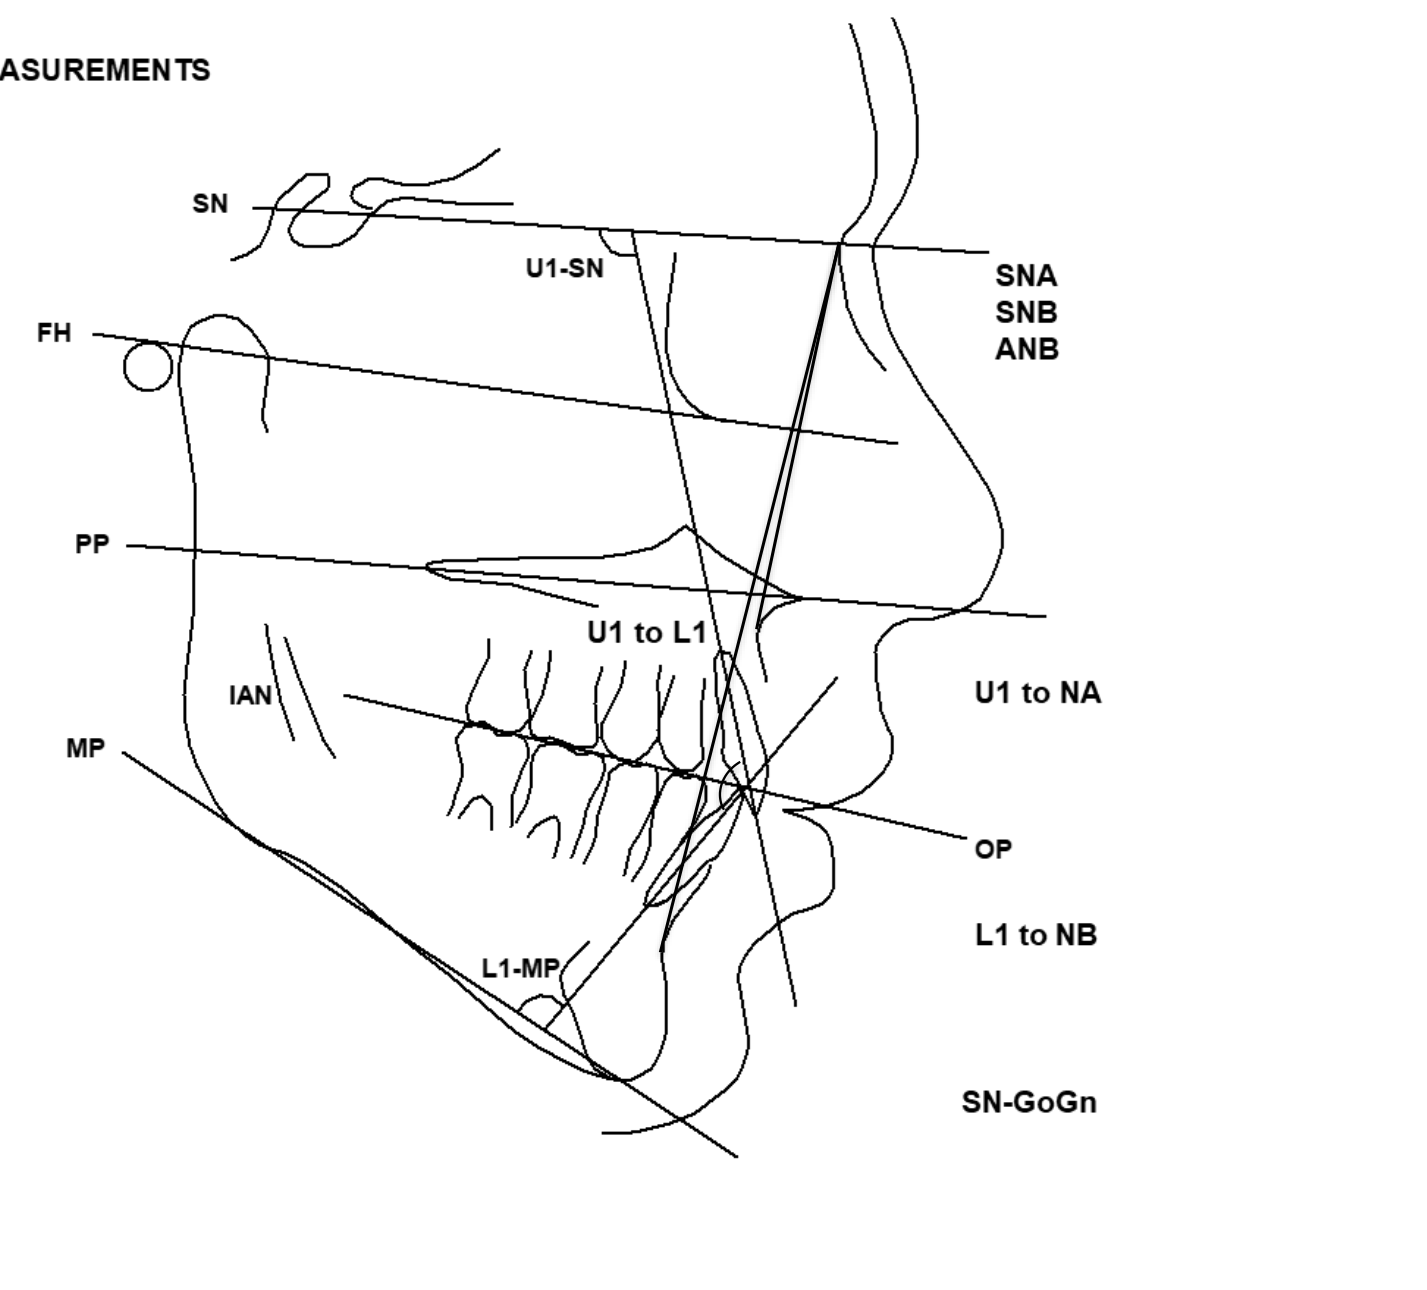
(1) Reference lines
Begin the analysis by drawing the five important horizontal planes:
- S-N plane (extend the S-N line posteriorly beyond S)
- True horizontal plane (perpendicular to true vertical, through Or)
- Palatal plane (extend the ANS-PNS line posteriorly beyond PNS)
- Occlusal plane (extend a line along the occlusal surface of the molars and premolars or primary molars both posteriorly and anteriorly)
- Mandibular plane (extend the Go-Gn line posteriorly)
Additional construction steps:
- Drop a true vertical line (parallel to the chain) from nasion.
- Draw a segment of a true vertical line, as a dashed line, through points A and B.
- Draw the long axis of the maxillary and mandibular incisors.
(2) Analysis
Observe the orientation of the horizontal reference lines, and the position of points A and B relative to the true vertical line from nasion. Measure the following angles and record the values on the analysis sheet:
- ANB
Cephalometric Measurements and Analysis222324
 |  |
 |
Angular Measurements25
- SN-GoGn
- Maxillary incisor to palatal plane
- Mandibular incisor to mandibular plane
- Interincisal angle
Linear Distances
Measure the following linear distances and record them on the analysis sheet:
- Maxillary incisor facial surface to true vertical line through NA
- Mandibular incisor facial surface to true vertical line through NB
- Pogonion to true vertical line through NB
Dentofacial Relationship Summary
From your observation of jaw positions relative to the reference lines and the measurements, you can summarize the patient’s dentofacial relationships by evaluating:
- Vertical skeletal relationships
- Anteroposterior skeletal relationships
- Maxillary tooth-jaw relationships
- Anteroposterior
- Vertical
- Mandibular tooth-jaw relationships
- Anteroposterior
- Vertical
Part 3. Superimposition of Cephalometric Radiographs
For superimposition of a basic tracing, see the detailed protocol below and orthodonticinstruction.com Level II Growth and Development Unit B - Diagnostic Procedures Cephalometric Superimposition:
- Cranial base superimposition: Superimpose your tracing on the red tracing, on the S-N line at S, and tape the two tracings together. Place a blank sheet of tracing paper over the superimposed tracings. Make a composite superimposition tracing, first reproducing the red tracing in solid lines, then using dashed lines to show differences between this and your tracing.
- Maxillary superimposition: Superimpose the two tracings on the lingual contour of the maxillary anterior alveolar process and the palatal plane. Make a composite tracing of the maxillary area only, showing the changes in the position of the maxillary teeth.
- Mandibular superimposition: Superimpose the two tracings on the lingual contour of the mandibular symphysis, the outline of the inferior alveolar canal and the crypt of the unerupted lower third molar. Make a composite tracing of the mandibular area only, showing the changes in the position of the mandibular teeth and the external contours of the mandible.
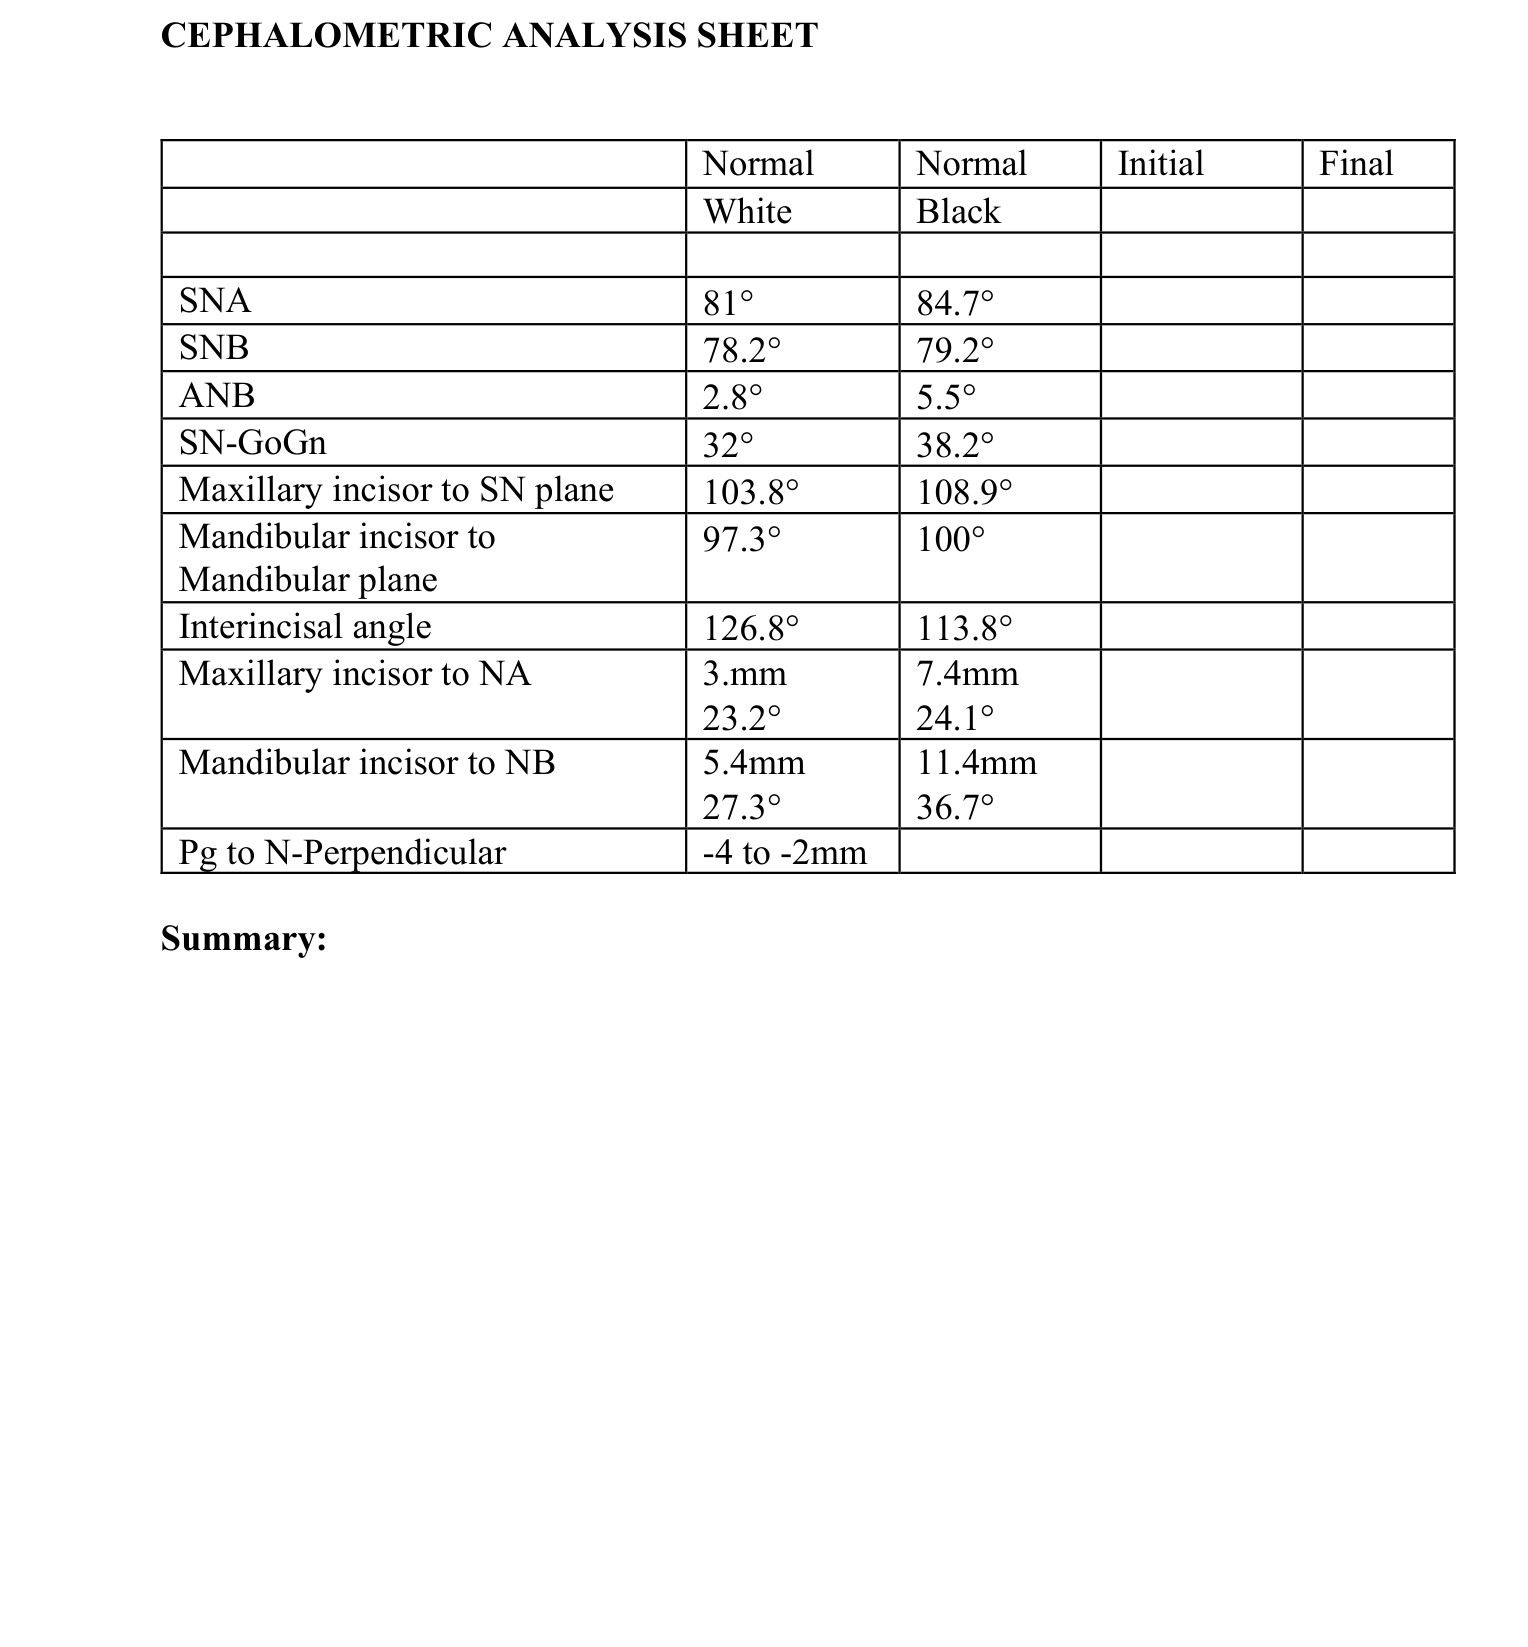
HORIZONTAL AND VERTICAL PLANES AND LOCATION FOR ANGULAR VALUES TO BE INSERTED FOR STANDARD UNC/UWA CEPHALOMETRIC ANALYSIS
| Measurement | Normal White | Normal Black | Initial | Final |
|---|---|---|---|---|
| SNA | 81° | 84.7° | ||
| SNB | 78.2° | 79.2° | ||
| ANB | 2.8° | 5.5° | ||
| SN-GoGn | 32° | 38.2° | ||
| Maxillary incisor to SN plane | 103.8° | 108.9° | ||
| Mandibular incisor to Mandibular plane | 97.3° | 100° | ||
| Interincisal angle | 126.8° | 113.8° | ||
| Maxillary incisor to NA | 3.mm / 23.2° | 7.4mm / 24.1° | ||
| Mandibular incisor to NB | 5.4mm / 27.3° | 11.4mm / 36.7° | ||
| Pg to N-Perpendicular | -4 to -2mm |
Summary:
Glossary of Cephalometric Terms26
Nasion (N): The anterior end of the fronto-nasal suture, or junction of frontal and nasal bones. This is seen in profile as an irregular notch. The nasal bone is less dense roentgenographically than the frontal bone, making it relatively easy to follow the suture even when the notch is not apparent.
Sella turcica (S): Literally the “Turkish Saddle.” The center of the bony crypt occupied by the hypophysis cerebri (pituitary gland). Roentgenographically a very constant profile outline seen in its lateral aspect.
Porion (P): This is a machine registration of the most superior point of the external auditory meatus, not necessarily corresponding to the anthropometric landmarks in the skull proper, but nevertheless constant.
Orbitale (Or): The lowest point on the inferior bony margin of the orbit (average of two sides if two images seen).
Gnathion (Gn): The most outward and everted point on the profile curvature of the symphysis of the mandible. It is located by bisecting the angle formed by the mandibular plane and the facial plane.
Pogonion (Pg): The most anterior point on the symphysis of the mandible.
Menton (M): The most inferior point on the cross section of the symphysis of the mandible.
Gonion (Go): The most outward and everted point on the angle formed by the junction of ramus and body of the mandible on its posterior inferior aspect (average of two sides if two images seen).
Anterior nasal spine (ANS): The spinous process of the maxilla forming the most anterior projection of the floor of the nasal cavity.
Occlusal plane (OP): The general plane of the molars and premolars (use left side if two images apparent).
Frankfort plane (FH): Established on lateral headfilms by connecting the lowest point on the shadow of the left bony orbit with the uppermost part of the ear-rod.
Mandibular plane (MP): The Go-Gn line.
(SN): Sella to nasion line.
“Y” (growth) axis: Line connecting Sella with gnathion, representing approximate path of downward and forward growth of the face from beneath the cranium.
Palatal plane (PP): ANS to PNS.
Inferior alveolar nerve (IAN): The shadow cast by the bony canal in the mandibular ramus. A stable landmark for mandibular superimposition.
U1-SN: Angle formed by maxillary incisor to Sella nasion line – indicates inclination of incisors to cranial base.
L1-MP: Angle formed by mandibular incisor to the mandibular plane (Go-Gn).
Assessment of Cephalometric Tracing27
| Criteria | Self-assessment | Pass/Fail |
|---|---|---|
| Cephalometric tracing and analysis accurately identified and practical assignment has been completed | ||
| Accurately traced the soft and hard tissues of the radiograph | ||
| Accurately completed the horizontal and vertical planes | ||
| Accurately completed the landmark identification | ||
| Accurately completed the addition of the angular measurements on the cephalometric tracing | ||
| Accurately completed the written cephalometric analysis | ||
| Accuracy of self-assessment – recognition of clinical acceptability |
Repeat Exercise | Modify Exercise | Completed Exercise
Tutor Name and Signature: Date:
Assignment expected time of completion: 30-45 minutes each. Assignment due date: 5:00PM Thursday, 16th April 2026

Space Analysis and Model Analysis
Background for Space Analysis28
Purpose To measure the size of the erupted permanent teeth and estimate the size of the unerupted permanent teeth and compare this estimate to the space available between the first permanent molars.
Assumptions
- There is a correlation between erupted mandibular incisors and the remaining succedaneous teeth.
- The prediction tables are valid for your patient.
- Arch dimensions do not change appreciably during growth.
- The mesial shift is predictable.
- All succedaneous teeth are developing normally.
Analysis Methodology
- Analysis used: Tanaka-Johnson Analysis.
- Applicability: These prediction tables were derived from a sample of Caucasians of Northern European descent. They are not applicable to different racial groups.
- Alternatives: If the patient does not fit this population, you may:
- Complete the analysis recognizing these limitations.
- Obtain long cone periapical radiographs to measure mesiodistal widths (not routine due to radiation exposure).
Materials Needed
- Dental casts or digital images of dental casts
- Sketched or digital image of patient’s profile
- Pencil
- Space analysis form
- Boley Gauge
Instrument Preparation When performing a space analysis using real dental casts, use a modified Boley gauge. Using a slow-speed handpiece and a heatless stone, grind the square ends of the measurement tips to points to accurately measure tooth widths.
Space Analysis Procedures
Space Analysis Form Instructions29
-
Measurement of Available Mandibular Space: Measure the four segments (a, b, c, d) on the mandibular cast. Enter each on the form and sum them to represent the total space available in the arch.
-
Measurement of Mesio-distal Permanent Mandibular Incisor: Measure the greatest width of each incisor on the digital image and calculate the sum.
-
Measurement of the Available Maxillary Space: Determined in the same manner as the mandibular arch (see section 1).
-
Measurement of the Mesio-Distal Permanent Maxillary Incisor Width: Measure the greatest width of each incisor on the digital image and calculate the sum.
-
Mandibular Space Analysis: Transcribe data to this section to determine space discrepancy (+). Use the table at the bottom of the form (based on total mandibular incisor width) to establish the size of canines and premolars for one quadrant. Calculate total space required and compare to space available.
-
Maxillary Space Analysis: Similar to section 5, but use the mandibular incisor width to estimate the size of the maxillary canines and premolars.
-
Skeletal Jaw Relationship: Complete using the Facial Profile Analysis to project mandibular incisor stability and space implications based on skeletal class.
-
Occlusion of the First Permanent Molars: Observe and record each side individually from the occluded cast images.
-
Molar Shift: Measured for patients with Class I skeletal patterns and end-to-end molars. Total the right and left sides and subtract from the space discrepancy in section 5.
-
Lip Support: Taken from the Facial Profile analysis. Over-supported or under-supported lips indicate protrusive or regressive incisors, respectively. Arch expansion is contraindicated when incisors are protrusive.
Interpretation and Resources30
- Numerical Adjustment: Results from sections 5 and 6 must be adjusted based on skeletal relationships, molar occlusion, molar shift, and lip support.
- Further Review: Refer to online materials: “The Space Analysis and Its Interpretation”.
- Formative Assessment: Complete the online quiz on space analysis.
Model Analysis Components
- Symmetry, Space and Tooth Size
- Symmetry: Check for asymmetric position of the entire arch (facial asymmetry) or asymmetry within the arch (crowding/tooth loss).
- Alignment, Crowding and Spacing
- Position of teeth on the dental arch line.
- Overlapping contact points.
- Rotations.
- Space analysis.
Model Analysis and Tooth Size
- Tooth Size Analysis
- Proportion of maxillary to mandibular teeth.
- Bolton analysis for tooth size discrepancy (affects ~5% of the population).
- Arch Form
- Constricted, Narrow, or “V” shaped.
- Normal types: Tapered, Square, Ovoid.
- Anterior-Posterior Relationship
- Class I, II, or III.
- Proclined or retroclined incisors.
- Vertical Relationship
- Deep Bite vs. Open Bite.
- Transverse Relationship
- Narrow vs. Wide.
Individual Practical Exercise Instructions31
- Independence: Complete this exercise without outside assistance.
- Identification: Clearly identify your assigned model set (1-14) on the worksheet. Use your student number and name.
- Space Analysis (Model A): Complete the analysis for Model A.
- Orthognathic Facial Profile: Models 1A, 4A, 6A, 11A, 12A, 13A, and 16A.
- Convex Facial Profile (Mandibular Retrusion): Models 2A, 3A, 5A…
Practical Exercise Instructions (Continued)32
- Profile Context: Models 7A, 8A, 9A, 10A, 14A, and 15A also have a Convex Facial Profile with mandibular retrusion or mild mandibular retrusion.
- Clinical Considerations: Lip posture is considered within normal limits. Determine incisor inclination by cast appearance only.
- Model Analysis (Model B): Complete a Model Analysis for Model B from your assigned set.
- Submission: Write or type conclusions on a separate A4 sheet. Include student name/number and Model number.
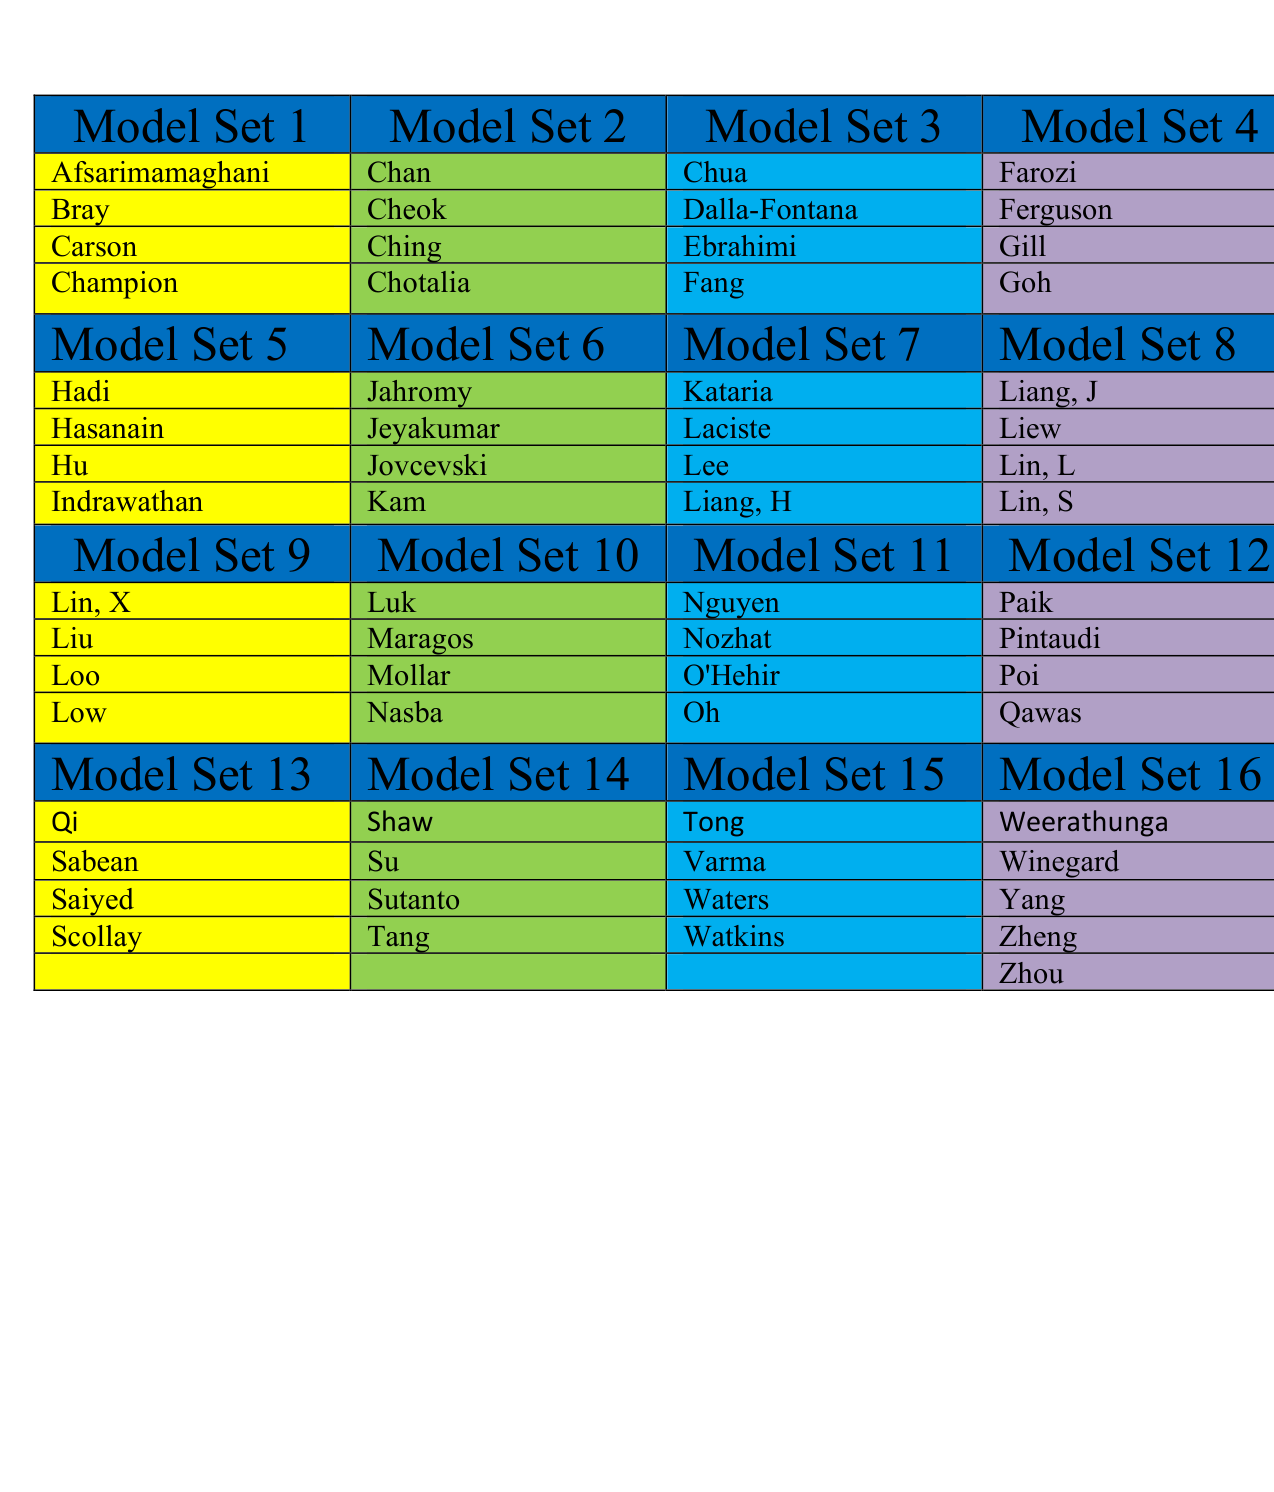
Model Set Assignments
| Model Set 1 | Model Set 2 | Model Set 3 | Model Set 4 |
|---|---|---|---|
| Afsarimamaghani | Chan | Chua | Farozi |
| Bray | Cheok | Dalla-Fontana | Ferguson |
| Carson | Ching | Ebrahimi | Gill |
| Champion | Chotalia | Fang | Goh |
| Model Set 5 | Model Set 6 | Model Set 7 | Model Set 8 |
|---|---|---|---|
| Hadi | Jahromy | Kataria | Liang, J |
| Hasanain | Jeyakumar | Laciste | Liew |
| Hu | Jovcevski | Lee | Lin, L |
| Indrawathan | Kam | Liang, H | Lin, S |
| Model Set 9 | Model Set 10 | Model Set 11 | Model Set 12 |
|---|---|---|---|
| Lin, X | Luk | Nguyen | Paik |
| Liu | Maragos | Nozhat | Pintaudi |
| Loo | Mollar | O’Hehir | Poi |
| Low | Nasba | Oh | Qawas |
| Model Set 13 | Model Set 14 | Model Set 15 | Model Set 16 |
|---|---|---|---|
| Qi | Shaw | Tong | Weerathunga |
| Sabean | Su | Varma | Winegard |
| Saiyed | Sutanto | Waters | Yang |
| Scollay | Tang | Watkins | Zheng |
| Zhou |
Assessment of Model Analysis
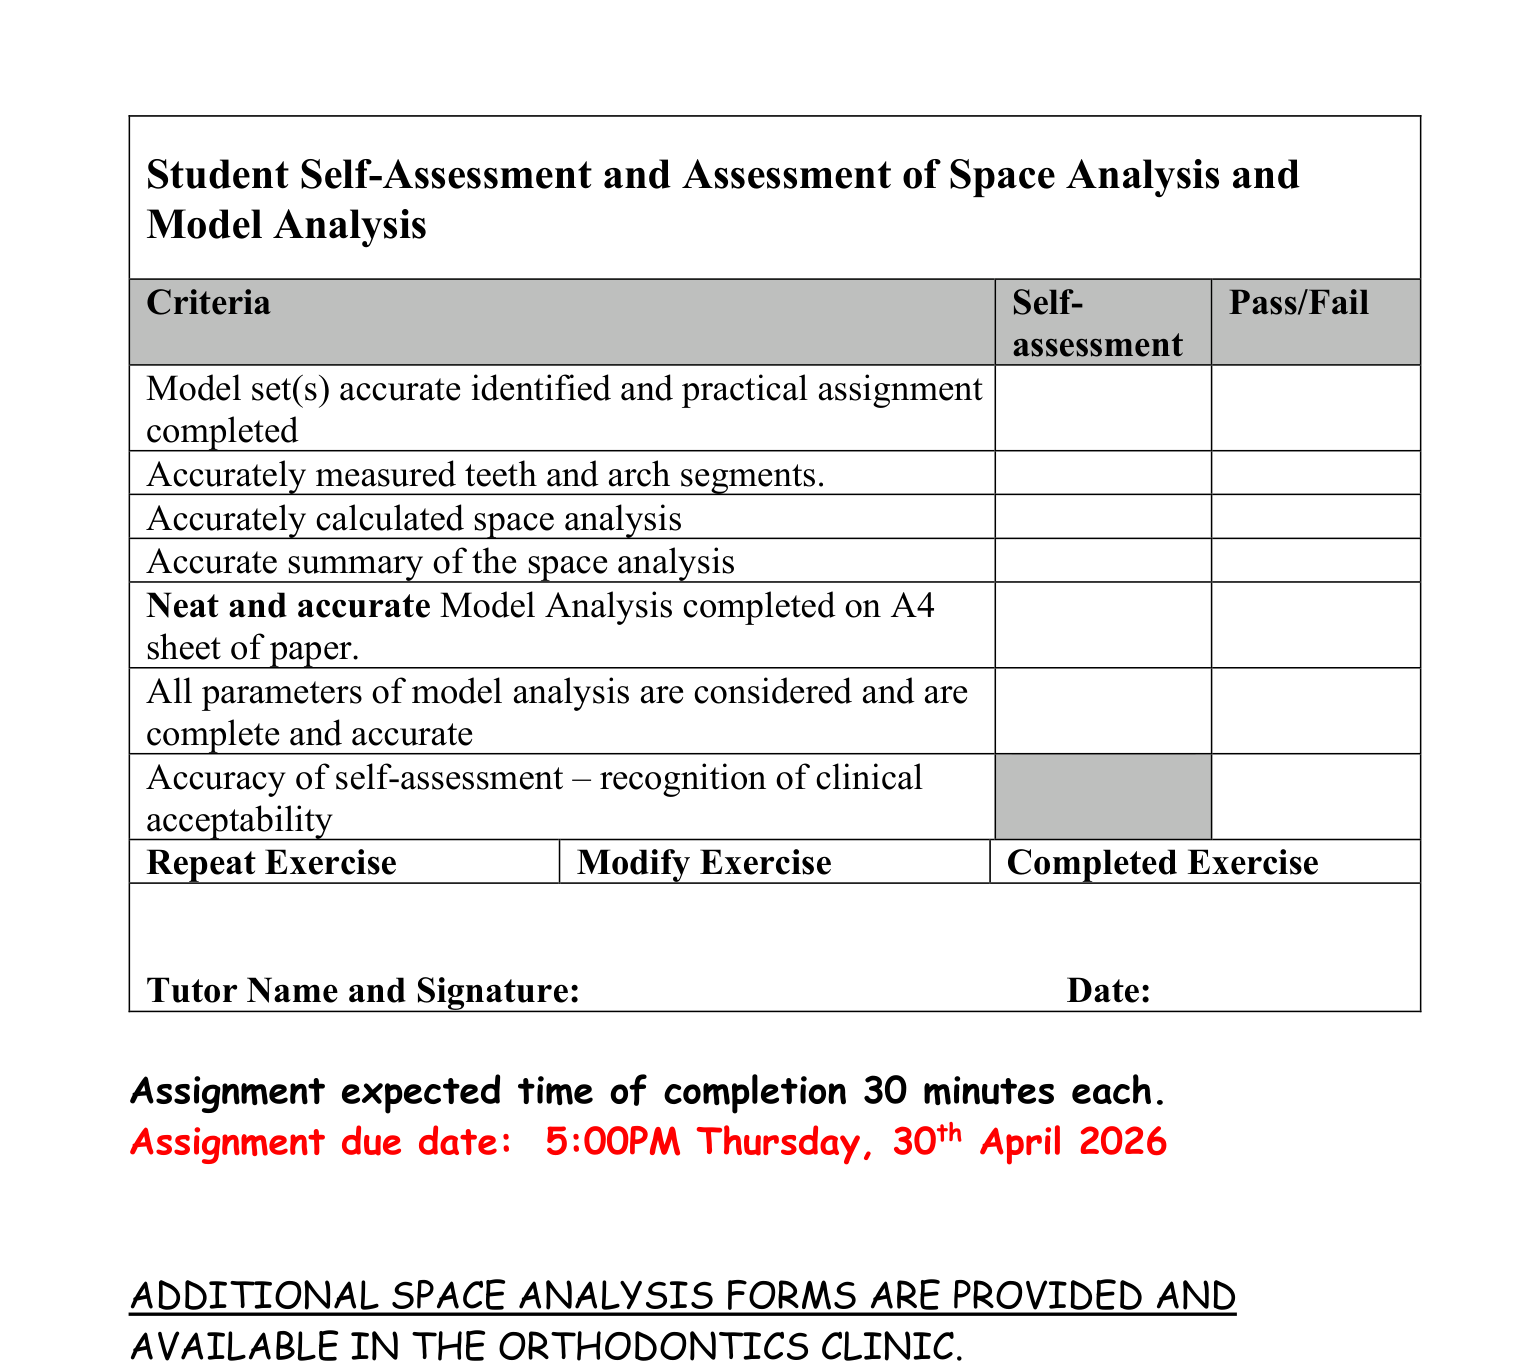
Student Self-Assessment and Assessment Table33
| Criteria | Self-assessment | Pass/Fail |
|---|---|---|
| Model set(s) accurate identified and practical assignment completed | ||
| Accurately measured teeth and arch segments | ||
| Accurately calculated space analysis | ||
| Accurate summary of the space analysis | ||
| Neat and accurate Model Analysis completed on A4 sheet | ||
| All parameters of model analysis are considered and accurate | ||
| Accuracy of self-assessment – recognition of clinical acceptability |
Outcome Status
- Repeat Exercise / Modify Exercise
- Completed Exercise
- Tutor Name and Signature:
- Date:
Deadlines and Logistics
- Expected completion time: 30 minutes per assignment.
- Due date: 5:00 PM Thursday, 30th April 2026.
- Note: Additional space analysis forms are available in the Orthodontics Clinic.
Footnotes
-
Original PDF page 1: 2026ThirdYearDMDSemester1WorkBook, p.1 ↩
-
Original PDF page 2: 2026ThirdYearDMDSemester1WorkBook, p.2 ↩
-
Original PDF page 3: 2026ThirdYearDMDSemester1WorkBook, p.3 ↩
-
Original PDF page 4: 2026ThirdYearDMDSemester1WorkBook, p.4 ↩
-
Original PDF page 6: 2026ThirdYearDMDSemester1WorkBook, p.6 ↩
-
Original PDF page 7: 2026ThirdYearDMDSemester1WorkBook, p.7 ↩
-
Original PDF page 8: 2026ThirdYearDMDSemester1WorkBook, p.8 ↩
-
Original PDF page 5: 2026ThirdYearDMDSemester1WorkBook, p.5 ↩
-
Original PDF page 9: 2026ThirdYearDMDSemester1WorkBook, p.9 ↩
-
Original PDF page 10: 2026ThirdYearDMDSemester1WorkBook, p.10 ↩
-
Original PDF page 11: 2026ThirdYearDMDSemester1WorkBook, p.11 ↩
-
Original PDF page 12: 2026ThirdYearDMDSemester1WorkBook, p.12 ↩
-
Original PDF page 13: 2026ThirdYearDMDSemester1WorkBook, p.13 ↩
-
Original PDF page 14: 2026ThirdYearDMDSemester1WorkBook, p.14 ↩
-
Original PDF page 15: 2026ThirdYearDMDSemester1WorkBook, p.15 ↩
-
Original PDF page 16: 2026ThirdYearDMDSemester1WorkBook, p.16 ↩
-
Original PDF page 17: 2026ThirdYearDMDSemester1WorkBook, p.17 ↩
-
Original PDF page 18: 2026ThirdYearDMDSemester1WorkBook, p.18 ↩
-
Original PDF page 19: 2026ThirdYearDMDSemester1WorkBook, p.19 ↩
-
Original PDF page 20: 2026ThirdYearDMDSemester1WorkBook, p.20 ↩
-
Original PDF page 21: 2026ThirdYearDMDSemester1WorkBook, p.21 ↩
-
Original PDF page 23: 2026ThirdYearDMDSemester1WorkBook, p.23 ↩
-
Original PDF page 24: 2026ThirdYearDMDSemester1WorkBook, p.24 ↩
-
Original PDF page 25: 2026ThirdYearDMDSemester1WorkBook, p.25 ↩
-
Original PDF page 22: 2026ThirdYearDMDSemester1WorkBook, p.22 ↩
-
Original PDF page 26: 2026ThirdYearDMDSemester1WorkBook, p.26 ↩
-
Original PDF page 27: 2026ThirdYearDMDSemester1WorkBook, p.27 ↩
-
Original PDF page 28: 2026ThirdYearDMDSemester1WorkBook, p.28 ↩
-
Original PDF page 29: 2026ThirdYearDMDSemester1WorkBook, p.29 ↩
-
Original PDF page 30: 2026ThirdYearDMDSemester1WorkBook, p.30 ↩
-
Original PDF page 31: 2026ThirdYearDMDSemester1WorkBook, p.31 ↩
-
Original PDF page 32: 2026ThirdYearDMDSemester1WorkBook, p.32 ↩
-
Original PDF page 33: 2026ThirdYearDMDSemester1WorkBook, p.33 ↩