Restoration of Endodontically Treated Teeth1
Oral Health Centre of Western Australia
This session focuses on the clinical and laboratory procedures involved in the restoration of teeth that have undergone endodontic therapy.
Lecture 3: Post and Core Fabrication Techniques2
This lecture covers the specific methodologies and clinical workflows required for the successful fabrication of post and core systems.
Introduction and Scope
This lecture focuses on the clinical execution of post and core restorations for endodontically treated teeth, transitioning from material selection (“what to choose”) to practical implementation (“how to do it”). The content covers three main fabrication approaches: direct technique (prefabricated posts), indirect technique (cast post and core via impression), and direct-indirect technique (burnout resin pattern). Common post options discussed include prefabricated metal posts, aesthetic/fiber posts, and custom cast posts.
Key Clinical Priorities Throughout All Techniques:
- Preserve remaining tooth structure – dentin conservation is paramount
- Achieve a durable coronal seal – essential before definitive crown placement
- Maintain apical seal – protect the endodontic obturation
- Create a ferrule – critical for long-term success
Learning Outcomes3
By the end of this lecture, you should be able to:
- Understand the difference between direct, indirect, and direct-indirect post fabrication techniques
- Describe each technique available to fabricate a post and core
- Understand the advantages and disadvantages of each technique
- Describe the post space preparation
- Describe the coronal preparation of a tooth receiving a post
Post Space Preparation4
Fabrication Methodologies
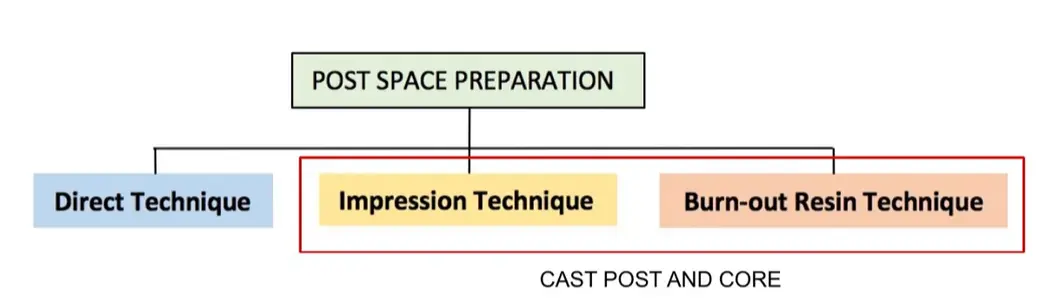
There are three primary techniques for fabricating a post and core:
Fabrication Techniques Overview5
- Direct Technique: Utilizes a pre-fabricated post combined with a core build-up (typically composite or amalgam).
- Indirect Technique: An impression-based technique used for a cast post and core.
- Direct-Indirect Technique: A burnout resin technique used for a cast post and core.
Following the fabrication of the post and core, a temporary post-crown is required.
The overall workflow for post and core restoration follows a logical sequence:
- Post Space Preparation: Removal of gutta-percha to planned length while preserving the apical seal
- Coronal Preparation: Removal of old restorations, assessment of remaining tooth structure, and ferrule creation
- Technique Selection: Choose direct, indirect, or direct-indirect based on tooth anatomy, remaining structure, and clinical requirements
- Temporization: Appropriate provisionalization if definitive restoration is delayed
Workflow by Technique
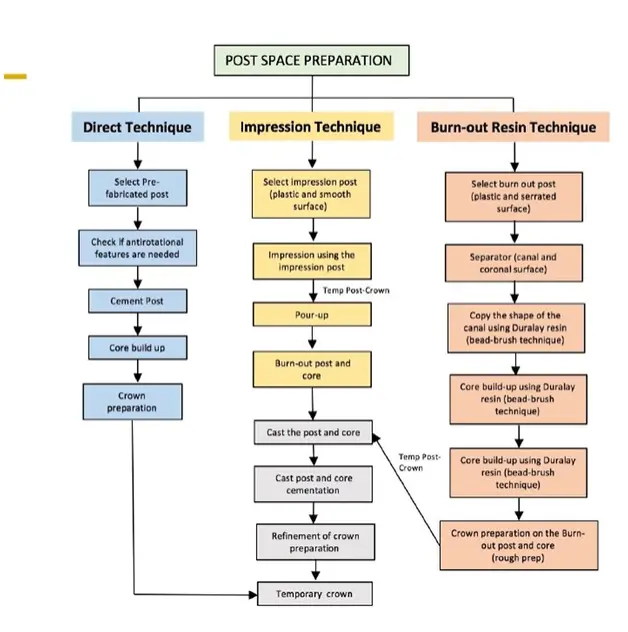 Direct Technique
- Select pre-fabricated post
- Check if antirotational features are needed
- Cement post
- Core build-up
- Crown preparation
- Temporary crown
Impression Technique
- Select impression post (plastic with smooth surface)
- Take impression using the impression post
- Place temporary post-crown
- Pour-up model
- Burn-out post and core
- Cast the post and core
- Cement cast post and core
- Refinement of crown preparation
- Final temporary crown
Burn-out Resin Technique
- Select burn-out post (plastic with serrated surface)
- Apply separator to canal and coronal surfaces
- Copy canal shape using Duralay resin (bead-brush technique)
- Core build-up using Duralay resin (bead-brush technique)
- Perform rough crown preparation on the burn-out post and core
Preparation of Coronal Structure
- Removal of existing restorations
- Elimination of undesirable undercuts (required for cast post and core only)
- Crown preparation to create a ferrule
Determine the Post Length Based on PA6789
Length and Retention Principles
- Retention: Increasing post length increases retention.
- Risk Factors: Excessively long posts may damage the apical seal of the root canal filling or cause root perforation, especially if the
- -Structural Integrity: Preserve as much tooth structure as possible.
- Fracture Risk: Short posts are more likely to result in root fracture.
Clinical Principle
Length is generally safer than width; reserve dentin whenever possible. Increasing post length provides better retention with less risk to root integrity compared to excessive width. apical third is curved or tapered.
Apical Seal Requirements
- Retention: Increasing post length increases retention.
- Risk Factors: Excessively long posts may damage the apical seal or risk root perforation in curved or tapered canals.
- Ideal Seal: Maintain at least a 5-mm apical seal.
- Compromised Cases: In very short roots with high crowns, a 4-mm apical seal is the minimum requirement.
Guidelines for Optimal Post Length
While there is no absolute guideline, common benchmarks include:
- Post length at least equal to the crown length.
- 2/3 of the remaining tooth length.
- 1/2 of the clinical root.
- 3/4 of the root canal length.
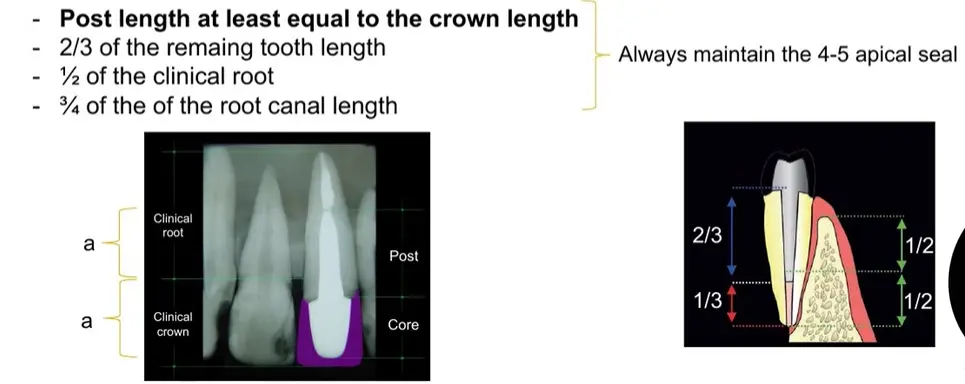 Note: Regardless of the benchmark used, always maintain a 4-5 mm apical seal.
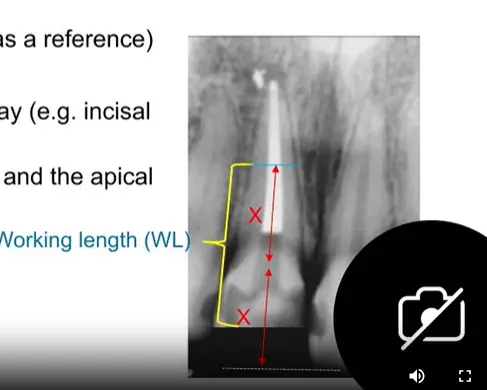
Measurement Steps
- Measure the crown height (use the contralateral tooth as a reference).
- Mark the intended apical end of the post on the radiograph.
- Select a visible reference point on the tooth (e.g., incisal edge, marginal ridge, or cusp tip).
- Measure the distance between the reference point and the apical limit to determine the working length for GP removal.
Rubber Dam10
The use of a rubber dam is essential to:
- Avoid bacterial contamination from saliva or blood.
- Prevent the inhalation or ingestion of instruments (e.g., endodontic files, burs).
- Protect the mucosa from contact with sodium hypochlorite during the final canal cleaning.
- Endodontic Seal: Acts as part of the endodontic seal to protect completed root canal treatment
- Visibility: Improves visibility and access during the procedure
Removal of GP1112
Procedure for Gutta-Percha Removal
- Begin removal using a heated endodontic plugger.
- Use a rubber stop to mark the calculated working length (WL) on the instrument.
- Use a Gates Glidden bur to reach the WL.
Perforation Prevention
- Align the bur parallel to the path of insertion.
- Apply light vertical forces only.
- Start with a smaller bur size and increase incrementally if necessary.
- Monitor debris: you should see red GP; white dentin indicates the bur is cutting into the root wall.
- Take a periapical (PA) radiograph if the bur path is uncertain.
Radiographic Verification
- Take a periapical (PA) radiograph to verify that the calculated working length has been reached.
- Ensure all GP has been removed from the canal walls before taking the radiograph.
- Check the integrity and length of the remaining apical GP seal.
Post Space Preparation Steps13
Technical Execution
- Utilize ParaPost drills (ParaPost System).
- Create parallel walls by allowing the drill to work without tilting.
- Remove any undercuts located inside the canal.
- Establish the final width of the post space.
Safety Protocols TO AVOID PERFORATION
- Ensure the drill follows the root canal direction.
- Use light vertical forces.
- Start with smaller drills and increase size sequentially.
- Confirm the path with a PA radiograph if necessary.
Establish the Width of the Post1415
Width Principles
- Retention and Resistance: Increasing post width increases both retention and resistance.
- Root Strength: Excessively wide posts weaken the root due to the removal of critical tooth structure.
- Dimensions: The post width should not exceed 1/3 of the root width.
- Specific Considerations: Preserve the buccal wall in upper incisors.
ParaPost Drill Sizing
| Color | Diameter (Inches) | Diameter (mm) |
|---|---|---|
| Black | .060” | 1.50 mm |
| Purple | .055” | 1.40 mm |
| Red | .050” | 1.25 mm |
| Blue | .045” | 1.14 mm |
| Yellow | .040” | 1.00 mm |
| Brown | .036” | 0.90 mm |
- Cast Post Minimum: Yellow (1.00 mm diameter).
- Pre-fabricated Minimum: Brown (0.90 mm diameter).
Establish the Shape of the Post1617
Uniradicular Teeth
In teeth with minimal coronal structure:
- The post space should be prepared with an elliptical shape to provide an antirotational feature.
- If the canal is naturally circular, create a small groove in the thickest wall of the root canal, following the path of insertion.
Multiradicular Teeth
In teeth with minimal coronal structure:
-
Utilize more than one canal to provide antirotational features and improve overall retention.
Posterior Specifics
- Divergent canals: A multi-piece cast post and core may be required
- Parallel canals: A single-piece cast post may be possible
- Main post location: Generally placed in the palatal canal of upper molars and the distal canal of lower molars
Verify Post Space with PA18
Take a periapical (PA) radiograph after completing the post space preparation to:
- Verify that no GP remains on the canal walls.
- Confirm the final shape and depth of the preparation.
Correction Protocol
If anything appears uncertain on the radiograph, stop and reassess before enlarging the post space further.
Coronal Preparation Timing1920
Clinical Considerations for Timing
Before Post Space Preparation:
- Better visualization of the canal.
- Accurate assessment of remaining tooth structure for planning (length, shape, antirotational features).
- Potential loss of original reference points.
After Post Space Preparation:
- Maintains the reference point established by the PA radiograph taken after the root canal treatment (RCT).
- Simplifies the process of temporization during multi-appointment procedures.
After Post Space Preparation2122
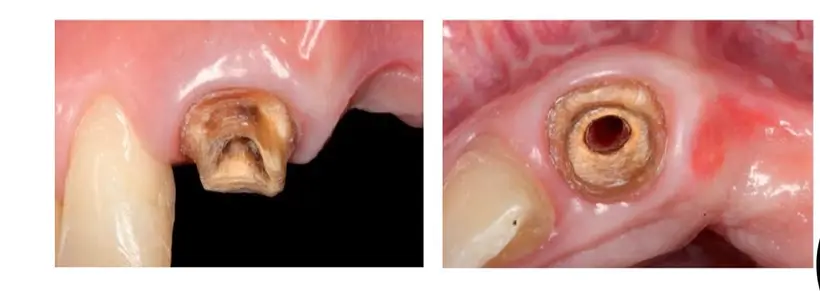
Coronal Preparation Steps
- Remove all existing temporary or definitive restorations.
- Eliminate undesirable undercuts (specifically for cast post and core).
- Complete the full crown preparation.
- Eliminate any unsupported tooth structure (less than 2 mm).
- Prepare margins to create a ferrule.
- Ensure a positive horizontal stop.
Coronal Structure Refinement
Preparation of the coronal structure involves:
- Removal of existing restorations.
- Elimination of undercuts for cast restorations.
- Full crown preparation with appropriate ferrule and horizontal stops.
Cast Post and Core Techniques2324
Following post space preparation, the clinician may choose between two primary methods for creating a cast post and core:
- Impression Technique
- Burn-out Resin Technique (Direct Technique)
Impression Technique25
Indications for Use
- Cases requiring multiple post and cores.
- Abutments for bridges, as it is easier to establish parallelism.
- Posterior teeth featuring divergent canals.
Advantages
- Faster clinical procedure compared to the burn-out resin technique.
- The laboratory handles the manufacturing of the post.
Disadvantages
- Potential for errors such as distortion during the impression or pour-up stages.
- May require more extensive adjustments during the try-in phase.
Clinical Procedure: Impression technique26
- Select and use a full arch stock tray or a custom tray.
- Dry the canal thoroughly using air and paper points.
- Verify the seating of the impression post.
- Apply light body Polyvinyl Siloxane (PVS) into the canal.
- Seat the impression post into the canal.
- Apply heavy or medium body PVS onto the impression tray.
- Insert the tray into the patient’s mouth.
- Remove the tray with a single ‘snap’ movement once set.
Laboratory Processing27
Workflow Steps
- The laboratory pours up the model based on the clinical impression.
- A burn-out resin post and core is created on the model.
- The final cast post and core is fabricated.
Burn-Out Resin Technique28
Indications
- Uniradicular or multiradicular teeth that do not have divergent root canals.
Contraindications
- Patients with a known allergy to monomer.
- Patients unable to keep their mouth open for extended periods.
- Teeth with divergent roots.
Advantages
- The clinician has direct control over the shape of the post and core.
- Generally requires fewer adjustments during the try-in phase (though not in all cases).
Disadvantages
- More technically difficult method to perform.
- Requires significantly more clinical chair time.
Clinical Procedure2930
- Dry the canal using air and paper points.
- Select the appropriate size for the burn-out post.
- Apply separator to the internal canal walls and the coronal tooth structure.
- Apply acrylic resin (such as Duralay or Pattern Resin) inside the canal and around the burn-out post using the bead-brush technique, ensuring a passive fit.
- Insert the burn-out post into the canal.
- Wait until the acrylic begins to set; perform frequent “in and out” movements until the acrylic is fully polymerized to prevent the post from becoming locked in the canal.
Posterior Teeth Considerations31
General Considerations
- Used when there is no remaining coronal structure to support core material.
- Often requires the use of more than one post.
Management of Canal Morphology
- Divergent Canals:
- Requires a multipiece cast post and core.
- Provides more retention.
- Best managed via the impression technique.
- Parallel Canals:
- Can be restored with a single-piece cast post and core.
Primary Post Selection
- Upper Molars: The palatal canal is used for the main post.
- Lower Molars: The distal canal is used for the main post.
The workflow for restoring endodontically treated teeth involves post space preparation followed by one of the following cast post and core techniques:
- Direct Technique: Burn-out Resin Technique
- Indirect Technique: Impression Technique
Direct Technique
To ensure the stability of the restoration, several methods can be employed to enhance the retention of the core material:
The direct technique involves selecting a prefabricated post, cementing it directly into the post space, and building the core directly in the mouth. This approach is efficient and widely used but requires careful post space preparation and tooth structure preservation.
Core Retention Enhancement32
- Mechanical Undercuts: Leave existing undercuts within the tooth structure to provide natural mechanical retention.
- Auxiliary Pins: Incorporate pins if additional retention is necessary for the core assembly.
- Amalgam Tags: When performing an amalgam core build-up on posterior teeth, utilize amalgam tags extending into other available root canals to secure the foundation.
- Multi-rooted Teeth: Goal is a core that resists dislodgement and rotation under function using the existing canal anatomy
Note
Unlike cast posts, direct techniques often utilize rather than eliminate internal anatomy.
Prefabricated Post Selection and Cementation33
Post Selection and Preparation
- Canal Preparation: Dry the canal thoroughly using air and paper points.
- Size Selection: Select a prefabricated post diameter that fits tightly within the post space. This should correspond to the size of the final Parapost drill used during preparation.
- Length Adjustment:
- Verify the post length relative to the available interarch space.
- If necessary, shorten the post by cutting the apical end to ensure the coronal portion is completely embedded within the core material.
- Final Cleaning: Clean the post space with saline and dry thoroughly with paper points prior to cementation.
Tip
Try-in: Confirm length and seating; adjust length by cutting the apical end if required. Select post diameter to fit without unnecessary canal enlargement.
Cementation Protocol
The choice of luting agent depends on the post material:
- Resin Cement (e.g., Panavia): Indicated for both metal and fiber posts.
- GIC and RMGIC (e.g., Permacem): Indicated for metal posts.
Note: Following cementation, allow the material to reach a complete set (minimum of 10 minutes) before proceeding.
Core Build-Up34
- Proceed with the core build-up using the selected restorative material following the successful cementation and setting of the prefabricated post.
Core Build-Up Procedure
- Material Selection: Choose core material appropriate to the case and follow manufacturer instructions
- Incremental Build-Up: Build core to planned crown form incrementally, ensuring good adaptation and avoiding voids
- Refinement: Refine and finish the core, completing the crown preparation
- Endpoint: Core with appropriate height, resistance form, and ferrule support, ready for definitive crown
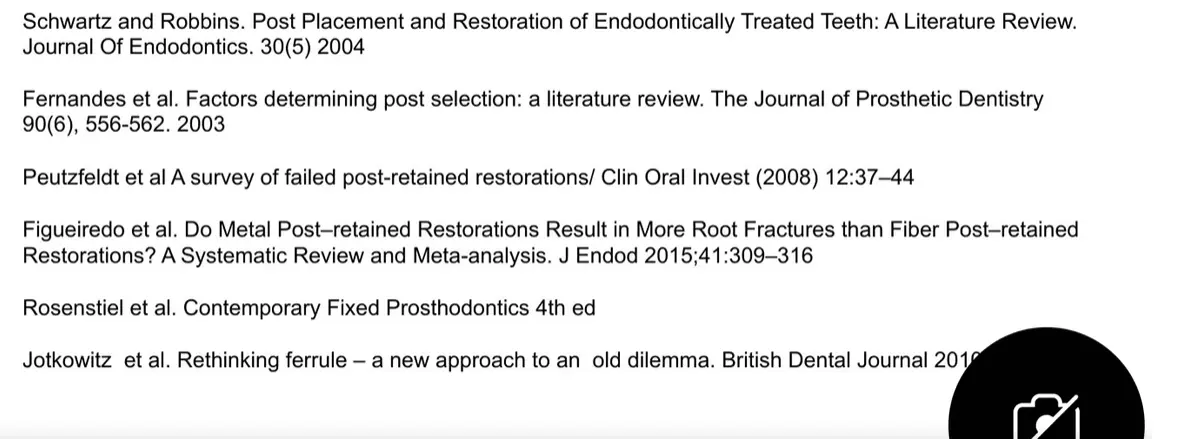
Readings
Footnotes
-
Original PDF page 1: L3 RETT 2026 Post and Core Fabrication Techniques, p.1 ↩
-
Original PDF page 2: L3 RETT 2026 Post and Core Fabrication Techniques, p.2 ↩
-
Original PDF page 3: L3 RETT 2026 Post and Core Fabrication Techniques, p.3 ↩
-
Original PDF page 5: L3 RETT 2026 Post and Core Fabrication Techniques, p.5 ↩
-
Original PDF page 4: L3 RETT 2026 Post and Core Fabrication Techniques, p.4 ↩
-
Original PDF page 6: L3 RETT 2026 Post and Core Fabrication Techniques, p.6 ↩
-
Original PDF page 7: L3 RETT 2026 Post and Core Fabrication Techniques, p.7 ↩
-
Original PDF page 8: L3 RETT 2026 Post and Core Fabrication Techniques, p.8 ↩
-
Original PDF page 9: L3 RETT 2026 Post and Core Fabrication Techniques, p.9 ↩
-
Original PDF page 10: L3 RETT 2026 Post and Core Fabrication Techniques, p.10 ↩
-
Original PDF page 11: L3 RETT 2026 Post and Core Fabrication Techniques, p.11 ↩
-
Original PDF page 12: L3 RETT 2026 Post and Core Fabrication Techniques, p.12 ↩
-
Original PDF page 13: L3 RETT 2026 Post and Core Fabrication Techniques, p.13 ↩
-
Original PDF page 14: L3 RETT 2026 Post and Core Fabrication Techniques, p.14 ↩
-
Original PDF page 15: L3 RETT 2026 Post and Core Fabrication Techniques, p.15 ↩
-
Original PDF page 16: L3 RETT 2026 Post and Core Fabrication Techniques, p.16 ↩
-
Original PDF page 17: L3 RETT 2026 Post and Core Fabrication Techniques, p.17 ↩
-
Original PDF page 18: L3 RETT 2026 Post and Core Fabrication Techniques, p.18 ↩
-
Original PDF page 19: L3 RETT 2026 Post and Core Fabrication Techniques, p.19 ↩
-
Original PDF page 20: L3 RETT 2026 Post and Core Fabrication Techniques, p.20 ↩
-
Original PDF page 21: L3 RETT 2026 Post and Core Fabrication Techniques, p.21 ↩
-
Original PDF page 22: L3 RETT 2026 Post and Core Fabrication Techniques, p.22 ↩
-
Original PDF page 23: L3 RETT 2026 Post and Core Fabrication Techniques, p.23 ↩
-
Original PDF page 31: L3 RETT 2026 Post and Core Fabrication Techniques, p.31 ↩
-
Original PDF page 24: L3 RETT 2026 Post and Core Fabrication Techniques, p.24 ↩
-
Original PDF page 25: L3 RETT 2026 Post and Core Fabrication Techniques, p.25 ↩
-
Original PDF page 26: L3 RETT 2026 Post and Core Fabrication Techniques, p.26 ↩
-
Original PDF page 27: L3 RETT 2026 Post and Core Fabrication Techniques, p.27 ↩
-
Original PDF page 28: L3 RETT 2026 Post and Core Fabrication Techniques, p.28 ↩
-
Original PDF page 29: L3 RETT 2026 Post and Core Fabrication Techniques, p.29 ↩
-
Original PDF page 30: L3 RETT 2026 Post and Core Fabrication Techniques, p.30 ↩
-
Original PDF page 32: L3 RETT 2026 Post and Core Fabrication Techniques, p.32 ↩
-
Original PDF page 33: L3 RETT 2026 Post and Core Fabrication Techniques, p.33 ↩
-
Original PDF page 34: L3 RETT 2026 Post and Core Fabrication Techniques, p.34 ↩