Purpose of Cephalometric Superimposition
Learning Objectives
This program describes and demonstrates methods of cephalometric superimposition. The learning objectives are to:
- Understand the purpose of cephalometric superimpositions
- Learn the method for overall (cranial base) superimpositions
- Learn the method for regional superimpositions on the maxilla and mandible
- Gain experience in the interpretation of cephalometric superimpositions
After viewing this program, you should be able to:
- Superimpose cephalograms of the same patient from two time points
- Assess changes in dental and jaw relationships as well as soft tissue changes in profile
- Determine whether changes in dental relationships are due to jaw growth, tooth movement, or both
Cephalometric Superimposition Technique
Cephalometric superimposition is the technique of overlaying a ceph tracing from one time point on another tracing from a ceph of the same individual at a different time point.
The purpose of ceph superimposition is to evaluate changes in jaw and tooth relationships in the same individual between different points in time, and to determine whether these changes occurred as a consequence of growth, dental maturation, or orthodontic tooth movement. Changes from orthognathic surgery also are evaluated in this way.
One strategy to make these comparisons is to take angular and linear measurements from a ceph at one time point and compare them to the measurements from another ceph at a later time. This strategy can be quite laborious. It would give some idea of the changes, but it is often difficult to visualize the changes that numbers represent and hard to differentiate between the skeletal and dental changes.
A better strategy is to compare tracings by overlaying them. This technique reduces the amount of information to a manageable level and provides a visual overview of the changes that occurred between two time points.
Cephalometric Superimposition Technique (cont’d)
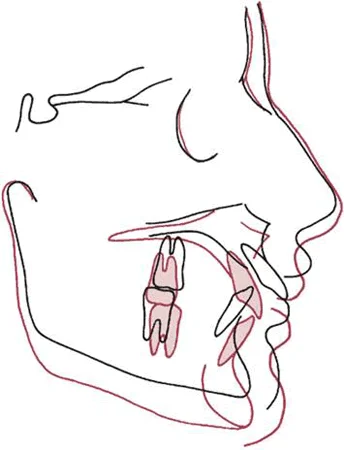
Cephalometric tracings are overlaid on defined anatomic landmarks that serve as registration points or lines. When tracings are superimposed, all changes are shown relative to the registration point(s) or lines.
This view may or may not accurately reflect what you know from other sources of information about the patient, and the interpretation of any given superimposition must always be reconciled with clinical findings or clinical history.
Regional Superimpositions
Ceph tracings are commonly superimposed on three regions:
- Cranial base
- Maxilla
- Mandible
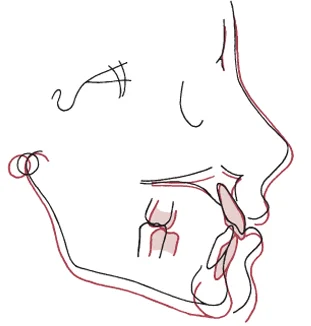
Your finished superimpositions, done on tracing paper, will look similar to these. As you can see, in each one different anatomical features are precisely overlapped, or superimposed.
| Image 1: Cranial base superimposition. | 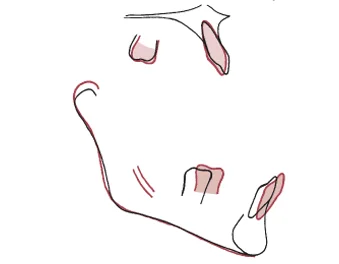 Image 2: Maxillary and mandibular superimpositions, same patient. Image 2: Maxillary and mandibular superimpositions, same patient. |
Cephalometric Superimposition: View of Changes
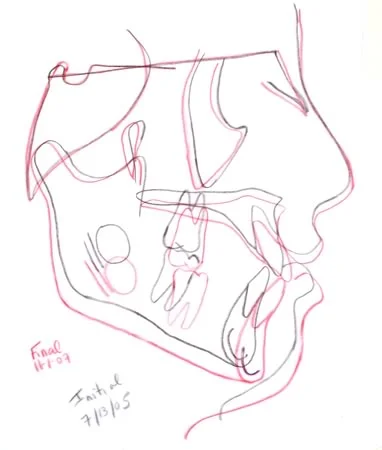
In the cranial base superimposition, changes in the jaws and face relative to the cranial base are demonstrated. Because cranial base growth follows the neural growth curve and is completed by age 7, cranial base superimposition for orthodontic patients (who are older than 7 when treated) reveals changes in facial hard and soft tissues relative to a stable reference area.
This superimposition compares cephs just before and after the adolescent growth spurt, which affects the facial structures but not the cranial base. Note the downward and somewhat forward growth of the face in this individual.
Cephalometric Superimposition: View of Changes (cont’d)
In the maxillary superimposition, the skeletal changes are canceled out and only dental changes relative to the maxilla are demonstrated. Note that for this individual (the same as on the previous screen), there was a little uprighting of the central incisors relative to their supporting bone, and a little mesial movement of the upper first molar. You’d expect to see that mesial movement at the time the second primary molars were lost.
The mandibular superimposition is a little trickier than the maxillary one. It’s done anteriorly on the lingual outline of the symphysis and posteriorly on the canal that contains the mandibular neurovascular bundle, for reasons that we’ll explore in detail later in this module. Note that relative to the supporting bone, the mandibular teeth moved mesially and erupted slightly, while the ramus grew longer.
The dental changes seen in these regional superimpositions are due to a combination of tooth eruption and (in treated patients) orthodontic tooth movement.
Cranial Base Superimposition
Technique
To understand the technique, you will complete 3 superimposition tracings while using this program. Before proceeding, you will need to gather the following supplies, as shown in this image:
- sharp black and red pencils
- a sheet of acetate tracing paper, from a tablet such as “ortho/trace”. Remember that the tissue paper between the acetate pages functions only to separate the acetate and may be discarded.
- the original tracing from your patient’s initial ceph, time point 1 (which is done with green lines)
- the original tracing from your patient’s final ceph, time point 2 (blue lines)
- masking tape
For the rest of this program, these will be called the “initial tracing” (i.e., time point 1) and the “final tracing” (i.e., time point 2).
The two tracings you will work with are for the same patient before and after orthodontic treatment during the adolescent growth spurt. So the changes you’ll see with the cranial base superimposition will be due to a combination of growth and effects of treatment.
The time interval between initial and final tracings will depend on the patient’s problem and the nature of the information you are looking for.
Evaluating growth changes may require a year or longer. In contrast, a few months may be all that is necessary to visualize changes due to treatment.
Technique (cont’d)
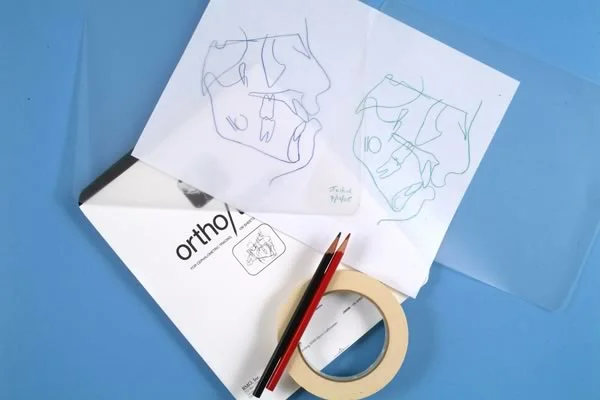
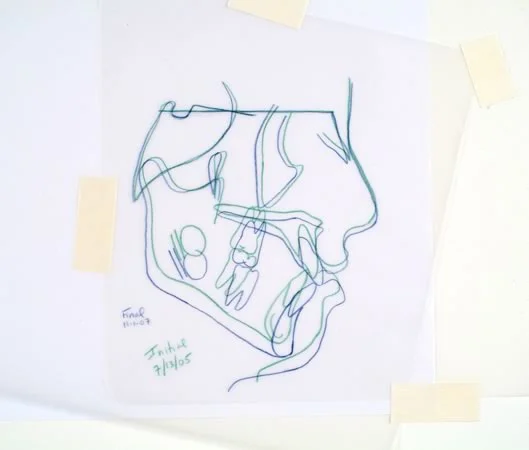
Begin by taping the initial tracing (green) to a smooth surface. Then place the final tracing (blue) over it, and superimpose the blue tracing over the green one at sella (S). Then rotate the blue tracing until it is oriented with the S-N line over the green S-N line. At that point it should like what you see in this image.
This registration on the sella-nasion line registered at sella is a simple and reasonably accurate method to superimpose on the anterior cranial base.
Because the area around S is unaffected by growth after age 7, it makes an ideal registration point. Nasion can move forward relative to sella because of growth, but the inclination of the S-N line also is reasonably constant.
Cranial Base Superimposition Tracing
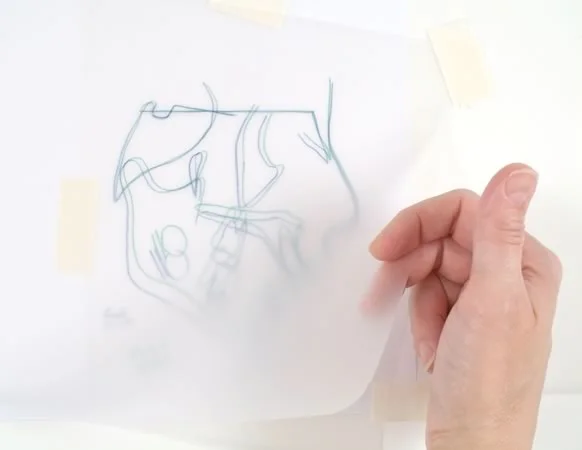
The first step in producing a cranial base superimposition tracing is to tape a clean sheet of acetate tracing paper over your superimposed tracings. Make sure the shiny side of the acetate tracing paper faces down and that you trace on the dull side.
Cranial Base Superimposition Tracing (cont.)
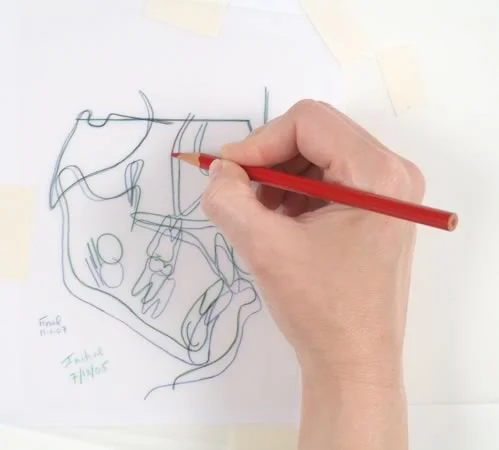
Using your black pencil (image 1), retrace the initial tracing (green lines) onto the clean acetate paper, including the soft tissue profile. Include the sella-nasion (S-N) line on the new tracing (image 2).
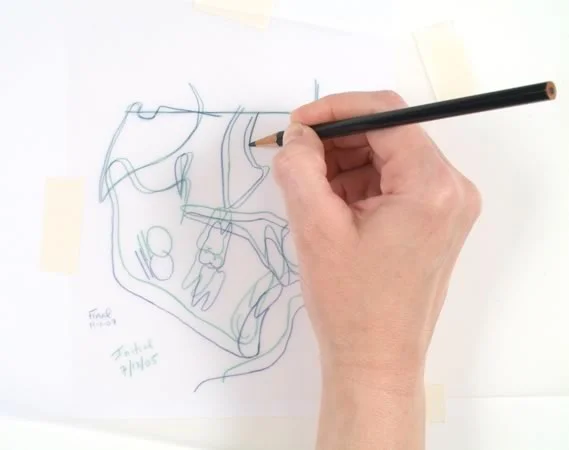 Image 1 Image 1 | 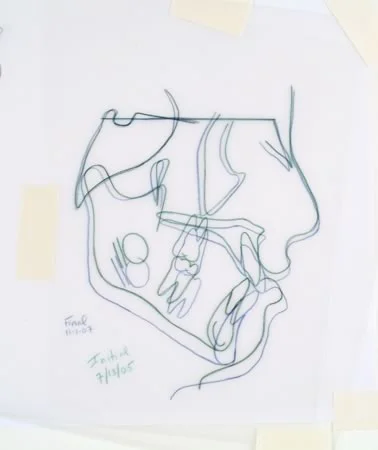 Image 2 Image 2 |
Cranial Base Superimposition Tracing (cont.)
Now, on the same acetate sheet with the copied initial tracing (black lines), retrace the hard and soft tissues of the final tracing, in red, wherever they are different. You don’t need to trace the cranial base in red, because the black and red are superimposed and the red line wouldn’t show anyway.
Cranial Base Superimposition Tracing (cont.)
You should now have an overall composite tracing with black and red lines superimposed on the anterior cranial base registered at sella. The black lines represent the first time point, and the red lines represent the second time point.
Before proceeding to the next screen, take the time to examine the overall skeletal and soft tissue growth in your patient, both in magnitude and in direction.
Regional Superimpositions: Maxillary and Mandibular
Maxillary Superimposition
Next, let’s do the maxillary superimposition. Superimposition on the maxilla helps you visualize how the maxillary incisors and molars changed position between the two tracings.
To do this, remove your new composite tracing, untape the blue tracing and superimpose it on the lingual contour of the palate behind the upper incisors, then rotate it so that the palatal plane is level (image 1), and again tape it so it can’t move (image 2). Note that the teeth aren’t superimposed. The objective here is to visualize any changes in the position of the teeth relative to the maxilla.
Then place your composite tracing over the superimposed tracings, with a blank area over the maxilla superimposition, and tape it into position.
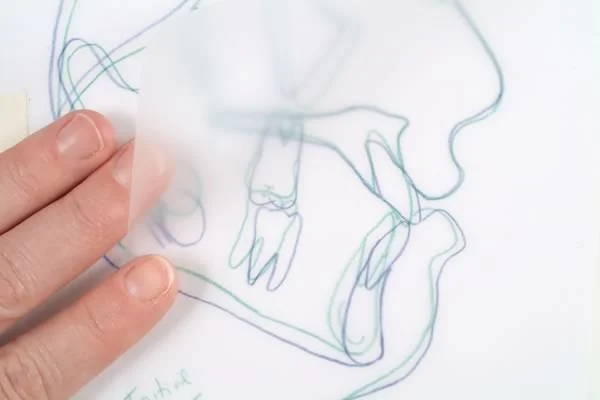 Image 1 Image 1 | 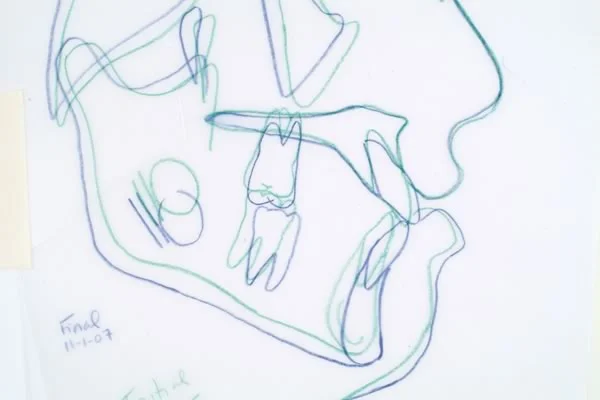 Image 2 Image 2 |
Maxillary Superimposition Tracing
Now, using your black pencil, retrace the maxillary outline and teeth from the new composite tracing onto your copy of the maxilla from the initial tracing (images 1,2). Also trace any changes in the maxillary contour if there are noticeable differences (there probably won’t be).
Then trace in red any areas where the green and blue lines around the maxilla are different (image 3).
You now have the maxillary superimposition tracing (image 4). By inspecting where the incisors and molars started (black tracing) and where they ended up (red tracing), you can visualize how these teeth changed their position and/or angulation relative to the maxilla during the time interval between the two tracings.
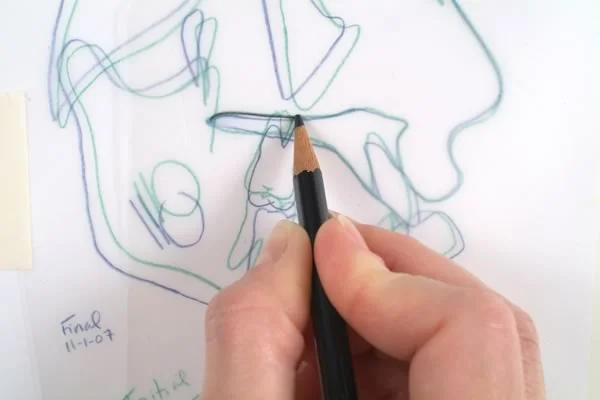 Image 1 Image 1 | 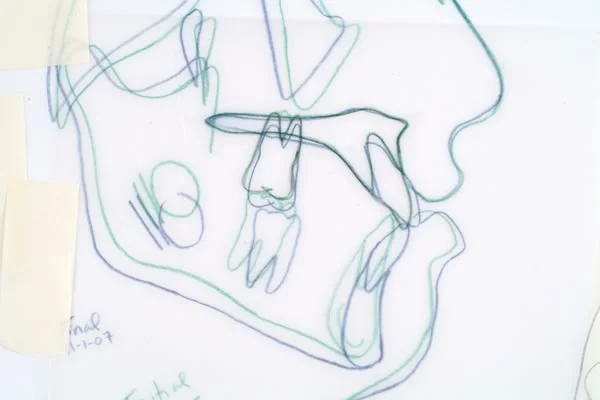 Image 2 Image 2 |
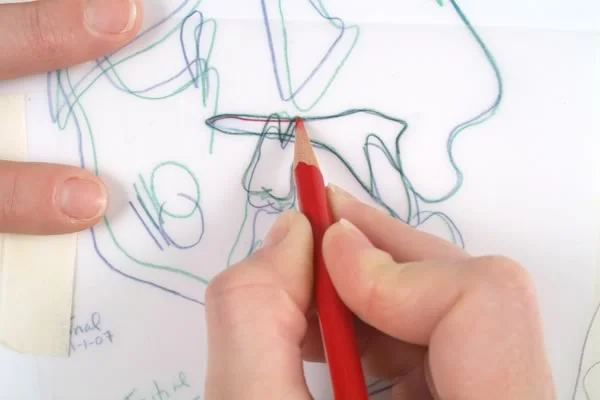 Image 3 Image 3 | 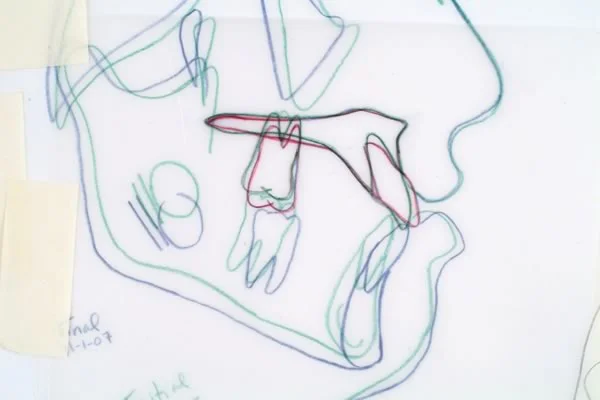 Image 4 Image 4 |
Mandibular Superimposition
The last superimposition tracing you will make is the mandibular superimposition. Superimposition on the mandible helps you see how the mandibular incisors and molars changed position and/or angulation between the two tracings.
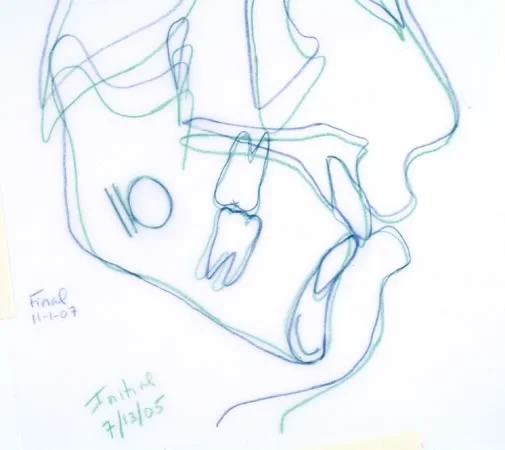
In the mandibular superimposition, the tracings are registered as shown here: along the inner aspect of the mandibular symphysis, the unerupted third molar crypt, and the inferior alveolar nerve canal. Studies of children who had metallic implants placed in their jaws have demonstrated that these anatomic landmarks don’t change as the mandible grows.
The mandibular superimposition tracing demonstrates changes in the mandibular dentition relative to stable mandibular points.
Mandibular Superimposition Tracing
The mandibular superimposition is accomplished in much the same manner as the maxillary superimposition.
Place the initial tracing (green lines) on the viewbox. Place the final tracing (blue lines), positioning it so that lingual outline of the symphysis superimposes on that area of the initial tracing, then rotate it to also superimpose on the mandibular canal and unerupted third molar, and tape it into position.
Take the acetate paper on which you have now traced cranial base and maxillary superimpositions and tape it over the original tracing so that the clean area of the page on the bottom left portion is placed over the mandibular area of the superimposed tracings.
Using a black pencil (image 1), retrace the mandibular anatomy of the initial tracing, including the incisor and first molar (or second primary molar if no permanent teeth are present) (image 2).
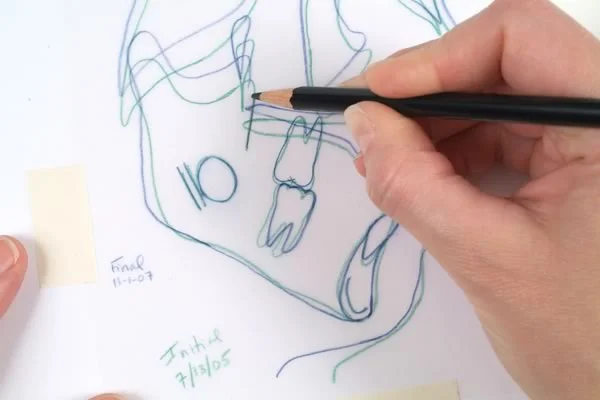 Image 1 Image 1 | 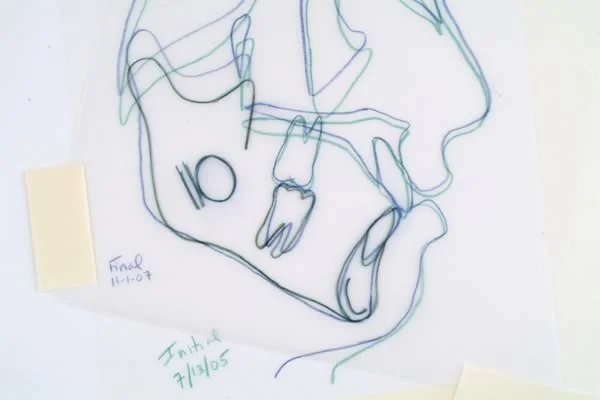 Image 2 Image 2 |
Mandibular Superimposition Tracing (cont.)
Now, using your red pencil (image 1), trace the teeth and areas of the mandibular outline onto the composite tracing. Remember, do not try to make the teeth coincide.
You now have a mandibular superimposition tracing which demonstrates mandibular dental changes, relative to the mandible itself (image 2). By comparing where the mandibular incisors and molars started (in black) to where they ended up (in red), you can see how they changed position relative to the basal bone of the mandible.
You also can see the amount of growth at the condyle and the remodeling of the mandible in the gonial angle area as it grows (note the resorption of bone at the angle even though the ramus grew longer).
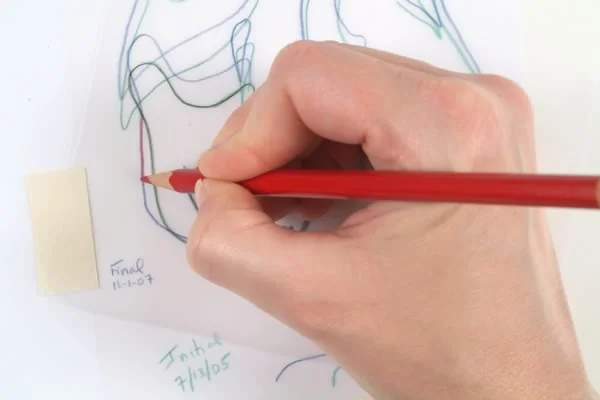 Image 1 Image 1 | 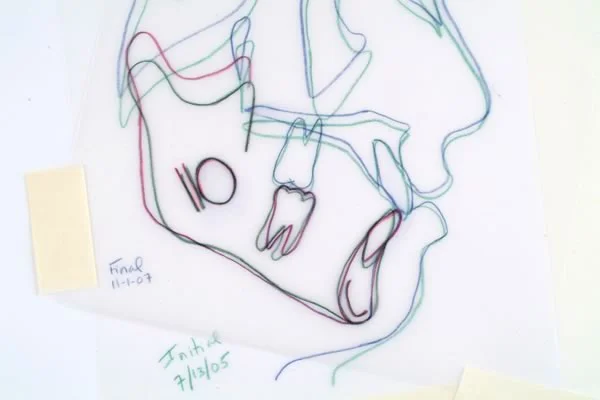 Image 2 Image 2 |
Interpretation of Superimpositions
The Standard Superimpositions for Orthodontic Applications
You now have produced a series of superimposition tracings for this patient, which should resemble the superimposition set shown here.
The cranial base superimposition reveals skeletal and soft tissue profile changes relative to the stable cranial base (image 1).
The maxillary superimposition demonstrates changes of the maxillary dentition relative to the palate (image 2).
The mandibular superimposition illustrates mandibular dentition changes and changes in the shape of the mandible relative to the stable mandibular landmarks that are not on the surface of the bone (image 3).
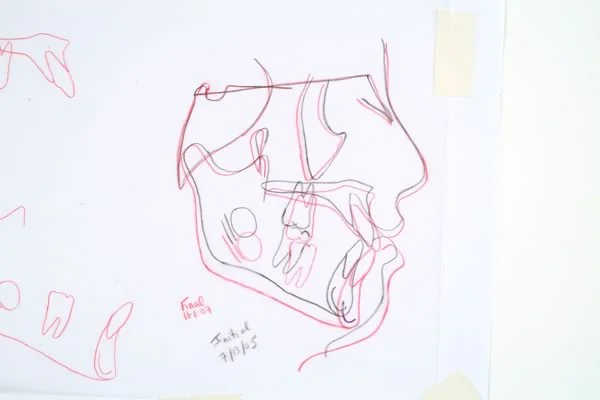 Image 1: Cranial base superimposition Image 1: Cranial base superimposition | 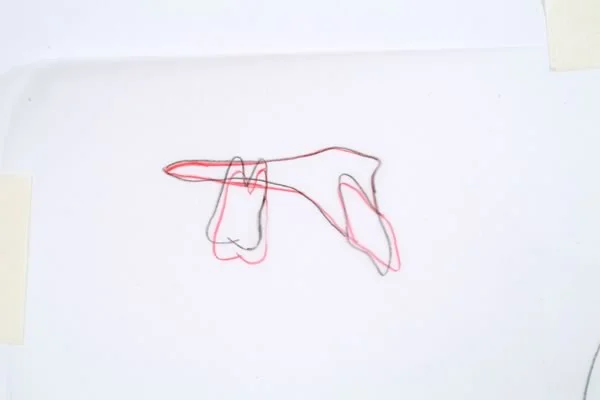 Image 2: Maxillary superimposition Image 2: Maxillary superimposition |
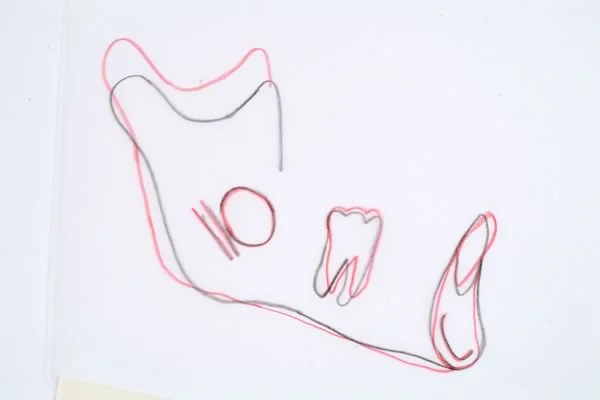 Image 3: Mandibular superimposition Image 3: Mandibular superimposition |
Interpretation of Cranial Base Superimposition, Patient #1
Let’s use these superimpositions to evaluate what happened in this patient. His Class II malocclusion was treated with extra-oral force (headgear) to restrain growth of the maxilla, and with a fixed appliance with brackets on the upper incisors to close the “gaps” (as he called them) between those teeth. Changes due to growth and treatment can be seen.
From the cranial base superimposition, it is apparent that the maxilla grew downward only and the upper lip became less prominent, while the mandible grew downward and forward.
This skeletal change was due to headgear wear that minimized forward growth of the maxilla. The mandible, which was not affected by the extraoral force to the maxilla, grew forward as well as downward, improving the jaw relationship—which was very favorable in this patient.
Interpretation of Max / Mand Superimpositions, Patient #1
In the same patient, the maxillary superimposition (image 1) illustrates that the maxillary anterior teeth were retracted, while the maxillary posterior teeth remained in nearly the same place in the a-p plane of space.
The maxillary molar moved down as the maxilla grew downward (which you saw in the cranial base superimposition), but now you can see in the maxillary superimposition that the molar also erupted downward relative to the maxilla, perhaps a bit more than ideal. How would you know this eruption was unfavorable? Look back at the cranial base superimposition and note that the mandibular plane angle increased a little, which is undesirable in a Class II patient because it takes away some of the effect of the forward growth.
The mandibular superimposition (image 2) demonstrates that the lower molars were maintained in the same anteroposterior relationship within the mandible, so the improvement in molar relationship for this patient was due almost totally to favorable growth rather than forward movement of the lower teeth relative to the mandible. Note the amount of mandibular growth at the condyle. A small amount of uprighting of the lower incisors is also evident. There was only a little eruption of the lower molar relative to the mandible.
| Image 1: The maxillary superimposition shows downward a little forward movement of the molar while the incisor teeth were retracted. | Image 2: The mandibular superimposition shows favorable upward-backward growth of the ramus with only small changes in the position of the mandibular teeth. |
Superimpositions, Pt #1
Combining the findings from these 3 superimpositions, one concludes that the correction from Class II to Class I molars was accomplished largely by maintaining the A-P position of the maxilla and upper teeth with the headgear while forward growth of the mandible occurred.
| Image 1 | Image 2 |
| Image 3 |
Interpretation of Superimpositions, Pt. #2
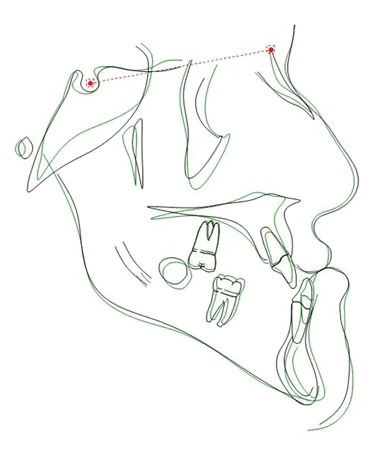
Let’s look at the changes in this patient during late adolescence. From this cranial base superimposition, how would you describe her? I hope you now would say “long face Class III” at a glance.
For a patient like this, the timing of surgery to reposition the jaws is determined primarily from superimpositions like this. The closer the superimposition in areas that are not registered, the less change has occurred. That would indicate that growth has stopped or almost stopped, and that it would be safe to go ahead with the surgery. If surgery is done too soon, further growth in the Class III pattern would cause the lower jaw to again be in front of the upper jaw.
Do you think this patient is ready for surgery? The black lines are the progress radiograph, the green lines the previous year. It certainly looks as if there has been very little change during the year, with a bit of change in tooth positions related to the orthodontics she’s undergoing to get her ready for surgery. This small amount of change would support going ahead with the surgical phase of treatment.
Interpretation of Superimpositions, Patient #2 (cont.)
In the maxillary superimposition for this patient, you can see more clearly that the maxillary molar actually was intruded relative to the maxilla, which is a reflection of orthodontic treatment in preparation for the surgery. The upper incisor moved forward a little.
The mandibular superimposition shows that the lower incisors also were intruded during the orthodontic treatment. The changes in tooth position in both arches were created by treatment to level out the arches.
It won’t matter whether you go into orthodontics or surgery in the future—you’re going to have a Class III patient who is a candidate for orthognathic surgery, and somebody will be showing you superimpositions like this as evidence that it is, or isn’t, time to proceed with surgery. Learning how to intepret superimpositions is an important tool for your professional future.
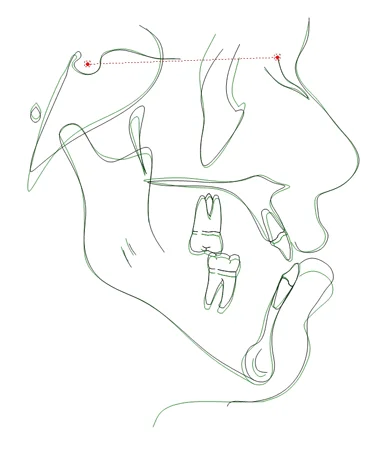 Image 1 Image 1 | 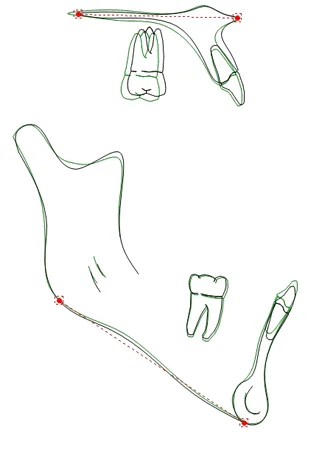 Image 2 Image 2 |
Superimposing Digital Cephalograms
Superimposition of Digital Cephs: Overview
Digital radiographs are rapidly becoming the norm. Lateral cephs obtained in digital format can be digitized to create a digital model, then superimposed using the same principles of landmark identification and superimposition as hand-traced cephalograms.
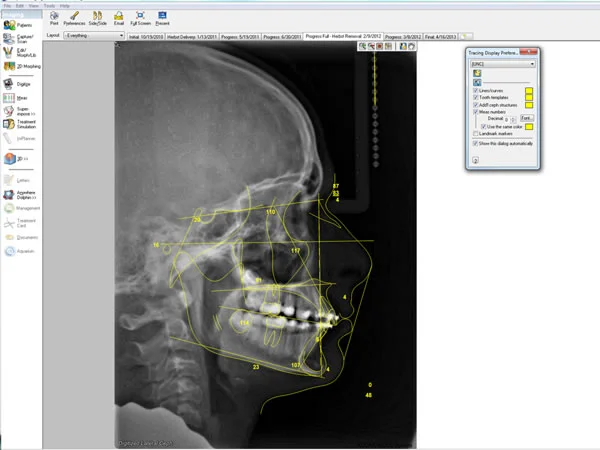
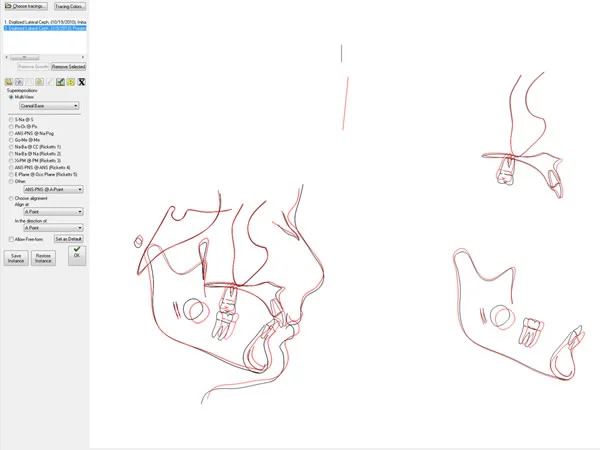
Imaging software (e.g., Dolphin Imaging [tm]) has been developed with the capability of “tracing” and superimposing cephalograms. The ceph “tracing” shown here was created in Dolphin from the series of digitized landmarks.
Digital Cephalograms: Superimpositions, Patient #3
The software also permits you to superimpose cephalograms from different time points after you’ve digitally traced them. Cranial base and regional superimpositions are registered in the same way, but now you only have to tell the software to do it. You must select the registration lines or points, and the program superimposes and displays a digital image of the superimposed tracings for you to interpret.
Interpretation proceeds in the same manner as with hand-traced cephs; that is, you must examine and infer whether changes you see are due to skeletal growth, dental maturation, and/or orthodontic tooth movement.
Summary
Cephalometric superimposition has two overlapping purposes:
- to evaluate changes over time in untreated individuals as they grow (which was the original goal)
- to evaluate changes during orthodontic treatment, so that the response to treatment procedures can be evaluated more accurately (which is now the major reason for obtaining cephs before, during and after treatment)
All change is relative to some reference. Three references are used routinely in cephalometric superimposition:
- cranial base: to demonstrate growth of the face and jaws, and any growth modification induced by treatment, relative to cranial base structures that are not growing during the time period of greatest interest clinically (>7 years)
- maxilla: to demonstrate movement of maxillary teeth relative to the maxilla
- mandible: to demonstrate movement of mandibular teeth relative to the mandible, and also growth changes in the ramus (both remodeling and condylar growth)
Measurements of the amount of change between two time points often are used in research, but in some contrast to analysis of individual cephs, clinical interpretation is done almost totally from observation of superimpositions. Humans are, after all, walking analog computers, and even when digital records are routinely obtained, a digital-to-analog conversion is required if the changes are to be understood.
Referral to Self-Test
Before going to the self-test, it’s a good idea to review some of the material on cephalometrics that you have previously studied in *Contemporary Orthodontics*. Then use the self-test to demonstrate to yourself that you have understood how regional superimpositions can provide important clinical information on how growth and treatment are interacting.
Self-Test
Question 1
What is the major purpose of preparing cephalometric tracings so that they can then be superimposed?
- allows multiple registrations
- makes it possible to observe growth changes
- makes it possible to observe treatment changes
- makes landmarks visible
- reduces the amount of information that is displayed ✓
Correct
That’s right, the major purpose is the reduce the amount of information to a manageable level. If you try to superimpose the two cephs themselves, almost everything becomes just a blur. The other things listed as possible answers are a function of the information reduction produced by making tracings.
Incorrect
That’s wrong, the major purpose is the reduce the amount of information to a manageable level. If you try to superimpose the two cephs themselves, almost everything becomes just a blur. The other things listed as possible answers are a function of the information reduction produced by making tracings.
Question 2
(A) Cranial base superimpositions are on the S-N line registered at N because (B) N does grow forward relative to the central part of the cranial base.
- A true, B true, A and B related
- A true, B true, A and B not related
- A true, B false
- A false, B true ✓
- A and B false
Correct
That’s right, the first statement is false but the second one is true. The cranial base superimposition is on the S-N line at S, so that forward growth of nasion will not affect the apparent forward growth of the facial structures below it.
Incorrect
No, that’s wrong. The first statement is false but the second one is true. The cranial base superimposition is on the S-N line at S, so that forward growth of nasion will not affect the apparent forward growth of the facial structures below it.
Question 3
What would be the apparent effect on facial growth of superimposing on the posterior part of the cranial base and registering on a point there that was distal to and below S (Basion, for example)?
- make growth look more forward and less downward ✓
- make growth look less forward and more downward
- make it look like less facial growth occurred
- make it look like the face grew upward and not forward at all
- effect would be unpredictable because the posterior cranial base grows away from S
Correct
That’s right, the effect would be to make the facial growth look more forward and less downward, because the registration point would be below S. Sometimes you will see superimpositions on the Ba-N line registered at Ba or other lower points, especially if the presenter wants to show how some type of treatment made the jaws grow forward.
Incorrect
No, that’s wrong. The effect would be to make the facial growth look more forward and less downward, because the registration point would be below S. Sometimes you will see superimpositions on the Ba-N line registered at Ba or other lower points, especially if the presenter wants to show how some type of treatment made the jaws grow forward.
Question 4
(A) In a mandibular superimposition you should superimpose posteriorly on the inferior alveolar canal instead of just using the mandibular plane (Go-Gn) because (B) Go can be significantly affected by surface remodeling.
- A true, B true, A and B related ✓
- A true, B true, A and B not related
- A true, B false
- A false, B true
- A and B false
Correct
That’s correct, the statements are true and related. As you learned previously, the surface of the mandible undergoes significant remodeling during growth. Studies based on implants in the mandible have shown that the best superimposition is on the lingual contour of the mandibular symphysis anteriorly (but changes in Gn relative to it usually are small), and on the inferior alveolar canal posteriorly, where changes in the location of Go can be surprisingly large. Note the changes in the position of Go in this superimposition.
Incorrect
That’s incorrect, the statements are true and related. As you learned previously, the surface of the mandible undergoes significant remodeling during growth. Studies based on implants in the mandible have shown that the best superimposition is on the lingual contour of the mandibular symphysis anteriorly (but changes in Gn relative to it usually are small), and on the inferior alveolar canal posteriorly, where changes in the location of Go can be surprisingly large. Note the changes in the position of Go in this superimposition.
Question 5
Which of the following are seen clearly in a maxillary superimposition?
- remodeling of the anterior palate
- upward or downward movement of PNS
- increase in distance of maxillary teeth from the palatal plane
- forward or backward movement of incisors relative to their supporting bone
- 1 and 2
- 2 and 3
- 3 and 4 ✓
- 1, 2, and 4
- all of the above
Correct
That’s correct, vertical or a-p movement of the teeth relative to the maxilla can be visualized in a maxillary superimposition, but you register on the lingual contour of the palate and keep the palatal plane (ANS-PNS) level, so changes in either of those cannot be seen.
Incorrect
No, that’s incorrect. Vertical or a-p movement of the teeth relative to the maxilla can be visualized in a maxillary superimposition, but you register on the lingual contour of the palate and keep the palatal plane (ANS-PNS) level, so changes in either of those cannot be seen.
Question 6
Which of the following could not be a correct interpretation of superimpositions from a patient being treated for a Class II problem?
- shortening of the body of the mandible
- transversel tipping of the maxillary incisors
- increase in mandibular plane angle
- downward growth of the maxilla
- 1 and 2 ✓
- 2 and 3
- 3 and 4
- 1, 2, and 4
- all of the above
Correct
That’s right, the mandible may not grow during a period of treatment, but shortening of the mandibular body would not occur, and of course you can’t see transverse movements of the incisors in a lateral ceph. An increase in the mandibular plane angle and downward growth of the maxilla are often observed.
Incorrect
No, that’s wrong. The mandible may not grow during a period of treatment, but shortening of the mandibular body would not occur, and of course you can’t see transverse movements of the incisors in a lateral ceph. An increase in the mandibular plane angle and downward growth of the maxilla are often observed.
Question 7
If the maxilla rotated down posteriorly during treatment, which of the following would you expect not to see in a set of cranial base, maxillary and mandibular superimpositions?
- downward-backward rotation of the mandible
- major retraction of the maxillary incisors
- increase in mandibular plane angle
- increase in anterior face height
- downward movement of the gonial angle area
- 1
- 2 ✓
- 3
- 4
- 5
Correct
That’s correct, retraction of the maxillary incisors almost surely would not be seen because the maxillary rotation would tend to move them anteriorly relative to the cranial base. Downward-backward rotation of the mandible, an increase in the mandibular plane angle, an increase in anterior face height, and downward movement of the gonial angle area all would be expected.
Incorrect
That’s wrong. Retraction of the maxillary incisors almost surely would not be seen because the maxillary rotation would tend to move them anteriorly relative to the cranial base. Downward-backward rotation of the mandible, an increase in the mandibular plane angle, an increase in anterior face height, and downward movement of the gonial angle area all would be expected.
Question 8
Which of the following could not be correct interpretations of superimpositions from a patient being treated for a long face Class II problem with premolar extractions and Class II elastics?
- anterior displacement of the maxillary incisors
- forward growth of the mandible
- eruption of the first molars in both arches
- decrease in anterior face height
- 1 and 2
- 2 and 3
- 1 and 4 ✓
- 1, 2, and 4
- all of the above
Correct
That’s right, anterior displacement of the maxillary incisors and a decrease in anterior face height almost couldn’t happen with this treatment plan. The maxillary extractions and Class II elastics both would favor pulling the maxillary incisors back, and the elastics would elongate posterior teeth and prevent a decrease in anterior face height. Forward growth of the mandible and eruption of the first molars would be quite likely to occur.
Incorrect
No, that’s wrong. Anterior displacement of the maxillary incisors and a decrease in anterior face height almost couldn’t happen with this treatment plan. The maxillary extractions and Class II elastics both would favor pulling the maxillary incisors back, and the elastics would elongate posterior teeth and prevent a decrease in anterior face height. Forward growth of the mandible and eruption of the first molars would be quite likely to occur.
Question 9
Which of the following are correct interpretations of these superimpositions from a patient being treated for a long face Class II problem?
- retraction of upper and lower incisors
- forward growth of the mandible
- downward and forward growth of the maxilla
- eruption of the first molars in both arches
- 1 and 2
- 2 and 3
- 3 and 4
- 1, 2, and 4 ✓
- all of the above
Correct
That’s right, the upper and lower incisors were retracted relative to the maxilla and mandible respectively, the mandible grew forward (and also downward), and the first molars erupted in both arches—but the position of the maxilla was quite stable. It didn’t grow downward and forward as might have been expected.
Incorrect
That’s wrong, the upper and lower incisors were retracted relative to the maxilla and mandible respectively, the mandible grew forward (and also downward), and the first molars erupted in both arches—but the position of the maxilla was quite stable. It didn’t grow downward and forward as might have been expected.
Question 10
For this patient being treated for a Class III problem, which of the following is not a correct interpretation of the superimpositions?
- forward movement of the maxilla
- forward displacement of the maxillary teeth relative to the maxilla ✓
- downward movement of the maxilla
- downward-backward rotation of the mandible
- stable position of mandibular teeth
Correct
That’s right, all of the other things happened, but the maxillary teeth did not move forward relative to the maxilla. For a patient like this one, moving the maxilla forward wthout displacing the maxillary teeth was a highly desirable outcome, because she had a skeletal maxillary deficiency. Rotating the mandible downward also moves the chin back, which helps to correct a forward position of the mandible (so long as face height does not increase too much).
Incorrect
That’s right, all of the other things happened, but the maxillary teeth did not move forward relative to the maxilla. For a patient like this one, moving the maxilla forward wthout displacing the maxillary teeth was a highly desirable outcome, because she had a skeletal maxillary deficiency. Rotating the mandible downward also moves the chin back, which helps to correct a forward position of the mandible (so long as face height does not increase too much).
Question 11
Which of the following are correct interpretations of this cranial base superimposition in a patient being treated for posterior crossbite with a maxillary expansion appliance?
- major transverse expansion occurred
- not possible to evaluate the crossbite correction
- vertical position of the maxillary molars maintained
- vertical position of the mandibular molars mainained
- 1 only
- 2 only
- 1 and 3
- 1, 3, and 4
- 2, 3, and 4 ✓
Correct
That’s right, the other 3 statements are correct, but it’s not possible to evaluate changes in the transverse plane of space in a lateral ceph, so there is no way to know from the ceph how much (if any) transverse expansion occurred.
Incorrect
No, that’s wrong. The other 3 statements are correct, but the first one is not. It’s not possible to evaluate changes in the transverse plane of space in a lateral ceph, so there is no way to know from the ceph how much (if any) transverse expansion occurred.