Molar Uprighting
Molar Uprighting
One of the most frequently used adjunctive orthodontic procedures is the uprighting and distal movement of a mesially tipped permanent second molar to allow placement of a properly contoured restoration.
Early loss of permanent first molars is much less common now than previously, but fluoridation does not protect against pit and fissure caries, and deep occlusal decay in these teeth can occur before patients are even aware of it. If a first molar must be extracted, mesial drift of the permanent second molar can be expected. The younger the patient when the tooth was removed, the more drift is likely to occur, but even in adults, second molars drift mesially when first molars are lost.
In the mandibular arch, the second molar typically tips mesially, and often spaces develop between the premolars as these teeth drift distally into the extraction site (image 1). Periodontal inflammation and bone loss often occur on the mesial of the tipped second molar. In the maxillary arch, the second molar usually rotates mesiolingually and tips mesially, while spaces open between the premolars. This makes replacement of the missing tooth difficult, but periodontal problems are much less frequent than in the mandibular arch.
Periodontal problems on the mesial of a tipped mandibular second molar occur for two reasons: (1) the area beneath the tipped mesial portion of the crown is difficult to clean and inherently unhealthy, and (2) occlusal forces are not directed along the long axis of the tooth. If a bridge or implant is placed without correcting the position of the tooth, both factors increase the likelihood of periodontal breakdown that may cause the restoration to fail.
The advantages of uprighting the tipped molar and closing spaces between the premolars are better periodontal health and a better long-term prognosis for restorations placed in this area. It is possible to fabricate a bridge without uprighting a tipped abutment molar, but it is very difficult to make a good one (image 2), and the long-term success of an implant-supported crown adjacent to a tipped molar also can be compromised.
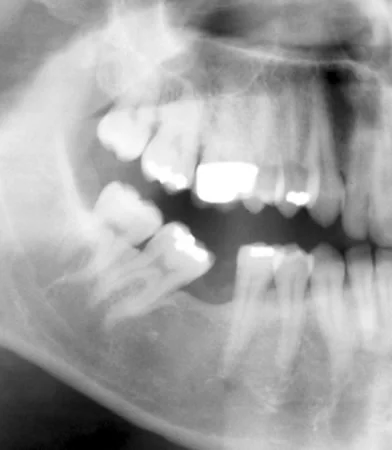 Image 1, loss of first molar: Typical mesial tipping of mandibular second molar after loss of first molar. Image 1, loss of first molar: Typical mesial tipping of mandibular second molar after loss of first molar. | 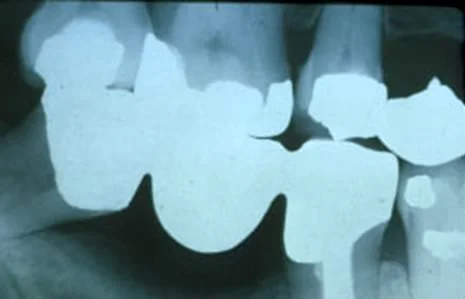 Image 2, bridge on tipped abutment: Bridge on tipped abutment: periodontal health is compromised. Image 2, bridge on tipped abutment: Bridge on tipped abutment: periodontal health is compromised. |
Molar Uprighting (cont.)
When a mandibular second molar has tipped mesially into an old first molar extraction space, the best treatment usually is to extract the third molar and upright the second molar by tipping it distally. This provides space for an appropriately contoured replacement tooth and places occlusal forces more along the long axis of the teeth.
If restorations (crowns/onlays) are needed in what would be the bridge abutment teeth (as they often are), replacing the missing first molar with a bridge pontic can be the best procedure (see images). If restorations are not needed, an implant is often preferred.
The bridge or implant stabilizes the dental occlusion and serves as a permanent retainer to maintain the tooth positions.
For this patient (image 1), the lower second molar was tipped distally after the third molar was extracted (image 2), creating an ideal arrangement for placing a bridge or implant. On the postuprighting radiograph, note the new bone that has filled in on the mesial of the second molar (image 3).
A view of implant-supported crowns to replace missing first molars (in a different patient) can be seen in image 4.
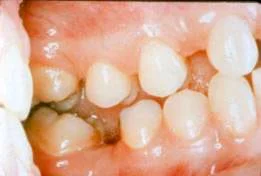 Image 1, pretreatment occlusion: Dental relationships prior to molar uprighting. Image 1, pretreatment occlusion: Dental relationships prior to molar uprighting. | 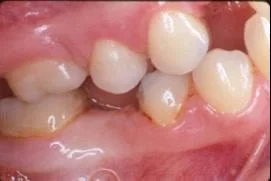 Image 2, post-uprighting occlusion: After molar uprighting, before restorations. Image 2, post-uprighting occlusion: After molar uprighting, before restorations. |
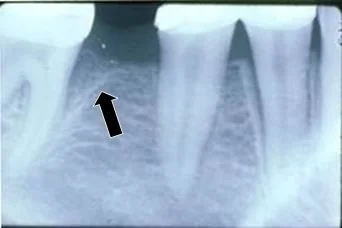 Image 3, post-uprighting radiograph: Radiograph after molar uprighting, showing new bone formation—note the old lamina dura at the tip of the arrow and the bone that has filled in as the molar was tipped distally. Image 3, post-uprighting radiograph: Radiograph after molar uprighting, showing new bone formation—note the old lamina dura at the tip of the arrow and the bone that has filled in as the molar was tipped distally. | 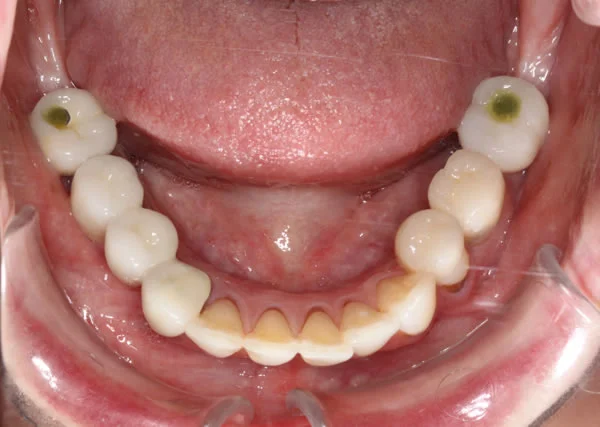 Image 4, implant-supported molar crowns: Crowns on implants now replace missing first molars for this patient. Image 4, implant-supported molar crowns: Crowns on implants now replace missing first molars for this patient. |
Considerations in Molar Uprighting
Three things must be kept in mind when this type of molar uprighting is the plan:
- Extraction of the third molar is necessary if significant distal movement of the second molar is to be obtained. If both the second and third molars are to be retained, the technique for uprighting is different (see below).
- Adequate anchorage for the uprighting must be obtained. This means that fixed attachments on the molar, canine, and both premolars are necessary, and better control is obtained when a fixed lingual arch from canine to canine is placed (image 1). Typically, a band is placed on the molar to be uprighted (but a bonded tube can be used), bonded brackets are placed on the facial surface of the premolars and canine, and a bonded lingual wire is used to stabilize the position of the canines.
- Reduction of the occlusal surface of the molar is necessary as it uprights, to control occlusal interferences (image 2). This also improves the crown-root ratio and decreases stress on the periodontium.
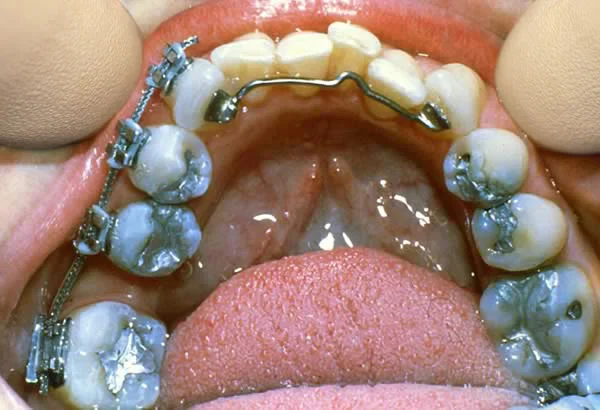 Image 1, fixed appliance for uprighting: Fixed appliance for molar uprighting: band on molar, bonded brackets on premolars and canines, and a bonded canine-to-canine lingual arch. Image 1, fixed appliance for uprighting: Fixed appliance for molar uprighting: band on molar, bonded brackets on premolars and canines, and a bonded canine-to-canine lingual arch. | 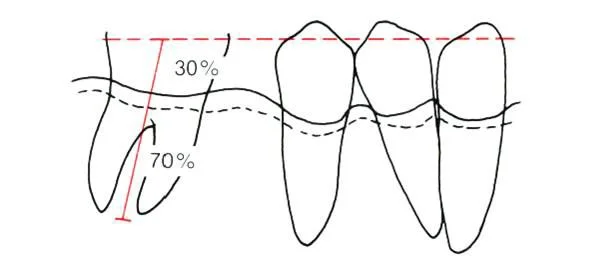 Image 2, reduction of uprighted molar: Reduction of the occlusal surface of the molar improves the crown-root ratio. Image 2, reduction of uprighted molar: Reduction of the occlusal surface of the molar improves the crown-root ratio. |
Fixed Appliance for Molar Uprighting
The first step in molar uprighting is to place a fixed appliance, either bands or bonded attachments, on the molar and the anchor teeth.
Bonded brackets on the premolars and canine are almost always preferred now. Exactly how they should be placed is determined by the extent to which movement of these anchor teeth is desired (see the Concepts of Adjunctive Treatment module). Marks on the teeth (which can be made intraorally after enamel etching in preparation for bonding) help in orienting the bracket as desired (image 1).
Either a bonded tube (image 2) or a band carrying a welded tube (image 3) can be used on the molar. A bonded tube can be broken off during treatment, so a band is more trouble-free, but the band margins should not extend into periodontally sensitive areas. The more severe the periodontal problems, the more likely a bonded tube would be preferred.
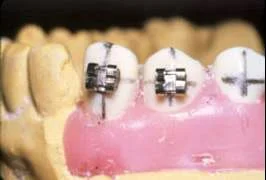 Image 1, orientation marks: Orientation marks help in bonding brackets in the correct location. Image 1, orientation marks: Orientation marks help in bonding brackets in the correct location. | 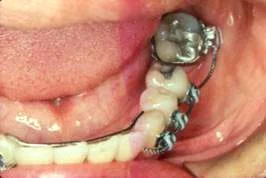 Image 2, molar uprighting appliance: Band on molar, with bonded attachments on anchor teeth—note the bonded lingual arch. Image 2, molar uprighting appliance: Band on molar, with bonded attachments on anchor teeth—note the bonded lingual arch. |
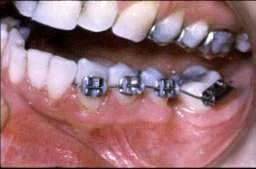 Image 3, banded molar: Bonded tube on molar, bonded brackets on canine and premolars. Image 3, banded molar: Bonded tube on molar, bonded brackets on canine and premolars. |
Step 1 in Mandibular Molar Uprighting
The sequence of treatment requires three steps. The first step to upright the molar, correcting malalignment of the premolars and canines at the same time.
This can be done in three ways: with
- a flexible rectangular wire placed in both the premolar brackets and the molar tube (image 1).
- a continuous wire that spans the old extraction site and an auxiliary spring (image 2). This requires two tubes on the molar, one used for the auxiliary spring and the other for the main arch wire. It is convenient to have two tubes available routinely on a molar to be uprighted, so that an auxiliary spring can be used if desired.
- a wire in the brackets of the anchor teeth that does not span the old extraction site, and an auxiliary uprighting spring (image 3).
The choice is determined by how much change is desired in the position of the anchor teeth, and how severely the molar is tipped. A continuous flexible wire implies that the molar is only mildly tipped. After initial alignment of the anchor teeth, an auxiliary spring often facilitates uprighting the molar, so the first two ways frequently are combined.
An auxiliary spring with a separate anchor segment of rigid wire is indicated when the molar is severely tipped, so that a continuous flexible wire cannot be fitted into both the attachments on the anchor teeth and the molar tube. With this approach, the anchor teeth should be stabilized with a rigid wire before the auxiliary spring is activated.
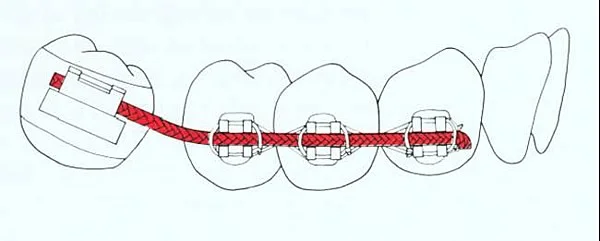 Image 1, continuous flexible wire: Continuous flexible wire for alignment/uprighting. Image 1, continuous flexible wire: Continuous flexible wire for alignment/uprighting. | 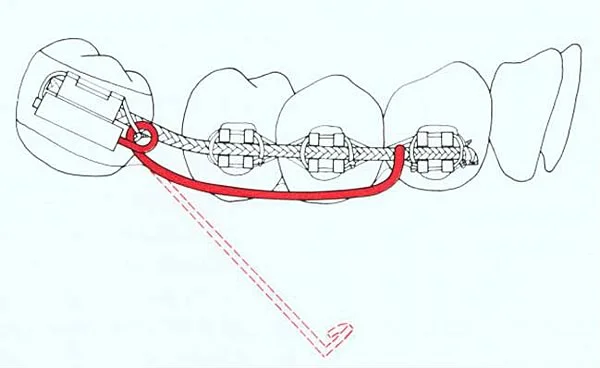 Image 2, continuous wire plus auxiliary spring: Auxiliary uprighting spring with continuous wire. Image 2, continuous wire plus auxiliary spring: Auxiliary uprighting spring with continuous wire. |
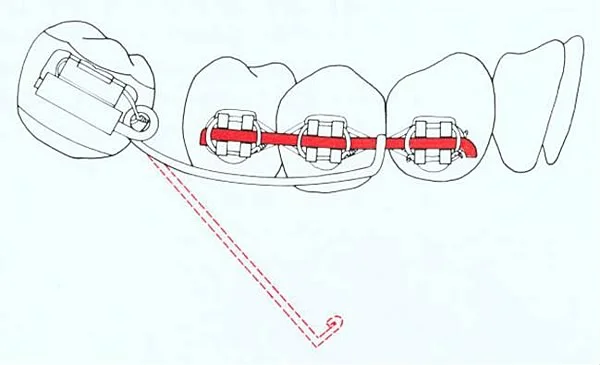 Image 3, anchor segment plus auxiliary spring: Auxiliary spring with separate anchor segment. Image 3, anchor segment plus auxiliary spring: Auxiliary spring with separate anchor segment. |
Step 2 in Mandibular Molar Uprighting
The second step in a typical molar uprighting case is to further open the space of the missing first molar, closing any space between the premolars and moving the second molar more distally. Often it is as important to move the second premolar mesially, closing spaces between the premolars, as it is to move the molar further distally.
This is accomplished with a compressed coil spring over a rigid wire (images 1 and 2). The wire must not fit too tightly in the brackets and molar tube, because it must be able to slide in the attachments. For sliding to occur, there must be at least 0.002 inch clearance between the wire and the attachments—so .020 wire would be the largest that should be used with a .022 edgewise appliance. Often .018 wire is rigid enough, and the additional clearance would facilitate sliding.
Reactivation of the spring can be accomplished by adding a split section of tubing over the arch wire to further compress the spring (image 3). It is not necessary to remove the spring to activate it in this way.
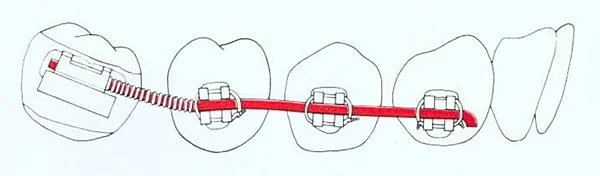 Image 1, compressed coil, diagram: Compressed coil spring to open space for replacement of the missing molar and close spaces between premolars. Image 1, compressed coil, diagram: Compressed coil spring to open space for replacement of the missing molar and close spaces between premolars. | 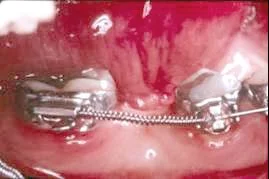 Image 2, compressed coil, intraoral: Compressed coil spring over continuous arch wire. Image 2, compressed coil, intraoral: Compressed coil spring over continuous arch wire. |
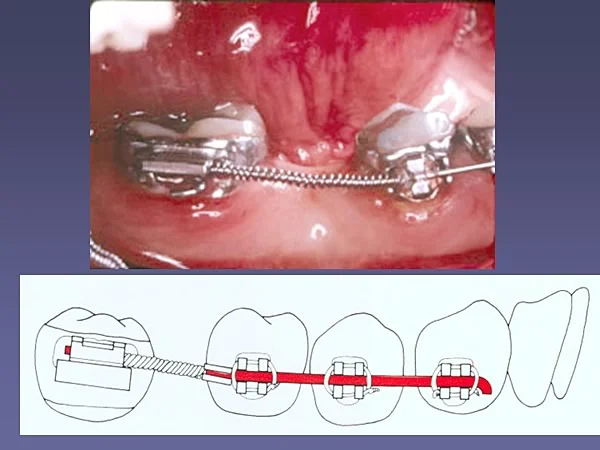 Image 3, re-activation of coil: Adding a split spacer as shown in the diagram reactivates the spring without having to remove the wire. Image 3, re-activation of coil: Adding a split spacer as shown in the diagram reactivates the spring without having to remove the wire. |
Step 3 in Mandibular Molar Uprighting
The third and final step in a typical molar uprighting case is a fixed retainer to maintain the teeth in position until either a bridge or implant can be placed.
This can be done either with a wire for that purpose in the attachments (images 1, 2), or with a wire bonded into shallow intracoronal preparations after the orthodontic appliance has been removed (images 3, 4).
In either case, the bridge or implant will serve as a permanent retainer, and it should be placed as soon as possible. Long delays in placing the permanent retainer can lead to problems.
The two types of fixed retainer are shown diagrammatically in image 5. If retention is continued more than a few weeks, the bonded intracoronal retainer is preferred.
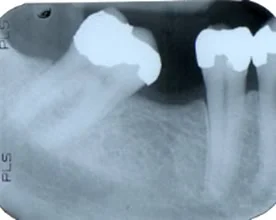 Image 1 pre-treatment: Prior to uprighting, third molar already removed. Image 1 pre-treatment: Prior to uprighting, third molar already removed. | 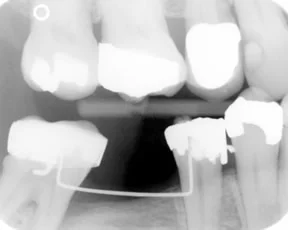 Image 2 wire in attachments as retainer: Wire section in orthodontic appliance as a temporary retainer. Image 2 wire in attachments as retainer: Wire section in orthodontic appliance as a temporary retainer. |
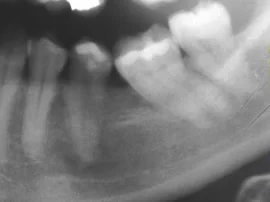 Image 3 pre-treatment: Prior to treatment, third molar still present. Image 3 pre-treatment: Prior to treatment, third molar still present. | 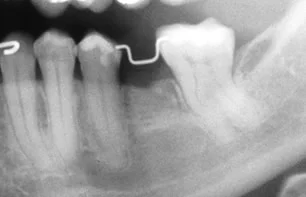 Image 4 bonded wire as retainer: Bonded intracoronal retainer, after removal of appliance. Image 4 bonded wire as retainer: Bonded intracoronal retainer, after removal of appliance. |
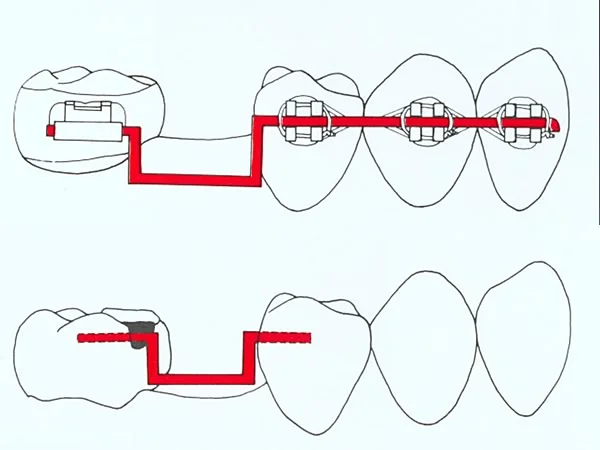 Image 5 two types of fixed retainers: The two types of fixed retainers. Image 5 two types of fixed retainers: The two types of fixed retainers. |
Mesial Root Movement in Mandibular Molar Uprighting
It is much more difficult to move the root of the second molar mesially than to tip the crown distally, but if the third molar is not extracted, some mesial root movement is needed.
This is typically accomplished with a loop in a rectangular arch wire segment. The wire is shaped initially as shown in image 1. When it is placed into the molar tube, a moment is created to tip the crown distally and bring the root mesially (image 2). If the wire is pulled through the distal of the tube and bent over (image 3), the effect is to create a force to prevent the crown from tipping distally. Then the effect is to close the space and bring the root of the second molar mesially—if the premolars are tied together to provide adequate anchorage.
If the molar to be uprighted is severely rotated and tipped, a modification of a loop wire, with the wire inserted into the distal of the molar tube as shown in image 4, can be helpful.
The major advantage of moving the roots of a lower second molar forward is to improve the periodontal condition between the 2nd and 3rd molars. As we have noted previously, this root movement is difficult because remodeling of cortical bone usually is required, and the advantage of retaining the 3rd molar versus removing it and tipping the 2nd molar distally must be evaluated carefully.
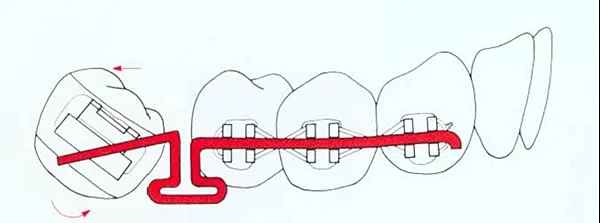 Image 1, T-loop before activation: T-loop spring (typically, 17 x 25 steel wire) before activation. Image 1, T-loop before activation: T-loop spring (typically, 17 x 25 steel wire) before activation. | 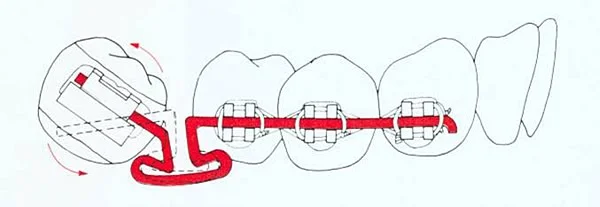 Image 2, T-loop, activated: T-loop activated for uprighting by distal tipping of the molar. Image 2, T-loop, activated: T-loop activated for uprighting by distal tipping of the molar. |
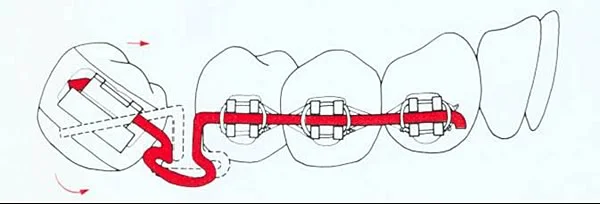 Image 3, T-loop, activated for space closure: T-loop activated for space closure, with mesial movement of the molar roots. Image 3, T-loop, activated for space closure: T-loop activated for space closure, with mesial movement of the molar roots. | 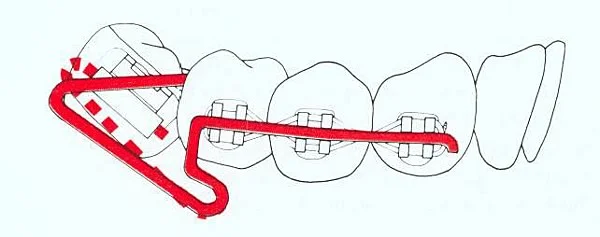 Image 4, modified loop for rotations: Modified T-loop with distal insertion, for rotation. Image 4, modified loop for rotations: Modified T-loop with distal insertion, for rotation. |
Maxillary Molar Uprighting
A similar approach can be taken to uprighting a mesially tipped maxillary second molar. In the upper arch, the additional anchorage of a canine-to-canine lingual arch is not needed (and would be highly irritating to the tongue if used).
As they drift mesially, upper molars tend to tip less than lower molars but rotate more. The details of the uprighting appliance always must be modified to deal with the specific clinical situation. Loops in rectangular wire, or a superelastic continuous wire, can be used to tip an upper molar distal or activated to bring the root mesially.
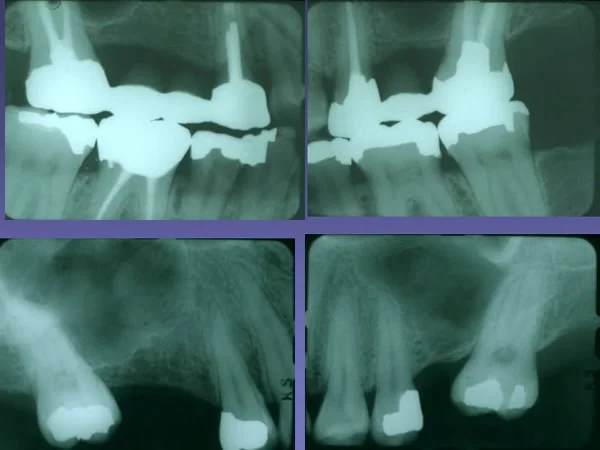
This patient, who had lost both upper first molars and one second premolar, needed uprighting of both second molars in preparation for restorations. On the right side, moving the roots of the molar mesially would be desirable so as not to increase the already large space. On the left side, tipping the molar distally to increase the space and improve its inclination was the appropriate goal.
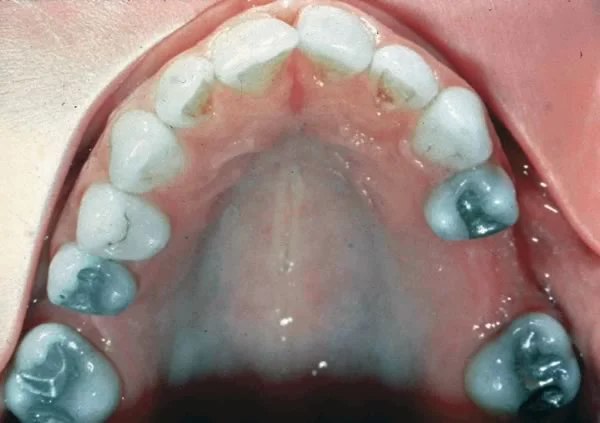 Image 1, occlusal view: Occlusal view, missing maxillary molars. Image 1, occlusal view: Occlusal view, missing maxillary molars. | 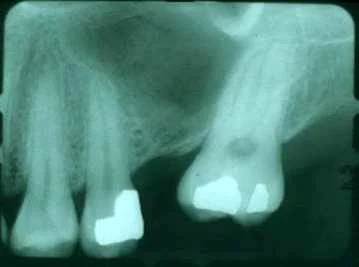 Image 2, radiograph, right side: Radiograph, right side: missing first molar and 2nd premolar. Image 2, radiograph, right side: Radiograph, right side: missing first molar and 2nd premolar. |
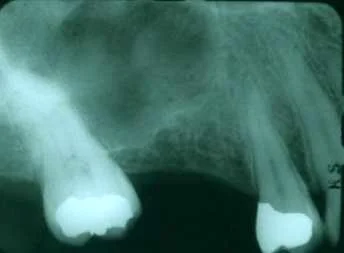 Image 3, radiograph, left side: Radiograph, left side: missing first molar. Image 3, radiograph, left side: Radiograph, left side: missing first molar. |
T-Loops in Uprighting
For this patient, T-loops were used bilaterally.
On the left side, after the loop was activated by placing it into the tube on the molar, the end of the wire was bent over so that the crown could not move distally and the roots would move mesially. This is the same type of activation shown in the drawing below, of activating a lower molar uprighting appliance to bring the roots mesially.
On the right side, the end of the loop was not bent over, and then the activation was expressed by tipping the crown distally and opening the space. When a couple is placed against the crown of a tooth, the crown will move more than the root unless movement of the crown is restrained. Thus a T-loop can be used to move either the crown or the root, depending on how it is attached.
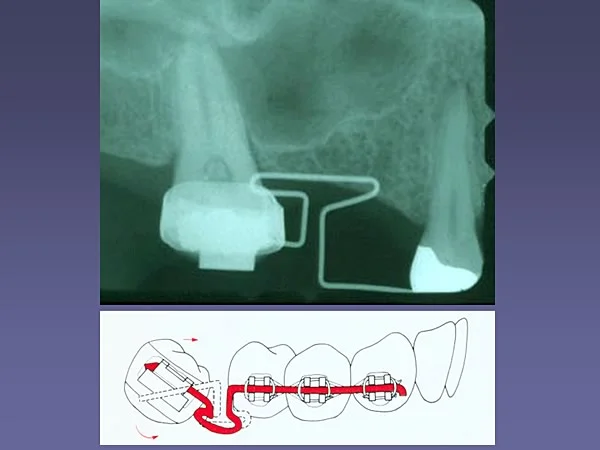 Image 1, uprighting right side: Uprighting maxillary 2nd molar, mesial root movement: wire activated with end bent over at back of molar tube to restrain distal movement of the crown. Image 1, uprighting right side: Uprighting maxillary 2nd molar, mesial root movement: wire activated with end bent over at back of molar tube to restrain distal movement of the crown. | 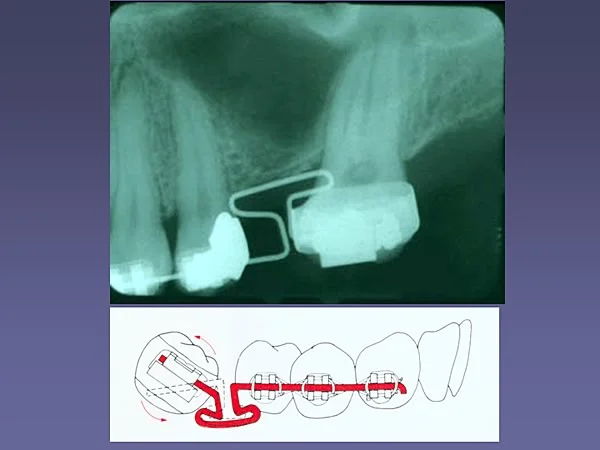 Image 2, uprighting left side: Uprighting maxillary 2nd molar, distal crown tipping: wire activated with molar tube free to slide distally along the wire. Image 2, uprighting left side: Uprighting maxillary 2nd molar, distal crown tipping: wire activated with molar tube free to slide distally along the wire. |
Fixed Retainers
At the completion of the molar uprighting, which required four months for this patient, fixed retainers in the form of bonded wires were placed (images 1-4).
Retainers of this type are tolerated by patients much better than a palate-covering maxillary removable retainer, and for that reason are much more effective in maintaining the position of the teeth until final restorations can be placed.
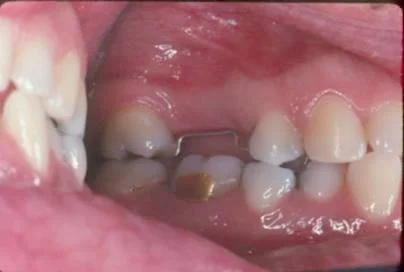 Image 1, left side: Fixed retainer bonded into small occlusal preparations, left side. Image 1, left side: Fixed retainer bonded into small occlusal preparations, left side. | 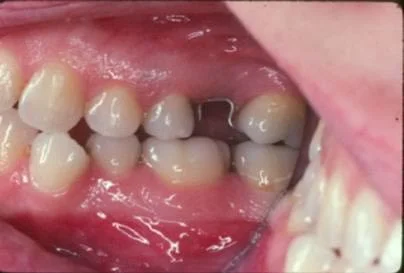 Image 2, right side: Bonded fixed retainer, right side. Image 2, right side: Bonded fixed retainer, right side. |
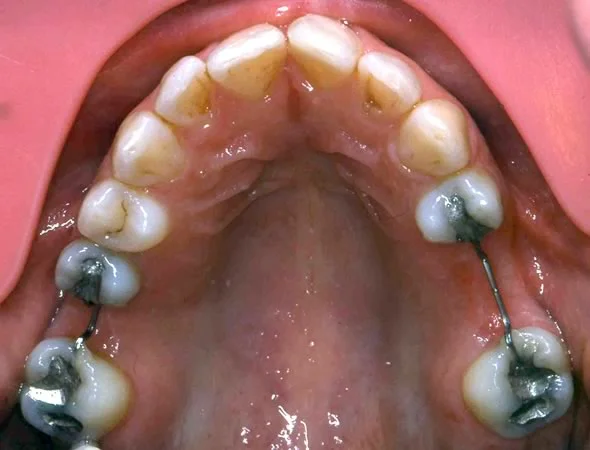 Image 3, occlusal view: Occlusal view, bilateral fixed retainers. Image 3, occlusal view: Occlusal view, bilateral fixed retainers. | 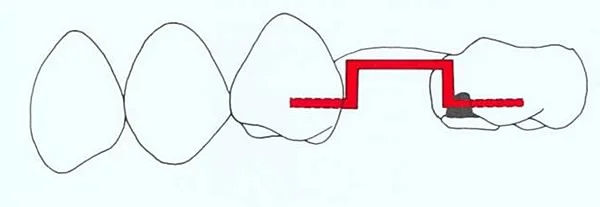 Image 4, drawing of fixed retainer: Diagram, intracoronal fixed retainer. Image 4, drawing of fixed retainer: Diagram, intracoronal fixed retainer. |
Evaluation of Maxillary Molar Uprighting
For this patient, bridges were placed bilaterally after the maxillary molar uprighting was continued. As part of the restorative phase of treatment, root canal therapy was performed for the right molar and second premolar abutment teeth.
Note that as planned, the space on the left side was opened as the crown of the molar tipped distally, while the inclination of the right molar was improved, but the space remained the same size as the roots moved mesially.
The benefit of the orthodontic treatment was to improve the periodontal prognosis of the abutment teeth, both by creating a better gingival environment and by placing masticatory stresses more along the long axis. Note particularly the improved bone contour on the mesial of the maxillary left 2nd molar.
Further Considerations in Molar Uprighting
Root Paralleling in Molar Uprighting
Because research has shown that in the upper arch, healthy alveolar bone can exist even if the second molar and second premolar roots are not parallel, closing space in the upper arch also is more feasible than in the lower arch. The crowns can be brought together with having to move the roots further than the crowns, i.e., the space can be closed without the necessity of paralleling the roots. Almost always, not as much tooth movement is required either to open space in the upper arch (or close it) when a first molar was lost previously.
For this patient who had lost both the upper and lower left first molars years before, uprighting the mandibular second molar by tipping it distally after extraction of the third molar, but closing the molar extraction space in the upper arch, was the treatment plan. That was feasible because the upper molars could be left at a mesially tipped inclination that would not be compatible with periodontal health in the lower arch.
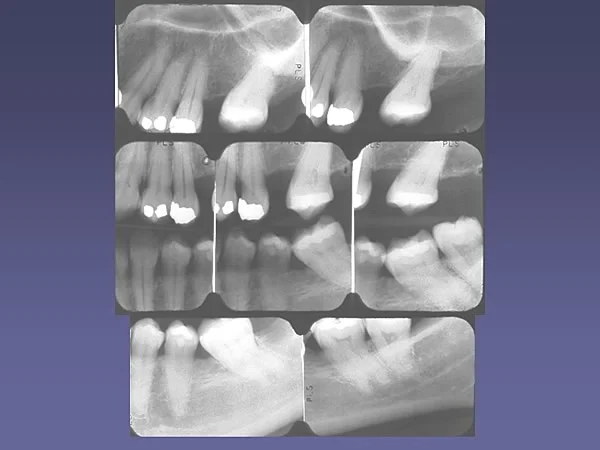
Molar Uprighting with Posterior Crossbite Correction
For this patient, who wanted replacement of a missing lower molar, the situation was complicated by a crossbite relationship of the molars in that quadrant. Note (image 1) that the lower second molar was rolled to the lingual, and the upper second molar was tipped facially, so there was a complete buccal crossbite of those teeth.
For this man (age 50), the anterior deep bite was not a problem esthetically, and since his periodontal condition was good (i.e., he was tolerating the anterior deep bite from the perspective of periodontal health), there was no necessity to totally correct the occlusion. His problems were the missing lower first molar, the mesially and lingually tipped lower second molar, and the molar crossbite. Adjunctive orthodontic treatment appropriately would focus on correcting the occlusion so that a satisfactory restoration for the missing tooth would be possible.
One approach to correction of a molar crossbite of this type is the use of a “through the bite” or cross-elastic, running from the mesial of the lower molar to the facial of the upper molar. A cross-elastic to correct the more common lingual crossbite is illustrated in image 2. Because elastics of this type tend to extrude the teeth as well as move them faciolingually, they must be used carefully, but they can be quite effective.
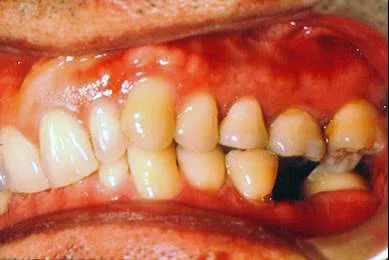 Image 1, posterior crossbite / tipped molar: Buccal crossbite of second molars, lower molar uprighting needed to allow replacement of missing lower first molar. Image 1, posterior crossbite / tipped molar: Buccal crossbite of second molars, lower molar uprighting needed to allow replacement of missing lower first molar. | 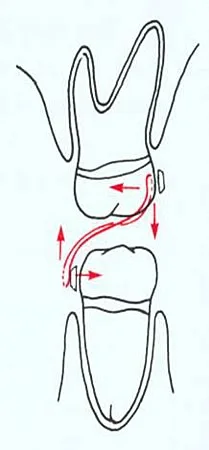 Image 2, cross elastics: Drawing of cross-elastic to correct posterior crossbite. Image 2, cross elastics: Drawing of cross-elastic to correct posterior crossbite. |
Molar Uprighting with Posterior Crossbite Correction (cont’d.)
Uprighting of the lower second molar was done in the usual way, tipping the crown distally with a flexible arch wire. In addition, a rubber band from a button on the lingual of the lower molar (image 1) to a hook on the facial of the upper molar (image 2) was used to tip the upper molar lingually and the lower molar facially.
An elastic of this type is called a cross-elastic because it crosses through the occlusion. The force was about 100 gm when the jaws were in their postural position. Reduction of the cusp height of both teeth was necessary to allow the crossbite correction. Normal occlusion on the lower second molar bridge abutment was achieved.
With the upper molar brought lingually and the lower molar moved facially as well as uprighted, it was possible to bring the posterior teeth into good occlusion (image 3), and a fixed bridge was placed with the abutment teeth out of crossbite (image 4). The amount of change created by the combination of uprighting the lower molar and lingual movement of the upper molar can be seen in the composite view (image 5).
This patient could tolerate some extrusion during crossbite correction that was compensated by reducing the cusp height of the teeth—but not every crossbite patient could, so cross-elastics cannot be used for all crossbite conditions.
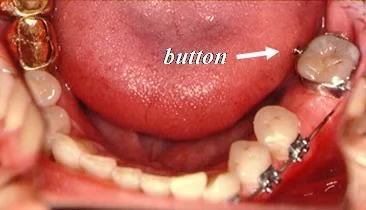 Image 1, lower band with lingual button: Lower arch, uprighting with fixed appliance, lingual button on lower molar for attachment of cross-elastic. Image 1, lower band with lingual button: Lower arch, uprighting with fixed appliance, lingual button on lower molar for attachment of cross-elastic. | 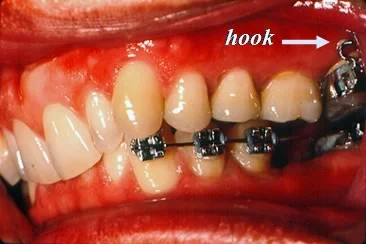 Image 2, upper band with facial hook: Molar uprighting in lower arch, buccal hook on upper molar band for attachment of cross-elastic. Image 2, upper band with facial hook: Molar uprighting in lower arch, buccal hook on upper molar band for attachment of cross-elastic. |
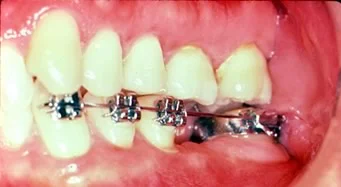 Image 3, orthodontic treatment completed: Crossbite corrected, upper molar band removed. Image 3, orthodontic treatment completed: Crossbite corrected, upper molar band removed. | 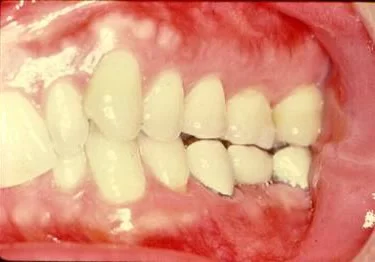 Image 4, bridge in place: Bridge in place, molar uprighted and crossbite eliminated. In this situation, retention of the crossbite correction is needed, and the bridge also serves as a permanent retainer. Image 4, bridge in place: Bridge in place, molar uprighted and crossbite eliminated. In this situation, retention of the crossbite correction is needed, and the bridge also serves as a permanent retainer. |
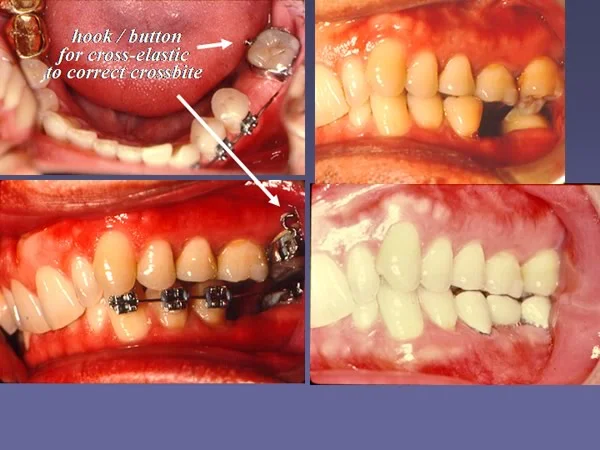 Image 5, overview of treatment: Composite views, crossbite correction/molar uprighting. Image 5, overview of treatment: Composite views, crossbite correction/molar uprighting. |
Molar Uprighting: Summary and Conclusions
Molar uprighting can improve the periodontal prognosis for teeth adjacent to the missing tooth or teeth, and facilitate restorative procedures. Some important considerations to remember:
- a partial fixed appliance almost always is the best method—removable appliances are largely ineffective because they are limited in the type of tooth movement they can produce and are difficult for the patient to tolerate
- in the mandibular arch, a bonded canine-to-canine lingual wire increases the anchorage value of a premolars-canine anchorage unit—but this is rarely indicated in the maxillary arch
- if a molar to be uprighted is not severely tipped, a continuous flexible archwire segment (usually NiTi wire) is effective
- greater tipping of the molar usually is managed best with the use of an auxiliary uprighting spring
- crossbite correction with cross-elastics can be done simultaneously with uprighting, but long-term retention is likely to be needed—and a fixed bridge with two abutments is a permanent retainer
- mesial root movement to close space can be managed with a T-loop archwire segment, and is easier to accomplish in the maxillary arch, where root inclination is not as critical as in the mandibular arch
Forced Eruption
Indications for Forced Eruption
If a tooth has a defect in the cervical third of the root (from fracture, resorption, decay or periodontal problems), extensive crown lengthening would be necessary to gain access for treatment. Poor esthetics and adverse changes in the crown-root ratio are likely problems.
For many patients, controlled extrusion (forced eruption) is an excellent alternative. It improves endodontic access and can allow crown margins to be placed on sound tooth structure while maintaining the gingival contour. Although a tooth with a single tapering root is the ideal candidate for extrusion, multirooted teeth also can be managed in this way.
The distance of extrusion is determined by
- the location of the defect relative to the alveolar crest
- space for placement of the restoration margin (1 mm)
- allowance for the gingival attachment (2 mm)
For this patient, the crown of a maxillary first premolar fractured beneath a restoration, leaving a defect extending 2 mm below the alveolar crest (images 1 and 2). To prepare this tooth for a new crown, 5 mm extrusion would be needed: 2 mm to reach the defect, 1 mm to place the restoration margin, and 2 mm allowance for the gingival attachment.
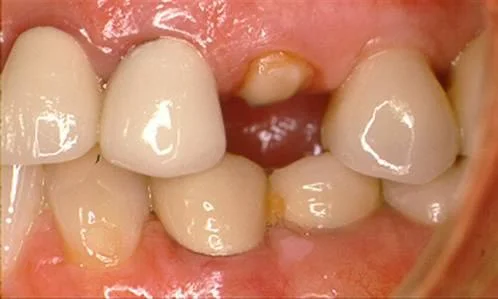 Image 1, lateral view: Fractured crown, defect extends 2 mm below gingival margin. Image 1, lateral view: Fractured crown, defect extends 2 mm below gingival margin. | 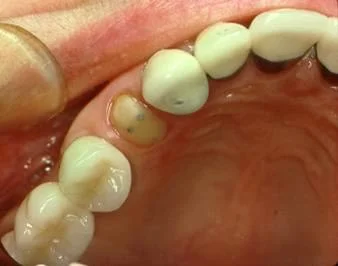 Image 2, occlusal view: Fractured crown, defect extends 2 mm below gingival margin. Image 2, occlusal view: Fractured crown, defect extends 2 mm below gingival margin. |
Forced Eruption
Extrusion requires relatively light force (50-100 grams). Too much force can produce tissue damage and ankylosis. A tooth can be extruded at a rate up to 1 mm/week without biologic damage, so a few weeks of treatment time almost always is sufficient.
For this patient, to extrude the damaged premolar, a button was bonded on its occlusal surface, and edgewise brackets were bonded on the adjacent canine and second premolar (image 1). A segment of rectangular wire with a loop that faced downward initially was rotated into position and tied to the button, creating a force of approximately 100 grams to extrude the premolar (image 2). It elongated about 5 mm in as many weeks (images 3 and 4).
Compare the change in position of the fractured tooth over that period of time (image 5). Note that when a tooth is extruded, both bone and gingival tissue tend to come with it.
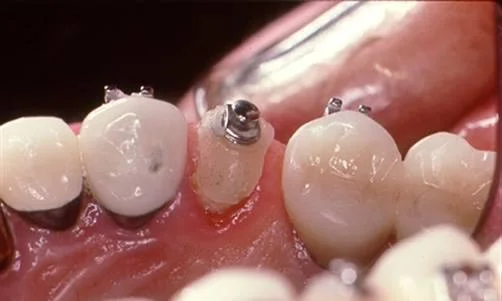 Image 1, appliance set-up: Bonded button on fractured tooth, brackets on adjacent teeth. Image 1, appliance set-up: Bonded button on fractured tooth, brackets on adjacent teeth. | 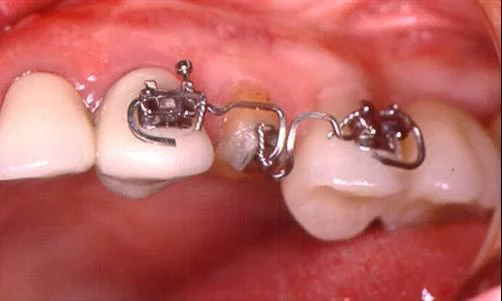 Image 2, extrusion spring: Extrusion spring rotated into position, tied to button. Image 2, extrusion spring: Extrusion spring rotated into position, tied to button. |
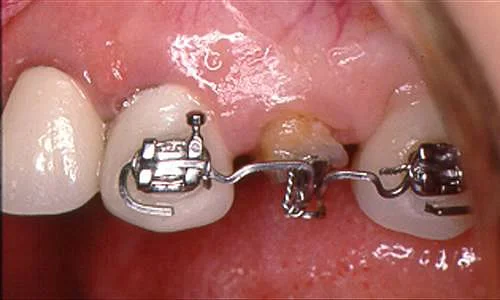 Image 3, 5 weeks later: Extrusion completed, 5 weeks later. Image 3, 5 weeks later: Extrusion completed, 5 weeks later. | 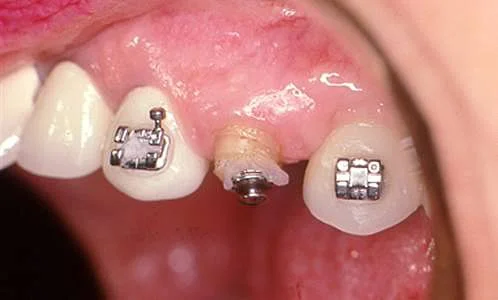 Image 4, 5 weeks later: Extrusion completed, 5 weeks later. Image 4, 5 weeks later: Extrusion completed, 5 weeks later. |
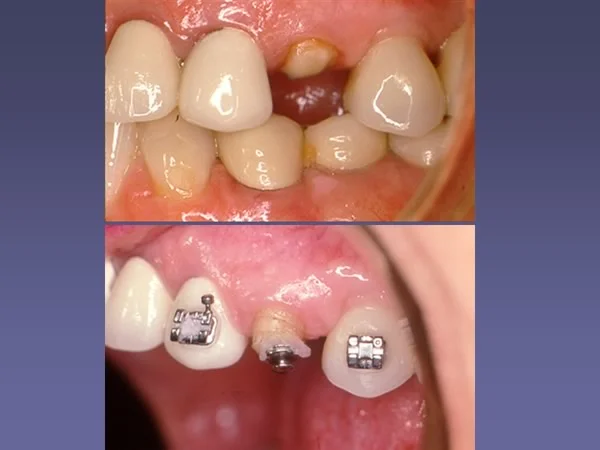 Image 5, change in position: Change in position with extrusion—note the change in gingival contour as well as the change in tooth position. Image 5, change in position: Change in position with extrusion—note the change in gingival contour as well as the change in tooth position. |
Forced Eruption (cont.)
With the extrusion completed, the brackets and button were removed, and the now-passive spring was bonded directly to serve as a fixed retainer (image 1). An extruded tooth should be held in its new position at least 4 weeks, until the rebound tendency from stretched gingival and periodontal tissues subsides.
Because gingival tissues tend to follow the extruding crown, usually it is necessary to perform a gingivoplasty before a new crown can be placed (image 2). This is much less extensive than a crown-lengthening procedure without the extrusion, however.
At that point a new crown can be placed, with a better crown-root ratio and better gingival contours than would have been the case without the extrusion (images 3 and 4).
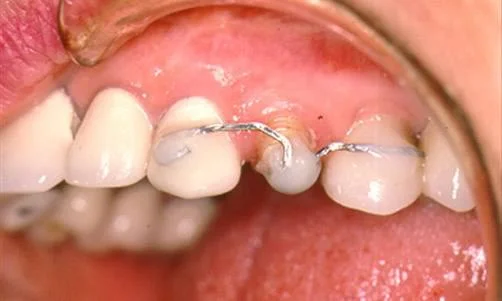 Image 1, bonded retainer: Spring wire, now passive, bonded as fixed retainer. Image 1, bonded retainer: Spring wire, now passive, bonded as fixed retainer. | 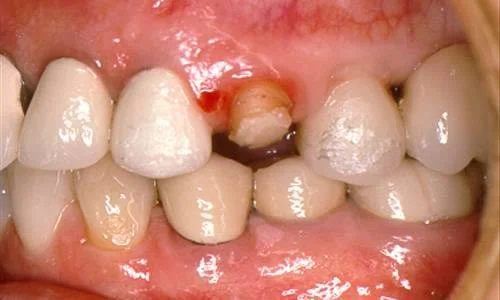 Image 2, gingivoplasty: Gingivoplasty before completion of new crown preparation. Image 2, gingivoplasty: Gingivoplasty before completion of new crown preparation. |
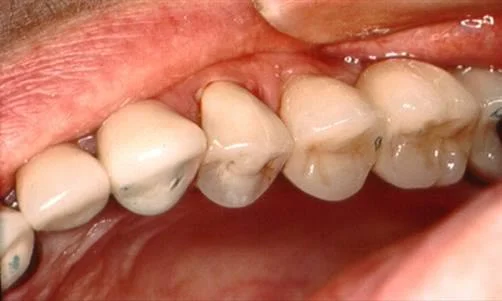 Image 3, new crown, oblique view: New crown, oblique view—note gingival contours. Image 3, new crown, oblique view: New crown, oblique view—note gingival contours. | 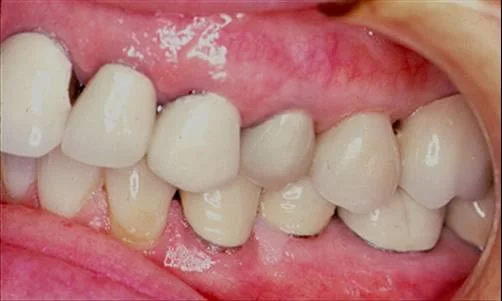 Image 4, new crown, lateral view: New crown, lateral view. Image 4, new crown, lateral view: New crown, lateral view. |
Inter-Arch Elastics for Forced Eruption
Sometimes the anchorage for extrusion can be the teeth in the opposite dental arch. This 60-year-old patient fractured off the facial surface of a mandibular first molar, with the fracture line extending subgingivally.
For extrusion of the fractured molar, the maxillary premolars and first molar were bonded, placing the brackets so that a straight wire would fit passively (image 1). The occlusal surface of the fractured tooth was reduced to provide space for extrusion. Then a button was bonded to the fractured lower molar, and a light elastic was used to extrude the tooth (image 2) until the fracture line was accessible. After 4 weeks (image 3), the fracture line was far enough above the alveolar crest that a crown with proper margins could be fabricated.
The force from an interarch elastic is not as constant as from a spring on a fixed appliance. Anything about an orthodontic appliance that can be removed will be—the elastic will not be worn all the time, even by a highly cooperative patient. So the rate of extrusion is less predicable with this method, but it can work very well for a fractured molar.
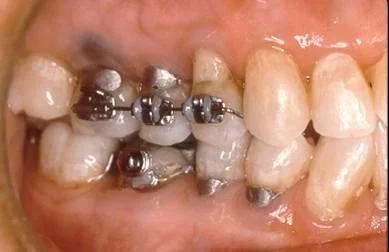 Image 1, appliance set-up: Button bonded to fractured molar, maxillary segment for anchorage. Image 1, appliance set-up: Button bonded to fractured molar, maxillary segment for anchorage. | 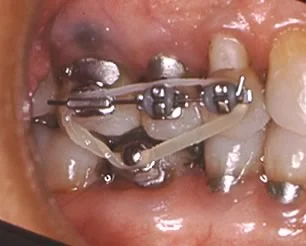 Image 2, extrusive elastic in place: Interarch elastic for extrusion, 100 gm force. Image 2, extrusive elastic in place: Interarch elastic for extrusion, 100 gm force. |
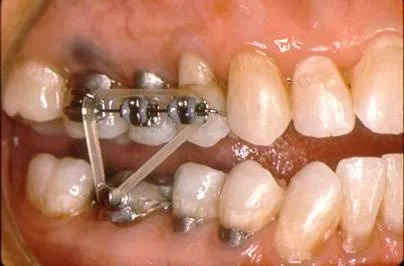 Image 3, 4 weeks later: Extrusion completed, 4 weeks later. Image 3, 4 weeks later: Extrusion completed, 4 weeks later. |
Forced Eruption to Maintain Bridge Abutment Tooth
For this patient in her 60s, the bridge in the maxillary left quadrant was failing, and the canine abutment had cervical decay that extended subgingivally (arrow in image points to the subgingival carious area).
The plan was to
- section the bridge, maintaining the molar crown that was the distal abutment of the bridge while removing the pontic and the canine crown
- restore the canine temporarily
- fabricate a new crown after it was extruded to the point that proper margins could be placed
Extruding the canine would also provide a better crown-root ratio, but the damaged tooth would not be an adequate abutment for a long-span replacement bridge, so an implant in the premolar area to replace the bridge pontic also was planned.
Forced Eruption to Maintain Abutment Tooth (cont.)
The other maxillary teeth were used as anchorage. A tube was bonded to the crown on the molar, brackets were bonded to the incisors and the other canine, and a button was bonded to the temporary amalgam restoration in the canine. A flexible nickel-titanium wire was used to generate the extrusive force (images 1 and 2). As the canine extruded, amalgam from the core of the previous crown was ground away to keep the tooth out of occlusion, and the button was rebonded at a higher level.
After 8 weeks, the button could be bonded on the root surface, and the tooth was extruded to its final position, with the old amalgam core completely removed (image 3). It was held there for a month before the orthodontic appliance was removed. Total elongation was about 6 mm, with treatment time of 3 months.
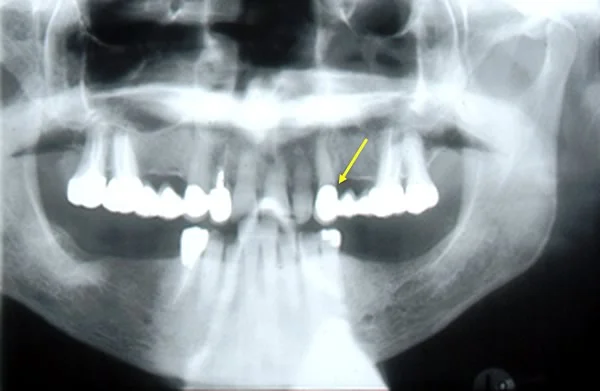
The panoramic radiograph near the completion of the restorative treatment (image 4) shows the elongated canine with a temporary crown in place and implants replacing the bridge pontic and the right lateral incisor.
Remember that patients with this type of adjunctive orthodontic treatment must be seen every 1-2 weeks to reduce the occlusal surface of the tooth being extruded, control inflammation, and monitor progress. Stabilization for 3-6 weeks after extrusion is completed allows for reorganization of the PDL and minimizes relapse.
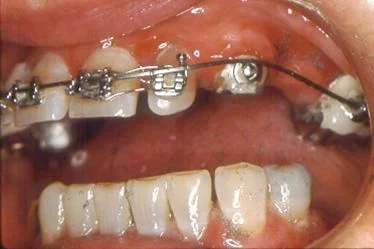 Image 1, auxiliary spring for extrusion: Anterior teeth and molar bonded for anchorage, button bonded to amalgam core of canine from previous crown preparation. Image 1, auxiliary spring for extrusion: Anterior teeth and molar bonded for anchorage, button bonded to amalgam core of canine from previous crown preparation. | 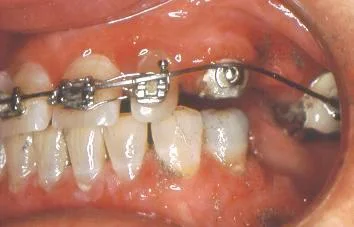 Image 2, space for extrusion: NiTi auxiliary spring for extrusion, amalgam core reduced to provide space. Image 2, space for extrusion: NiTi auxiliary spring for extrusion, amalgam core reduced to provide space. |
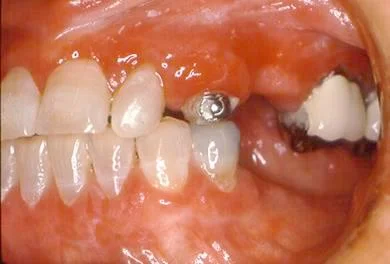 Image 3, extrusion completed: Extrusion completed: 6 mm total elongation. Image 3, extrusion completed: Extrusion completed: 6 mm total elongation. | 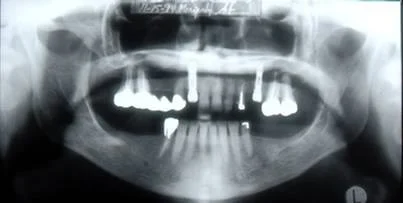 Image 4, post-treatment radiograph: Post-treatment panoramic radiograph, temporary crown on elongated canine, implant in place. Image 4, post-treatment radiograph: Post-treatment panoramic radiograph, temporary crown on elongated canine, implant in place. |
Forced Eruption: Summary and Conclusions
Forced eruption as an adjunctive orthodontic procedure:
- is indicated as a way to make restoration of fractured teeth possible
- usually requires a partial fixed appliance (an exception using magnets in attraction can be seen in Module 23, Biology of Orthodontic Treatment)
- should be done using relatively light force (50-100 gm)
- occurs at a rate of about 1 mm per week
- often requires recontouring the gingiva, and sometimes requires recontouring alveolar bone, after the tooth movement is completed.
One theory of forced eruption has been that it should be done very quickly (in a few days) with heavy force, so that bone and gingiva would not follow the movement of the remaining part of the tooth. This is undesirable because it injures the periodontal support apparatus of a tooth that already has been damaged. That is too high a price to pay for avoiding recontouring of the tissues before a final restoration is placed—and recontouring often is required anyway.
Maxillary Incisor Alignment
Appliances for Maxillary Incisor Alignment
Another frequent indication for adjunctive orthodontics is to prepare for restoration of maxillary incisors. Cosmetic dentistry in this region—for example, the placement of veneers on discolored or fractured teeth—is facilitated by properly aligning the teeth initially.
There are two ways to accomplish this:
- bonded brackets, flexible arch wires, and coil springs over the wire to reposition the teeth (image 1); or
- a series of transparent plastic aligners (image 2).
At this point, brackets and wires remain the most cost-effective approach. For modest degrees of tooth movement, plastic aligners are a feasible (but expensive) alternative.
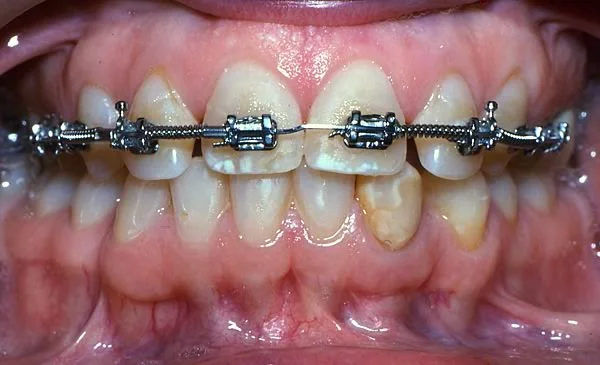 Image 1: Bonded brackets, wire, and coil springs to open space for build-ups of lateral incisors. Image 1: Bonded brackets, wire, and coil springs to open space for build-ups of lateral incisors. | 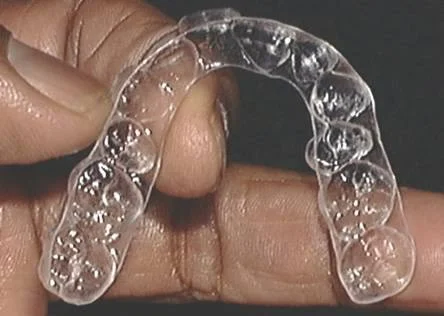 Image 2: Plastic aligners, made by resetting teeth on a dental cast with small movements, are an alternative for minor tooth movements. Image 2: Plastic aligners, made by resetting teeth on a dental cast with small movements, are an alternative for minor tooth movements. |
Maxillary Incisor Alignment, Fixed Appliance
Ed was age 47 when he asked his dentist if it was possible to put crowns on his upper incisors to close the large central diastema (image 1), which he had never liked. The result of that, however, would be a pair of the world’s largest central incisors, hardly an esthetic improvement.
He was told that what he really needed was repositioning of the incisors to distribute the space equally among them, then esthetic restorations with build-ups of all four maxillary incisors would be possible. He accepted that plan, which called for placing a fixed appliance on his upper arch only. The estimated orthodontic treatment time was about 6 months. The treatment objective was to partially close the large central diastema (images 2, 3) by bringing the central incisors closer together, opening space mesial and distal to the lateral incisors as this was done, and then to restore all four maxillary incisors.
Although his lower incisors were mildly irregular (image 4), this was not a problem, either from the point of periodontal maintenance or esthetics, and no treatment for the lower arch was planned.
His periodontal health was good, so disease control measures before beginning orthodontic treatment were not necessary. But remember that any pathologic processes must be brought under control before orthodontics begins.
 Image 1, smile: Ed, age 47, pretreatment. Image 1, smile: Ed, age 47, pretreatment. | 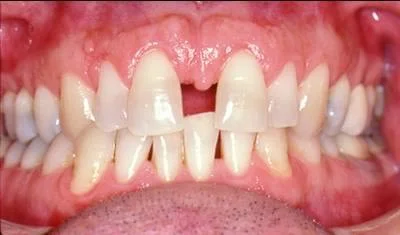 Image 2, diastema: Ed, age 47, pretreatment. Image 2, diastema: Ed, age 47, pretreatment. |
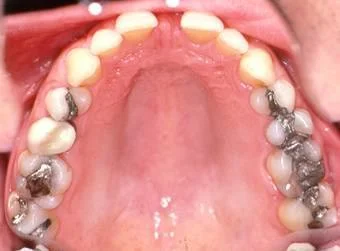 Image 3, upper arch: Occlusal view, upper arch: large central diastema, small incisors. Image 3, upper arch: Occlusal view, upper arch: large central diastema, small incisors. | 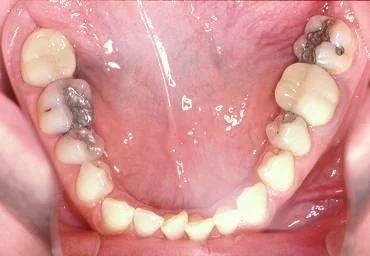 Image 4, lower arch: Occlusal view, lower arch: mild crowding, no problem. Image 4, lower arch: Occlusal view, lower arch: mild crowding, no problem. |
Fixed Appliance Treatment
For Ed, first molars were banded, and brackets were bonded on all other maxillary teeth except the upper left second premolar. It had a ceramic crown that would be difficult to bond and was not really needed as part of the anchorage unit.
Coil springs on a light steel arch wire were used to obtain the desired spacing of the incisors, which had been determined by the restorative dentist. This was achieved in 5 months. The soft tissues in the midline tolerated the partial closure of the diastema well—but sometimes diastema closure leads to enough tissue reaction to require periodontal surgery. Ed did not need that, though he had been warned that it might be necessary.
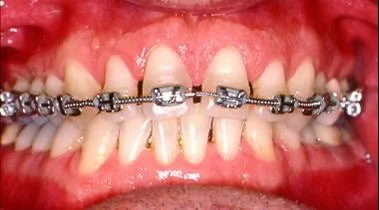 Image 1, frontal view: Repositioning completed, 5 months treatment. Image 1, frontal view: Repositioning completed, 5 months treatment. | 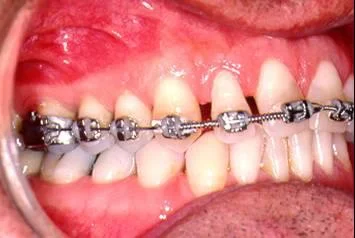 Image 2, right lateral: Repositioning completed, 5 months treatment. Image 2, right lateral: Repositioning completed, 5 months treatment. |
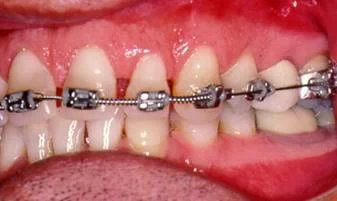 Image 3, left lateral: Repositioning completed, 5 months treatment. Image 3, left lateral: Repositioning completed, 5 months treatment. | 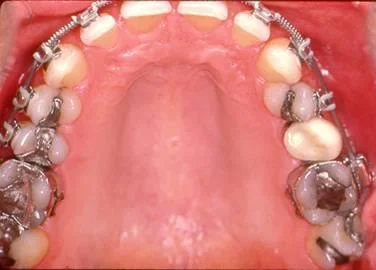 Image 4, maxillary occlusal: Repositioning completed, 5 months treatment. Image 4, maxillary occlusal: Repositioning completed, 5 months treatment. |
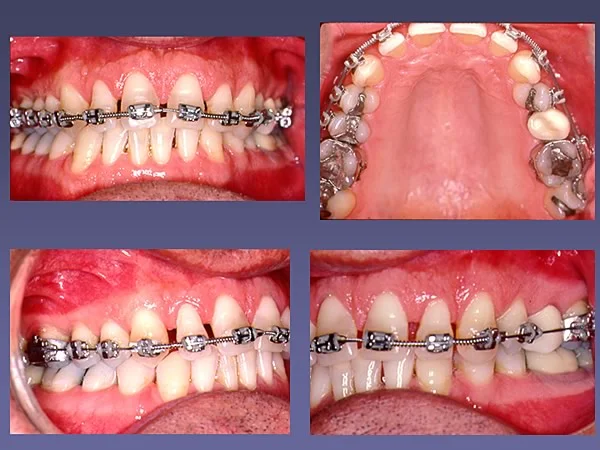 Image 5, progress composite: Repositioning completed, 5 months treatment. Image 5, progress composite: Repositioning completed, 5 months treatment. |
Fixed Appliance Treatment (cont.)
When the appliance was removed after 5 months, a thermoplastic suckdown retainer was placed immediately to maintain the teeth in position until the restorations could be placed (image 1).
This retainer looks just like a plastic aligner (shown in this program in the next few screens), and is identical except that it holds the teeth in position rather than moving them a little.
Before the build-ups are done, it is important to evaluate tooth-lip relationships (image 2). For best smile esthetics in this case, it was apparent that slight lengthening of the central incisor crowns was needed, in addition to closing the interproximal spaces.
For Ed, composite plastic build-ups for the four upper incisors were completed a few weeks later (image 3). It is critically important to coordinate the completion of the orthodontics and the restoration of the repositioned teeth. Unless the restorations are placed immediately after the appliance is removed (which often is the best plan), a retainer must be placed immediately, otherwise the teeth will drift.
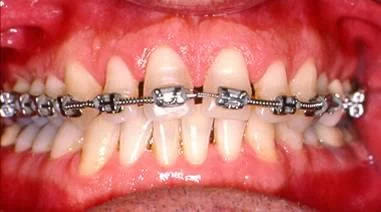 Image 1, completion of treatment: Ready for appliance removal, suckdown retainer to be placed immediately. Image 1, completion of treatment: Ready for appliance removal, suckdown retainer to be placed immediately. | 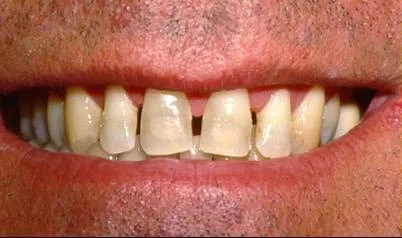 Image 2, tooth-lip relationships: 4 weeks later, tooth-lip relationships just prior to composite build-ups. Image 2, tooth-lip relationships: 4 weeks later, tooth-lip relationships just prior to composite build-ups. |
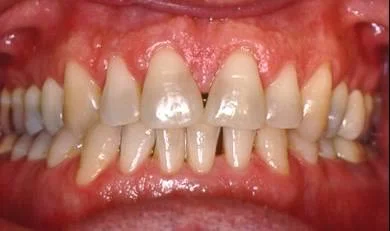 Image 3, build-ups completed: Same day, build-ups completed. Image 3, build-ups completed: Same day, build-ups completed. |
Retention After Completion of Restorations
Ed was very pleased with the change in his smile esthetics (image 1). Restorations alone, without repositioning the incisors first, would not have been nearly as successful.
When a maxillary central disastema is closed, there always is a tendency for it to reopen because the gingival circumferential fiber system is interrupted in the region of a large diastema. Like many adults, Ed did not tolerate a palate-covering maxillary retainer and much preferred a fixed retainer.
There are two ways to make a fixed retainer to hold central incisors together. The first type (image 2), consisting of a rigid bar, is both less effective (more likely to break) and less physiologic (splints the teeth too much).
The better way, bonding the teeth together with a piece of flexible wire, which was done for Ed, is shown in image 3. He will need a retainer of this type indefinitely.
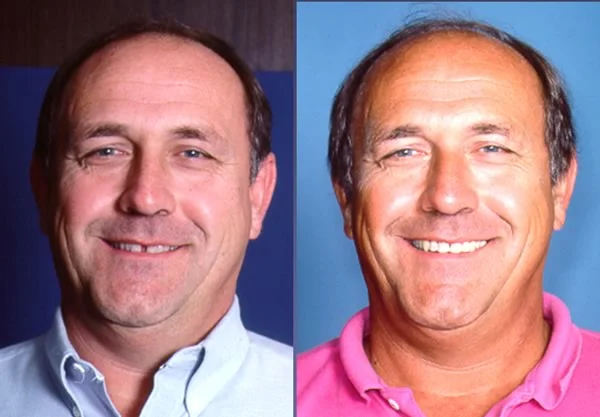 Image 1, change in smile esthetics: Improved smile esthetics, before/after treatment. Image 1, change in smile esthetics: Improved smile esthetics, before/after treatment. | 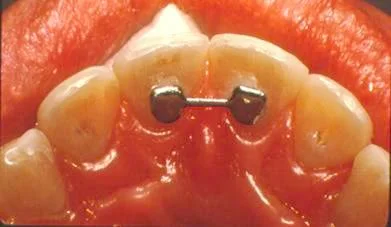 Image 2, rigid bonded retainer: Fixed retainer, rigid wire: less satisfactory. Image 2, rigid bonded retainer: Fixed retainer, rigid wire: less satisfactory. |
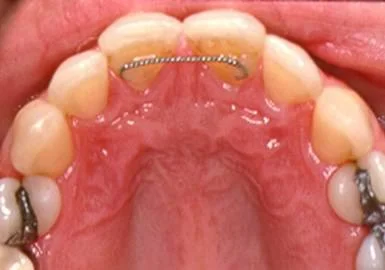 Image 3, flexible bonded retainer: Fixed retainer, flexible wire: preferred. Image 3, flexible bonded retainer: Fixed retainer, flexible wire: preferred. |
Maxillary Incisor Alignment, Removable Aligner
An alternative for incisor alignment is a series of plastic aligners. This approach is less effective when space closure is needed (and so wouldn’t have worked as well for Ed, the case immediately above). It is better suited for the correction of mild crowding.
These aligners are made on a series of computer-generated casts, with a small amount of movement of teeth (not more than 0.5-mm increments) between aligners. Each aligner is worn for approximately 2 weeks, then is replaced with the next in a series.
This patient (courtesy Dr. Richard Beane) wanted alignment of her maxillary incisors, which had relapsed into mild crowding after previous orthodontic treatment nearly 20 years ago (images 1, 2).
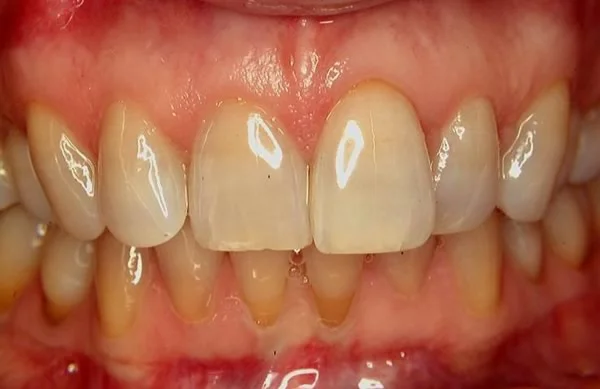 Image 1, frontal view: Pam, age 35, mild relapse into maxillary incisor crowding. Image 1, frontal view: Pam, age 35, mild relapse into maxillary incisor crowding. | 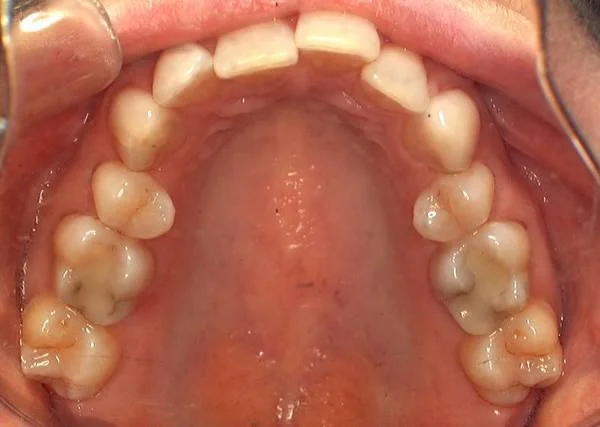 Image 2, occlusal view: Pam, age 35, mild relapse into maxillary incisor crowding. Image 2, occlusal view: Pam, age 35, mild relapse into maxillary incisor crowding. |
Removable Aligner Treatment
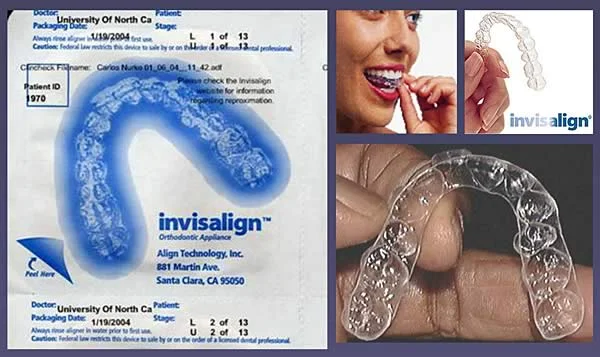
For this patient, a series of 16 aligners was fabricated using computer technology (image) (at a laboratory cost of $1500). The plan was for the patient to wear each aligner all the time for 2 weeks, then switch to the next one.
In this case, treatment time was just under one year, as opposed to the theoretical 32 weeks, because compliance with wearing the appliance all the time left something to be desired. The treatment sequence depends on completing the movement created by any aligner before proceeding to the next one.
Removable Aligner Treatment (cont.)
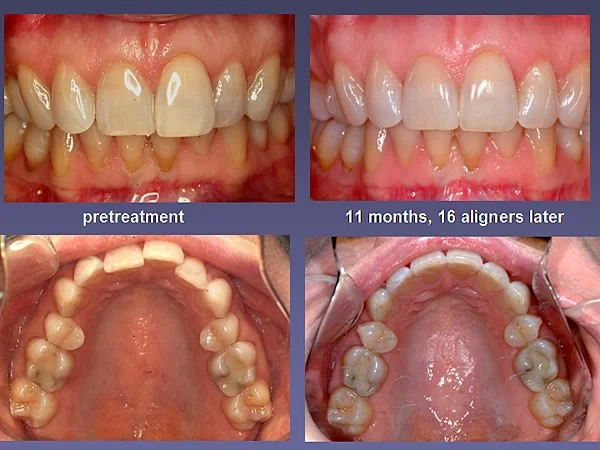
The result of treatment was satisfactory alignment of the incisors, as well as correction of the premolar positions.
The last aligner would continue to be worn as a retainer full-time for at least 3 months, then just at night. Maintaining perfect alignment long-term would require long-term retention, and the last aligner would eventually have to be replaced with a new retainer. With multiple teeth involved, a plastic suckdown retainer, essentially identical to the last aligner, would be the best choice.
Mandibular Incisor Alignment
Indications for Mandibular Incisor Alignment
Another indication for adjunctive orthodontics is crowding of lower incisors that poses a restorative problem, creates tissue irritation, or is needed to help control periodontal disease.
A key question with crowded lower incisors that require orthodontic alignment is whether extraction of one lower incisor and space closure, or opening space for alignment and restoration of the tooth, is the best plan. The more severe the crowding, the better the final occlusion would be with extraction of one tooth.
Let’s look at a patient in whom restoration of a fractured lower incisor was quite difficult because of malalignment. She wanted something done about the fractured crown, both because of its appearance and because the fractured edge was irritating.
Should the fractured tooth be extracted and the space closed, or should space be opened for better alignment and a successful restoration?
 Image 1: Sara, age 60, fractured lower incisor = restorative problem. Image 1: Sara, age 60, fractured lower incisor = restorative problem. | 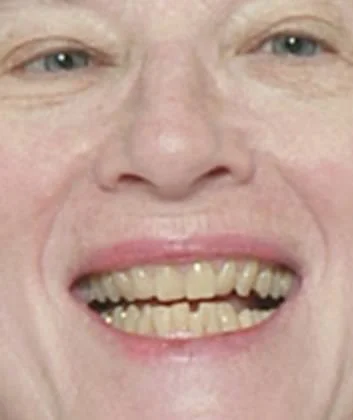 Image 2: Sara, age 60, fractured lower incisor = restorative problem. Image 2: Sara, age 60, fractured lower incisor = restorative problem. |
Planning for Mandibular Incisor Alignment
From the perspective of dental esthetics, three lower incisors versus four is not an important issue, but the lower incisors are exposed more in older patients than in younger ones because the upper and lower lips sag downward with aging. So alignment of these teeth can become more important with increasing age.
In addition, in adults, loss of lip support if the incisors are retracted during space closure can increase facial wrinkles and subtly make the patient look older. For esthetics, it’s better to increase lip support than decrease it. Because of the esthetic sensitivity, mandibular incisor alignment can be considered the most difficult and potentially troublesome type of adjunctive treatment.
Note that Sara has mild crowding in the upper arch and more severe crowding in the lower arch. There is a deep bite anteriorly. The maxillary incisors are upright and tipped lingually in a mild Class II, division 2 pattern (although the molar relationship is Class I). She has a fixed bridge replacing a lower premolar and extensive good-quality restorations. She expects the best in dental care.
 Image 1, frontal view: Sara, age 60, fractured lower incisor = restorative problem. Image 1, frontal view: Sara, age 60, fractured lower incisor = restorative problem. |  Image 2, right lateral: Sara, age 60, fractured lower incisor = restorative problem. Image 2, right lateral: Sara, age 60, fractured lower incisor = restorative problem. |
 Image 3, left lateral: Sara, age 60, fractured lower incisor = restorative problem. Image 3, left lateral: Sara, age 60, fractured lower incisor = restorative problem. |  Image 4, maxillary occlusal: Mild maxillary incisor crowding, central incisors tipped lingually. Image 4, maxillary occlusal: Mild maxillary incisor crowding, central incisors tipped lingually. |
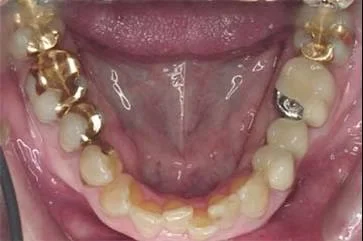 Image 5, mandibular occlusal: More severe mandibular incisor crowding. Image 5, mandibular occlusal: More severe mandibular incisor crowding. |
Planning for Mandibular Incisor Alignment (cont.)
At age 60, some loss of lip fullness is to be expected (image 1). Sara’s facial proportions and jaw relationships are normal. The appearance of the fractured tooth is a concern, but facial esthetics is not. On the other hand, treatment certainly shouldn’t make her look worse or older.
The panoramic radiograph (image 2) shows extensive restorations (inlays, onlays, and crowns) in good condition, with a fixed bridge replacing a missing mandibular left premolar.
Alveolar bone levels appear normal in both the panoramic radiograph and in recent bitewings (which are needed for patients with restorations—see the radiographic guidelines in Concepts of Adjunctive Treatment). Clinical examination confirmed no evidence of active periodontal disease.
For this patient, either of the treatment approaches (extract the fractured incisor and close space, ending up with three lower incisors; or expand the arches to allow the fractured tooth to be aligned) would change the position of the incisor(s) and affect lip support. So a cephalometric radiograph and tracing (images 3 and 4) are needed to evaluate the esthetic impact of treatment.
Cephalometric analysis confirms that jaw relationships are within normal limits but with a mild skeletal Class II pattern. There is some retrusion of upper incisors (a mild Class II division 2 pattern), and a normal relationship of the mandibular incisors to the chin.
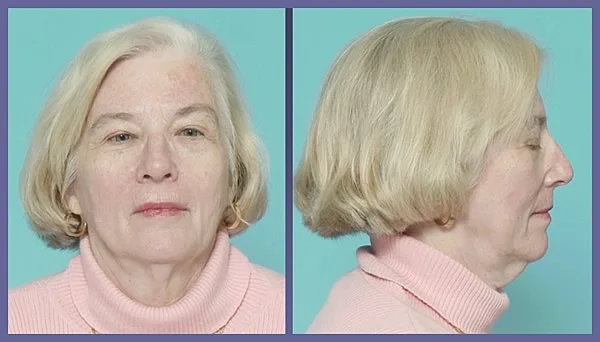 Image 1, frontal/profile views: Frontal/profile views: normal facial proportions, no esthetic problem. Image 1, frontal/profile views: Frontal/profile views: normal facial proportions, no esthetic problem. | 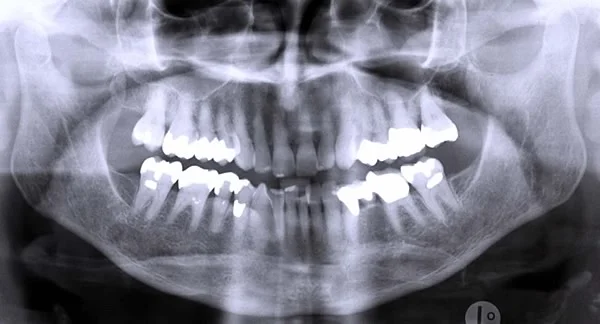 Image 2, panoramic radiograph: Panoramic radiograph, extensive previous restorative treatment. Image 2, panoramic radiograph: Panoramic radiograph, extensive previous restorative treatment. |
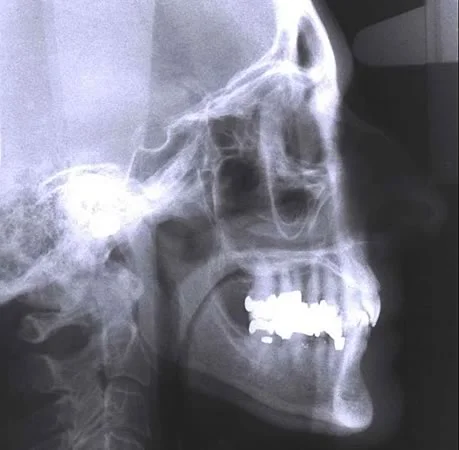 Image 3, lateral ceph: Cephalometric radiograph. Image 3, lateral ceph: Cephalometric radiograph. | 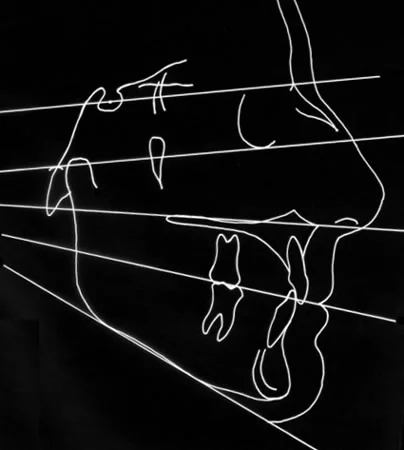 Image 4, ceph tracing/analysis: Cephalometric tracing: mild Class II division 2 pattern. Image 4, ceph tracing/analysis: Cephalometric tracing: mild Class II division 2 pattern. |
Treatment Options: the Patient Decides
For Sara, extracting one lower incisor and closing the space would deepen the bite and could lead to tissue damage lingual to the upper incisors. In addition, lip support from the teeth would decrease, which has an aging effect. On the positive side, there would be no need to restore the fractured tooth and no worry about maintaining the restoration long term.
The alternative treatment would be expansion of the lower arch to make room for the fractured incisor, so that it could be restored properly. It would be necessary to correct the lingual tipping of the upper incisors to gain enough overjet to expand the lower arch, so alignment of the upper incisors would be necessary. This would slightly increase lip support and improve dental and facial esthetics. Treatment time would be about the same with both approaches.
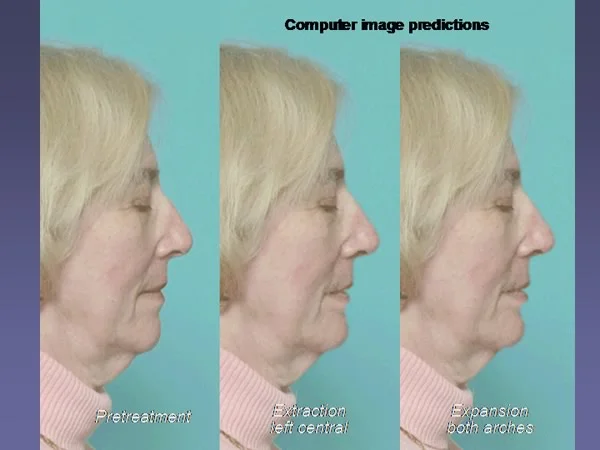
Computer predictions help patients understand the esthetic impact of changing jaw or tooth position (image 1). Sara was shown computer image predictions of the effect on her profile of the alternative treatment possibilities, so she could choose between them. This, of course, is her decision—both morally and legally, she is entitled to make the decision.
As the predictions show, for Sara the esthetic impact on the profile of either treatment plan would be subtle, but increased lip fullness makes you look younger—which is as desirable at age 60 as age 40. Smile esthetics also would be better with arch expansion and alignment of the teeth in both arches. Since her primary motivation was esthetics, Sara preferred arch expansion rather than extraction and space closure.
The plan, therefore, was a bonded fixed appliance for both arches. Because of the deep bite, only the upper arch was bonded initially, and the upper incisors were tipped facially to create some overjet. Then the lower arch was bonded, and space was opened so that the crowded incisors could be aligned. Since major tooth movement was not required in the upper arch, clear brackets were satisfactory for treatment and were more esthetic.
Treatment Completion
The orthodontic treatment required 6 months. As anticipated, expansion of the maxillary incisor segment gave space to expand the mandibular incisor area, and produced excellent occlusion and incisor function. The rotated mandibular right canine was not corrected because a preliminary set-up of the teeth showed that there was not quite enough space to allow this.
She was referred for restoration of the fractured lower incisor immediately after braces were removed, and wore plastic suckdown retainers in both arches until the restoration could be accomplished. Then a clip-on lower retainer was used, and the suckdown retainer for the upper arch was continued at night for a few months.
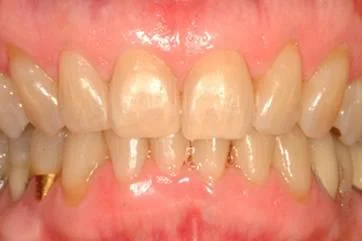 Image 1, frontal view: Sara, completion of orthodontic and restorative treatment. Image 1, frontal view: Sara, completion of orthodontic and restorative treatment. | 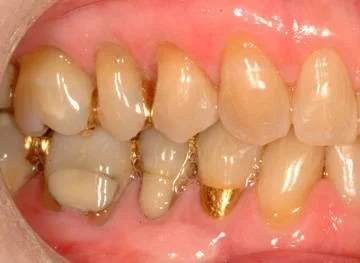 Image 2, right lateral: Sara, completion of orthodontic and restorative treatment. Image 2, right lateral: Sara, completion of orthodontic and restorative treatment. |
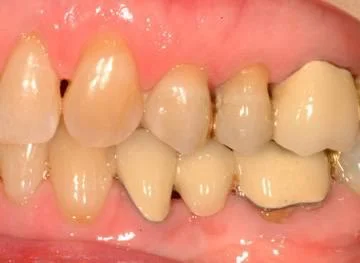 Image 3, left lateral: Sara, completion of orthodontic and restorative treatment. Image 3, left lateral: Sara, completion of orthodontic and restorative treatment. | 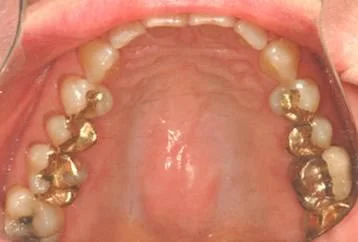 Image 4, maxillary occlusal: Sara, completion of orthodontic and restorative treatment. Image 4, maxillary occlusal: Sara, completion of orthodontic and restorative treatment. |
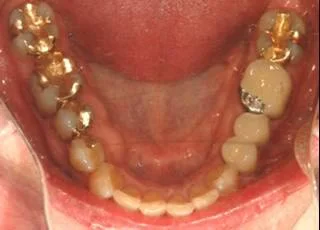 Image 5, mandibular occlusal: Sara, completion of orthodontic and restorative treatment. Image 5, mandibular occlusal: Sara, completion of orthodontic and restorative treatment. |
Post-Treatment Esthetics
Dental and facial esthetics were satisfactory after restoration of the incisor, which took place a few weeks after the orthodontic appliance was removed (images 1-4). In this case, both better occlusion and better esthetics were accomplished with arch expansion rather than extraction of the fractured incisor, at the cost of one more restoration to be maintained. Treatment time would have been the same or longer with extraction, and the cost of the two possible orthodontic approaches also would be quite similar.
It came down to understanding what the patient wanted, offering her alternatives that she understood, and letting her make an informed decision (see Concepts of Adjunctive Treatment).
It is interesting to compare the computer image prediction, which was based on predicted changes in incisor position on the cephalometric tracing, to the real profile posttreatment (image 5).
Computer image predictions are not perfect, but if done carefully can be quite close to reality. It’s one thing to explain to a patient what the effect of treatment is likely to be, and something else to show them a picture. Patients like the feeling of better communication that seeing the predictions provides, and there is minimal risk that they will think the reality is not as good as the prediction.
 Image 1, frontal, smile: Sara, facial appearance at completion of treatment. Image 1, frontal, smile: Sara, facial appearance at completion of treatment. |  Image 2, frontal, relaxed: Sara, facial appearance at completion of treatment. Image 2, frontal, relaxed: Sara, facial appearance at completion of treatment. |
 Image 3, oblique, smile: Sara, facial appearance at completion of treatment. Image 3, oblique, smile: Sara, facial appearance at completion of treatment. | 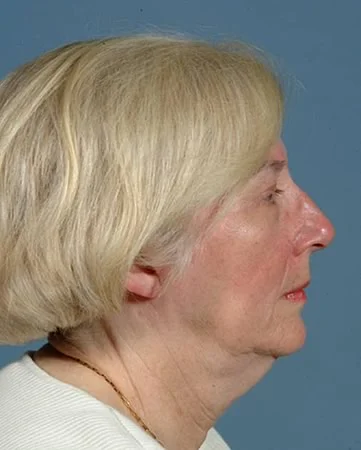 Image 4, profile, relaxed: Sara, facial appearance at completion of treatment. Image 4, profile, relaxed: Sara, facial appearance at completion of treatment. |
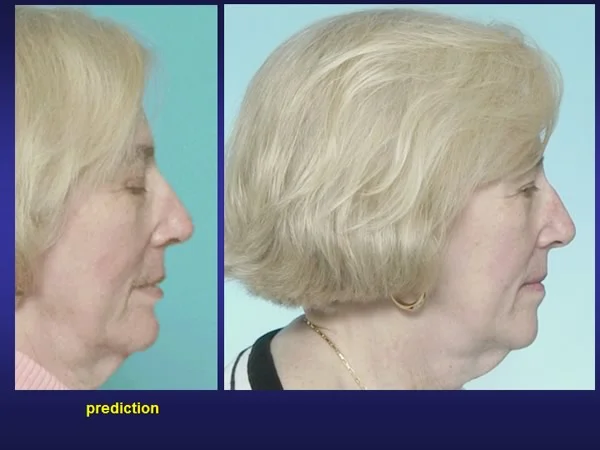 Image 5, prediction versus actual profile: Predicted profile compared to actual posttreatment profile. Image 5, prediction versus actual profile: Predicted profile compared to actual posttreatment profile. |
Retention After Mandibular Incisor Alignment
Whenever incisors are repositioned in adults, retainers are needed. Sara had a suckdown upper retainer (similar to the removable aligner, but passive) and an acrylic-wire clip-on lower retainer.
For Sara, the lower retainer will be worn just at night, indefinitely. It has two purposes:
- maintaining the lower incisor alignment, and
- controlling the overbite, as the facial aspect of this retainer is contoured to do.
After the teeth have stabilized initially, preventing the bite from deepening also will maintain the alignment of the upper incisors, so an upper retainer is not needed long term. She discarded it after 4 months.
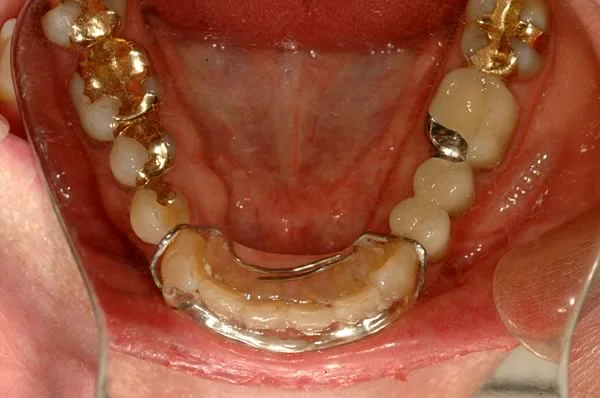 Image 1, lower retainer, occlusal: Mandibular clip-on retainer. Image 1, lower retainer, occlusal: Mandibular clip-on retainer. | 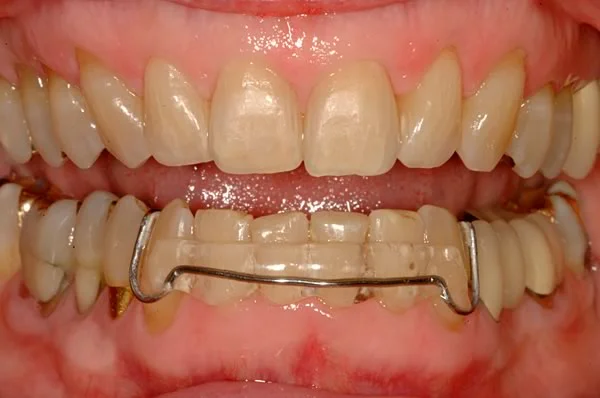 Image 2, lower retainer, frontal: Mandibular clip-on retainer. Image 2, lower retainer, frontal: Mandibular clip-on retainer. |
Mandibular Incisor Alignment (cont’d.)
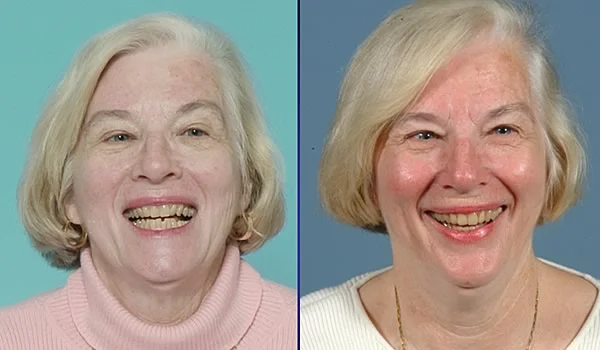
Comparison of smile esthetics from before to after treatment shows the improvement that was achieved.
Note that there were two components to the esthetic change:
- restoration of the fractured incisor, and
- improved lip support.
Adjunctive treatment to change incisor positions must always take both into account.
In modern dentistry, adjunctive orthodontic treatment offers the possibility of better management of other dental problems. For that reason, adjunctive orthodontics for adults is a rapidly growing part of clinical treatment.
Conclusions
Mandibular incisor alignment in adults:
- is one of the more difficult adjunctive treatment procedures.
- in a patient with severe incisor crowding and a fractured or endodontically-involved incisor, extraction and space closure can be the most effective treatment.
- non-extraction alignment of less severely crowded lower incisors often requires repositioning of the upper incisors as well,
- whatever the type of treatment in an adult, long-term retention will be needed. Initially, a suckdown retainer can be satisfactory; in the long-term, either a clip-on removable retainer or a bonded lingual flexible wire performs better
Summary of Adjunctive Treatment
Summary: Molar Uprighting, Crossbite Correction
There are five major types of adjunctive orthodontic treatment for adults:
-
Uprighting of drifted molars to facilitate restorations
-
Distal tipping of crowns—the preferred method in the lower arch, and usually in the upper arch as well; requires removal of third molar if second molar is to move significantly distally
-
Three steps:align/upright: active, flexible arch wires; with or without auxiliary spring consolidate space: coil spring on rigid wire retention: bonded intracoronal wire
-
Mesial movement of roots—difficult but possible, more feasible in the upper arch because root paralleling is not as critical; allows retention of third molar
-
Correction of posterior crossbite, also to facilitate restorations
-
Cross-elastics are effective, if some extrusion of the teeth can be tolerated
-
The alternative is an active arch wire (see Chapter 20, Contemporary Orthodontics)
Summary: Extrusion, Maxillary Incisor Alignment
The five major types of adjunctive orthodontic treatment for adults:
-
Extrusion of fractured teeth, an alternative to crown-lengthening surgery that may produce an esthetic problem
-
How far do you have to extrude?enough movement to bring the fracture line to the surface an additional 1 mm for placement of the gingival margin of the restoration an additional 2 mm for gingival contours
-
Requires a bonded attachment (usually a button rather than a bracket) on the tooth to be extruded
-
Anchor teeth can be adjacent (usually preferred) or in the opposite arch (requires use of vertical elastics)
-
Alignment of maxillary incisors, usually to redistribute spaces in preparation for build-ups
-
Fixed appliance with bonded brackets and coil springs: the usual method
-
Removable aligners: a new method involving computer-generated casts on which a sequence of aligners can be made
Summary: Mandibular Incisor Alignment
The five major types of adjunctive orthodontic treatment for adults:
-
Alignment of mandibular incisors, usually for the correction of crowding
-
One possibility: extraction of one incisor and space closuremay or may not be compatible with good occlusion reduces lip support, may tend to make the patient look subtly older
-
The other possibility: arch expansionlikely to require treatment of both the upper and lower arch esthetic considerations are the key in this decision
-
This is the most difficult and potentially troublesome of the adjunctive procedures
Adjunctive orthodontics is an increasingly important of comprehensive treatment for adults, with the potential to improve periodontal health and improve the quality of restorative dentistry.
Self-Test Referral
The self-test section of this program is designed to help you be sure you have understood the material. Read the section on adjunctive treatment in adults in Contemporary Orthodontics (5th ed., pages 627-637; 4th ed., pages 639-651). Then take the self-test, and use it as a guide for further study and review.
Copyright 2013, UNC Dept. of Orthodontics
Self-Test
Question 1
(A) Unlike other types of tooth loss, first molars still are lost to caries as frequently as ever because (B) Fluoridation does not protect against pit and fissure caries that can lead to pulpal involvement.
- A true, B true, A and B related
- A true, B true, A and B not related
- A true, B false
- A false, B true ✓
- A and B false
Correct
That’s correct, the first statement is false, but the second one is true. First molars are not lost nearly as frequently as they were 50 years ago, even though fluoridation does not protect against the occlusal decay in pits and fissures that is the usual reason these teeth once were extracted. More children now are seen by dentists before the tooth becomes an emergency and have pit and fissure sealants or restorations.
Incorrect
No, that’s wrong. The first statement is false, but the second one is true. First molars are not lost nearly as frequently as they were 50 years ago, even though fluoridation does not protect against the occlusal decay in pits and fissures that is the usual reason these teeth once were extracted. More children now are seen by dentists before the tooth becomes an emergency and have pit and fissure sealants or restorations.
Question 2
When a mandibular second molar is to be uprighted, which of the following are reasons for extracting the third molar in that quadrant before doing the uprighting?
a. Improves the periodontal prognosis for the second molar
b. Makes it possible to tip the crown distally rather than moving the roots mesially
c. Eliminates occlusal interferences from the opposing upper molars
d. Eliminates the need to use fixed appliances because less anchorage is required
- a and b ✓
- b and c
- c and d
- a, b, and c
- all of the above
Correct
That’s right, the first two statements are correct, the other two are not. Removing the third molar makes it possible to reduce or eliminate the pocket usually found on the mesial of a tipped lower molar as it is uprighted and may improve the periodontal condition on the distal as well. But uprighting does not eliminate occlusal interferences. Usually it is necessary to reduce the crown height to control interferences when a molar is uprighted. Because anchorage is important, this type of movement almost always requires a fixed appliance. With removable appliances, there are both biomechanical and compliance problems. The removable appliances don’t work very well, and adults won’t wear them very well anyway.
Incorrect
No, that’s wrong. The first two statements are correct, the other two are not. Removing the third molar makes it possible to reduce or eliminate the pocket usually found on the mesial of a tipped lower molar as it is uprighted and may improve the periodontal condition on the distal as well. But uprighting does not eliminate occlusal interferences. Usually it is necessary to reduce the crown height to control interferences when a molar is uprighted. Because anchorage is important, this type of movement almost always requires a fixed appliance. With removable appliances, there are both biomechanical and compliance problems. The removable appliances don’t work very well, and adults won’t wear them very well anyway.
Question 3
Which of the following are appropriate ways to upright a mesially tipped lower molar?
a. Flexible rectangular wire in premolar brackets and molar tube
b. Auxiliary spring and continuous wire in brackets and tube
c. Segmented wire in brackets and auxiliary spring to molar tube
d. Elastics from the upper molar on the same side to the tipped lower molar
- a and b
- a, b, and c ✓
- b, c, and d
- c and d
- all of the above
Correct
That’s right, the first three methods are appropriate for uprighting. An elastic from the upper molar to the lower one is a way to correct a crossbite relationship but is not effective for correction of mesial tipping.
Incorrect
No, that’s wrong. The first three methods are appropriate for uprighting. An elastic from the upper molar to the lower one is a way to correct a crossbite relationship but is not effective for correction of mesial tipping.
Question 4
Which of the following are characteristics of cross-elastics to correct posterior crossbite?
a. Pull the teeth across the line of occlusion
b. Extrude the teeth to which they attach
c. Require extremely high force
d. May create a need to eliminate occlusal interferences
- a and b
- a, b, and c
- b, c, and d
- a, b, and d ✓
- all of the above
Correct
That’s right, cross-elastics pull the teeth across the occlusion, also extrude the teeth to which they are attached, and for that reason may create a need to eliminate occlusal interferences—but they don’t require extremely high force. In fact, if very high force is used, the undesirable extrusive effect is magnified more than the desired crossbite correction, so very high force is a mistake.
Incorrect
No, that’s wrong. Cross-elastics pull the teeth across the occlusion, also extrude the teeth to which they are attached, and for that reason may create a need to eliminate occlusal interferences—but they don’t require extremely high force. In fact, if very high force is used, the undesirable extrusive effect is magnified more than the desired crossbite correction, so very high force is a mistake.
Question 5
Which of the following are indications for the use of a T-loop appliance in uprighting a mesially tipped maxillary molar?
a. Need to tip the crown distally
b. Need to bring the roots mesially
c. Tooth in crossbite
d. Extensive bone loss around anchor teeth
- a and b ✓
- a and c
- b and d
- a, b, and c
- all of the above
Correct
That’s correct, a T-loop appliance is appropriate both for distal tipping of the crown of a molar that needs uprighting or for mesial movement of the roots of the teeth. For distal tipping, the distance from the anchor teeth is allowed to increase, so that the crown can move distally. For mesial root movement, the loop is restrained so that the crown cannot move distally. This loop design is not effective for crossbite correction, however, and bone loss is not an indication for its use.
Incorrect
No, that’s wrong. A T-loop appliance is appropriate both for distal tipping of the crown of a molar that needs uprighting or for mesial movement of the roots of the teeth. For distal tipping, the distance from the anchor teeth is allowed to increase, so that the crown can move distally. For mesial root movement, the loop is restrained so that the crown cannot move distally. This loop design is not effective for crossbite correction, however, and bone loss is not an indication for its use.
Question 6
(A) In occlusal rehabilitation it is particularly important to upright tipped maxillary second molars rather than closing the old first molar extraction site because (B) Unless there is good root parallelism at an old maxillary first molar extraction site, periodontal problems are inevitable.
- A true, B true, A and B related
- A true, B true, A and B not related
- A true, B false
- A false, B true
- A and B false ✓
Correct
That’s right, both these statements are false. Good periodontal health is more likely around a tipped maxillary than mandibular second molar. Closing a maxillary molar extraction site, therefore, is more likely to be a feasible treatment choice. Uprighting maxillary molars usually is indicated for better restorations, not for better periodontal health.
Incorrect
No, that’s incorrect. Both these statements are false. Good periodontal health is more likely around a tipped maxillary than mandibular second molar. Closing a maxillary molar extraction site, therefore, is more likely to be a feasible treatment choice. Uprighting maxillary molars usually is indicated for better restorations, not for better periodontal health.
Question 7
Which of the following is the most time-efficient way to obtain the desired spacing of maxillary incisors before restorations are placed?
- Modified Hawley retainer with finger springs
- Fixed functional appliance (like the Herbst appliance)
- A series of suckdown plastic aligners
- Bonded brackets with full-dimension superelastic arch wires
- Bonded brackets with undersized rigid wires and coil springs ✓
Correct
That’s correct. A fixed appliance with bonded brackets, undersized rigid wires (so the teeth can slide as needed along the arch wire), and coil springs is the most time-efficient way to position maxillary incisors. This is very difficult with full-dimension arch wires of any material, because of friction between the wire and the bracket. It can be done with a series of plastic aligners, but that takes longer, so this method is not as time-efficient. Neither a fixed functional appliance nor a modified retainer with finger springs is an effective way to accomplish the precise spacing needed in preparation for restorations.
Incorrect
No, that’s wrong. A fixed appliance with bonded brackets, undersized rigid wires (so the teeth can slide as needed along the arch wire), and coil springs is the most time-efficient way to position maxillary incisors. This is very difficult with full-dimension arch wires of any material, because of friction between the wire and the bracket. It can be done with a series of plastic aligners, but that takes longer, so this method is not as time-efficient. Neither a fixed functional appliance nor a modified retainer with finger springs is an effective way to accomplish the precise spacing needed in preparation for restorations.
Question 8
After closure of a maxillary central diastema, what is the most effective method for the long-term retention that almost always is required?
- Flexible bonded wire ✓
- Rigid bonded wire
- Removable plastic aligner
- Hawley retainer
- Doesn’t matter, long-term retention isn’t needed after restorations are placed
Correct
That’s right, a flexible bonded wire on the lingual of the incisors is the most effective method. A rigid bonded wire is more likely to break. Any removable appliance tends not to be worn as much or as consistently as needed to keep the midline space from reopening enough to be noticeable, so a fixed retainer is preferred.
Incorrect
No, that’s incorrect. A flexible bonded wire on the lingual of the incisors is the most effective method. A rigid bonded wire is more likely to break. Any removable appliance tends not to be worn as much or as consistently as needed to keep the midline space from reopening enough to be noticeable, so a fixed retainer is preferred.
Question 9
When a series of plastic aligners are used to reposition teeth, how much can any tooth be moved relative to the ones adjacent to it with any one aligner?
- 0.25 mm
- 0.5 mm ✓
- 0.75 mm
- 1 mm
- 2 mm, but only with computer technology
Correct
That’s right, 0.5 mm is about as much movement as can be produced with reasonable control with a single aligner—which is why a large number of aligners often are needed for a course of treatment.
Incorrect
No, that’s wrong. 0.5 mm is about as much movement as can be produced with reasonable control with a single aligner—which is why a large number of aligners often are needed for a course of treatment.
Question 10
Which of the following are potential problems in correcting crowded lower incisors by extracting one incisor and closing the space?
a. Creation of excess overjet
b. Deepening of the bite anteriorly
c. Decrease in lip support that accentuates facial wrinkles
d. TMD because of increased bruxism
- a and b
- b and c
- a, b, and c ✓
- b, c, and d
- all of the above
Correct
That’s right, the first three statements are correct, but the last one isn’t. If only one lower incisor is extracted, overjet is likely to increase, and this can be a problem in some patients. Extraction of one incisor also tends to deepen the bite anteriorly, and it can increase the prominence of facial wrinkles by decreasing lip support. These are potential problems, but not things that are inevitable—they don’t occur in patients correctly selected for this treatment. Extraction of one lower incisor has nothing to do with TMD due to bruxism. This extraction pattern, like other orthodontic extractions, is unlikely to either cause or cure TMD.
Incorrect
No, that’s wrong. The first three statements are correct, but the last one isn’t. If only one lower incisor is extracted, overjet is likely to increase, and this can be a problem in some patients. Extraction of one incisor also tends to deepen the bite anteriorly, and it can increase the prominence of facial wrinkles by decreasing lip support. These are potential problems, but not things that are inevitable—they don’t occur in patients correctly selected for this treatment. Extraction of one lower incisor has nothing to do with TMD due to bruxism. This extraction pattern, like other orthodontic extractions, is unlikely to either cause or cure TMD.
Question 11
Which of the following are not effective orthodontic appliances in nonextraction alignment of crowded lower incisors?
a. Fixed functional appliance (like Herbst appliance)
b. Aseries of suckdown plastic aligners
c. Bonded brackets with full-dimension superelastic arch wires
d. Bonded brackets with undersized wires and coil springs
- a and b
- b and c
- a and c ✓
- b and d
- a, b, and c
Correct
That’s right, a fixed functional appliance is not an effective way to correct crowded lower incisors (totally inappropriate in fact—such appliances are used in children to guide jaw growth, and crowding of lower incisors is a possible side effect). Neither is a fixed appliance with a full-dimension wire (because that makes sliding teeth along the arch wire almost impossible, and teeth need to slide to open up space). Plastic aligners are effective but slow and expensive. The best approach is bonded brackets, undersized arch wires, and coil springs.
Incorrect
No, that’s wrong. a fixed functional appliance is not an effective way to correct crowded lower incisors (totally inappropriate in fact—such appliances are used in children to guide jaw growth, and crowding of lower incisors is a possible side effect. Neither is a fixed appliance with a full-dimension wire (because that makes sliding teeth along the arch wire almost impossible, and teeth need to slide to open up space). Plastic aligners are effective but slow and expensive. The best approach is bonded brackets, undersized arch wires, and coil springs.
Question 12
(A) After crowded lower incisors in an adult have been aligned by expanding the arch, a retainer usually is needed long term because (B) Teeth with decreased alveolar bone height in an adult are less stable and more likely to relapse after orthodontic tooth movement.
- A true, B true, A and B related
- A true, B true, A and B not related ✓
- A true, B false
- A false, B true
- A and B false
Correct
That’s correct, both these statements are true, but they aren’t related. After expansion to align the lower incisors, a retainer would be needed long-term whether bone loss had occurred or not, because the pattern of lip-tongue pressures that determines the position of incisors would not change after treatment in an adult. That’s why long-term retention is needed to keep the teeth aligned. A wire and plastic clip-on retainer like this one often is the best choice for long-term retention of lower incisors in a cooperative adult.
Incorrect
That’s wrong. Both these statements are true, but they aren’t related. After expansion to align the lower incisors, a retainer would be needed long-term whether bone loss had occurred or not, because the pattern of lip-tongue pressures that determines the position of incisors would not change after treatment in an adult. That’s why long-term retention is needed to keep the teeth aligned. A wire and plastic clip-on retainer like this one often is the best choice for long-term retention of lower incisors in a cooperative adult.