Core Buildup with Pins — Clinical Procedure and Guidelines
Case Summary
- Patient: Simulated case with a substantial loss of tooth structure involving the mesio‑distolingual aspect of the tooth (likely due to caries or a large existing restoration).
- Treatment objective: Restore tooth form with a core buildup reinforced by pins to support a definitive crown.
Preoperative Documentation
- Complete the electronic patient record (EPR) entry prior to treatment.
- Include diagnosis (extent of structural loss).
- Record the treatment plan: core buildup with pins followed by crown preparation and crown placement.
- Note any contraindications or concerns (pulpal proximity, periodontal ligament considerations).
Indications for Pins
- Use pins when remaining tooth structure is insufficient to retain a core or crown.
- Pins provide additional mechanical retention for the core material.
Instruments and Materials
- Rotary instruments:
- Quarter‑round bur (for pilot hole)
- Appropriate pin‑channel bur or instrument for creating pin channels
- Pins (self‑fracturing or threaded type as per clinician preference)
- Matrix and wedge system (to contain core material and establish proper contours)
- Restorative materials:
- Composite core material (many are dual‑cure)
- Alternatively: amalgam (if indicated)
- Adhesive system (etch, rinse, bonding agent)
- Air syringe, curing light
- Explorer or suitable instrument for adapting material
Surgical Principles and Safety
- Avoid iatrogenic pulpal exposure and damage to the periodontal ligament (PDL).
- Place pilot holes and pin channels in line angles or axial line locations that preserve remaining dentin.
- Depth guideline: approximately 0.5 mm into dentin for pilot holes (avoid pulp and PDL space).
- Maintain and verify the path of draw to prevent interference with future crown preparation and to avoid damage during pin insertion.
- Use appropriate handpiece speed when seating pins; excessive speed or force may cause improper placement or root damage.
Step‑by‑Step Procedure
1. Prepare the Tooth and Plan Pin Locations
- Assess residual tooth structure and identify locations for pins (typically in line angles away from pulp).
- Verify that pin placement will not compromise future crown path of draw.
2. Create Pilot Holes
- Use a quarter‑round bur to create pilot holes at the planned sites.
- Enter at the line angle and extend approximately 0.5 mm into dentin.
- Continuously confirm orientation to avoid pulp and PDL.
3. Prepare Pin Channels (Path of Draw)
- Enlarge or shape the pilot holes to form pin channels that follow the planned path of draw.
- Prepare channels conservatively—one pass per site is often sufficient.
- Confirm channel alignment visually and with a probe prior to pin insertion.
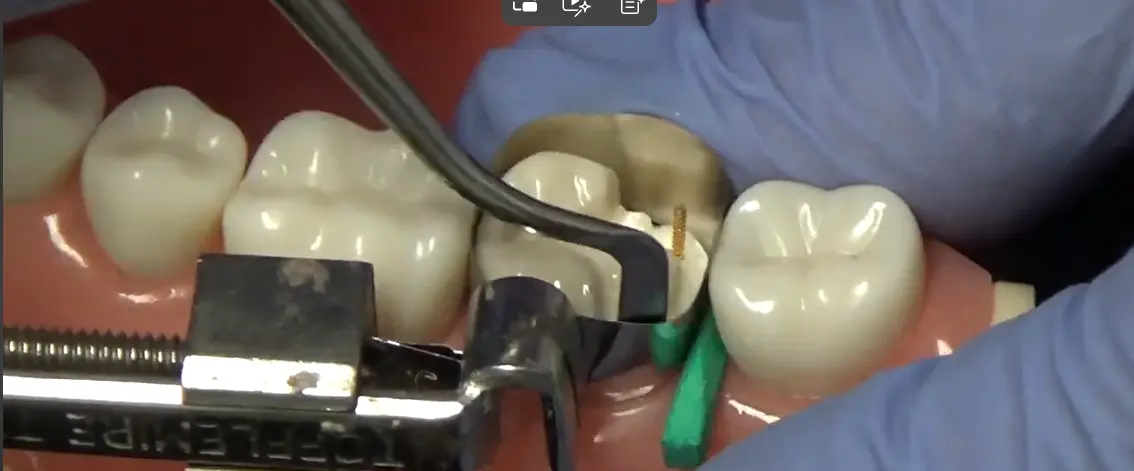
4. Pin Placement
- Verify the point of entry and path of draw once more before seating each pin.
- Use the correct insertion speed (manufacturer recommendations) and apply firm, controlled pressure.
- Many pins are designed to shear/fracture at the head when fully seated—press down until the pin fractures at its designed break point.
- Repeat for the second pin(s) ensuring both follow the prepared channel and have appropriate orientation.
5. Matrix Placement and Wedge
- Place an appropriate matrix and wedge to contain the core material and reestablish proper contours and proximal contact if needed.
6. Adhesive Protocol (for Composite Core)
- Acid‑etch the prepared dentin/enamel surfaces (as per adhesive system instructions).
- Rinse thoroughly and gently air‑dry (avoid desiccation).
- Apply bonding agent and thin with gentle air flow.
- Light cure according to the adhesive manufacturer’s recommended time.
7. Core Build‑Up Placement
- Place core material in incremental layers.
- Although many core composites are dual‑cure, incremental light curing provides better control and reduces voids.
- Use an explorer or similar instrument to adapt material, avoid trapped air, and ensure intimate contact around pins and internal walls.
- Cure each increment as recommended.
- Inspect for voids or bubbles before final curing—layering helps minimize the risk of internal bubbles that may appear later during impression or prepping.
Resotrative theory
He really likes to just put flowable and cure it so kind of mid
8. Finishing
- After final cure, remove matrix and wedge.
- Verify core morphology and marginal adaptation.
- Finish and adjust core as required to prepare for definitive crown preparation.
Practical Tips and Common Pitfalls
- Always verify the planned path of draw—improper alignment will complicate crown preparation and seating.
- Confirm pin orientation and depth before final seating; reversing or repositioning pins is difficult after insertion.
- Use controlled speed and pressure during pin placement; too high a speed or excessive force risks root/pulp damage.
- Layer composite cores to reduce the incidence of internal voids that may present during later stages.
- Use an explorer to spread and adapt each increment to minimize air entrapment.
Summary Checklist (Quick Reference)
- Document EPR with diagnosis and treatment plan
- Verify indications for pin retention
- Plan pin locations avoiding pulp/PDL
- Create pilot holes with quarter‑round bur (~0.5 mm into dentin)
- Prepare pin channels following path of draw
- Seat pins at recommended speed until fracture point
- Place matrix and wedge
- Perform adhesive steps (etch, rinse, dry, bond, cure)
- Place core material in layers; adapt and cure
- Remove matrix/wedge and finish core for crown preparation
This protocol provides a concise, safe approach to core buildups with pins in preparation for crowns. Adjustments may be required based on tooth anatomy, pin system, and material manufacturer guidelines.