Masterclass: Effective Use of Rubber Dams in Clinical Practice
Introduction
The rubber dam is a sheet of latex or non-latex material used in conjunction with specific tools to achieve the most complete field isolation possible in dentistry. While alternative methods like cotton rolls and aspiration exist, the rubber dam remains the gold standard for moisture control and patient safety.

1. Why Use a Rubber Dam?
The primary goal of a rubber dam is to create a controlled environment. Key benefits include:
- Moisture and Fluid Control: Protects bonded fillings and ceramics from saliva, blood, gingival fluid, and the moisture present in a patient’s breath.
- Tissue Retraction: Thick dams physically retract the gingiva and buccal tissue, improving access to Class 2 (MOD) and anterior cavities.
- Field Isolation: Keeps water spray and debris from the patient’s throat, enhancing comfort and safety.
- Efficiency: Acts as an “extra hand” for the assistant by retracting the tongue and cheeks, allowing the assistant to focus on aspiration and keeping the mirror clean.
- Time Management: Prevents patients from talking or rinsing frequently, which often offsets the time taken to place the dam.
- Visual Contrast: Using non-transparent, high-contrast colors (e.g., blue) provides a clear background, making it easier to identify margins and detect any fluid seepage.

2. Contraindications and Challenges
While highly beneficial, there are instances where a rubber dam may not be appropriate:
- Learning Curve: Initially, placement can be time-consuming. It is recommended to start with simple cases before moving to complex procedures like veneer bonding.
- Technical Difficulty: In extremely difficult cases, a “split dam” technique may be used, or the dam may be omitted if it hinders performance.
- Poor Placement: A poorly placed dam is worse than no dam at all, as it can trap moisture and blood exactly where a dry field is most critical (e.g., the gingival box of a cavity).
- Material Quality: Old, porous rubber sheets tear easily. Always use fresh materials and high-quality clamps.
3. Essential Equipment and Materials
Rubber Dam Sheets
| Feature | Recommendation |
|---|---|
| Material | Latex is preferred for its superior elasticity and seal; non-latex for allergic patients. |
| Size | 6x6 inches (15x15 cm) for adults; 4x4 inches for pediatrics. |
| Thickness | Medium is the “go-to” for most procedures. Heavy/Thick provides better retraction but is harder to floss. |
| Color | Opaque, high-contrast colors (Blue) are best for photography and focus. |


Clamps and Tools
- Punches: Ainsworth or Ivory styles. Must be sharp to ensure clean, round holes that won’t tear under tension.

- Frames: Metal or plastic “U-shaped” frames. Ensure the top is open and the frame does not press into the patient’s face or eyes.

- Forceps: Used to place clamps. Styles include Brewer, Washington, or Ivory.

- Clamps:
- Anterior/Premolar: 9 or 90N (universal); 212 for aggressive retraction.
- Molar: W4 (wingless) is a versatile favorite; 8, 8A, and 14/14A are alternatives
 .
.
- Additional Aids: Dental floss (waxed), Teflon tape, bite blocks, and water-based lubricants.
4. Clinical Techniques
Hole Placement
- Spacing: Holes should be approximately 1 cm apart. If they are too close, the dam will not cover the interproximal papilla, leading to leakage.
- Sizing: Use the largest hole for the tooth holding the clamp, medium for molars/premolars, and the smallest for incisors.

Application Methods
- Winged Clamp Method: The dam is stretched over the wings of the clamp outside the mouth, and both are placed simultaneously.
- Clamp First (Preferred): Place and test the clamp for stability first, then stretch the dam over the bow and the tooth.
- Dam First: Stretch the dam over the tooth (often with an assistant’s help), then place the clamp over the dam.
The Importance of Inversion
To achieve a true seal, the edges of the dam must be “inverted” into the gingival sulcus.
- Process: Use a probe or plastic instrument to tuck the dam edges apically while the assistant blows air to dry the tooth surface. This “locks” the dam in place and prevents fluid from seeping upward.
5. Specialized Scenarios
- Quadrant Isolation: Always isolate at least one tooth posterior and one tooth anterior to the working site. For maximum visibility, isolating the entire quadrant is recommended.
- Split Dam Technique: Used for bridges or connected crowns where flossing between teeth is impossible. The dam is cut between holes, and the gap is sealed with liquid dam (caulk) or bite registration material.

- Deep Margins: If decay is subgingival, use a wedge or a specialized retraction clamp (like the Brinker B4). In some cases, a gingivectomy (using a laser or ceramic bur) may be necessary before placement.

- Floss Ties: Used for additional retraction in the anterior region, especially for diastema closures or Class 4 restorations.
6. Tips for Success
- Anesthesia: Always anesthetize the palatal/lingual gingiva if using a clamp, as the pressure can be uncomfortable.
- Pre-Flossing: Check contacts before placing the dam. If a contact is sharp or tight, polish it first to prevent the dam from tearing.
- Suction: Use a high-volume suction tip near the clamp. For solo practitioners, a modified saliva ejector can be tucked under the dam.

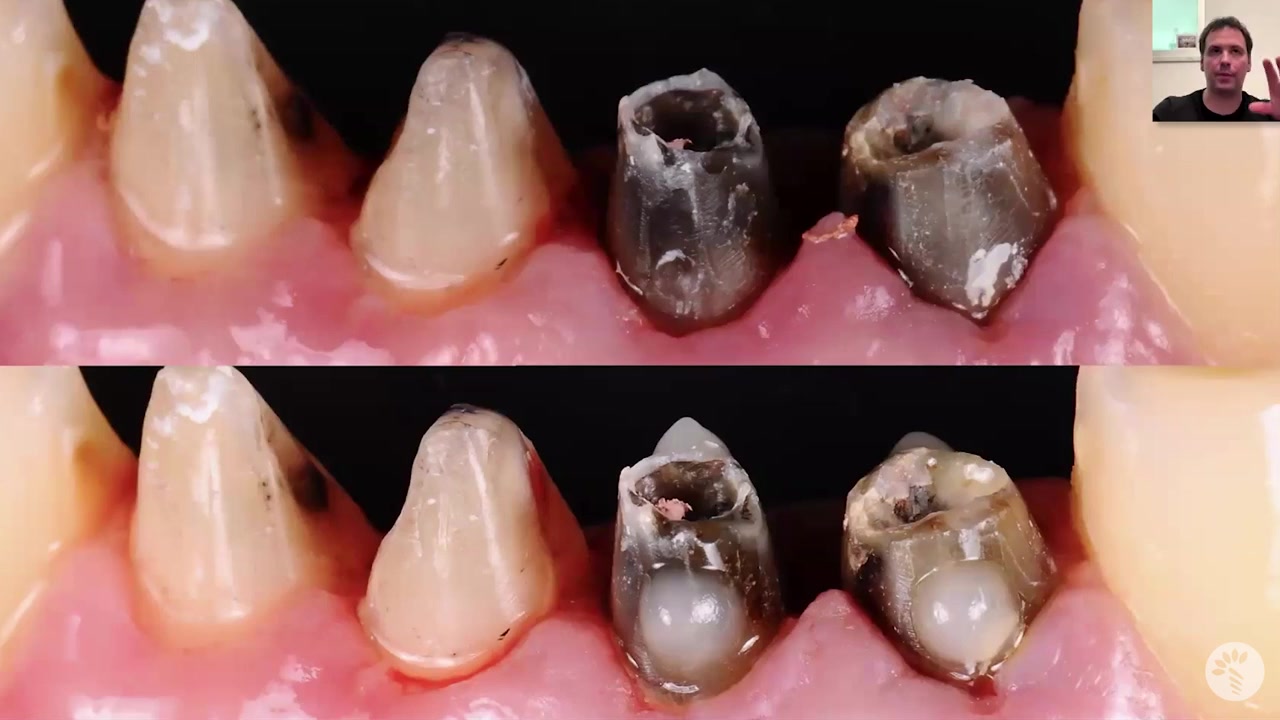
- Flowable Composite: If a clamp won’t stay on a tapered crown prep, bond a small “button” of flowable composite to the buccal/lingual surface to act as a mechanical stop for the clamp.
Conclusion
Mastering the rubber dam is a journey of skill development. By starting with simple cases and using high-quality, opaque materials, clinicians can significantly improve the predictability of their restorative and endodontic outcomes.