04 - DENT5311 Contemporary Fixed Appliances
Front matter1
Contemporary Fixed Appliances
Dr Daniel Fernandes - Orthodontics
CONTEMPORARY ORTHODONTICS, Proffit, 6th Edition
Proffit, CO Chapter 15, 16 and 19
The lecture covers three main subjects:
- Contemporary fixed appliances
- Retention
- Patients with special needs and how to deal with these conditions in orthodontic treatment
THE UNIVERSITY OF WESTERN AUSTRALIA FACULTY OF Medicine and Dentistry

Historical Development of Fixed Appliances23456
Development of Contemporary Fixed Appliances
- Angle’s Progression to the Edgewise Appliance
- Other Early Appliance Systems
- Begg Appliance
- Contemporary Edgewise: The Modern Appliance
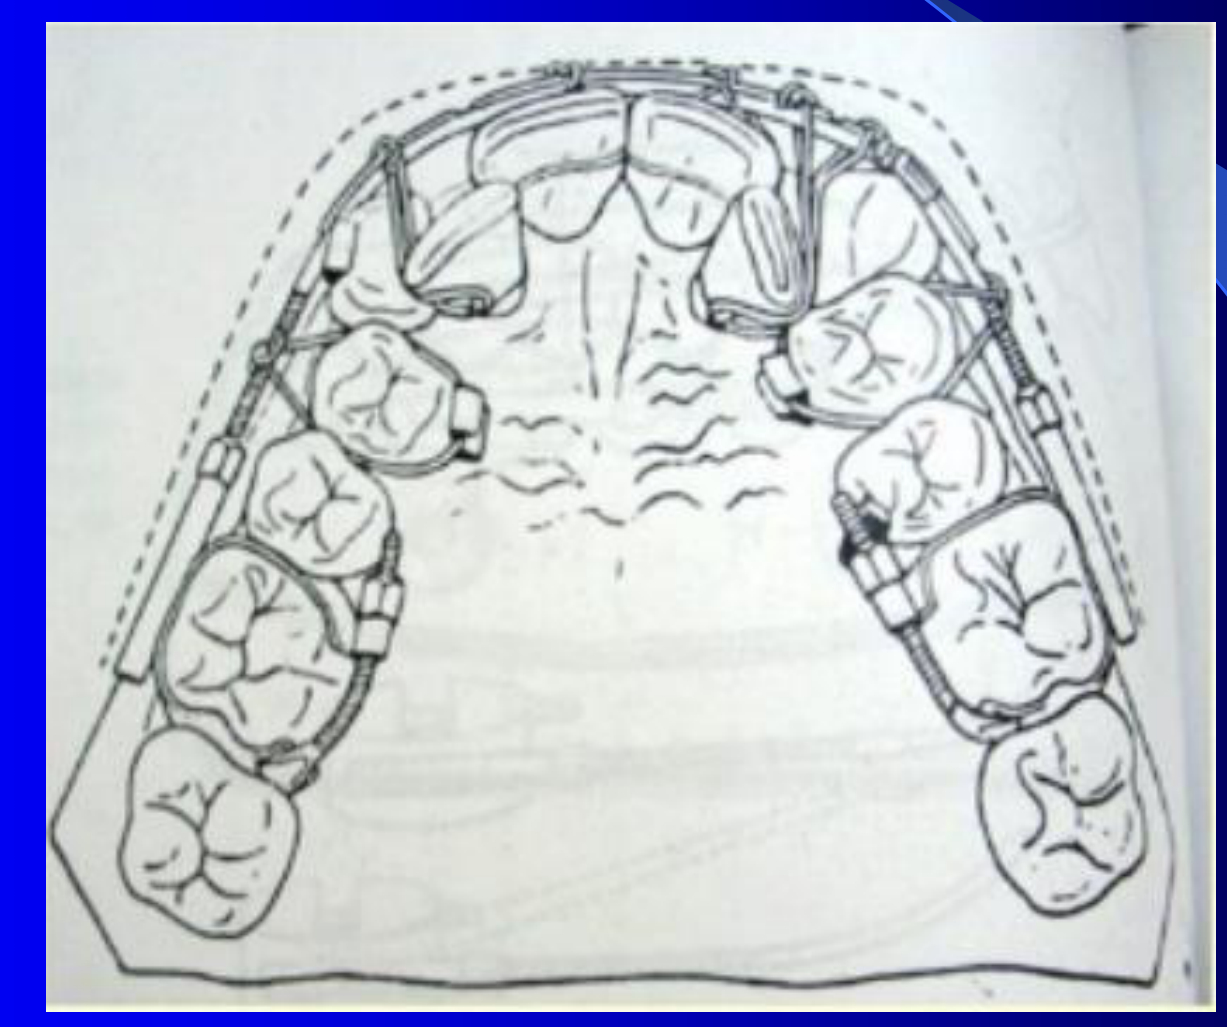
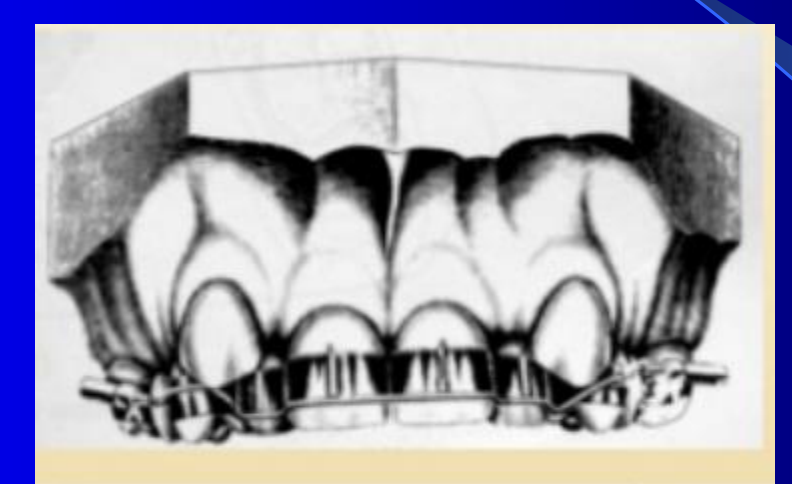
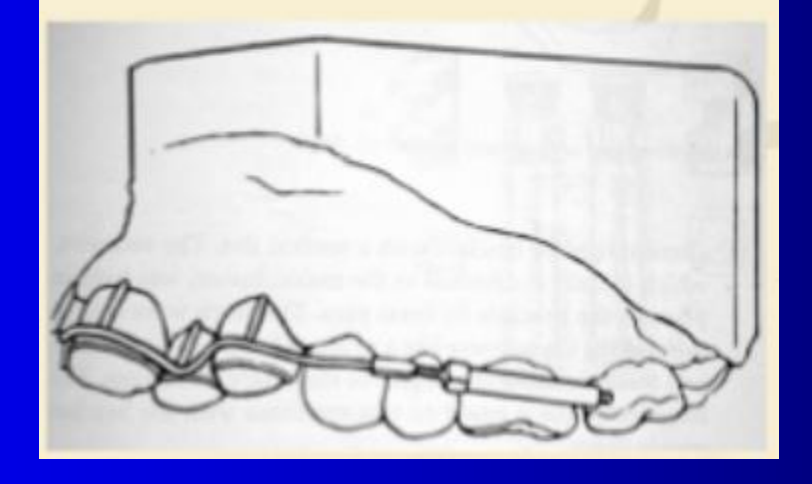
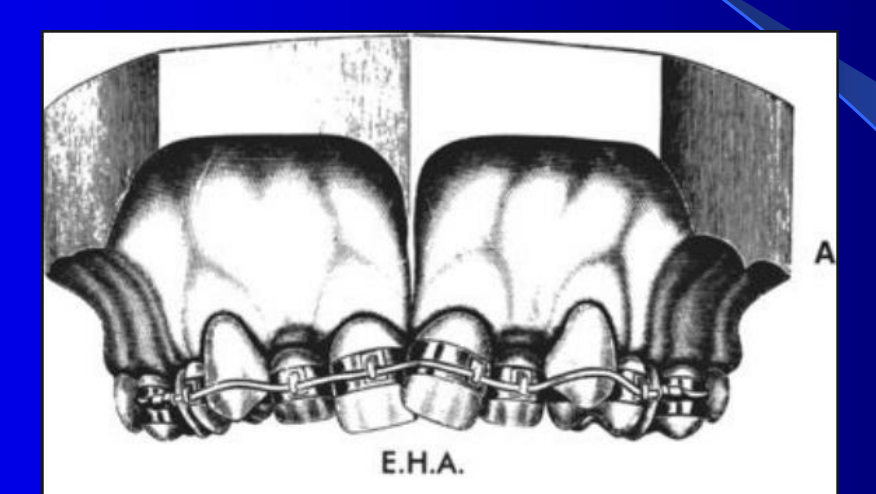
Angle’s Progression to the Edgewise Appliance
- The E-Arch
- Pin and Tube
- Ribbon Arch
- Edgewise
E-Arch 1900
Pin and Tube 1910
Ribbon Arch 1915
E.H.A.
A B
Edgewise 1925
 |  |  |
 |  |
Brief Encyclopedia7891011121314
The Edgewise 1925 system was a landmark development in orthodontia, created by Edward H. Angle. It was a major shift from the previous “Jewelry” or straight-wire systems, as it utilized a braced denture design with ligatures and a unique placement of brackets on the buccal side of the teeth. This system is still used today.
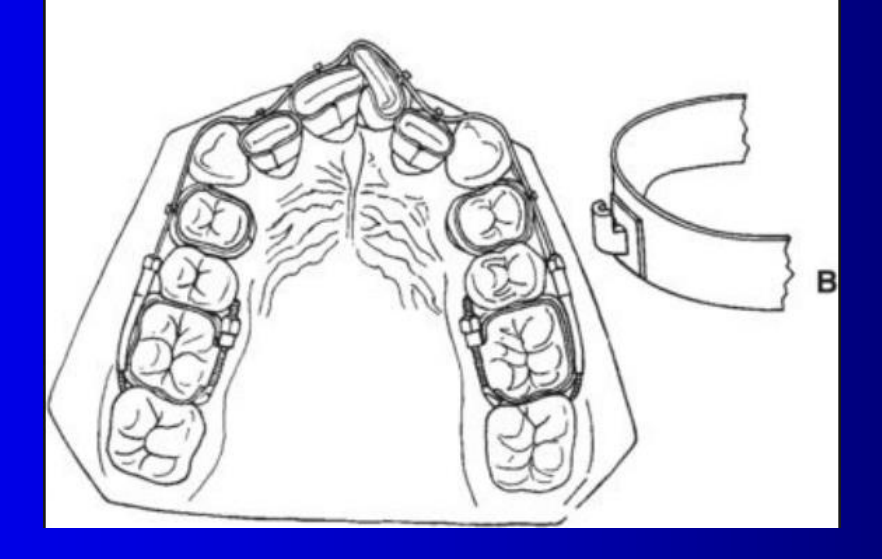
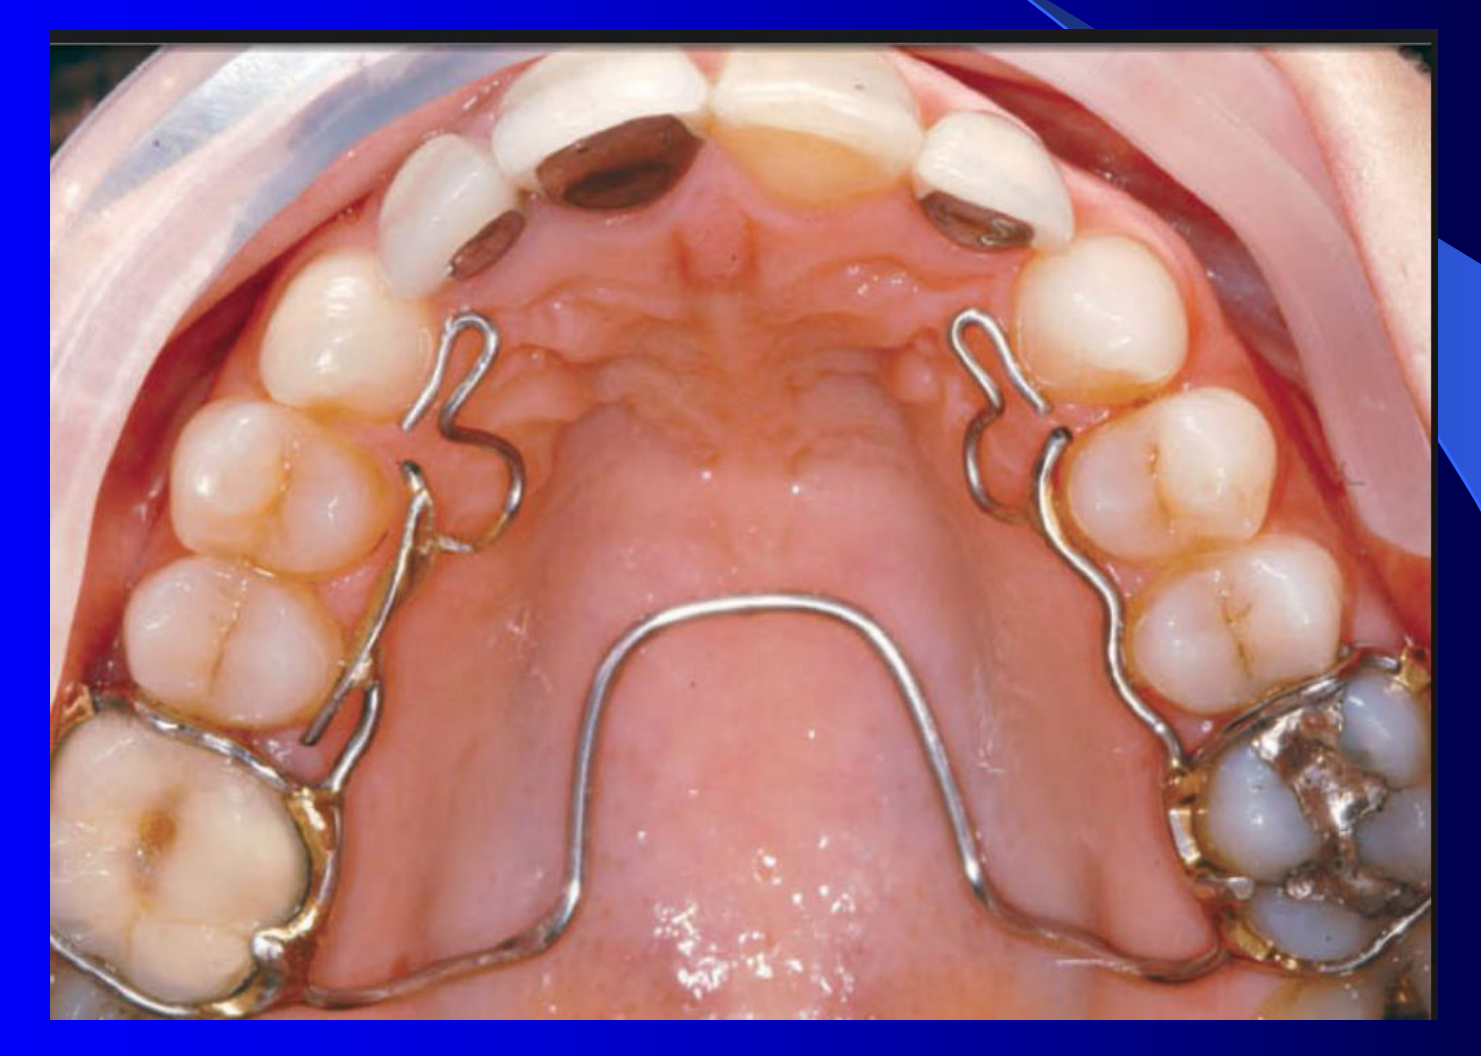
Crozat 1920
Twin Wire 1930
A B
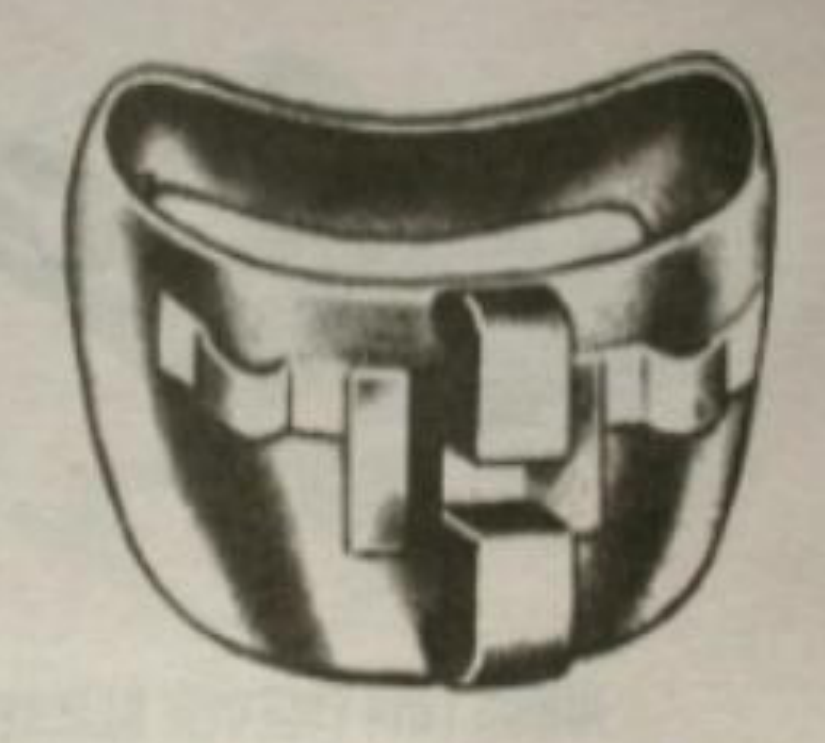
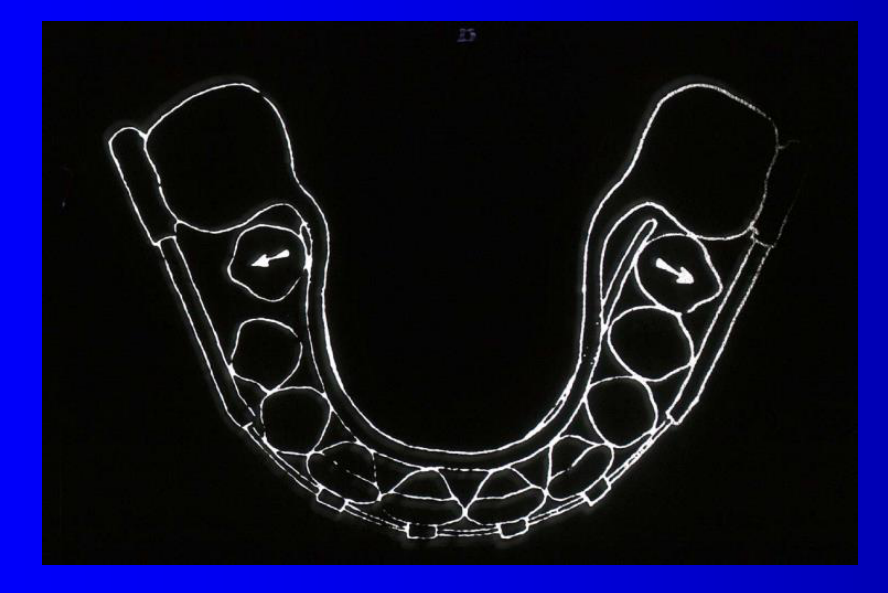
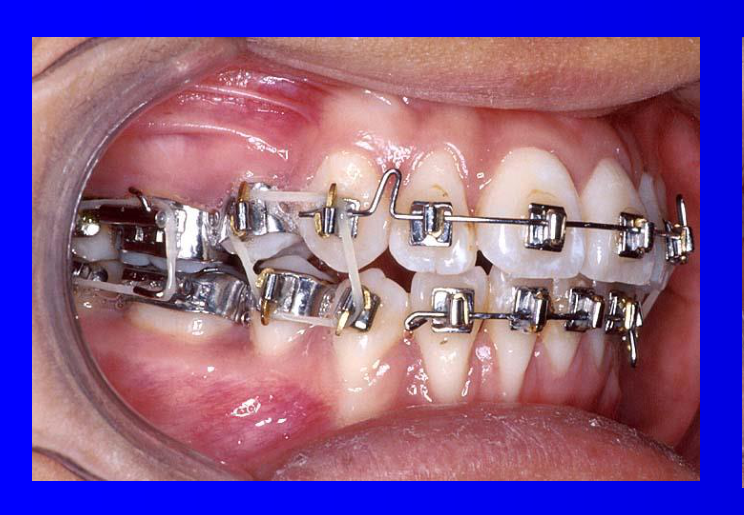
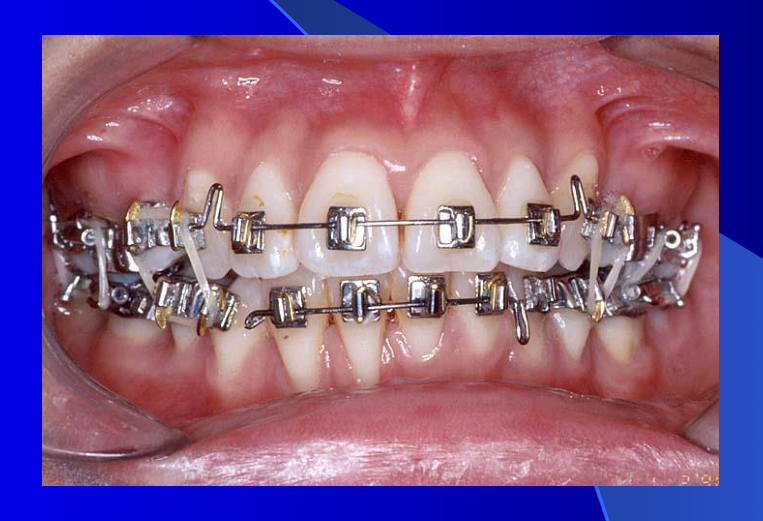
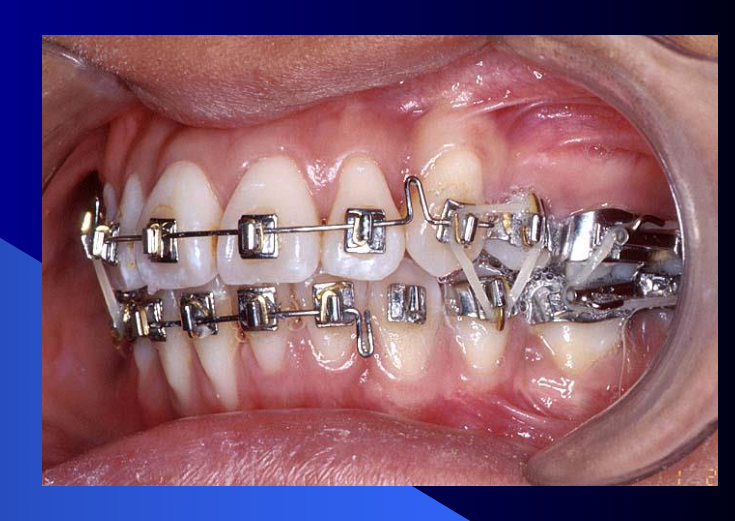
Begg Appliance
Begg Appliance:
- Point contact only
- Round wire exclusively
- Multiple individual tooth auxiliaries
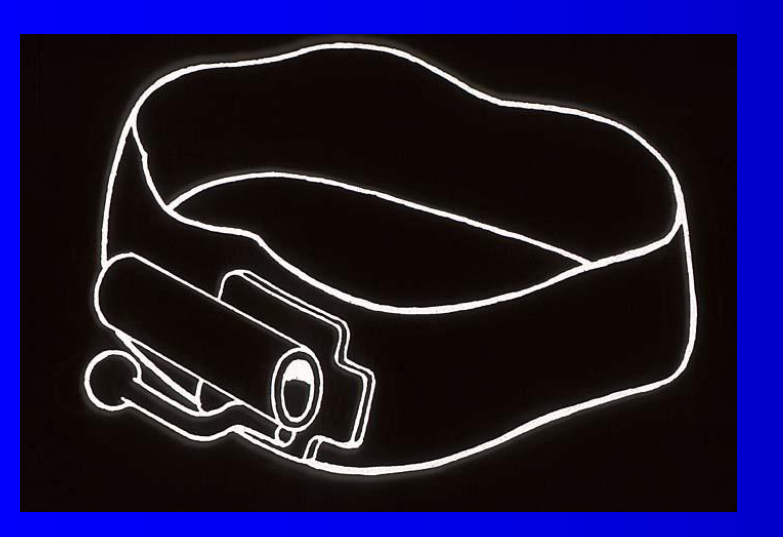
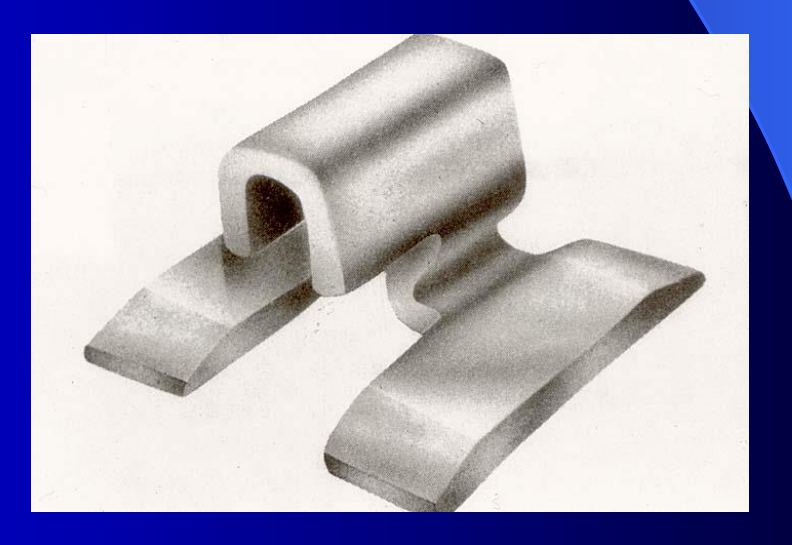
Begg Appliance
- Molar Tube (round or oval)
- Bracket (pin and tube)
 |  |  |
 |  |  |
 |  |  |
Orthodontics Market Overview
- 3M Unitek
- Dentsply Sirona
- TOMY INTERNATIONAL INC.
- RMO® (Rocky Mountain Orthodontics) – Synergistic Solutions for Progressive Orthodontics
- AO American Orthodontics®
Orthodontics Market15
 |  |  |
 |  |  |
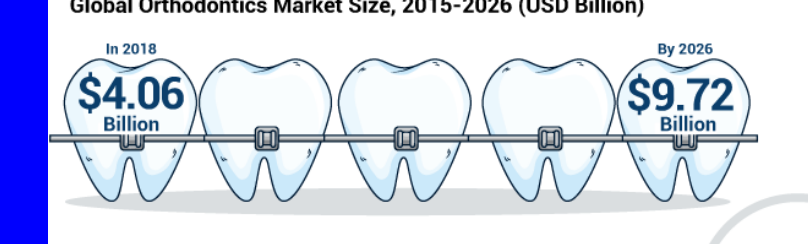
Global Orthodontics Market Size, 2015-2026 (USD Billion)
- In 2018: $4.06 Billion
- By 2026: $9.72 Billion
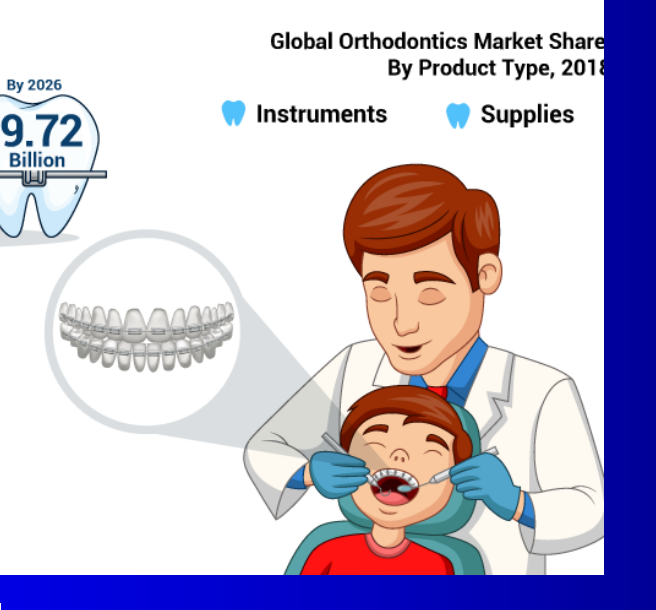
Global Orthodontics Market Share By Product Type, 2018
- Instruments
- Supplies
North America Orthodontics Market Size, 2018
-
USD 1.84 Billion
-
HENRY SCHEIN® ORTHODONTICS
-
Ormco™
-
OSE Orthodontic Supply & Equipment Co., Inc.
-
TP Orthodontics, Inc.®
-
There is a competition among companies: who has the best material, who is developing new technology.
-
Products span arch wires, elastic bands, and bonding systems.
-
A current trend is antimicrobial performance of dental materials to fight white spot lesions.
-
In the US, orthodontists are being held legally responsible for white spot lesions — a significant problem in practice.
Contemporary Fixed Appliance Components
Major Elements of Contemporary Fixed Appliances1617
-
Bands / Bonded Brackets (Attachments)
-
Archwire (in main bracket slot)
-
Auxiliary Elements (lingual arch and labial auxiliary elements, etc.)
-
Horizontal Rectangular Slot
-
Round, Square or Rectangular Wire
-
Major improvements in bonding systems, etching, primers, and moisture-controlled primer systems.
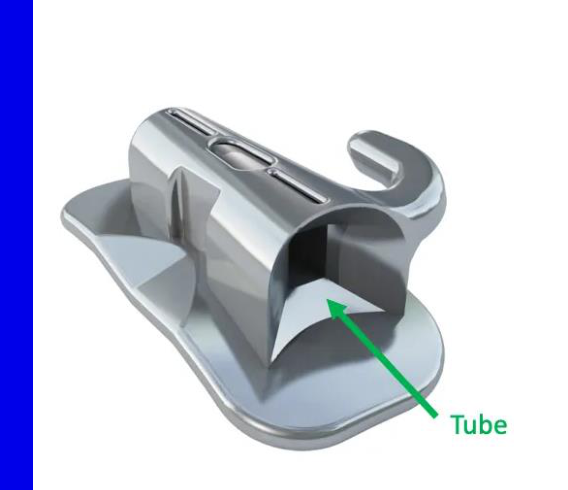
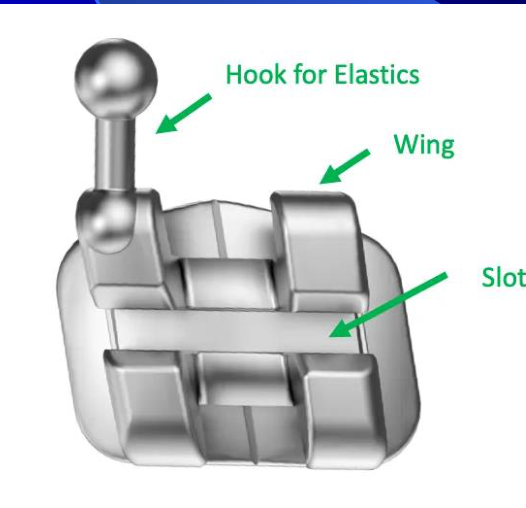
Components: Brackets18
- Typically for anterior teeth and bicuspids
- Wings - twin or single
- All have horizontal slot
- Many variations in materials and size of the attachment depending upon the manufacturer
- Allows use of round and rectangular wires; square wires are not so commonly used.
- Treatment always starts with round wires of reduced diameter.
- Incorporate as much wire length as possible to reduce stiffness and increase resilience.
- Traditionally, elastomeric rings are used to keep the wire constrained inside the slot.
 |  |
 |
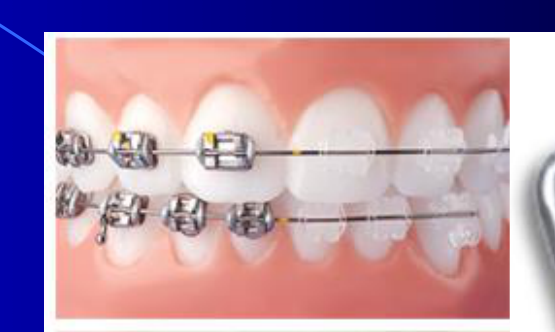
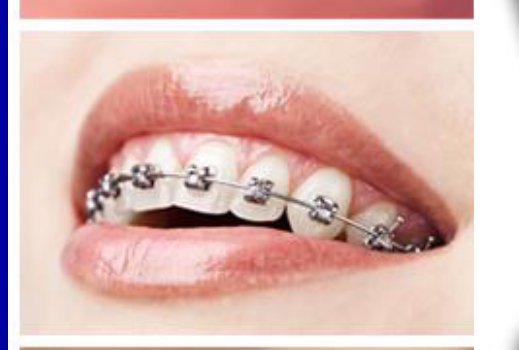
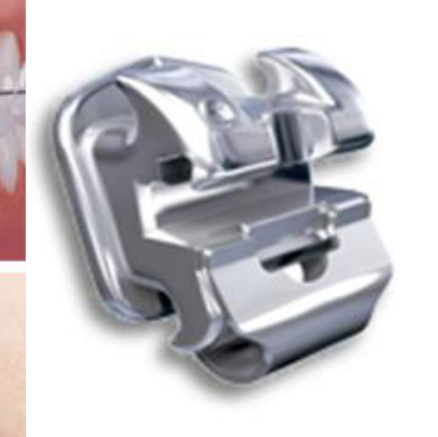
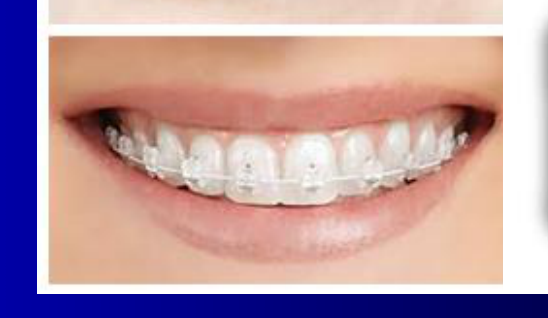
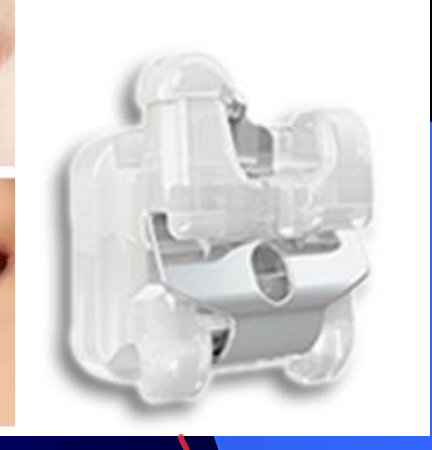
Brackets19
- Metal (Stainless Steel)
- Clear or Tooth Colored (Ceramic or Plastic)
- Higher friction with ceramic braces
- Lingual (Stainless Steel or Gold)
- Self-Ligating (Stainless Steel and combination of Ceramic and Stainless Steel)
- Become yellow in 2 weeks
 |  |  |
 |  |
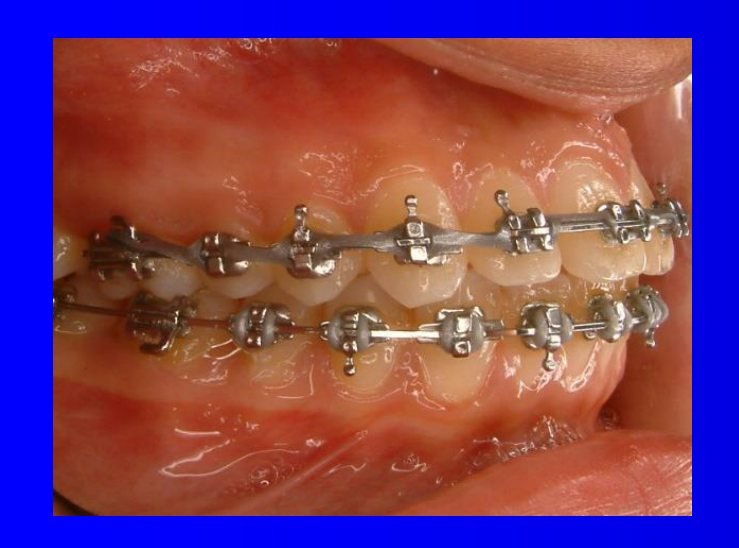
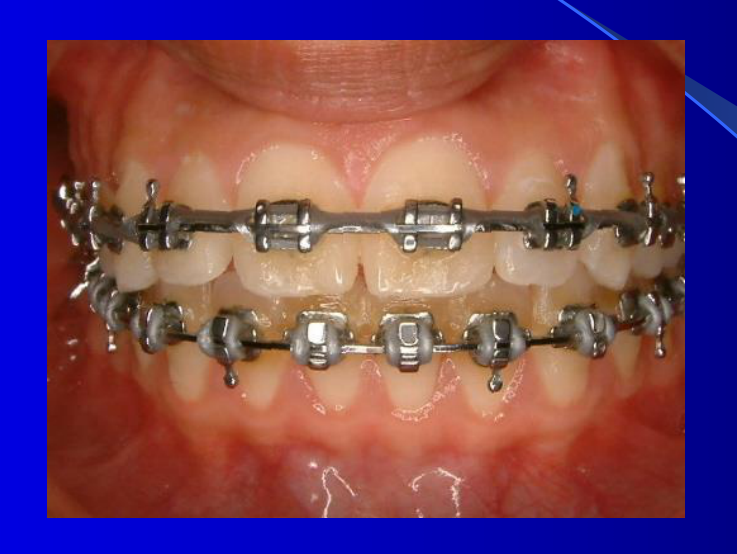
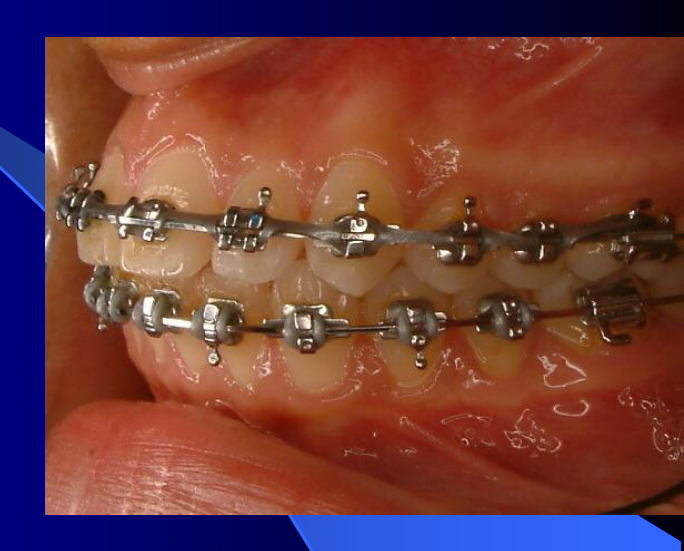
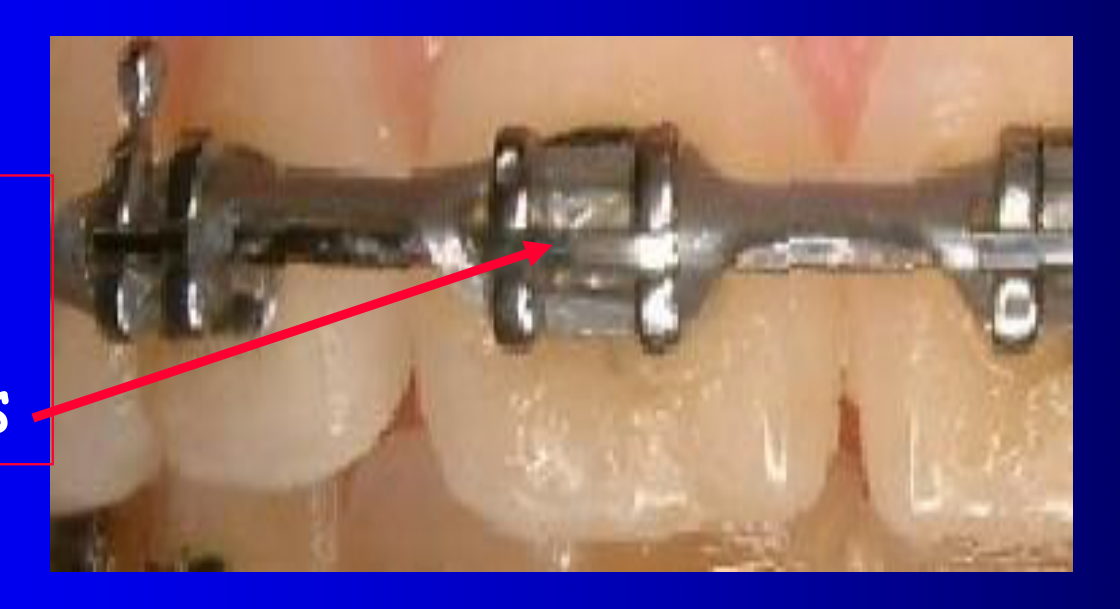
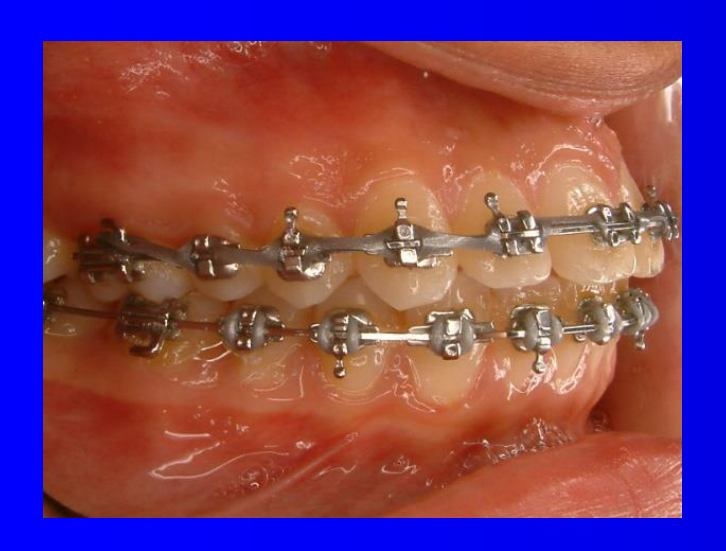
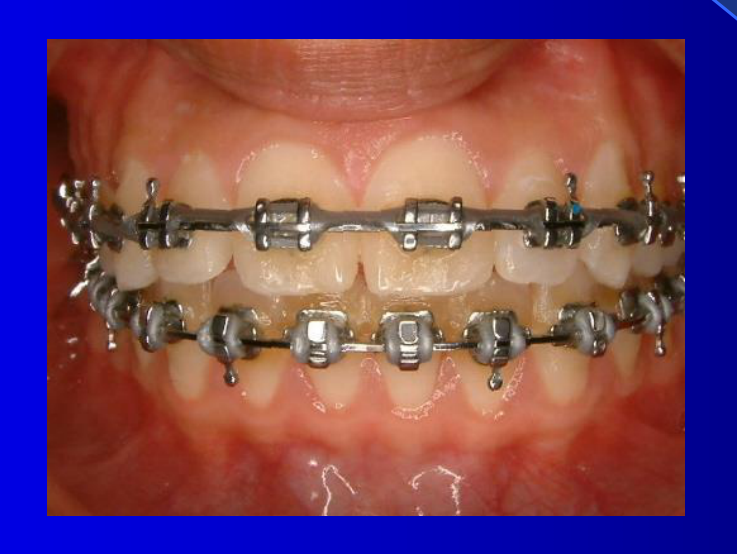
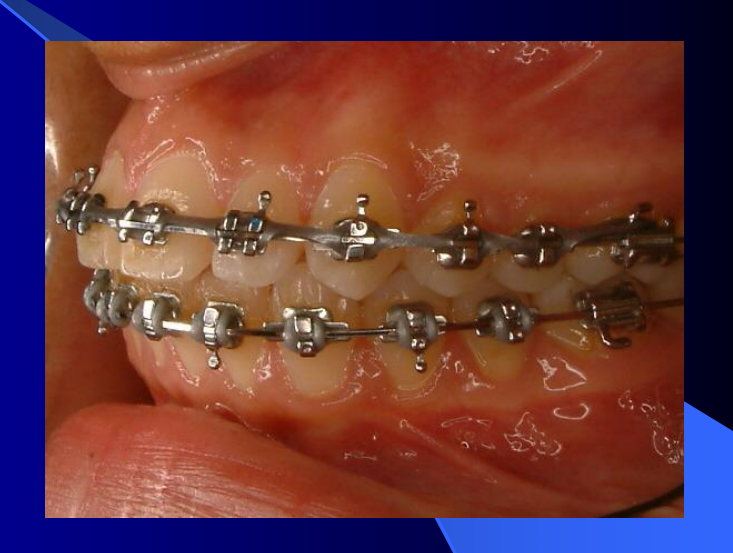
Metal Brackets – Twin Wing20
On upper central and lateral incisors
- Twin system: double wings on the anterior teeth. Provides two points of contact with the wire → more control. However, reduces the inter-bracket distance → higher force levels. Every system has pros and cons.
 |  |
 |  |
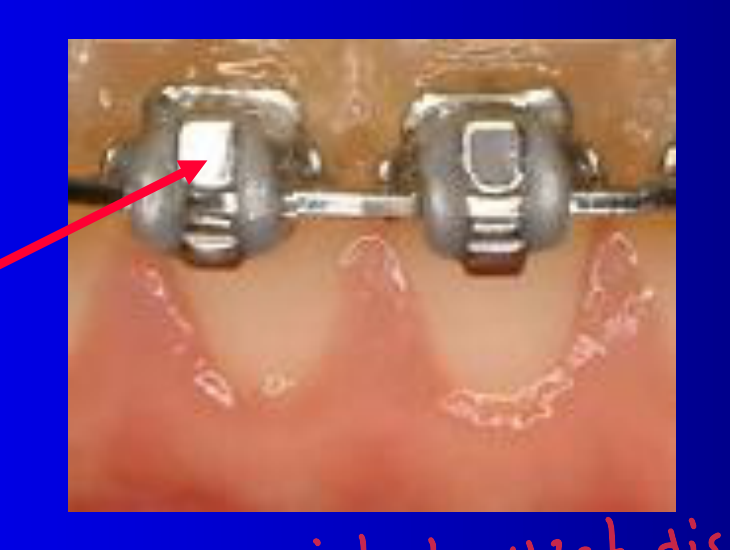
Metal Brackets – Single Wing21
On canines, bicuspids and lower incisors
- Single system = more narrow → more inter-bracket distance = less force, less control
- Single bracket: just one slot. The bracket becomes narrower. More inter-bracket distance → more wire → increased resilience and decreased stiffness → lower force levels. However, less control compared to twin systems.
 |  |
 |  |
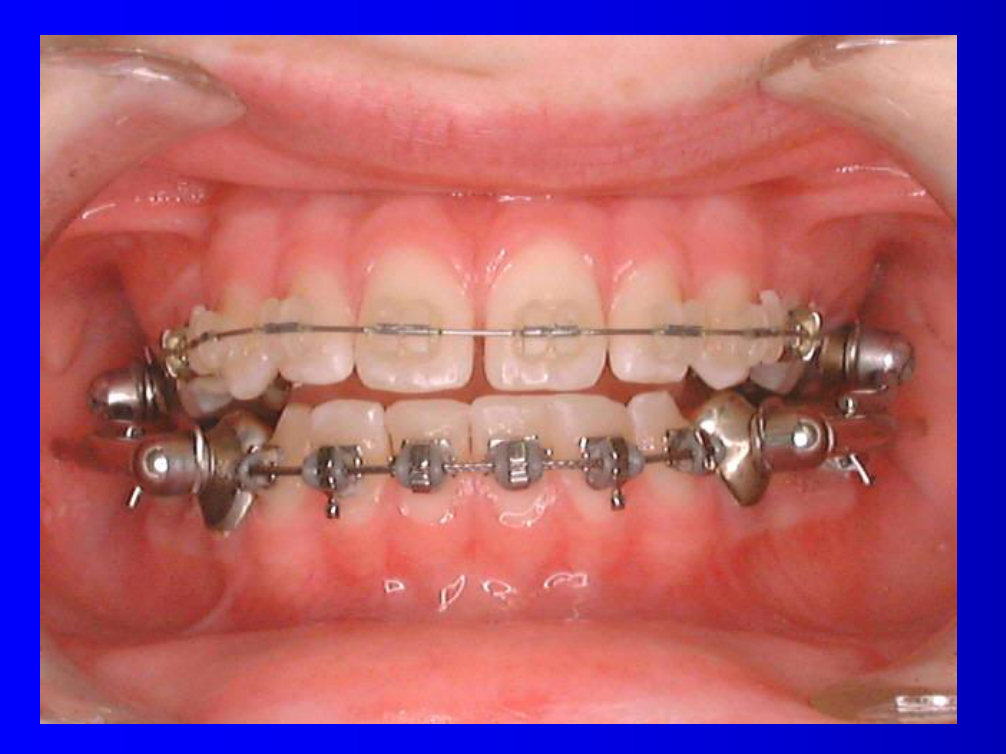
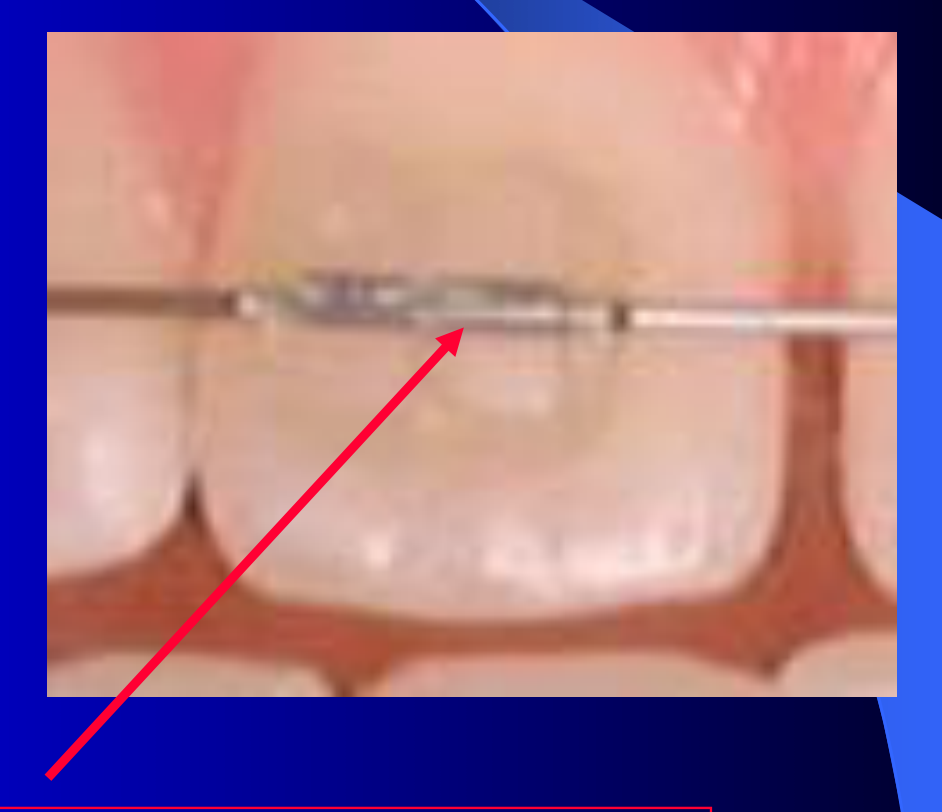
Ceramic Brackets22
In this case on the upper anterior teeth
- Single crystal brackets are very clear, like glass — very nice aesthetic result.
- Problems: Very brittle — difficulties during debonding. Higher friction between wire and slot. Companies try to keep the inner part of the slot metallic to reduce friction. For ceramic brackets, it is better to consider non-self-ligating options. Clear elastomeric rings stain and become yellowish in two weeks — patients need more regular visits.
 |  |
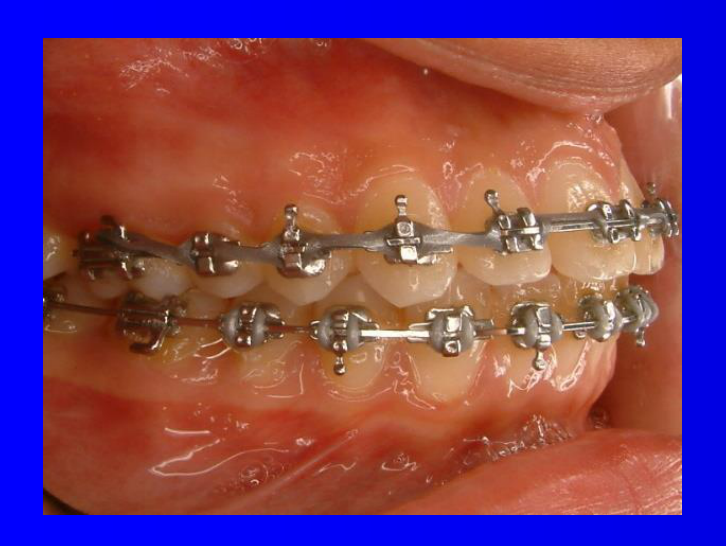
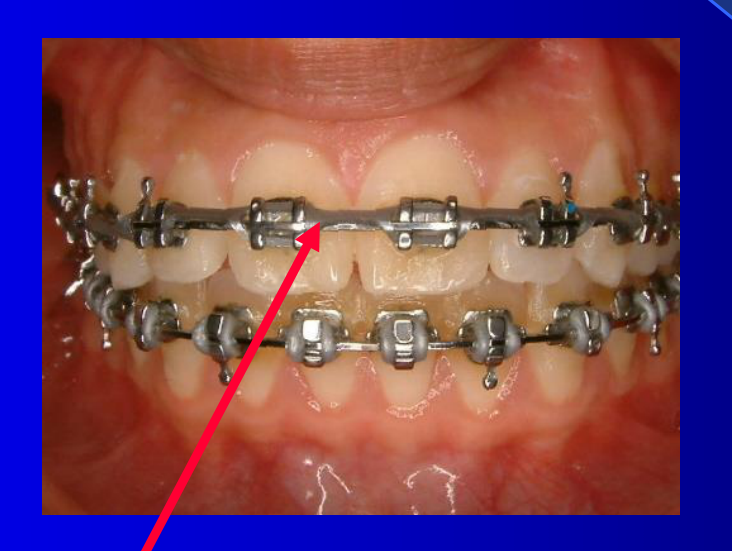
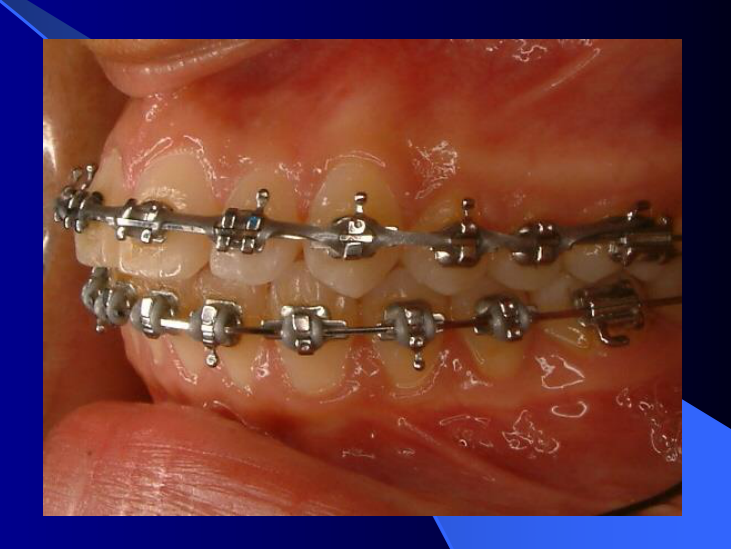
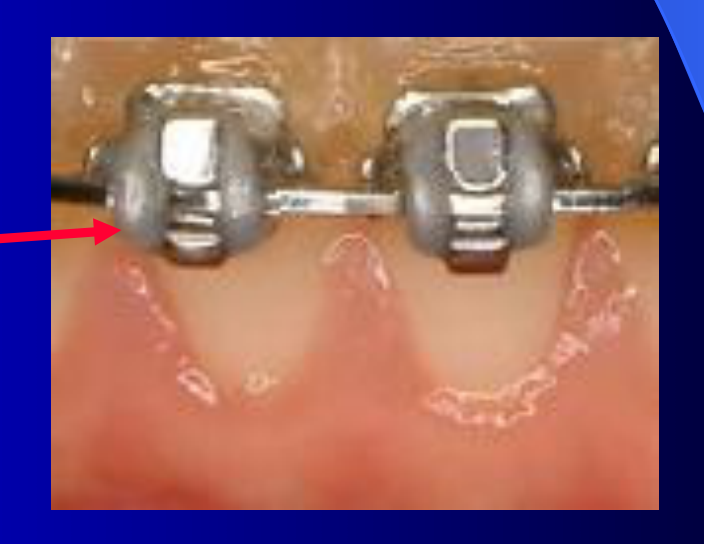
Change Alastics or Alastic Chain23
- Elastomeric rings come in different colors.
- Power chains (e.g., red) are used to achieve movement — for example, retraction of canines or improving anchorage.
- Elastomeric materials degrade in the oral environment (moisture, temperature, pH), becoming aged and losing elastomeric performance — the wire becomes loose.
- Biofilm buildup occurs on polymeric materials — a problem if patients are not seen within four weeks.
You should ensure you do this at least once or twice for a patient
This page is a single figure consisting of images of dental braces.
 |  |
 |  |
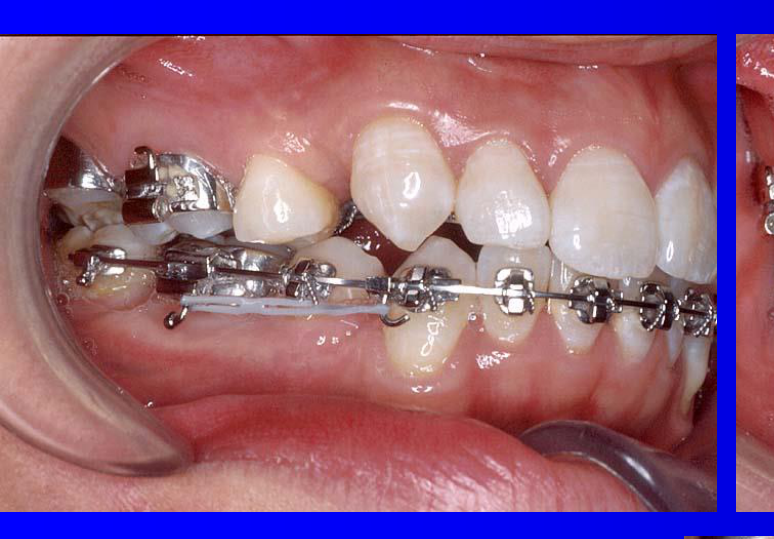
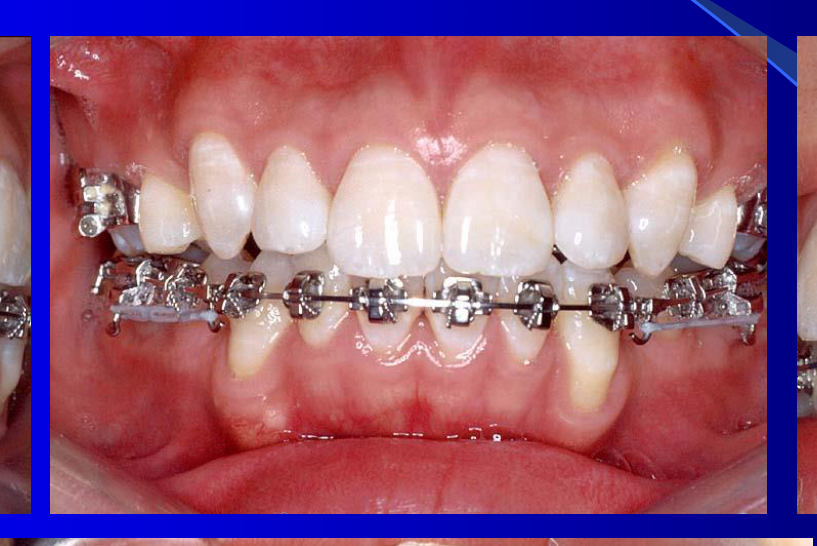
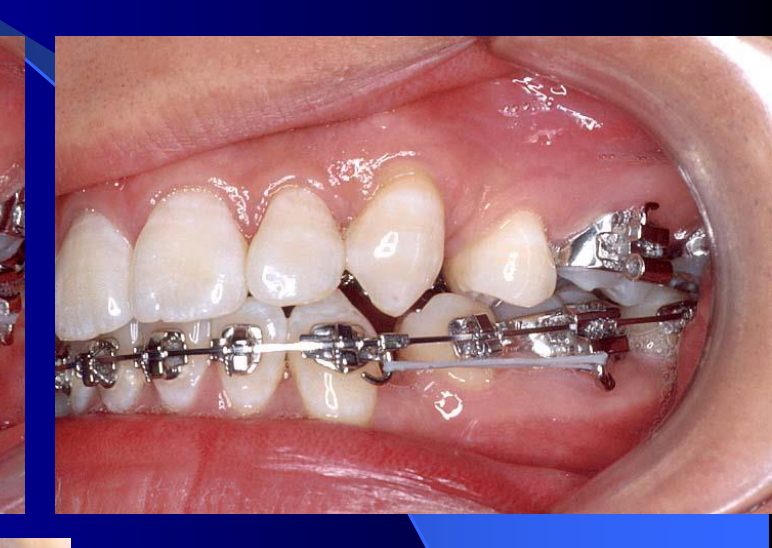
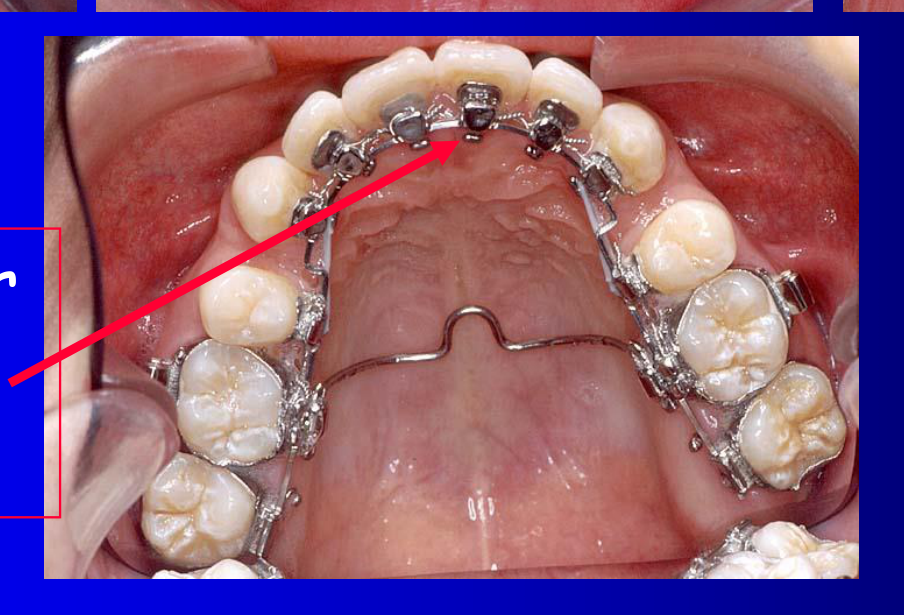
Lingual Brackets24
- The best aesthetic system available from brackets.
- Can bring problems with tongue adaptation.
- Can achieve the same results as other systems — depends on the clinician’s experience with the system.
 |  |
 |  |
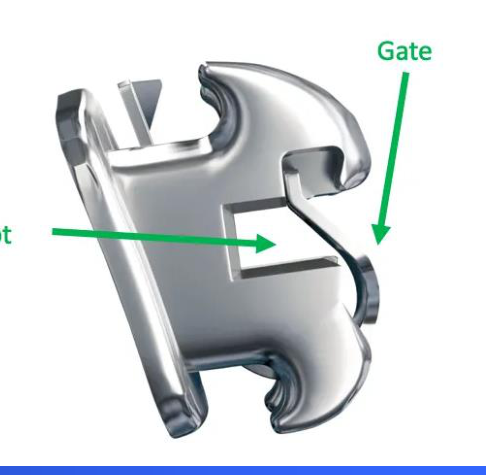
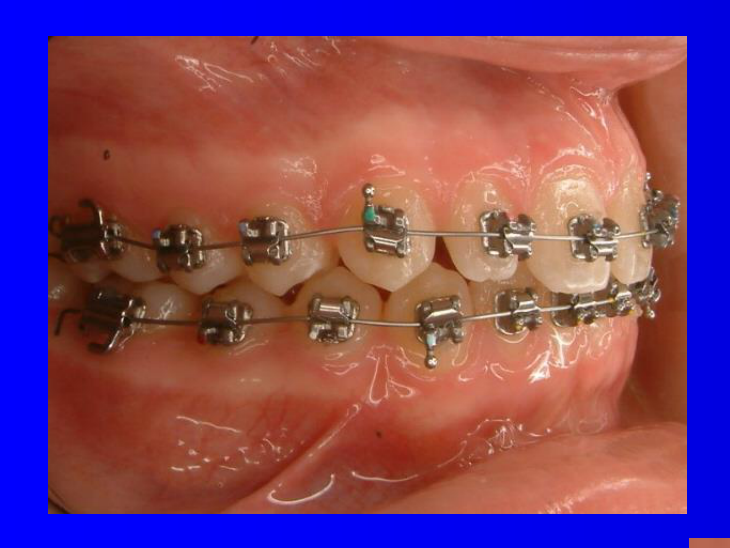
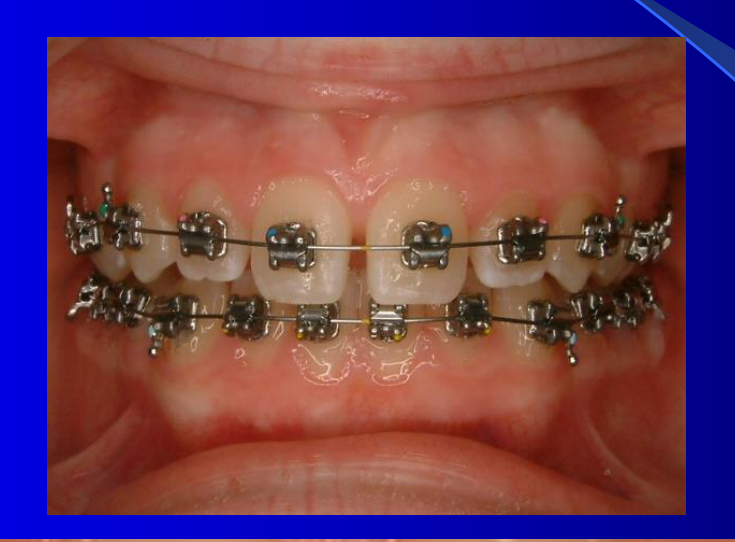
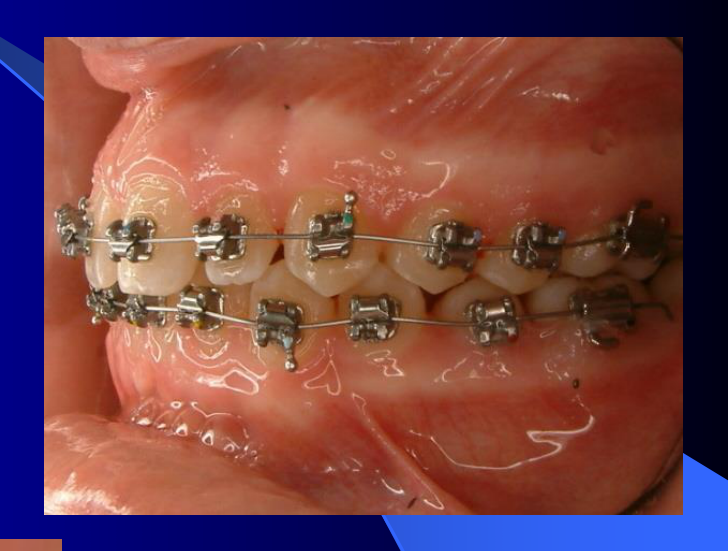
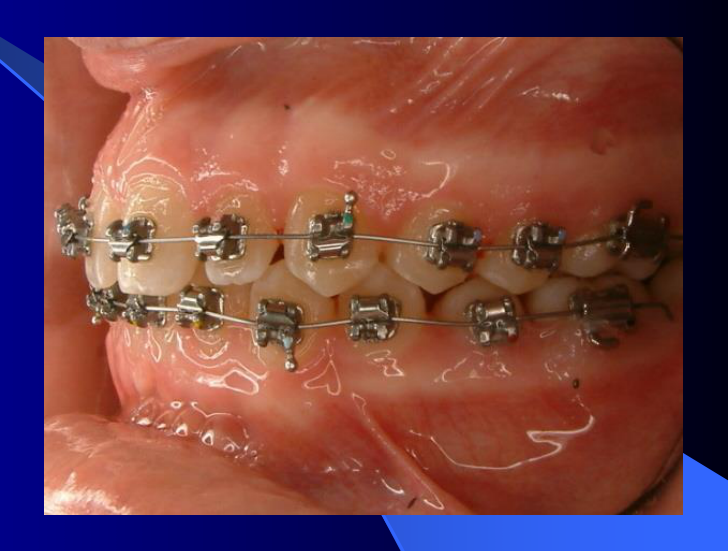
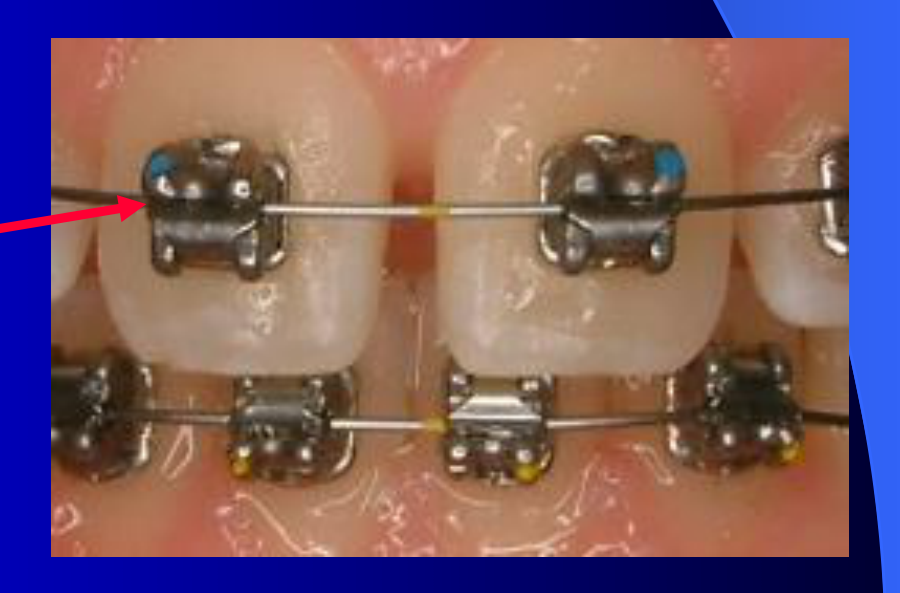
Self Ligating - Brackets25
- Same bracket design but with a lid or gate. Open with a probe, connect the wire, close the lid.
- Advantages: No elastomeric material → no degradation. More stable system. Saves clinical time.
- Disadvantages: The gate can be blocked by calculus depending on saliva composition. After 6–7 weeks without opening/closing, the gate can get stuck and the bracket must be replaced. Emphasizes the importance of oral hygiene — if the gate gets stuck, there are likely white spot lesion issues.
- The lecturer uses this system and finds it very easy to open and close.
 |  |
 | 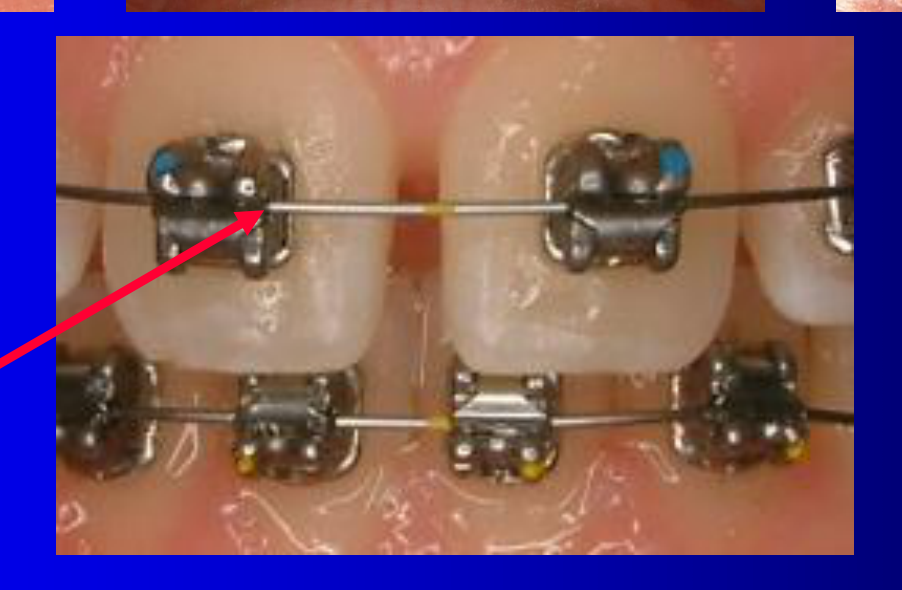 |
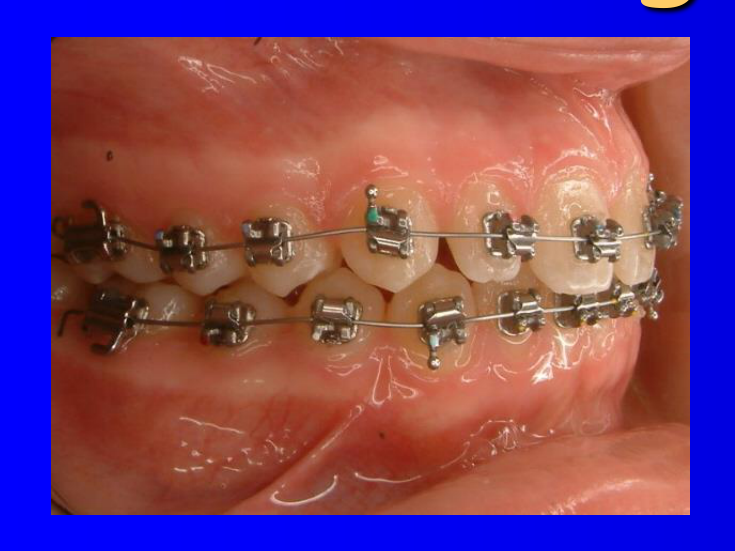
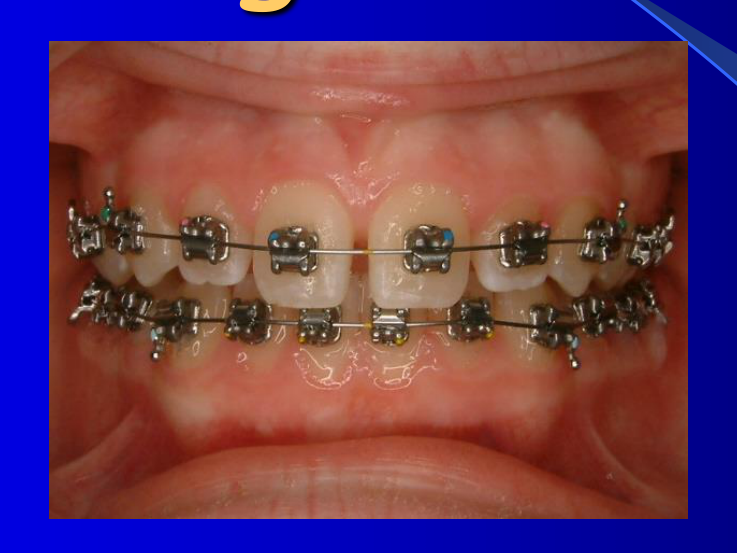
Opening and Closing of Self Ligating Brackets26
Start here
- The gate keeps the wire inside the slot system.
- No O-rings or elastomeric rings are needed.
- If the gate becomes blocked by calculus, the bracket may need replacement.
You should ensure you do this at least once or twice for a patient
 |  |
 |  |
Bands and Band Fitting Procedures
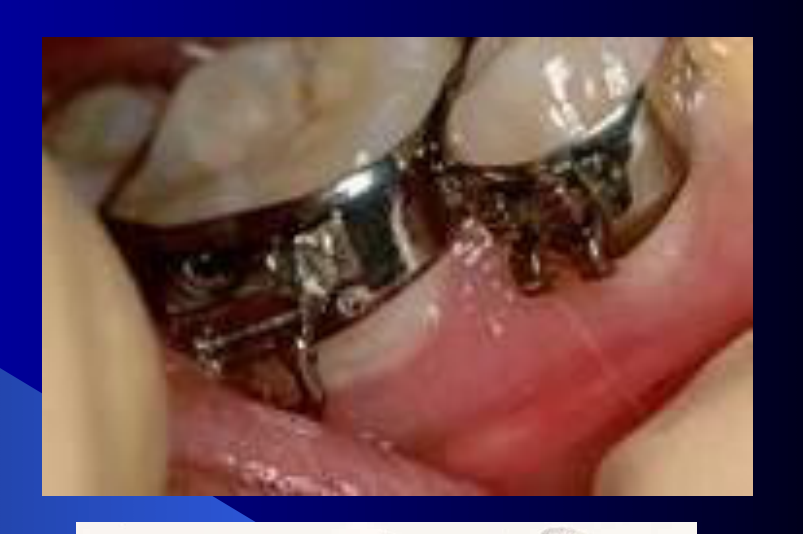
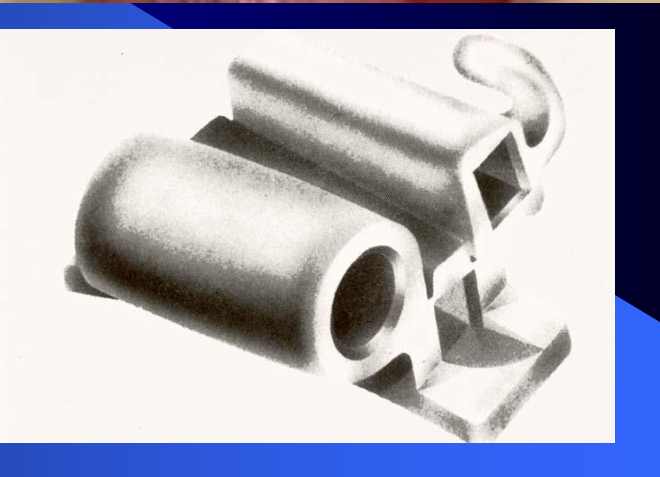
Components - Bands27
- Typically for molars and occasionally premolars
- Horizontal tube (slot)
- Heavy stress application
- Lingual attachments
- Auxiliary and headgear tubes
- As much as possible, clinicians try to bond brackets or tubes on the sixes and fours. Sometimes bands are still needed: Maxillary expansion requires a lot of retention from bands. Bands may be needed for the sixes and even the fours.
 |  |
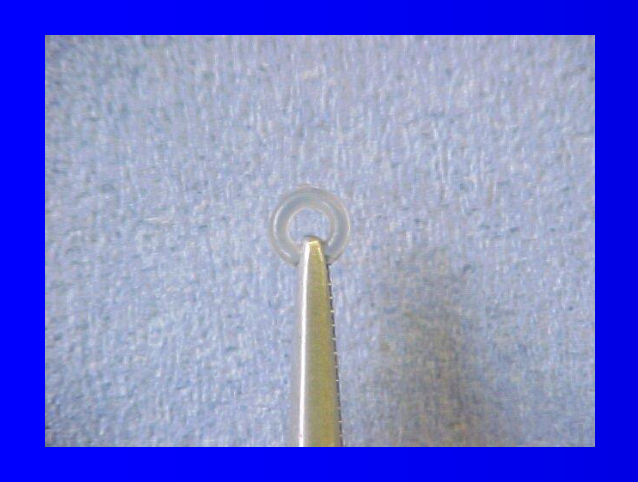
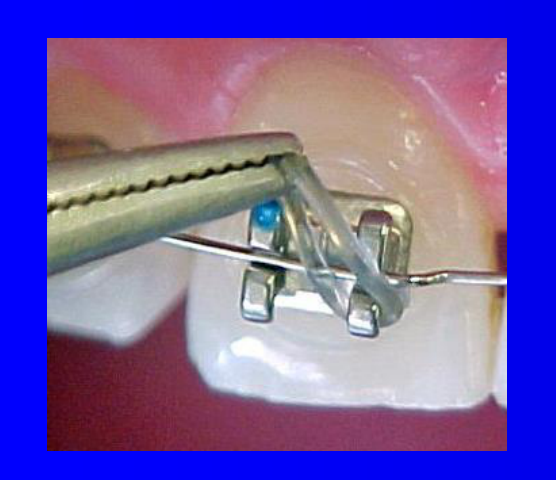
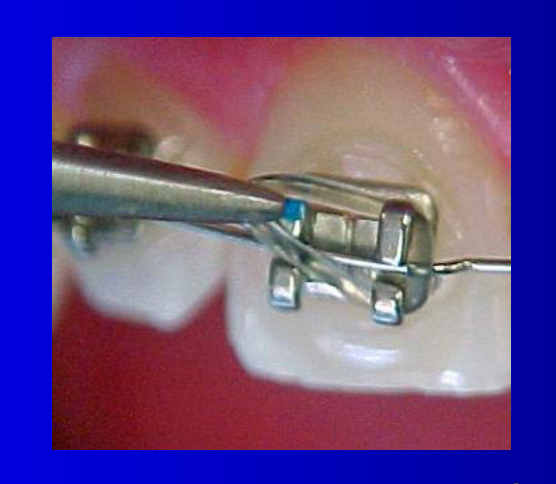
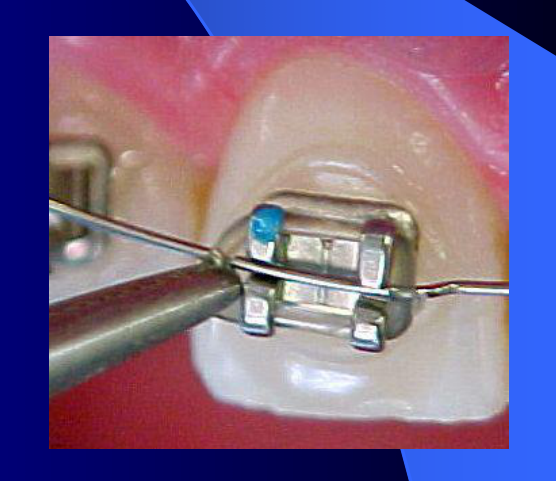
Changing Alastic Modules28
Using the Mathieu or mosquito forceps, grip and remove an Alastic module from its “tree”.
Hook the module onto one wing of the bracket, then over the remaining wings to hold the archwire in place.
- Rings are used with twin brackets to keep the wire tied.
- Different ways to tie the wire:
- Follow the wings of the brackets.
- Tie in cross.
- Different methods keep the wire very tight until the end of the slot.
 |  |
 |  |
Band Fitting29
Proffit, CO Chapter 12
- Separators are used first to create space between contact points.
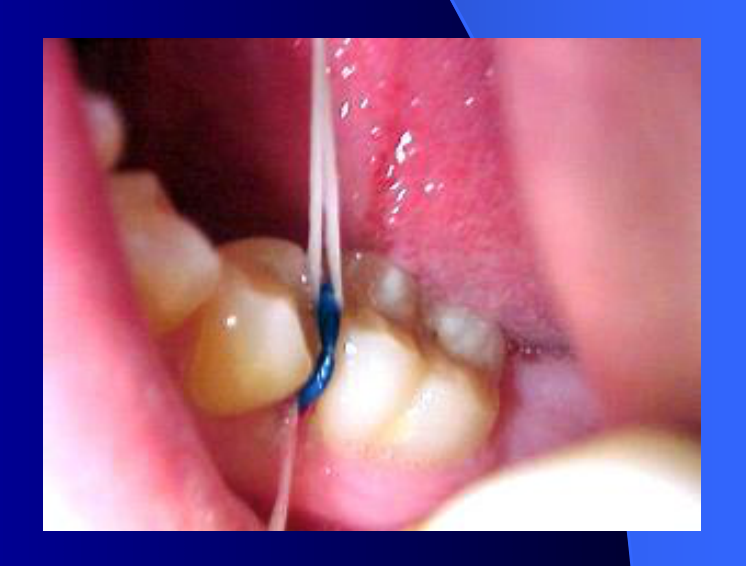
- Separators can be placed using a plier or with two pieces of dental floss:
- Stretch the separator (a rubber ring), keep the ring between the tooth, then remove the floss.
- Patients/parents/carers are shown how to do this with dental floss.
- Patients leave with a kit; if a separator is missed, the parent can replace it.
- Patients must come to the next appointment with separators in place — if they miss 2–3 days, the space closes and the appointment must be rebooked.
Placing Separators30
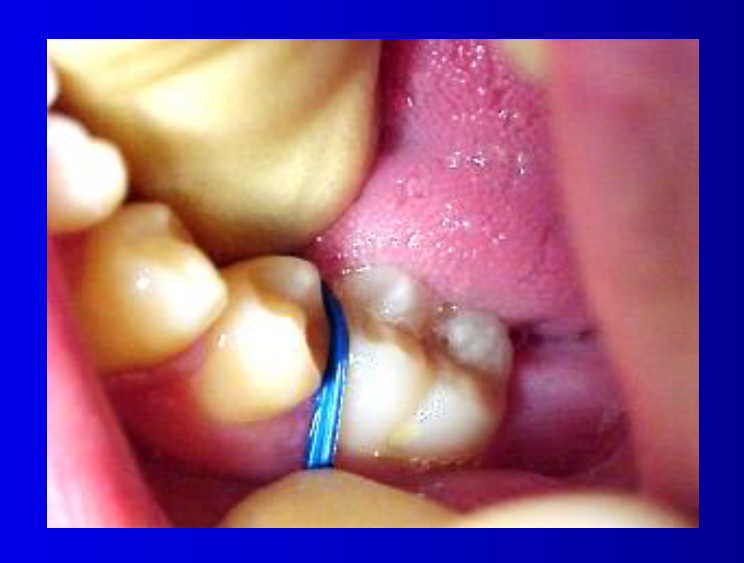
Separators are placed 7-10 days before band placement (often on the same visit as bond-up) to separate the molar teeth slightly. This facilitates band placement. Usually elastomeric separators are used, but either brass wire or Kesling separator can be used (see orthodontic staff for more information on these alternatives).
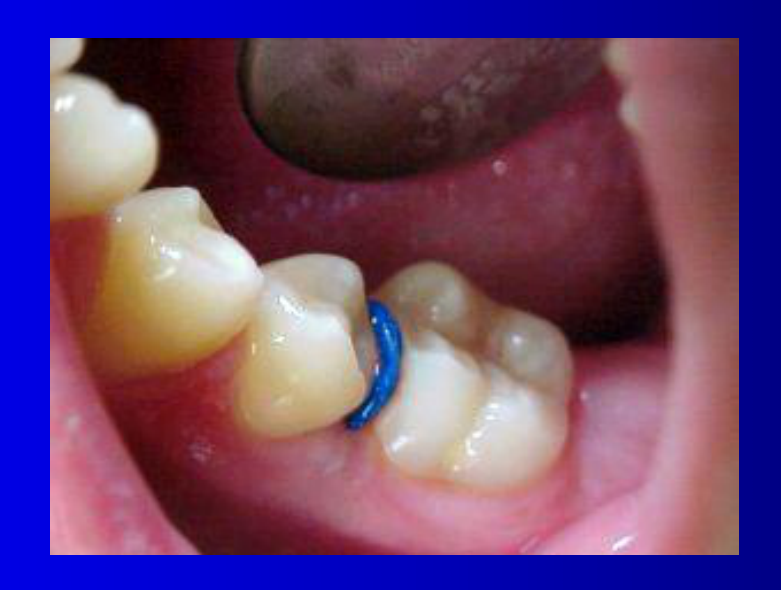
Separators313233
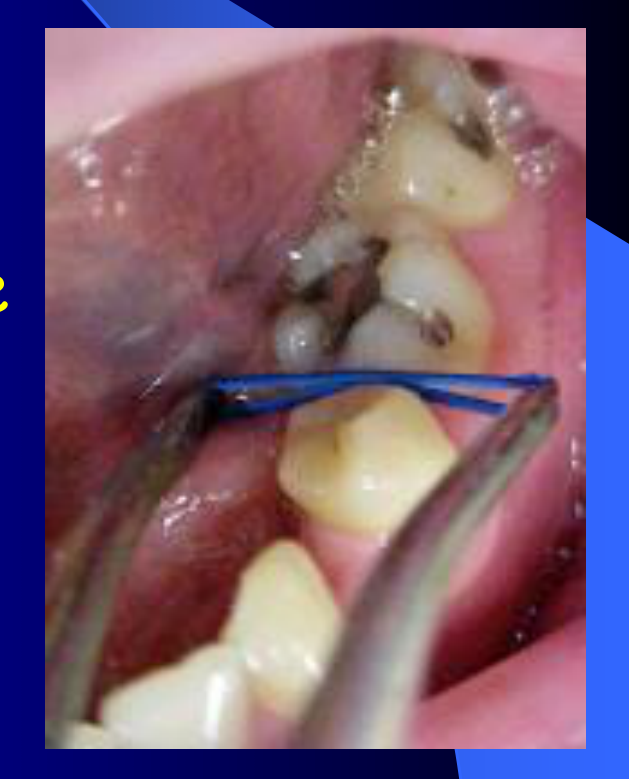
Separator pliers or Dental Floss Separator
Procedure (2 Methods)
Separator pliers
Separators are placed over the end of the separator pliers and squeezed between the teeth. EXTREME CARE is needed in order that the pliers do not slip and cause injury.
Separator pliers or Dental Floss Separator
Procedure (2 Methods)
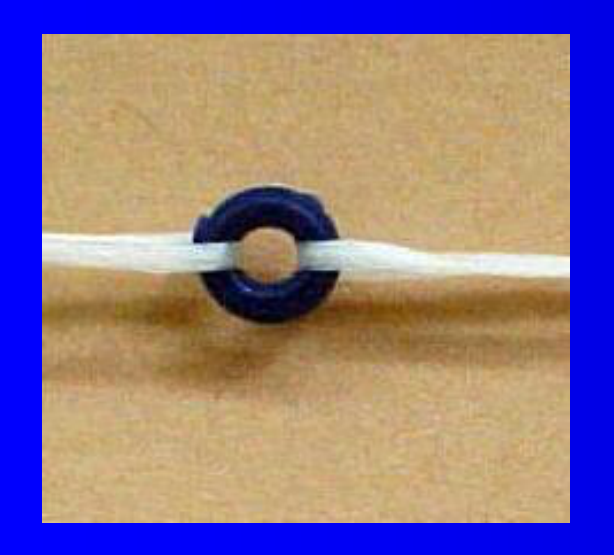
Floss
Two lengths of Dental Floss are threaded through the separator.
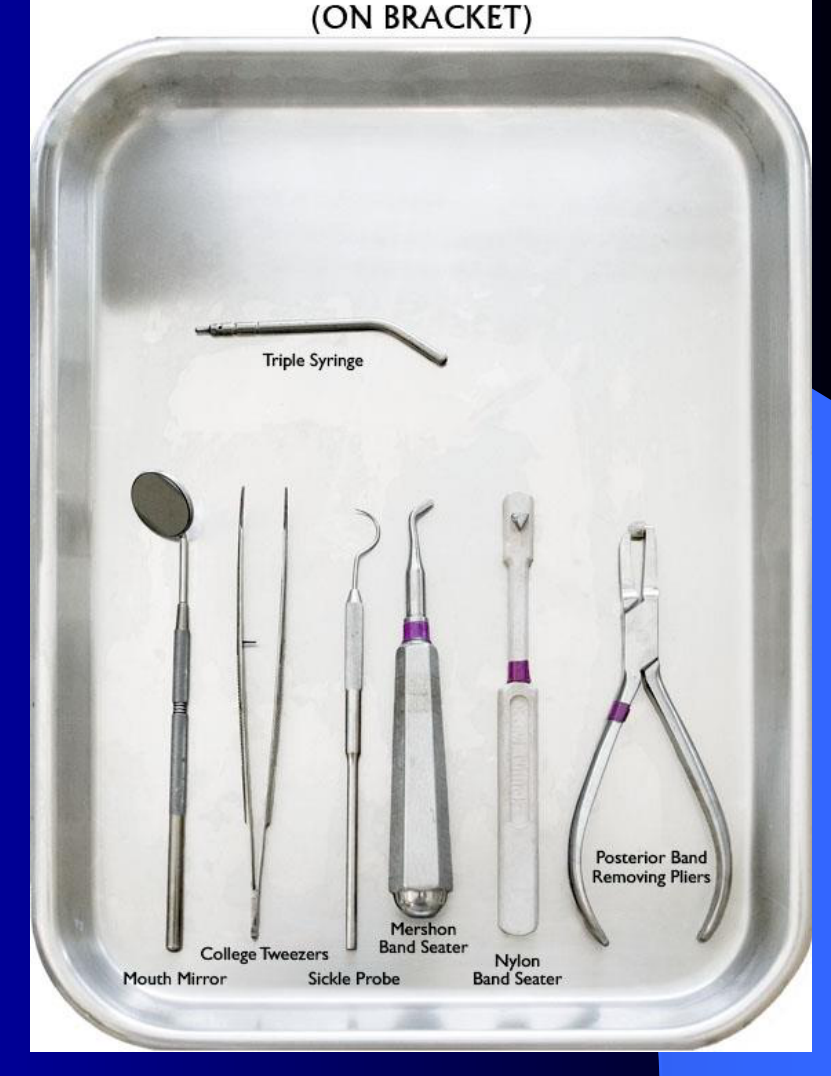
- Handpiece, rubber cup and oil free prophy paste
- Band fit Tray (Band pusher, bite stick, band removing pliers, etc.)
- Cotton wool rolls, Glass ionomer cement, glass mixing slab and spatula
 |  |  |
 |  |
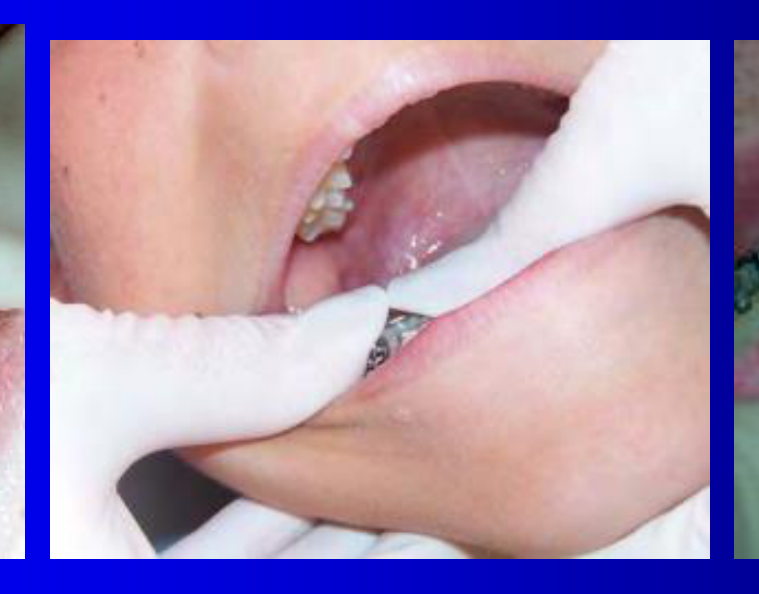
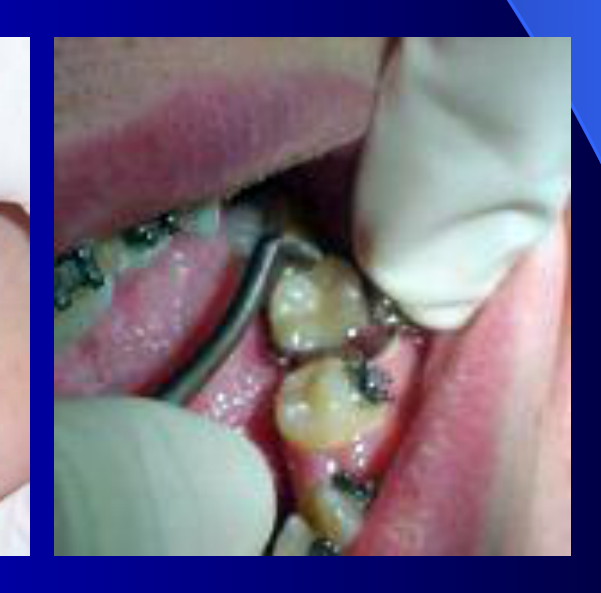
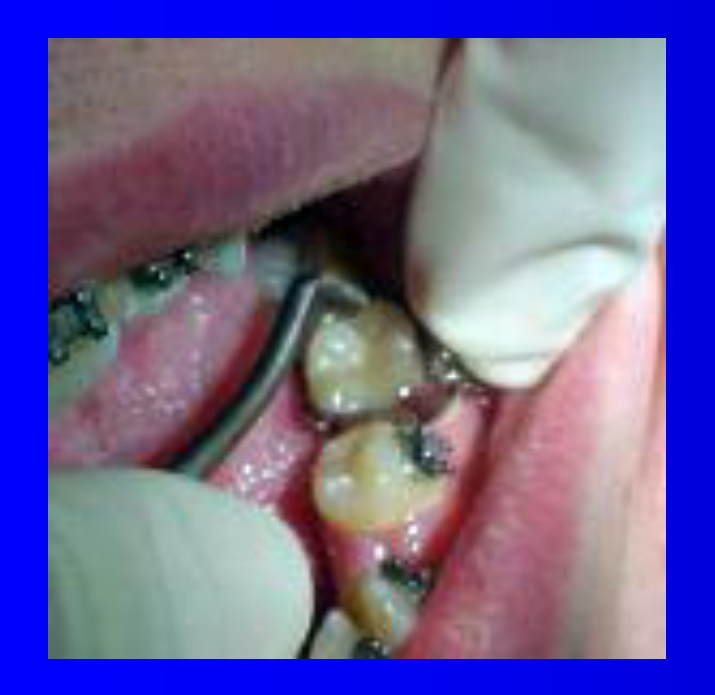
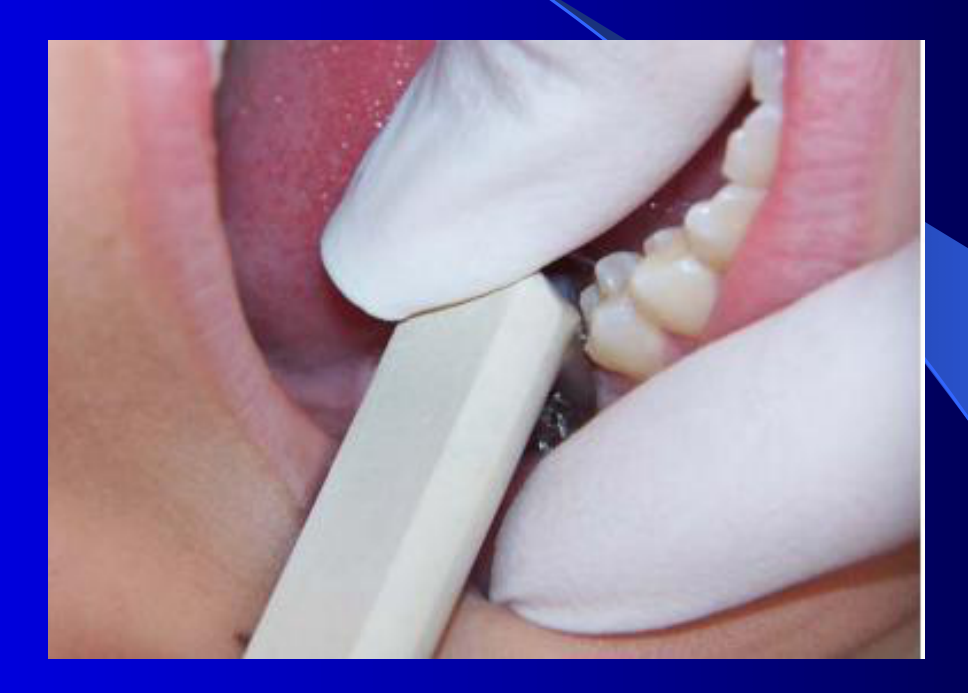
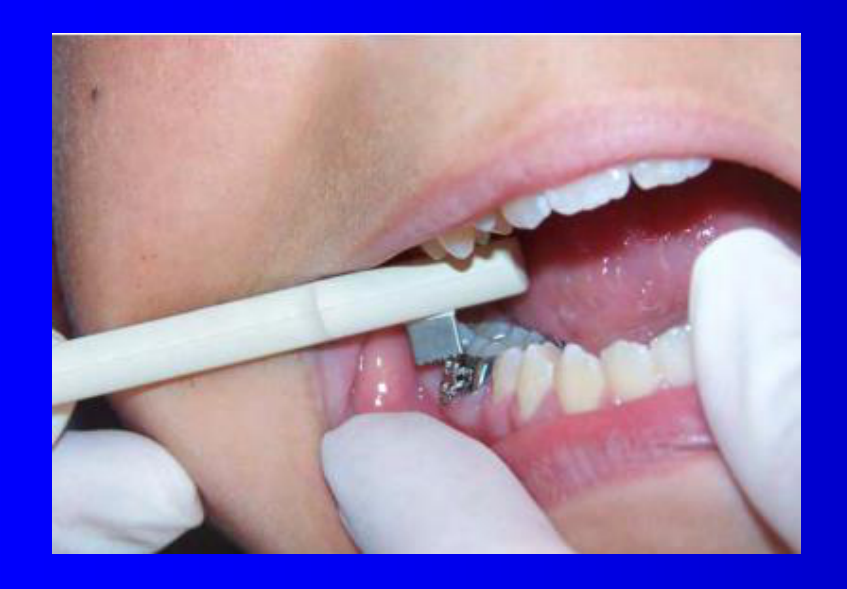
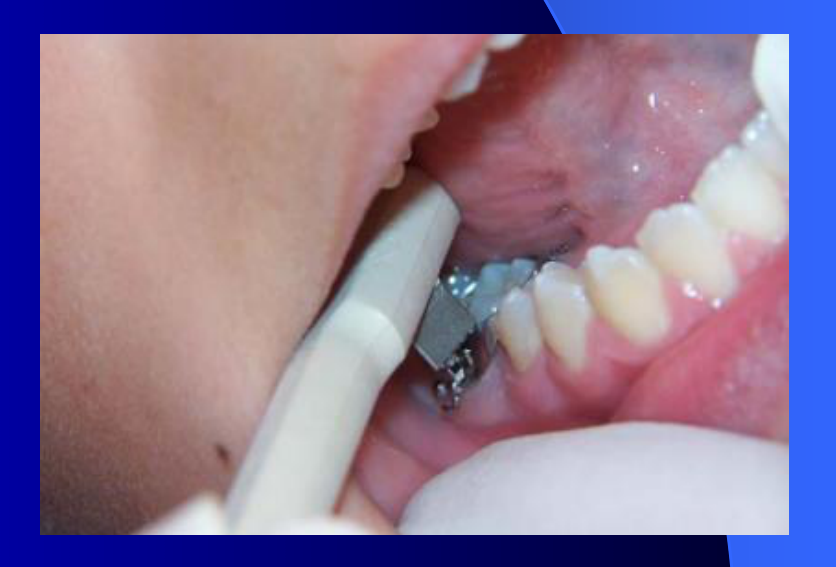
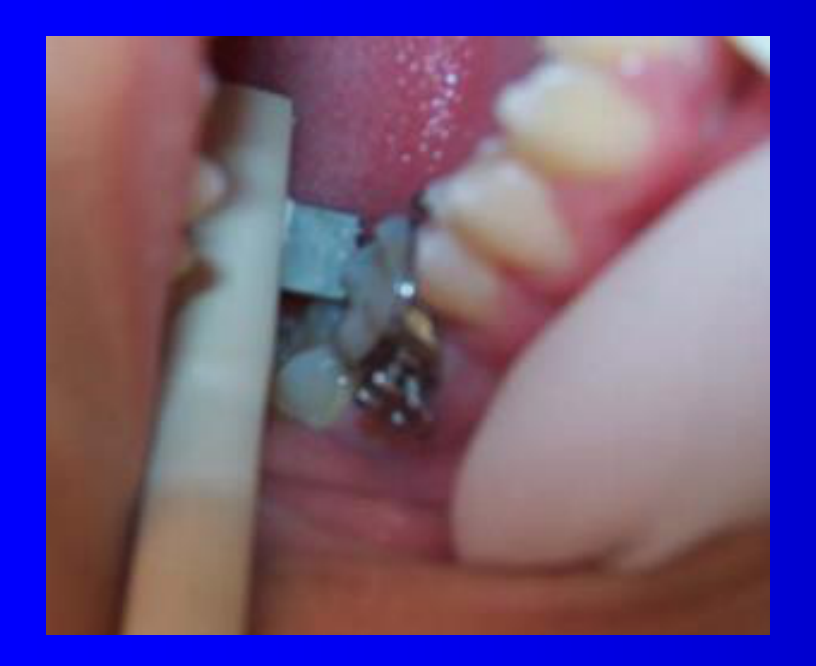
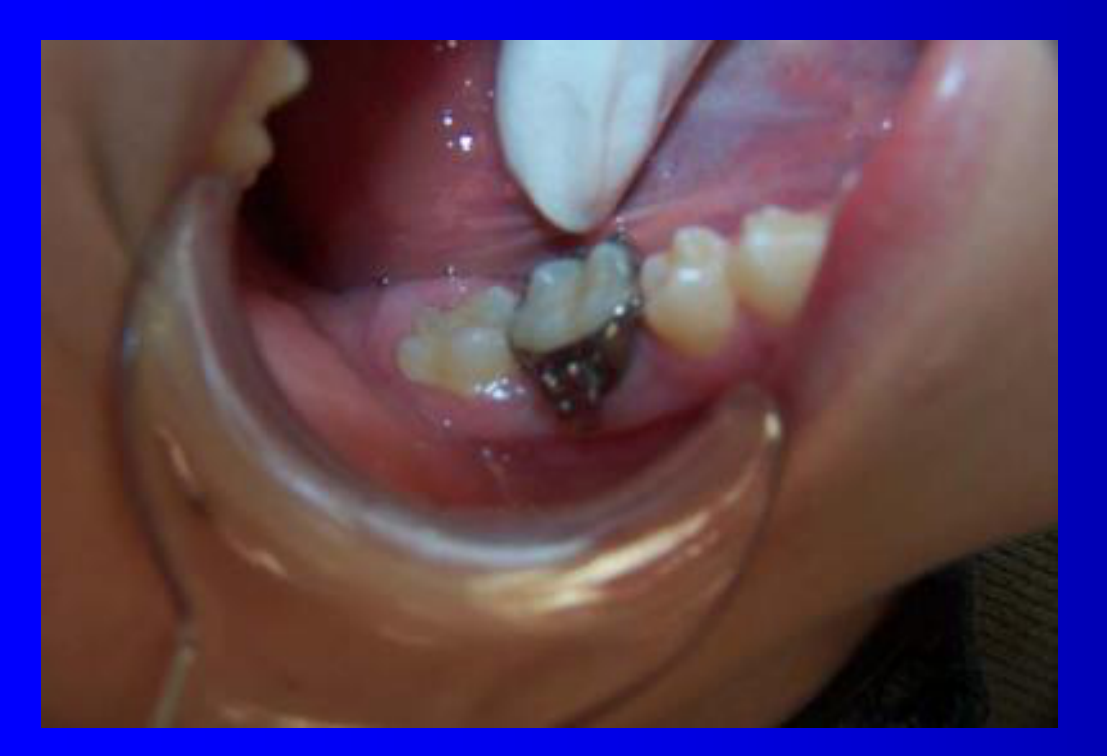
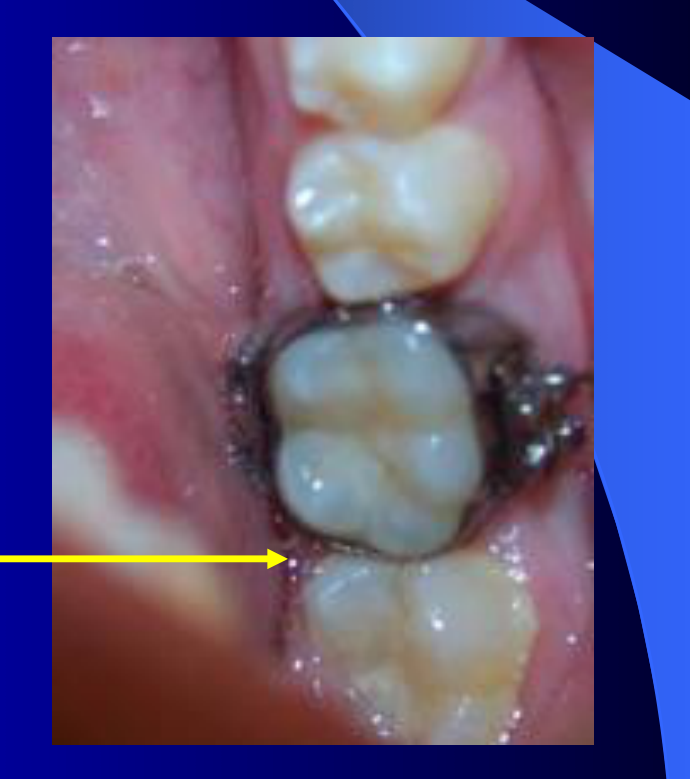
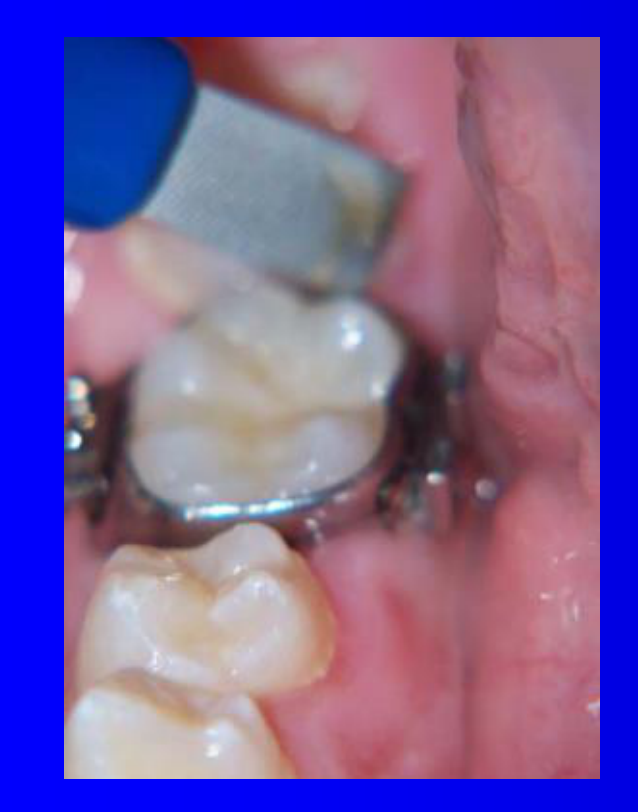
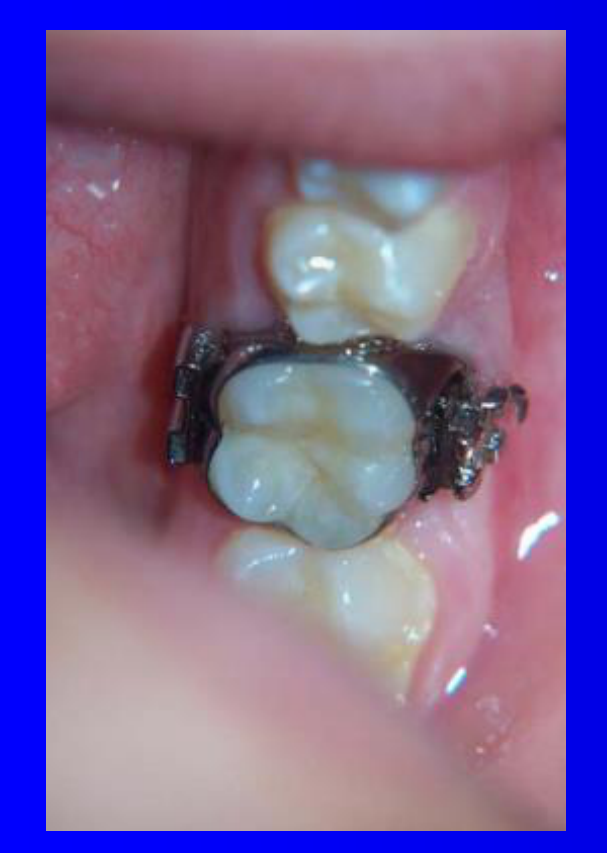
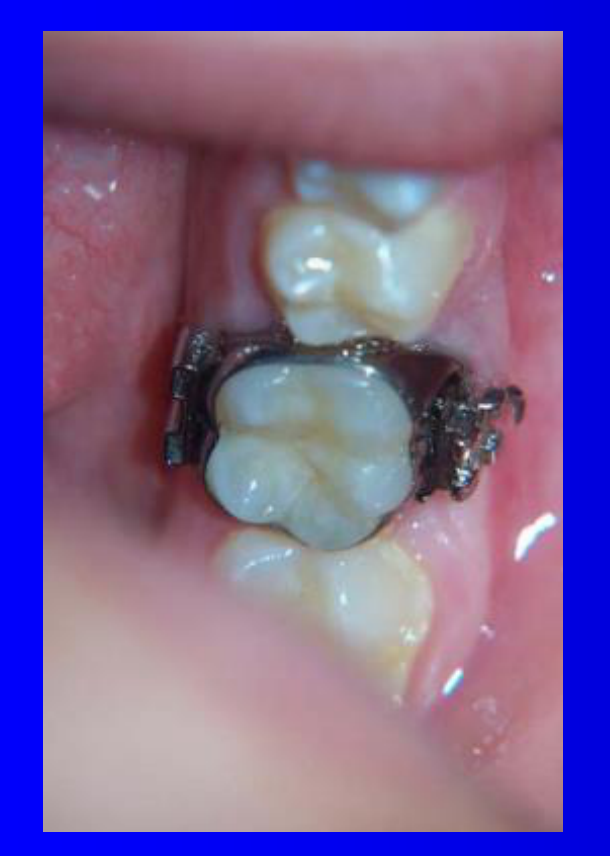
Band Fitting Procedure343536373839404142
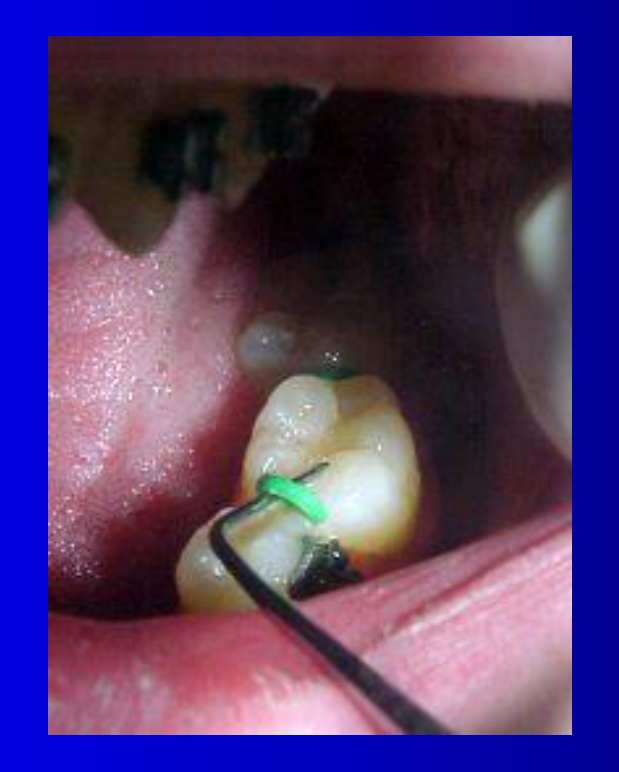
Remove any separators present (use a Probe or Schure to hook them out).
Select the band size to be fitted and press into place using band seater.
Use the handle of the bite stick to have the patient bite lightly to start seating the band.
Use the flat side of the tip on the buccal attachment or on the top of the band. Mesial buccal bite on the edge of the band gently.
Use one of the points of the triangle to lightly push the edge of the band.
Have the patient bite gently on the lingual and hold the buccal attachment with the thumb to avoid over seating.
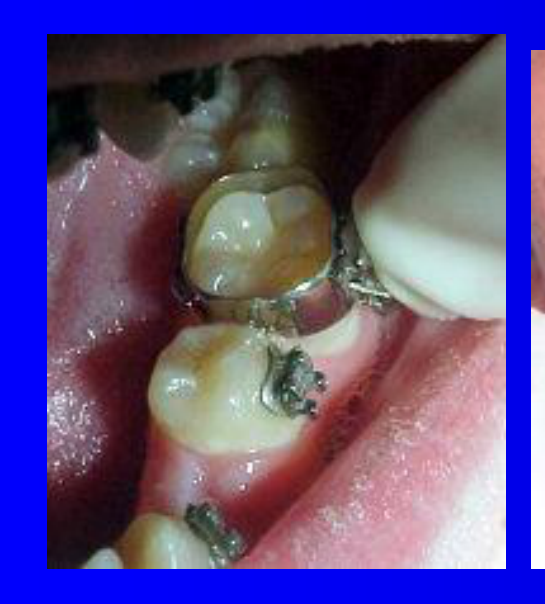
Band seated and now to inspect for band fitting to contours of the tooth.
Notice a small gap on the distal lingual cusp.
Take the band file or Schure and contour the band into the distal lingual cusp if necessary.
Check the tooth for any gaps and use the file to contour areas if gaps are seen.
Band seated after contouring; no gaps on the distal cusps.
Notice the relative position of the band to the occlusal margins of the tooth.
Some but not all of you will get the opportunity to fit bands. Ask if you can… when you see the procedure being completed as you will benefit immensely.
- Instruments needed:
- Band remover plier to take the band off.
- Band sitters to adjust the band.
- Band selection is not science — try different sizes until the band achieves enough retention and is not loose.
- With experience, the procedure becomes faster.
- When the patient arrives:
- Remove separators with a probe.
- Start band selection.
- Place the band with fingers.
- Use the band sitter on the proximal face (mesial and distal), keeping it just below the contact point.
- Finish band fitting, remove the band, and use cement to place it.
 |  |  |
 |  |  |
 |  |  |
 |  |  |
 |  |
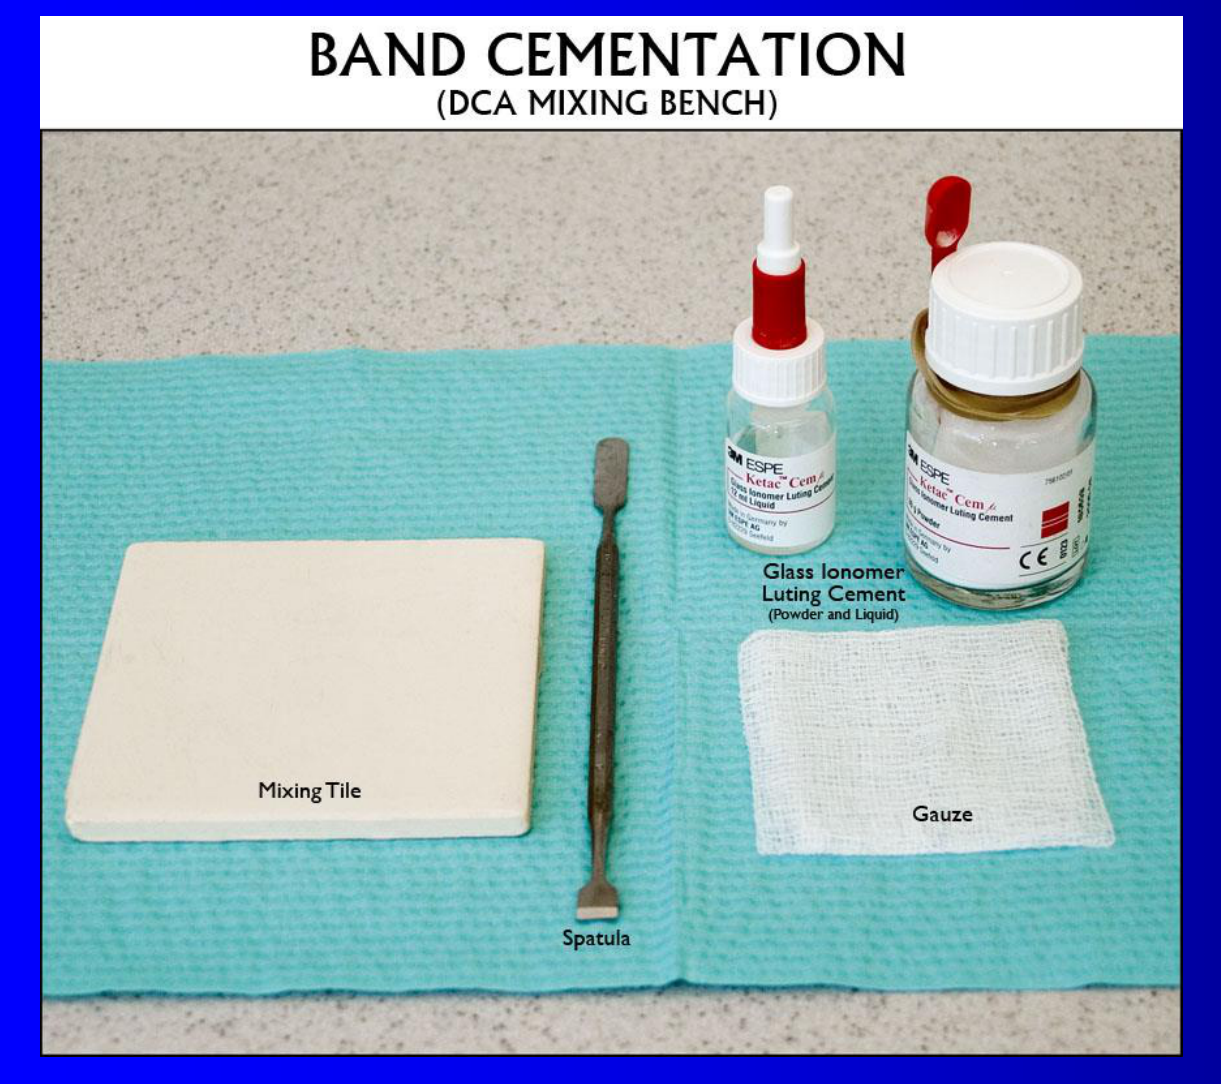
Band Cementation43
Band cementation is much like cementing a crown with the cement placed at the gingival margins of the band and just repeat the process of band fitting/seating.
- There is usually a small gap on the gingivolingual cusp where a seater or band seat can adjust the band.
- When the band is in place, check adjustment across all anatomical structures — no gaps allowed.
- Previously used glass ionomer cement; now using light-cured cement — easier and better results.
- Still need as much mechanical retention as possible with close adjustment of the band to the enamel structure.
Band Cementation (DCA Mixing Bench)
- Mixing Tile
- Spatula
- Glass Ionomer Luting Cement (Powder and Liquid)
- Gauze
Archwires and Auxiliaries
Archwires44
-
Continuous or Segmented
-
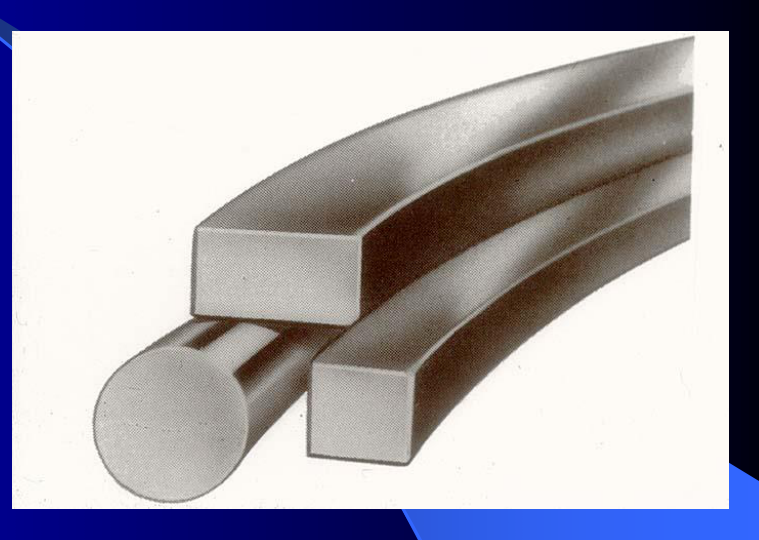
Round, Square or Rectangular
-
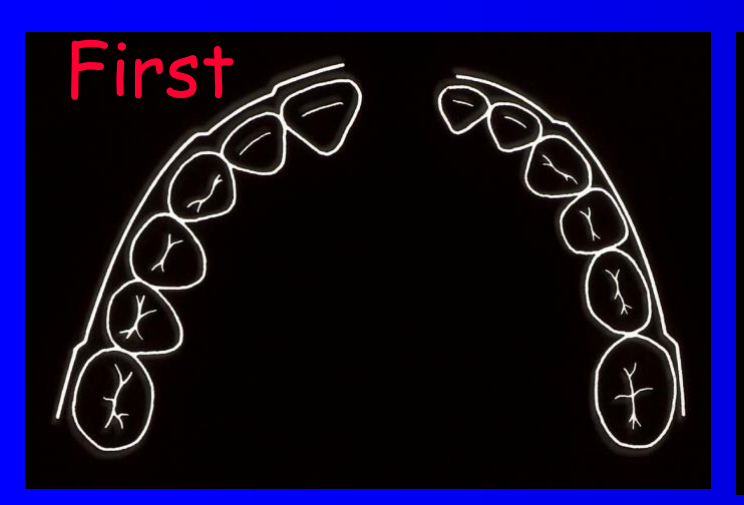
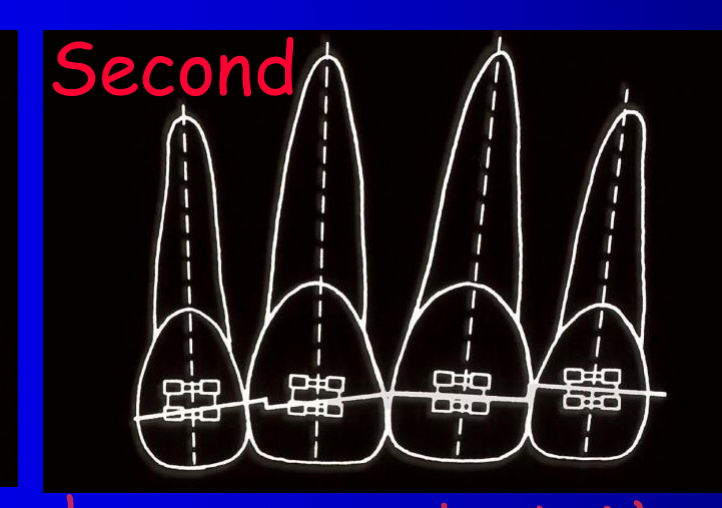
First, Second and Third Order Bends
- First
- Second
- Third
-
Torque/torsion
-
Historically, first order bends were placed in the wire by hand. Now, a straight wire can be used — all bends are compensated inside the bracket system. Square wires are less commonly used.
 |  |
 |
Auxiliaries4546
-
Tubes on Bands
-
Arches
-
Arch wires
-
Elastics
-
Hooks → Anchor elastic bands
-
Coils → open space
-
Push coils are open springs placed between brackets to open space. Elastics and O-rings connect wires inside the slot.
-
Headgear Tube
-
Long Wire
-
Elastic Tie
-
Elastic Power Chain
-
Wire
-
Coil
-
Wire Slots
-
Molar Band
-
Steel Tie
-
Rubber Band Post
-
Steel Tie Pig Tail
Power Chain: achieves movement
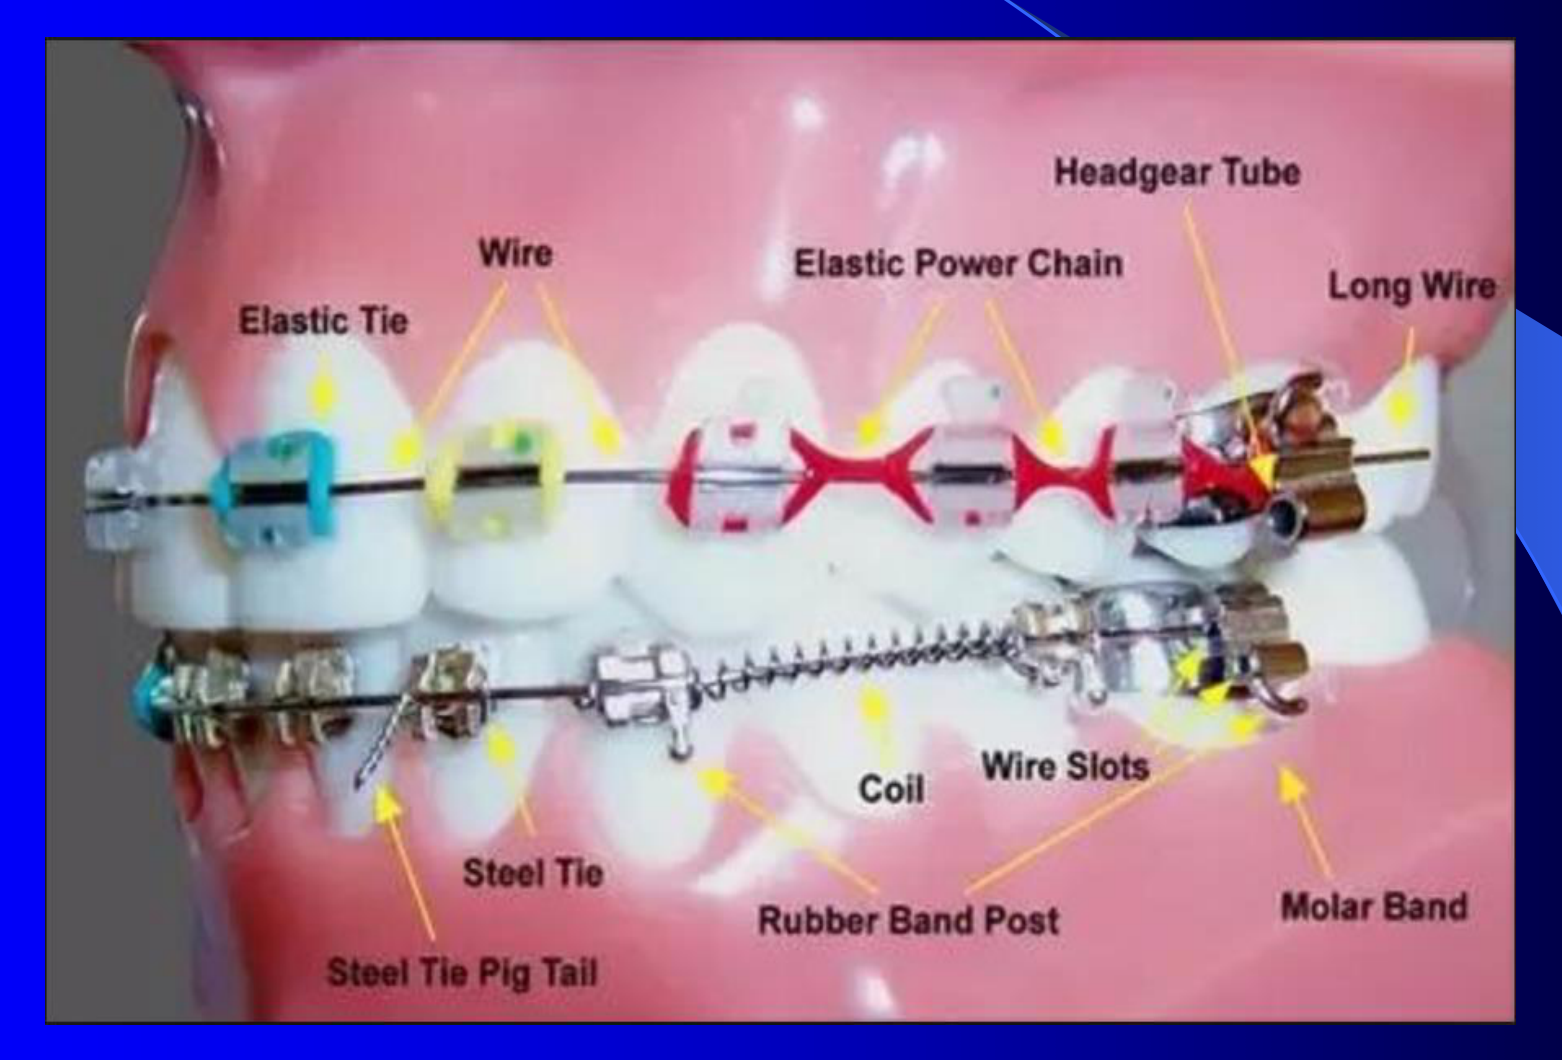
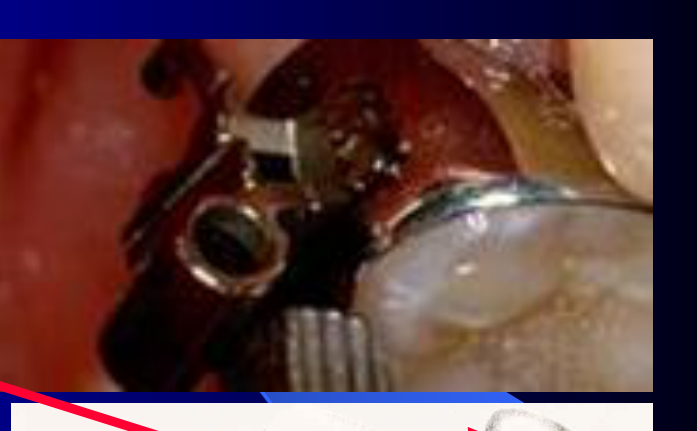
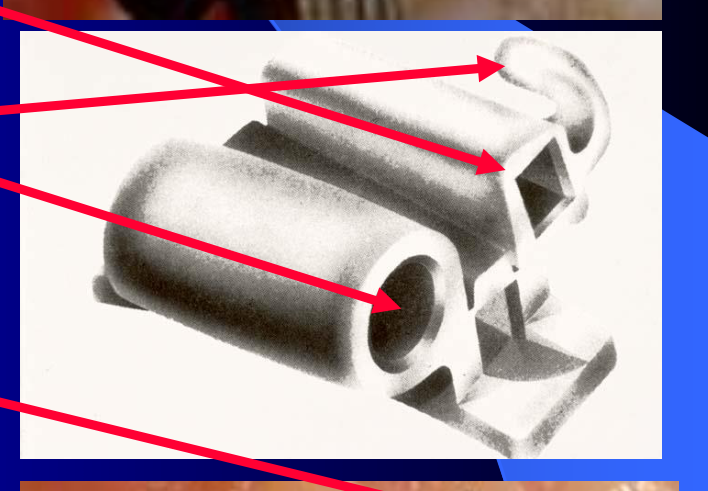
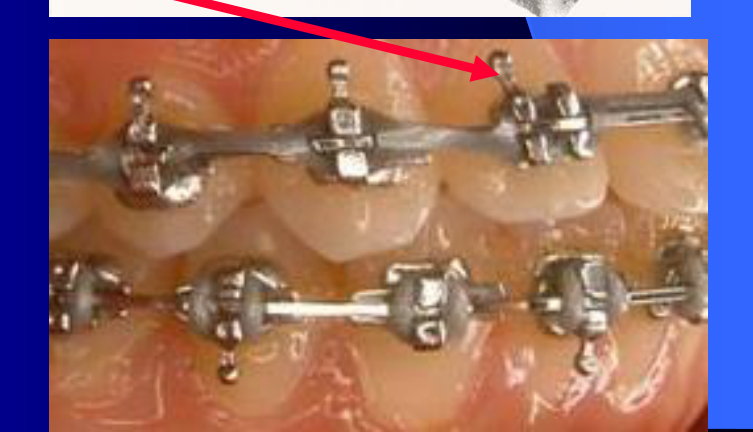
Bracket / Band Auxiliaries47
- Auxiliary tubes (buccal, palatal or lingual)
- Headgear tubes
- Hooks
 |  |
 |
Standard vs “Straight Wire” Bracket48
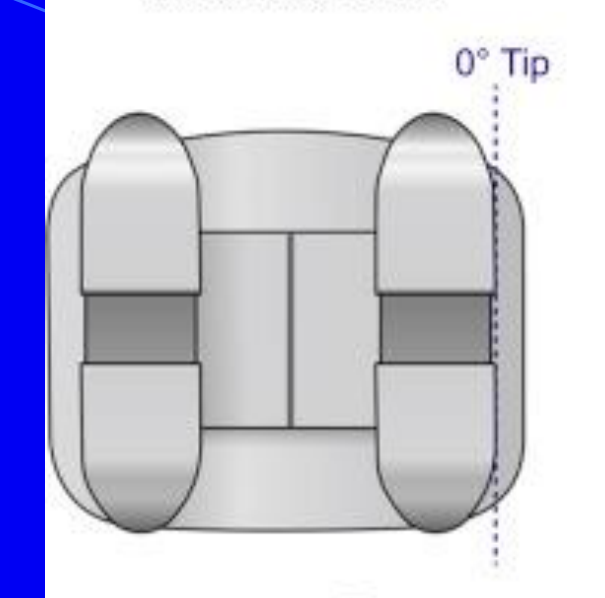
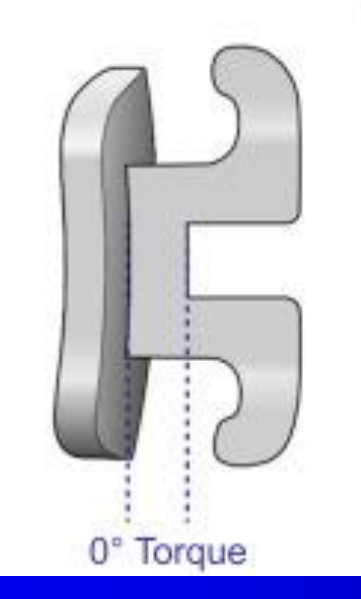
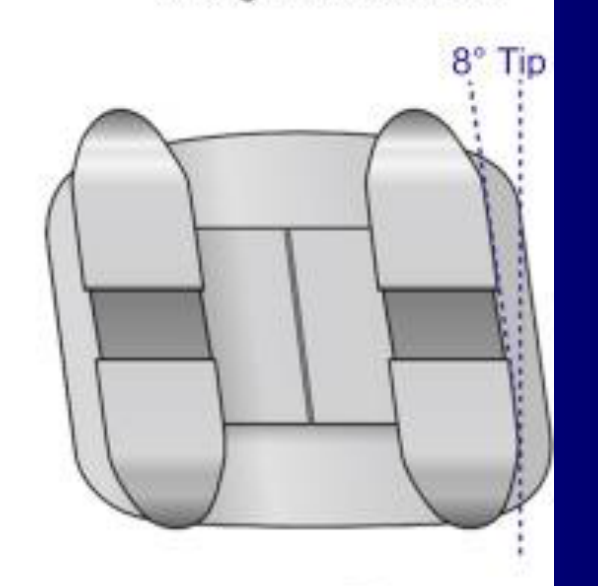
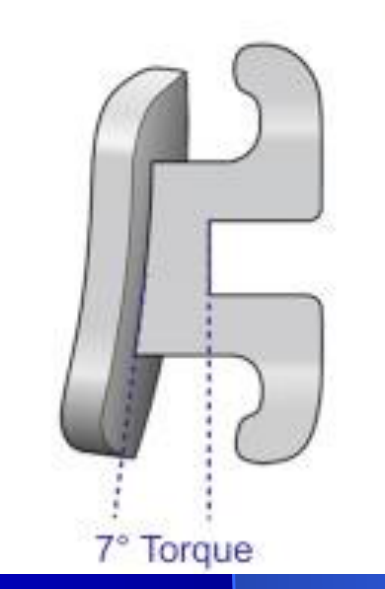
Standard bracket 0° Tip Straight-wire bracket 8° Tip 0° Torque 7° Torque
*Each brand has different prescription
Straight-wire bracket design
All angulations are built into the bracket: Inclination of the slot → third order (torque). Tip of the wings → second order (inclination). Thickness of the bracket → first order (rotation). This is the difference between standard and straight wire systems.
 |  |
 |  |
Common Prescriptions Chart49
TIP
| 1 | 2 | 3 | 4 | 5 | 6 | 7 | ||
|---|---|---|---|---|---|---|---|---|
| Upper | Andrews | 5 | 9 | 11 | 2 | 2 | 5 | 5 |
| Roth | 5 | 9 | 13 | 0 | 0 | 0 | 0 | |
| MBT | 4 | 8 | 8 | 0 | 0 | 0 | 0 | |
| Lower | Andrews | 2 | 2 | 5 | 2 | 2 | 2 | 2 |
| Roth | 2 | 2 | 7 | -1 | -1 | -1 | -1 | |
| MBT | 0 | 0 | 3 | 2 | 2 | 0 | 0 |
TORQUE
| 1 | 2 | 3 | 4 | 5 | 6 | 7 | ||
|---|---|---|---|---|---|---|---|---|
| Upper | Andrews | 7 | 3 | -7 | -7 | -7 | -9 | -9 |
| Roth | 12 | 8 | -2 | -7 | -7 | -14 | -14 | |
| MBT | 17 | 10 | +7/0/-7 | -7 | -7 | -14 | -14 | |
| Lower | Andrews | -1 | -1 | -11 | -17 | -22 | -30 | -30 |
| Roth | -1 | -1 | -11 | -17 | -22 | -30 | -30 | |
| MBT | -6 | -6 | +6/0/-6 | -12 | -17 | -20 | -10 |
ROTATION
| 1 | 2 | 3 | 4 | 5 | 6 | 7 | ||
|---|---|---|---|---|---|---|---|---|
| Upper | Andrews | 0 | 0 | 0 | 0 | 0 | 10 | 10 |
| Roth | 0 | 0 | 4 | 2 | 2 | 14 | 14 | |
| MBT | 0 | 0 | 0 | 0 | 0 | 10 | 10 | |
| Lower | Andrews | 0 | 0 | 0 | 0 | 0 | 0 | 0 |
| Roth | 0 | 0 | 2 | 4 | 4 | 4 | 4 | |
| MBT | 0 | 0 | 0 | 0 | 0 | 0 | 0 |
Prescription Knowledge
Different prescriptions are based on different authors. The lecturer does not expect memorization of the tables — but you must know the prescription you are using. Example: Roth prescription — upper canines have 13 degrees of tip (tip forward). To engage a canine in Class I, vertical canines are preferred — so the clinician must compensate with banding on the wire. You must know how to do banding — you cannot place a bracket and say that is all you can provide. Prescriptions are provided by different manufacturers (e.g., MBT prescription can be from different brands). Every prescription has specific values for first, second, and third order bends. The bracket comes ready but has individualization about tip, torque, and rotation.
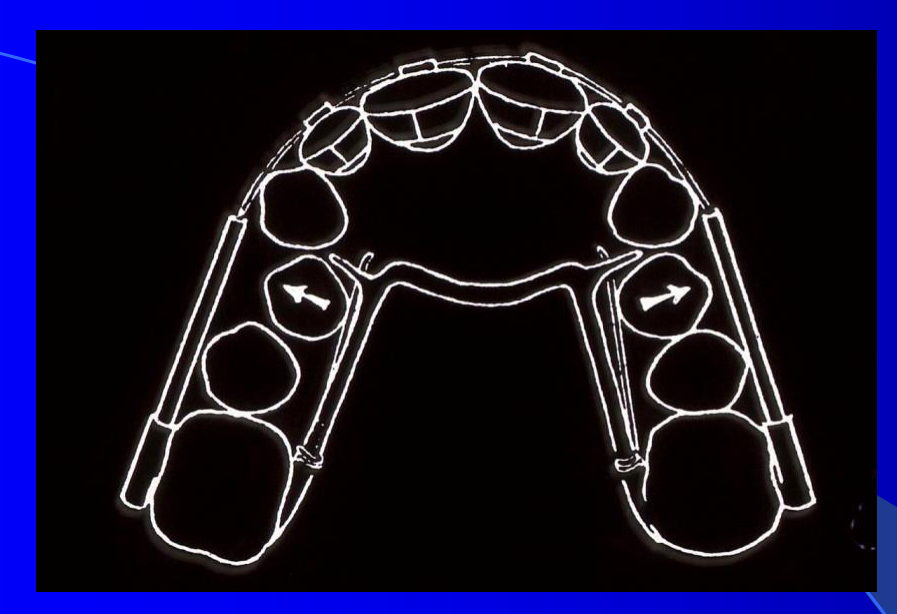
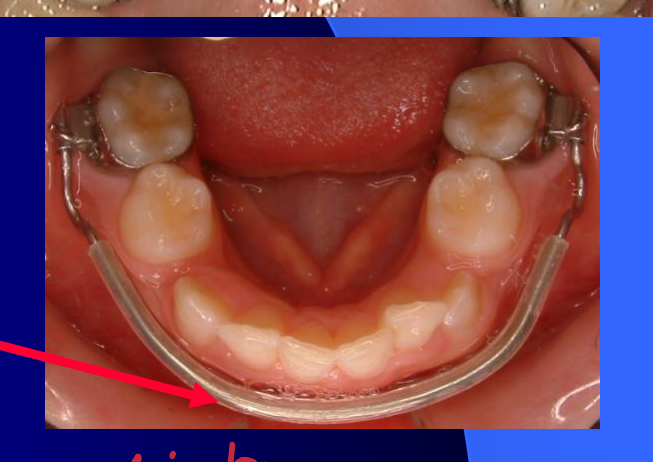
Auxiliary Arches50
Can rotate upper 6’s
- Trans-palatal
- Nance button
- Lingual
- Lip Bumper
- Lingual bar
- Lingual arch — used when extra control of lower anchorage is needed; connect the sixes with a lingual arch.
- Lip bumper — used to upright lower molars (discussed in the morning).
- Nance button — for the upper arch; blocks mesial drift of upper molars via a button on the palate.
- Transpalatal bar — analogous to the lower lingual arch for the upper arch; provides ability to rotate or derotate upper sixes if activated correctly.
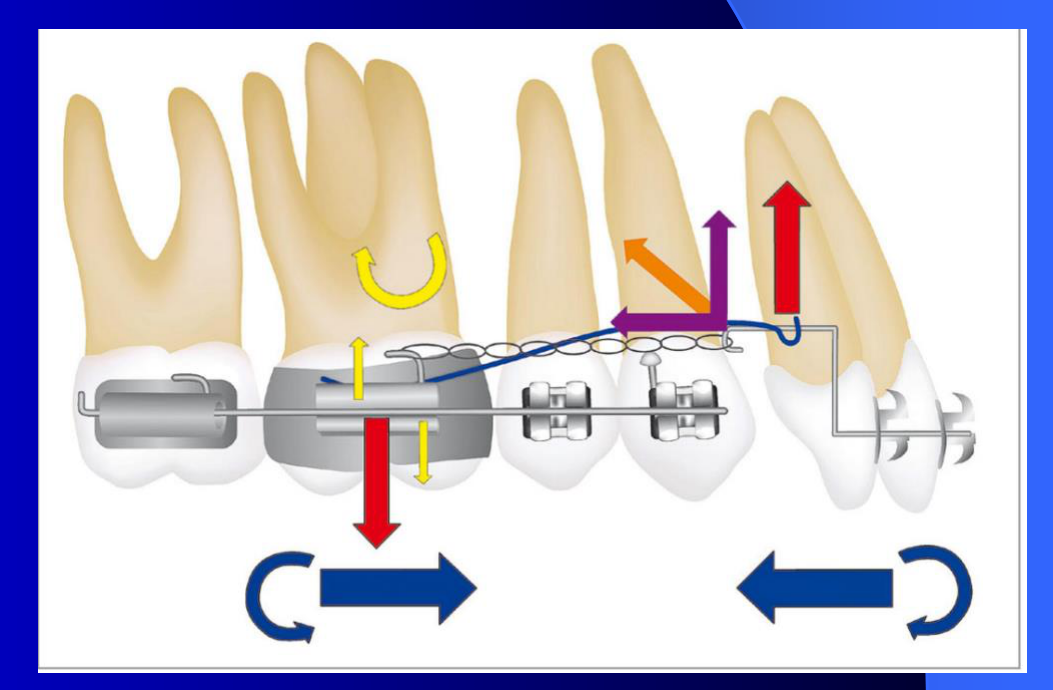
- Intrusion arch with cantilevers — example of the lower six; never forget the moment involved due to the distance from where the force is applied to the center of resistance.
Auxiliary Arch Wires51
- Intrusion Arches (also referred to as auxiliary arch)
- Sectional arches
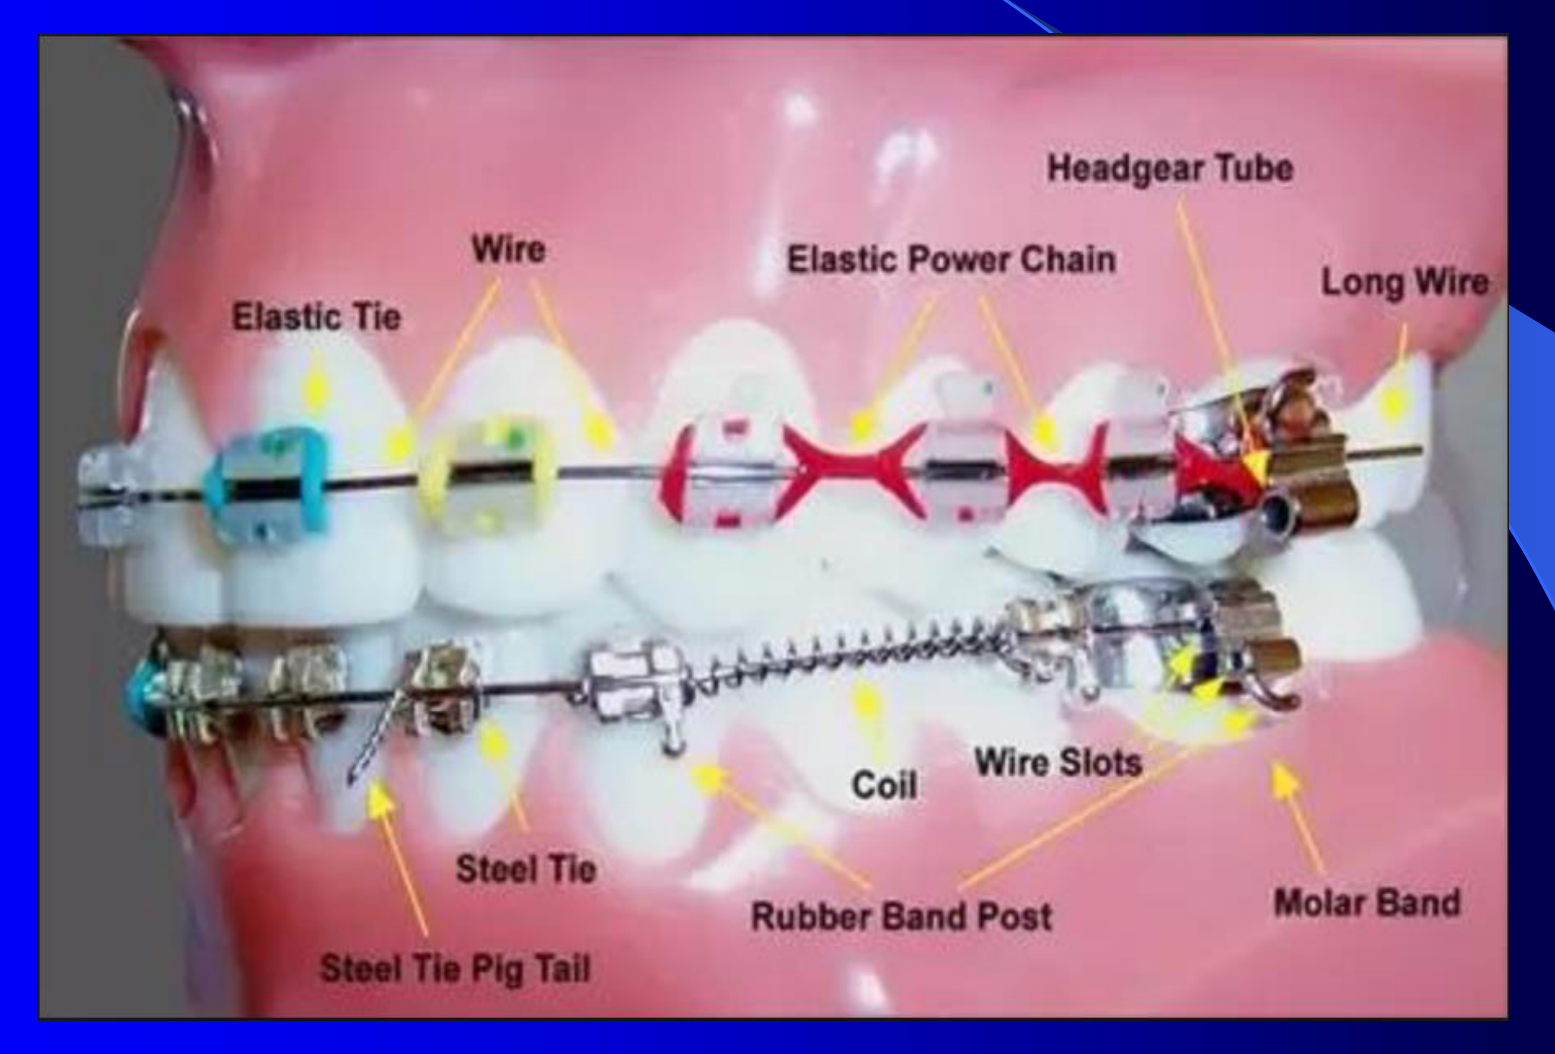
Elastomeric Auxiliaries5253
-
Elastic ligature thread
-
Elastomeric modules
-
Power Chains
-
Elastics
- Intermaxillary
- Intra-arch
-
Elastic Tie
-
Wire
-
Elastic Power Chain
-
Headgear Tube
-
Long Wire
-
Coil
-
Wire Slots
-
Steel Tie
-
Rubber Band Post
-
Molar Band
-
Steel Tie Pig Tail
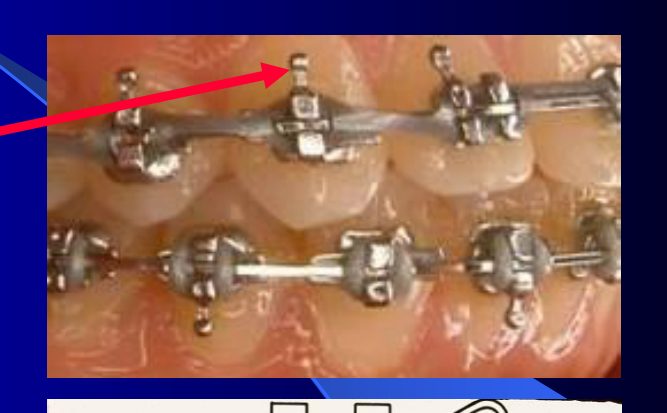
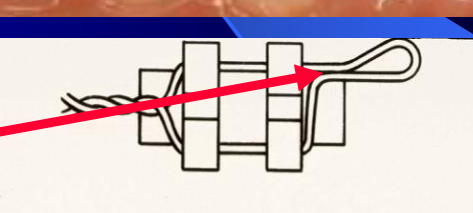
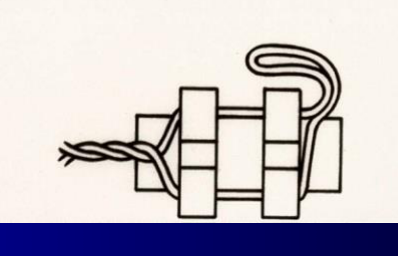
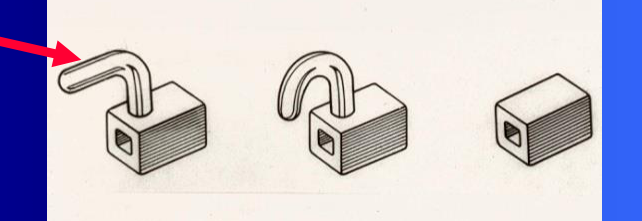
Auxiliary Hooks54
- Incorporated into the bracket
- Soldered brass
- Kobayashi ligature wires (k-ties)
- Sliding
- Surgery
- Hooks are a point to connect elastics. Can be: built into the bracket system, a wire tie with a little wire left on top to act as a hook, or a sliding hook connected inside the wire — slides along the wire, used with an elastic to move a segment backwards or forwards.
 |  |
 |  |
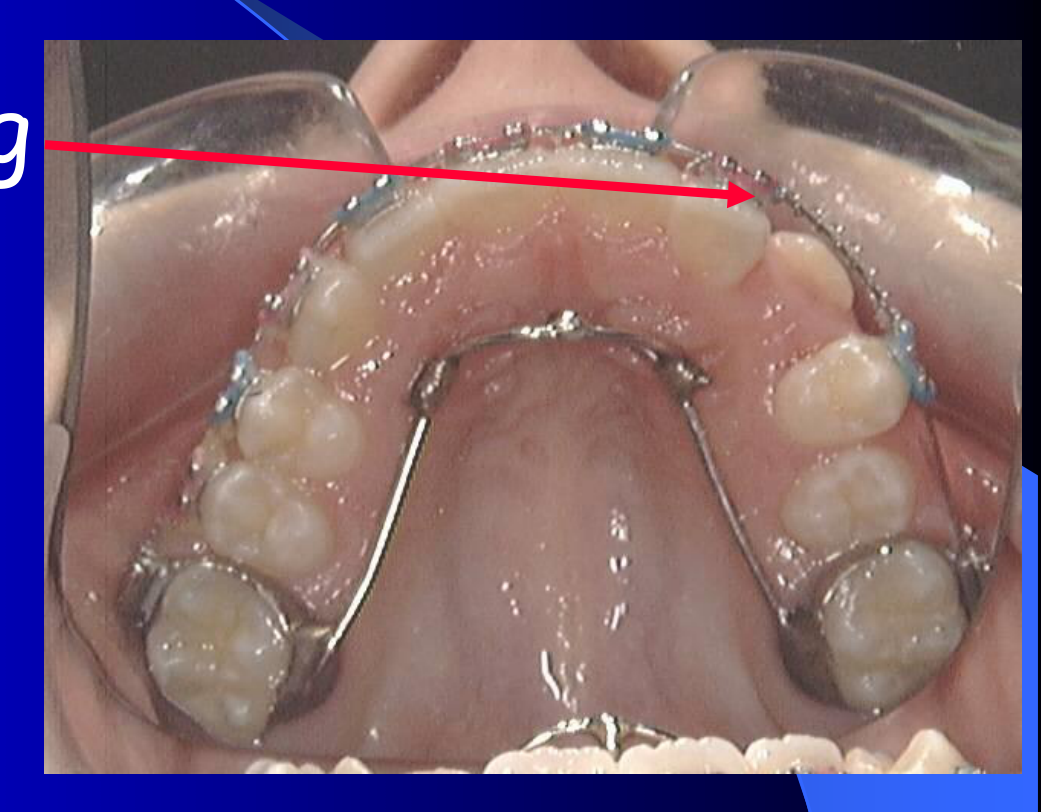
Auxiliary Coils55
- Push (open) coil spring
- Pull coil spring
- Closed coil spring
- Push coils are open springs placed between brackets; when placed in position they are compressed, so they open space. Closed coils can be connected from a tube to a hook to do sliding backwards of canines. Different devices with different materials — must understand how they perform inside the mouth to minimize side effects.
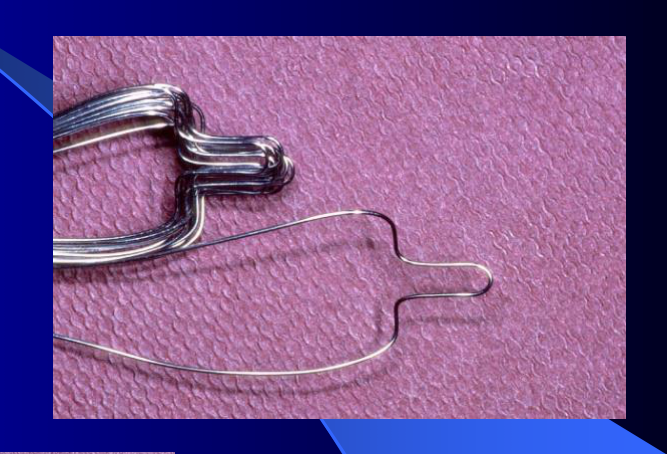
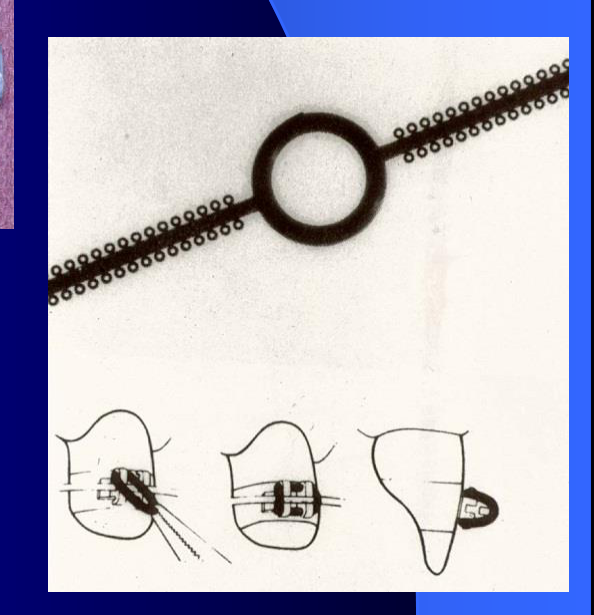
Types of Ligatures56
- Stainless Steel wire
- Elastomeric donut-shaped modules
- Elastic Thread
- Polymeric material (elastomeric rings) come in different colors; patients love colors. Tie wires (steel ties) are laced on top; no degradation, but can increase friction depending on how tight they are tied. With self-ligating systems, patients may still ask for elastomeric rings just for color — frustrating, but can be done depending on the case.
 |  |
Orthodontic Arch Wires5758
-
Auxiliary arches
-
Arch wire materials
-
Arch wire types
-
Arch wire forms
-
Auxiliary arch wires
-
Trans-palatals
-
Palatal
-
Lingual
-
Nance Button
-
Lip Bumper
Arch Wire Materials59
- Precious Metal Alloys
- Stainless steel and Cobalt-Chromium Alloys
- Nickel Titanium (NiTi) Alloys A-NiTi and M-NiT (austinitic / martinsitic)
- Beta-Titanium
- Composite plastics
Electric current on NiTi can cause it to charge. Used to correct deep bite.
Arch Wire Material Properties
Stainless steel: The tough one. Higher level of stiffness. Lower friction. Can start treatment with stainless steel, but use the smallest diameter possible. Nickel titanium: Shape memory alloy — delivers super elasticity. Can be bent 10 times more than steel and still deliver force at lower levels. Cannot be bent easily — requires a different technique. New technique: applying direct electric current — the resistance of the material heats it up and changes its shape. Being trialed in the clinic to correct overbite — intrude the anterior segment and level the curve of Spee. Titanium beta alloy: Has 40% of the stiffness of steel. Being used more than steel now. But higher friction. Every material has pros and cons — balance depending on the planned outcome.
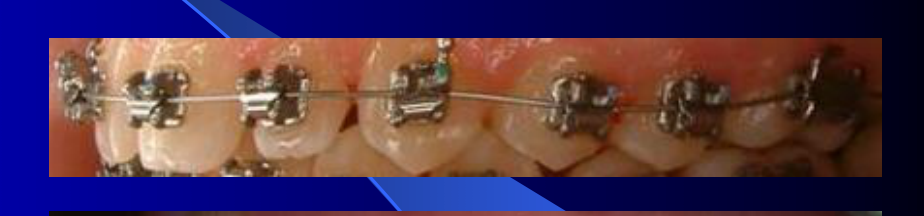
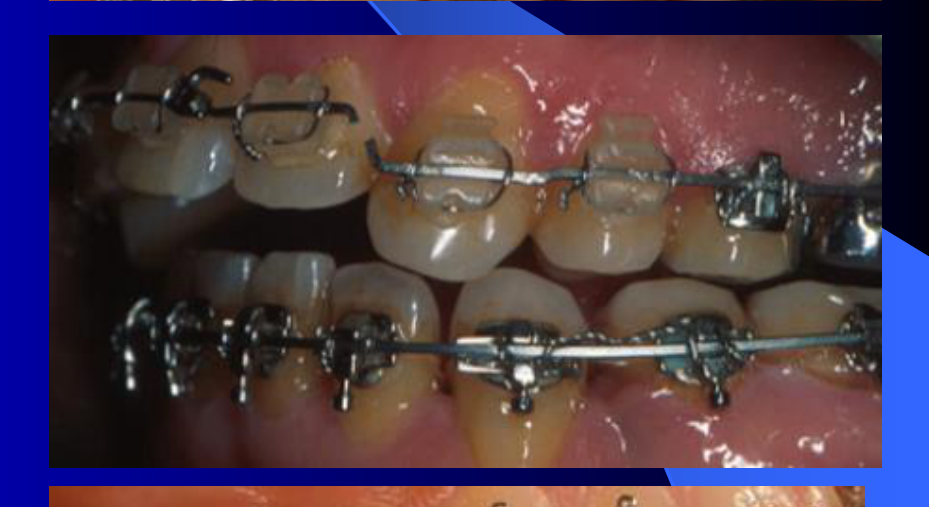
Arch Wire Types6061
-
Continuous or segmented
-
Solid or multistranded
-
Round, square or rectangular
-
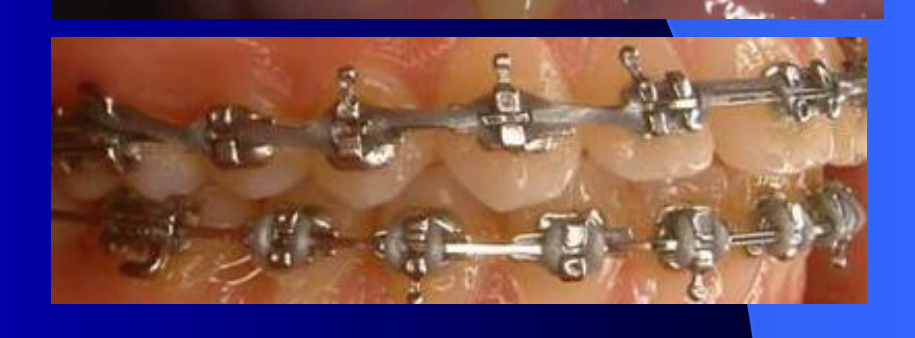
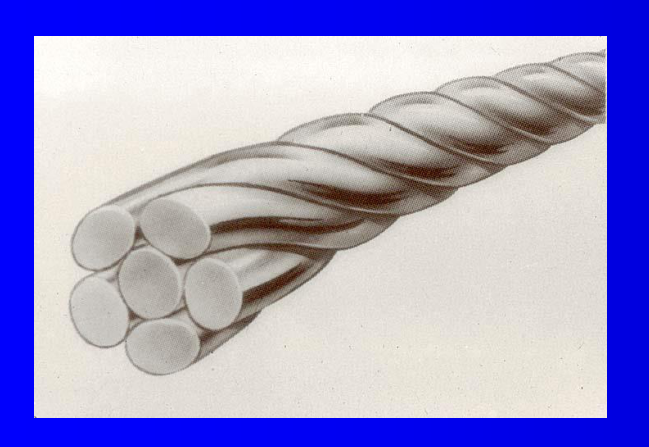
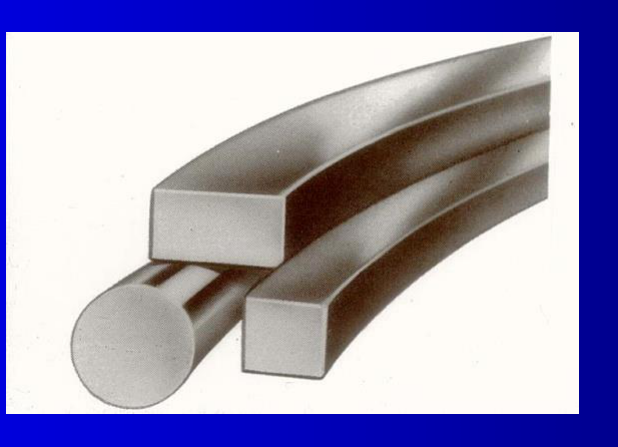
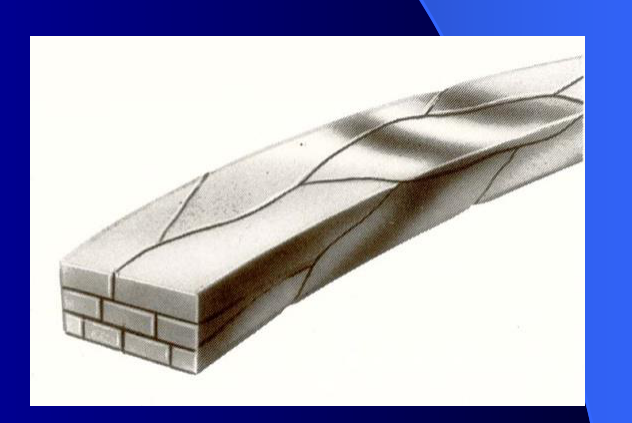
A multi-strand round wire is formed by six or seven other round wires. Multi-strand wires reduce stiffness. Example: a multi-stranded stainless steel wire has reduced stiffness compared to a solid steel wire of the same diameter. Now also available in rectangular shape.
 |  |  |
 |  |  |
Arch Wire Form62
- Bonwill-Hawley
- Cantenary curve
- Brader arch form
- Lingual appliance arch forms (mushroom Arch)
- Most if not all arch wires require some form of modification to match the patient’s arch form
Arch Wire Form and Relapse
The shape of the wire becomes significant in the retention lecture. Keeping the original shape of the wire reduces the level of relapse. Nature provides the most stable condition for the balance of muscles, occlusion, and everything involved. Crowding is the most stable space that nature could accommodate for teeth along a lack of spacing. The point of orthodontic treatment is to create/regain space (most often with extraction), while keeping as much as possible the original arch wire form to reduce relapse.
Treatment Stages and Limitations636465
Traditional Stages of Orthodontic Treatment66
-
Stage 1 - Leveling and Alignment
-
Stage 2 - Space Management
-
Stage 3 - Finishing
-
Stage 4 - Retention
-
Leveling and alignment:
- Leveling corrects the height of all teeth.
- Alignment aligns teeth across a specific form of wire.
-
Space management:
- Regain space, consider extractions or not.
-
Finishing:
- Individualize banding and create specific bandages for each case.
- Prescriptions are not perfect for all cases.
- Cannot change the prescription for every single patient — the logistics would be unsustainable.
-
Retention:
- Period after finishing treatment to maintain achievements.
- Normal aging of the occlusion, bone loss, and change of positions occur — retention cannot be the same forever.
- No magic and no consensus about the retention period.
- Usually there is a protocol; sometimes the orthodontist is responsible.
- A patient may return three years later with a problem and need correction at no cost.
- The secret is to see the patient as a collaborator — if you did good work and have the patient on your side, it is not a big deal.
- Sometimes partial braces and a first set of wire can correct a rotation that is annoying the patient.
- Keep the patient on your side — every patient can tell others good or bad things about you.
Critical Fixed Appliance Limitations67
-
Fixed appliances are limited to moving teeth within the confines of the alveolar bone. Therefore, fixed appliances depend upon an adequate and healthy periodontium.
-
Cannot have inflammation during treatment — delivering a force system upon gingivitis will cause bone loss.
-
This is the challenge to explain to the patient.
-
At the screening clinic, hygiene is checked first — if not good enough, the patient will not get treatment, regardless of health card, eligibility, or DCP.
-
Patients are usually given three months to improve oral hygiene; if they cannot, treatment does not start.
-
Worst-case scenario: start treatment, patient stops cooperating, extractions are done, spaces need closing, white spot lesions appear, and the periodontium is compromised.
-
Fixed appliances often require a high degree of patient cooperation. The best treatment results depend upon faithful wearing of elastics, headgear and/or other orthodontic or orthopaedic auxiliaries.
-
Fixed appliances require an acceptable level of oral hygiene to allow movement of the teeth with minimal loss of crestal bone, as well as to prevent dental caries.
-
Fixed appliances require an acceptable skeletal relationship prior to the completion of treatment. The skeletal relationship may be achieved before or during fixed appliance treatment by the use of extraoral traction, functional appliances or orthognathic surgery.
Orthodontic Complications686970717273
- Pain – Appliance impinging on soft tissues; pain associated with tooth movement
- Occurs but for a limited time; usually manageable.
- Appliance Breakages – Bracket/bond/wire
- Oral Hygiene – Periodontal/Dental caries issues
- Mandatory — prevents white spot lesions and prevents extra resorption of the alveolar bone and ridge.
- Root Resorption – Due to patient susceptibility or treatment mechanics
Root Resorption — Clinical Considerations
Can occur even before bonding brackets — it comes with the patient. If it is really necessary to treat, get in and get out as fast as possible. When triggered, it is sometimes genetically related. Management:
- Avoid rectangular wires.
- Use light wires and take advantage of moments.
- Increase the distance between brackets.
- Work with the lowest level of force.
- Ask for OPGs every six months — you cannot be in charge of this if you are not well covered. If root resorption has started:
- Stop treatment for three months.
- Do a follow-up X-ray.
- Wait for the case to become more stable.
- Reduce the amount of force.
- Try to finish as soon as possible.
- Review objectives based on the root resorption case.
-
Devitalization
-
Muscle and/or TM Joint Pain
- Usually when a more stable occlusion and very good intercuspidation between upper and lower arches is achieved, the TMJ becomes under control.
-
Relapse
-
Tooth mobility – due to bone loss or tooth movement into area of inadequate osseous support
-
Loss of crestal bone – due to gingival inflammation
-
Atypical Growth – growth that distorts the skeletal relationship beyond the orthodontist’s ability to compensate
-
Compliance
-
Ceramic Brackets – potential enamel damage
-
Complimentary Aesthetic Dentistry
-
Loose or Debonded Fixed Retainer
Complications Orthognathic Surgery
- Altered Sensation / Anesthesia
- Surgical Relapse
- Fixation Time
- Tooth Devitalization/Root Resection
- Condylar Resorption
- Reduced TM Joint Mobility
- TM Joint Pain
Orthognathic Surgery Complications — Further Details
- Surgical relapse can happen, as with any surgical procedure.
- Tooth devitalization — depending on the ostomy performed during surgery.
- Condylar resorption — now very reduced because setback of the lower jaw is no longer performed (it caused condyle resorption and relapse).
- Depending on the amount of gain from the surgical procedure, most side effects can be controlled.
Complications Orthognathic Surgery
- Pain
- Inflammation Swelling
- Hemorrhage
- Avascular Necrosis
Audio Appendix
Additional Audio Content
The following sections from the lecture audio did not correspond to any heading in the main document.
Twin Wire Appliance
- Used double wires instead of just one.
- Different kinds of movements started to be achieved.
Edgewise Appliance (Modern Core)
- The core of what is used now, with the difference that all the bends are built into the bracket rather than the wire.
- Saves clinical time.
- Many companies now compete in the market — competition over best materials, new technology, arch wires, elastic bands, and bonding systems.
Crozat Appliance
- A rudimentary system to correct posterior crossbite.
- No bands; the system was sustained by springs and activations.
Edgewise Device
- The edgewise device has absolutely no bends included in the system.
- The lecturer was trained in this technique: all first order, second order, and torque had to be done by hand for all patients across all arch wires.
- This required more time during appointments and could not be delegated to assistants — the clinician had to do everything by hand.
Slot Attached to Band
- A slot attached to the band was achieved, similar to modern brackets, but more complicated.
- Required cementing a band across all teeth — imagine the white spot lesion problems at that time.
- An eyelet (a soldered device) was used to pin something on both sides (mesial and distal) to control rotation.
- The eyelet had to be soldered by hand with a torch, and the inner part could not be blocked by soldering material — a challenge for hand skills.
Early Rudimentary Arch Wires
- In the very beginning, there was no bonding — clinicians could not etch enamel or bond braces.
- Early devices used screws to tighten, with an arch on the buccal/labial face.
- Teeth were laced to try to correct rotation.
- Biomechanically, this was limited compared to what is available today.
The Begg Appliance
- A relevant personality in Australia.
- The arch wire was connected on vertical pins.
- Bands were used as done today for finishing.
- Did not use a rectangular slot — used round wires only.
- Had limitations regarding third order rotation (torque control).
- Could not control uncontrolled tipping as done today, but achieved similar results with elastics.
- No one uses this system anymore.
Current Trends
- A trend toward antimicrobial performance of dental materials, mainly to fight white spot lesions.
- In the US, orthodontists are now legally responsible for white spot lesions — even if the patient is instructed to maintain oral health and does not, the orthodontist can be held responsible.
- Developing materials or bonding systems that prevent lesions or remineralize enamel would be a huge advance.
Pin and Tube Appliance
- Evolved roughly 10 years later.
- A pin attached to the bands; bands were placed across all teeth — still no bonding.
- Force had a distance from the center of resistance, so biomechanics worked the same way.
- Improvements in dental materials and technique allowed new movements.
Clinical Cases
Case: Bonding an Appliance to Crowned Teeth in a Remote Patient
Question
Scenario: A patient requires a 3D-printed, single-piece chrome-cobalt lingual arch. However, the patient’s first molars are already crowned, which prevents standard direct bonding. Furthermore, the patient lives in a remote area (Geraldton) and has complicated dynamics, making it impossible for them to return to the clinic soon for an alternative bonding system. What’s shown: The clinical challenge of needing to bond an orthodontic appliance to crowned teeth when the patient cannot easily return for a more optimal bonding procedure. Consider: Given the constraints of the crowned teeth and the patient’s inability to return promptly, how can you successfully bond the appliance to the crowns in the interim?
Answer
Observations:
- The patient’s first molars are crowned, precluding standard etching and bonding.
- The patient lives in Geraldton and cannot return to the clinic in the near future for a better bonding system.
- A 3D-printed single-piece chrome-cobalt lingual arch is being used, which eliminates the need for separators. Reasoning:
- Since standard bonding is not possible and the patient cannot return for an alternative, a temporary but effective bonding method must be used immediately.
- The crowns are sandblasted to prepare the surface.
- Zinc phosphate cement is used to bond the appliance to the sandblasted crowns.
- The plan is to monitor the situation and update the bonding system with a different material when the patient returns in four weeks to achieve better bonding results. Takeaway: When faced with crowned teeth and a patient who cannot return for optimal bonding, surface preparation (sandblasting) combined with traditional cements (zinc phosphate) can provide a viable temporary solution to secure orthodontic appliances.
Footnotes
-
Original PDF page 1: 04 - DENT5311 Contemporary Fixed Appliances, p.1 ↩
-
Original PDF page 2: 04 - DENT5311 Contemporary Fixed Appliances, p.2 ↩
-
Original PDF page 3: 04 - DENT5311 Contemporary Fixed Appliances, p.3 ↩
-
Original PDF page 4: 04 - DENT5311 Contemporary Fixed Appliances, p.4 ↩
-
Original PDF page 5: 04 - DENT5311 Contemporary Fixed Appliances, p.5 ↩
-
Original PDF page 6: 04 - DENT5311 Contemporary Fixed Appliances, p.6 ↩
-
Original PDF page 7: 04 - DENT5311 Contemporary Fixed Appliances, p.7 ↩
-
Original PDF page 8: 04 - DENT5311 Contemporary Fixed Appliances, p.8 ↩
-
Original PDF page 9: 04 - DENT5311 Contemporary Fixed Appliances, p.9 ↩
-
Original PDF page 10: 04 - DENT5311 Contemporary Fixed Appliances, p.10 ↩
-
Original PDF page 11: 04 - DENT5311 Contemporary Fixed Appliances, p.11 ↩
-
Original PDF page 12: 04 - DENT5311 Contemporary Fixed Appliances, p.12 ↩
-
Original PDF page 13: 04 - DENT5311 Contemporary Fixed Appliances, p.13 ↩
-
Original PDF page 14: 04 - DENT5311 Contemporary Fixed Appliances, p.14 ↩
-
Original PDF page 15: 04 - DENT5311 Contemporary Fixed Appliances, p.15 ↩
-
Original PDF page 16: 04 - DENT5311 Contemporary Fixed Appliances, p.16 ↩
-
Original PDF page 17: 04 - DENT5311 Contemporary Fixed Appliances, p.17 ↩
-
Original PDF page 18: 04 - DENT5311 Contemporary Fixed Appliances, p.18 ↩
-
Original PDF page 19: 04 - DENT5311 Contemporary Fixed Appliances, p.19 ↩
-
Original PDF page 20: 04 - DENT5311 Contemporary Fixed Appliances, p.20 ↩
-
Original PDF page 21: 04 - DENT5311 Contemporary Fixed Appliances, p.21 ↩
-
Original PDF page 22: 04 - DENT5311 Contemporary Fixed Appliances, p.22 ↩
-
Original PDF page 23: 04 - DENT5311 Contemporary Fixed Appliances, p.23 ↩
-
Original PDF page 24: 04 - DENT5311 Contemporary Fixed Appliances, p.24 ↩
-
Original PDF page 25: 04 - DENT5311 Contemporary Fixed Appliances, p.25 ↩
-
Original PDF page 26: 04 - DENT5311 Contemporary Fixed Appliances, p.26 ↩
-
Original PDF page 27: 04 - DENT5311 Contemporary Fixed Appliances, p.27 ↩
-
Original PDF page 28: 04 - DENT5311 Contemporary Fixed Appliances, p.28 ↩
-
Original PDF page 29: 04 - DENT5311 Contemporary Fixed Appliances, p.29 ↩
-
Original PDF page 30: 04 - DENT5311 Contemporary Fixed Appliances, p.30 ↩
-
Original PDF page 31: 04 - DENT5311 Contemporary Fixed Appliances, p.31 ↩
-
Original PDF page 32: 04 - DENT5311 Contemporary Fixed Appliances, p.32 ↩
-
Original PDF page 33: 04 - DENT5311 Contemporary Fixed Appliances, p.33 ↩
-
Original PDF page 34: 04 - DENT5311 Contemporary Fixed Appliances, p.34 ↩
-
Original PDF page 35: 04 - DENT5311 Contemporary Fixed Appliances, p.35 ↩
-
Original PDF page 36: 04 - DENT5311 Contemporary Fixed Appliances, p.36 ↩
-
Original PDF page 37: 04 - DENT5311 Contemporary Fixed Appliances, p.37 ↩
-
Original PDF page 38: 04 - DENT5311 Contemporary Fixed Appliances, p.38 ↩
-
Original PDF page 39: 04 - DENT5311 Contemporary Fixed Appliances, p.39 ↩
-
Original PDF page 40: 04 - DENT5311 Contemporary Fixed Appliances, p.40 ↩
-
Original PDF page 41: 04 - DENT5311 Contemporary Fixed Appliances, p.41 ↩
-
Original PDF page 42: 04 - DENT5311 Contemporary Fixed Appliances, p.42 ↩
-
Original PDF page 43: 04 - DENT5311 Contemporary Fixed Appliances, p.43 ↩
-
Original PDF page 44: 04 - DENT5311 Contemporary Fixed Appliances, p.44 ↩
-
Original PDF page 45: 04 - DENT5311 Contemporary Fixed Appliances, p.45 ↩
-
Original PDF page 46: 04 - DENT5311 Contemporary Fixed Appliances, p.46 ↩
-
Original PDF page 47: 04 - DENT5311 Contemporary Fixed Appliances, p.47 ↩
-
Original PDF page 48: 04 - DENT5311 Contemporary Fixed Appliances, p.48 ↩
-
Original PDF page 49: 04 - DENT5311 Contemporary Fixed Appliances, p.49 ↩
-
Original PDF page 50: 04 - DENT5311 Contemporary Fixed Appliances, p.50 ↩
-
Original PDF page 51: 04 - DENT5311 Contemporary Fixed Appliances, p.51 ↩
-
Original PDF page 52: 04 - DENT5311 Contemporary Fixed Appliances, p.52 ↩
-
Original PDF page 53: 04 - DENT5311 Contemporary Fixed Appliances, p.53 ↩
-
Original PDF page 54: 04 - DENT5311 Contemporary Fixed Appliances, p.54 ↩
-
Original PDF page 55: 04 - DENT5311 Contemporary Fixed Appliances, p.55 ↩
-
Original PDF page 56: 04 - DENT5311 Contemporary Fixed Appliances, p.56 ↩
-
Original PDF page 57: 04 - DENT5311 Contemporary Fixed Appliances, p.57 ↩
-
Original PDF page 58: 04 - DENT5311 Contemporary Fixed Appliances, p.58 ↩
-
Original PDF page 59: 04 - DENT5311 Contemporary Fixed Appliances, p.59 ↩
-
Original PDF page 60: 04 - DENT5311 Contemporary Fixed Appliances, p.60 ↩
-
Original PDF page 61: 04 - DENT5311 Contemporary Fixed Appliances, p.61 ↩
-
Original PDF page 62: 04 - DENT5311 Contemporary Fixed Appliances, p.62 ↩
-
Original PDF page 65: 04 - DENT5311 Contemporary Fixed Appliances, p.65 ↩
-
Original PDF page 66: 04 - DENT5311 Contemporary Fixed Appliances, p.66 ↩
-
Original PDF page 67: 04 - DENT5311 Contemporary Fixed Appliances, p.67 ↩
-
Original PDF page 63: 04 - DENT5311 Contemporary Fixed Appliances, p.63 ↩
-
Original PDF page 64: 04 - DENT5311 Contemporary Fixed Appliances, p.64 ↩
-
Original PDF page 68: 04 - DENT5311 Contemporary Fixed Appliances, p.68 ↩
-
Original PDF page 69: 04 - DENT5311 Contemporary Fixed Appliances, p.69 ↩
-
Original PDF page 70: 04 - DENT5311 Contemporary Fixed Appliances, p.70 ↩
-
Original PDF page 71: 04 - DENT5311 Contemporary Fixed Appliances, p.71 ↩
-
Original PDF page 72: 04 - DENT5311 Contemporary Fixed Appliances, p.72 ↩
-
Original PDF page 73: 04 - DENT5311 Contemporary Fixed Appliances, p.73 ↩