Crown with Post and Core Template
Chairside Form 26 for a crown on an endodontically treated tooth on [tooth __], [material: PFM / all-ceramic / zirconia / gold]. Two pathways: Pathway A = direct/prefabricated post + chairside core (folded into the prep visit); Pathway B = cast post & core (extra impression + try-in visit). Post/core content extracted from L3 Post and core fabrication techniques and L4 RETT Online.
Two signatures required
Form 26 = reconstructive phase. You need 2 signatures — prosth specialist AND clinic coordinators. No aesthetic work on this form.
Scope
This sheet covers the post & core-specific steps only. Crown preparation, definitive impression, provisional and crown cementation are not duplicated — follow Crown Template / Clinical Sequence for Crowns. Full post-and-core protocol (post length/width, GP removal, cast techniques, cementation, failure modes): L3 Post and core fabrication techniques and L4 RETT Online.
Ferrule gate — check BEFORE committing to a post
A ferrule = a 360° collar of sound dentine encircled by the crown margin, coronal to the prep shoulder. It, not the post, does the mechanical work (L1 Introduction To RETT).
- Height: minimum 1.5–2 mm of sound tooth structure above the margin
- Width (dentine thickness): remaining dentine 1–2 mm
- Coronal-to-crest: 4–5 mm above bone crest = 2–3 mm biologic width + 1.5–2 mm ferrule
- Ideal is 360°, but an incomplete ferrule beats no ferrule; on maxillary incisors the palatal ferrule matters most
- Inadequate/absent ferrule → do NOT just proceed. Options, in order: (1) reassess restorability (poor crown-root ratio, cracks, inadequate perio → extraction may be better); (2) surgical crown lengthening; (3) orthodontic extrusion
- 0 ferrule remaining = non-restorable (L4 RETT Online)
Decide the crown type before the post & core
Prep the coronal tooth for the definitive crown type before fabricating the post & core — “Each type of restoration requires different amounts of tooth reduction, and the form of the tooth preparation varies considerably” (35 Chapter 35 Contemporary Restoration of Endodontically Treated Teeth).
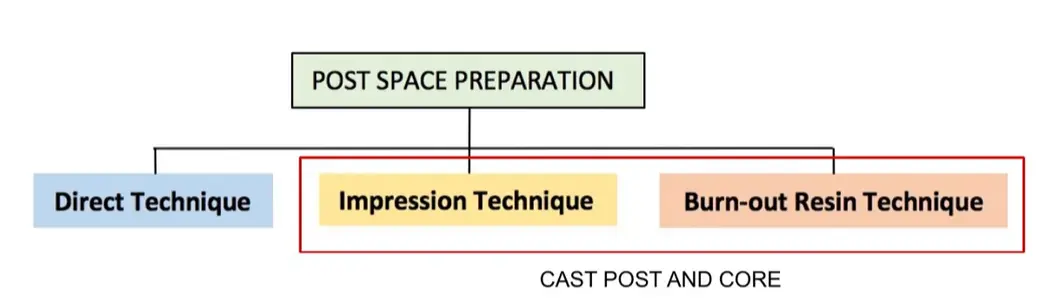
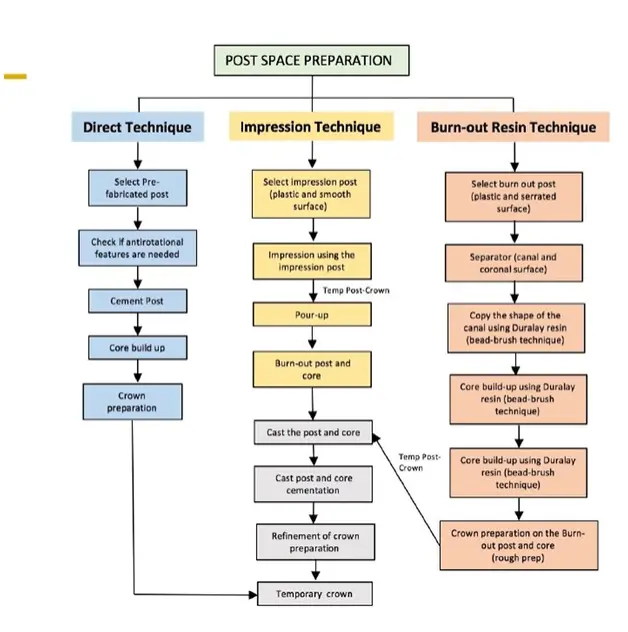
Pathway A — Direct (prefabricated post + chairside core)
Post + core folded into the crown-prep visit — 0 extra appointments (L4 RETT Online).
Appointment 1 — Post space, core, then crown prep (same visit)
- Confirm plan, local anaesthesia, rubber dam
- Confirm endodontic readiness first: adequate apical seal, no sinus/exudate/percussion tenderness, radiographic periapical stability
- Post space prep: remove GP with heated plugger / Gates-Glidden / ParaPost drill to planned length; retain ≥4–5 mm apical GP seal; post ≤ ⅓ root width; PA to verify
- Try fibre post — diameter matching the final drill; confirm passive seating and length (shorten apical end so the coronal end is buried in the core); do not over-enlarge the canal
- Adhesive core build-up: clean/dry canal (paper points), etch/prime canal walls, cement post with dual-cure resin, avoid overfill / “pumping” / hydraulic wedging, single seating path; let cement reach full set (~10 min) before building the core; build composite core to crown form incrementally
- → Crown prep onward per Crown Template / Clinical Sequence for Crowns (reduction, impression, provisional — not duplicated here)
Appointment 2 — Crown try-in & cementation per Crown Template.
Pathway B — Cast post & core
Post space and cementation occur in different sessions; a temporary post crown is required between them (L4 RETT Online).
Appointment 1 — Post space prep + pattern/impression + temporary post crown
- LA, rubber dam, confirm endodontic readiness
- Post space prep as above (retain apical GP seal; remove internal undercuts — required so the cast pattern draws)
- Coronal prep: remove undercuts, rough crown prep, establish ferrule + positive horizontal stop
- Capture the pattern by one of:
- Impression technique — seat plastic impression post, light-body PVS into the dried canal, heavy/medium body in the tray, single-snap removal (lab pours, burns out, casts); or
- Direct burn-out resin pattern — separator to canal/coronal surfaces, copy the canal with Duralay / pattern resin (bead-brush), build core, repeat in-and-out until fully polymerised so it doesn’t lock in undercuts
- Temporary post crown — temp post + resin crown as a single unit, passive canal fit, temp cement kept shallow (not deep in the canal), light/out of occlusion in excursions, margins closed
- Lab casts the post & core
Appointment 2 — Cast try-in, cement, then crown prep + crown impression
- Remove temp; clean the post space of all temp cement/debris (especially the coronal third)
- Try-in cast post — passive, fully seated fit; never force; verify path of insertion; fit-checker for high spots; PA if any doubt. A fully passive seat prevents hydraulic wedging → vertical root fracture on cementation
- Cement (resin / RMGI / zinc phosphate per isolation & post material): coat canal walls with a lentulo, avoid overfill, single steady path, no pumping; do not disturb until full set
- Refine crown prep only after the cement has fully set
- Crown impression → new provisional → hand to Crown Template
Appointment 3 — Crown try-in & cementation per Crown Template.
Same-visit crown impression vs a separate visit
L4 RETT Online advises against taking the final crown impression/scan in the same appointment as cast-post cementation (to reduce micro-movement and debonding). Following that strictly, the crown impression moves to a separate visit (cast pathway = +2 visits vs Pathway A). The structure above takes the impression at Appt 2 (+1 visit). Decide per case.
Copy-pastable checklist
Pathway A — direct post + chairside core
POST AND CORE (direct) AND CROWN — [tooth __] — [material]
FERRULE CHECK — Confirm 1.5-2 mm of sound dentine height, a 1-2 mm wall thickness, and 4-5 mm coronal to the bone crest. A full 360-degree ferrule is ideal. If the ferrule is inadequate, reassess restorability, then consider crown lengthening or orthodontic extrusion.

APPOINTMENT 1 — Post space, core and crown prep (same visit)
- Confirm the plan, give LA and place rubber dam.
- Confirm endodontic readiness: an adequate apical seal, no sinus, exudate or percussion tenderness, and a stable PA.
- Prepare the post space by removing GP to the planned length. Retain at least 4-5 mm of apical GP. Keep the post no more than one third of the root width. Take a PA to verify.
- Try in the fibre post and confirm a passive seat at the correct length, with the coronal end buried in the core. Do not over-enlarge the canal.
- Dry the canal with paper points, etch and prime, then cement the post with dual-cure resin without pumping or overfilling. Allow the cement to reach full set, about 10 minutes, then build the composite core to crown form.
- Prepare the crown by zone: occlusal reduction deeper on the functional cusp with a bevel, axial reduction in two planes buccally and lingually, interproximal reduction, and a supragingival margin, chamfered for gold and shouldered for ceramic.
- Check the prep. View from directly above with one eye closed and confirm every part of the margin is visible, so there are no undercuts. Check clearance in centric and in excursion.
- Make the provisional before the impression, using Luxatemp in a putty key. Place double cord. Take a dual-phase PVS impression with light body on the margins and heavy body in the tray, removing the top cord first.
- Take an opposing alginate and a Regisil bite registration. Cement the provisional with TempoCem. Dispatch to the lab with the shade, the material and the lab slip.

APPOINTMENT 2 — Crown try-in and cementation
- Remove the provisional with ultrasonic and pumice. Seat the crown proximally, then internally, then marginally.
- Assess stability, contour, occlusion (using 8 micron shim stock, blue for centric and red for eccentric) and aesthetics. Obtain PATIENT APPROVAL before cementing.
- Cement according to the material: for zirconia or PFM use RelyX or Panavia; for glass-ceramic use Variolink with HF etch and Monobond silane.
- Place rubber dam and remove all excess cement. Take a post-cementation bitewing, recheck the occlusion and give OHI.
Pathway B — cast post & core
POST AND CORE (cast) AND CROWN — [tooth __] — [material]
FERRULE CHECK — Confirm 1.5-2 mm of sound dentine height, a 1-2 mm wall thickness, and 4-5 mm coronal to the bone crest. A full 360-degree ferrule is ideal. If the ferrule is inadequate, reassess, then consider crown lengthening or orthodontic extrusion.

APPOINTMENT 1 — Post space, pattern or impression, and temporary post crown
- Give LA, place rubber dam and confirm endodontic readiness.
- Prepare the post space by removing GP to the planned length. Retain at least 4-5 mm of apical GP. Keep the post no more than one third of the root width. Take a PA to verify.
- REMOVE all internal undercuts in the canal and the coronal tooth so that the casting draws.
- Complete a rough crown prep and establish a ferrule and a positive stop.
- Capture the pattern with the impression technique. Seat the impression post, syringe light-body PVS into the dried canal, load heavy body in the tray and remove in a single snap.
- Make the temporary post crown as a single unit with a passive fit. Keep the temporary cement shallow. Leave the crown light and out of the excursions.
- The lab casts the post and core.

APPOINTMENT 2 — Cast try-in, cementation, crown prep and impression
- Remove the temporary and clean the post space of all cement and debris, especially in the coronal third.
- Try in the cast post. It must be PASSIVE and fully seated, so never force it. Use fit-checker, and take a PA if there is any doubt. A passive seat prevents hydraulic wedging that leads to root fracture.
- Cement with resin, RMGI or zinc phosphate. Apply the cement with a lentulo, avoid overfill, use a single path and do not pump. Leave it undisturbed until it reaches full set.
- Refine the crown prep only after the cement has fully set.
- Prepare the crown by zone, then check the prep with one eye closed for undercuts and confirm clearance in centric and in excursion. Make the provisional before the impression, using Luxatemp. Place double cord and take a dual-phase PVS impression.
- Take an opposing alginate and a Regisil bite registration. Cement the provisional with TempoCem and dispatch to the lab.

APPOINTMENT 3 — Crown try-in and cementation
- Remove the provisional. Seat the crown proximally, then internally, then marginally.
- Assess stability, contour, occlusion and aesthetics. Obtain PATIENT APPROVAL.
- Cement according to the material, using RelyX or Panavia, or Variolink with HF etch and silane.
- Place rubber dam and remove all excess cement. Take a bitewing, recheck the occlusion and give OHI.