E.max Crown Template
Chairside Form 26 for a lithium disilicate (IPS e.max) crown on [tooth __] — prep, impression, and adhesive cementation. Anterior takes Variolink Esthetic LC; a posterior crown takes Panavia F 2.0, because a posterior crown is too thick to light-cure through. There is a separate copy-pastable checklist for each. Material selection, the cement comparison and the impression comparison live in Crown Template; this sheet is the single-material, paste-and-go version.
Two signatures required
Form 26 = reconstructive phase. You need 2 signatures — prosth specialist AND clinic coordinators. No aesthetic work on this form.
Design & material
E.max is a glass-ceramic, so it is HF-etchable — and for lithium disilicate the adhesion carries the load: chemical adhesion is essential for fatigue behaviour and load-bearing capacity, and weak adhesion concentrates stress in the crown and the cement (DMD2 L3 - Biomaterials Dental Cements). An adhesive protocol is therefore not optional on this material, unlike zirconia where a self-adhesive cement is defensible.
- Margin design: shoulder / modified shoulder with a rounded internal line angle — a sharp 90° cannot be reproduced by CAD/CAM milling burs. No bevel and no feather edge — both leave a thin, fragile ceramic edge.
- Total occlusal convergence 6–12° (ideal taper 6°; TOC = 2 × taper). The shorter the axial walls, the more parallel they must be.
- Margin placement: supragingival wherever possible; if subgingival, intracrevicular only, maximum about 0.7 mm, and never within 2 mm of crestal bone. Beyond 0.5–1.0 mm subgingival a conventional impression is more reliable than a scan — decide before you prep.
Reduce to the OCHWA all-ceramic figures (OCHWA Crown Reduction Guidelines):
| Surface | Anterior | Posterior |
|---|---|---|
| Incisal / occlusal | 1.5 mm | 2 mm functional cusp · 1.5 mm non-functional cusp |
| Axial | 1 mm | 1 mm |
| Margin (shoulder) | 1 mm | 1 mm |
| Total occlusal convergence | 6–12° | 6–12° |
Do not prepare to the video figures
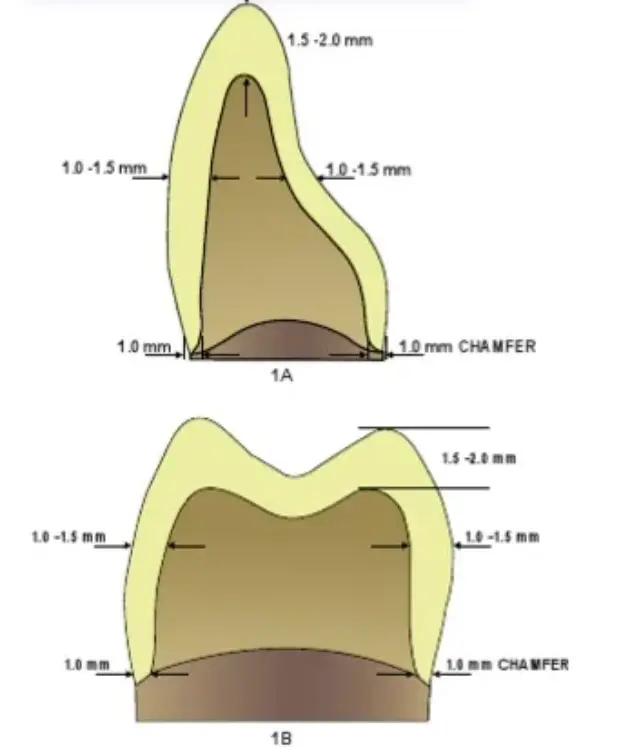
One prep video gives a 1.5–2.0 mm axial for lithium disilicate. That is the outlier — do not prepare to it. The OCHWA 1 mm axial and 1 mm margin agree with the 5x5x5 and ACC 30 figures. The “a ceramic shoulder needs at least 1.5 mm” line from M2 PFM Prep is about the PFM ceramic shoulder — it does not override the 1 mm all-ceramic margin.
Thickness drives cement shade and curing mode
At about 1 mm of ceramic the abutment colour and the cement shade are visually significant — worth raising on a discoloured or post-cored abutment, because 1 mm is exactly the OCHWA axial figure. At 1.5–2 mm the effect becomes clinically negligible. Curing mode by restoration thickness: light-cure for a translucent restoration under 1.5 mm, dual-cure at 1.5–2.5 mm, self- or dual-cure for anything thick or opaque. That rule is what splits this sheet in two: anterior takes the light-cure Variolink Esthetic LC, a posterior crown takes Panavia F 2.0.
Appointment 1 — Prep and impression
- LA — buccal plus palatal/lingual infiltration, with or without a block.
- Shade BEFORE the prep with Vita 3D Master: tooth wet, daylight, quick glances; record the thirds and any in-between shade (e.g. A1.5).
- Opposing alginate while the LA takes effect.
- Two putty keys — one kept intact for the provisional, one sectioned buccolingually as a reduction guide.
- Prep by zone to the figures above. Depth grooves on the triangular ridges and developmental grooves (1 mm diamond); reduce half the occlusal surface and use the other half as a guide; gross-reduce to about 80% of the final depth and leave the last 0.2 mm for finishing. Functional cusps (maxillary palatal, mandibular buccal) take the deeper reduction plus a functional cusp bevel. Axial reduction in two planes. Plane the margin from the side — never cut with the bur tip (“gutter margin”). Round all line angles.
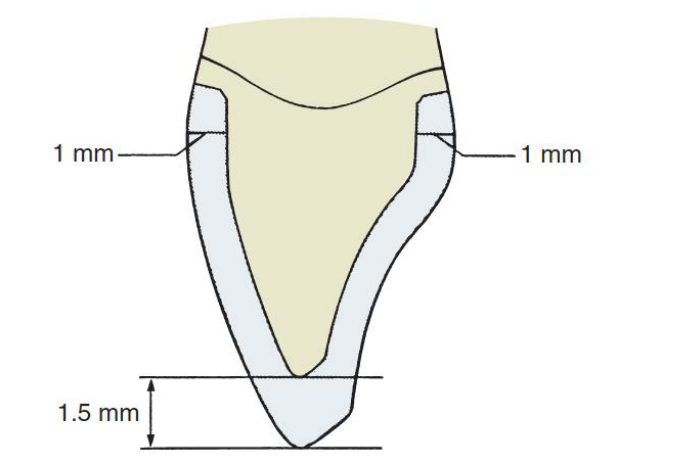
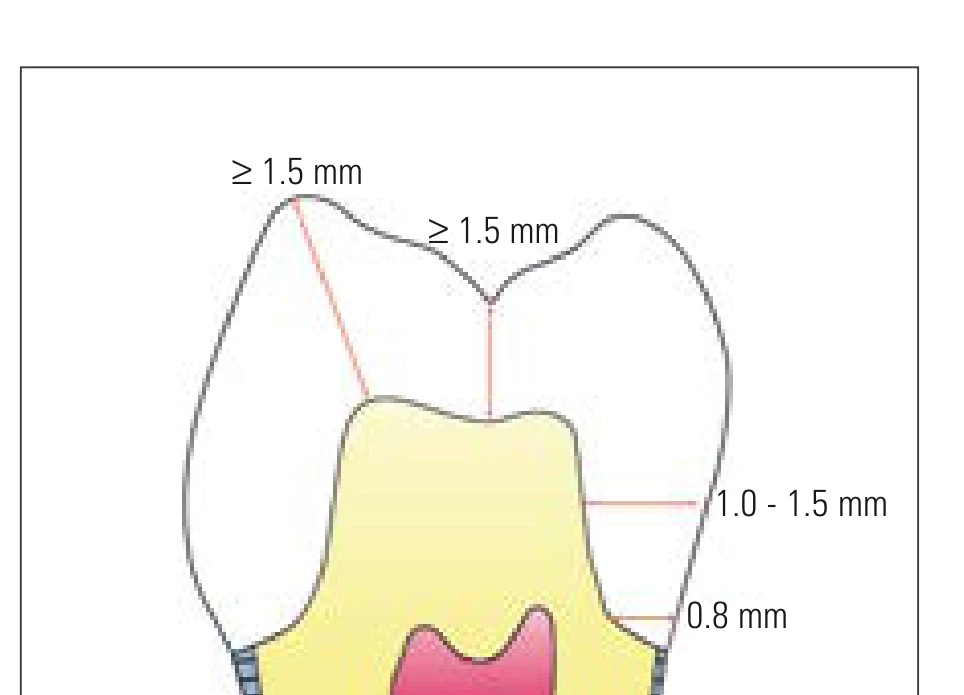
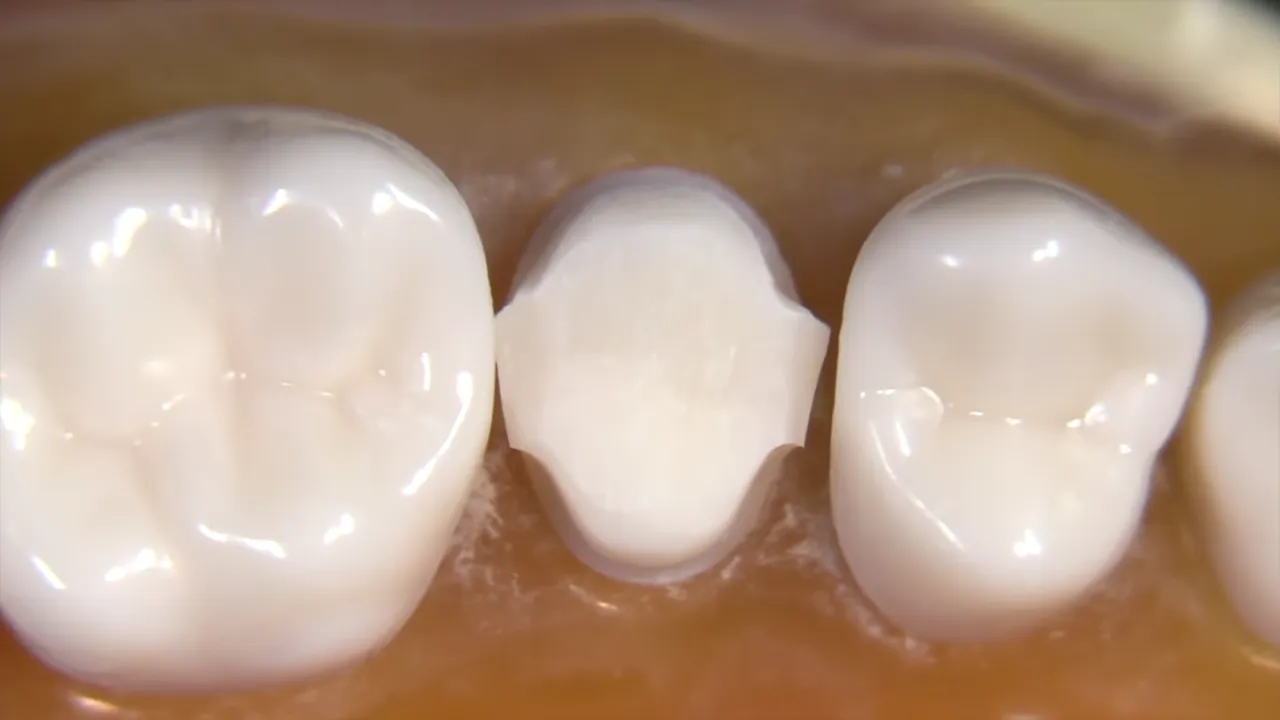
 Left — upper incisor prepped for an all-ceramic crown: 1 mm labial, 1 mm palatal, 1.5 mm incisal. Middle — the posterior equivalent, a sectioned premolar with the layer thicknesses marked. Right — a finished lithium disilicate posterior prep, showing the rounded occlusal table and continuous circumferential margin.
Read the posterior diagram against the OCHWA figures, not instead of them
That middle figure is VITA’s minimum ceramic layer thickness guidance for VITABLOCS, so it is generic all-ceramic rather than e.max-specific, and it runs slightly thinner than this clinic: 0.8 mm margin against OCHWA’s 1 mm, and 1.0–1.5 mm circumferential against OCHWA’s 1 mm. It also gives both cusps the same ≥1.5 mm. OCHWA does not — the functional cusp takes 2 mm and the non-functional 1.5 mm, as in the table above. Prepare to the table; use the drawing for where the numbers sit on the tooth.
- Check the prep. Undercuts: view from directly above with one eye closed — every part of the margin must be visible. Over-taper: only a small, uniform band of axial wall should be visible from the occlusal. Clearance: sectioned putty key, in centric and excursion. Margin: smooth and continuous on the probe, no ledges.
- Fabricate the provisional BEFORE the impression — Luxatemp or Protemp in the intact putty key.
- Double cord. Thin 000/00 stays in; the larger 0/1 comes out just before injecting. Wet in astringent.
- Dual-phase PVS — light body on the margins, heavy body in the tray. Remove the top cord first, seat back to front. Nitrile gloves only: latex inhibits the set.
- Inspect: all margins clear, 3–4 mm recorded beyond the margin, no bubbles, drags, or tray showing through.
- Opposing alginate and bite registration with Regisil, at MIP for a conformative case.
- Cement the provisional with TempoCem — eugenol-free, because the definitive is resin-bonded. Check the occlusion.
- Post-op advice: the temp is weak, avoid sticky and hard foods, floss out sideways.
- Lab dispatch: impression, opposing model, bite registration, shade and characterisation, material = IPS e.max lithium disilicate, lab slip. Ask whether the intaglio will come back pre-etched (9% HF gel).
+1.5 — On receiving labwork (before Appt 2)
- Die and opposing model: no pouring defects, over-trimming, fracture or wear.
- Internal surface: no blebs; touching the die at the margins only; slightly loose from the die spacer rather than friction-tight.
- Margins: no open margins, no overhangs, no underextensions.
- External surface: contour, shade and texture as requested; occlusion checked on the articulator.
Appointment 2 — Try-in and adhesive cementation
Try-in
- LA if needed. Remove the provisional by wiggling it; section it buccolingually if it is retentive. Clean off the cement with an ultrasonic scaler and pumice.
- Seat in order: proximal contact, then internal fit, then marginal fit. Assess stability, then contour, then occlusion, then aesthetics — 8 micron shim, blue marks centric and red marks eccentric.
- Variolink Esthetic Try-In paste (a temporary gel, not the cement): seat, assess colour and fit, and get patient approval before cementing. This step earns its keep anteriorly where shade is critical; on a posterior crown going to Panavia there is no matching try-in paste, so assess and get approval dry.
- Remove the crown. Clean the try-in paste off both crown and tooth. Isolate — rubber dam.
Restoration pre-treatment — extra-oral, and BEFORE conditioning the tooth (keeps the etched/bonded tooth uncontaminated)
- Wash the intaglio with water to remove the try-in gel; air dry.
- Ivoclean — rub on, wash off, dry again (removes saliva and blood contamination).
- HF etch — IPS Ceramic etching gel, 20 seconds for e.max. (IPS Empress is 60 seconds — do not apply the Empress time to e.max.) Skip if the lab has already etched with 9% HF gel. HF-free alternative: Monobond Etch & Prime — 20 s scrub, 40 s reaction time, rinse with water, air dry; it is a self-etching primer that replaces HF plus a separate silane.
- Monobond Plus silane on the conditioned intaglio: agitate, let it react 60 seconds, then disperse with a strong stream of air. Do not rinse it off. Use 60 s here, not the generic 20 s silane figure.
Everything above is the same whichever tooth you are on. The cementation is not.
A posterior e.max crown is too thick to light-cure through
Light penetrates a translucent restoration reliably to only about 1.5 mm. A posterior e.max crown is built to 2 mm on the functional cusp and 1.5 mm on the non-functional, so a light-cure cement cannot be relied on to set under the occlusal table. DMD2 L3 - Biomaterials Dental Cements scopes its light-cure protocol as “Variolink Esthetic LC Protocol (Inlays < 2 mm)” for exactly this reason. A posterior crown therefore goes to Panavia F 2.0, which dual-cures and has a guaranteed self-cure route through OXYGUARD II. Why Panavia and not RelyX Unicem 2 here: Panavia is a true adhesive resin cement — the tooth is primed, the intaglio is etched and silanated — whereas RelyX is self-adhesive and gives up the adhesion that e.max depends on for its fatigue and load-bearing behaviour (306.6 N mean failure load adhesively cemented, against 94.7 N for a non-adhesive cement). Keep RelyX Unicem 2 as the fallback if the Panavia kit is incomplete, and if you use it, still HF etch and silane the intaglio.
Anterior, or any restoration under 1.5 mm — Variolink Esthetic LC
- Rinse the prep with water, air dry.
- Total Etch phosphoric acid — marked optional on the technique card: 15–30 seconds (or 15–30 s on enamel and 15 s on dentine). Total etch and selective enamel etch are both options. Rinse thoroughly, air dry.
- Adhese Universal — scrub 20 seconds, air-thin the layer (avoid pooling), light cure 10 seconds (Bluephase G4).
- Variolink Esthetic LC into the pre-treated intaglio — do not overfill. Seat fully; patient bites on a cotton roll.
- Tack cure 2 seconds (about 1 second per surface) so the cement reaches a gel state, then remove excess (see below).
- Liquid Strip (glycerin gel) around all margins to block the oxygen-inhibition layer, then final cure through the Liquid Strip, 10 seconds per surface. Rinse off the Liquid Strip, polish the margins, apply Fluor Protector S.
Posterior crown — Panavia F 2.0
- Rinse the prep with water, air dry. Do not etch and bond with Adhese Universal here — Panavia brings its own tooth primer and the two systems are not interchangeable.
- ED PRIMER II — mix liquids A and B, apply to the prep, leave 30 seconds, then dry with gentle air. It goes on the TOOTH and it initiates the set, so keep to the 30 seconds and do not leave it sitting.
- Mix Panavia paste A and B for 20 seconds and load the intaglio. The cement goes inside the crown, never onto the tooth.
- Seat fully; patient bites on a cotton roll.
- Tack cure 2–3 seconds per surface to gel the excess, then remove excess (see below).
- Either light cure 20 seconds per surface (5 seconds with a plasma arc or fast halogen), or paint OXYGUARD II over all margins and leave 3 minutes to self-cure. OXYGUARD II blocks the oxygen-inhibition layer — it is doing Liquid Strip’s job. Rinse it off and polish the margins.
Either way — removing excess and finishing
- Remove excess at the gel stage: plastic instrument buccally and palatally/lingually. Interproximally the assistant holds the crown down, floss passes through the contact, then pull the floss out to the side — never back up occlusally, it can dislodge the crown.
- Post-cementation bitewing for residual interproximal or subgingival cement — remove any. Recheck the occlusion, re-polish anything adjusted, and give OHI and crown-care advice.
Review (about 1–2 weeks)
- Re-evaluate the occlusion — the patient was numb at insertion.
- Fine-tune the contacts, the shape and the height; re-polish any ceramic that was adjusted.
- Check function and gingival health.
Copy-pastable checklist — anterior
E.MAX (LITHIUM DISILICATE) CROWN — ANTERIOR — [tooth __]
Cement: Variolink Esthetic LC. Adhesive cementation is mandatory for this material, because the bond carries the load.

APPOINTMENT 1 — Prep and impression
- Give LA, using buccal plus palatal or lingual infiltration, with or without a block.
- Take the shade BEFORE the prep with Vita 3D Master. Keep the tooth wet, work in daylight, and use quick glances. Record the thirds and any in-between shades, for example A1.5.
- Take the opposing alginate while the LA takes effect.
- Take two putty keys. Keep one intact for the temp and section the other to use as a reduction guide.
- Prep by zone. Cut depth grooves with a 1 mm diamond, then reduce the incisal edge by 1.5 mm.
- Reduce the axial walls by 1 mm in two planes, keeping the total occlusal convergence between 6 and 12 degrees.
- Prepare a 1 mm shoulder margin with a ROUNDED internal line angle, using no bevel and no feather edge. Plane the margin from the side rather than cutting with the bur tip, and round all line angles.
- Check for undercuts by viewing from directly above with one eye closed. Every part of the margin must be visible.
- Check clearance against the sectioned putty key, in centric and in excursion.
- Run a probe around the margin and confirm it is smooth and continuous, with no ledges.
- Fabricate the provisional BEFORE the impression, using Luxatemp or Protemp in the intact putty key.
- Pack double cord. The thin 000 or 00 cord stays in, and the larger 0 or 1 cord is removed just before injecting. Wet the cords in astringent.
- Take a dual-phase PVS impression. Put light body on the margins and heavy body in the tray. Remove the top cord first, then seat back to front. Wear nitrile gloves, because latex inhibits the set.
- Inspect the impression. All margins must be clear, with 3-4 mm recorded beyond the margin, no bubbles or drags, and no tray showing through.
- Take the opposing alginate and the bite registration with Regisil, recording at MIP for a conformative case.
- Cement the provisional with TempoCem, and use a eugenol-FREE cement because the definitive will be resin-bonded. Check the occlusion afterwards.
- Give post-op advice. The temp is weak, so the patient should avoid sticky and hard foods, and should floss out sideways.
- Dispatch to the lab. Send the impression, the opposing model, the bite registration, the shade and characterisation, the MATERIAL as IPS e.max lithium disilicate, and the lab slip. Ask whether the lab will return the crown already etched with 9% HF gel.

+1.5 LAB CHECK (before Appt 2)
- Check the die and the opposing model for pouring defects, over-trimming, fracture, and wear.
- Check the internal surface. There should be no blebs, it should touch the die at the margins only, and it should be slightly loose because of the die spacer rather than friction-tight.
- Check the margins. There should be no open margins, no overhangs, and no underextensions.
- Check the external surface. The contour, shade, and texture should be as requested, and the occlusion should be checked on the articulator.

APPOINTMENT 2 — Try-in
- Give LA if needed. Remove the provisional by wiggling it, and section it from buccal to lingual if it is retentive. Clean off the cement with an ultrasonic scaler and pumice.
- Seat IN ORDER: the proximal contact first, then the internal fit, then the marginal fit.
- Assess the seated crown in order. Check stability, then contour, then occlusion, then aesthetics. For occlusion use an 8 micron shim, where blue marks centric and red marks eccentric.
- Try the crown in with Variolink Esthetic Try-In paste, which is a temporary gel and not the cement. Assess the colour and the fit.
- Get PATIENT APPROVAL before cementing.
- Remove the crown, clean the try-in paste off both the crown and the tooth, then isolate with rubber dam.

APPOINTMENT 2 — Restoration pre-treatment, done OUTSIDE the mouth and BEFORE conditioning the tooth
- Wash the intaglio with water to remove the try-in gel, then air dry it.
- Apply Ivoclean, rub it on, wash it off, and dry again. This removes saliva and blood contamination.
- HF etch the intaglio with IPS Ceramic etching gel for 20 seconds. That time is for e.max. IPS Empress takes 60 seconds, so do not apply the Empress time here. Skip this step if the lab has already etched with 9% HF gel.
- As an HF-free alternative, use Monobond Etch and Prime. Scrub for 20 seconds, allow 40 seconds of reaction time, then rinse with water and air dry. It replaces both the HF etch and the separate silane.
- Apply Monobond Plus silane to the conditioned intaglio, agitate it, allow it to react for 60 seconds, then disperse it with a strong stream of air. DO NOT RINSE Monobond Plus off. Use 60 seconds here, not the generic 20 second silane figure.

APPOINTMENT 2 — Cementation with Variolink Esthetic LC
- Rinse the prep with water and air dry it.
- Apply Total Etch phosphoric acid, which the technique card marks as optional, for 15 to 30 seconds. If splitting it, leave 15 to 30 seconds on enamel and 15 seconds on dentine. Rinse thoroughly and air dry.
- Scrub Adhese Universal into the surface for 20 seconds, air-thin the layer and avoid pooling, then light cure for 10 seconds with the Bluephase G4.
- Apply Variolink Esthetic LC to the pre-treated intaglio, and do not overfill.
- Seat the crown fully and have the patient bite on a cotton roll.
- Tack cure for 2 seconds, which is about 1 second per surface, so the cement reaches a gel state.
- Remove the excess at the gel stage with a plastic instrument buccally and palatally or lingually.
- Remove the interproximal excess with the assistant holding the crown down while floss passes through the contact. Pull the floss OUT TO THE SIDE, either buccally or lingually. Do not pull it back up occlusally, because that can dislodge the crown.
- Apply Liquid Strip glycerin gel around all margins to block the oxygen-inhibition layer, then final cure through the Liquid Strip for 10 seconds per surface.
- Rinse off the Liquid Strip, polish the margins, and apply Fluor Protector S.
- Take a post-cementation bitewing to check for residual interproximal or subgingival cement, and remove any that is found.
- Recheck the occlusion, and re-polish any adjusted surfaces.
- Give OHI and crown-care advice.

REVIEW (about 1-2 weeks)
- Re-evaluate the occlusion, because the patient was numb at insertion.
- Fine-tune the contacts, the shape, and the height.
- Check function and gingival health.
Copy-pastable checklist — posterior crown
E.MAX (LITHIUM DISILICATE) CROWN — POSTERIOR — [tooth __]
Cement: Panavia F 2.0. A posterior crown is too thick for light to cure through, so a light-cure cement is not used here. Adhesive cementation is mandatory for this material, because the bond carries the load.

APPOINTMENT 1 — Prep and impression
- Give LA, using buccal plus palatal or lingual infiltration, with or without a block.
- Take the shade BEFORE the prep with Vita 3D Master. Keep the tooth wet, work in daylight, and use quick glances. Record the thirds and any in-between shades, for example A1.5.
- Take the opposing alginate while the LA takes effect.
- Take two putty keys. Keep one intact for the temp and section the other to use as a reduction guide.
- Prep by zone. Cut depth grooves on the triangular ridges and the developmental grooves with a 1 mm diamond, then reduce the occlusal surface by 2 mm on the functional cusp and 1.5 mm on the non-functional cusp. The functional cusp also takes a functional cusp bevel.
- Reduce the axial walls by 1 mm in two planes, keeping the total occlusal convergence between 6 and 12 degrees.
- Prepare a 1 mm shoulder margin with a ROUNDED internal line angle, using no bevel and no feather edge. Plane the margin from the side rather than cutting with the bur tip, and round all line angles.
- Check for undercuts by viewing from directly above with one eye closed. Every part of the margin must be visible.
- Check clearance against the sectioned putty key, in centric and in excursion.
- Run a probe around the margin and confirm it is smooth and continuous, with no ledges.
- Fabricate the provisional BEFORE the impression, using Luxatemp or Protemp in the intact putty key.
- Pack double cord. The thin 000 or 00 cord stays in, and the larger 0 or 1 cord is removed just before injecting. Wet the cords in astringent.
- Take a dual-phase PVS impression. Put light body on the margins and heavy body in the tray. Remove the top cord first, then seat back to front. Wear nitrile gloves, because latex inhibits the set.
- Inspect the impression. All margins must be clear, with 3-4 mm recorded beyond the margin, no bubbles or drags, and no tray showing through.
- Take the opposing alginate and the bite registration with Regisil, recording at MIP for a conformative case.
- Cement the provisional with TempoCem, and use a eugenol-FREE cement because the definitive will be resin-bonded. Check the occlusion afterwards.
- Give post-op advice. The temp is weak, so the patient should avoid sticky and hard foods, and should floss out sideways.
- Dispatch to the lab. Send the impression, the opposing model, the bite registration, the shade and characterisation, the MATERIAL as IPS e.max lithium disilicate, and the lab slip. Ask whether the lab will return the crown already etched with 9% HF gel.

+1.5 LAB CHECK (before Appt 2)
- Check the die and the opposing model for pouring defects, over-trimming, fracture, and wear.
- Check the internal surface. There should be no blebs, it should touch the die at the margins only, and it should be slightly loose because of the die spacer rather than friction-tight.
- Check the margins. There should be no open margins, no overhangs, and no underextensions.
- Check the external surface. The contour, shade, and texture should be as requested, and the occlusion should be checked on the articulator.

APPOINTMENT 2 — Try-in
- Give LA if needed. Remove the provisional by wiggling it, and section it from buccal to lingual if it is retentive. Clean off the cement with an ultrasonic scaler and pumice.
- Seat IN ORDER: the proximal contact first, then the internal fit, then the marginal fit.
- Assess the seated crown in order. Check stability, then contour, then occlusion, then aesthetics. For occlusion use an 8 micron shim, where blue marks centric and red marks eccentric.
- Assess the colour and the fit dry, because Panavia has no try-in paste.
- Get PATIENT APPROVAL before cementing.
- Remove the crown, clean both the crown and the tooth, then isolate with rubber dam.

APPOINTMENT 2 — Restoration pre-treatment, done OUTSIDE the mouth and BEFORE conditioning the tooth
- Wash the intaglio with water to remove the try-in gel, then air dry it.
- Apply Ivoclean, rub it on, wash it off, and dry again. This removes saliva and blood contamination.
- HF etch the intaglio with IPS Ceramic etching gel for 20 seconds. That time is for e.max. IPS Empress takes 60 seconds, so do not apply the Empress time here. Skip this step if the lab has already etched with 9% HF gel.
- As an HF-free alternative, use Monobond Etch and Prime. Scrub for 20 seconds, allow 40 seconds of reaction time, then rinse with water and air dry. It replaces both the HF etch and the separate silane.
- Apply Monobond Plus silane to the conditioned intaglio, agitate it, allow it to react for 60 seconds, then disperse it with a strong stream of air. DO NOT RINSE Monobond Plus off. Use 60 seconds here, not the generic 20 second silane figure.

APPOINTMENT 2 — Cementation with Panavia F 2.0
- Check the kit is complete before you start: ED PRIMER II, pastes A and B, and OXYGUARD II. If Panavia is unavailable, RelyX Unicem 2 is the fallback. It is self-adhesive and bonds less well, so still HF etch and silane the intaglio.
- Rinse the prep with water and air dry it. DO NOT etch and bond with Adhese Universal here. Panavia brings its own tooth primer and the two systems are not interchangeable.
- Mix ED PRIMER II liquids A and B, apply to the prep, leave it 30 seconds, then dry with gentle air. It goes on the TOOTH and it initiates the set, so keep to the 30 seconds.
- Mix Panavia paste A and B for 20 seconds and load the intaglio. The cement goes inside the crown, never onto the tooth.
- Seat the crown fully and have the patient bite on a cotton roll.
- Tack cure for 2 to 3 seconds per surface to gel the excess.
- Remove the excess at the gel stage with a plastic instrument buccally and palatally or lingually.
- Remove the interproximal excess with the assistant holding the crown down while floss passes through the contact. Pull the floss OUT TO THE SIDE, either buccally or lingually. Do not pull it back up occlusally, because that can dislodge the crown.
- Either light cure for 20 seconds per surface, or 5 seconds with a plasma arc or fast halogen, OR paint OXYGUARD II over all the margins and leave it 3 minutes to self-cure. OXYGUARD II blocks the oxygen-inhibition layer.
- Rinse off the OXYGUARD II and polish the margins.
- Take a post-cementation bitewing to check for residual interproximal or subgingival cement, and remove any that is found.
- Recheck the occlusion, and re-polish any adjusted surfaces.
- Give OHI and crown-care advice.

REVIEW (about 1-2 weeks)
- Re-evaluate the occlusion, because the patient was numb at insertion.
- Fine-tune the contacts, the shape, and the height.
- Check function and gingival health.
Clinical Stages and Authorisation
Each stage requires date, signature, and clinical code (2 signatures — prosth specialist + clinic coordinator).
- DISCUSSION (material, shade, cement) — date / sign / code:
- FORM 26 signed – CC — date / sign / code:
- PREP and FINAL IMPRESSION — date / sign / code:
- LAB CHECK (die and crown on the model) — date / sign / code:
- INSERTION (adhesive cementation) — date / sign / code:
Authorisation
- Procedure Outline Authorised by:
- Clinician ID:
- Date: