Zirconia Crown Template
Chairside Form 26 for a monolithic zirconia crown on [tooth __] — prep, impression, try-in and Panavia cementation. Material selection, the cement comparison and the impression comparison live on the hub, Crown Template.
Two signatures required
Form 26 = reconstructive phase. You need 2 signatures — prosth specialist AND clinic coordinators. No aesthetic work on this form.
Design & material
- Margin design: rounded shoulder / modified shoulder, or a fillet. No sharp internal line angles — they are crack-initiation points, and CAD/CAM milling burs cannot reproduce a sharp 90° internal angle anyway.
- No bevel and no feather edge. A feather edge is contraindicated in most cases — the lab cannot read it.
- Total occlusal convergence 6–12° (ideal taper 6°; TOC = 2 × taper). The shorter the axial walls, the more parallel they must be.
- Zirconia is strong and opaque, so under-reduction shows up as an over-contoured crown rather than as a fracture. Sandblasting the intaglio adds mechanical retention, but the retentive geometry of the prep is still what holds the crown — do not rely on the cement.
- Margin placement as per house rules: supragingival wherever possible; if subgingival, intracrevicular only, maximum about 0.7 mm, and never inside the biologic width.
Prepare to these figures (OCHWA Crown Reduction Guidelines, “All-ceramic / full-ceramic” row):
| Surface | Anterior | Posterior |
|---|---|---|
| Incisal / occlusal | 1.5 mm | 2 mm functional cusp · 1.5 mm non-functional cusp |
| Axial | 1 mm | 1 mm |
| Margin | 1 mm | 1 mm |
| Total occlusal convergence | 6–12° | 6–12° |
There is no zirconia row in the OCHWA table — ring the lab
The guidelines group lithium disilicate and zirconia together as one “all-ceramic” category, and no DENT4216 or DMD3S1 lecture gives a zirconia-specific figure. The guidelines warn in their own words: monolithic zirconia tolerates thinner sections than layered ceramic in manufacturers’ own guidance — so confirm with the lab before reducing a zirconia case to these layered-ceramic figures. Do not substitute manufacturer or video thicknesses into the table above. Prepare to the OCHWA figures.
Appointment 1 — Prep and impression
- LA — buccal plus palatal/lingual infiltration, with or without a block.
- Shade BEFORE the prep, Vita 3D Master. Tooth wet, daylight, quick glances. Record thirds and in-between shades (e.g. A1.5).
- Opposing alginate while the LA takes effect.
- Two putty keys — one kept intact for the provisional, one sectioned buccolingually as a reduction guide.
- Prep by zone to the OCHWA figures above. Depth grooves on the triangular ridges and developmental grooves (1 mm diamond); reduce half the occlusal surface and use the other half as a guide; two-plane axial reduction; functional cusp bevel on the maxillary palatal / mandibular buccal cusp. Gross-reduce to about 80% of the target depth, then finish the last fraction.
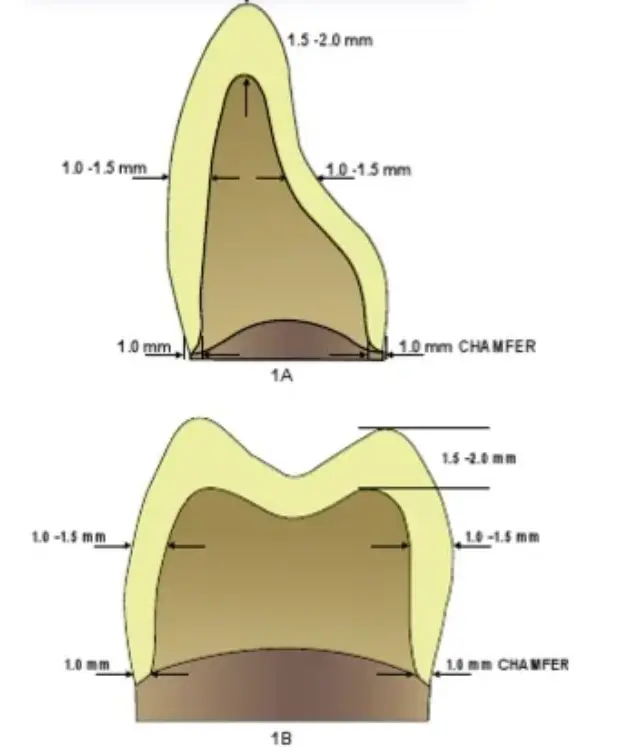
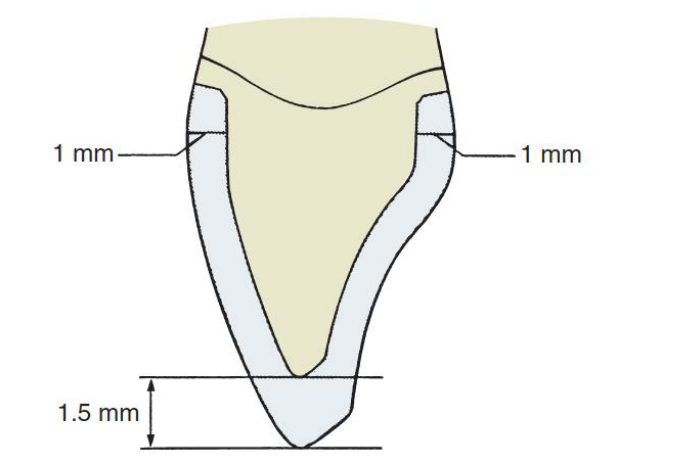 | 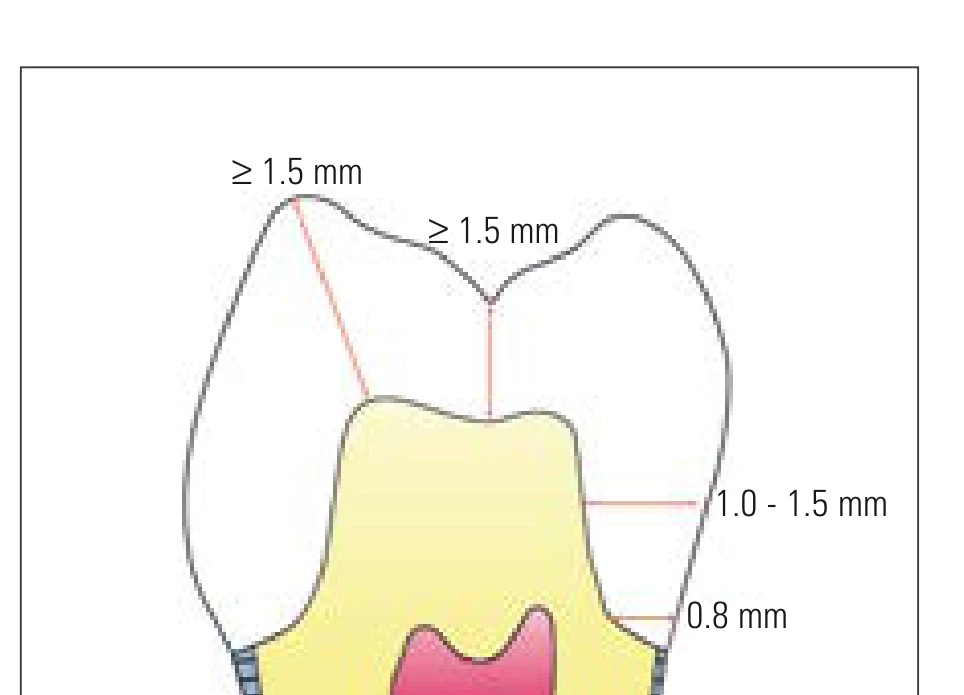 | 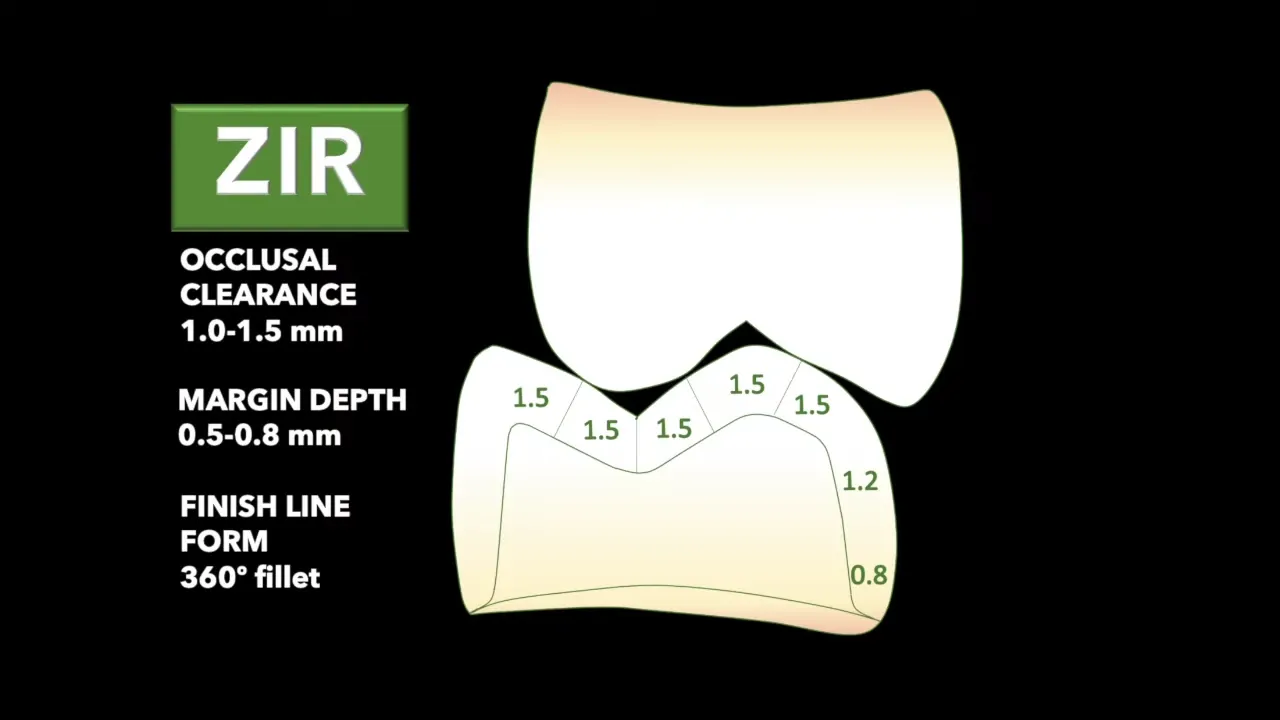 |
|---|---|---|
| Generic all-ceramic anterior prescription — 1 mm labial, 1 mm palatal, 1.5 mm incisal. It applies to zirconia; the vault has no zirconia-specific anterior image. | The posterior equivalent — a sectioned premolar with the layer thicknesses marked. Also generic all-ceramic, and it gives both cusps the same figure; see the note below. | Video-source ZIR schematic: its printed numbers (1.5 mm cusp incline, 1.2 mm axial, 0.8 mm margin, 360° fillet) differ from the OCHWA figures above, and the OCHWA figures are what you prepare to. |
Neither diagram overrides the OCHWA figures
The vault holds no zirconia-specific reduction diagram at all. The premolar figure is VITA’s minimum ceramic layer thickness guidance for VITABLOCS — generic all-ceramic, thinner than this clinic at the margin (0.8 mm against 1 mm), and it gives both cusps the same ≥1.5 mm. OCHWA differentiates them: 2 mm functional cusp, 1.5 mm non-functional. Use the drawings for where the measurements sit on the tooth, and the table above for what to prepare to.
- Check the prep. Undercuts: view from directly above with one eye closed — every part of the margin must be visible. Over-taper: only a small, uniform band of axial wall should be visible from the occlusal. Clearance: check with the sectioned putty key in centric and excursion. Margin: smooth and continuous on the probe, no ledges, no gutter margins.
- Fabricate the provisional BEFORE the impression — Luxatemp or Protemp in the intact putty key.
- Double cord. Thin 000/00 stays in, larger 0/1 comes out just before injecting. Wet the cords in astringent.
- Dual-phase PVS — light body on the margins, heavy body in the tray. Remove the top cord first, seat back to front. Nitrile gloves; latex inhibits the set.
- Inspect: all margins clear, 3–4 mm recorded beyond the margin, no bubbles, no drags, no tray showing through.
- Bite registration with Regisil at MIP for a conformative case.
- Cement the provisional with TempoCem — eugenol-free, because the definitive is resin-bonded. Check the occlusion.
- Post-op: the temp is weak — avoid sticky and hard foods, floss out sideways.
- Dispatch: impression, opposing model, bite registration, shade and characterisation, material = monolithic zirconia, and the lab slip.
+1.5 — On receiving labwork (before Appt 2)
- Die and opposing model — no pouring defects, over-trimming, fracture or wear.
- Internal surface — no blebs; touches the die at the margins only; slightly loose from the die spacer rather than friction-tight.
- Margins — no open margins, no overhangs, no underextensions.
- External surface — contour, shade and texture as requested; occlusion checked on the articulator.
Appointment 2 — Try-in and cementation
- LA if needed. Remove the provisional by wiggling; section buccal to lingual if retentive. Clean the cement off with an ultrasonic scaler and pumice.
- Seat in order: proximal contact, then internal fit, then marginal fit.
- Assess in order: stability, contour, occlusion, aesthetics. Occlusion with an 8 µm shim — blue marks centric, red marks eccentric.
- Patient approval before cementing.
Zirconia has no glassy phase
No hydrofluoric acid etch. No silane. There is no silica for a silane coupling agent to bond to. Bonding is airborne particle abrasion plus a 10-MDP cement.
Cement: Panavia F 2.0 (RelyX Unicem 2 acceptable — self-adhesive, dual cure, sets in about 6 minutes; still sandblast and clean the intaglio first).
Intaglio preparation
- Airborne particle abrasion, aluminium oxide, maximum 1 bar (15 psi). Excessive pressure creates microcracks and weakens the zirconia.
- After try-in, decontaminate with Ivoclean or Katana Cleaner — rub on, wash off, dry.
Panavia F 2.0 technique card
- Mix equal amounts of ED PRIMER II A & B and apply to the TOOTH. Wait 30 seconds.
The ED PRIMER II trap tooth, not in the crown, and it is what initiates the set of the cement. The cement goes inside the crown. Get these the wrong way round and the cement sets where you do not want it.
ED PRIMER II goes on the
- Gently air dry.
- Dispense equal amounts of Paste A & B.
- Mix Paste A & B for 20 seconds.
- Apply the mixed paste inside the crown. Seat fully.
- Remove excess. For easy clean-up, partially light-cure the excess 2–3 seconds, then peel it off.
- Cure the margins — one of:
- Light cure 20 seconds per surface (halogen or LED), or 5 seconds per surface (plasma arc / fast halogen), or
- Self cure: apply OXYGUARD II to the margins and wait 3 minutes.
- Post-cementation bitewing to check for subgingival cement remnants.
- Recheck the occlusion. Polish any adjusted surface — polish zirconia, never leave it glazed or adjusted-unpolished, or it abrades the antagonist.
- OHI and crown-care advice.
Check the Panavia kit before the appointment
ED PRIMER II, OXYGUARD II and Alloy Primer are Panavia F 2.0 kit components. No vault source confirms OCHWA stocks them separately — confirm the kit is complete before you start.
Review (about 1–2 weeks)
- Re-evaluate the occlusion — the patient was numb at insertion.
- Fine-tune the contacts, the shape and the height.
- Check function and gingival health.
Copy-pastable checklist
ZIRCONIA CROWN — [tooth __]


APPOINTMENT 1 — Prep and impression
- Give LA, using buccal plus palatal or lingual infiltration, with or without a block.
- Take the shade BEFORE the prep with Vita 3D Master. Keep the tooth wet, work in daylight, and use quick glances. Record the thirds and any in-between shades, for example A1.5.
- Take the opposing alginate while the LA takes effect.
- Take two putty keys. Keep one intact for the temp and section the other to use as a reduction guide.
- Prep by zone to the OCHWA all-ceramic figures. Incisal reduction on an anterior tooth is 1.5 mm. Occlusal reduction on a posterior tooth is 2 mm on the functional cusp and 1.5 mm on the non-functional cusp. Axial reduction is 1 mm and margin width is 1 mm.
- Check clearance against the sectioned putty key in centric and in excursion, and confirm the margin is smooth and continuous on the probe.
- Fabricate the provisional BEFORE the impression, using Luxatemp or Protemp in the intact putty key.
- Pack double cord. The thin 000 or 00 cord stays in, and the larger 0 or 1 cord is removed just before injecting. Wet the cords in astringent.
- Take a dual-phase PVS impression. Put light body on the margins and heavy body in the tray. Remove the top cord first, then seat back to front. Wear nitrile gloves, because latex inhibits the set.
- Inspect the impression. All margins must be clear, with 3 to 4 mm recorded beyond the margin, no bubbles or drags, and no tray showing through.
- Take the opposing alginate and the bite registration with Regisil, recording at MIP for a conformative case.
- Cement the provisional with TempoCem, and use a eugenol-FREE cement because the definitive will be resin-bonded. Check the occlusion afterwards.
- Give post-op advice. The temp is weak, so the patient should avoid sticky and hard foods, and should floss out sideways.
- Dispatch to the lab. Send the impression, the opposing model, the bite registration, the shade and characterisation, the MATERIAL as monolithic zirconia, and the lab slip.

+1.5 LAB CHECK (before Appt 2)
- Check the die and the opposing model for pouring defects, over-trimming, fracture, and wear.
- Check the internal surface. There should be no blebs, it should touch the die at the margins only, and it should be slightly loose because of the die spacer rather than friction-tight.
- Check the margins. There should be no open margins, no overhangs, and no underextensions.
- Check the external surface. The contour, shade, and texture should be as requested, and the occlusion should be checked on the articulator.

APPOINTMENT 2 — Try-in and cementation
- Give LA if needed. Remove the provisional by wiggling it, and section it from buccal to lingual if it is retentive. Clean off the cement with an ultrasonic scaler and pumice.
- Seat IN ORDER: the proximal contact first, then the internal fit, then the marginal fit.
- Assess the seated crown in order. Check stability, then contour, then occlusion, then aesthetics. For occlusion use an 8 micron shim, where blue marks centric and red marks eccentric.
- Get PATIENT APPROVAL before cementing.
- Sandblast the intaglio with aluminium oxide at NO MORE THAN 1 bar, which is 15 psi. Higher pressure creates microcracks and weakens the zirconia.
- Decontaminate the intaglio after try-in with Ivoclean or Katana Cleaner. Rub it on, wash it off, and dry.
- Mix equal amounts of ED PRIMER II A and B, and apply the mixture to the TOOTH. Wait 30 seconds.
- REMEMBER: ED PRIMER II goes on the tooth and initiates the set of the cement, and the cement itself goes inside the crown.
- Gently air dry.
- Dispense equal amounts of Paste A and Paste B.
- Mix Paste A and Paste B for 20 seconds.
- Apply the mixed paste INSIDE THE CROWN, not on the tooth, then seat the crown fully.
- Remove the excess. For easy clean-up, partially light-cure the excess for 2 to 3 seconds, then peel it off.
- Cure the margins by ONE of two methods. Either light cure for 20 seconds per surface with a halogen or LED light, or 5 seconds per surface with a plasma arc or fast halogen light. Otherwise self cure by applying OXYGUARD II to the margins and waiting 3 minutes.
- RelyX Unicem 2 is an acceptable alternative. It is self-adhesive and dual cure, and sets in about 6 minutes. Still sandblast and clean the intaglio first.
- Take a post-cementation bitewing to check for subgingival cement.
- Recheck the occlusion, and re-polish any adjusted surfaces. Polish zirconia rather than leaving it glazed or adjusted-unpolished.
- Give OHI and crown-care advice.

REVIEW (about 1-2 weeks)
- Re-evaluate the occlusion, because the patient was numb at insertion.
- Fine-tune the contacts, the shape, and the height.
- Check function and gingival health.
Clinical Stages and Authorisation
Each stage requires date, signature, and clinical code (2 signatures — prosth specialist + clinic coordinator).
- DISCUSSION (material, shade, cement) — date / sign / code:
- FORM 26 signed – CC — date / sign / code:
- PREP and FINAL IMPRESSION — date / sign / code:
- LAB CHECK (die and crown on the model) — date / sign / code:
- INSERTION (cementation) — date / sign / code:
Authorisation
- Procedure Outline Authorised by:
- Clinician ID:
- Date: