Endodontics Guidelines and Policies for Root Canal Treatment1
The University of Western Australia School of Dentistry
ENDODONTICS Guidelines and Policies for Root Canal Treatment
The following guidelines and policies are presented in order to familiarise Tutors and Students with the current teaching of Endodontic clinical procedures in the School of Dentistry. These Guidelines should be followed at all times in order to ensure consistency of teaching and consistency of clinical practice.
These guidelines are based on scientific evidence from the dental literature and in particular from studies performed within the Endodontics unit of this School. Whilst it is recognised that some variations to these clinical procedures may be necessary at times for specific cases, any such variations must be based on scientific evidence and must be in the patient’s best interests.
This document provides a summary of essential procedures and techniques used in the School. More detail is provided in other material supplied to students – especially the Laboratory Technique Course Instruction Manual.
Any queries about these guidelines should be directed to Winthrop Professor Paul Abbott.
Contents
- Introduction
- Initial Appointment
- Root Canal Preparation Appointment
- Root Canal Filling Appointment
- Definitive Restoration of the Tooth
- Review Examination
- Other Notes
- Post-Treatment Pain Management
- Antibiotics
- Drainage
- Root Canal Re-Treatment
- Assessing Root-Filled Teeth Prior to a New Restoration
Introduction to Root Canal Treatment
Root canal treatment is typically performed over three appointments – however, this may vary depending on the condition being treated (i.e. the diagnosis), the complexity of the tooth being treated, the response to treatment, the time available, the operator’s skills, the patient, etc.
Typically, the three appointments consist of:
- Examination, diagnosis, discussion, investigation and stabilisation of the tooth.
- Root canal preparation.
- Root canal filling.
Initial Appointment2
The aim of the initial appointment is to examine the patient, formulate a diagnosis, discuss the procedure with the patient to get his/her consent for treatment, and then to commence the root canal treatment if time is available. The first stage of the treatment is to investigate the tooth to ensure it is suitable for root canal treatment and further restoration, and then to stabilise the tooth with a medicament and an interim restoration.
Examination
- The OHCWA Form 70 must be used for ALL endodontic cases.
- The entire Form 70 should be completed to ensure that sufficient information has been collected to enable an accurate diagnosis to be made.
- History – a through history of the presenting problem is essential.
- Clinical examination – includes pulp sensibility tests (CO2 and electric pulp tests), transillumination, mobility, percussion, palpation, restoration assessment, periodontal probing, assessment for discolouration, swelling, etc.
- TRANSILLUMINATION – this is a very valuable diagnostic tool where a small but intense light is transilluminated through the tooth from many different angles. It readily highlights cracks and caries in the tooth. All teeth should be transilluminated when assessing the pulp and periapical status.
- The CAUSE of the diseases must be identified as part of the examination – specifically, what is the pathway of entry for the bacteria that have led to the pulp and periapical disease.
- Radiographs – the modified parallel technique must be used with a RINN XCP positioning device. Some teeth will require a tube shift view in addition to the standard “straight on” view.
- The diagnosis must include notations of all of the following four things:
- (i) the tooth (FDI identification number),
- (ii) the state of the pulp or the root canal system (note: not all teeth have pulps),
- (iii) the state of the periapical tissues, and
- (iv) the cause(s) of the diseases.
Case Discussion and Informed Consent
Case Discussion and Consent3
Patients must be aware of the diagnosis, the cause of the diseases, and the proposed management plan. Patients must give informed consent to the management plan before any treatment is provided. Patients must be aware that the final decision regarding the feasibility of root canal treatment and subsequent restoration of the tooth will be made once the tooth has been investigated (see below). Patients must be aware that there are two possible outcomes of the tooth investigation stage:
- (i) The tooth is suitable for treatment – in which case, treatment can proceed
- (ii) The tooth is not suitable for treatment – in which case, extraction is required.
Local Anaesthesia
Standard local anaesthesia (LA) techniques should be used. Lignocaine is usually the preferred local anaesthetic agent unless there is a medical contra-indication (which is very rare). LA should be used for all appointments until the root canal preparation has been completed. LA is NOT required for dressing changes or for root canal filling appointments (see below).
Rubber Dam
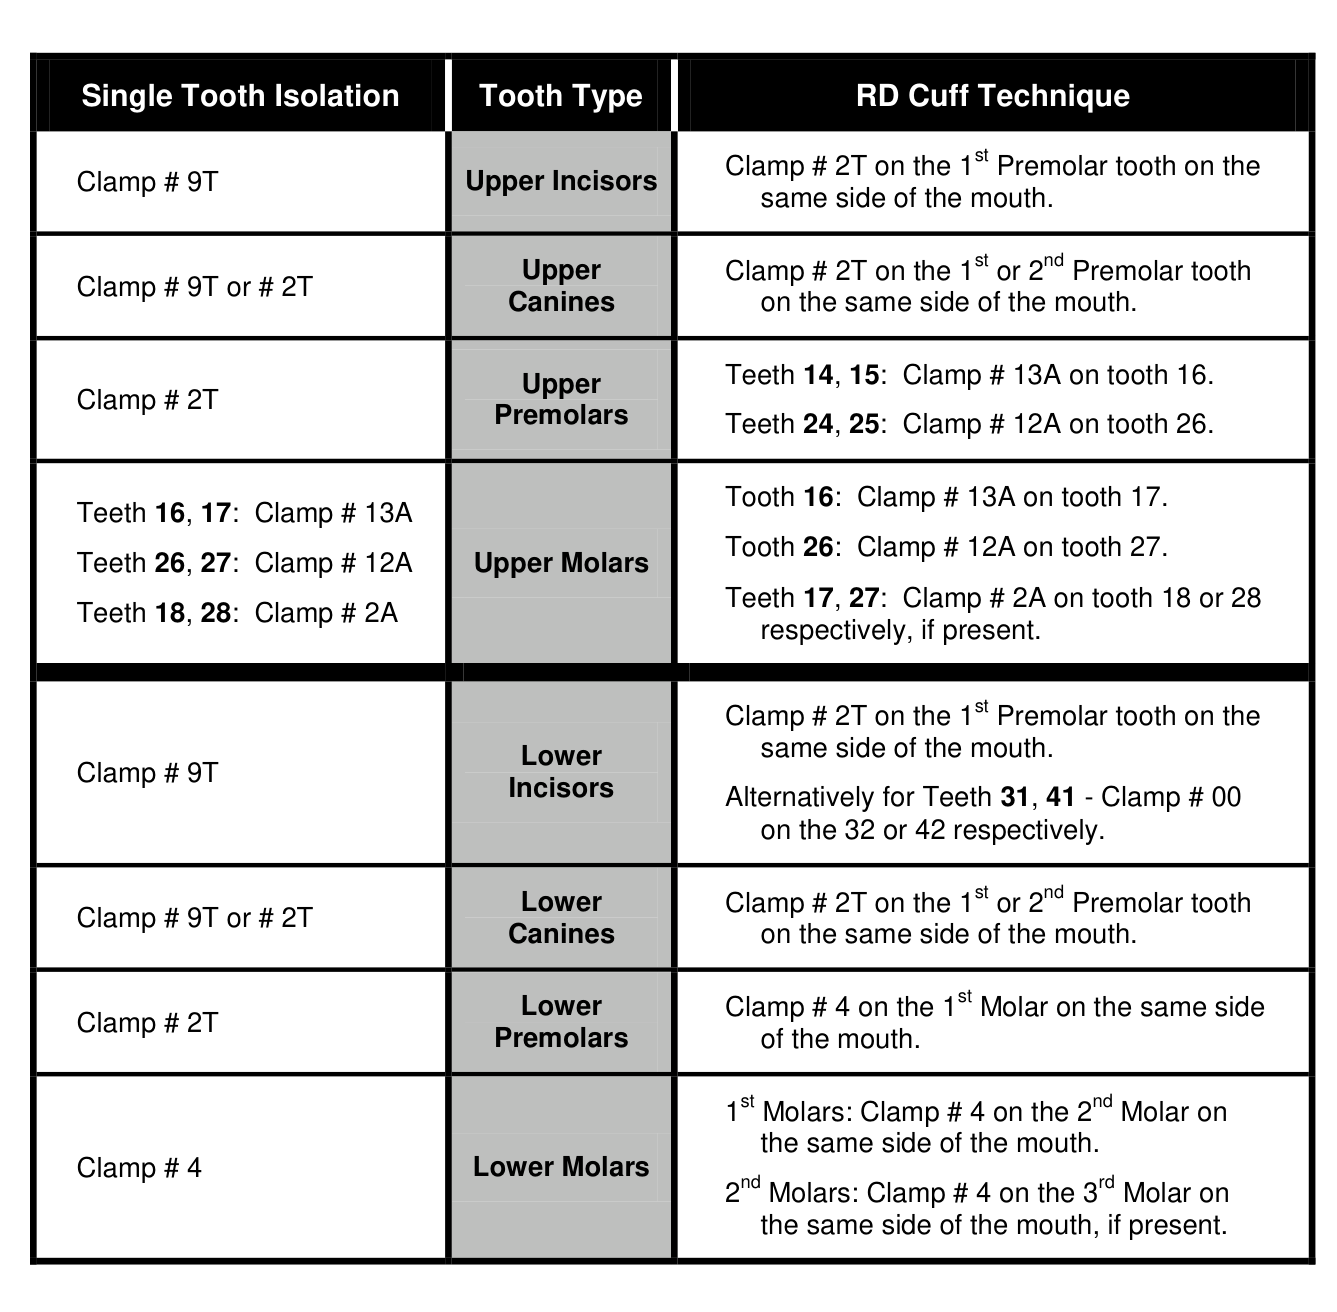
Rubber dam is MANDATORY for all appointments when root canal treatment is being done. This includes all stages of treatment, including tooth investigation. There is NO excuse for not using rubber dam for all stages of root canal treatment. If the tooth cannot be adequately isolated, then it is unlikely that the tooth can be adequately restored due to lack of tooth structure – in which case, extraction is indicated. Rubber dam should also be used for any other procedure involving the pulp (e.g. pulp capping, pulpotomy, etc) and where there is a possibility of the pulp becoming involved (e.g. a deep restoration). Rubber dam must also be used when the definitive restoration is being done on a root-filled tooth – this especially includes when a post hole preparation is being done and when posts are being inserted. There is little point protecting the root canal system from bacterial contamination during root canal treatment if it is then contaminated during the restorative procedures that follow. The rubber dam CUFF TECHNIQUE is an excellent way to isolate teeth for all root canal procedures and during restoration of the tooth. It allows complete access to the tooth during the tooth investigation stage, when placing interim restorations, during post preparation and placement, and for placing other restorations. The Cuff Technique provides more access and better vision during root canal treatment compared to a single tooth isolation technique. However, the single tooth technique will need to be used if the last standing tooth in the arch is being treated – otherwise, a cuff technique is preferred. Clamps – the following table lists the clamps that are ideal for most teeth / situations:
Isolation and Rubber Dam Techniques
| Single Tooth Isolation | Tooth Type | RD Cuff Technique |
|---|---|---|
| Clamp # 9T | Upper Incisors | Clamp # 2T on the 1st Premolar tooth on the same side of the mouth. |
| Clamp # 9T or # 2T | Upper Canines | Clamp # 2T on the 1st or 2nd Premolar tooth on the same side of the mouth. |
| Clamp # 2T | Upper Premolars | Teeth 14, 15: Clamp # 13A on tooth 16. Teeth 24, 25: Clamp # 12A on tooth 26. |
| Teeth 16, 17: Clamp # 13A Teeth 26, 27: Clamp # 12A Teeth 18, 28: Clamp # 2A | Upper Molars | Tooth 16: Clamp # 13A on tooth 17. Tooth 26: Clamp # 12A on tooth 27. Teeth 17, 27: Clamp # 2A on tooth 18 or 28 respectively, if present. |
| Clamp # 9T | Lower Incisors | Clamp # 2T on the 1st Premolar tooth on the same side of the mouth. Alternatively for Teeth 31, 41 - Clamp # 00 on the 32 or 42 respectively. |
| Clamp # 9T or # 2T | Lower Canines | Clamp # 2T on the 1st or 2nd Premolar tooth on the same side of the mouth. |
| Clamp # 2T | Lower Premolars | Clamp # 4 on the 1st Molar on the same side of the mouth. |
| Clamp # 4 | Lower Molars | 1st Molars: Clamp # 4 on the 2nd Molar on the same side of the mouth. 2nd Molars: Clamp # 4 on the 3rd Molar on the same side of the mouth, if present. |
Tooth Investigation4
- Tooth Investigation is an essential part of root canal treatment, and it could be considered as the most important part. Case selection for root canal treatment is based on whether there is sufficient tooth structure remaining to enable the tooth to be restored again with an expectation of reasonable longevity.
- Tooth investigation involves removal of ALL existing restorations, caries and cracks to determine how much tooth structure remains and whether it is suitable for the placement of a restoration that has a good long-term prognosis.
- Cracks should be considered as a potential entry point for bacteria – hence, they should all be removed in the same manner as caries and restorations. The only exception is a crack that is confined to enamel.
- Recommended bur – high speed Tungsten carbide Jet #331 bur (except if porcelain – use a Beaver bur #1931).
- The water coolant of the high speed handpiece can be turned off during this procedure since the pulp does not require “protection” from heat generated by the bur. This markedly improves visualisation and efficiency, as well as patient comfort. Use the bur in a series of short applications and do not place pressure on the bur when cutting the tooth or restoration as this can cause the tooth to “burn”.
Tooth Investigation and Access Cavity Preparation
Teeth should be regularly TRANSILLUMINATED during the investigation procedure in order to visualise cracks and ensure that they have been removed.
Once all restorations, caries and cracks have been removed, the pulp chamber should be opened.
Once the pulp chamber has been opened, the Triplex syringe should no longer be used. The cavity should only be washed with EDTAC irrigating solution in an irrigating syringe. If it needs to be dried at this stage to help with visibility, then use a small suction tip, aspirate with the irrigating syringe, or with use a cotton pellet.
The pulp chamber should be irrigated to remove debris and the floor of the chamber should be explored with a DG16 probe to locate the root canal orifices. Once the root canal orifices have been identified, the canals can be initially negotiated (see below).
It is not necessary to fully negotiate the canals to the estimated working length at this stage – this initial negotiation is done for two simple reasons –
- (i) it allows the operator to determine whether root canal treatment can be done easily or not, including whether the patient should be referred for specialist treatment; and
- (ii) it opens the canals to allow an initial medicament to be placed (see below).
At this stage, the tooth should be assessed to determine whether it is suitable for further restoration – this is based on the amount, quality and position of the remaining tooth structure. The following three questions should now be considered:
- (i) Is there sufficient tooth structure remaining to enable the tooth to be restored again with a good long-term prognosis?
- (ii) How can it be restored again (and note this in the Records)?
- (iii) What interim restoration can be used while the endodontic treatment is being done?
If the tooth IS suitable for further restoration – then the root canal treatment can be continued.
If the tooth is NOT suitable for further restoration – then a simple temporary restoration should be placed and the patient should be advised of the very poor prognosis as well as the need to extract the tooth. The extraction should then be arranged.
Canal Negotiation5
Initial negotiation of the root canal is one of the most critical mechanical steps in root canal treatment. If this is done well, and carefully, the remainder of the treatment becomes relatively simple. However, if the initial negotiation is not done well, ledges, other blockages and complications can be created and these will all complicate the remaining treatment.
Initial canal negotiation should be done with a small Hedström file – e.g. size 10 or 15 – but the size used will depend on the natural size of the canal. Some canals can be negotiated with larger files.
Hedström files are used in the School of Dentistry – negotiation is done with these files using a combination of actions:
- (i) Slight rotation of the file (maximum one-eighth of a turn) – to engage the dentine when wanting to go further into the canal.
- (ii) A push-pull action with cutting on the withdrawal stroke, and
- (iii) Circumferential filing – moving the file circumferentially around the canal wall in a flaring manner.
The latter two actions are done simultaneously to enlarge and flare the canal in all dimensions to create a tapered canal preparation.
Initial Irrigation Protocols
Irrigation6
- At the initial appointment only EDTAC is required.
- Canals at this stage are very narrow and therefore little irrigant penetrates into the canal.
- EDTAC is used as it has good cleaning action - due to the cetrimide component which helps to clean the access cavity and pulp chamber. This assists with location of the canal orifices.
Initial Medicament Selection
Initial Medicament
- The choice of medicament to be used at this stage of treatment is entirely dependent on the diagnosis of the pulp/root canal system and the periapical tissues, with the main indicator being the state of the pulp/root canal system, as follows:
- (i) Acute or chronic irreversible pulpitis – Ledermix paste
- (ii) “Elective” root canal treatment– Ledermix paste (Note: this is a rarely required or justified procedure)
- (iii) Necrotic and infected pulp, pulpless and infected root canal system or a root-filled and infected root canal system – a 50:50 mixture of Ledermix paste and a calcium hydroxide paste.
- Variations to these general guidelines are necessary in certain situations – such as following trauma, when treating external inflammatory resorption, internal inflammatory resorption, other forms of resorption, open apices, concurrent endodontic and periodontal diseases, etc. In these cases, operators should consult other notes provided about the specific condition in order to follow the recommended medicament regimes for the particular presenting problem.
- As the canals have not been enlarged at this stage, the medicament should be placed in the canal with a small Hedström file by rotating it anti-clockwise.
- Do NOT use a spiral filler at this stage unless the canal is naturally wide.
- Ensure the medicament is only in the root canal and NOT in the crown part of the tooth in order to avoid discolouration of the tooth (especially important in anterior teeth).
- NOTE – a 50:50 mix of Ledermix paste and a calcium hydroxide paste can be applied in either of two ways, although the first method is the simplest and most efficient way:
- (i) Mix equal amounts of Ledermix paste and Calasept Plus paste (a saline-based paste) on a glass slab and then place the mixture in the canal, or
- (ii) Place Ledermix paste in the canal first and then place Pulpdent paste (a methyl cellulose-based paste) in the canal – the two pastes will be mixed in the canal (Note: if these two pastes are pre-mixed, the result is a thick, “gluggy” paste that is very difficult to place in the canal).
Closing the Pulp Chamber
- A SMALL pellet of sterile cotton wool should be placed across the floor of the pulp chamber to prevent the temporary restorative material from going into the canals and blocking them.
- The cotton pellet must be small so as not to encroach too much on the space available for the Cavit layer (see below) and to keep the Cavit layer stable during the placement of the interim restoration.
- Place a layer of Cavit in the pulp chamber to close it. The Cavit can be “built up” (e.g. 2-3mm) to make it easier to locate when accessing the pulp chamber at the next appointment.
Interim Restorations
- “Interim restorations” are the restorations used to restore the tooth following tooth investigation – this restoration is left in place for the remainder of the root canal treatment and until the tooth is restored in a definitive manner.
- Interim restorations are largely based on glass ionomer cements – and particularly Ketac Silver and Ketac Fil. These two materials are chosen because experimental studies have been performed to show their usefulness and efficacy as interim restorative materials. Other glass ionomer materials have NOT been investigated in the same manner and therefore there is a lack evidence to support their use as interim restorations during root canal treatment.
- The Ketac materials are chemically cured which is highly advantageous due to the need to use stainless steel bands in many posterior teeth – since light curing cannot be done through a stainless steel band. The chemical curing also avoids the shrinkage associated with resin-modified materials. This is a particular consideration in the large cavities that are likely to be encountered in teeth requiring root canal treatment. It is much faster, easier and more efficient to use chemical-cured materials than to have to use incremental layers of light cured materials.
- Ketac Silver – use in posterior teeth when there are no aesthetic concerns. This material is recommended because of its higher strength, it is less brittle, it is less sensitive to moisture loss, and its colour contrast with the tooth enables easy and conservative removal after root canal treatment.
- Ketac Fil – use in anterior teeth and where there are aesthetic concerns with premolars (e.g. upper 1st premolars) as this material is tooth-coloured.
- Ketac Conditioner MUST be used to “condition” the dentine prior to placing Ketac Silver or Ketac Fil. This ensures a clean dentine surface which assists with bonding and retention of the restoration.
- It is also advantageous to “condition” the enamel surface of the tooth with the Ketac Conditioner in order to provide a clean surface for the material to bond to the enamel.
- The simplest method for applying Ketac Conditioner is to use tweezers and a cotton pellet dipped into the solution.
- Ketac Glaze MUST be placed over Ketac Silver and Ketac Fil whilst these materials are setting in order to prevent them from drying out (and subsequently cracking). Use tweezers and a cotton pellet to apply the Ketac Glaze and also to shape the restoration once the material has been placed in the tooth. Most restorations can be fully shaped and smoothed over with the cotton pellet so minimal, if any, trimming or polishing is required once the material has set.
- Do NOT use mini applicator tips for applying Ketac Glaze as these leave a lot of “divots” or a “pock-marked” surface on the material which then requires considerable smoothing and polishing.
- Stainless steel bands MUST be used if there is a cusp missing from the tooth, or if the interim restoration is likely to fracture or dislodge during function or during access cavity preparation at subsequent appointments.
- The major purpose of using stainless steel bands is to help retain the interim restorations.
- When using stainless steel bands, use the Ketac Silver or Ketac Fil as a cementing medium (coat the inside of the band before seating it on the tooth) and then fill the rest of the cavity with the same material.
- If a stainless steel band is used in a premolar tooth with aesthetic concerns, then a “veneer” of the Ketac Fil should be placed over the buccal aspect of the band to hide the metal – in this situation, drill two small holes through the band to help retain the “veneer” of Ketac Fil. In addition, the Ketac Fil can be built up slightly to resemble a cusp – but do not try to reconstruct the tooth to normal size.
Anterior Tooth Restorations
- Anterior teeth – typically, Ketac Fil can be used for most interim restorations in anterior teeth. However, some teeth may require an interim crown and these can be constructed using a cold-cure acrylic such as Luxatemp - with or without a polycarboxylate crown form. If a crown form is not used, then a putty impression must be taken pre-operatively to construct the interim crown.
- It is essential to use a material that provides retention and anti-bacterial action over an extended period of time to cement interim crowns – hence, IRM or zinc phosphate cement should be used. Materials such as TempBond, TempCem, etc should not be used as there is no evidence that they prevent bacterial penetration over the usual 4-6 week inter-appointment time required during root canal treatment. They also rarely retain a crown for such an extended period of time.
Interim Restoration Finishing and Occlusal Adjustment7
- The interim restoration and the tooth should be removed from all occlusal contact – this helps to protect the tooth during function and it reduces post-operative pain by keeping pressure off the periapical tissues.
- Check the occlusion with articulating paper to ensure the tooth is free of all contact in centric occlusion and during all lateral and protrusive movements.
- Tooth structure that will need to be removed as part of the definitive restoration (e.g. crown, overlay, etc) can be removed as part of the tooth investigation and occlusal adjustment procedures at this first appointment - since it needs to be removed anyway and it helps to avoid tooth fractures and sharp edges around the interim restoration.
- The interim restoration should be checked to ensure there are no sharp edges and that the patient can floss and clean around the tooth. When placing the interim restoration (especially if a stainless steel band is also used), build the restorative material up slightly to create rounded edges rather than leaving the occlusal surface flat as the latter will usually result in sharp edges at the edge of the band and these will annoy the patient, or they may cut the tongue, or cheeks.
Records
- All treatment details must be entered on the OHCWA Form 71 and/or Form 72 (the latter if a continuation of treatment and the Form 71 is filled on both sides).
- Form 71 has a table for the recording of the technique used for rubber dam placement.
- Form 71 has another table for the recording of root canal treatment details such as working lengths, file sizes, etc.
- It is not necessary to repeat the information in these tables elsewhere in Forms 71 or 72 (e.g. when writing other details of treatment).
Inter-Appointment Time Interval
- The minimum inter-appointment time following the initial appointment is four (4) weeks although up to six (6) weeks is acceptable.
- Medicaments such as Ledermix paste and a 50:50 mixture of Ledermix and calcium hydroxide pastes take at least 3-4 weeks to be fully effective.
- Inflammation in the periapical tissues also takes at least four weeks to show early signs of resolution.
- Hence, patients should not be seen again for at least four (4) weeks after the initial root canal treatment.
Root Canal Preparation Appointment
At the second appointment and after reassessing the tooth to ensure that all symptoms and signs have resolved, the root canal treatment can be continued and this involves completing the root canal preparation. The aim of this procedure is to create a space that can be predictably disinfected – through the use of liquids (i.e. irrigants) and pastes (i.e. medicaments) - and then eventually filled with materials (i.e. the root canal filling) to prevent re-infection of the root canal system.
-
Local anaesthesia should be used for this appointment as there may still be viable nerve fibres within the apical part of the root canal.
-
Local anaesthesia should also be used because operators may insert files beyond the apical constriction as the actual/true working length of the root canal has not yet been established.
-
Rubber dam is again essential. A cuff technique is the most ideal way to isolate the tooth and to provide good access to the canals and visibility to the operating field (see above).
Access Cavity Through the Interim Restoration
- The access cavity can be cut using a tungsten carbide Jet #331 bur in the high speed handpiece.
- The water coolant of the high speed handpiece can be turned off during this procedure since the pulp does not require “protection” from heat generated by the bur. This markedly improves visualisation and efficiency, as well as patient comfort.
- Initially, aim to locate the Cavit that was placed in the pulp chamber at the first appointment.
- Once the Cavit has been located, the access cavity should be expanded until all of the Cavit has been exposed and removed. The cotton pellet can then be removed to expose the root canals.
- Irrigate with EDTAC to ensure removal of all of the restorative materials from the access cavity before attempting to negotiate the root canals.
- Do NOT use the triplex syringe as this can force materials into the canals and block them.
Canal Negotiation
- Locate and negotiate the root canals using small Hedström files, as described above.
- At this stage, the aim is to reach the estimated working length of each canal.
- Ideally, at least a size 15 file should reach the estimated working length before a radiograph is taken to more accurately establish the working length.
- It is difficult to see the tip of a size 10 or smaller file on a radiograph – hence, a size 15 is the minimum size that should be used for working length determination.
- If a larger size than size 15 can be inserted without actively using the file, then use the larger file.
Working Length Determination
Working Length8
- The working length must be established radiographically as this is the most accurate and reliable technique. If an Apex Locator is used, a radiograph is still required as apex locators have not been shown to be 100% reliable – if they are incorrect, they usually indicate a longer working length than what is required and this can lead to periapical inflammation and foreign body reactions.
- Once a size 15 file (or larger) has reached the estimated working length in each canal, a periapical radiograph must be taken to assess the correct working length. Some teeth will require more than one radiograph to establish the working lengths of all canals.
- The aim is to complete the root canal preparation at the apical constriction (i.e. the dentino-cemental junction) as this is the point where the pulp ends and the periodontal ligament commences. It is also the point where the canal has its narrowest diameter and therefore this point creates a good natural mechanical barrier to prevent the root filling material being extruded through the apical foramen and thereby potentially causing a foreign body reaction – as long as this constriction is not violated or enlarged by incorrect filing of the canal!
- The “working length radiograph” should have a file placed in every canal.
- Tube shift radiographs must be used for multi-canal teeth. Typical tube shifts for each tooth type:
- Upper incisors & canines – straight on view with increased vertical angle
- Lower central incisors – mesial tube shift with increased vertical angle
- Lower lateral incisors & canines – distal tube shift with increased vertical angle
- Upper & lower premolars – mesial tube shift with increased vertical angle
- Lower molars – mesial tube shift with increased vertical angle
- Upper molars – distal tube shift with increased vertical angle. Often also need a mesial tube shift (NB: the distal shift is good for viewing the MB root, the mesial shift is good for viewing the DB root)
- Measure the files before placing them into the canals, but then move the rubber stopper up the file to allow other canals to be visualised and accessed with files.
- Accurately measure each file AS IT IS REMOVED from the canal after the radiograph has been exposed.
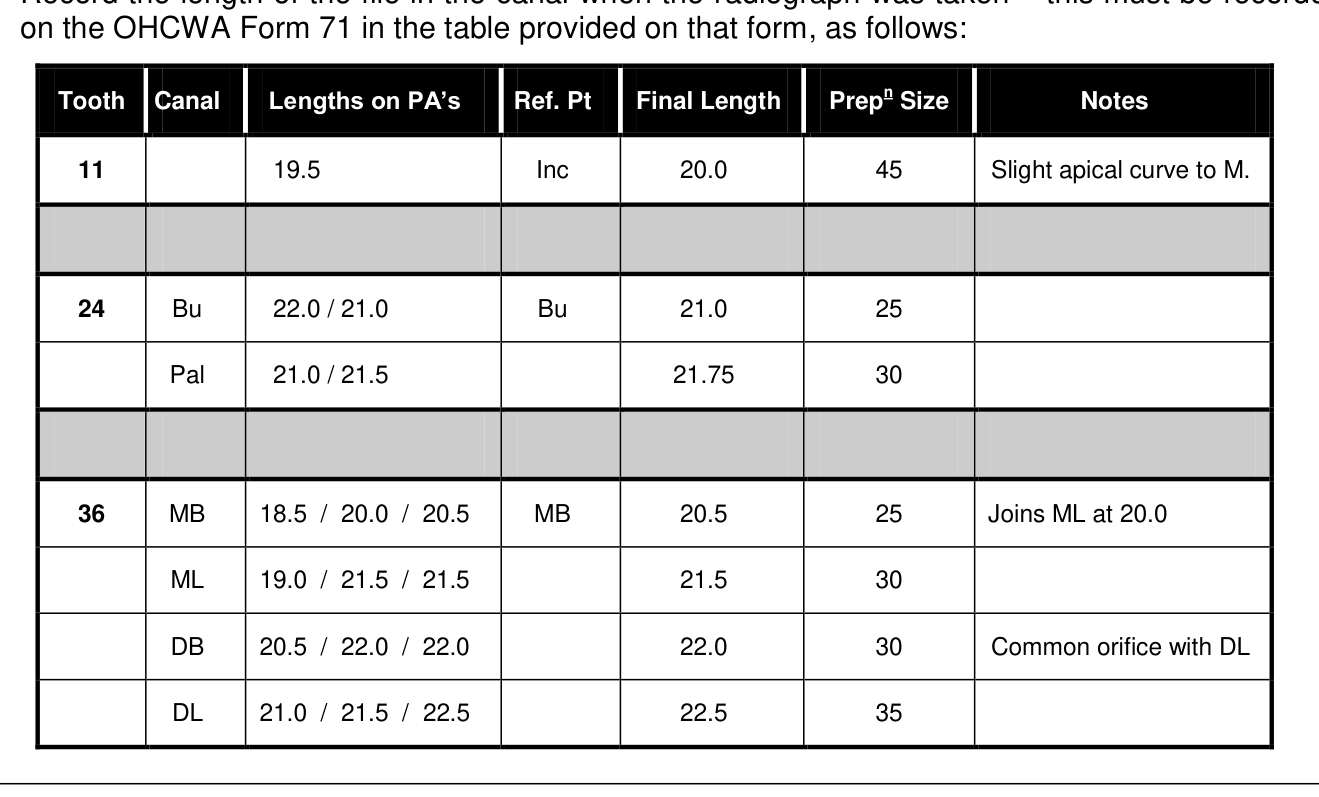
- Record the length of the file in the canal when the radiograph was taken – this must be recorded on the OHCWA Form 71 in the table provided on that form, as follows:
| Tooth | Canal | Lengths on PA’s | Ref. Pt | Final Length | Prep Size | Notes |
|---|---|---|---|---|---|---|
| 11 | 19.5 | Inc | 20.0 | 45 | Slight apical curve to M. | |
| 24 | Bu | 22.0 / 21.0 | Bu | 21.0 | 25 | |
| Pal | 21.0 / 21.5 | 21.75 | 30 | |||
| 36 | MB | 18.5 / 20.0 / 20.5 | MB | 20.5 | 25 | Joins ML at 20.0 |
| ML | 19.0 / 21.5 / 21.5 | 21.5 | 30 | |||
| DB | 20.5 / 22.0 / 22.0 | 22.0 | 30 | Common orifice with DL | ||
| DL | 21.0 / 21.5 / 22.5 | 22.5 | 35 |
Recording Radiographic Lengths
The “Length on PA’s” column is used to record the length at which the file has been placed in the canal when the radiograph is taken. It is NOT the estimated length measured on the pre-operative radiograph - there is no need to record this estimate. It is ESSENTIAL to keep a record of the lengths at which the files were placed whenever a radiograph is taken. If more than one radiograph is taken with files at different lengths, then record the second and subsequent lengths in the same column in the chart – see examples above for Tooth 24 (two films taken) and Tooth 36 (three films taken).
The working length should always be established at the same appointment as when the canals are being prepared. That is, do not establish working length at one appointment and then prepare the canals at a subsequent appointment as operators are unlikely to measure files in exactly the same manner every time they do root canal treatment, plus it is impossible to remember how it was done for every canal. At times it may seem efficient use of time if some time is available at the initial appointment, but the reality is that it may lead to problems with the root canal preparation due to different measuring techniques at the different appointments.
Canal Preparation9
Once working length is established for each canal, the canals can be biomechanically prepared.
The aim of the root canal preparation procedure is to prepare a constantly tapering, conical shape root canal – since this is the easiest canal shape to fill. It is also the easiest canal shape in which to place irrigants and medicaments to disinfect the canals prior to filling them.
Hedström files are used sequentially in increasing sizes to prepare the root canals.
The files are used with three distinct actions as described above – i.e. slight rotation to engage the dentine when trying to penetrate further into the canal, and a push-pull action in conjunction with circumferential filing when enlarging and flaring the canals.
Canals must be prepared to a minimum file size 25 at the apical constriction – this minimum size applies to canals that initially could only be negotiated with a size 20 or smaller file.
Some canals will have a larger apical size when prepared as they may have been naturally larger at the commencement of treatment.
Canals that can be easily negotiated with larger files need to be enlarged one, two or more sizes beyond the first file that engaged dentine. The final size chosen will depend on several factors – mainly, the first file that engaged dentine, and how many files are required to produce an easy-to-fill canal shape and size.
The main criteria used to determine whether the root canal has been adequately prepared are:
- (i) The final size file used can easily go to the full working length without hindrance – this indicates that the canal has been adequately prepared for that file size.
- (ii) The final size file used will stop at the working length and cannot penetrate any further if a vertical force is applied – this indicates a good “apical seat” or “stop” at the apical constriction.
- (iii) The final size file used at working length is very loose in the prepared canal – this indicates that good the prepared canal has good and adequate taper which facilitates disinfection and filling of the canal.
During the filing procedure, the canals should be irrigated with EDTAC – see below.
Once the root canals have been mechanically prepared and enlarged, they should then be irrigated with sodium hypochlorite, followed by EDTAC again, as outlined below.
Irrigation During Preparation
Irrigation During the Canal Preparation Appointment10
- Irrigation is required for several reasons, with the most important ones being disinfection of the root canal system, dissolution of inorganic and organic tissue, flushing of debris from the canal and lubrication while filing.
- Root canal preparation results in a smear layer being created on any/all parts of the canal wall that is contacted by the files.
- The smear layer can consist of inorganic and/or organic matter, depending on what irrigating solution is used while filing.
- Inorganic smear layer is the hardest to remove so it is best to avoid creating such a smear layer.
- Organic smear layer is relatively easy to remove as organic tissue is more easily dissolved.
- Two irrigants are required to achieve all aims of irrigation during root canal preparation.
- The irrigants to be used during the root canal preparation appointment are as follows:
- (i) EDTAC – 15% solution - use during ALL filing procedures (i.e. while the root canal is being prepared) since it reduces the amount of inorganic matter within the smear layer. It is also a good lubricating agent due to the effects of the cetrimide which is essentially a detergent and a good surfactant.
- (ii) Sodium hypochlorite – 1% solution (NaOCl) – use this irrigant after the canals have been enlarged in order to disinfect the root canal, to dissolve organic tissue and to remove the organic part of any smear layer that has developed (which should minimal due to the use of EDTAC while filing).
- Flush the EDTAC out of the canal by irrigating with NaOCl after the last file has been used at working length, then leave the canals filled with the NaOCl for 30-60 seconds.
- Then, flush the NaOCl out of the canal with more NaOCl and leave some of the fresh solution in the canal for another 30-60 seconds. Repeat this process for at least 5 minutes.
- The solution can be agitated inside the canal by using a small file (e.g. size 15) to help remove any air bubbles that may be trapped in the apical third – but do not file the canal walls at all with this file at this stage.
- (iii) EDTAC – a final flush with EDTAC should be done after the NaOCl has been used in the canal. Leave the EDTAC in the canal for 2-3 minutes to ensure any remaining smear layer of inorganic matter is dissolved.
- Do NOT use NaOCl while the canals are being filed as this creates an inorganic smear layer which is very difficult to remove.
- The above irrigation regime has been researched at UWA and has been shown to result in the cleanest root canal walls.
- After the final flush with the EDTAC solution, the canals should be dried by aspirating with the irrigating syringe, followed by the use of paper points.
Medicaments Following Root Canal Preparation
- The choice of medicament to be used following root canal preparation is dependent on the original diagnosis of the pulp/root canal system and the periapical tissues, with the main indicator being the state of the pulp/root canal system, as follows:
- (i) Acute or chronic irreversible pulpitis – a 50:50 mixture of Ledermix paste and a calcium hydroxide paste (see notes above regarding how to place this mixture).
Medicament Selection for Infected Canals
- (ii) “Elective” root canal treatment – a 50:50 mixture of Ledermix paste and a calcium hydroxide paste (see notes above re how to place this mixture).
- (iii) Necrotic and infected pulp, pulpless and infected root canal system or a root-filled and infected root canal system – a calcium hydroxide paste used alone.
When calcium hydroxide is used alone, Pulpdent paste is the preferred formulation to use as it has a methyl cellulose base which makes it easier to place in the canal and easier to remove at subsequent visits.
As the canals have been enlarged by the preparation procedure, the medicament should be placed in the canal with a spiral filler used in a low speed handpiece, running in the forward direction and at a low speed. The spiral filler should be kept 3-4 mm short of the working length of each canal in order to avoid it “catching” and breaking in the canal. The use of a spiral filler ensures the entire canal is filled with the medicament.
Ensure the medicament is only placed in the root canal and NOT in the crown part of the tooth as this leads to discolouration of the tooth (especially important in anterior teeth).
Variations to these general guidelines are necessary in certain situations – such as following trauma, when treating external inflammatory resorption, internal inflammatory resorption, other forms of resorption, open apices, concurrent endodontic and periodontal diseases, etc. In these cases, operators should consult other notes provided about the specific condition in order to follow the recommended medicament regimes for the particular presenting problem.
Temporary Restoration of the Access Cavity11
“Temporary restorations” are used to fill the access cavity that has been cut through the interim restoration which was placed at the initial appointment.
The access cavity must be filled to prevent bacterial penetration into the tooth and contamination of the root canal system between appointments.
A SMALL pellet of cotton wool is first placed over the floor of the pulp chamber to prevent the temporary filling materials from going into the root canals as these can cause blockages. The cotton pellet must be small so as not to encroach too much on the space available for the temporary filling materials.
A “double layer” temporary restoration should be used, as follows:
- (i) CAVIT – place a layer of Cavit over the cotton pellet as the inner layer of temporary filling material. The Cavit should be gently packed into the cavity with a plastic instrument (e.g. round end of a DE120 instrument), and then the Cavit should be activated with moisture by using a wet cotton pellet (e.g. wet with EDTAC). The wet pellet can also be used to shape the Cavit and to remove excess material from the canal walls.
- (ii) IRM – pack a layer of IRM over the Cavit and finish it by using a wet cotton pellet. The IRM should be finished flush with the occlusal surface without being in occlusal contact.
Cavit is used as the inner layer as it is an excellent material for preventing moisture penetration into a tooth. However, it has poor wear resistance, poor strength and high solubility so it is not suitable to use as an external material, especially where any loading occurs during function.
It is NOT necessary to have a 3-4mm layer of Cavit in this situation. The thickness of the Cavit layer (and the IRM layer) will be dependent on the height of the tooth/access cavity. Old studies that have suggested this 3-4mm layer is required have been shown to be flawed in their methodology and they do not apply to this situation of an access cavity inside the interim restoration.
- IRM is used as the outer layer as it has excellent anti-bacterial properties (due to eugenol release when in contact with moisture), good wear resistance, good strength and low solubility. However, it is a poor barrier against moisture penetration. Hence, Cavit is used as an underlying layer.
- The hand-mixed form of IRM should be used as the capsulated form is very tacky/sticky and tends to stick to the application instrument – and so the material is partly withdrawn from the cavity during placement. The capsule form also tends to become very pitted over a short time of function in the mouth. Hand-mixed IRM is more easily placed into the cavity.
- Note – there is no scientific evidence available that shows that glass ionomer cement will bond to set glass ionomer and provide a barrier against bacterial penetration. Hence, there is no evidence to support the use of any glass ionomer cement inside an access cavity that has been cut through a glass ionomer interim restoration.
Records
- As above, all treatment details must be entered on the OHCWA Form 71 and/or Form 72 (the latter if a continuation of treatment and the Form 71 is filled on both sides).
- Form 71 has a table for the recording of the technique used for rubber dam placement and another table for the recording of root canal treatment details such as working lengths, file sizes, etc.
- It is not necessary to repeat this information elsewhere in Forms 71 or 72 (e.g. when writing other details of treatment).
Inter-Appointment Time Interval
- The minimum inter-appointment time following the root canal preparation appointment is four (4) weeks although up to six (6) weeks is acceptable.
- As outlined above, a 50:50 mixture of Ledermix and calcium hydroxide pastes take at least 3-4 weeks to be fully effective.
- Calcium hydroxide when used alone takes at least 3-4 weeks to be fully effective, as shown by studies measuring pH changes in the outer dentine near the cementum.
- Hence, patients should not be seen again for at least four (4) weeks after the root canal preparation appointment in order to achieve maximum anti-bacterial action in the entire root canal system.
Temporary Sealing Materials
Root Canal Filling Appointment
At the third appointment and after reassessing the tooth to ensure that all symptoms and signs have resolved, the root canal filling can be placed.
The aim of this procedure is to fill the space created by the root canal preparation procedure - to help prevent further re-infection of the root canal system.
Bacteria require space in order to colonise and establish an infection – hence, the root canal filling reduces the space available in the tooth for this.
-
Local anaesthesia is NOT required during the root filling appointment, and its use is contraindicated since anaesthesia may hide potential problems such as:
- (i) medicament being forced through the apical foramen due to inadequate irrigation and medicament removal,
- (ii) pulp tissue remaining in the apical part of the canal,
- (iii) incorrect working length (i.e. too long), or
- (iv) a perforation.
-
All of the above problems must be identified prior to placing the root filling as they contraindicate the canal being filled.
-
These problems must be rectified before the root filling can be considered. If LA has been used, it will mask the existence of these problems which will lead to poor treatment outcomes.
-
Rubber dam is again essential. A cuff technique is still the most ideal way to isolate the tooth and to provide good access to the canals and visibility to the operating field (see above).
Access Cavity Through the Interim Restoration
- The temporary restoration (i.e. IRM and Cavit) should be removed by using a tungsten carbide Jet #331 bur in the high speed handpiece to re-create the access cavity that was used at the previous appointment.
- The water coolant of the high speed handpiece can be turned off during this procedure to improve visibility.
- Once the all of the IRM and Cavit have been removed, the cotton pellet can then be removed to expose the prepared root canals.
- Irrigate with EDTAC to ensure removal of all of the restorative materials from the access cavity before attempting to negotiate the root canals.
- Do NOT use the triplex syringe during this procedure as this can force materials into the canals and block them.
Root Canal Filling Appointment12
Root Canal Filling Appointment (continued)13
Irrigation During the Canal Preparation Appointment
- Use EDTAC to irrigate the root canal during the root filling appointment.
- This avoids the creation of an inorganic smear layer which is difficult to remove.
- There is no indication for the use of NaOCl during this appointment as all organic tissue should have been removed at the previous appointment and the canals have been disinfected by the previous irrigants and medicaments.
- The use of NaOCl is contra-indicated as this can lead to the creation of an inorganic smear layer.
Removal of Medicament
- The medicament can be removed via copious irrigation with EDTAC.
- The irrigant can be agitated by using a small file (e.g. size 15 file) to help break up the medicament and make it easier to flush out of the canal. Further irrigation should follow the agitation.
- Once all of the medicament has been removed, the file should be re-negotiated with a Hedström file that is one size smaller than the last file used at working length. The slightly smaller file will help to prevent pushing any remaining medicament through the apical foramen, if any medicament is left in the canal. The main purpose of re-negotiating the canal at this stage is to ensure there is nothing blocking the canal to prevent placement of the root filling.
- Once the canal has been re-negotiated to working length, irrigate again with EDTAC and then dry the canal by aspirating with the irrigating syringe, followed by the use of paper points.
Root Canal Filling
- Gutta percha is the core filling material used for root canal fillings. Gutta percha is the most common core material used throughout the world and has considerable evidence in the scientific literature to support its use. No other core filling material has been shown to have any advantages over gutta percha, and many have several distinct disadvantages.
- AH26 is the cement used in the School of Dentistry. This cement is used as considerable evidence is available in the literature to show it is effective and a long-lasting cement. It also has a long working and setting time so it is ideal for student use and allows filling of all canals in a multi-canal tooth with the one mix of cement.
- The consistency of AH26 can be varied according to the operator’s preference.
- Lateral compaction is the technique of choice for root canal fillings as it is simple, quick and readily learnt by students. It is also relatively easy to remove gutta percha for root canal re-treatment if the root filling has been placed with this technique.
- Use a D11T spreader with “Fine-Fine” accessory gutta percha points to fill the apical third of each canal. Several accessory points should be condensed into each can before taking the apical third radiograph.
- Take a periapical radiograph to check the apical third root filling once it has been condensed within the apical few millimetres of each canal.
- Then use a D11 spreader with “Fine” accessory gutta percha points to fill the middle third and some of the coronal third of the canal.
- The root filling can be vertically compacted into the most coronal aspect of each canal by using a warm plugger – e.g. a 5/7 plugger, or a broken spreader that has been modified to have a flat end.
Irrigation During Filling Appointment
Access Cavity Cleaning
- Following completion of the root canal filling, all root filling materials (GP and AH26) must be removed from the access cavity to avoid causing discolouration of the tooth.
- Use a cotton pellet that has been dipped in alcohol to wipe out the access cavity– this will remove any unset AH26. Repeat until the access cavity is clear of all cement.
Temporary Restoration of the Access Cavity
- As above, a SMALL pellet of cotton wool is placed over the floor of the pulp chamber.
- A “double layer” temporary restoration should be used – Cavit is placed first as a deep layer followed by IRM as the outer layer.
Post-Operative Radiograph
- A post-operative radiograph must be taken once the temporary restoration has been placed in the access cavity and the rubber dam has been removed.
- The modified parallel technique must be used with a RINN XCP positioning device as this allows comparison with the pre-operative radiograph and subsequent radiographs taken when reviewing the tooth to determine the treatment outcome.
- Arrangements should then be arranged for definitive restoration of the tooth in a timely manner to avoid problems associated with breakdown of the interim and temporary restorations.
Definitive Restoration of the Tooth
- The tooth should be restored in a definitive manner as soon as possible after the root canal filling has been completed, unless there are specific reasons to delay this restoration (e.g. a large periapical radiolucency – however, such cases are usually managed with long-term dressings so the tooth should be ready to restore once the root canal filling has been completed since periapical healing has already been confirmed prior to doing the root canal filling).
- Delaying the definitive restoration places the tooth at risk of further root canal infection if the interim or temporary restoration breakdown.
- Research has also shown more predictable treatment outcomes and better longevity of teeth that are restored soon after the root canal filling has been done.
Access Cavity Cleaning14
Review Examination15
- The tooth should be reviewed six months after the root canal filling has been completed in order to assess the healing response and the treatment outcome.
- The healing response and the treatment outcome are assessed via a combination of a thorough history, a clinical examination and a periapical radiograph.
- The modified parallel technique must be used with a RINN XCP positioning device in order to use the same angulation as that used when the pre-operative and post-operative radiographs were taken.
- Further reviews should be arranged with the time interval depending on the initial healing response.
- If healing is progressing but not yet complete, then a further 12 month review is usually required.
- If healing is complete, then a further review in 3-4 years is recommended in order to monitor the tooth.
Other Notes
The following guidelines are applicable to specific situations. Further details are supplied in other material given to students.
Post-Treatment Pain Management
- Oral and dental pain should be managed with the 3D’s principle – that is:
- (i) Diagnosis,
- (ii) Dental treatment, and
- (iii) Drugs
- The 3D’s should follow the order listed above. Hence, Drugs should only be used AFTER a diagnosis has been established and appropriate dental treatment has been provided.
- The principle of the 3D’s also applies to pain associated with pulp and periapical conditions.
- If the correct diagnosis has been made and appropriate dental treatment has been provided, there is usually little need for drug therapy, or lower doses can be used for short periods of time. Many studies have demonstrated that dental treatment is the most effective way to relieve the inflammation which is causing the pain that patients present with.
- Some post-treatment pain may be experienced following dental treatment, even when the most appropriate and most thorough treatment has been provided – but in these cases, the level of pain is usually mild or moderate rather than severe.
- The amount of post-treatment pain likely to be experienced by a patient is directly related to the amount of pre-operative pain, the level of pain control during treatment, the patient’s perception of pain and the strategies the patient uses to cope with pain.
Review Examination and Outcome Assessment
Post-Treatment Pain Management (continued)16
- Since pain is a result of inflammation of tissues, the use of non-steroidal anti-inflammatory drugs (NSAID’s) is the most effective way to manage the pain.
- Some patients may not be able to use the NSAID’s (e.g. asthmatics, those with peptic ulcers, drug interactions, etc) so the medical history must be checked before making recommendations. If the patient cannot use the NSAID’s, then pain management is based on the use of paracetamol and codeine.
- Be aware of the maximum daily doses for each drug recommended, as well as the dosing regimes.
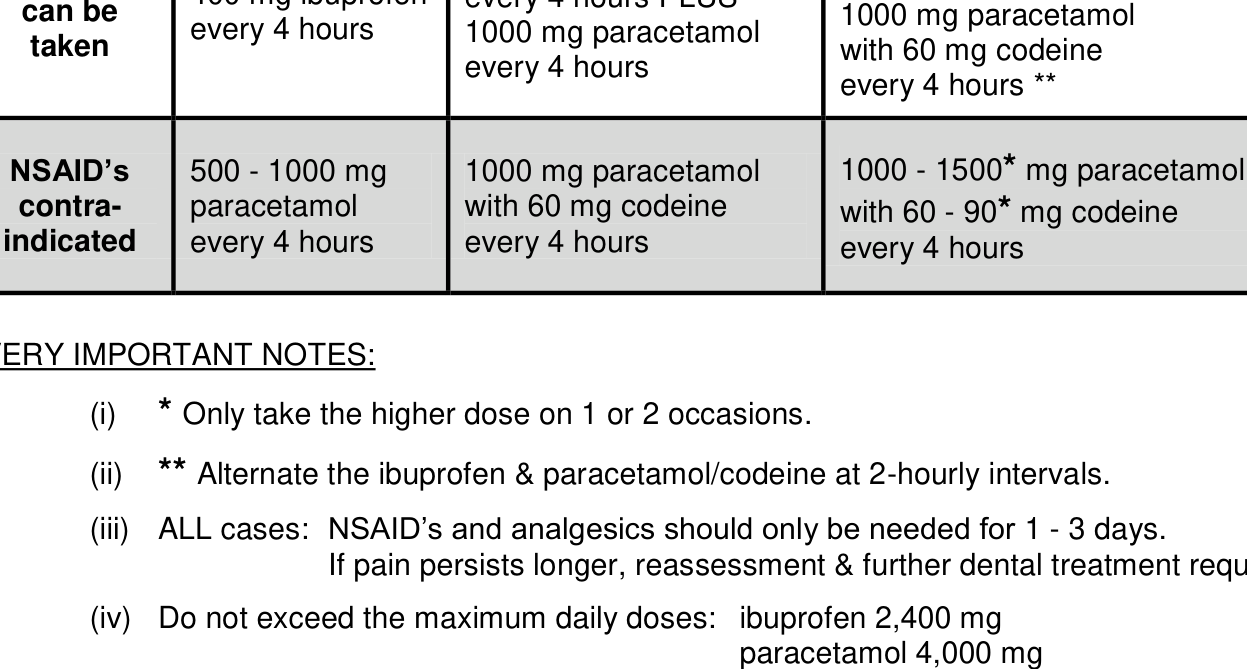
- The following pain management strategies are recommended in the book Therapeutic Guidelines Oral & Dental - Version 2:
| Pain Level: | MILD | MODERATE | SEVERE |
|---|---|---|---|
| NSAID’s can be taken | 400 mg ibuprofen every 4 hours | 400 - 600* mg ibuprofen every 4 hours PLUS 1000 mg paracetamol every 4 hours | 400 - 600* mg ibuprofen every 4 hours PLUS 1000 mg paracetamol with 60 mg codeine every 4 hours ** |
| NSAID’s contra-indicated | 500 - 1000 mg paracetamol every 4 hours | 1000 mg paracetamol with 60 mg codeine every 4 hours | 1000 - 1500* mg paracetamol with 60 - 90* mg codeine every 4 hours |
VERY IMPORTANT NOTES:
- (i) * Only take the higher dose on 1 or 2 occasions.
- (ii) ** Alternate the ibuprofen & paracetamol/codeine at 2-hourly intervals.
- (iii) ALL cases: NSAID’s and analgesics should only be needed for 1 - 3 days. If pain persists longer, reassessment & further dental treatment required.
- (iv) Do not exceed the maximum daily doses: ibuprofen 2,400 mg, paracetamol 4,000 mg, codeine 360 mg.
Antibiotics
- Antibiotics are rarely required and should only be used when definitely indicated.
- Antibiotics should not be used to manage pain.
- Antibiotics should only be used as an ADJUNCT to dental treatment.
- Antibiotics should be reserved for special circumstances where they are essential for the patent’s health and well-being.
- Use antibiotics locally (e.g. intra-canal) rather than systemically wherever possible.
- Infections should not be managed with antibiotic therapy alone – the appropriate dental treatment must also be provided to prevent more sever episodes of infection which may risk airway compromise.
Pain Management and Pharmacology
Indications for Antibiotic Therapy17
The indications for the use of antibiotics are:
- (i) A definite bacterial infection is present
- (ii) The infection is likely to respond to the antibiotic therapy
- (iii) The patient has systemic signs of being sick because of the infection
- (iv) The patient shows signs of malaise – i.e. fever, increased body temperature
- (v) There is lymph node involvement
- (vi) There is cellulitis or a spreading infection
- (vii) The infection has had a rapid onset (e.g. < 24 hours)
Patients with a suppressed or compromised immune system may need antibiotics for situations that would not otherwise meet the above indications.
The antibiotic of first choice is PHENOXYMETHYL PENICILLIN (Pen V) – 500 mg taken every 6 hours (1 hour before meals). An initial loading dose of 1,000 mg is often advantageous.
In severe cases, consider using intra-venous or intra-muscular penicillin.
Amoxicillin is not indicated for most odontogenic infections as its spectrum of anti-bacterial action is too broad and it is not necessary to use such a broad spectrum antibiotic.
Consult the book Therapeutic Guidelines Oral & Dental - Version 2 for more detail and information.
Drainage
Drainage is only required when there is a fluctuant swelling associated with an acute apical abscess. Attempt to achieve drainage via the root canal by commencing root canal treatment as soon as possible. All restorations, caries, cracks, etc must be removed to determine whether the tooth is suitable for further restoration – i.e. the tooth must be investigated, as outlined above. ALWAYS place a medicament (such as a 50:50 mix of Ledermix paste and a calcium hydroxide paste, or calcium hydroxide paste alone) in the root canal system and then close the tooth with an appropriate interim restoration. NEVER leave a tooth “open to drain” as this leaves the root canal system open for further infection and it means that a medicament cannot be placed to destroy the bacteria that are already present within the root canal system.
Root Canal Re-Treatment
Root canal re-treatment should follow the same principles (e.g. tooth investigation, interim restorations, etc) outlined above for root canal treatment. The only difference is that the existing root filling material needs to be removed from the root canals before the initial medicament can be placed. Use eucalyptus oil as the solvent for root filling materials – especially if gutta percha and cement have been used. The eucalyptus oil can be delivered to the tooth by using a standard irrigating syringe and needle. Use only a small volume of eucalyptus oil – just enough to fill the canal and the pulp chamber.
Indications for Antibiotic Therapy18
Do NOT allow the eucalyptus oil to flow out of the tooth and on to the rubber dam as it will soften the rubber dam and leave a large hole in it. The rubber dam will then need to be replaced if this happens.
In general, start with a Gates-Glidden (GG) bur to remove the coronal aspect of the root filling.
If starting with a size 3 GG bur, only use it for 2-3 mm into the canal, and then change to a size 2 GG bur which can be used for another 2-3 mm. Otherwise, just use a size 2 GG bur.
Aster using the GG burs, use a Hedström file to penetrate and remove the remaining gutta percha from the apical two-thirds of the canal – start with a larger file (e.g. size 25) in the middle third and then use a smaller file (e.g. size 20) as you approach the apical end of the canal.
Retreatment and Root Filling Removal
Assessing Root-Filled Teeth Prior to a New Restoration19
Assessment of an existing root canal filling is difficult and it is based mainly on radiographic appearance. However, the radiographic appearance is very limited in the information it provides and it does not indicate anything about the treatment procedures used.
If the history is available, including previous radiographs, then these should all be reviewed in conjunction with a new/current periapical radiograph.
In general, ALL old root fillings should be replaced prior to restoring the tooth again – this particularly applies to teeth having a post/core and teeth having full coverage crowns.
The major reason for replacing the root filling is the same reason used to justify replacement of the restoration– that is, the restoration is breaking down or unsatisfactory and this can lead to bacterial contamination of the root canal system.
Restorations may appear to be “clinically satisfactory” but studies have shown that even “clinically satisfactory” restorations can have bacteria present between the restoration and the tooth.
Periapical changes (e.g. radiolucencies) take some time to be evident on periapical radiographs after the root canal system has become infected. That is, the root canal system will be infected long before the periapical radiolucency can be seen on a radiograph.
Studies have shown that it can take anywhere from 1-2 months up to more than 10 months for a periapical radiolucency to be evident after the root canal system becomes infected, depending on the type of bacteria present in the root canal system and the conditions for their growth.
The lack of a periapical radiolucency does not necessarily indicate a lack of apical periodontitis.
The root canal filling should be considered in the same manner as any existing restoration in the tooth (e.g. an amalgam or composite restoration) and should be replaced prior to having a core restoration and a crown.
-
- o o - -
Footnotes
-
Original PDF page 1: a. 2013 UWA Endodontic Guidelines, p.1 ↩
-
Original PDF page 2: a. 2013 UWA Endodontic Guidelines, p.2 ↩
-
Original PDF page 3: a. 2013 UWA Endodontic Guidelines, p.3 ↩
-
Original PDF page 4: a. 2013 UWA Endodontic Guidelines, p.4 ↩
-
Original PDF page 5: a. 2013 UWA Endodontic Guidelines, p.5 ↩
-
Original PDF page 6: a. 2013 UWA Endodontic Guidelines, p.6 ↩
-
Original PDF page 8: a. 2013 UWA Endodontic Guidelines, p.8 ↩
-
Original PDF page 10: a. 2013 UWA Endodontic Guidelines, p.10 ↩
-
Original PDF page 11: a. 2013 UWA Endodontic Guidelines, p.11 ↩
-
Original PDF page 12: a. 2013 UWA Endodontic Guidelines, p.12 ↩
-
Original PDF page 13: a. 2013 UWA Endodontic Guidelines, p.13 ↩
-
Original PDF page 14: a. 2013 UWA Endodontic Guidelines, p.14 ↩
-
Original PDF page 15: a. 2013 UWA Endodontic Guidelines, p.15 ↩
-
Original PDF page 16: a. 2013 UWA Endodontic Guidelines, p.16 ↩
-
Original PDF page 17: a. 2013 UWA Endodontic Guidelines, p.17 ↩
-
Original PDF page 18: a. 2013 UWA Endodontic Guidelines, p.18 ↩
-
Original PDF page 20: a. 2013 UWA Endodontic Guidelines, p.20 ↩
-
Original PDF page 19: a. 2013 UWA Endodontic Guidelines, p.19 ↩
-
Original PDF page 21: a. 2013 UWA Endodontic Guidelines, p.21 ↩