Root Canal Treatment: Comprehensive Clinical Guide1
Dr Mostafa Elkholy, BDS, MSc (Endo), DDS (Endo)
Senior Lecturer and Discipline Lead in Endodontics, The University of Western Australia
Introduction
This comprehensive clinical guide combines evidence-based recommendations for root canal preparation and filling procedures. The document is organised into two complementary chapters that provide endodontic practitioners with complete protocols for optimal root canal treatment outcomes.
Chapter 1: focuses on the systematic approach to root canal preparation using the ProTaper Ultimate system, covering fundamental concepts, assessment protocols, step-by-step procedures, and safety guidelines.
Chapter 2: addresses the critical aspects of root canal filling, including evidence-based timing guidelines and detailed clinical procedures for successful obturation.
The guidelines presented are based on high-impact, peer-reviewed literature and established clinical protocols, ensuring practitioners have access to both scientific rationale and practical implementation strategies for successful endodontic treatment.
Chapter 1: Root Canal Preparation2
Root Canal Preparation Guide | Dr Mostafa Elkholy, BDS, MSc (Endo), PhD (Endo)
Chapter 1: Root Canal Preparation The ProTaper Ultimate System Protocol A Comprehensive Clinical Guide
1 Fundamental Concepts for Canal Preparation 2 Initial Canal Preparation Assessment 3 Step-by-Step Protocol 4 Critical Safety Guidelines 5 Special Considerations 6 Root Canal Irrigation Guidelines
Fundamental Concepts For Canal Preparation3
Root Canal Preparation Guide | Dr Mostafa Elkholy, BDS, MSc (Endo), PhD (Endo)
1. Fundamental Concepts for Canal Preparation
Endodontic treatment can be simplified by dividing the entire procedure into a series of smaller, manageable steps. Understanding the anatomical dimensions and characteristics of root canal systems is essential for successful treatment planning and execution.
Root Canal Dimensions
The vast majority of teeth range from 19-25 mm in total length. Most clinical crowns measure approximately 10mm, while most roots range from 9-15 mm in length. By dividing the root into coronal, middle, and apical thirds, each segment measures between 3-5 mm in length. This systematic approach becomes particularly valuable in longer roots that contain more complicated canal systems exhibiting significant calcification, challenging curvatures, or deep anatomical divisions.
Calcification Patterns
Clinicians should understand that calcification patterns follow predictable distributions within the root canal system. More extensive calcification is typically encountered within the pulp chamber, extending into the coronal third and, to a lesser extent, the middle third of canals. Fortunately, the apical third of canals, although more narrow in diameter, are typically open and free of significant calcification. This anatomical characteristic allows for more predictable negotiation and preparation of the critical apical region.
Strategic Advantages of Coronal Pre-enlargement
Pre-enlarged canals provide multiple clinical advantages that significantly improve treatment outcomes. Coronal enlargement increases the volume of irrigant that can be delivered to the canal system, encourages more effective elimination of debris and microorganisms, and affords better access and control when preparing the complex apical third microanatomy. This crown-down approach reduces the risk of instrument separation and allows for more conservative apical preparation while maintaining adequate cleaning and shaping.
Preparation Strategy
When straight-line access has been completed and all canal orifices have been identified, attention is directed towards systematic root canal preparation using the principles outlined in this protocol.
Initial Canal Preparation Assessment4
- Initial Canal Preparation Assessment
Before beginning any instrumentation, evaluate the degree of difficulty to determine the appropriate treatment approach and anticipate potential challenges. This assessment is crucial for successful treatment outcomes and helps prevent complications during instrumentation.
Canal Curvature Assessment
Examine preoperative radiographs to identify canal curvature patterns. Assess the degree of curvature, which can be classified as slight or no curvature (less than 10 degrees), moderate (10-30 degrees), or severe (greater than 30 degrees). The degree of curvature significantly influences instrument selection and technique modification.
Radius of Curvature
Evaluate the radius of curvature, as sharp curves with small radii present greater challenges than gradual curves with larger radii. Sharp curvatures increase the risk of instrument separation and require more conservative preparation techniques.
Narrow Canals
Identify canals with restricted dimensions that may require extended manual preparation before rotary instrumentation.
Pulp Space Obliteration
Assess for calcifications and pulp space obliteration that may appear as non-patent canals on radiographs.
Treatment Planning: Based on this assessment, modify your treatment approach accordingly. Severely curved or calcified canals may require additional time, specialized techniques, or alternative instrumentation sequences.
Step-By-Step Preparation Protocol
Root Canal Preparation Guide | Dr Mostafa Elkholy, BDS, MSc (Endo), PhD (Endo)
3. Step-by-Step Protocol
Step 1: Scouting of the Coronal Third
Begin with scouting of the coronal third using small K-files (size 8-10). These small “scouter files” provide critical information that is essential for safe and effective treatment.
Purpose of Scouting Files
Small scouter files immediately reveal the cross-sectional diameter of a canal and provide information as to whether the canal is open, restricted, or seriously calcified. Before any rotary instrument can be safely introduced into the canal, sufficient space must exist to accommodate and guide their non-cutting tips. In other words, there must be a pilot hole and a smooth glide path for NiTi rotary instruments to follow.
Scouting Of The Coronal Third5
Anatomical Information Gathering
Scouter files provide information regarding root canal system anatomy. Clinicians need to appreciate the five commonly encountered anatomical forms which include canals that merge, curve, recurve, dilacerate, or divide. Scouter files provide critical information regarding the anatomy and give important feedback regarding the canal’s degree of curvature, re-curvature, or if there is a dilaceration.
Straight-Line Access Confirmation
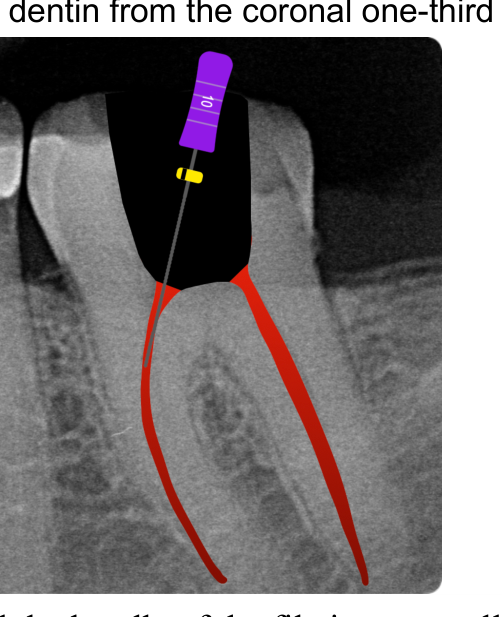
Scouter files confirm the presence or absence of straight-line access. Clinicians can observe the handle position of an instrument (Figure 1) to see if it is upright and paralleling the long axis of the tooth or skewed off-axis. When the roots are under the circumferential dimensions of the clinical crown and the file handle is upright, then the clinician can confirm both coronal and radicular straight-line access.
Important: When the handle of the initial scouting instrument is off the long axis of the tooth, pre-enlargement procedures should be directed towards uprighting the file handle. To upright the handle of small scouter files often requires refining and expanding the access preparation and selectively removing restrictive dentin from the coronal one-third of the canal.
Coronal Pre-Flaring6
Root Canal Preparation Guide | Dr Mostafa Elkholy, BDS, MSc (Endo), PhD (Endo)
Step 2: Coronal Pre-flaring
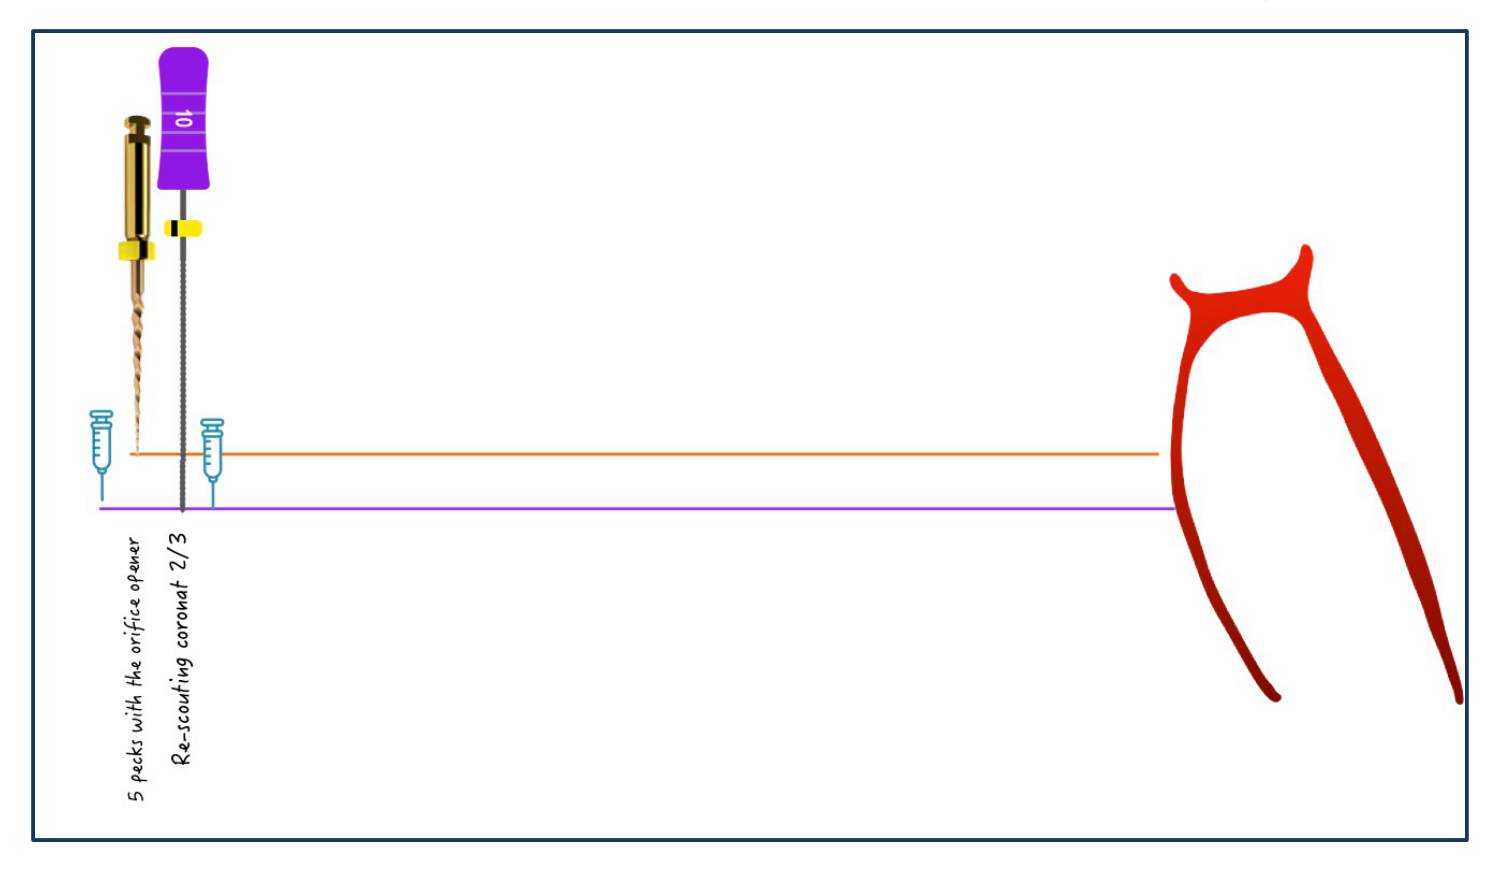
Following initial scouting, proceed with the Orifice Opener file (SX). This file features a small tip with large taper design, allowing engagement of the canal orifice by its side rather than the tip, hence coronally enlarging this part (Figure 2).
Procedure Steps:
- Use light pressure with a pecking motion and limit penetration to the coronal third only.
- Engage the canal walls laterally, not with the tip of the file.
- Maintain constant irrigation during use.
- Irrigate thoroughly with sodium hypochlorite (NaOCl) after SX file use.
- Re-scout the coronal third to ensure debris removal and that the canal is not ledged.
Mid-Canal Preparation
Root Canal Preparation Guide | Dr Mostafa Elkholy, BDS, MSc (Endo), PhD (Endo)
Step 3: Mid-Canal Preparation Fill your access cavity with irrigant to ensure adequate lubrication throughout the procedure. Use the Slider file followed by the Shaper file to the middle of the canal with gentle, controlled movements. Insert the file without rotation until it fully engages the dentinal walls. Then activate the rotary motion and gently advance apically in an in-and-out motion of approximately 1 mm amplitude.
Advantages of coronal and mid-canal pre-enlargement
- Reduces the severity of the canal’s initial curvature
- Minimizes changes in working length
- Enhances tactile feedback
- Improves irrigant penetration
- Decreases torsional stress
- Lowers the risk of instrument fracture
Step 4: Apical Third Negotiation Small hand files are used (08K or 10K file) in a watch-winding motion to negotiate the rest of the canal and establish patency. In complex anatomies with small, long, and potentially multiplanar canals, it is not possible to immediately pass a 10K file initially to the root end at first attempt, some manual effort.
Working Length Determination And Glide Path7
Root Canal Preparation Guide | Dr Mostafa Elkholy, BDS, MSc (Endo), PhD (Endo)
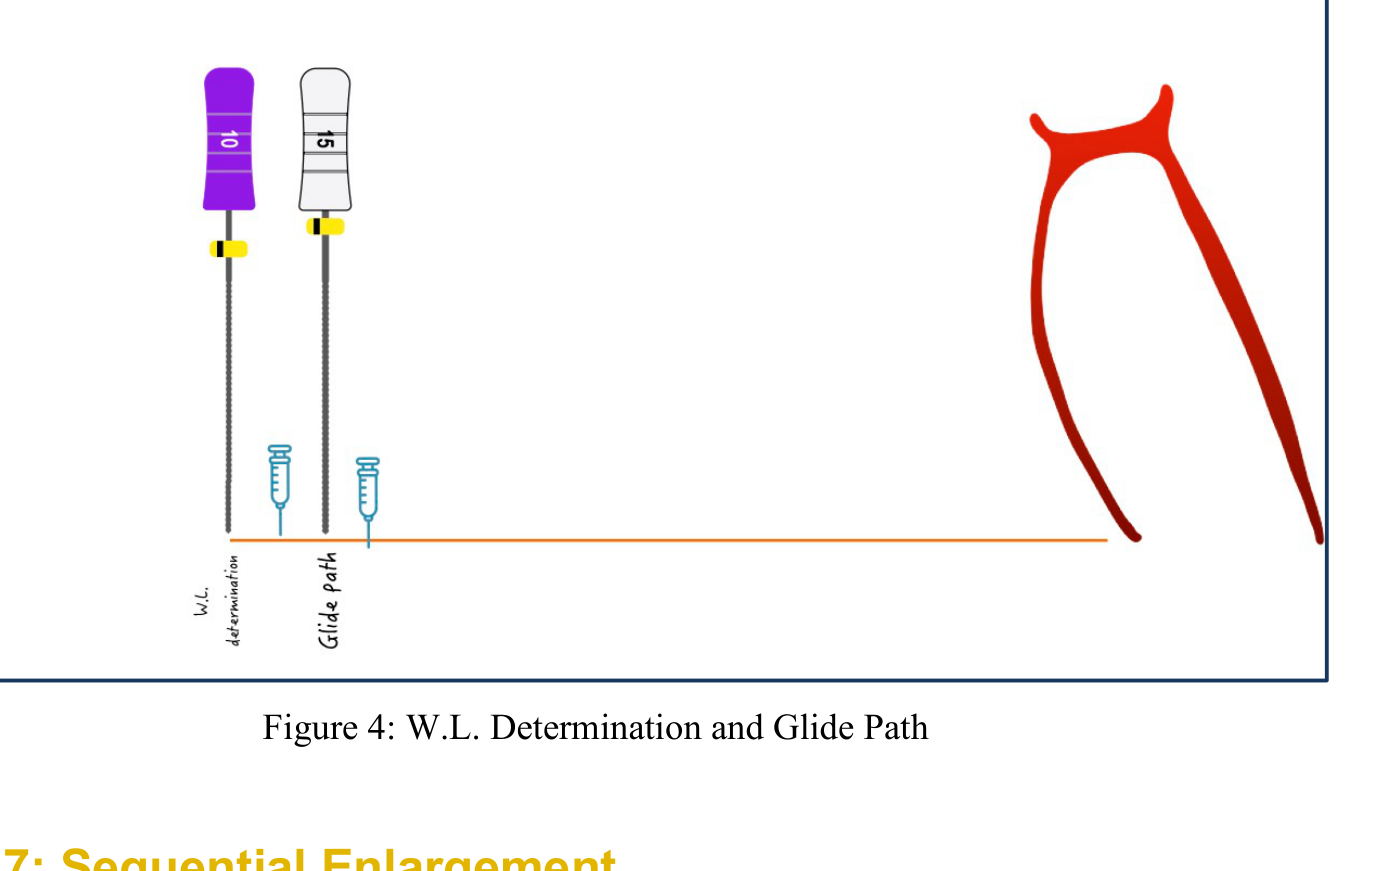
Step 5: Working Length Determination
Determine the working length using an electronic apex locator, confirmed by radiographic verification. Accurate working length determination is crucial for successful treatment and should be verified using multiple methods when possible.
Step 6: Manual Glide Path Establishment
Establish a manual glide path using K-files up to size 15, ensuring the file becomes “super loose” at the working length (Figure 4). This step is critical for safe rotary instrumentation and helps prevent instrument separation.
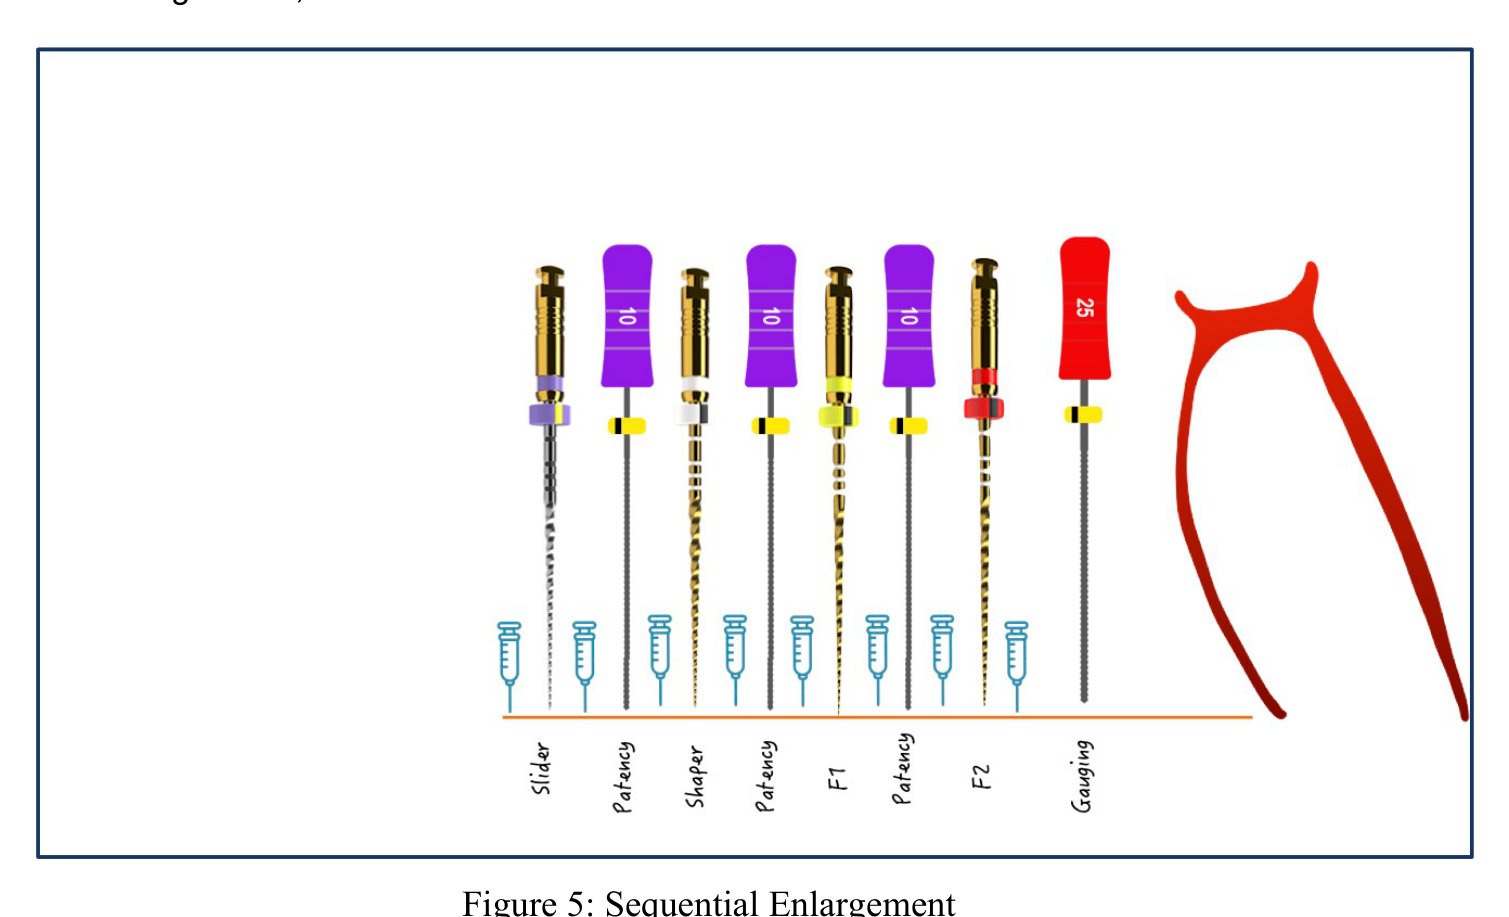
Step 7: Sequential Enlargement
- Follow the sequential enlargement protocol: Slider to working length.
- Proceed with Shaper, then F1, and finally F2 (Figure 5).
- Insert the file without rotation until it fully engages the dentinal walls. Then activate the rotary motion and gently advance apically in an in-and-out motion of approximately 1 mm.
- If the file is not advancing, avoid any pressure and consider manual enlargement.
- Between each file, irrigate with a minimum of 2mL of NaOCl and check patency with a small K-file, then re-irrigate prior to moving to the next file.
Prevention Of Ledge Formation8
Root Canal Preparation Guide | Dr Mostafa Elkholy, BDS, MSc (Endo), PhD (Endo)
Critical Safety Principle: Never force the file apically, excessive pressure dramatically increases the risk of ledge formation. If the tip binds against the canal wall, you’re more likely to create a ledge. Instead, use gentle, controlled “watch-winding” or motions with your scouting file, avoiding any force that could lead to ledges, , or instrument separation. The clinician should feel a smooth, viscous resistance as the file advances through the canal, instead of encountering a hard, immovable “rock” barrier.
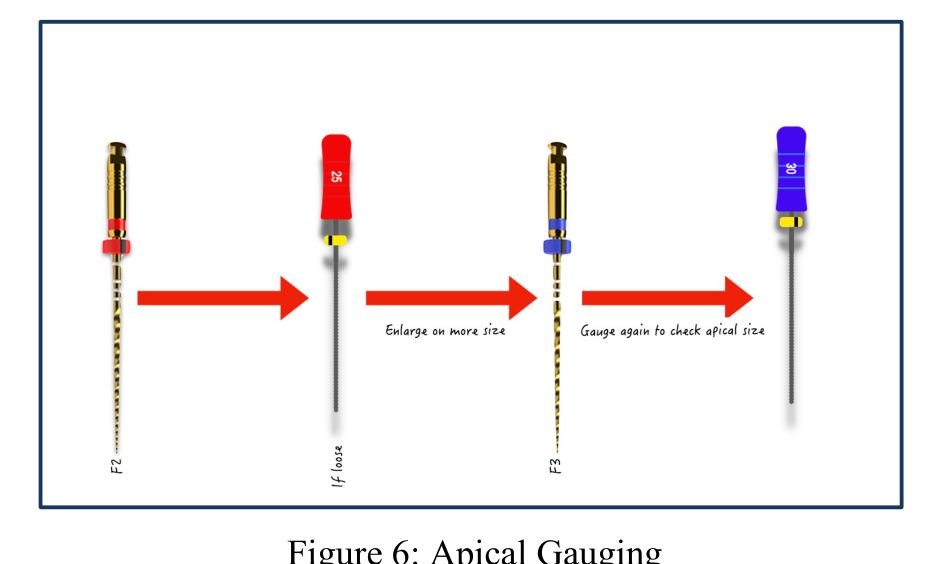
Step 8: Apical Gauging
After completing preparation with the F2 file, always perform apical gauging to confirm your final canal size. Insert a size-25 K-file to full working length and note whether it binds. If it passes through loosely, advance to the F3 file and repeat the apical gauging. This ensures the apical portion of the canal is fully enlarged to its proper diameter rather than being under-prepared (Figure 6).
 |  |
Critical Safety Guidelines9
Root Canal Preparation Guide | Dr Mostafa Elkholy, BDS, MSc (Endo), PhD (Endo)
4. Critical Safety Guidelines
Essential Safety Protocols
-
Maintain continuous irrigation: keep the pulp chamber always flooded with irrigant to suspend debris and prevent smearing of the canal wall with debris or debris’ compaction at the apex, which can cause loss of working length.
-
Limit advancement to 1 mm increment in a gentle up–down (pecking) motions. Even if you’re tempted to go deeper, resist it as this minimises excessive engagement with the canal walls.
-
Use light, pencil-like pressure: apply only the force you’d use to write with a pencil. Over-pressing increases the risk of ledging, transportation, and file separation.
-
Keep your fingertips as close as possible to the file tip: this maximizes tactile feedback and control over the instrument.
-
If you need extra force to advance, switch to a file with a different taper or manually enlarge the canal coronally before proceeding.
-
At the first hint of a screw-in effect or binding, stop, select a less aggressive taper, or perform coronal enlargement.
-
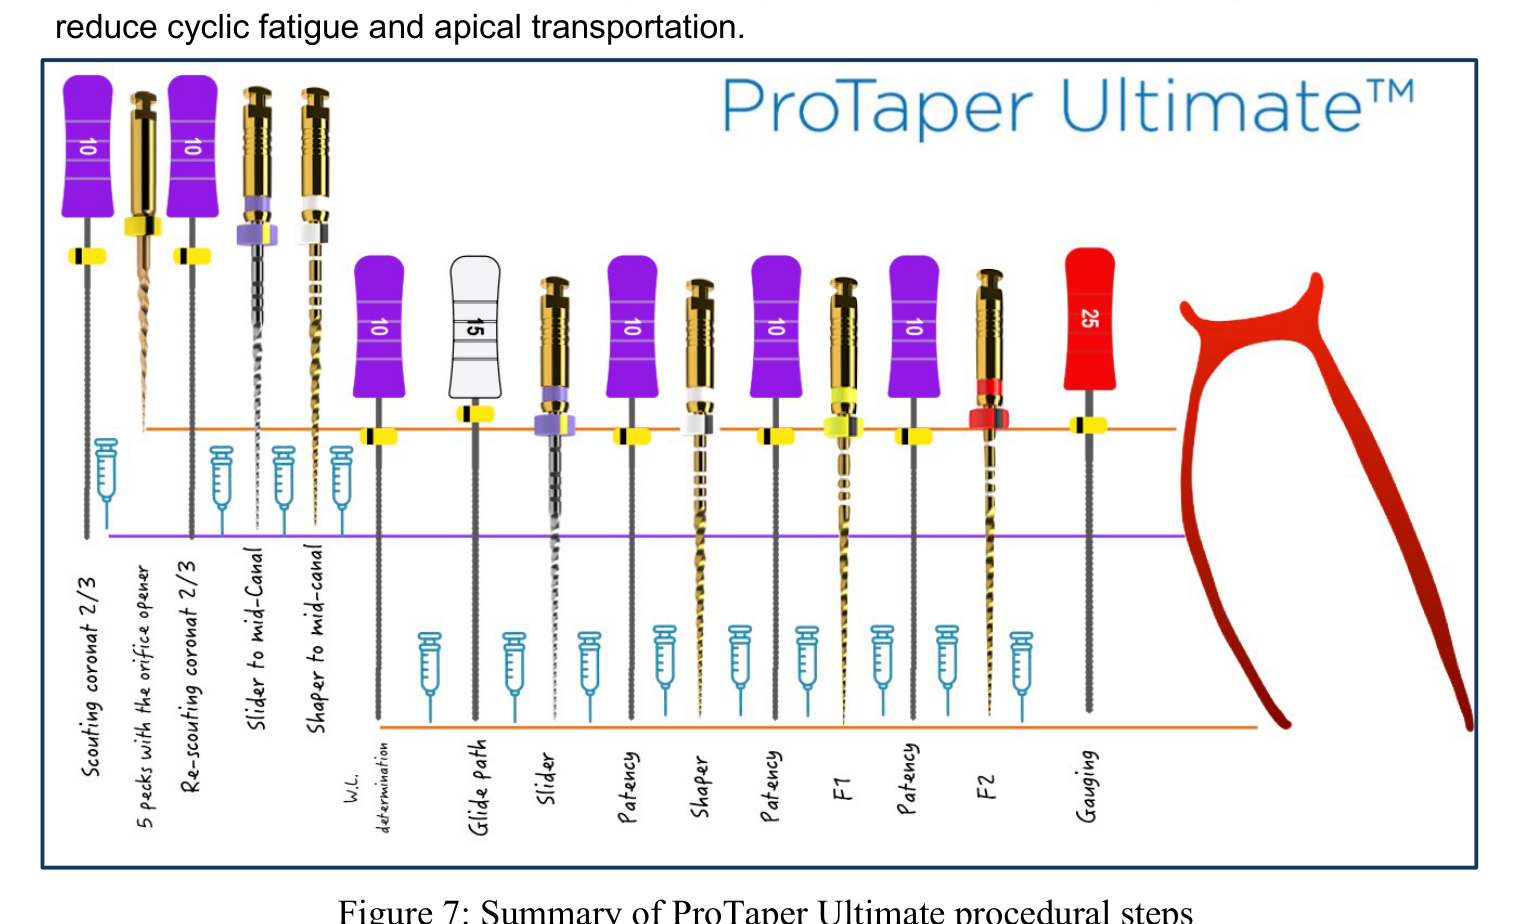
“Just kiss the apex”: Avoid prolonged rotary motion when full working length is reached to reduce cyclic fatigue and apical transportation.
Special Considerations For Complex Anatomy
Root Canal Preparation Guide | Dr Mostafa Elkholy, BDS, MSc (Endo), PhD (Endo)
- Special Considerations
Narrow Canals
For narrow canals, F1 preparation may be sufficient for adequate cleaning and shaping. Extended manual preparation may be necessary before introducing rotary instruments. Consider ultrasonic activation of irrigants to enhance cleaning in these challenging cases.
Curved Canals
For curved canals, prepare the straight coronal portion first before advancing into the curvature. Always maintain canal anatomy and avoid straightening natural curvatures. Use pre-curved files when appropriate and consider shorter working lengths in severely curved areas.
- Root Canal Irrigation Guidelines
Principles
Syringe and needle irrigation allows exact placement, fluid replenishing, debris removal, and direct microbial contact near needle tip. Irrigant exchange is restricted to 1-1.5mm apical to needle tip with fluid dynamics occurring near needle outlet. Volume and flow speed are proportional to cleansing efficiency.
Selection
- Syringe: 3ml with Luer-Lok connection
- Needle: Closed-ended up to working length (polypropylene needles are preferred for apical access without wall damage)
- Open-ended needles: Avoid when possible; if used, position 2mm short of working length
Protocol
- Irrigant: 2.5% NaOCl throughout procedure
- Positioning: Avoid needle wedging; move longitudinally up to maximum recommended point
- Pressure: Avoid excessive pressure during irrigation
Safety Considerations
- Proper needle depth without wedging
- Controlled, gentle pressure
- Understand 1-1.5mm effective zone
- Appropriate equipment selection
Chapter 2: Root Canal Filling Protocol
Chapter 2: Root Canal Filling Protocol: Complete Guidelines A Comprehensive Clinical Guide for Endodontic Filling
TABLE OF CONTENT10
1 Evidence-Based Guidelines: The Timing of Root Canal Filling
- 1.1 When Should Root Canals Be Filled?
- 1.2 How Long Should I Medicate with Calcium Hydroxide?
- 1.3 Adverse Effects of Long-Term Medication and Delayed Filling
- 1.4 Summary of Recommendations
2 Clinical Guide for Root Canal Filling Techniques
- 2.1 Pre-filling Assessment
- 2.2 Master Gutta-Percha: Selection and Fitting
- 2.3 Master Gutta-Percha Adjustment
- 2.4 Canal Dryness Verification
- 2.5 Sealer Preparation and Properties
- 2.6 Sealer Placement Techniques
- 2.7 Single Cone Obturation Technique
- 2.8 Lateral Condensation Technique
- 2.9 Quality Assessment and Radiographic Evaluation
- 2.10 Post-filling Procedures
- 2.11 Final Recommendations
3 References
Evidence-Based Guidelines For Filling Timing
- Evidence-Based Guidelines: The Timing of Root Canal Filling
This guideline synthesises evidence from high-impact, peer-reviewed literature to address key questions regarding the optimal timing for root canal filling. It aims to provide clinicians with evidence-based recommendations on when to fill, the necessity of waiting for radiographic healing, the appropriate duration for intracanal medication, and the consequences of delays.
1.1 When Should Root Canals Be Filled?
Once the objectives of cleaning, shaping, and disinfection are achieved, and the tooth is asymptomatic definitive root canal filling should proceed promptly.
Optimal Timing And Radiographic Healing11
The choice between single-visit and multi-visit treatment depends on the clinical situation (e.g., presence of infection, symptoms, time availability). Both can be successful when principles of disinfection are followed. However, unnecessary delays between appointments should be avoided.
The benefits of timely filling:
- Improved Apical Seal & Reduced Microleakage: Achieving a high-quality, three-dimensional seal immediately after disinfection is crucial. Delays increase the risk of compromising the apical barrier. Evidence, particularly from studies on post-space preparation timing, suggests that immediate procedures result in lower apical microleakage compared to delayed approaches (Mahmoudi et al., 2022; Nagas et al., 2016). Prompt filling effectively seals the canal against bacterial re-entry.
- Prevention of Re-infection: The primary goal of RCT is eliminating microorganisms and preventing re-infection. Delays leave the cleaned canal system vulnerable. Temporary restorations can leak, allowing oral bacteria and fluids to penetrate and compromise the treatment outcome (Siqueira & Rôças, 2008). Timely obturation provides a definitive barrier against coronal microleakage and bacterial ingress (Ray & Trope, 1995).
• Reduced Risk of Tooth Loss: As noted below, significant delays in completing root canal treatment (including obturation and final restoration) dramatically increase the risk of tooth loss. A retrospective study found a 56% extraction rate for teeth with incomplete treatment compared to 2-3% for promptly completed cases (Wong et al., 1992).
Waiting for complete radiographic resolution of periapical lesions before filling is generally not necessary or recommended. Radiographic healing is a slow biological process. While most healing trends are evident within the first year, complete bone regeneration can take 1 to 4 years, or even longer, depending on lesion size and other factors (Ørstavik, 1996; Zhang et al., 2024; Mosquera-Barreiro et al., 2024). Radiographic assessment at 1 year post- treatment is crucial for evaluating healing trends. Significant reduction in lesion size at 1 year is a strong predictor of long-term success, even if complete resolution is not yet visible (Ørstavik, 1996; Zhang et al., 2024).
The primary goals are adequate disinfection and achieving a three-dimensional seal of the root canal system. Once these are met and clinical signs/symptoms are favorable, filling can be performed without waiting for complete radiographic healing.
1.2 How Long Should I Medicate with Calcium Hydroxide?
Intracanal medication, typically with calcium hydroxide (Ca(OH)₂), is indicated between appointments primarily when disinfection cannot be adequately achieved in a single visit, such as in cases of persistent infection, exudation, or symptomatic apical periodontitis.
Optimal Duration (1-2 Weeks): Current expert consensus suggests a relatively short duration for Ca(OH)₂ medication. A period of 1-2 weeks between appointments is generally recommended (Zou et al., 2024).
Minimum Effective Time: While Ca(OH)₂ requires time to exert its antimicrobial effect (high pH), a minimum period of 7 days is often considered sufficient for clinical efficacy (Based on Siqueira & Lopes 1999; Zou et al. 2024).
Adverse Effects Of Long-Term Medication1213
Avoid Long-Term Use: Prolonged medication beyond a few weeks should be avoided due to adverse effects (see next section).
1.3 Adverse Effects of Long-Term Medication and Delayed Filling
1.3.1 Effects on Dentine Strength
Dentine Weakening: Long-term exposure (>1 month) to Ca(OH)₂ significantly decreases the fracture resistance and microhardness of root dentin due to the degradation of its organic matrix (collagen) by the high pH (Sethi et al., 2022)
Increased Fracture Risk: The weakening effect translates to an increased clinical risk of root fracture, particularly noted in teeth with immature roots or thin dentinal walls (Andreasen et al., 2002; Cvek, 1992).
1.3.2 Chemical Instability and Loss of Efficacy in the Canal Environment
pH Dependence: Ca(OH)₂ relies on maintaining a high pH (≈12.5) through hydroxyl ion release for its antimicrobial action (Siqueira & Lopes, 1999).
Buffering by Dentine: Dentine components (proteins, phosphates) possess buffering capacity, neutralizing hydroxyl ions and lowering the pH over time, especially near the dentin wall. This reduces the effective zone and duration of high alkalinity (Wang & Hume, 1988; Nerwich et al., 1993).
Buffering by Dentinal/Tissue Fluids: Fluids within dentinal tubules and surrounding tissues contain proteins and bicarbonate buffering systems that further neutralize hydroxyl ions, actively working against maintaining the high pH required for efficacy (Siqueira & Lopes, 1999; Mohammadi & Dummer, 2011).
Carbonation (Inactivation by CO₂): Ca(OH)₂ readily reacts with carbon dioxide (CO₂), which is abundantly available from dentinal/tissue fluids and air leakage, to form inert calcium carbonate (CaCO₃). This process progressively inactivates the medication and lowers pH (Estrela et al., 1995).
Reduced Efficacy Over Time: Due to the combined effects of buffering (by both dentine and fluids) and carbonation, the antimicrobial effectiveness of a single Ca(OH)₂ application diminishes significantly over time. Its ability to eliminate persistent bacteria or disinfect deep into dentinal tubules decreases as the high pH is neutralized (Siqueira & Lopes, 1999; Mohammadi & Dummer, 2011).
Implication for Replacement: This limited duration of action in the complex biological environment reinforces the recommendation for short application periods (1-2 weeks). If longer medication were considered necessary (which is generally discouraged due to strength reduction), replacement of the dressing might be needed to replenish active Ca(OH)₂ and attempt to re-establish a high pH, although the primary recommendation remains to avoid long-term use altogether.
1.3.3 Risks of Delayed Filling
Independent of medication effects, delaying definitive filling increases risks associated with:
- Failure/leakage of temporary restorations.
- Coronal microleakage leading to re-infection of the canal system.
- Significantly higher probability of eventual tooth extraction (Wong et al., 1992).
Summary Of Clinical Recommendations14
1.4 Summary of Recommendations
- Fill Promptly: Complete root canal filling as soon as adequate cleaning, shaping, and disinfection are achieved and the tooth is clinically asymtomatic to ensure optimal sealing and prevent re-infection.
- Don’t Wait for Radiographs: Do not delay filling solely to wait for radiographic evidence of periapical healing. Assess healing trends at the 1-year follow-up.
- Short-Term Medication: If intracanal medication with Ca(OH)₂ is indicated, limit its duration, ideally to 1-2 weeks between appointments, recognising its efficacy diminishes over time due to buffering and carbonation in the canal environment.
- Avoid Long-Term Ca(OH)₂: Avoid using Ca(OH)₂ as a long-term dressing due to its detrimental effects on dentine strength and increased fracture risk.
- Minimise Delays: Minimise the time between appointments and complete the final restoration promptly after obturation to prevent re-infection and improve tooth survival.
Clinical Guide For Filling Techniques
- Clinical Guide for Root Canal Filling Techniques
2.1 Pre-filling Assessment
Before beginning the filling procedure, ensure that canal preparation has been completed according to protocol and that the canal system is adequately cleaned and shaped. The canal should be free of debris, properly irrigated, and ready for three- dimensional filling. Verify that adequate time has been allocated for the filling procedure, as rushing this critical step can compromise treatment success.
Confirm that all necessary materials and instruments are prepared and within reach, including gutta-percha points, sealer, spreaders, pluggers, and appropriate radiographic equipment. The operating field should be properly isolated with rubber dam to maintain aseptic conditions and prevent contamination during the filling process.
Pre-Filling Assessment And Master Point Fit1516
2.2 Master Gutta-Percha: Selection and Fitting
The selection of the appropriate master gutta-percha point is crucial for successful filling, as this point should fit properly in terms of length and width to seal the apical terminus of the root canal. Begin by selecting a gutta-percha point that corresponds to the size of your final preparation. For example, if the canal was prepared to F2, start with a matching size F2 gutta-percha point.
Insert the selected gutta-percha point into the canal to the full working length with gentle pressure. The point should reach the working length with slight resistance, indicating proper apical fit. The master point should feel snug at the apical third but should not bind excessively, which could indicate an oversized point or inadequate canal preparation.
Perform a radiographic confirmation of the master gutta-percha fit. The radiograph should show the point extending to 0.5-1 mm of the radiographic apex, with the point appearing to fill the canal space adequately. If the point appears short of the working length, it may be too large for the canal preparation. Conversely, if the point extends beyond the apex or appears loose, a larger size may be needed.
2.3 Master Gutta-Percha Adjustment
If the initial master point does not fit properly, adjustments are necessary. For points that are too long, carefully trim small increments from the tip using a sharp blade (not scissors). Make conservative cuts of 0.5mm at a time, testing the fit after each adjustment. Avoid aggressive trimming, which can result in a point that is too short. Alternatively, you can always try the next larger size. The goal is to achieve a master point that reaches working length with appropriate resistance, creating a good apical seal.
Conversely, if the master gutta-percha point is too short, first determine the cause if the point is oversized relative to the prepared canal, choose a smaller size; if there is an obstruction (dentine debris, a ledge, or a separated instrument), re-establish patency with small files, copious irrigation, or bypass techniques. If the master file reaches working length but the MGP don’t, this is because the GP as a thermoplastic non- rigid material. Perform conservative manual or rotary enlargement to improve taper and allow the point to reach full working length.
Test the master point multiple times to ensure consistent fit and resistance. The point should require gentle but definite pressure to reach working length and should show slight resistance when withdrawn. This “tug-back” sensation indicates proper apical adaptation and is essential for creating an effective apical seal. Confirmation with a radiograph again is mandatory.
2.4 Canal Dryness Verification
Proper canal dryness is essential for optimal sealer adhesion and filling success. Begin the drying process by using paper points that correspond to the size of your final preparation. Insert the paper point to the full working length and leave it in place for several seconds to absorb residual
Canal Drying And Moisture Control17
irrigant.
Continue using fresh paper points until they emerge from the canal completely dry, with no visible moisture or discoloration. This process typically requires 3-5 paper points, depending on canal size and residual irrigation. Pay particular attention to the apical third, as moisture retention in this area can significantly compromise the seal.
For canals that continue to show moisture after multiple paper points, that might suggest discharge of exudate from the periapical area indicating persistence of inflammation, this tooth is not to be filled and should be further medicated with Calcium Hydroxide for 2 weeks and re-assess.
2.5 Sealer Preparation and Properties
The selection and preparation of endodontic sealer is critical for achieving a hermetic seal of the root canal system. Choose a sealer appropriate for your clinical situation, considering factors such as biocompatibility, sealing ability, radiopacity, and working time. Common sealer types include zinc oxide- eugenol based sealers, resin-based sealers, and hydraulic calcium silicate- based sealers.
Resin-based sealers (AH Plus) require precise mixing ratios. Dispense equal lengths (1:1 volume ratio) of the base paste (white cap) and catalyst paste (gray cap) onto a clean mixing pad. Combine pastes thoroughly with a spatula for 10—15 seconds until streak-free, then spread and mix vigorously for another 30 seconds (40—45 seconds total) until achieving a homogeneous, glossy, ivory-colored cream. Verify consistency by lifting the spatula to form a “stringing thread” ≈1 cm long. Use immediately within the 4-hour working window, and clean uncured residue with alcohol/acetone.
Hydraulic calcium silicate- based sealers have gained popularity due to their biocompatibility and ability to set in the presence of moisture. These materials typically come pre-mixed or require minimal preparation, making them user- friendly while providing excellent sealing properties and bioactivity.
Sealer Placement And Obturation Methods181920
2.6 Sealer Placement Techniques
Proper sealer placement ensures adequate coating of canal walls and optimal interaction with the gutta-percha filling material. Several techniques can be used for sealer introduction, each with specific advantages and applications.
The spiral filler technique involves using a slow-speed spiral filler to carry sealer into the canal. Insert the spiral filler with sealer to approximately two-thirds of the working length and activate it at low speed while slowly withdrawing. This technique provides good sealer distribution but requires careful control to avoid forcing sealer beyond the apex.
The master point coating technique involves coating the fitted master gutta- percha point with sealer before insertion. Apply a thin, even layer of sealer to the apical two-thirds of the master point, ensuring complete coverage without excess that could be expressed beyond the apex. This technique is simple and effective for single cone obturation.
The injection technique uses specialized tips or syringes to place sealer directly into the canal. Insert the tip to approximately half the working length and slowly inject sealer while withdrawing the tip. This method allows for controlled sealer placement and is particularly useful for complex canal anatomy. This technique is sensitive, and need be performed under the microscope to avoid forceful injection of the sealer.
For optimal results, combine techniques by first placing sealer in the canal using injection or spiral filler, then coating the master point with additional sealer before insertion. This dual approach ensures comprehensive sealer distribution throughout the canal system.
2.7 Single Cone Obturation Technique
Single cone obturation is an efficient and effective technique when proper canal preparation and master point fitting have been achieved. This technique relies on the combination of a well-fitted master gutta-percha point and adequate sealer to achieve three-dimensional filling of the canal system, but only to be used matched sized GP points.
Begin by confirming that the master gutta-percha point fits properly as previously verified. Apply sealer to the canal using your preferred technique, ensuring adequate coverage of canal walls without overfilling. The amount of sealer should be sufficient to coat the walls but not so excessive as to create voids or extrusion beyond the apex.
Coat the master gutta-percha point with a thin layer of sealer, paying particular attention to the apical portion that will contact the canal walls. Insert the coated master point slowly and steadily to the full working length, using gentle pressure to ensure proper seating. The point should reach working length with the same resistance noted during fitting.
Once the master point is seated, use a heated instrument to sever the gutta-percha at the canal orifice level. Apply gentle vertical pressure with a plugger to ensure complete seating and to express any excess sealer. The goal is to achieve intimate contact between the gutta-percha, sealer, and canal walls throughout the entire length of the preparation. In multi-rooted teeth, it might be easier to insert MGP in one canal sever it before moving on to another canal, this prevent crowding of the MGP points in the chamber and allow better visibility and control.
Take a radiograph to confirm proper master point position and to check for adequate fill density. The radiograph should show the gutta-percha extending to within 0.5-1 mm of the radiographic apex with uniform density throughout the canal length. Any voids or inadequate fill may require additional gutta-percha placement or technique modification.
2.8 Lateral Condensation Technique
Lateral condensation remains the gold standard for root canal filling, providing excellent adaptation and density when performed correctly. This technique involves the placement of a master gutta-percha point followed by the lateral compaction of additional accessory points to achieve complete canal filling.
After sealer placement and master point insertion as described previously, select an appropriate finger spreader or hand spreader (D11). The spreader should penetrate to within 1-2mm of the working length, indicating proper canal flare, alongside the master point without binding or creating excessive pressure that could fracture the root.
Insert the spreader alongside the master gutta-percha point, applying gentle apical pressure without moving the spreader in a lateral direction. The spreader should reach to within 1-2mm of working length, creating a space that extends the full length of the canal preparation.
Remove the spreader and immediately insert a fine accessory gutta-percha point into the created space. The accessory point shouldn’t be coated with sealer, and it is inserted to the full depth of the space created by the spreader. Apply gentle pressure to seat the accessory point completely.
Repeat the lateral condensation process, alternating between spreader insertion and accessory point placement. Each subsequent spreader insertion should create additional space for more accessory points, gradually building density throughout the canal. Continue this process until the spreader can no longer penetrate more than 3-4mm into the canal (level of the CEJ), indicating adequate density has been achieved.
The number of accessory points required varies with canal size and anatomy, typically ranging from 3-8 points for most canals. Larger canals may require more accessory points to achieve adequate density, while smaller canals may be adequately filled with fewer points.
After completing lateral condensation, use a heated plugger or hot instrument to remove excess gutta-percha from the pulp chambers at the level of the orifice. Then apply vertical pressure to compact the GP apically. This step helps eliminate voids and improves the overall density of the filling.
Clean the pulp chamber thoroughly, removing all traces of sealer and gutta-percha debris; you can use a cotton pellet soaked in alcohol which is very effective to remove resin-based sealer. The chamber walls should be clean and ready for placement of the permanent restoration or temporary filling material.
Quality Assessment And Final Recommendations2122
2.9 Quality Assessment and Radiographic Evaluation
Take a final radiograph to assess the quality of the filling. The radiograph should demonstrate several key features indicating successful obturation: the gutta-percha should extend to within 0.5-2 mm of the radiographic apex, show uniform density throughout the canal length, and demonstrate no obvious voids or underfilled areas.
Document the final result with high-quality radiographs from multiple angles if necessary. These images serve as baseline references for future evaluation and are essential for monitoring healing and treatment success over time.
2.10 Post-filling Procedures
Immediately following filling completion, place an appropriate temporary or permanent restoration to seal the access cavity. The restoration should provide an adequate coronal seal to prevent bacterial contamination of the root canal system. Use high-quality temporary filling materials such as IRM (intermediate restorative material) or glass ionomer cement if permanent restoration will be delayed.
Schedule appropriate follow-up appointments for permanent restoration placement and healing assessment. The timing of permanent restoration is critical, as delayed restoration can compromise treatment success through coronal leakage and bacterial contamination.
2.11 Final Recommendations
Successful root canal filling requires careful attention to each step of the process, from master point selection through final radiographic assessment. The combination of proper technique, appropriate materials, and attention to detail will result in optimal treatment outcomes and long-term success.
Although no sealer or obturation technique has demonstrated clear superiority, it is generally recommended to use the single-cone technique with hydraulic calcium silicate sealers, which exhibit slight expansion upon setting. In contrast, when using resin-based sealers which undergo slight polymerization shrinkage, the cold lateral condensation technique is preferred to minimise sealer film thickness and improve gutta-percha adaptation.
Regular practice and continuing education in obturation techniques will improve clinical skills and patient outcomes. Stay current with new materials and techniques while maintaining proficiency in proven traditional methods such as lateral condensation.
Remember that root canal filling is only one component of successful endodontic treatment. Proper diagnosis, adequate access, thorough cleaning and shaping, and appropriate restoration are equally important for achieving optimal results.
References2324
-
Andreasen JO, Farik B, Munksgaard EC. Long-term calcium hydroxide as a root canal dressing may increase risk of root fracture. Dent Traumatol. 2002 Jun;18(3):134-7.
-
Cvek M. Prognosis of luxated non-vital maxillary incisors treated with calcium hydroxide and filled with gutta-percha. A retrospective clinical study. Endod Dent Traumatol. 1992 Apr;8(2):45-55.
-
Estrela C, Sydney GB, Bammann LL, Felippe Júnior O. Mechanism of action of calcium and hydroxyl ions of calcium hydroxide on tissue and bacteria. Braz Dent J. 1995;6(2):85-90.
-
Mahmoudi S, Iranmanesh P, Khazaei S, Zare Jahromi M. Immediate and Delayed Post Space Preparations in Endodontically Treated Teeth: A Scoping Review. BMC Oral Health. 2022 Dec 21;22(1):625.
-
Mohammadi Z, Dummer PMH. Properties and applications of calcium hydroxide in endodontics and dental traumatology. Int Endod J. 2011 Aug; 44(8):697-730.
-
Mosquera-Barreiro C, Ruíz-Piñón M, Abella Sans F, et al. Predictors of periapical bone healing associated with teeth having large periapical lesions following nonsurgical root canal treatment or retreatment: A cone beam computed tomography-based retrospective study. Int Endod J. 2024 Jan; 57(1):23-36.
-
Nagas E, Karaduman E, Sahin C, Uyanik O, Canay S. Effect of timing of post space preparation on the apical seal when using different sealers and obturation techniques. J Dent Sci. 2016 Mar;11(1):79-82.
-
Nerwich A, Figdor D, Messer HH. pH changes in root dentin over a 4-week period following root canal dressing with calcium hydroxide. J Endod. 1993 Mar;19(3):302-6.
-
Ørstavik D. Time-course and risk analyses of the development and healing of chronic apical periodontitis in man. Int Endod J. 1996 Mar;29(2):150-5.
-
Ray HA, Trope M. Periapical status of endodontically treated teeth in relation to the technical quality of the root filling and the coronal restoration. Int Endod J. 1995 Jan;28(1):12-8.
-
Sethi S, Gupta A, Kurian AH, et al. Effect of calcium hydroxide on fracture resistance and microhardness of dentin in human teeth: A systematic review. Endodontology. 2022;34(4):223-228.
-
Siqueira JF Jr, Lopes HP. Mechanisms of antimicrobial activity of calcium hydroxide: a critical review. Int Endod J. 1999 Sep;32(5):361-9.
-
Siqueira JF Jr, Rôças IN. Clinical implications and microbiology of bacterial persistence after treatment procedures. J Endod. 2008 Aug;34(11):1291-1301.e3.
-
Wang JD, Hume WR. Diffusion of hydrogen ion and hydroxyl ion from various sources through dentine. Int Endod J. 1988 Jul;21(1):17-26.
-
Wong M, Shelley J, Bodey T, Hall R. Delayed root canal therapy: An analysis of treatment over time. J Endod. 1992 Aug;18(8):387-90.
-
Zhang MM, Jiang LM, Liang YH, et al. The trend of radiographic healing after root canal treatment in teeth with apical periodontitis based on cone-beam computed tomography: A 4-year longitudinal study. J Dent. 2024 Jul;146:105071.
-
Zou X, Zheng X, Liang Y, et al. Expert consensus on irrigation and intracanal medication in root canal therapy. Int J Oral Sci. 2024 Mar 1;16(1):23.
Footnotes
-
Original PDF page 1: Elkholy - Root Canal Treatment Comprehensive Clinical Guide, p.1 ↩
-
Original PDF page 2: Elkholy - Root Canal Treatment Comprehensive Clinical Guide, p.2 ↩
-
Original PDF page 3: Elkholy - Root Canal Treatment Comprehensive Clinical Guide, p.3 ↩
-
Original PDF page 4: Elkholy - Root Canal Treatment Comprehensive Clinical Guide, p.4 ↩
-
Original PDF page 5: Elkholy - Root Canal Treatment Comprehensive Clinical Guide, p.5 ↩
-
Original PDF page 6: Elkholy - Root Canal Treatment Comprehensive Clinical Guide, p.6 ↩
-
Original PDF page 8: Elkholy - Root Canal Treatment Comprehensive Clinical Guide, p.8 ↩
-
Original PDF page 9: Elkholy - Root Canal Treatment Comprehensive Clinical Guide, p.9 ↩
-
Original PDF page 10: Elkholy - Root Canal Treatment Comprehensive Clinical Guide, p.10 ↩
-
Original PDF page 12: Elkholy - Root Canal Treatment Comprehensive Clinical Guide, p.12 ↩
-
Original PDF page 14: Elkholy - Root Canal Treatment Comprehensive Clinical Guide, p.14 ↩
-
Original PDF page 15: Elkholy - Root Canal Treatment Comprehensive Clinical Guide, p.15 ↩
-
Original PDF page 16: Elkholy - Root Canal Treatment Comprehensive Clinical Guide, p.16 ↩
-
Original PDF page 17: Elkholy - Root Canal Treatment Comprehensive Clinical Guide, p.17 ↩
-
Original PDF page 18: Elkholy - Root Canal Treatment Comprehensive Clinical Guide, p.18 ↩
-
Original PDF page 19: Elkholy - Root Canal Treatment Comprehensive Clinical Guide, p.19 ↩
-
Original PDF page 20: Elkholy - Root Canal Treatment Comprehensive Clinical Guide, p.20 ↩
-
Original PDF page 21: Elkholy - Root Canal Treatment Comprehensive Clinical Guide, p.21 ↩
-
Original PDF page 22: Elkholy - Root Canal Treatment Comprehensive Clinical Guide, p.22 ↩
-
Original PDF page 23: Elkholy - Root Canal Treatment Comprehensive Clinical Guide, p.23 ↩
-
Original PDF page 24: Elkholy - Root Canal Treatment Comprehensive Clinical Guide, p.24 ↩
-
Original PDF page 25: Elkholy - Root Canal Treatment Comprehensive Clinical Guide, p.25 ↩
-
Original PDF page 26: Elkholy - Root Canal Treatment Comprehensive Clinical Guide, p.26 ↩
-
Original PDF page 27: Elkholy - Root Canal Treatment Comprehensive Clinical Guide, p.27 ↩