Discoloured Teeth - 1 & 21
Bleaching - Stages2
- Assess the Pulp/Root Canal & Periapical status
- if there is a previous root canal it should be redone, this is usually the causes of the internal staining
Info
> This is because the quality, materials, and history of the previous treatment are often unknown, and it may be a contributing factor to the discoloration (e.g., from materials like Crypaste).
- Asses the Pulp/Root canal and Periapcial Status
- Remove the root canal filling to below the CEJ
- Put CAvit as the base over the RC and allow to set for 1 week
- Rubber dam and access cavity
- Acid etch, wash and dry
- A liquid acid etch solution should be used
- Place a thick paste of H2O2/Na perborate
- Temporary filling with cavit
- Review after 1 week
- Repeat if necessary
- Restore access cavity
- temporary filling for minimum of 2 weeks- cavit then do GIC/ composit
- Use the “sandwhich technique”
- Review in 6 months, then in a few years etc
Bleaching - Stages2
Walking Bleach Technique
The internal bleaching process, also known as the walking bleach technique, is a multi-stage procedure that begins after the tooth has been successfully root-treated.
5. Rubber Dam ; Access
Crucial Note
> It is incorrect and detrimental to remove the discoloured dentine itself, as this would weaken the tooth structure significantly. Only the tooth structure necessary for the initial endodontic access should be removed.
6. Acid etch, wash & dry
- HINT: Use a LIQUID acid etch solution
Info
> A liquid etch is easier to apply in the confined space than a gel.
7. Place thick paste of H₂O₂/Na Perborate
Paste Preparation and Placement sodium perborate powder and hydrogen peroxide liquid. > - The paste should be dry enough to be transported to the access cavity using an amalgam carrier. > - The paste is packed firmly against the labial wall of the pulp chamber. It is not necessary to place it on the palatal wall.
> - A thick, dry paste is mixed using
8. Temporary filling - Cavit
-
Info
A dry cotton pellet can be used to absorb any excess moisture from the bleaching paste. A double layer with IRM is not typically used due to limited space.
9. Review after 1 week
10. Repeat if necessary
- repeat steps 5-9 until the bleaching is satisfactory
11. Restore access cavity
- Temporary filling for minimum 2 weeks - Cavit
- Then do GIC/composite
Rationale for Waiting Period two weeks because this allows time for any residual oxygen from the hydrogen peroxide to dissipate. Residual oxygen would otherwise inhibit the bond strength of composite and glass ionomer materials.
> The patient must wait a minimum of
Restoration of Access Cavity3
- “Sandwich technique”
- GIC - dentine replacement
- Composite resin - enamel replacement
Clinical Recommendation
It is recommended that the restoring dentist leaves a portion of the Cavit in place as a base over the gutta-percha and also leaves a thin layer of Cavit on the labial wall. This serves two purposes:
- It provides a good underlying colour.
- It makes access significantly easier if the tooth ever requires re-bleaching in the future.
12. Review - 6 mths, 2–3 years, etc
Internal Bleaching of Teeth An Analysis of 255 Teeth
Conclusions4
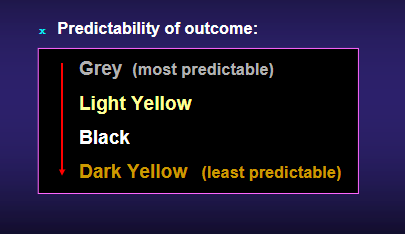
- Internal bleaching is a predictable procedure yielding “good” or “acceptable” initial results.
- Bleaching is easiest on teeth stained by trauma or those with grey/light yellow discolorations.
- Darker teeth, particularly dark yellow ones, require more appointments. Stains from previous root filling materials are also difficult to bleach.
- Discoloration recurring within 2-5 years seems linked to restoration breakdown, not bleaching reversal.
Overall Conclusions
-
Internal bleaching is a predictable, simple, fast, and cost-effective treatment.
-
It is biologically conservative, preserving the natural tooth’s structure, form, function, and occlusion.
-
This approach avoids potential prosthetic complications like periodontal issues, occlusal changes, root fractures, or unnatural aesthetics.
-
The procedure is safe if proper precautions are taken, which demands a solid understanding of the materials’ chemistry and procedural steps.
-
Safety First
- Use of safety glasses for the patient and clinical team is mandatory.
- A rubber dam must be used to protect soft tissues from chemical burns.
-
Footnotes
-
Original PDF page 1: 6b Discoloured teeth, p.1 ↩
-
Original PDF page 2: 6b Discoloured teeth, p.2 ↩ ↩2
-
Original PDF page 6: 6b Discoloured teeth, p.6 ↩
-
Original PDF page 21: 6b Discoloured teeth, p.21 ↩