Preparation Steps1
Note
The preparation follows a systematic sequence to ensure all criteria are met efficiently and accurately.
Pre-Operative Steps
- Anesthesia: Administer local anesthetic. Even for endodontically treated teeth, anesthesia is often required for patient comfort during soft tissue manipulation (e.g., placing retraction cord).
- Opposing Arch Impression: Take an impression of the opposing arch while waiting for the anesthetic to take effect.
- Silicone putty index
- Occlusal reduction
- Buccal & lingual axial reduction
- Interproximal reduction
- Finishing
- Auxiliary retentive features
1. Silicone Putty Index2
-
Gives a useful guide to the original shape of the tooth once preparation has begun
-
Not necessary with every case
-
Mainly when major modifications are required
-
In conjunction with wax-up
-
Two indices are recommended:
- One is kept intact for fabricating the temporary crown.
- The other is sectioned (e.g., buccolingually) to serve as a reduction guide, allowing for visual verification of occlusal and axial reduction throughout the preparation process.
2. Occlusal Reduction3
Note
This step creates the necessary space for the restorative material on the chewing surface.
Ridges and Grooves
-
Occlusal guiding grooves
-
Bur: diamond (1mm diam)
-
Follow anatomy
-
==Depth grooves are placed at the highest points (triangular ridges) and lowest points (developmental grooves) of the occlusal surface.==
-
The accuracy of these depth grooves is critical, as they guide the entire occlusal reduction. Incorrect depth or angulation will lead to an improper final reduction.
Reduction Amounts45
-
Functional cusp: 1.5 mm
- Buccal on mandibular posterior teeth
- Lingual on maxillary posterior teeth
-
Non-functional cusp: 1.0 mm
- Lingual– mandibular posterior teeth
- Buccal– maxillary posterior teeth
-
It is advisable to prepare to approximately 80% of the final depth (e.g., 0.8 mm for a 1.0 mm reduction) during the gross reduction phase, leaving the final 0.2 mm for the finishing step.
Procedure6
- Even occlusal surface reduction
- Bur (1mm diameter)
- Reduce half the occlusal surface
- Use the other half as a guide
- Check the occlusal reduction (Putty key and antagonist)
- Centric and excursive movements
Alternate Procedure
- Optional Central Fossae Holes: Place 1.0 mm deep holes in the central, mesial, and distal fossae. This can help guide reduction but may be skipped if it tends to cause over-reduction.
- Place Depth Grooves: Use a bur to create depth grooves on the triangular ridges and developmental grooves to the required depths (1.5 mm on functional cusps, 1.0 mm on non-functional).
- Connect the Grooves: Reduce the remaining occlusal surface by connecting the depth grooves, following the natural anatomy of the cusps and fossae.
- Adjust Bur Angulation: Be mindful that the bur will not sit flat on all inclines. Adjust the handpiece angulation to ensure uniform reduction across the entire surface.
Following the occlusal anatomy
3. Axial Reduction789
Path of Insertion
The path of insertion should be parallel to the long axis of the tooth, not the clinical crown, which may be tilted (e.g., the lingual tilt of mandibular molars).
Lingual Reduction (2 Planes of Reduction)
-
Place depth grooves (the lecturer suggests starting with five for stability, rather than the textbook's three) to guide the reduction.
-
Connect the grooves, establishing two distinct planes to avoid under-reduction in the occlusal third or over-tapering the preparation.
-
Occlusal Third (Supporting Cusp)
- Reduction: 1.5 mm
-
Gingival 2/3
- Axial reduction: 1.0 mm
- Margin: 0.5 mm
- Parallel to long axis
-
General Principles
- Even axial surface reductions
- Margin placement in the same procedure
Buccal Reduction (2 Planes of Reduction)101112131415
Purpose of Two Planes
- The gingival two-thirds of the axial wall should be prepared nearly parallel to the long axis of the tooth to maximize retention and resistance.
- The occlusal one-third is prepared with a second, more angled plane. This follows the natural contour of the tooth, ensuring adequate material thickness without creating an excessive taper that would compromise retention.
Procedure
- Place several vertical depth grooves along the buccal surface.
- Connect the grooves, creating the two planes of reduction.
-
Occlusal 2/3 (Non-supporting Cusp)
- Reduction: 1.0 mm
-
Gingival 1/3
- Reduction: 1.0 mm
- Parallel to the long axis
4. Interproximal Reduction161718
- Extra care for the interproximal areas / adjacent tooth
- Use narrow tapered bur
- Use needle bur
- Matrix band protection if needed
- Acquired skill
Procedure6
- Extend the buccal and lingual axial reductions as far into the interproximal embrasures as possible without touching the adjacent tooth.
- ==To safely break contact, it is recommended to favor occlusal reduction when cutting through the marginal ridge. This approach increases visibility of the bur tip and the contact area, minimizing the risk of damaging the adjacent tooth.==
- Follow the natural curvature of the tooth interproximally; do not cut a flat slice.
Evaluation of the Preparation192021
Final Check
A final, systematic check is crucial before proceeding to the impression stage.
- ==Occlusal Clearance: Use the sectioned putty index to verify that adequate clearance (1.0-1.5 mm) has been achieved across the entire occlusal surface.==
- ==Taper and Path of Insertion:==
- ==View the preparation from the buccal and lingual aspects to evaluate the mesio-distal taper.==
- ==View from the mesial and distal aspects (using a mirror) to evaluate the bucco-lingual taper.==
- ==Occlusal View (Concentricity and Undercuts):==
- ==Undercuts: When viewing from directly above, all parts of the margin must be visible. If any portion of the margin is hidden by a bulge of tooth structure, an undercut is present.==
- ==Over-tapering: You should see only a small, uniform amount of the axial wall. If a large amount of the axial wall is visible, the preparation is likely over-tapered.==
- ==Margin Quality: Use an explorer to confirm the margin is smooth, continuous, and free of ledges.==
5. Finishing
Note
The goal is to create a smooth preparation free of sharp angles, which act as points of stress concentration.
-
Smooth preparation
-
Smooth transition between surfaces
-
No sharp angles
-
Fine-grit diamond or carbide bur
-
Consider low speed hand piece
-
Assessing criteria with dental explorer or periodontal probe
-
==Round all line angles, creating a smooth transition between the occlusal, axial, and interproximal surfaces. The final prep should have no
6. Auxiliary Retentive Features22
Note
These are features added to the preparation to increase retention and resistance form, typically only when necessary (e.g., on very short clinical crowns).
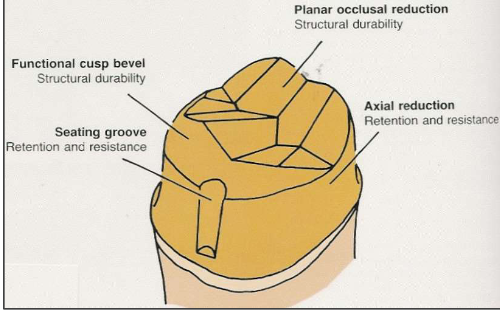
-
Vertical grooves or boxes
-
1 mm deep
-
1 mm above the margin
-
In the middle of the buccal surface
-
Restricting the path of withdrawal
-
As parallel to the long axis of the tooth as possible
-
==Types: Vertical grooves or boxes.==
-
==Mechanism: They enhance retention by limiting the path of insertion to a single direction, creating resistance to dislodgement.==
-
==Critical Consideration: Auxiliary features must be prepared parallel to the path of insertion of the crown. If they are divergent, the crown will not seat. The lab would be forced to block out the feature, rendering it useless.==
-
==Modern Relevance: With the advent of modern adhesive cements and refined preparation techniques, auxiliary features are needed less frequently than in the past but remain a useful tool in challenging cases.==
Footnotes
-
Original PDF page 8: F1 Metal Crowns, p.8 ↩
-
Original PDF page 9: F1 Metal Crowns, p.9 ↩
-
Original PDF page 10: F1 Metal Crowns, p.10 ↩
-
Original PDF page 11: F1 Metal Crowns, p.11 ↩
-
Original PDF page 12: F1 Metal Crowns, p.12 ↩
-
Original PDF page 13: F1 Metal Crowns, p.13 ↩ ↩2
-
Original PDF page 14: F1 Metal Crowns, p.14 ↩
-
Original PDF page 15: F1 Metal Crowns, p.15 ↩
-
Original PDF page 16: F1 Metal Crowns, p.16 ↩
-
Original PDF page 17: F1 Metal Crowns, p.17 ↩
-
Original PDF page 18: F1 Metal Crowns, p.18 ↩
-
Original PDF page 19: F1 Metal Crowns, p.19 ↩
-
Original PDF page 20: F1 Metal Crowns, p.20 ↩
-
Original PDF page 21: F1 Metal Crowns, p.21 ↩
-
Original PDF page 22: F1 Metal Crowns, p.22 ↩
-
Original PDF page 23: F1 Metal Crowns, p.23 ↩
-
Original PDF page 24: F1 Metal Crowns, p.24 ↩
-
Original PDF page 25: F1 Metal Crowns, p.25 ↩
-
Original PDF page 26: F1 Metal Crowns, p.26 ↩
-
Original PDF page 27: F1 Metal Crowns, p.27 ↩
-
Original PDF page 28: F1 Metal Crowns, p.28 ↩
-
Original PDF page 29: F1 Metal Crowns, p.29 ↩