Frontal View
Image sources
Every figure below is captioned with where it came from. Three sources are used throughout: L2 lecture (Dr. Razza’s slides — the red-line diagrams), OrthoInstruction Level II Unit B, and Proffit, *Contemporary Orthodontics* 6e (figure numbers given).
Facial Midline (Symmetry)
Landmarks to mark:
- Glabella / Nasion — bridge of the nose (soft tissue nasion)
- Tip of the nose — pronasale
- Philtrum — the midpoint of the cupid’s bow of the upper lip (most reliable soft tissue midline landmark)
- Subnasale — base of the nose
- Pogonion / Menton — the chin point
Line to draw:
- Draw a vertical midline connecting Glabella → Subnasale → Pogonion
- The philtrum and tip of the nose should fall on or very close to this line
What to assess:
- Facial symmetry: do the landmarks align on a single vertical line, or does the chin or nose deviate to one side?
- Chin deviation: > 4 mm deviation of the chin from midline is consistently noticed by both clinicians and patients; < 3 mm is generally undetectable
- Dental midline vs facial midline: the maxillary dental midline should coincide with the facial midline (philtrum). A deviation > 3 mm becomes noticeable and is a treatment priority
- Upper vs lower dental midline: should coincide with each other, but matching both to the facial midline matters more than matching them to each other
- Source of asymmetry: if asymmetry is present, determine whether it is skeletal (mandible shifted), dentoalveolar (teeth shifted), or both
Clinical method
Hold a piece of dental floss vertically from glabella through subnasale — if the chin (pogonion) does not fall on this line, there is mandibular asymmetry. Be aware that if mandibular asymmetry exists, using three points will not give a valid midline — rely on the upper landmarks (glabella, subnasale, philtrum) and note chin deviation separately.
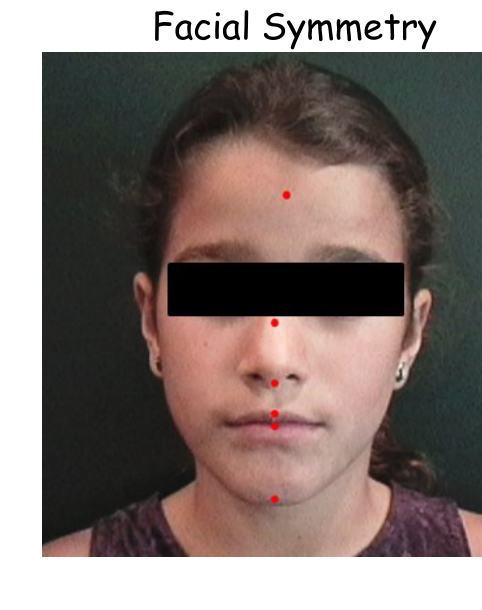 The five landmarks to mark, before any line is drawn — glabella, nasion, tip of nose, philtrum, subnasale, pogonion. — L2 lecture
 Calibrating normal asymmetry: the true photo (B) between a right-side mirror composite and a left-side mirror composite of the same boy. Every face is asymmetric — this is what a normal amount looks like. — Proffit Fig. 6.10, Ch. 6
 |  |
|---|---|
| Chief complaint: “my smile is crooked.” The maxillary dental midline is displaced from the facial midline. — OrthoInstruction | Same problem in the mixed dentition — correcting this would be a priority item in the treatment plan. — OrthoInstruction |
Sourcing gap
No photograph of the floss-held-vertically technique described in the callout above exists anywhere in the vault. If you find one in a later lecture, it belongs here.
Facial Cant (Occlusal Cant)
Landmarks to mark:
- Right and left pupils — centers of the pupils (patient looking straight ahead)
- Right and left alae of the nose — the lateral-most points of the nasal alar base
- Right and left commissures of the lips — corners of the mouth
Lines to draw:
- Interpupillary line (IPL): draw a horizontal line connecting the centers of the two pupils — this is the primary horizontal reference
- Alar base line: draw a horizontal line connecting the right and left alae of the nose — an elevated alar base on one side indicates vertical maxillary asymmetry (one side of the maxilla has grown down more than the other)
- Commissural line (CL): draw a horizontal line connecting the two corners of the mouth — an elevated commissure on one side is also an indicator of vertical skeletal asymmetry
What to assess:
- All three lines (IPL, alar base, CL) should be parallel to each other and perpendicular to the facial midline
- If any line is tilted relative to the interpupillary line, there is a facial cant indicating vertical asymmetry
- Detection thresholds:
- Orthodontists detect cant at ~2° of tilt
- Laypeople detect cant at ~4° of tilt
- Note which side is higher/lower
Additional: Occlusal plane cant
- Place a wooden tongue depressor across the premolar/molar teeth and have the patient bite
- View from the front and compare the angle of the depressor to the interpupillary line
- Any visible tilt indicates an occlusal cant — the occlusal plane should be parallel to the interpupillary line
- Occlusal cant reflects differential vertical growth of the maxilla/mandible on one side
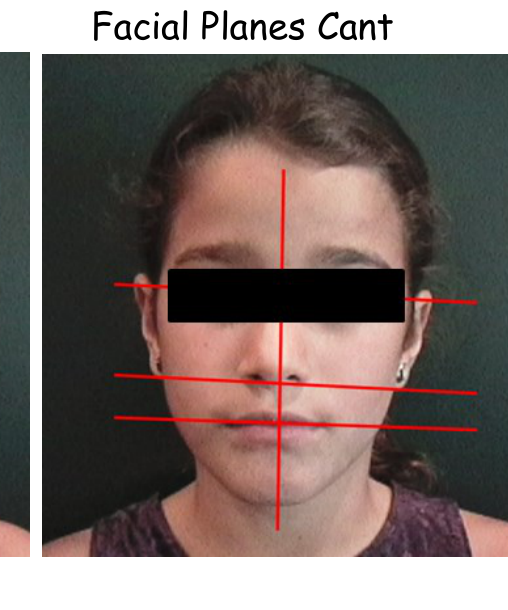 All four lines on one face: the vertical midline, and the three horizontals (interpupillary, alar base, commissural) that should be parallel to each other and perpendicular to it. This is the construction to reproduce in the exercise. — L2 lecture
 The clinical manoeuvre described above. (A) Facial asymmetry that developed after fracture of the left condylar process at age 5. (B) A wooden tongue depressor laid across the occlusal surfaces — the blade is visibly tilted, which is the cant. Trauma is the most frequent cause of asymmetry of this type. — Proffit Fig. 6.3, Ch. 6
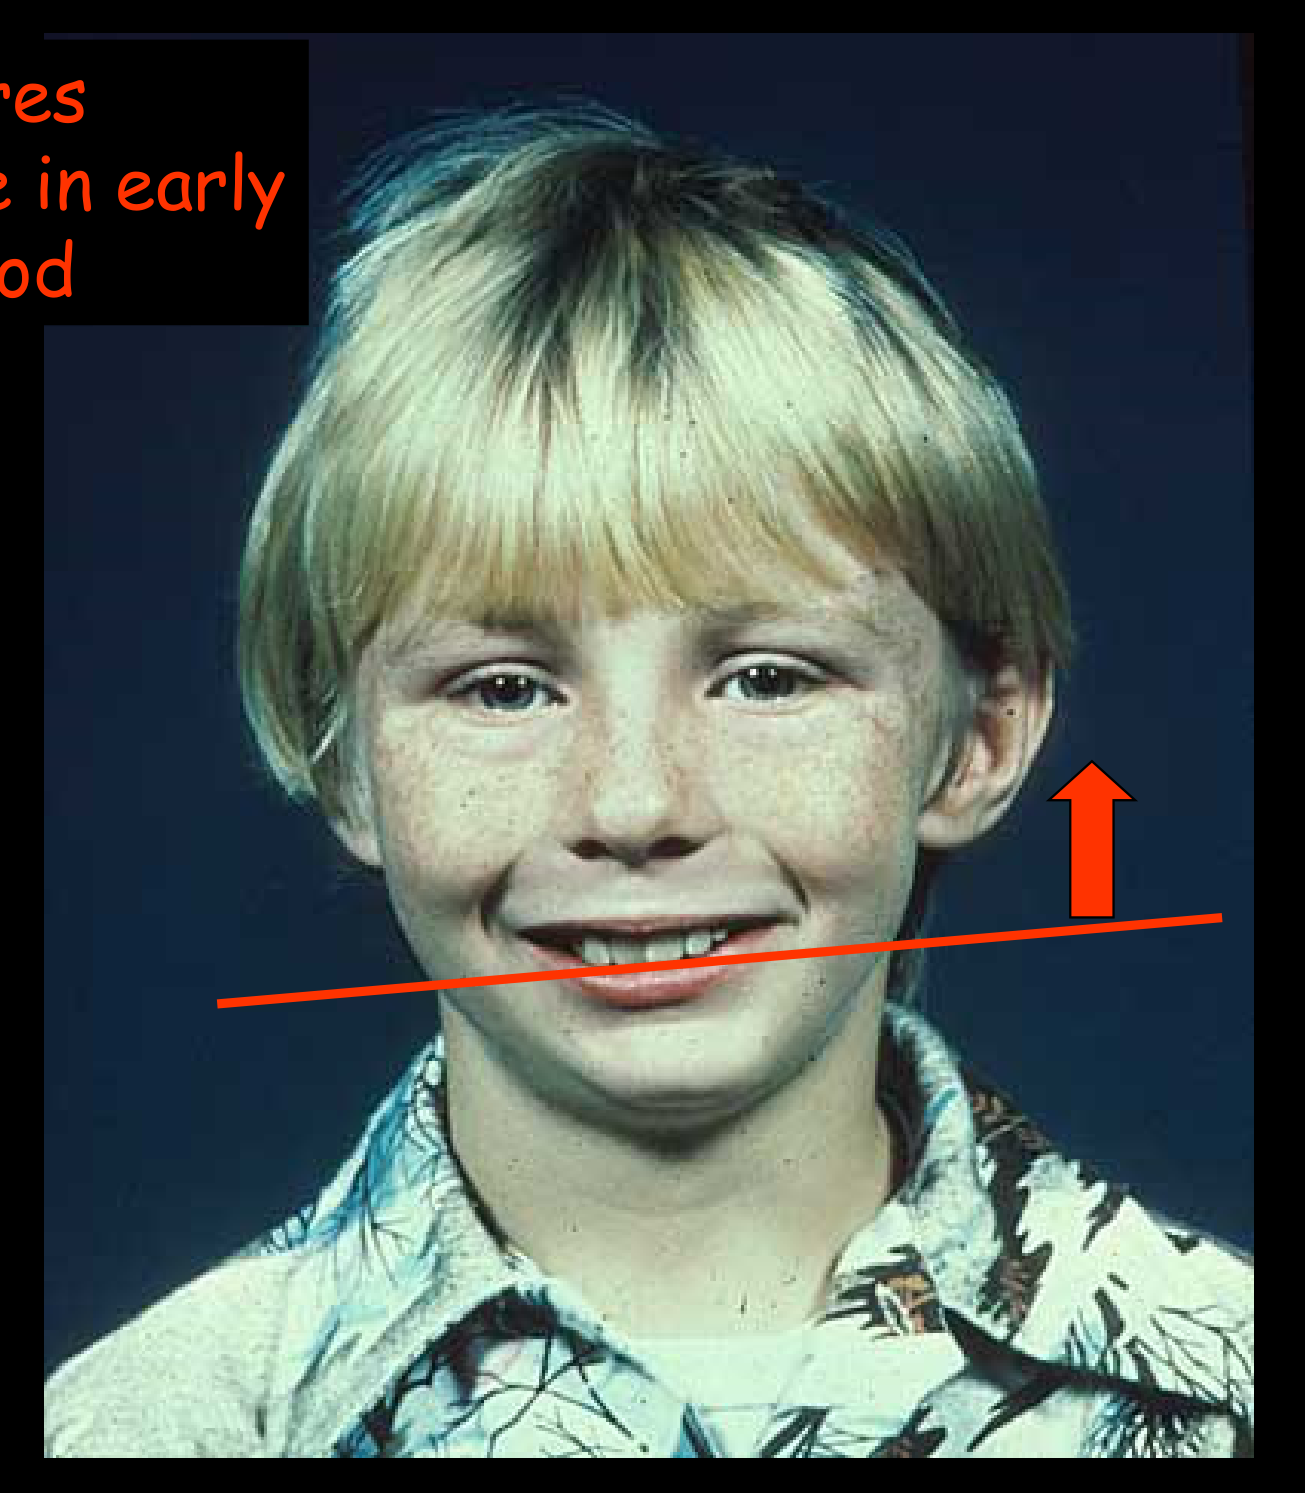 The same finding marked directly on a smiling patient — the red line follows the occlusal/commissural plane and the arrow points to the elevated side. — L2 lecture
 Roll: (A) the yellow line is the intercommissure reference, and the dentition is rolled down on the patient’s right with the chin deviated. (B) the same deformity in an adult, unannotated — practise seeing it without the line. Roll correlates with asymmetric mandibular growth. — Proffit Fig. 6.78, Ch. 6
Facial Fifths
Landmarks to mark (6 vertical lines creating 5 equal segments):
- Right and left helices of the ears (outermost boundaries of the face)
- Right and left outer canthi (outer corners of the eyes)
- Right and left inner canthi (inner corners of the eyes — should align with the alae of the nose)
Lines to draw:
- Draw 6 vertical lines through each landmark above, dividing the face into 5 equal-width segments:
- 1st fifth: Right helix → Right outer canthus (ear width)
- 2nd fifth: Right outer canthus → Right inner canthus (eye width)
- 3rd fifth: Right inner canthus → Left inner canthus (intercanthal / nasal width)
- 4th fifth: Left inner canthus → Left outer canthus (eye width)
- 5th fifth: Left outer canthus → Left helix (ear width)
What to assess:
- All 5 segments should be approximately equal in width
- The intercanthal width (3rd fifth) should equal the alar base width of the nose
- The mouth width (commissure to commissure) should approximate the inter-iris/inter-pupillary distance
- A vertical line from the outer canthi should be coincident with the gonial angles of the mandible
- Any significant deviation between segments indicates asymmetry
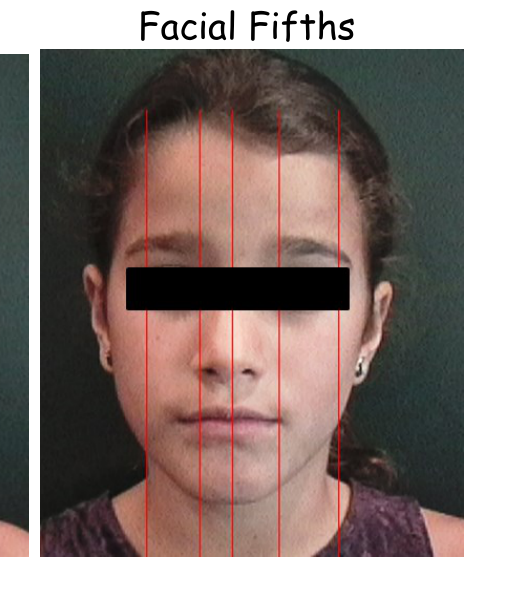 The construction to reproduce — same patient and same red-line convention as the Cant and Thirds diagrams. — L2 lecture
 The same division with the derived proportion rules drawn in as dashed lines: the nose should be centred in the central fifth with its width equal to or slightly wider than that fifth, and the interpupillary distance should equal the width of the mouth. — Proffit Fig. 6.9, Ch. 6
For a face with visibly unequal fifths
See
facialform_desmarais1.webpin OrthoInstruction — the module’s answer key notes her face is larger on the right side.
Facial Thirds
Landmarks to mark:
- Trichion (Tr) — hairline (top boundary)
- Glabella / Nasion — bridge of the nose (soft tissue nasion)
- Subnasale (Sn) — base of the nose where the columella meets the upper lip
- Menton (Me) — bottom of the chin
Lines to draw:
- Draw 3 horizontal lines through Trichion, Glabella, Subnasale, and Menton
- This divides the face into three vertical thirds:
- Upper third: Trichion to Glabella
- Middle third: Glabella to Subnasale
- Lower third: Subnasale to Menton
What to assess:
- The three thirds should be approximately equal
- In modern populations the lower third is often slightly longer — this is normal
- A markedly long lower third suggests long face / hyperdivergent pattern
- A markedly short lower third suggests short face / deep bite tendency
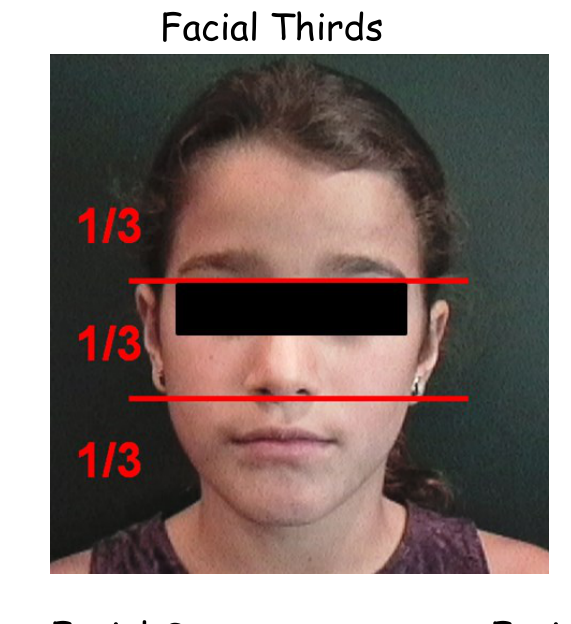 The construction to reproduce. — L2 lecture
 Both views of the same face, and the only figure that carries the thirds and the lower-third 1/3 : 2/3 subdivision together — worth checking your own tracing against. — Proffit Fig. 6.13, Ch. 6
Lower Facial Third
Landmarks to mark:
- Subnasale (Sn) — base of nose
- Stomion (Sto) — the point where upper and lower lips meet (lip junction)
- Menton (Me) — bottom of chin
Lines to draw:
- Draw 2 horizontal lines through Stomion and Menton (Subnasale already marked from Facial Thirds)
- This subdivides the lower facial third into:
- Upper portion (Sn to Sto): should be 1/3 of the lower third
- Lower portion (Sto to Me): should be 2/3 of the lower third
What to assess:
- If upper portion > 1/3 — suggests increased upper lip length or vertical maxillary excess
- If lower portion is proportionally too large — suggests increased lower anterior face height
- Note lip separation at rest (normally 2-4 mm; > 3-4 mm suggests lip incompetence)
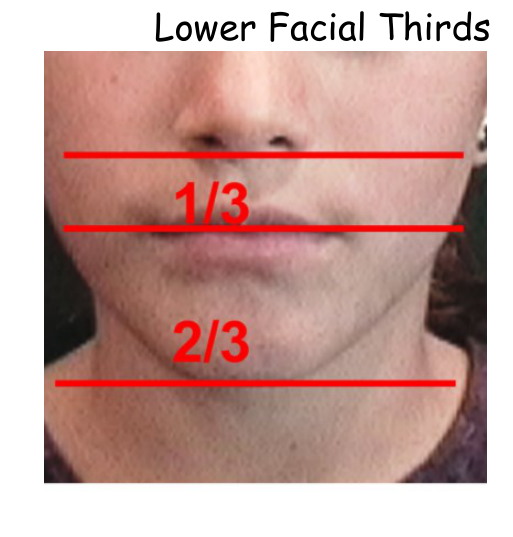 Cropped to the lower face so the 1/3 : 2/3 relationship is the only thing on screen. — L2 lecture
 |  |
|---|---|
| Long face — increased lower anterior face height, steep mandibular plane. — OrthoInstruction | Short face — her short lower third predicts a deep overbite. — OrthoInstruction |
 Excessive gingival display graded across three patients. The Sn–Sto vs Sto–Me proportion is what tells you whether this is a long face, incomplete eruption, or a short upper lip — the display alone does not. — Proffit Fig. 6.14, Ch. 6
Smile Arc
Landmarks to mark:
- The incisal edges of the maxillary anterior teeth (trace the curve of the upper teeth)
- The curvature of the lower lip on social smile
Lines to draw:
- Trace a curved line along the incisal edges of the maxillary incisors and canines
- Trace a curved line along the upper border of the lower lip on smile
What to assess:
- Ideally the two curves should be parallel and consonant (matching curvature)
- Flat smile arc — maxillary incisor curve does not follow the lower lip curve → detracts from smile esthetics
- Excessive smile arc — maxillary incisors curve too far below the lower lip contour
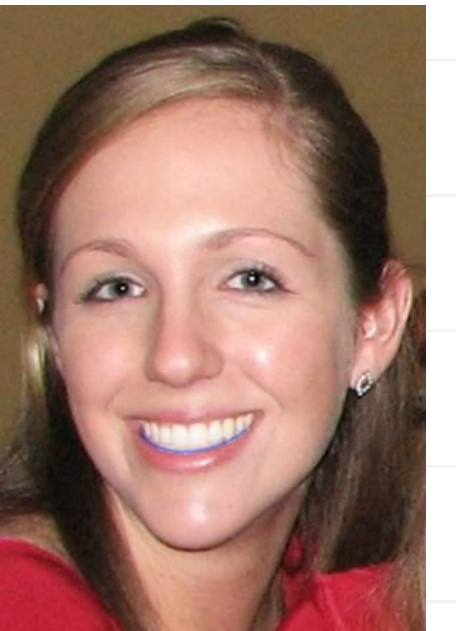 Ideal consonant arc with the curve traced in — the incisal line of the maxillary teeth parallels the upper border of the lower lip. (The same patient appears untraced as
 facialform_scr12.webp in OrthoInstruction.) — L2 lecture
 Side by side, no annotation: (A) the incisal curve does not follow the lower lip — flat arc. (B) consonant arc. Train your eye on this pair. — Proffit Fig. 6.27, Ch. 6
 |  |
|---|---|
| Flattened arc — short square incisors, incisal line not following the lip. — OrthoInstruction | Corrected by lengthening the short maxillary incisors with laminates. — OrthoInstruction |
Anterior Tooth Display
What to observe (no lines needed — visual assessment):
- At rest (lips relaxed): how many mm of maxillary incisor are visible below the upper lip?
- Normal: 2-4 mm of incisor visible at rest (more in children, less/zero in adults)
- On social smile: what percentage of the maxillary incisor crown is visible?
- Ideal: 100% of the crown with perhaps a small amount of gingiva (1-2 mm)
- Minimum for good esthetics: 75% of the crown
- Excessive gingival display (> 2-3 mm) → “gummy smile” — suggests vertical maxillary excess
 The whole acceptable range in one figure, from full incisor plus gingiva (A), through no gingival display (B), 1–2 mm of gingiva (C), the ideal 1–2 mm of lip overlap (D), to 4 mm of lip coverage (E). The single most useful image in this section. — Proffit Fig. 6.24, Ch. 6
 |  |
|---|---|
| Ideal for late adolescence — 100% of the crown plus a small amount of gingiva. — OrthoInstruction | 75% of the crown showing — about the minimum for good facial esthetics. — OrthoInstruction |
 The opposite failure mode to a gummy smile: too little incisor exposure. Her chief complaint was facial appearance, and the frontal — not the profile — was what bothered her. — Proffit Fig. 7.11, Ch. 7
Posterior Tooth Display — Buccal Corridors
What to observe (on social smile):
- The buccal corridor is the dark space between the buccal surfaces of the maxillary posterior teeth and the inner cheek/corner of the mouth on smile
What to assess:
- A small buccal corridor is normal and ideal
- Excessive buccal corridor (too much dark space) → narrow maxillary arch, may need transverse expansion
- Absent buccal corridor (no dark space, teeth fill entire smile width) → overdone transverse dimension
 (A) Narrow maxillary arch with wide dark corridors. (B) The same patient at 5-year recall after orthodontic widening — broad smile, corridors nearly eliminated. — Proffit Fig. 6.25, Ch. 6
 The judgment is relative to face width, not absolute: a broad smile is appropriate for a wide bizygomatic face, a narrower one for a narrow face. This is why the assessment is subjective and unreliable between examiners. — Proffit Fig. 6.26, Ch. 6
 |  |
|---|---|
| Too much dark space — the excessive end. — OrthoInstruction | Teeth fill the entire smile width — the absent/overexpanded end. — OrthoInstruction |
Profile View
Mandibular Angle — Frankfort Plane, Nasion, Lower Rim of Orbit
Landmarks to mark:
- Porion (Po) — the superior aspect of the external auditory canal (approximate with the tragus of the ear or the ear rod)
- Orbitale (Or) — the lowest point on the inferior orbital rim
- Soft tissue Nasion (N’) — the deepest concavity at the bridge of the nose
- Gonion (Go) — the angle of the mandible (posterior-inferior corner)
- Menton (Me) — the lowest point on the chin
Lines to draw:
- Frankfort Horizontal Plane (FH): draw a line from Porion to Orbitale — this represents the true horizontal reference when the patient is in natural head position
- Mandibular Plane (MP): draw a line along the lower border of the mandible from Gonion to Menton
- Measure the angle between these two lines (FMA — Frankfort Mandibular Angle)
What to assess:
- Average FMA: ~25° (normal range ~22-28°)
- Low angle / hypodivergent (< ~20°): flat mandibular plane → short face tendency, deep bite
- High angle / hyperdivergent (> ~30°): steep mandibular plane → long face tendency, open bite
Clinical shortcut
Hold a mirror handle or straight edge along the lower border of the mandible to visualize the mandibular plane angle clinically. The steeper the angle, the more likely downward-backward mandibular rotation has occurred.
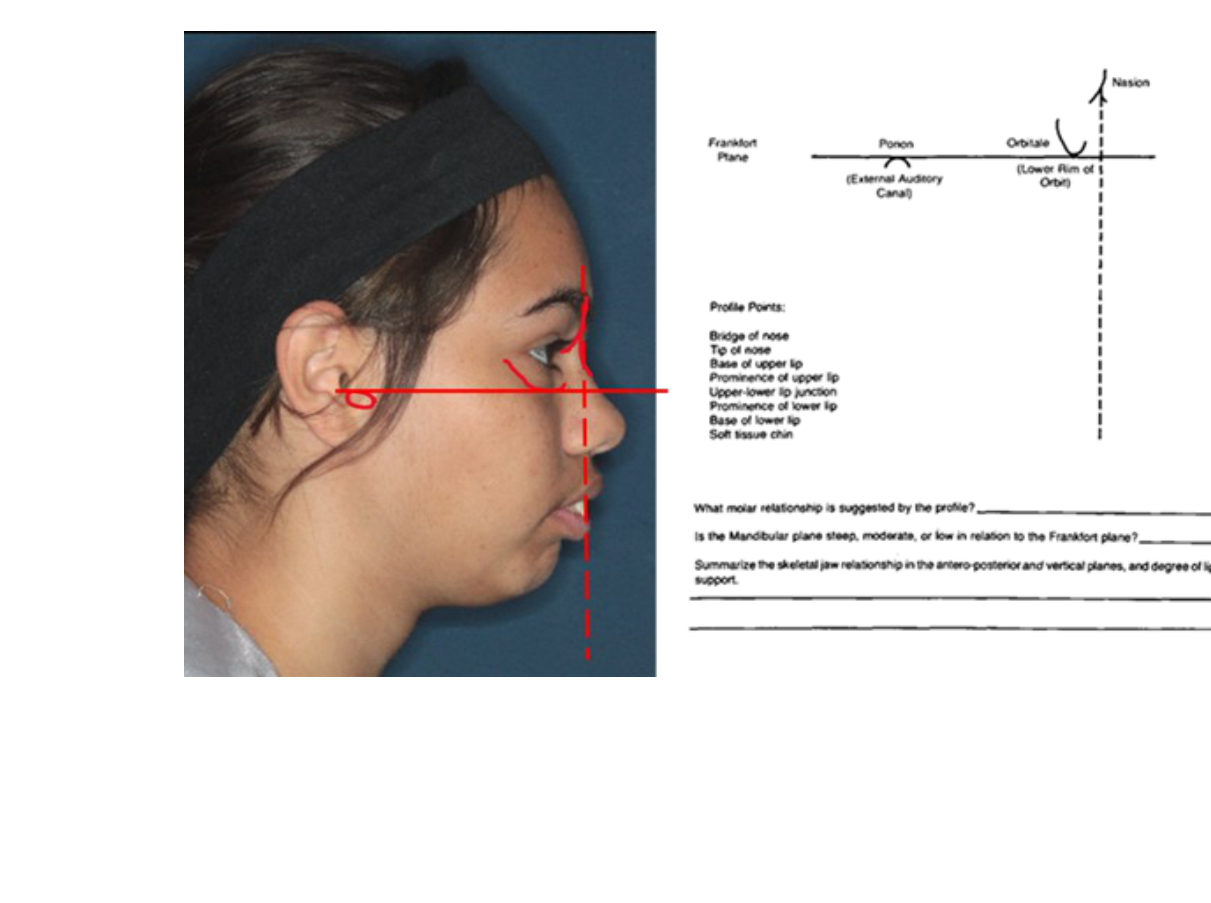 The exercise sheet itself: FH drawn from the tragus with a true vertical dropped through it, beside the Frankfort diagram (Porion = external auditory canal, Orbitale = lower rim of orbit, Nasion) and the eight profile points. — L2 lecture
 Where the two landmarks actually sit on bone — porion at the external auditory meatus (A) and orbitale at the inferior orbital rim (B). — Proffit Fig. 6.50, Ch. 6
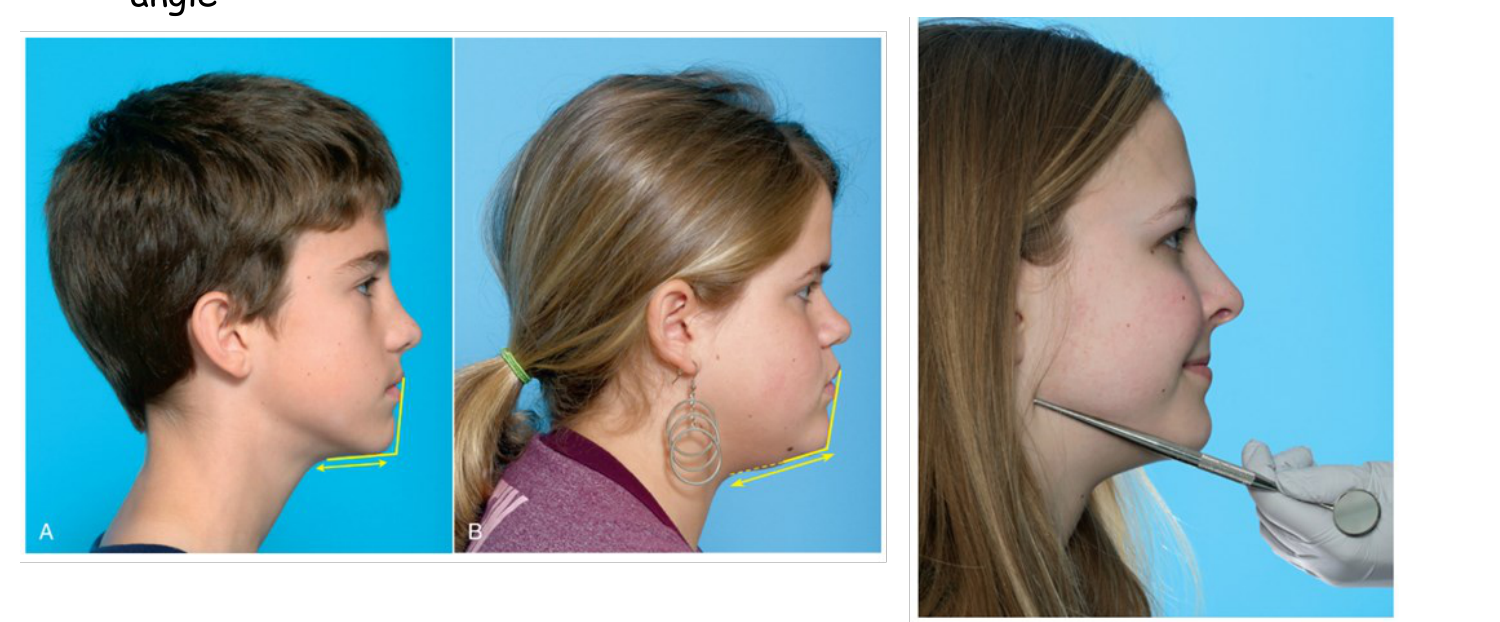 Left and centre: the angle drawn in yellow on a flatter (A) and a steeper (B) mandibular plane — the contrast to look for. Right: the clinical shortcut, a mirror handle laid along the lower border. — L2 lecture
 Natural head position: the freely suspended chain at the edge of the film gives the true vertical, from which a true horizontal is derived. NHP is preferred in modern cephalometrics over the anatomic Frankfort plane. — Proffit Fig. 6.51, Ch. 6
Steep vs flat, side by side
The long-face and short-face profiles in the Lower Facial Third section above are the clearest mandibular-plane contrast available — look at them again with the angle in mind rather than the vertical proportion.
Outline Facial Convexity
Landmarks to mark:
- Bridge of the nose — soft tissue nasion / glabella region
- Base of the upper lip — subnasale (the concavity where the columella meets the lip)
- Soft tissue chin — soft tissue pogonion (the most prominent point of the chin)
Lines to draw:
- Draw a line from the bridge of the nose → base of the upper lip (subnasale)
- Draw a second line from the base of the upper lip (subnasale) → soft tissue chin
- Assess the angle formed where these two lines meet at subnasale
What to assess:
- Straight profile (Class I): the two lines are nearly co-linear or form a very slight convexity — balanced jaw relationship, no AP discrepancy
- Convex profile (Class II): the chin point falls behind the upper line → mandible is retrusive relative to maxilla
- Concave profile (Class III): the chin point falls forward of the upper line → mandible is protrusive and/or maxilla is deficient
Quick sketch method
Drawing these two lines on a printed photo (or tracing on paper) forces you to look closely at the jaw relationships. If the profile is convex → think Class II; if concave → think Class III.
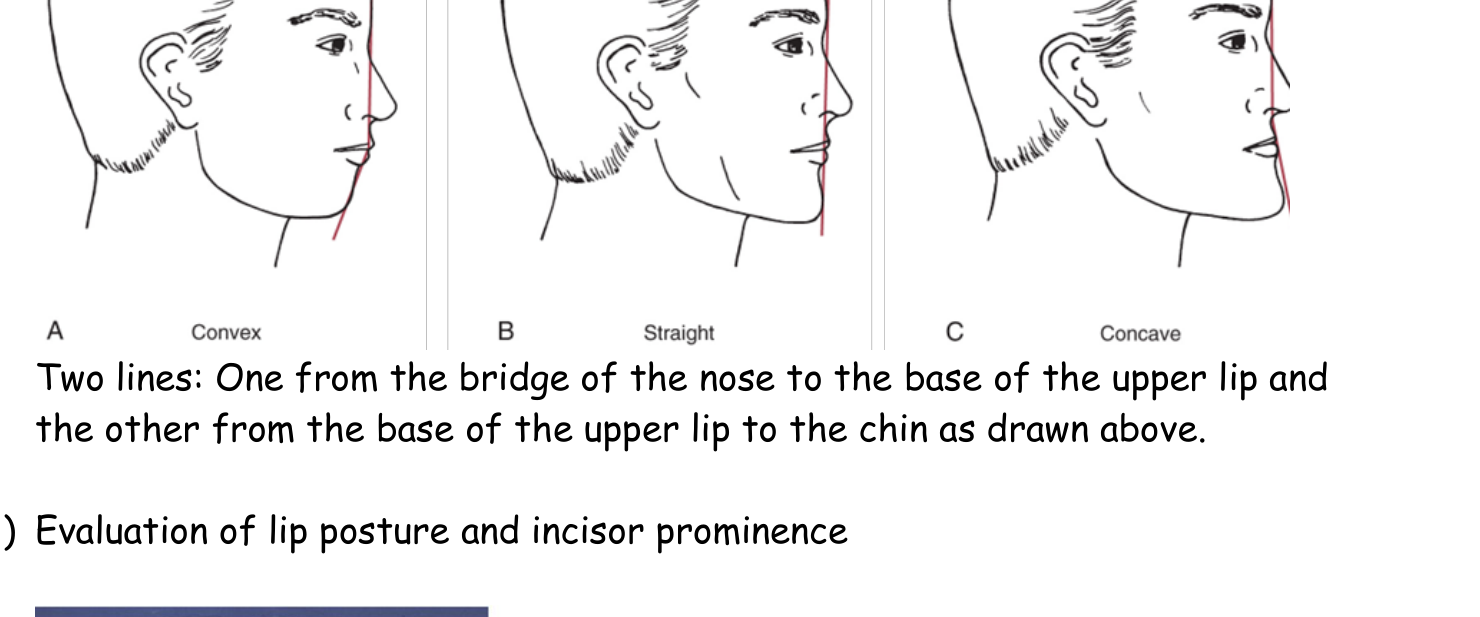 The three profile types with the construction written out underneath: “Two lines: one from the bridge of the nose to the base of the upper lip, and the other from the base of the upper lip to the chin.” — L2 lecture
 |  |
|---|---|
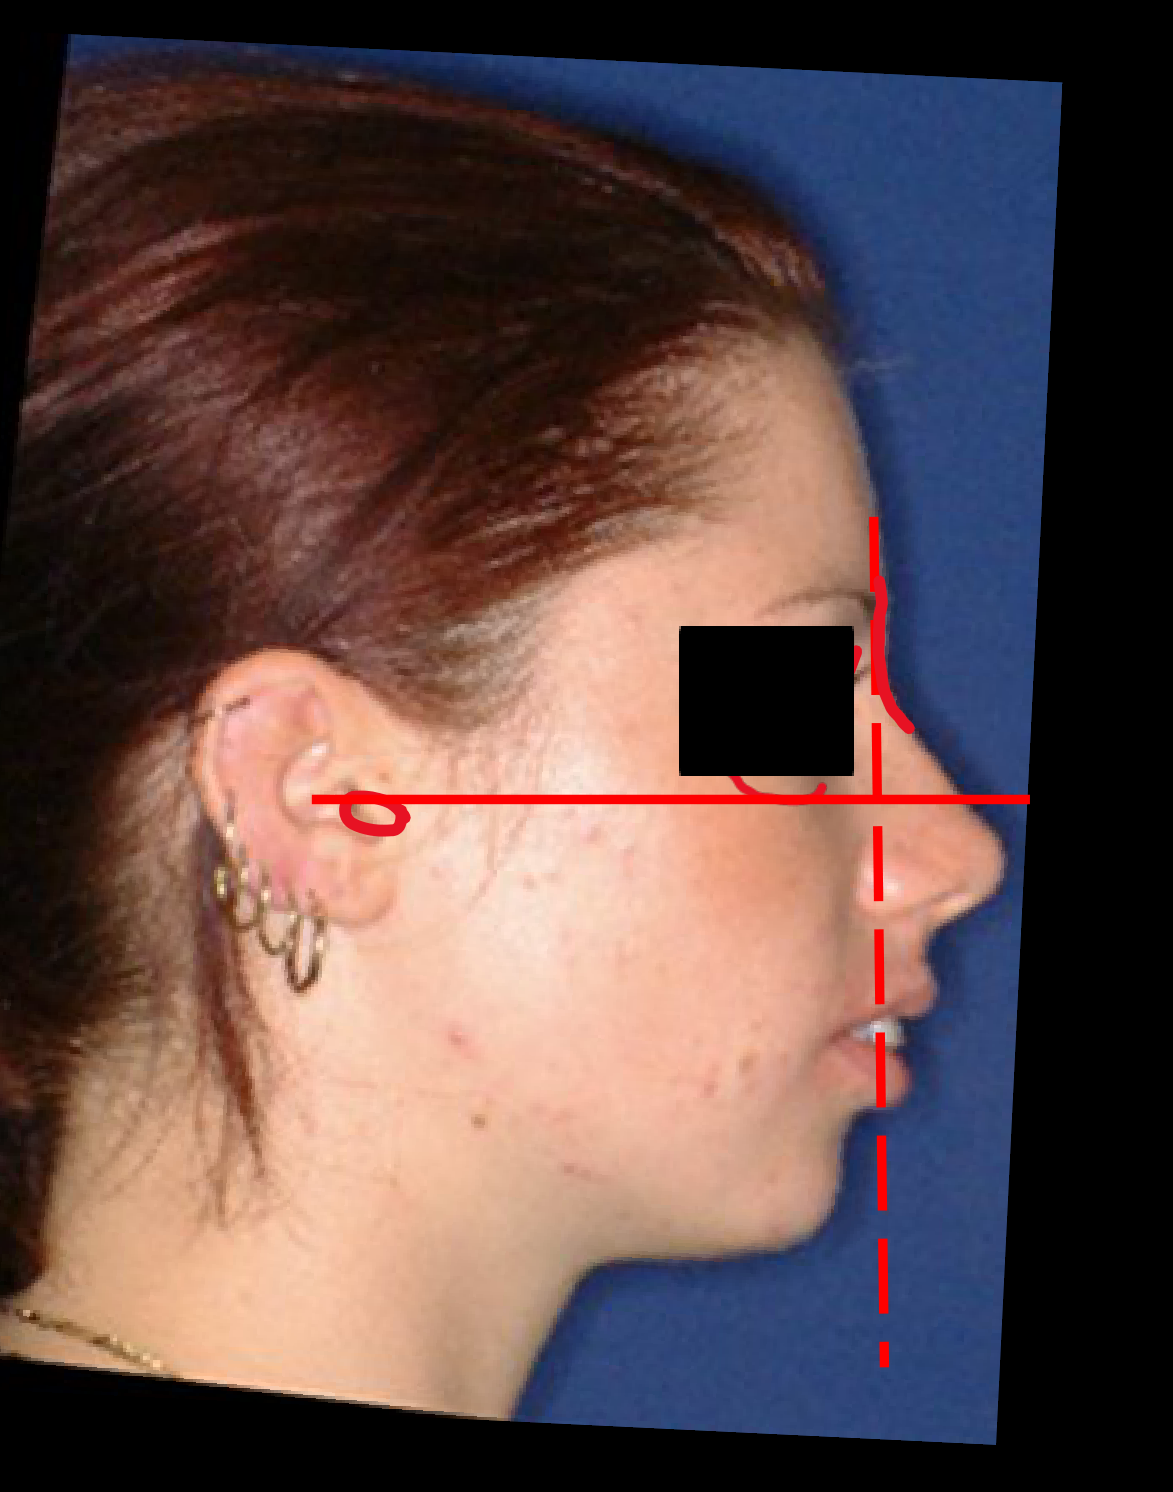
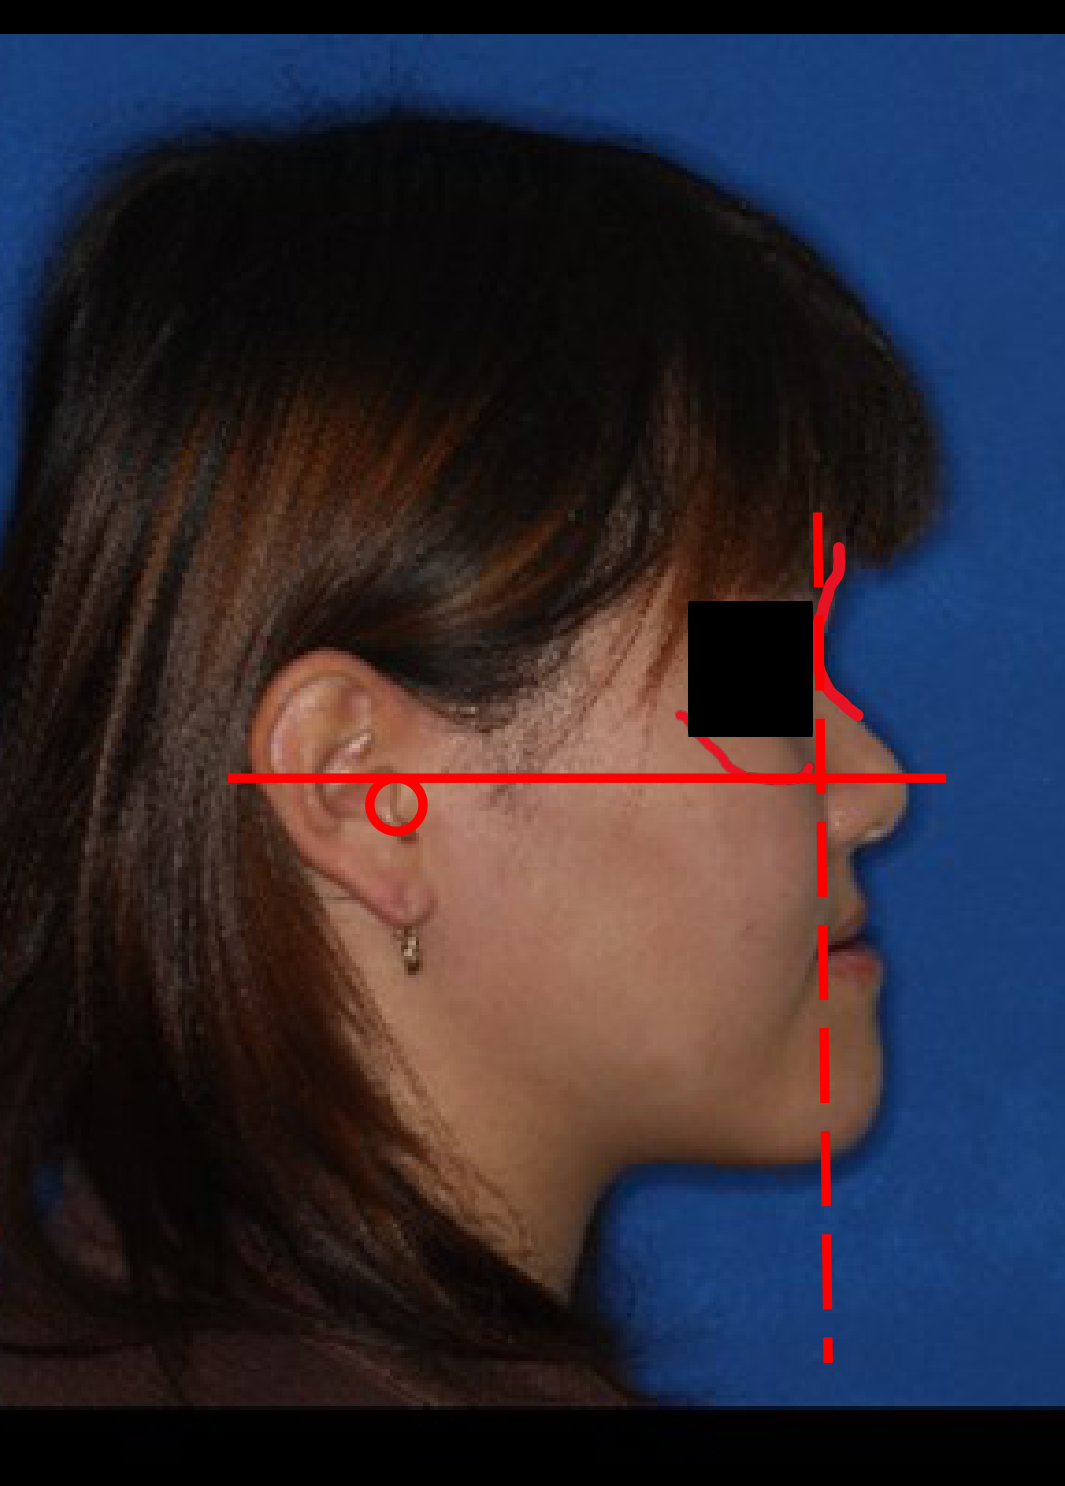
| The construction on a real patient — porion circled, FH drawn, true vertical dropped through the profile. — L2 lecture | Same construction, a more retruded chin — note where the chin falls relative to the vertical. — L2 lecture |
 Two real profiles, no annotation. (A) Skeletal Class II from mandibular deficiency. (B) Skeletal Class III with both maxillary deficiency and mandibular excess. A skeletal problem of even moderate severity can be picked up from the profile alone — no ceph required. — Proffit Fig. 11.4, Ch. 11
 |  |
|---|---|
| Do you see the mandibular deficiency that predicts a Class II malocclusion? — OrthoInstruction | A drawing of the profile at left. A drawing is only valuable if it’s accurate — and to draw it accurately you have to look at it carefully. — OrthoInstruction |
 What you are actually predicting when you read a profile — the soft tissue photo superimposed on the same patient’s ceph, jaws and dentition visible through the face. — OrthoInstruction
Sourcing gap
Proffit’s canonical convexity figure (Fig. 6.15 — convex/straight/concave with the two-line construction drawn on) has no image file in this vault’s OCR of Ch. 6; the caption text is present but the figure was never extracted. The lecture drawings above are the substitute.
Lip Posture and Incisor Prominence — E-Line, A and B Lines
E-Line (Ricketts Esthetic Line)
Landmarks to mark:
- Tip of the nose — pronasale
- Soft tissue chin — soft tissue pogonion
Line to draw:
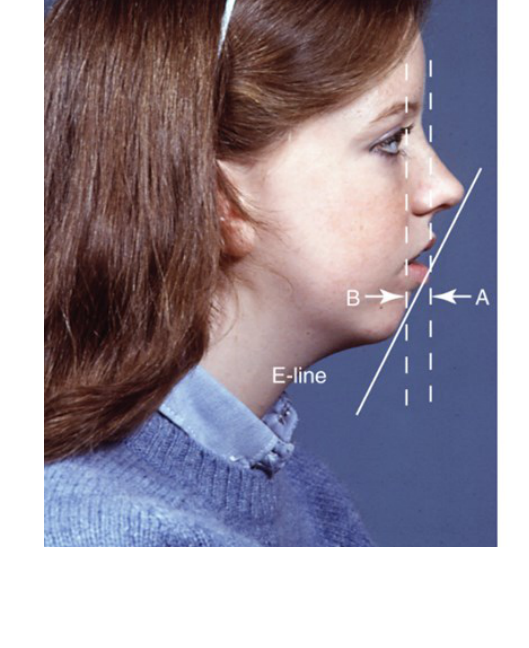
- Draw a straight line from pronasale (tip of nose) to soft tissue pogonion (chin)
What to assess:
- The upper and lower lips should fall 2-4 mm behind this line (in Caucasian populations)
- Lips forward of the E-line → suggests excessive incisor protrusion / lip prominence
- Lips significantly behind the E-line → suggests inadequate tooth support / retrusive incisors
Soft Tissue Point A Line (Upper Lip Assessment)
Landmarks to mark:
- Soft tissue Point A — the deepest concavity at the base of the upper lip (between subnasale and the upper lip vermilion)
Line to draw:
- Drop a true vertical line through soft tissue Point A
What to assess:
- The prominence of the upper lip is evaluated relative to this line
- If the upper lip is forward of this line → upper incisors are protrusive / excessive support
- If the upper lip falls behind this line → upper incisors are retrusive / inadequate support
Soft Tissue Point B Line (Lower Lip Assessment)
Landmarks to mark:
- Soft tissue Point B — the deepest concavity between the lower lip and the chin (labiomental sulcus)
Line to draw:
- Drop a true vertical line through soft tissue Point B
What to assess:
- The prominence of the lower lip is evaluated relative to this line
- If the lower lip is forward → lower incisors are protrusive
- If the lower lip falls behind → lower incisors are retrusive
 The whole of this section’s line work in one figure: the E-line from nasal tip to soft tissue pogonion, plus two separate dashed true verticals labelled A and B. Note the key point — a different reference line is used for each lip; the upper lip is judged against A, the lower against B. — Proffit Fig. 6.18, Ch. 6
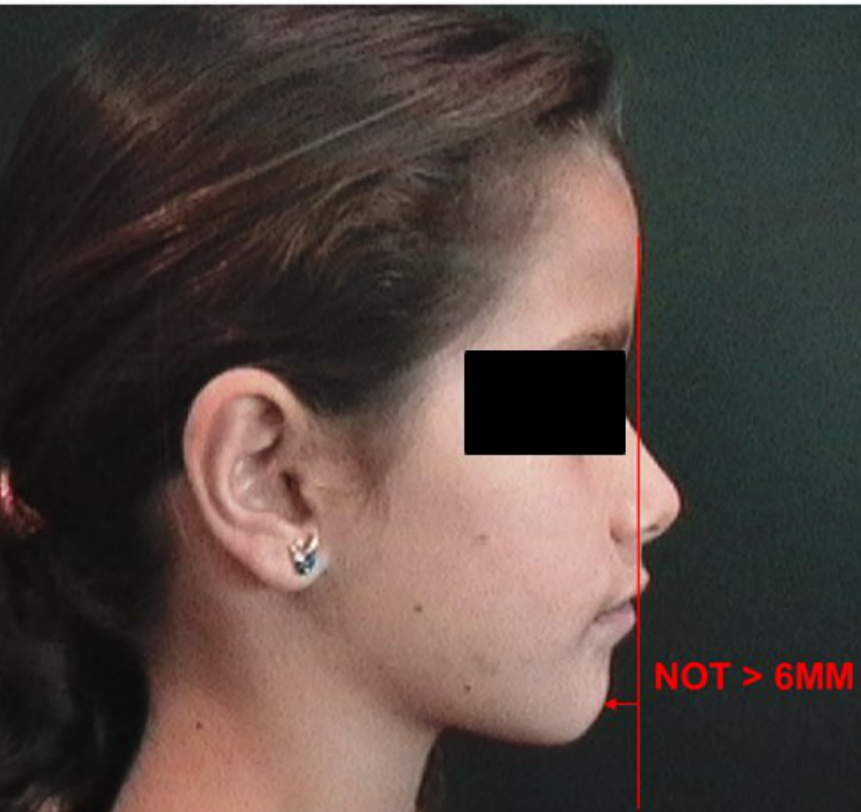
 The lecture’s copy of the same construction. — L2 lecture
 |  |
|---|---|
| Note the difference in position of the upper lip to its base (point A) and the lower lip to its base (point B). — OrthoInstruction | The magnitude to remember when judging lip position against the reference line. — L2 lecture |
Signs of Excessive Incisor Protrusion
Look for the combination of:
- Lips prominent (forward of reference lines)
- Lips incompetent at rest (> 3-4 mm separation)
- Lips strained on closure (mentalis strain, chin dimpling)
 |  |
|---|---|
| Excessive separation of the lips at rest, seen particularly well in an oblique (three-quarter) view. — OrthoInstruction | Note the lip strain and chin puckering when she brings her lips together. — OrthoInstruction |
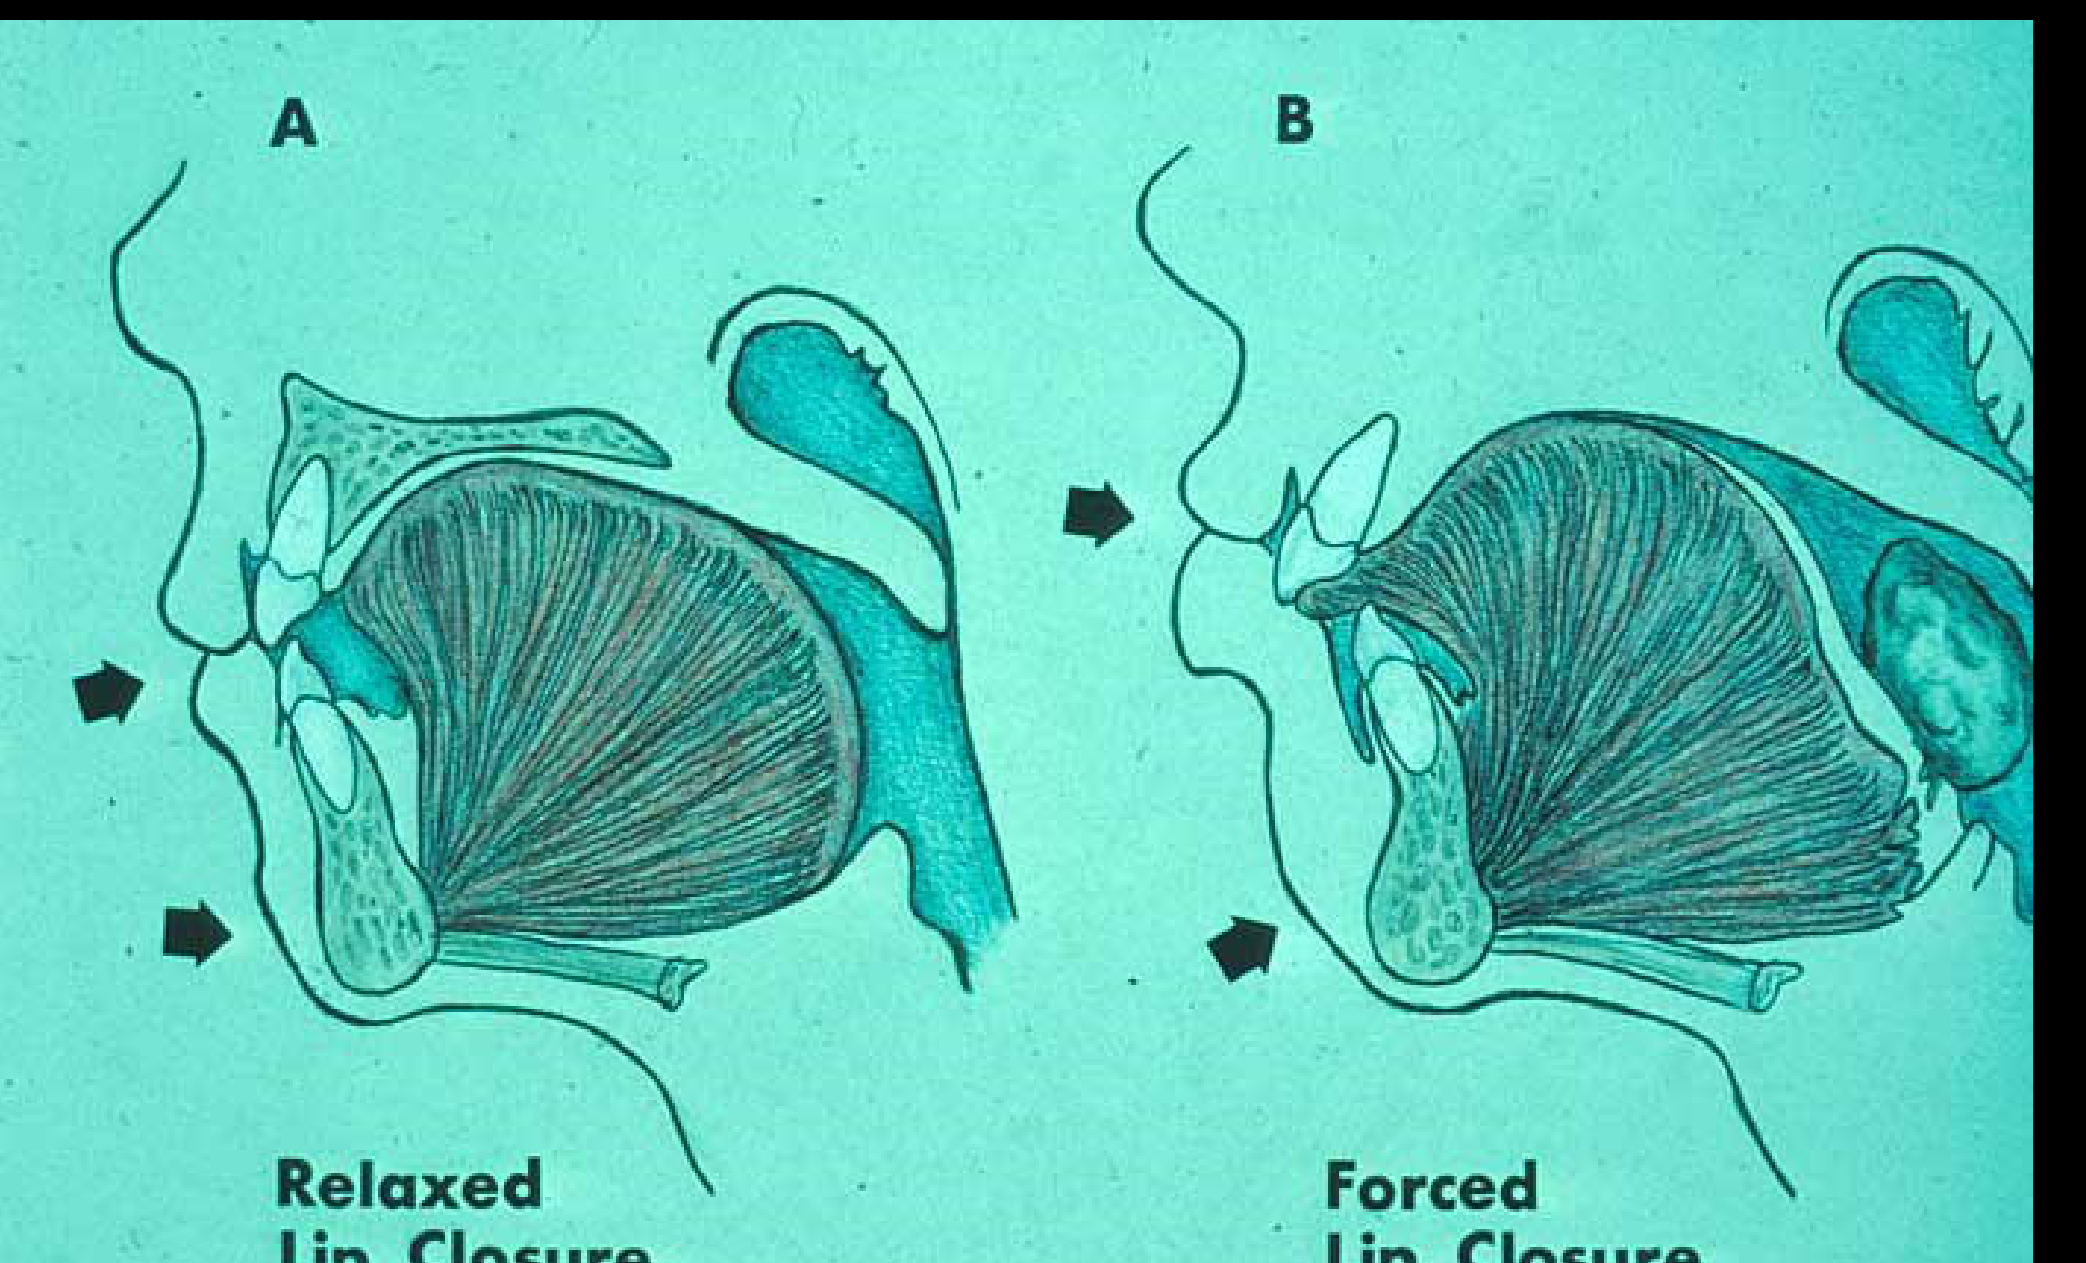 Why the strain appears: relaxed lip closure (A) versus forced lip closure (B), with the muscle activity that produces the chin dimpling. — L2 lecture
 The dentition behind the soft tissue — extremely protrusive incisors in both arches. The soft tissue profile reflects this protrusion. — OrthoInstruction
 |  |
|---|---|
| Before: prominent and incompetent lips over protrusive incisors. — OrthoInstruction | After premolar extraction and retraction of the incisors — lips now competent and less prominent. — OrthoInstruction |
Sources
- L2 Facial Form Analysis — DENT5310 lecture, Dr. Razza. Source of all red-line and yellow-line annotated diagrams.
- 01 - Facial Form Analysis — OrthoInstruction, Level II Diagnosis, Unit B. Source of all
facialform_*clinical photographs and case series. - 10 6 Orthodontic Diagnosis — Proffit, Contemporary Orthodontics 6e, Ch. 6 (Figs 6.3, 6.9, 6.10, 6.13, 6.14, 6.18, 6.24, 6.25, 6.26, 6.27, 6.50, 6.51, 6.78).
- 11 7 Orthodontic Treatment Planning — Proffit 6e, Ch. 7 (Fig. 7.11).
- 15 11 Moderate Nonskeletal Problems in Preadolescent Children — Proffit 6e, Ch. 11 (Fig. 11.4).