General Principles for Managing Dental Trauma1
W/Prof. Paul V. Abbott AO
BDSc, MDS, FRACDS(Endo), FPFA, FADI, FICD, FACD, FIADT
Specialist Endodontist Winthrop Professor of Clinical Dentistry UWA Dental School The University of Western Australia
DMD - 3rd Year - 2020
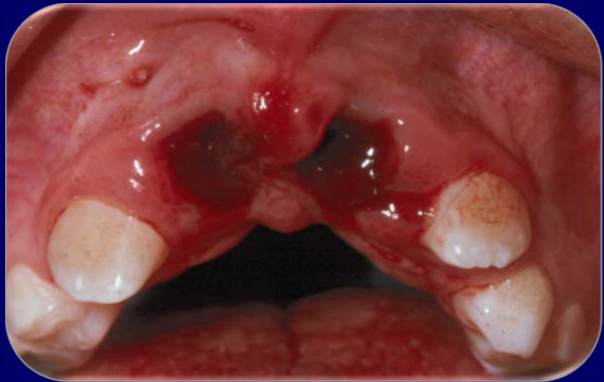
Lecturer — Management Order
The listed management order is not mandatory for every injury and should be adjusted to the clinical situation.
- With an avulsed tooth, replanting the tooth and protecting the root surface take priority, even when the pulp is exposed.
- The pulp can be managed after the tooth has been repositioned and stabilized.
Overview of Management Principles2
- History, examination and assessment
- Establish priorities
- Protection
- Pulp (if exposed)
- Root surface (e.g. during repositioning)
- Reposition — Immediately: teeth, bone, soft tissues
- Stabilisation
- Bone and teeth: splint (rigid or flexible)
- Soft tissues: sutures
- Temporary restorations
- Medications
- Systemic: tetanus, antibiotics, analgesics, anti-inflammatories
- Local: intra-canal dressings, chlorhexidine mouthwash, gel
- Follow-up
Lecturer — History Details
The history should establish the mechanical forces involved, because they influence both the type of injury and subsequent healing responses.
- The day and time are important for clinical records, insurance reports, and legal cases, particularly for avulsed and luxated teeth.
- For an avulsed or luxated tooth, determine how long it has been outside its normal position.
- The reason for the injury may be relevant to legal or insurance issues.
- The injury location can affect likely contamination of an avulsed tooth; a football-field injury may involve soil contamination, whereas an injury at home may involve different contamination circumstances.
- After obtaining the history, perform clinical tests and obtain radiographs.
Lecturer — Radiographic Angulation
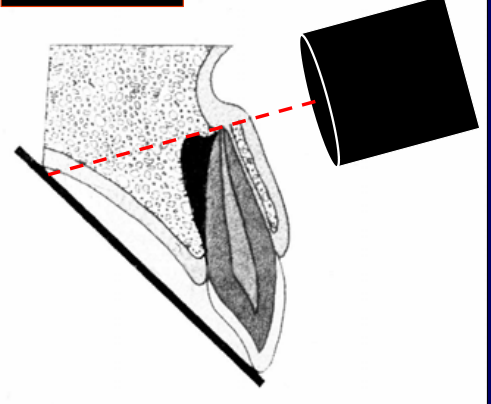
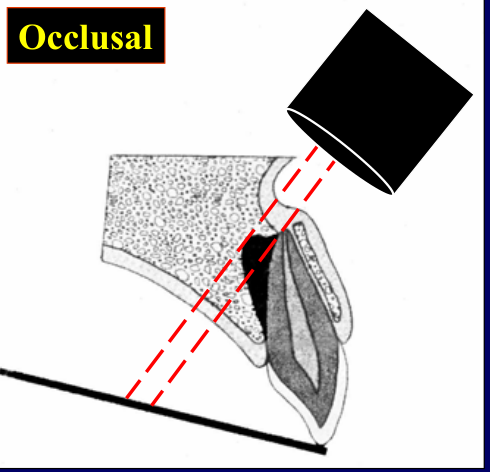
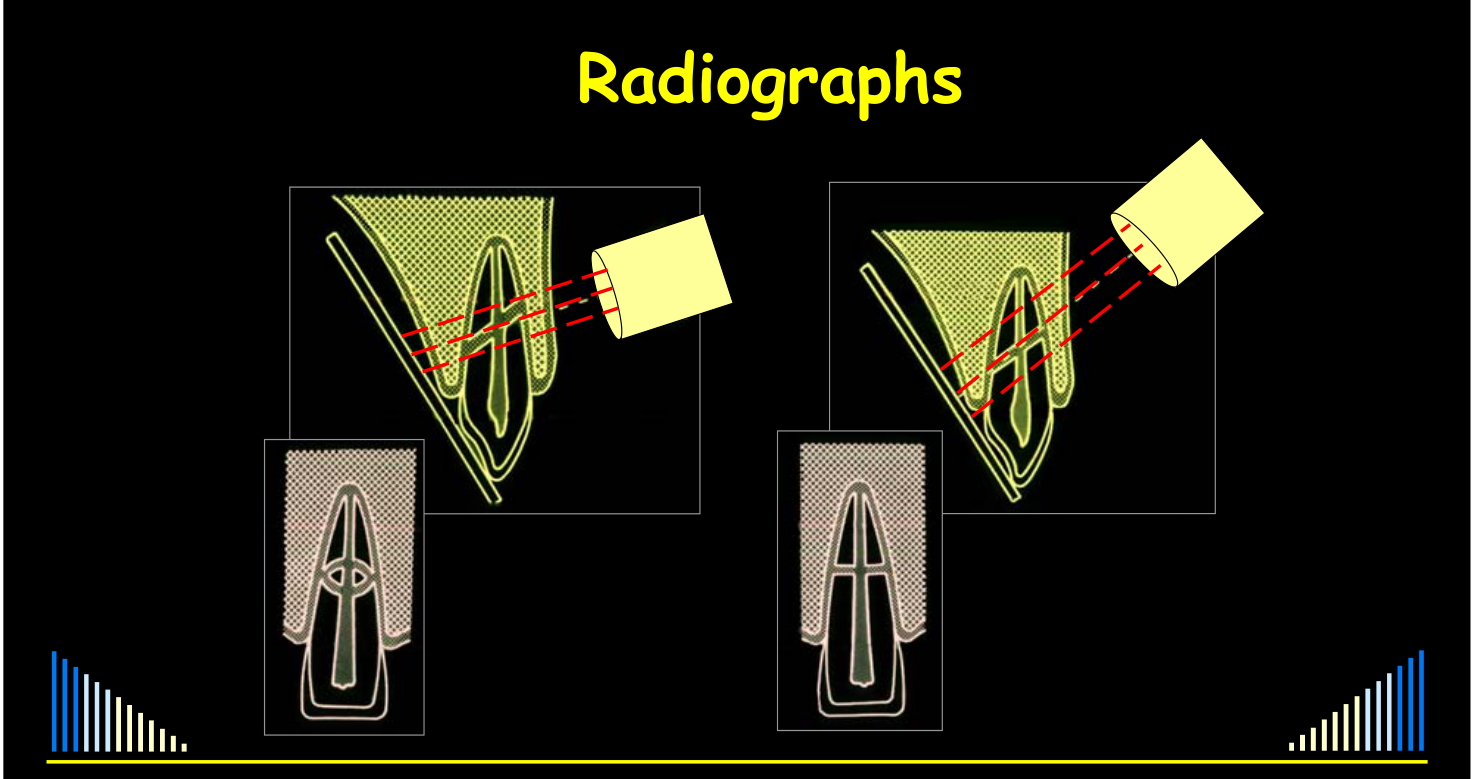
Different radiographic angulations can reveal injuries that are hidden on an initial view.
- In lateral luxation, a periapical view may make the root apex appear to remain within the socket because it is superimposed over the socket, whereas an occlusal view may show that it has moved out of the socket.
- An unfavorable angle can make one root fracture appear to be two; changing the angulation, particularly with an occlusal view, may demonstrate that there is only one fracture.
History, Examination and Assessment
- Full assessment of all injuries is essential
- How, when, why, and where it happened
- History, examination, tests, radiographs
- Tests:
- Mobility, percussion, palpation, etc
- Pulp sensibility tests
- May indicate other teeth damaged
- Baseline data for later comparison
Pulp Sensibility Tests3
Essential to perform at the emergency visit.
Time is NO EXCUSE for not doing these tests!!!
- Can indicate teeth that have been injured, where there are no other obvious signs
- Best predictor for subsequent pulp necrosis
- Baseline data for later comparison
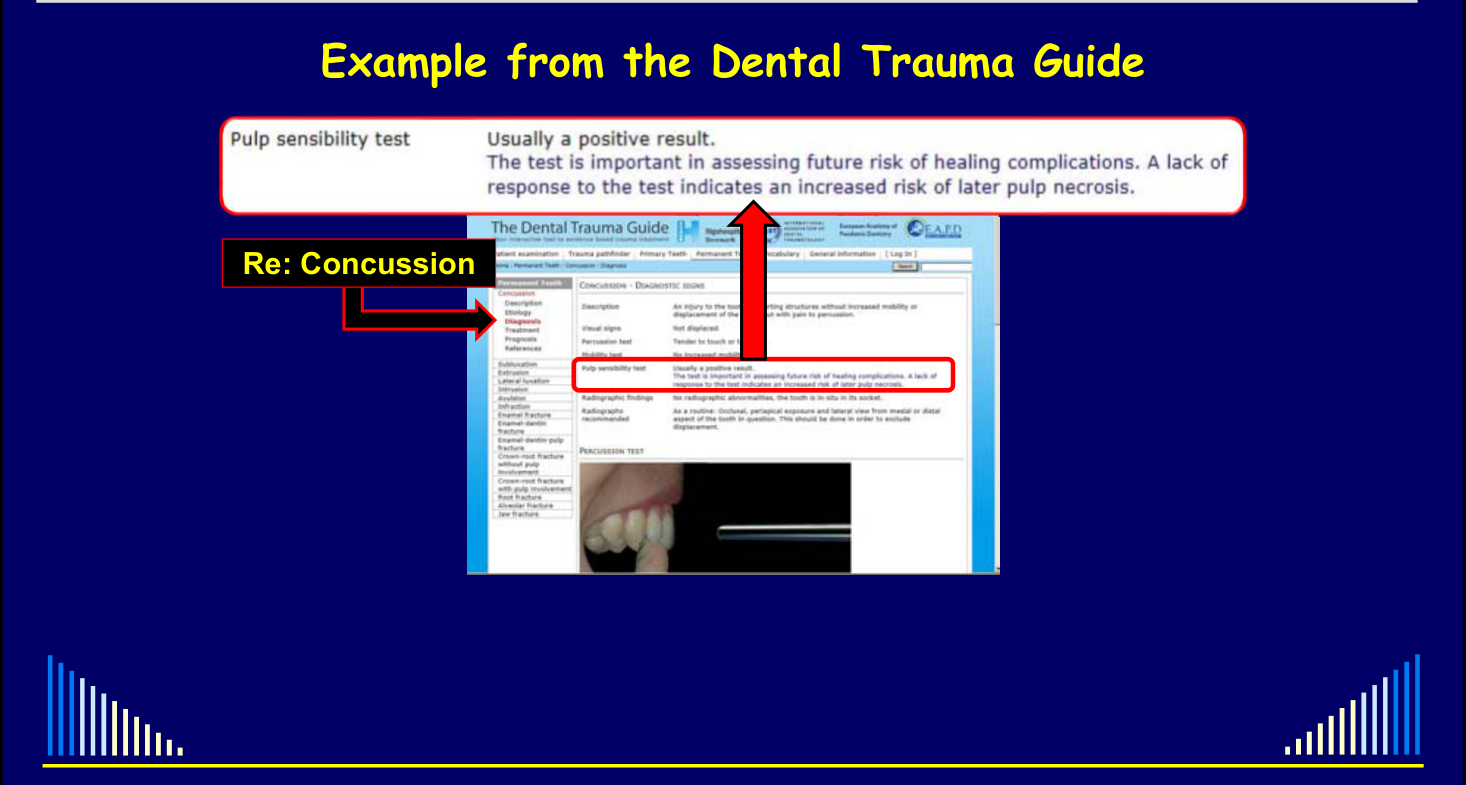
Pulp sensibility test: usually a positive result. The test is important in assessing future risk of healing complications. A lack of response to the test indicates an increased risk of later pulp necrosis.
Re: Concussion
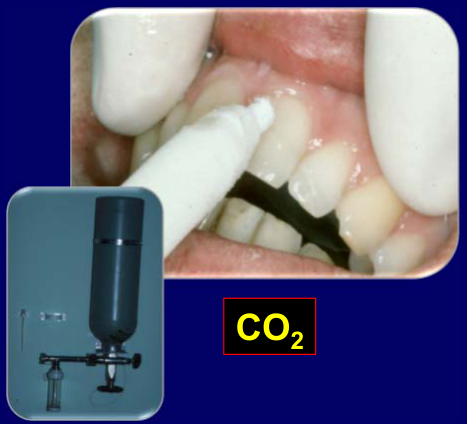 | 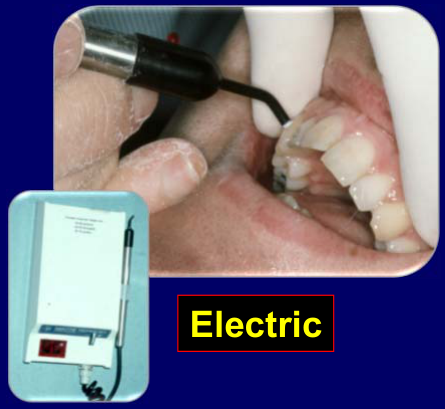 |
Risk of Pulp Necrosis After Concussion4
Pulp Necrosis after Concussion + Crown Fracture
Two charts compare risk of pulp necrosis (y-axis: Risk, 0–100%; x-axis: Years):
- Responded to pulp tests at initial examination
- No response to pulp tests at initial examination
Similar differences for other injuries.
Lecturer — Pulp Test Interpretation
A lack of response shortly after trauma generally indicates a reduced likelihood of pulp recovery for most injuries.
- Pulp sensibility results also allow discussion of possible future complications with the patient, parent, insurer, or other relevant parties.
Lecturer — Concussion Prognosis
For concussion associated with a crown fracture, the initial pulp test response is particularly useful for estimating the risk of later pulp necrosis.
- Responding teeth have a very low subsequent frequency of pulp necrosis.
- With no initial response, approximately half of the teeth may subsequently develop pulp necrosis, with variation around that estimate.
- These results are a powerful predictive tool when discussing the likely course of healing.
Full Assessment and Radiographs56
- Full assessment of all injuries is essential
- How, when, why, and where it happened
- History, examination, tests, radiographs
- Tests:
- Mobility, percussion, palpation, etc
- Pulp sensibility
- May indicate other teeth damaged
- Baseline data for later comparison
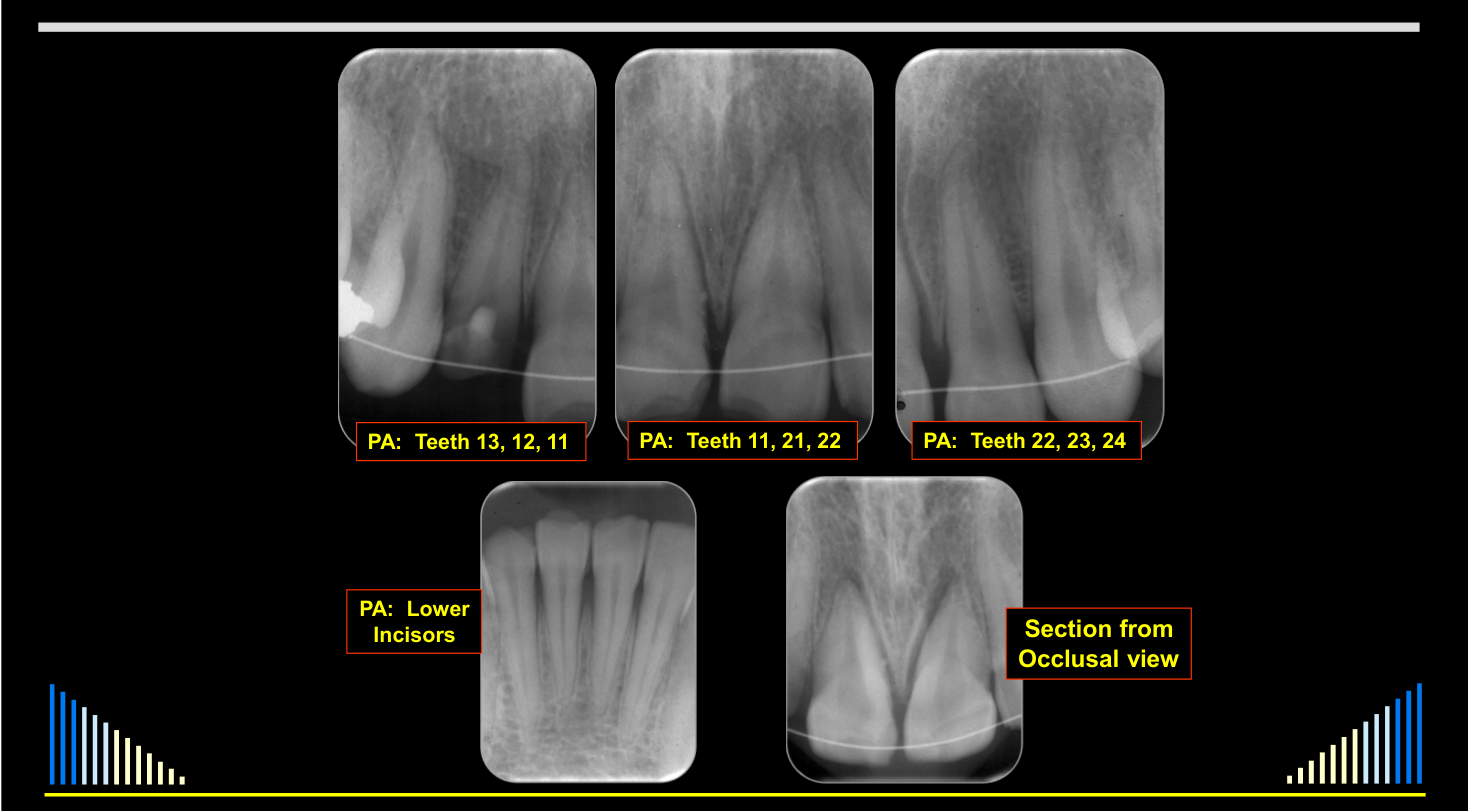
- Radiographs:
- 3 x periapicals, 1 x occlusal
- Opposing arch also
MINIMUM!!!
- PA: Teeth 13, 12, 11
- PA: Teeth 11, 21, 22
- PA: Teeth 22, 23, 24
- PA: Lower incisors
- Section from occlusal view
 |  |
 |  |
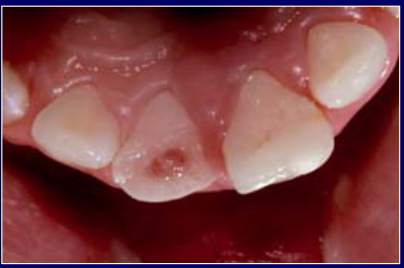
Protection of Pulp7
Aim — to:
- Preserve the pulp
- Especially in incompletely developed teeth
- Allow further root development
- Improves the long-term prognosis of tooth
- “Stronger tooth” — more dentine
Lecturer — Medical Priority
After the examination, the clinician must establish whether the patient may have sustained a concussion to the brain.
- The history should establish whether loss of consciousness occurred.
- If it did, the patient should be referred to hospital for medical assessment because the medical situation takes priority over the dental injury.
- Other findings suggesting possible brain concussion should also be assessed.
Lecturer — Immediate Treatment
Emergency treatment does not need to include the definitive restoration.
- The immediate objective is to protect exposed dentine and the pulp, stabilize the injury, and allow more comprehensive treatment later.
- Pulp protection is also required when the pulp is not exposed but the tooth needs a temporary restoration.
Aims and Options for Pulp Protection
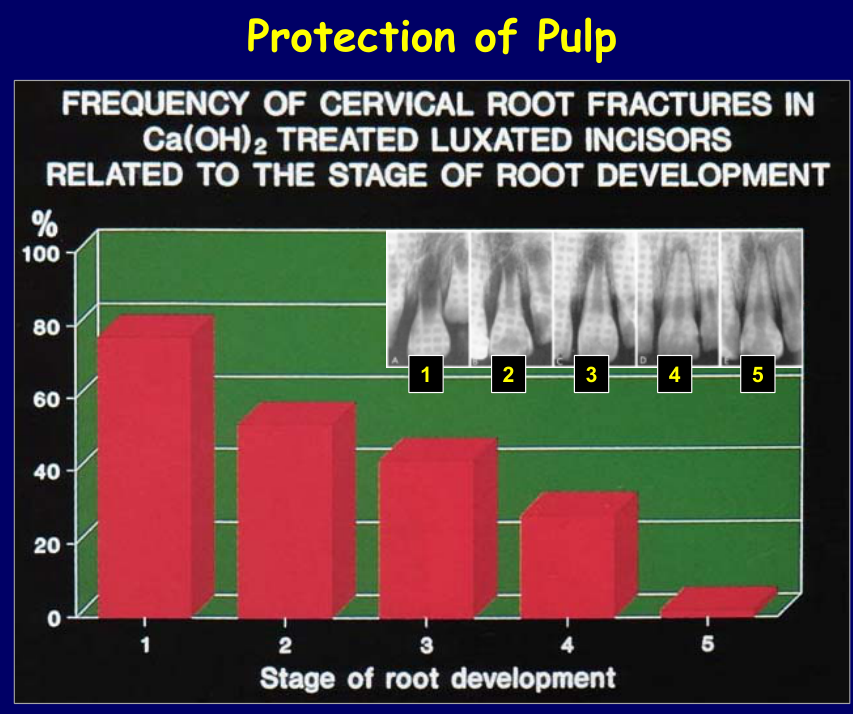
Frequency of Cervical Root Fractures in Ca(OH)₂ Treated Luxated Incisors Related to the Stage of Root Development8
Graph: percentage (0–100%, axis at 20% intervals) plotted against stage of root development (stages 1–5).
 |  |
Lecturer — Incomplete Teeth
In incompletely developed teeth, the combination of root-surface and periodontal ligament damage with pulp necrosis and infection makes preventive management necessary.
Lecturer — Root Fracture Risk
Cervical root fractures were more frequent in immature teeth after root canal treatment and apexification.
- Very immature teeth had short roots and thin dentine walls, resulting in a higher fracture frequency.
- As root development progressed and more dentine formed, fracture frequency decreased; fully developed teeth had fewer fractures.
- The risk is related to the amount of remaining tooth structure, so pulp preservation should be attempted whenever possible, particularly in immature teeth.
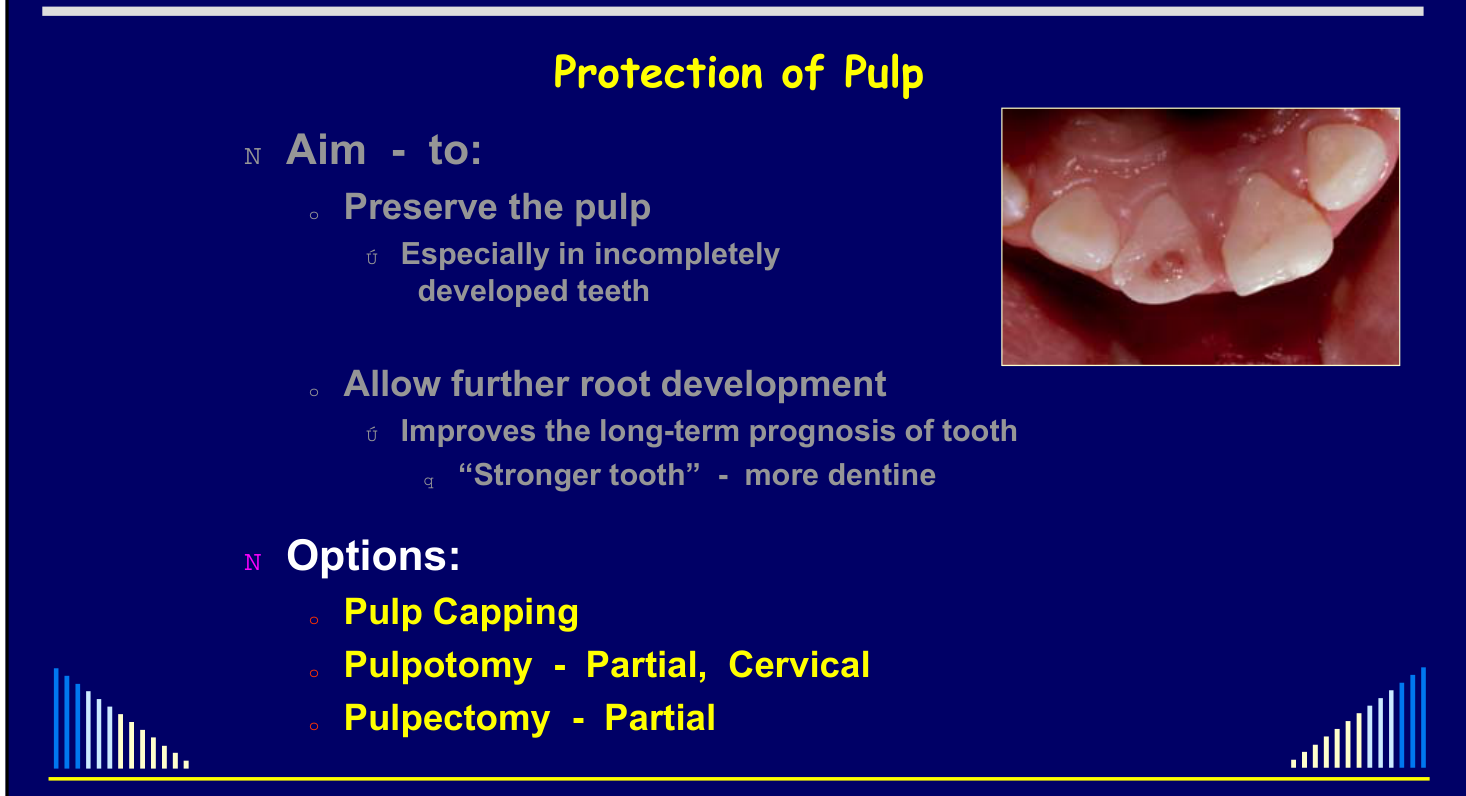
Aim and Options
Aim — to:
- Preserve the pulp
- Especially in incompletely developed teeth
- Allow further root development
- Improves the long-term prognosis of tooth
- “Stronger tooth” — more dentine
Options:
- Pulp capping
- Pulpotomy — partial, cervical
- Pulpectomy — partial
Healing Frequencies and Materials910
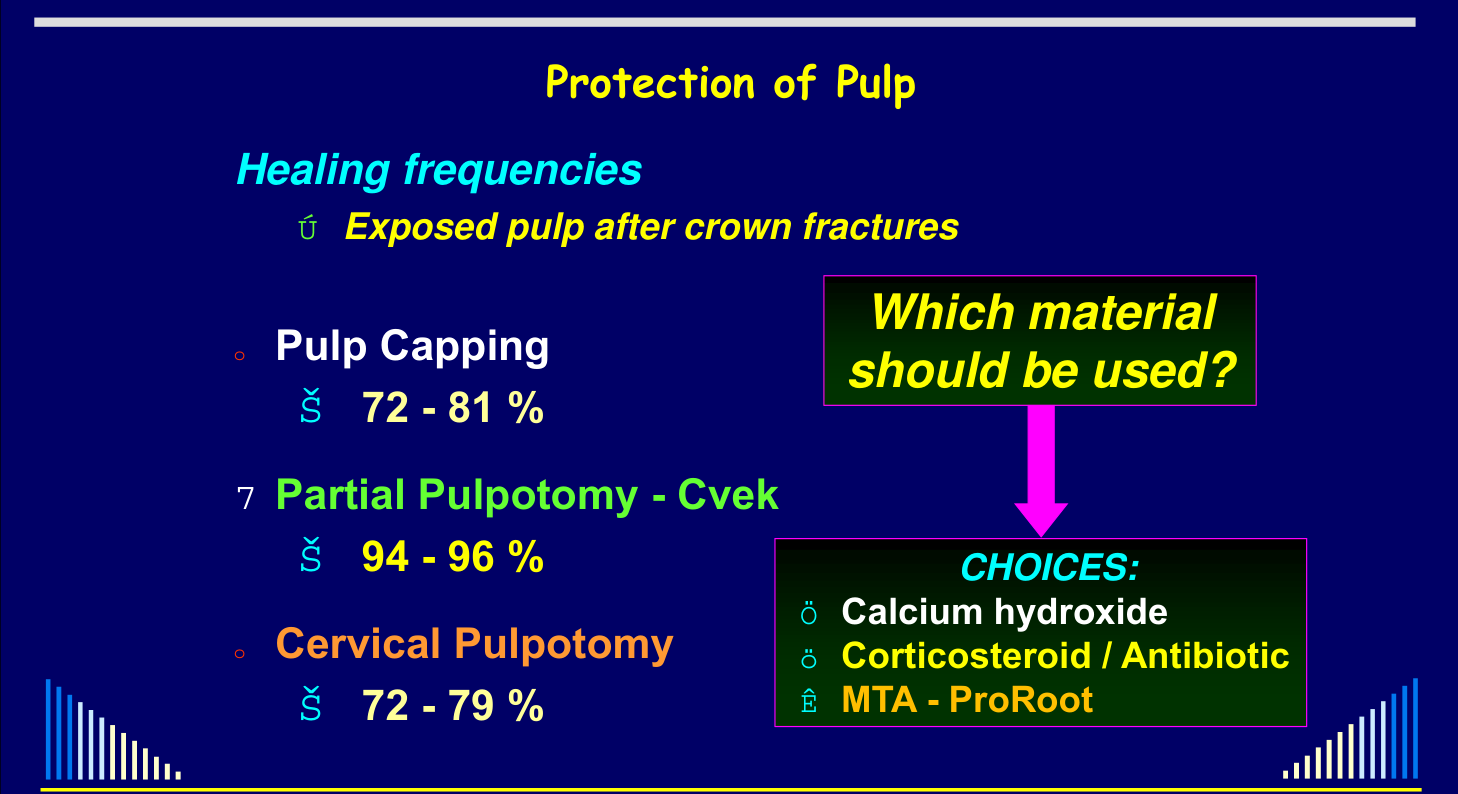
Exposed pulp after crown fractures — healing frequencies:
- Pulp capping — 72–81 %
- Partial pulpotomy — Cvek — 94–96 %
- Cervical pulpotomy — 72–79 %
Exposed pulp after crown fractures — healing frequencies:
- Pulp capping — 72–81 %
- Partial pulpotomy — Cvek — 94–96 %
- Cervical pulpotomy — 72–79 %
Which material should be used? Choices:
- Calcium hydroxide
- Corticosteroid / antibiotic
- MTA — ProRoot
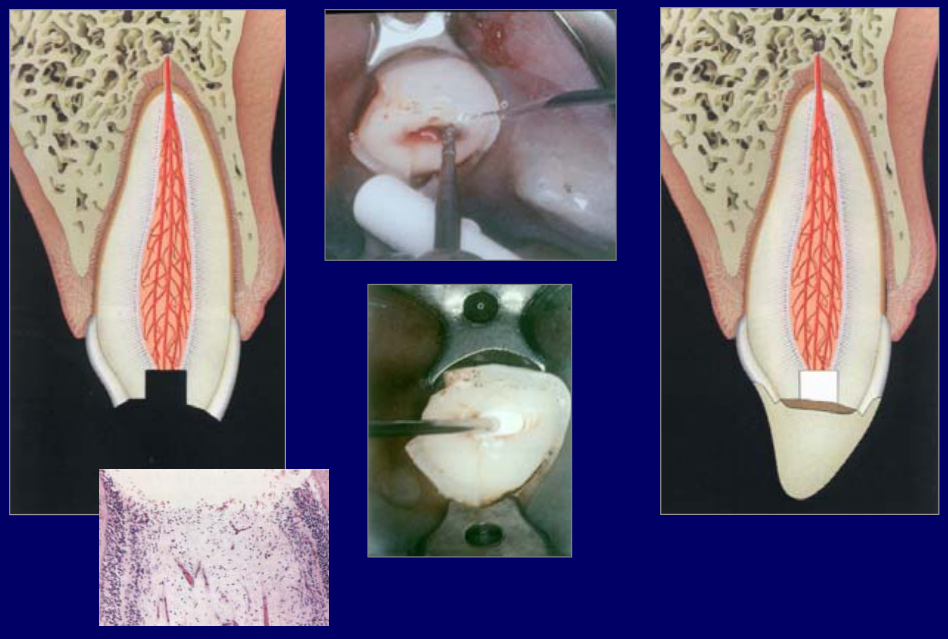 |  |
Lecturer — Cvek Technique
The Cvek partial pulpotomy removes the superficial pulp tissue affected by trauma and then covers the remaining pulp.
- Create a small cavity-like preparation with a high-speed diamond bur using water or saline coolant.
- Apply pressure with a saline-moistened cotton pellet until bleeding stops, then place the capping material and restore the tooth.
- The diamond bur creates an abrasion-type wound that heals more favorably, whereas a tungsten carbide bur tends to lacerate the tissue and produces less favorable healing.
Protection of Root Surface
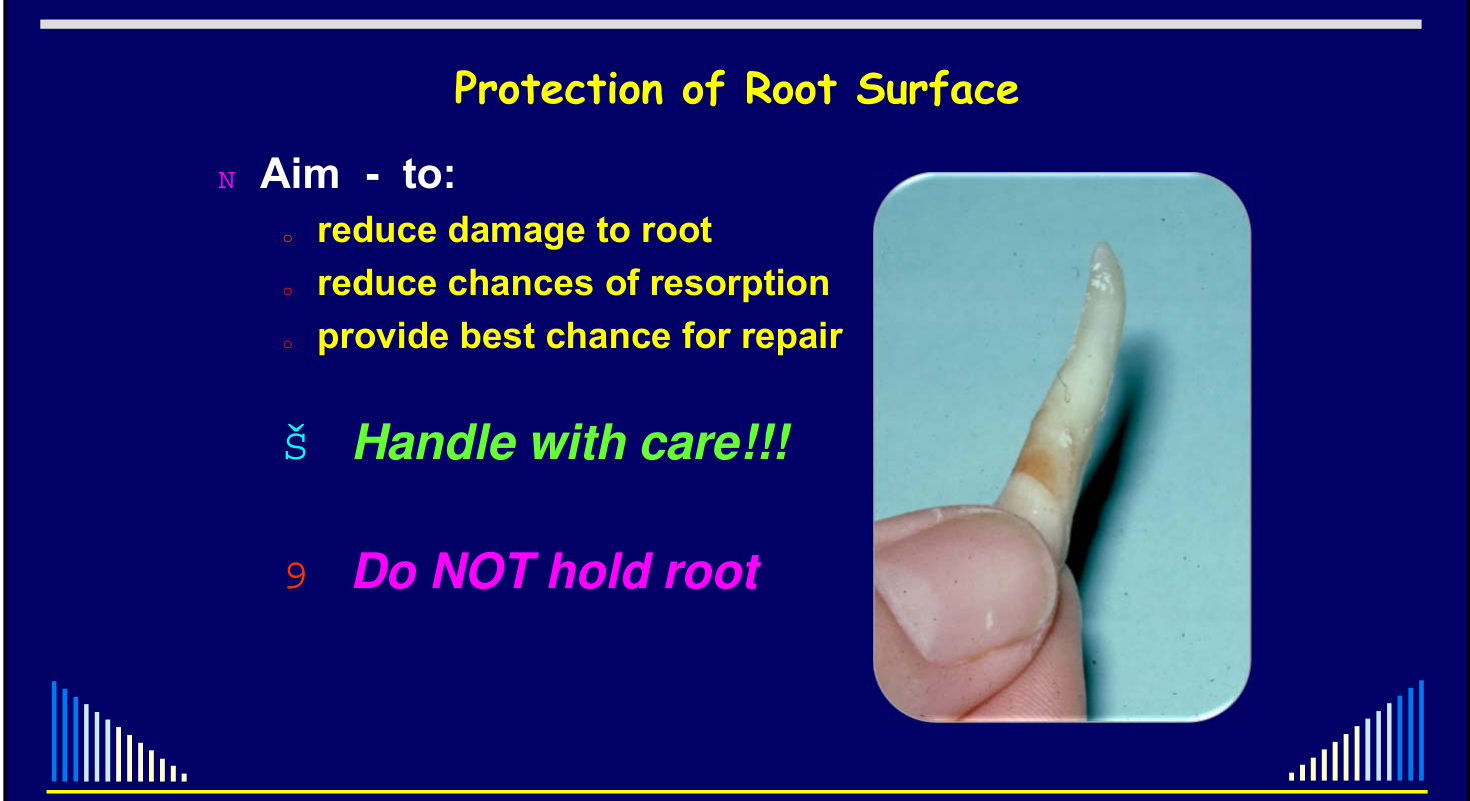
Aim — to:
- Reduce damage to root
- Reduce chances of resorption
- Provide best chance for repair
Handle with care!!! Do NOT hold root.
Handling and Periodontal Ligament Healing1112
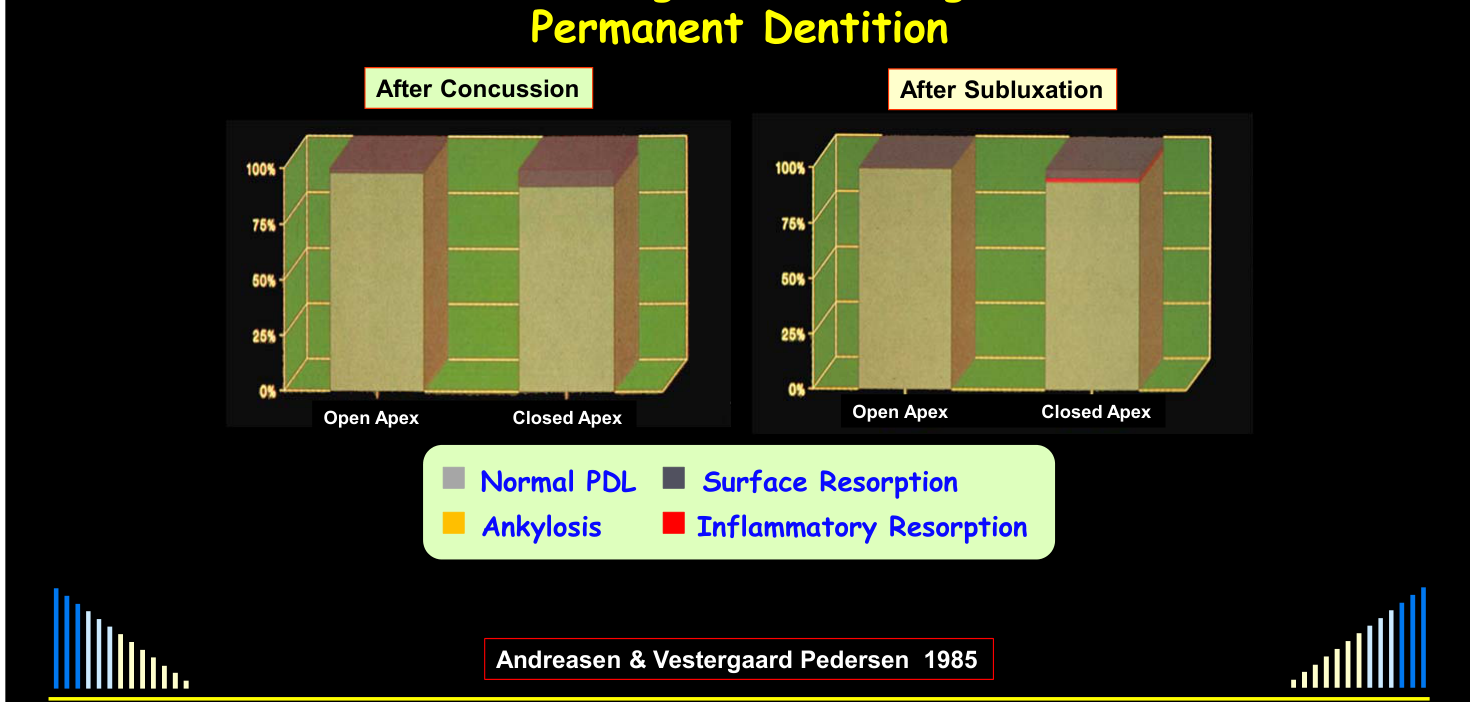
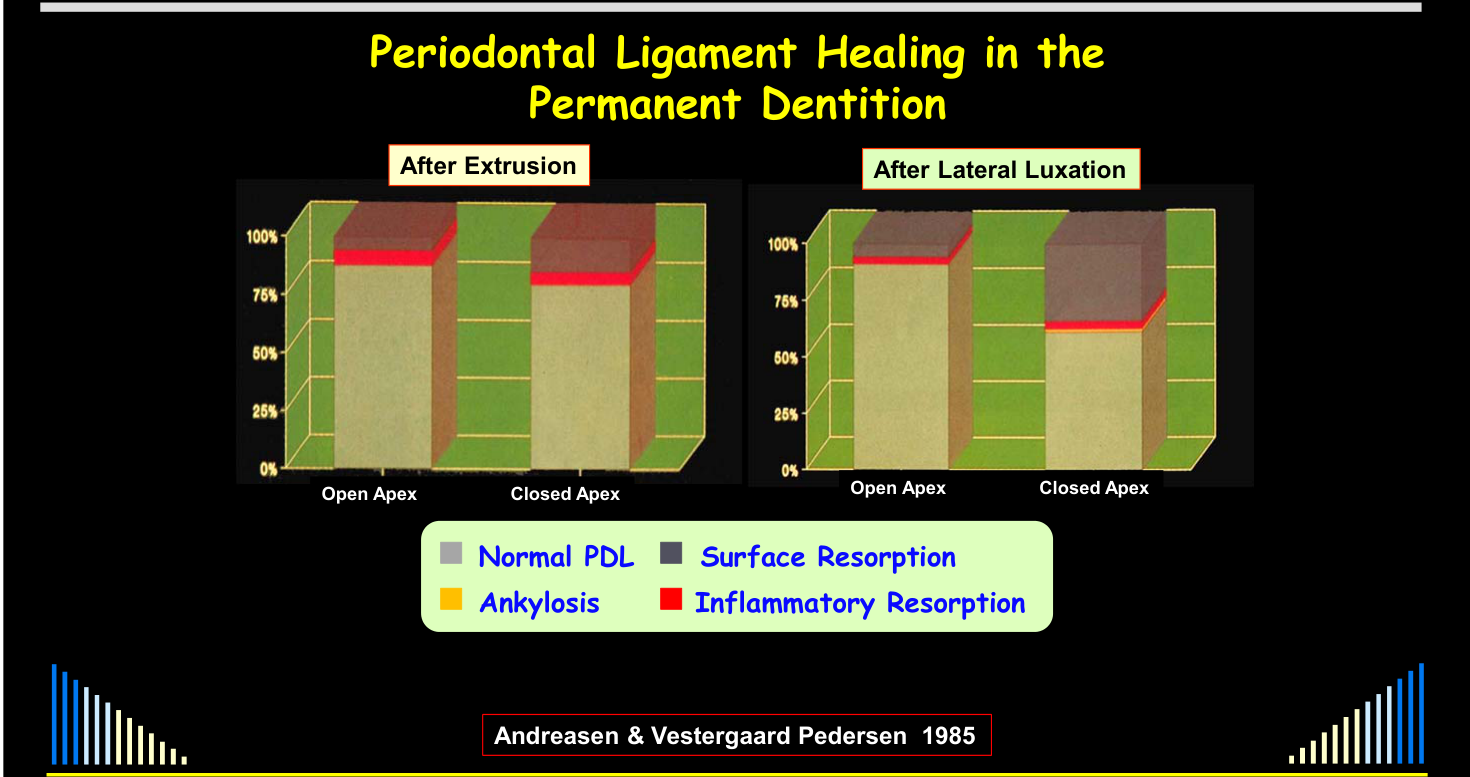
Andreasen & Vestergaard Pedersen 1985
Outcomes recorded: Normal PDL, Surface Resorption, Ankylosis, Inflammatory Resorption.
Compared: After Concussion vs After Subluxation — each with Open Apex and Closed Apex.
Outcomes recorded: Normal PDL, Surface Resorption, Ankylosis, Inflammatory Resorption.
- After Extrusion — Andreasen & Vestergaard Pedersen 1985
- After Lateral Luxation — Andreasen & Vestergaard Pedersen 1985
- After Intrusion — Open Apex vs Closed Apex — Andreasen & Vestergaard Pedersen 1985
- After Avulsion — Open Apex vs Closed Apex; per cent (0–100%) plotted against minutes dry (5, 30, 40, 120) — Andreasen et al 1989
 |  |
 |
Lecturer — Avulsion Timing
Periodontal ligament cells begin to die rapidly when an avulsed tooth dries.
- Cell death begins at approximately 12–15 minutes.
- At approximately 30 minutes, about half of the cells may have died.
- By approximately one hour, nearly all periodontal ligament cells may have died.
Management of Avulsed Teeth13
Avulsed teeth — IMPORTANT:
- Don’t allow the root to dry out
- PDL cells will die
- Storage media important
- Milk or tissue culture: BEST
- Saliva, saline or plastic wrap: OK
- AVOID water
- Replant / reposition ASAP
- Physiological splint
- Antibiotics — systemic
- Endodontic treatment
These measures reduce the chance of replacement resorption and of inflammatory resorption.
Types:
- Transient
- Minor areas of damage
- Later disappear — normal PDL forms
- Progressive
- Associated with drying or removal of PDL
- Gradually involves whole root
External Replacement Resorption14
Treatment:
- Transient
- → NIL required
- → Difficult to assess: transient vs progressive
- Progressive
- → NIL — cannot arrest
- → Extraction eventually
- → AIM to prevent or minimise occurrence
Factors — summary:
- Extra-alveolar time
- Keep as short as possible (ideally < 12 mins)
- Storage conditions
- Milk > saliva = plastic wrap ≠ water = dry
- Damage during avulsion and replant
- Avoid mechanical damage
- Splinting
- Flexible > rigid
- Endodontic treatment
- Avoid toxic materials; use CS-Ab’s
Predictable Root Surface and PDL Damage
Fully developed teeth15
- Avulsion
- Intrusion
- Lateral luxation + crown fracture
- Extrusion + crown fracture
HENCE — in ALL these cases, a “preventive approach” should be taken to prevent external inflammatory resorption.
Lecturer — PDL Damage
Damage to the periodontal ligament reduces the chance of recovery and increases the likelihood of resorption.
Incompletely developed teeth
- Intrusion + crown fracture
- Avulsion + crown fracture
Splinting
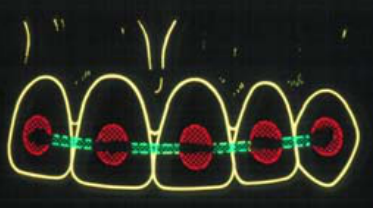
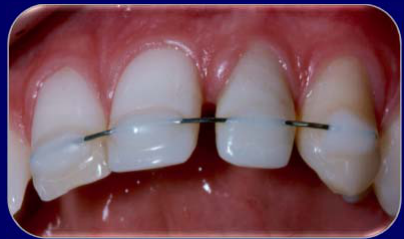
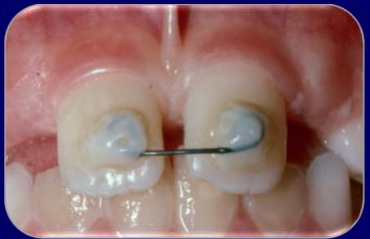
Two types of splints:
- Flexible
- Rigid
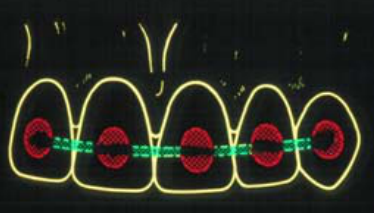
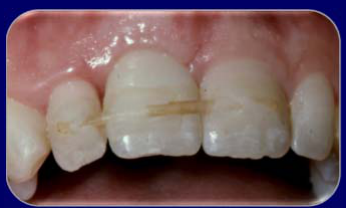
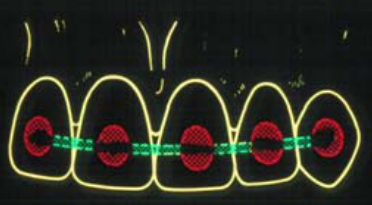
Flexible and Rigid Splints16
Flexible splint:
- If NO root or bone fractures
- Allows “functional” healing of the periodontal ligament
- Reduces ankylosis and replacement resorption
- 7–10 days only
Rigid splint — ONLY use if:
- A bone fracture → 6 weeks
- OR if:
- A root fracture → 3 months
 |  |
 | 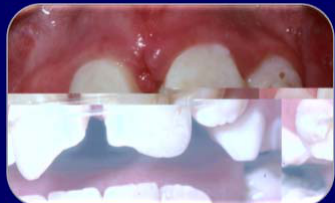 |
Lecturer — Stabilization Purpose
Once a tooth has been repositioned or replanted, it should generally be stabilized. Stabilization also helps stabilize the surrounding bone.
General Principles for Managing Trauma17
- History, examination and assessment
- Establish priorities
- Protection
- Pulp (if exposed)
- Root surface (e.g. during repositioning)
- Reposition — immediately: teeth, bone, soft tissues
- Stabilisation
- Bone and teeth: splint (rigid or flexible)
- Soft tissues: sutures
- Temporary restorations
- Medications
- Systemic: tetanus, antibiotics, analgesics, anti-inflammatories
- Local: intra-canal dressings, chlorhexidine mouthwash, gel
- Follow-up
 |  |
 |
Lecturer — Dentine Protection
Exposed dentine must be covered because its microscopic tubules provide pathways to the pulp.
- Bacteria should be prevented from entering these tubules, particularly in a tooth compromised by trauma.
- For an uncomplicated crown or enamel fracture, enamel may be etched and covered with composite resin as either a flat layer or a rough build-up.
- For a crown-root fracture, glass ionomer can temporarily build up the fractured area and remain functional until definitive treatment.
[!example] Football Injury With Multiple Tooth Injuries
A young boy kicked in the mouth while playing football had several injuries. The right central incisor had an uncomplicated crown fracture involving the mesial corner and required only initial coverage with composite resin or glass ionomer. The left central incisor had a complicated crown-root fracture with lost tooth structure, a loose unattached palatal fragment, and apparent pulp projection; the pulp itself remained in its normal position while tooth structure had been lost around it. The lateral incisor was laterally luxated.
Emergency treatment was performed on a Saturday afternoon without a dental assistant. A rubber dam cuff technique was used, the loose fragment was removed, trichloroacetic acid controlled gingival bleeding, and the pulp was removed from the mature central incisor before root canal treatment was commenced. The lateral incisor was repositioned and splinted to the anchor teeth, and composite resin covered the fractured central incisor, improved its appearance, and incorporated it into the splint. The result provided stability, protection, and a reasonable appearance while allowing more comprehensive treatment later. All treatment was performed under rubber dam, which was described as particularly useful when working alone.
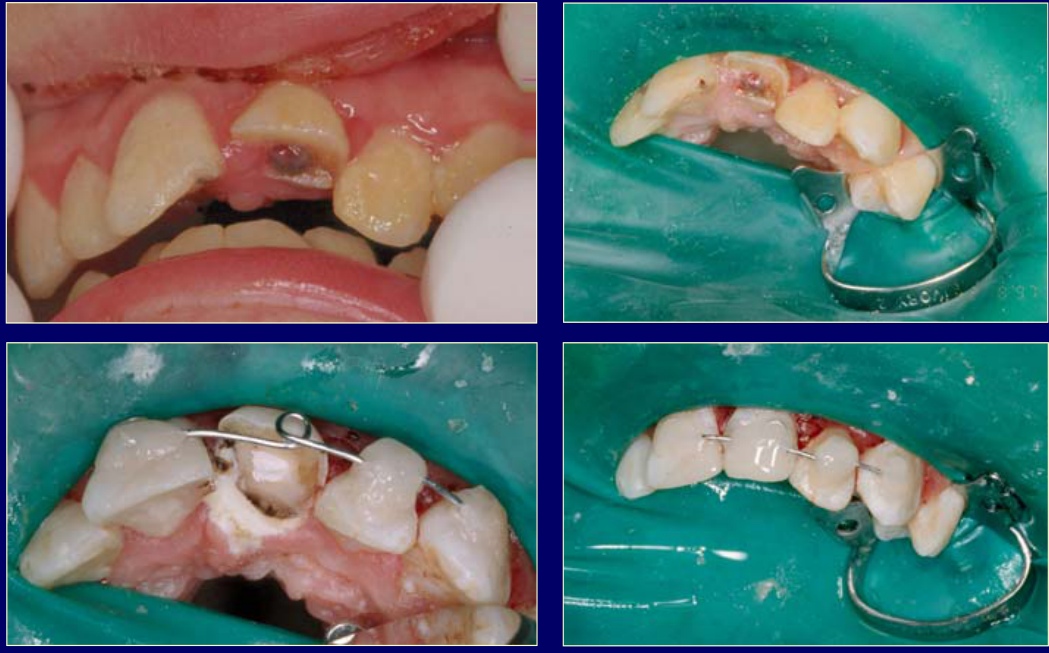
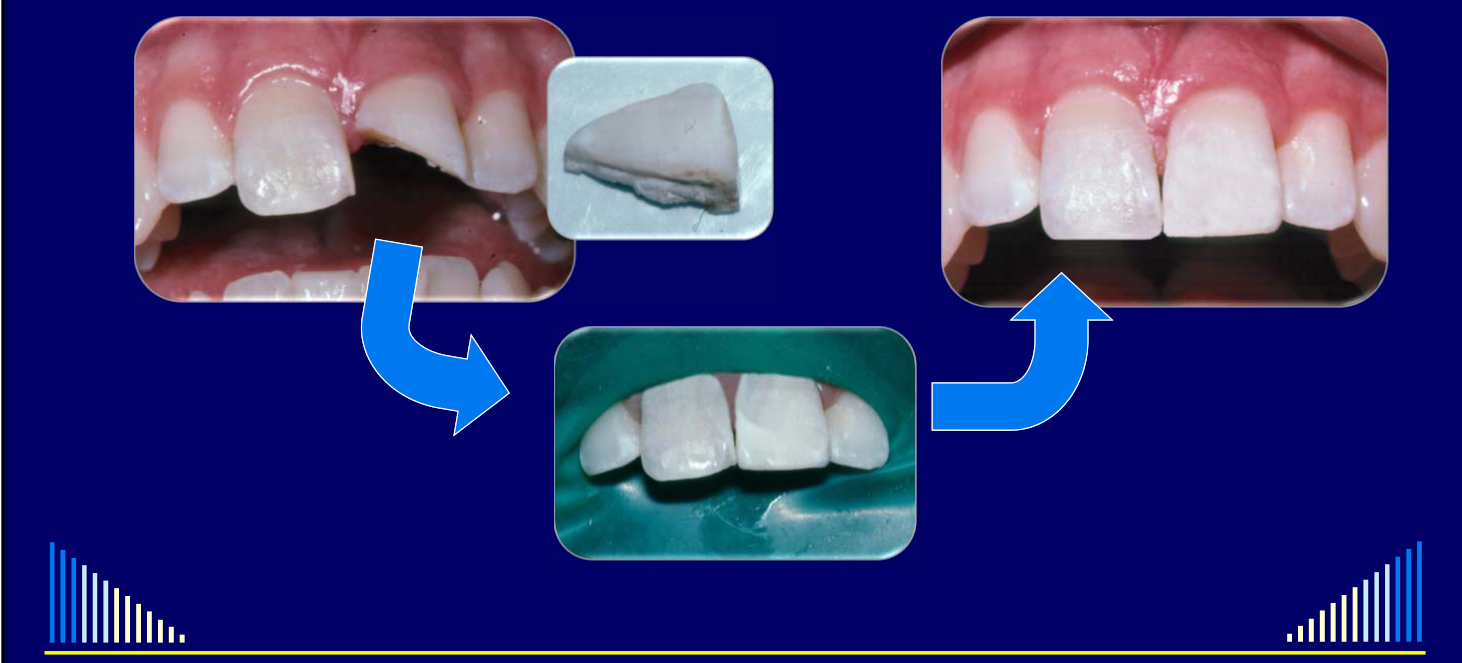
[!example] Reattachment of a Fractured Tooth Fragment
In a young patient struck in the face, a fractured tooth fragment was reattached after hours under rubber dam using bonding techniques.
- Reattachment can remain functional for many years.
- It restores the original tooth structure, shape, and color and reduces the likelihood of occlusal problems.
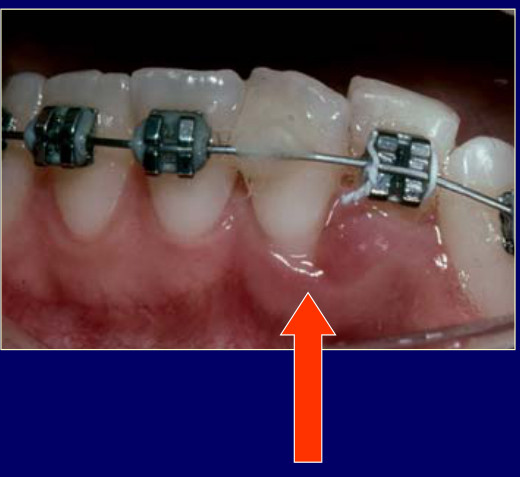
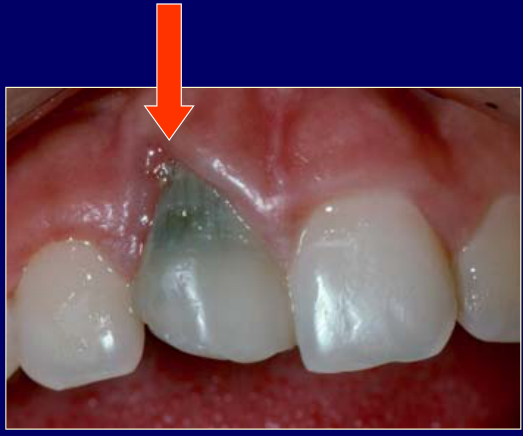
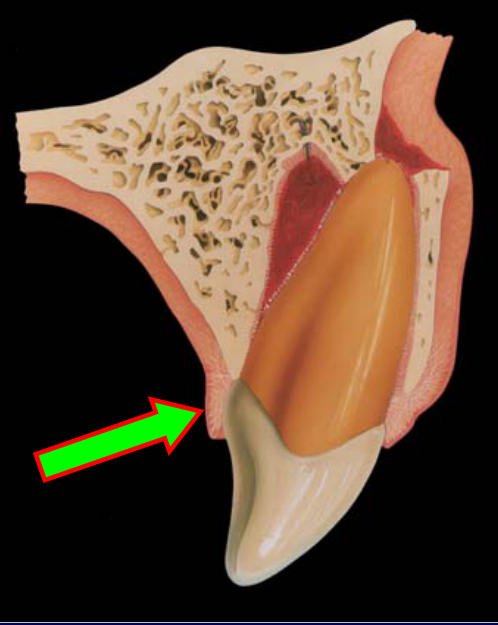
Soft Tissue Management1819
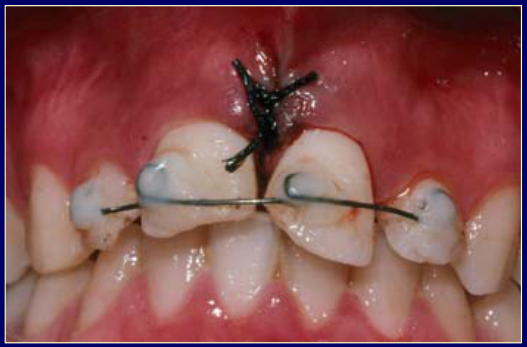
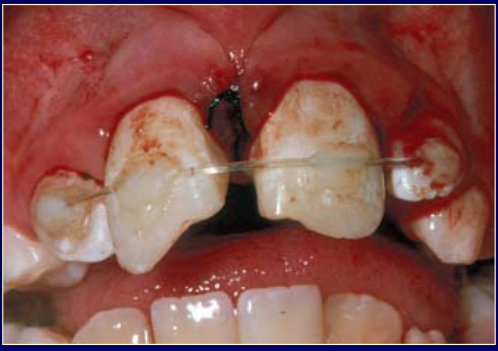
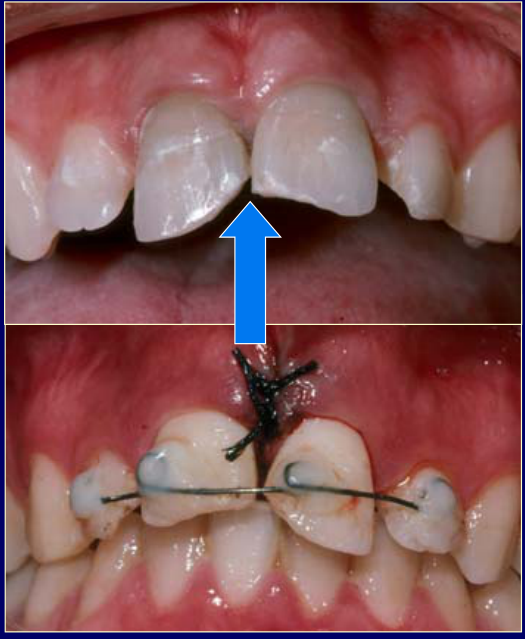
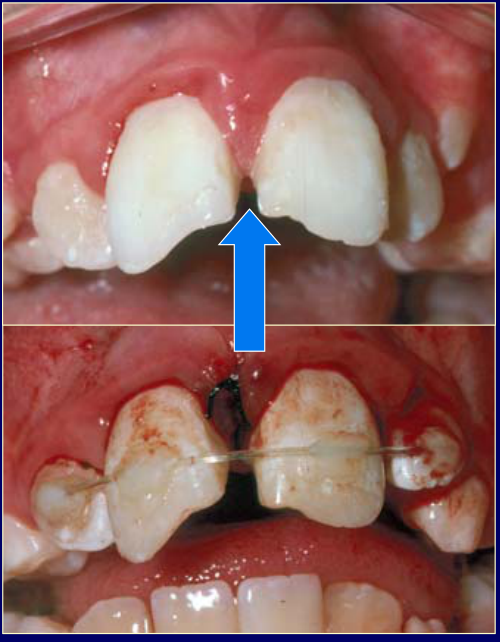
Suture ALL lacerations:
- For optimum healing
- To maintain tissue position
- To prevent gingival recession
No sutures, no tissue repositioning → poor healing, gingival recession and bone loss.
 |  |  |
 |  |  |
 |
Lecturer — Suture Technique
Simple interrupted sutures were suggested, with black 4-0 silk preferred because it is visible to the patient and generally comfortable.
- Many resorbable sutures become sharp after several days and may take approximately 10–12 days to begin resorbing.
- Sutures are generally removed after approximately five days, although timing varies with the injury and other treatment.
[!note] Lecturer — Palatal Tissue
Palatal tissues require particular attention after displaced teeth, including lateral luxation, intrusion, extrusion, and avulsion.
- Tissue that appears repositioned may remain detached from the underlying bone and tooth, resembling an open flap or degloving injury.
- A probe or flat plastic instrument should be used to check attachment; if the tissue is detached, interproximal sutures are often sufficient to hold it against the bone and tooth.
- When uncertain, an additional suture is preferable because the opportunity for optimal repair exists immediately after the injury and cannot be recreated a week later.
Lecturer — Unsutured Lacerations
Cases were described in which avulsed teeth were repositioned but lacerations were not sutured.
- The resulting problems illustrated the importance of suturing even small lacerations.
Repositioning and Temporary Restorations20
 |  |
General Principles for Managing Trauma21
- History, examination and assessment
- Establish priorities
- Protection
- Pulp (if exposed)
- Root surface (e.g. during repositioning)
- Reposition — Immediately: teeth, bone, soft tissues
- Stabilisation
- Bone and teeth: splint (rigid or flexible)
- Soft tissues: sutures
- Temporary restorations
- Medications
- Systemic: tetanus, antibiotics, analgesics, anti-inflammatories
- Local: intra-canal dressings, chlorhexidine mouthwash, gel
- Follow-up
Lecturer — Systemic Medication Details
For an avulsed tooth, review the circumstances and check tetanus protection, particularly if the tooth may have been contaminated by soil.
- If the last tetanus injection is uncertain, another injection may be appropriate; refer the patient to a medical practitioner with a letter requesting tetanus toxoid when indicated.
- Antibiotics are generally limited to preventing external inflammatory resorption or addressing a genuine risk of infection. They are not routinely indicated for all dental injuries, including root fracture alone.
- Studies discussed in the lecture associated antibiotic use in transverse root fractures with more cases of pulp necrosis than when antibiotics were not used.
- Tetracyclines may have advantages over penicillins for external inflammatory resorption and may be preferred when the patient’s age and allergy status permit.
- An adult ibuprofen dose of 400 mg every four hours was discussed. Paracetamol may be combined with ibuprofen if pain is severe, although substantial pain is unusual after good emergency treatment.
- Good repositioning and splinting often result in little pain, and patients may be able to eat normally once the teeth and tissues are repositioned and stabilized.
Lecturer — Intra-canal Dressings
Ledermix paste may be used initially when root canal treatment must be started immediately, when preventing external inflammatory resorption, or when a fully developed tooth has pulp exposure and little chance of pulp recovery.
- Calcium hydroxide should not be the initial dressing because of its irritant properties and potential contribution to ankylosis and replacement resorption.
- A 50:50 Ledermix and calcium hydroxide mixture should also not be used as the emergency dressing; it may be used later in a protocol to prevent external inflammatory resorption.
Lecturer — Chlorhexidine Mouthwash
Chlorhexidine mouthwash may be used to maintain cleanliness around soft-tissue injuries and splints.
- If sutures are removed after about five days, mouthwash use may continue for approximately one week.
- Tannin-containing drinks, such as tea, should not be taken at the same time as the mouthwash.
- Staining can be polished away later.
Lecturer — Chlorhexidine Gel
Chlorhexidine gel may be applied around lacerations, soft-tissue injuries, and splints where cleaning may be difficult.
- Apply it with a cotton bud or finger, or put it on a toothbrush and work it around the injured region.
- For long-term splints used with bone or root fractures, continue using it until the splint is removed.
Temporary Restorations
- Cover dentine + protect pulp
- Aesthetics
- “Composite Bandage”
- Glass ionomer cements
(No additional slide content on this page.)
Medications
Systemic Medications
Systemic Medications22
- Tetanus toxoid → check status (10 years)
- Antibiotics → prophylaxis
- Inflammatory resorption
- Pulp healing (tetracycline)
- Choices
- Penicillin / amoxycillin
- Tetracyclines
- NSAIDs → anti-inflammatory
- Ibuprofen
- Synergism with tetracyclines
- Analgesics
- Rarely needed
- Use NSAIDs for analgesic + anti-inflammatory actions
Local Medication
- Intra-canal dressings
- Ledermix paste initially
- Calcium hydroxide — NOT initially
- 50:50 mix of Ledermix / Ca(OH)₂
- Chlorhexidine mouthwash
- After each meal until 2 days after sutures removed
- Warn about staining of teeth — avoid tannin
- Chlorhexidine gel
- Apply with cotton bud, finger or toothbrush
- 2–3 times / day
- Continue for 2–3 weeks
Trauma Follow-Up
Trauma Follow-Up Examinations23
- Examine soft tissues
- Examine teeth
- Percussion and palpation
- Mobility
- Colour changes
- Pulp sensibility tests
- CO₂ and electric tests
- Periapical radiograph(s)
Lecturer — Examination Findings
Follow-up examinations should assess healing of the periodontal ligament, periradicular tissues, pulp, root surface, and soft tissues.
- Particular attention should be paid to pulp necrosis, root canal infection, external inflammatory resorption, replacement resorption, ankylosis, abnormal mobility, and changes in tooth color.
- Color change does not necessarily indicate pulp necrosis; it must be interpreted together with pulp sensibility results, clinical findings, and periapical radiographs.
- Both carbon dioxide cold testing and electric pulp testing should be performed at each follow-up because a tooth may respond to only one test.
Follow-Up Examinations
Trauma Follow-Up Schedule
- Will depend on type of injuries present
- Especially need for endodontic treatment
- e.g. Immediate: avulsion, intrusion — mature teeth
- And need to remove sutures & / or splint
- Sutures: 5–6 days
- Flexible splint: 7–10 days
- Rigid splint: 6 weeks–3 months
- Especially need for endodontic treatment
Follow-Up Schedule
Trauma Follow-Up Schedule24
If immediate endodontics is not required:
- 2 weeks
- 1 month
- 2 months
- 3 months
- 6 months
- 9 months
- 1 year
- Annually for 5 years
- Then every 3 years
Lecturer — Follow-Up Importance
Follow-up is as important as emergency treatment because it determines whether healing is occurring and whether further treatment is required.
- Trauma may affect a patient for the remainder of their life, so teeth require continued observation for later complications.
- The first three months are particularly important because pulp necrosis, root canal infection, inflammatory resorption, and sometimes replacement resorption may become evident during this period.
- If no adverse signs are present at one year, the prognosis is more favorable, although later complications cannot be completely excluded.
- Patients should be encouraged to attend long-term reviews, even though compliance may decrease over time.
Lecturer — Emergency Priorities
Emergency treatment follows general principles, but the sequence must be adapted to the specific injury.
- Priorities include assessing medical status and possible brain concussion, examining all teeth and tissues, taking an adequate trauma radiographic series, promptly repositioning displaced teeth, and replanting avulsed teeth as soon as possible.
- Treatment also includes protecting the root surface, periodontal ligament, exposed pulp, and dentine; stabilizing teeth and bone with an appropriate splint; suturing relevant lacerations, especially detached palatal tissue; using temporary restorations when necessary; and providing medications only when indicated.
- Subsequent management must consider tissue responses, the likelihood of pulp necrosis, risks of external inflammatory or replacement resorption, tooth maturity, root or bone fractures, and the need for short-, medium-, and long-term follow-up.
Emergency Treatment of Dental Injuries
W/Prof. Paul V. Abbott AO
Emergency Treatment of Dental Injuries25
-
Infractions
-
Crown Fractures
-
Crown : Root Fractures
-
Root Fractures
-
Concussion + Subluxation
-
Extrusive Luxation
-
Lateral Luxation
-
Intrusive Luxation
-
Avulsion
Clinical Cases
Case: Missed lateral luxation of central incisors following a car accident
Question
Scenario: A patient involved in a car accident presented a couple of hours after initial treatment by another dentist, complaining of an inability to bite her teeth together properly.
What’s shown: A series of radiographs including a midline periapical, an occlusal view of the maxillary central incisors, and a periapical of the lower incisors. The initial dentist had placed a wire splint and commenced root canal treatment on a fractured lateral incisor.
Consider: What do the different radiographic angulations reveal about the patient’s occlusion and the true nature of her injuries?
Answer
Observations:
- The midline periapical radiograph makes the central incisors appear to be in a normal position.
- The occlusal view reveals that the root apices of the central incisors are not in the socket, with a radiolucency at the end of the tooth sockets.
- The crowns of the central incisors are pushed back into a palatal position.
- The lower incisor radiograph shows minor enamel fractures.
Reasoning: The different angulations of the radiographs demonstrate that the central incisors are actually laterally luxated in a palatal direction. The initial dentist missed this injury due to inadequate radiographs and clinical examination, which is why the teeth were not repositioned and the patient could not bite properly.
Outcome: The patient was evaluated a couple of hours after the initial missed diagnosis; the inability to bite was attributed to the unrepositioned palatal lateral luxation of the central incisors.
Takeaway: A full trauma series with different angulations, including occlusal views, is essential to detect tooth displacements like lateral luxations that may appear normal on standard periapical radiographs.
Case: Repositioned avulsed teeth without suturing
Question
Scenario: A patient with avulsed teeth that were repositioned by a dentist who did not place sutures in the soft tissue lacerations.
What’s shown: Clinical photographs of the anterior maxillary dentition showing the repositioned teeth and the resulting soft tissue condition.
Consider: What are the consequences of failing to suture lacerations during the repositioning of avulsed teeth?
Answer
Observations:
- The teeth were avulsed and repositioned.
- No sutures were placed in the soft tissue lacerations.
- The clinical result shows poor tissue repair.
Reasoning: Failing to suture lacerations prevents optimum healing. Without sutures to maintain tissue position, the tissues do not reattach properly, leading to a degloving-type injury or periodontal defect.
Outcome: The case demonstrates poor healing, gingival recession, and associated loss of bone and attachment, resulting in long-term aesthetic problems.
Takeaway: Always place sutures for lacerations, even small ones, to maintain tissue position, prevent gingival recession, and ensure optimum healing.
Case: Uncomplicated crown root fracture with temporary restoration
Question
Scenario: A patient with an uncomplicated crown root fracture extending a couple of millimeters into the root, managed in an emergency setting.
What’s shown: A clinical photograph of the fractured tooth restored with a glass ionomer cement, taken six months after the injury.
Consider: How can an uncomplicated crown root fracture be managed as a temporary restoration in an emergency setting?
Answer
Observations:
- The fracture extends a couple of millimeters into the tooth root.
- The tooth was built up with glass ionomer cement.
- The restoration is still present and functioning well at six months.
Reasoning: In an emergency, a perfect buildup is not necessary. The key priority is to cover the exposed dentine to protect the pulp from bacterial ingress through the dentinal tubules. A simple glass ionomer or composite bandage provides this protection effectively.
Outcome: The temporary glass ionomer restoration remained in place and functioned well at the six-month follow-up.
Takeaway: In emergency management of crown fractures, the priority is to cover exposed dentine with a simple temporary restoration (like glass ionomer or composite) to protect the pulp, rather than attempting a definitive restoration.
Case: Multiple dental trauma injuries in a young boy
Question
Scenario: A 15-16-year-old boy kicked in the mouth while playing football, presenting on a Saturday afternoon with multiple dental injuries.
What’s shown: Clinical photographs showing an uncomplicated crown fracture of the right central incisor, a complicated crown root fracture of the left central incisor with exposed pulp, and a palatally displaced laterally luxated lateral incisor. The images also show the emergency management using a rubber dam, splinting, and composite resin.
Consider: What is the appropriate emergency management for multiple complex dental injuries when treating alone after hours?
Answer
Observations:
- Right central incisor: uncomplicated crown fracture of the mesial corner.
- Left central incisor: complicated crown root fracture with a loose palatal fragment and exposed pulp.
- Lateral incisor: laterally luxated and palatally displaced.
- Treatment was performed under rubber dam isolation.
- The loose palatal fragment was removed, and trichloroacetic acid was applied for hemostasis.
- Pulp was removed from the left central incisor, and root canal treatment was commenced (root fully developed).
- The lateral incisor was repositioned.
- A splint was placed and attached to anchor teeth using composite resin.
- Composite resin was used to cover the fractured right central incisor and incorporate it into the splint for aesthetics and stability.
Reasoning: In an emergency after-hours setting without an assistant, the goal is stabilization and pulp protection, not definitive restoration. Rubber dam is essential for isolation. The complicated fracture requires pulp removal and root canal treatment. The luxated tooth needs repositioning and splinting. Composite can be used creatively to splint, cover fractures, and provide temporary aesthetics.
Outcome: The teeth were stabilized with a splint, the pulp exposure was managed with pulp removal and root canal treatment, and the fractures were covered with composite resin. The temporary restorations and splint will be removed later for definitive treatment.
Takeaway: In emergency trauma management, prioritize stabilization, pulp protection, and isolation (e.g., rubber dam) over definitive aesthetics or restorations; simple materials like composite can be used effectively for temporary splinting and coverage.
Case: Reattachment of a fractured tooth fragment
Question
Scenario: A 17- or 18-year-old boy presents after hours (around 9 or 10 PM) after being hit in the face, bringing the fractured portion of his tooth with him.
What’s shown: Clinical images showing the sequence of reattaching the tooth fragment.
Consider: How to manage and restore a tooth when the patient presents with the fractured fragment.
Answer
Observations:
- The patient presented with the fractured portion of the tooth.
- The procedure was performed under rubber dam isolation.
- The fragment was reattached to the tooth using bonding techniques.
Reasoning: Reattaching the patient’s own tooth fragment restores the tooth to its normal shape and color, and maintains the original occlusion. It provides a simple, highly aesthetic, and functional restoration that can last for many years.
Outcome: The tooth fragment was successfully reattached during the after-hours service.
Takeaway: If a patient presents with the fractured portion of a tooth following trauma, it can be reattached using bonding techniques, providing an excellent restoration that utilizes the patient’s own tooth structure.
Footnotes
-
Original PDF page 1: L11 Dento-Alveolar Trauma 4 - General Principles for Managing Dental Trauma, p.1 ↩
-
Original PDF page 2: L11 Dento-Alveolar Trauma 4 - General Principles for Managing Dental Trauma, p.2 ↩
-
Original PDF page 3: L11 Dento-Alveolar Trauma 4 - General Principles for Managing Dental Trauma, p.3 ↩
-
Original PDF page 4: L11 Dento-Alveolar Trauma 4 - General Principles for Managing Dental Trauma, p.4 ↩
-
Original PDF page 5: L11 Dento-Alveolar Trauma 4 - General Principles for Managing Dental Trauma, p.5 ↩
-
Original PDF page 6: L11 Dento-Alveolar Trauma 4 - General Principles for Managing Dental Trauma, p.6 ↩
-
Original PDF page 7: L11 Dento-Alveolar Trauma 4 - General Principles for Managing Dental Trauma, p.7 ↩
-
Original PDF page 8: L11 Dento-Alveolar Trauma 4 - General Principles for Managing Dental Trauma, p.8 ↩
-
Original PDF page 9: L11 Dento-Alveolar Trauma 4 - General Principles for Managing Dental Trauma, p.9 ↩
-
Original PDF page 10: L11 Dento-Alveolar Trauma 4 - General Principles for Managing Dental Trauma, p.10 ↩
-
Original PDF page 11: L11 Dento-Alveolar Trauma 4 - General Principles for Managing Dental Trauma, p.11 ↩
-
Original PDF page 12: L11 Dento-Alveolar Trauma 4 - General Principles for Managing Dental Trauma, p.12 ↩
-
Original PDF page 13: L11 Dento-Alveolar Trauma 4 - General Principles for Managing Dental Trauma, p.13 ↩
-
Original PDF page 14: L11 Dento-Alveolar Trauma 4 - General Principles for Managing Dental Trauma, p.14 ↩
-
Original PDF page 15: L11 Dento-Alveolar Trauma 4 - General Principles for Managing Dental Trauma, p.15 ↩
-
Original PDF page 16: L11 Dento-Alveolar Trauma 4 - General Principles for Managing Dental Trauma, p.16 ↩
-
Original PDF page 17: L11 Dento-Alveolar Trauma 4 - General Principles for Managing Dental Trauma, p.17 ↩
-
Original PDF page 18: L11 Dento-Alveolar Trauma 4 - General Principles for Managing Dental Trauma, p.18 ↩
-
Original PDF page 19: L11 Dento-Alveolar Trauma 4 - General Principles for Managing Dental Trauma, p.19 ↩
-
Original PDF page 21: L11 Dento-Alveolar Trauma 4 - General Principles for Managing Dental Trauma, p.21 ↩
-
Original PDF page 20: L11 Dento-Alveolar Trauma 4 - General Principles for Managing Dental Trauma, p.20 ↩
-
Original PDF page 22: L11 Dento-Alveolar Trauma 4 - General Principles for Managing Dental Trauma, p.22 ↩
-
Original PDF page 24: L11 Dento-Alveolar Trauma 4 - General Principles for Managing Dental Trauma, p.24 ↩
-
Original PDF page 25: L11 Dento-Alveolar Trauma 4 - General Principles for Managing Dental Trauma, p.25 ↩
-
Original PDF page 26: L11 Dento-Alveolar Trauma 4 - General Principles for Managing Dental Trauma, p.26 ↩