Orthodontic Seminar: Biomechanics and Preclinical Orthodontics1
DMD Level 3
Unit A: Biomechanics and Preclinical Orthodontics
The University of Western Australia
Orthodontic Seminar
- Part 1. Orthodontic Diagnosis & Treatment Planning
- Part 2. Biologic Response to Orthodontic Force
- Part 3. Mechanical Principles in Controlling Orthodontic Force
- Part 4. Orthodontic Anchorage and Controlled Tooth Movement
Part 1: Orthodontic Diagnosis and Treatment Planning
Learning Objectives for Diagnosis and Treatment Planning2
Be sure that you are able to:
- Recognize and evaluate skeletal and dental relationships in all three planes of space.
- Recognize and quantify the patient’s arch length status.
- Evaluate the skeletal and arch length considerations, interactions and appropriateness of treatment or non-treatment.
- Recommend treatment or referral of specific problems based upon case evaluation.
Review previous seminars.
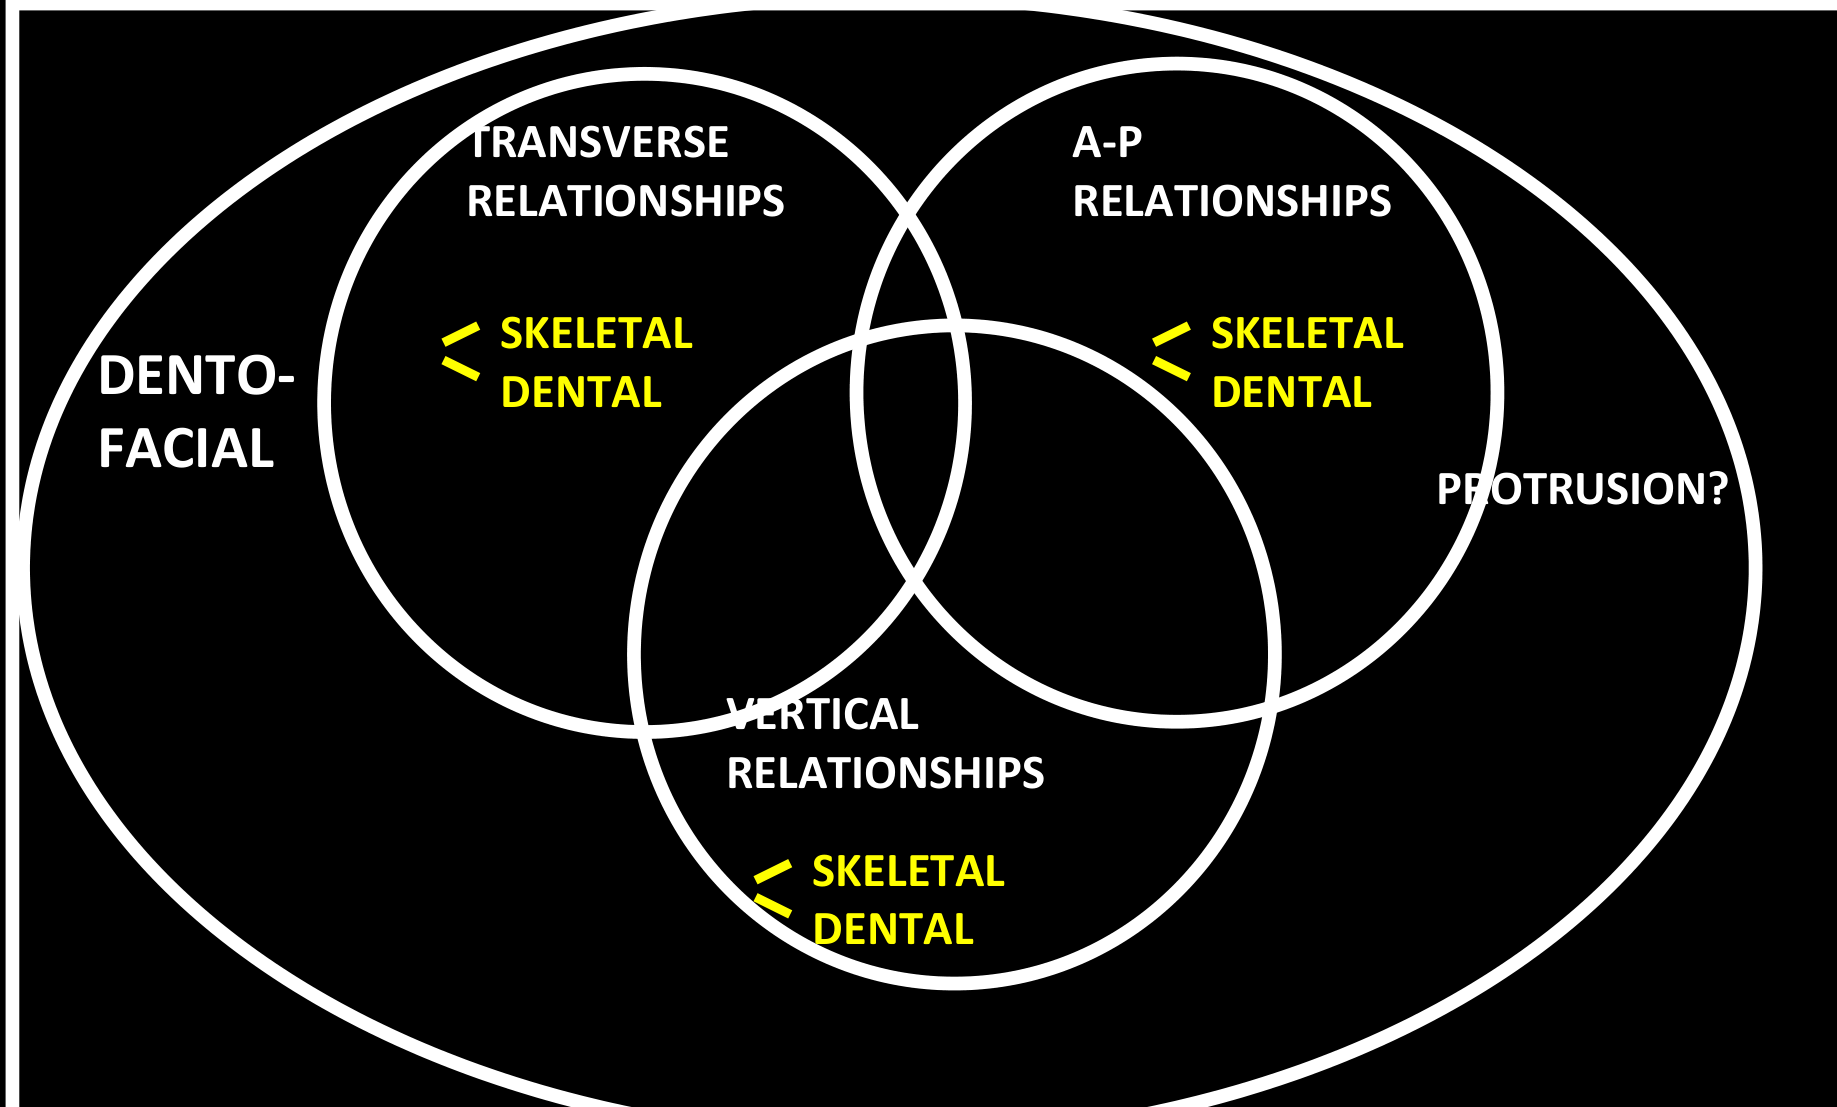
Evaluating Skeletal and Dental Relationships in Three Planes of Space3
- Recognize and evaluate skeletal and dental relationships in all three planes of space.
Ackerman-Proffit Classification
Alignment and Asymmetry4
Mixed dentition space analysis form.
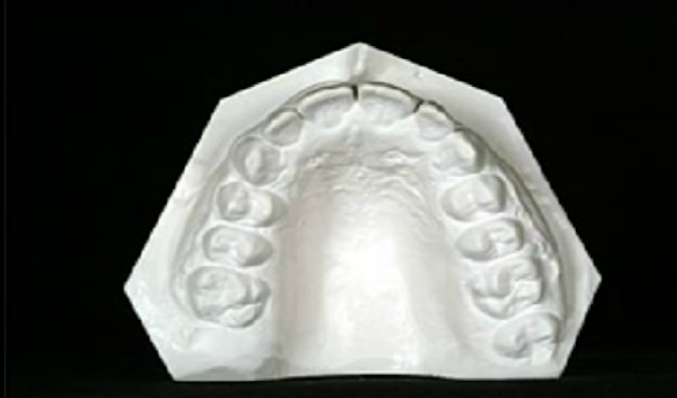
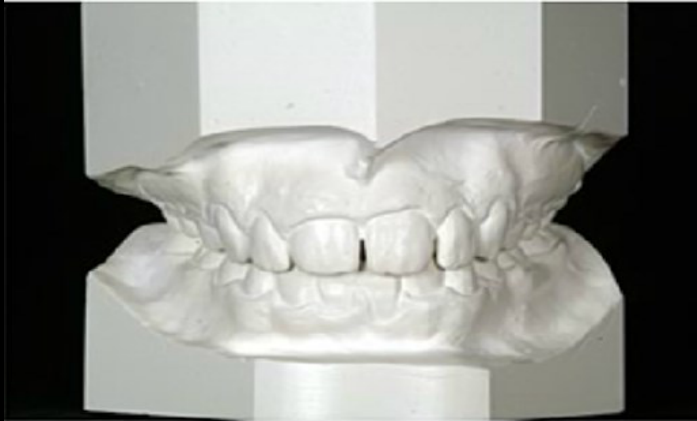
Lecturer — Study Models
Study models help evaluate arch shape and identify discrepancies.
- In mixed dentition, space analysis can predict the space required for eruption of the permanent teeth.
- Cast models also show transverse discrepancies, excessive overbite, anterior open bite, and other vertical relationships.
 |  |
Esthetic Impact of Malocclusion5
Lecturer — Esthetic Effects
Malocclusion affects the lips and soft-tissue profile because the soft tissues reflect the position of the underlying teeth. Lack of space or excessive incisor proclination can alter lip behavior, the facial profile, and the overall esthetic result of treatment.
- In a hyperdivergent patient, the mandibular angle and lower facial height are increased.
Transverse Relationships6
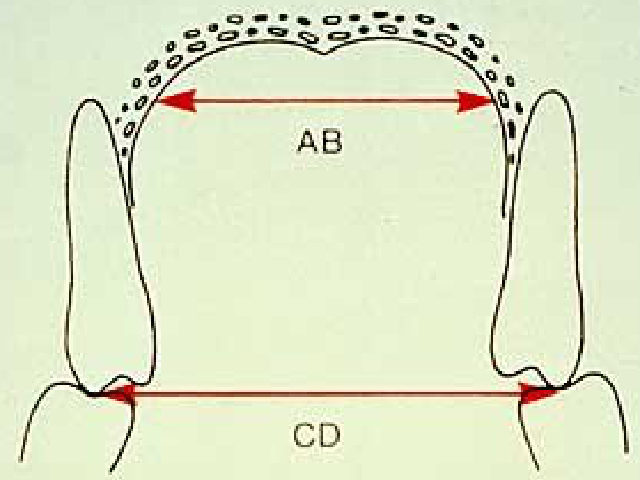
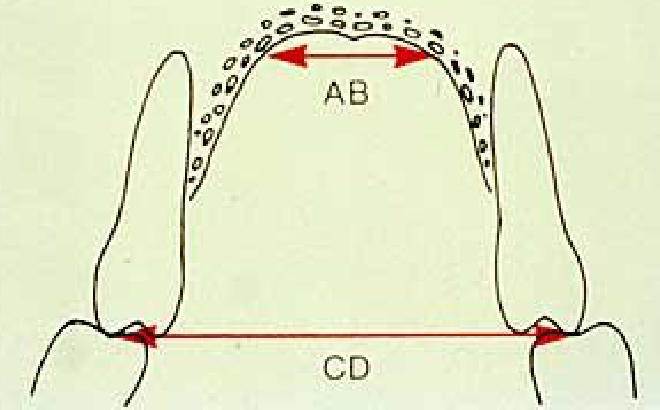
Palatal Width — panels A, B, C, D
Lecturer — Crossbite Analysis
Transverse analysis can be performed on cast models by comparing the upper and lower arches. Palatal width helps differentiate skeletal from dental crossbites.
- A dental crossbite may occur with normal palatal width when the upper molars have a normal inclination or are excessively tilted lingually because an altered eruption pathway has produced an abnormal dental inclination.
- A skeletal crossbite may occur when the upper arch is constricted and the palatal width is very narrow; the upper molars may compensate by tipping buccally.
- In a severe skeletal crossbite, the upper arch may lie completely lingual to the lower arch, and molar compensation may be insufficient to correct the discrepancy.
- The extent of molar tipping depends on the severity of the upper-arch deficiency or narrowing.
 |  |
Anteroposterior Relationships7
- Class I skeletal pattern
- Class II skeletal pattern
- Class III skeletal pattern
Lecturer — Profile Analysis
Profile analysis can suggest the underlying skeletal pattern and helps differentiate skeletal relationships from dental relationships.
- A balanced profile may be associated with a skeletal Class I pattern.
- A convex profile may be associated with a Class II malocclusion.
- A concave profile may be associated with a Class III malocclusion.
Vertical Relationships8
Part 2: Biologic Response to Orthodontic Force9
Be sure that you are able to:
- Describe the histologic/cellular/vascular response of the supporting structures to force applied to teeth.
- Discuss the role of biologic electricity in maintenance and turnover of alveolar bone.
- Describe the relationship of orthodontic force levels to anchorage.
Histologic and Vascular Response of Supporting Structures to Force1011
- Describe the histologic/cellular/vascular response of the supporting structures to force applied to teeth.
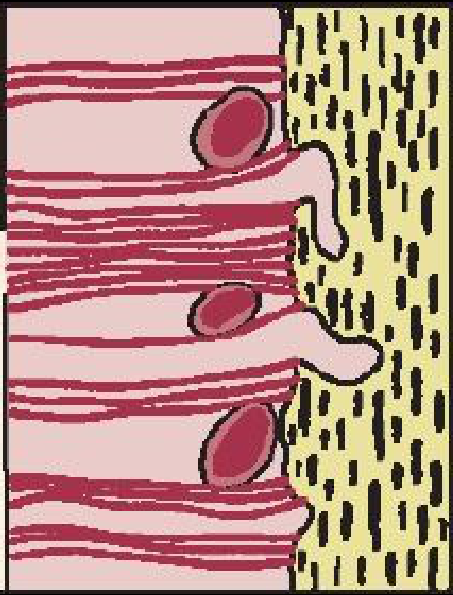 | 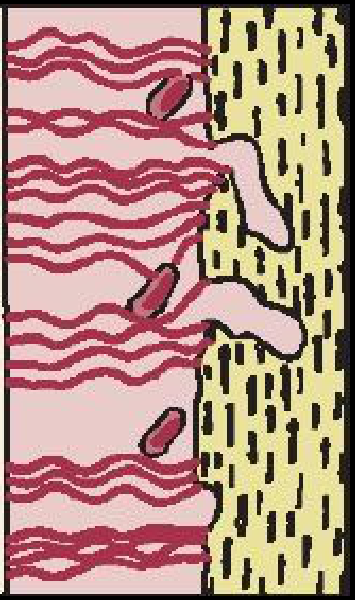 |
 | 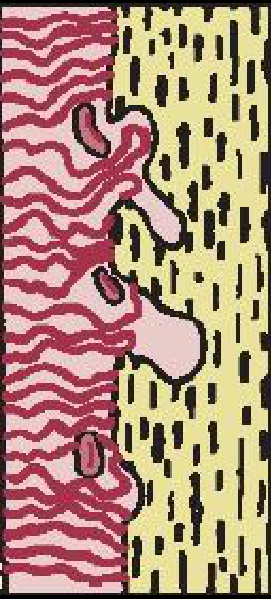 |
Time Sequence of Light Continuous Pressure1213
Time sequence — light continuous pressure:
- Milliseconds — fluid pressure up; piezo-electric effect
- Seconds — fluid pressure balanced
- Minutes — blood flow affected
- Hours — cellular differentiation begins
- Days — apposition/resorption; tooth movement
Lecturer — Cellular Signaling
Over hours and days, osteoclasts and osteoblasts participate in bone turnover. Prostaglandins and cytokines allow these cells to communicate, and the balance between their activities depends on the amount released.
Heavy Pressure and Sterile Necrosis1415
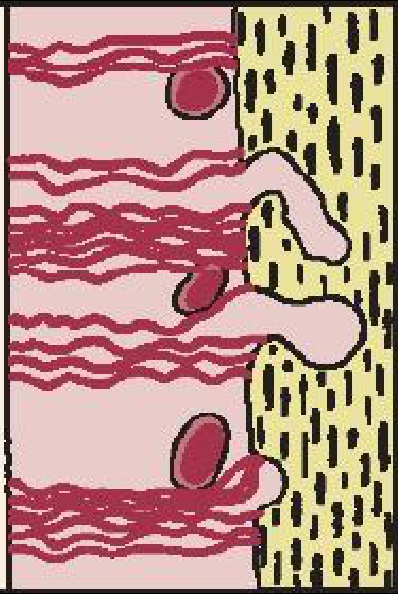
Heavy pressure:
- Total shut-off of blood flow
- Sterile necrosis = hyalinization
Lecturer — Sterile Necrosis
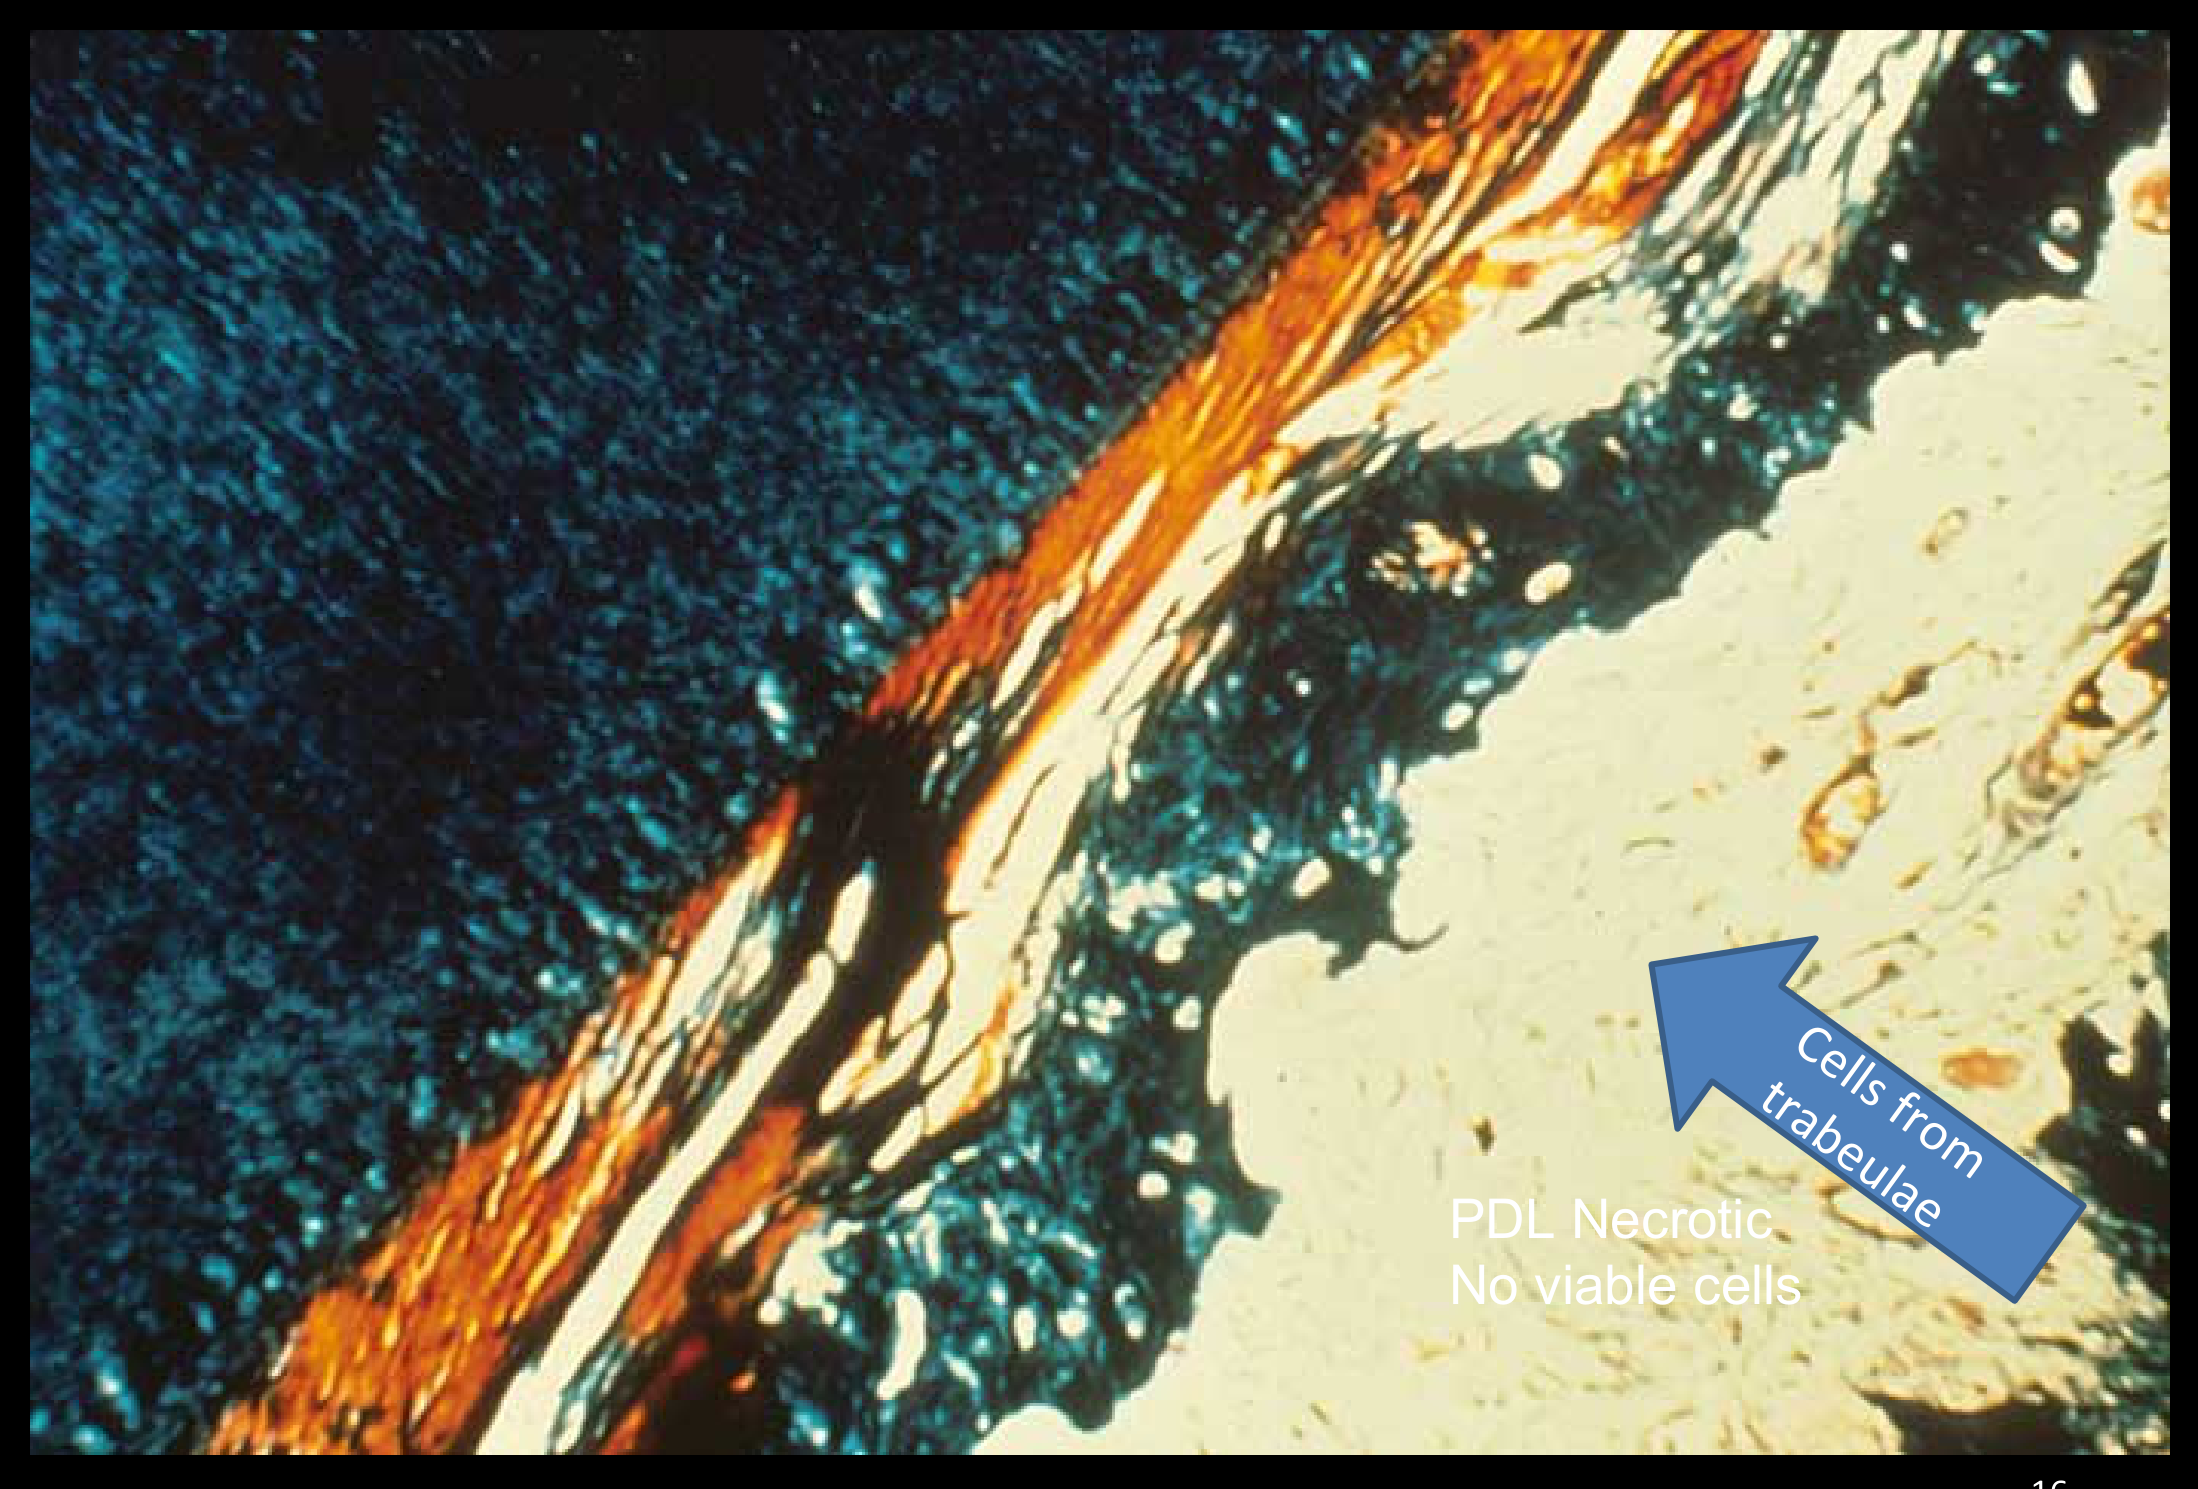
Complete vascular blockage deprives the periodontal ligament of nutrients and can cause sterile necrosis, which is not caused by infection. Hyalinization reorganizes the periodontal ligament, but tooth movement is delayed; if it remains nonviable, the required bone-turnover cells must come from the bone itself, which takes more time.
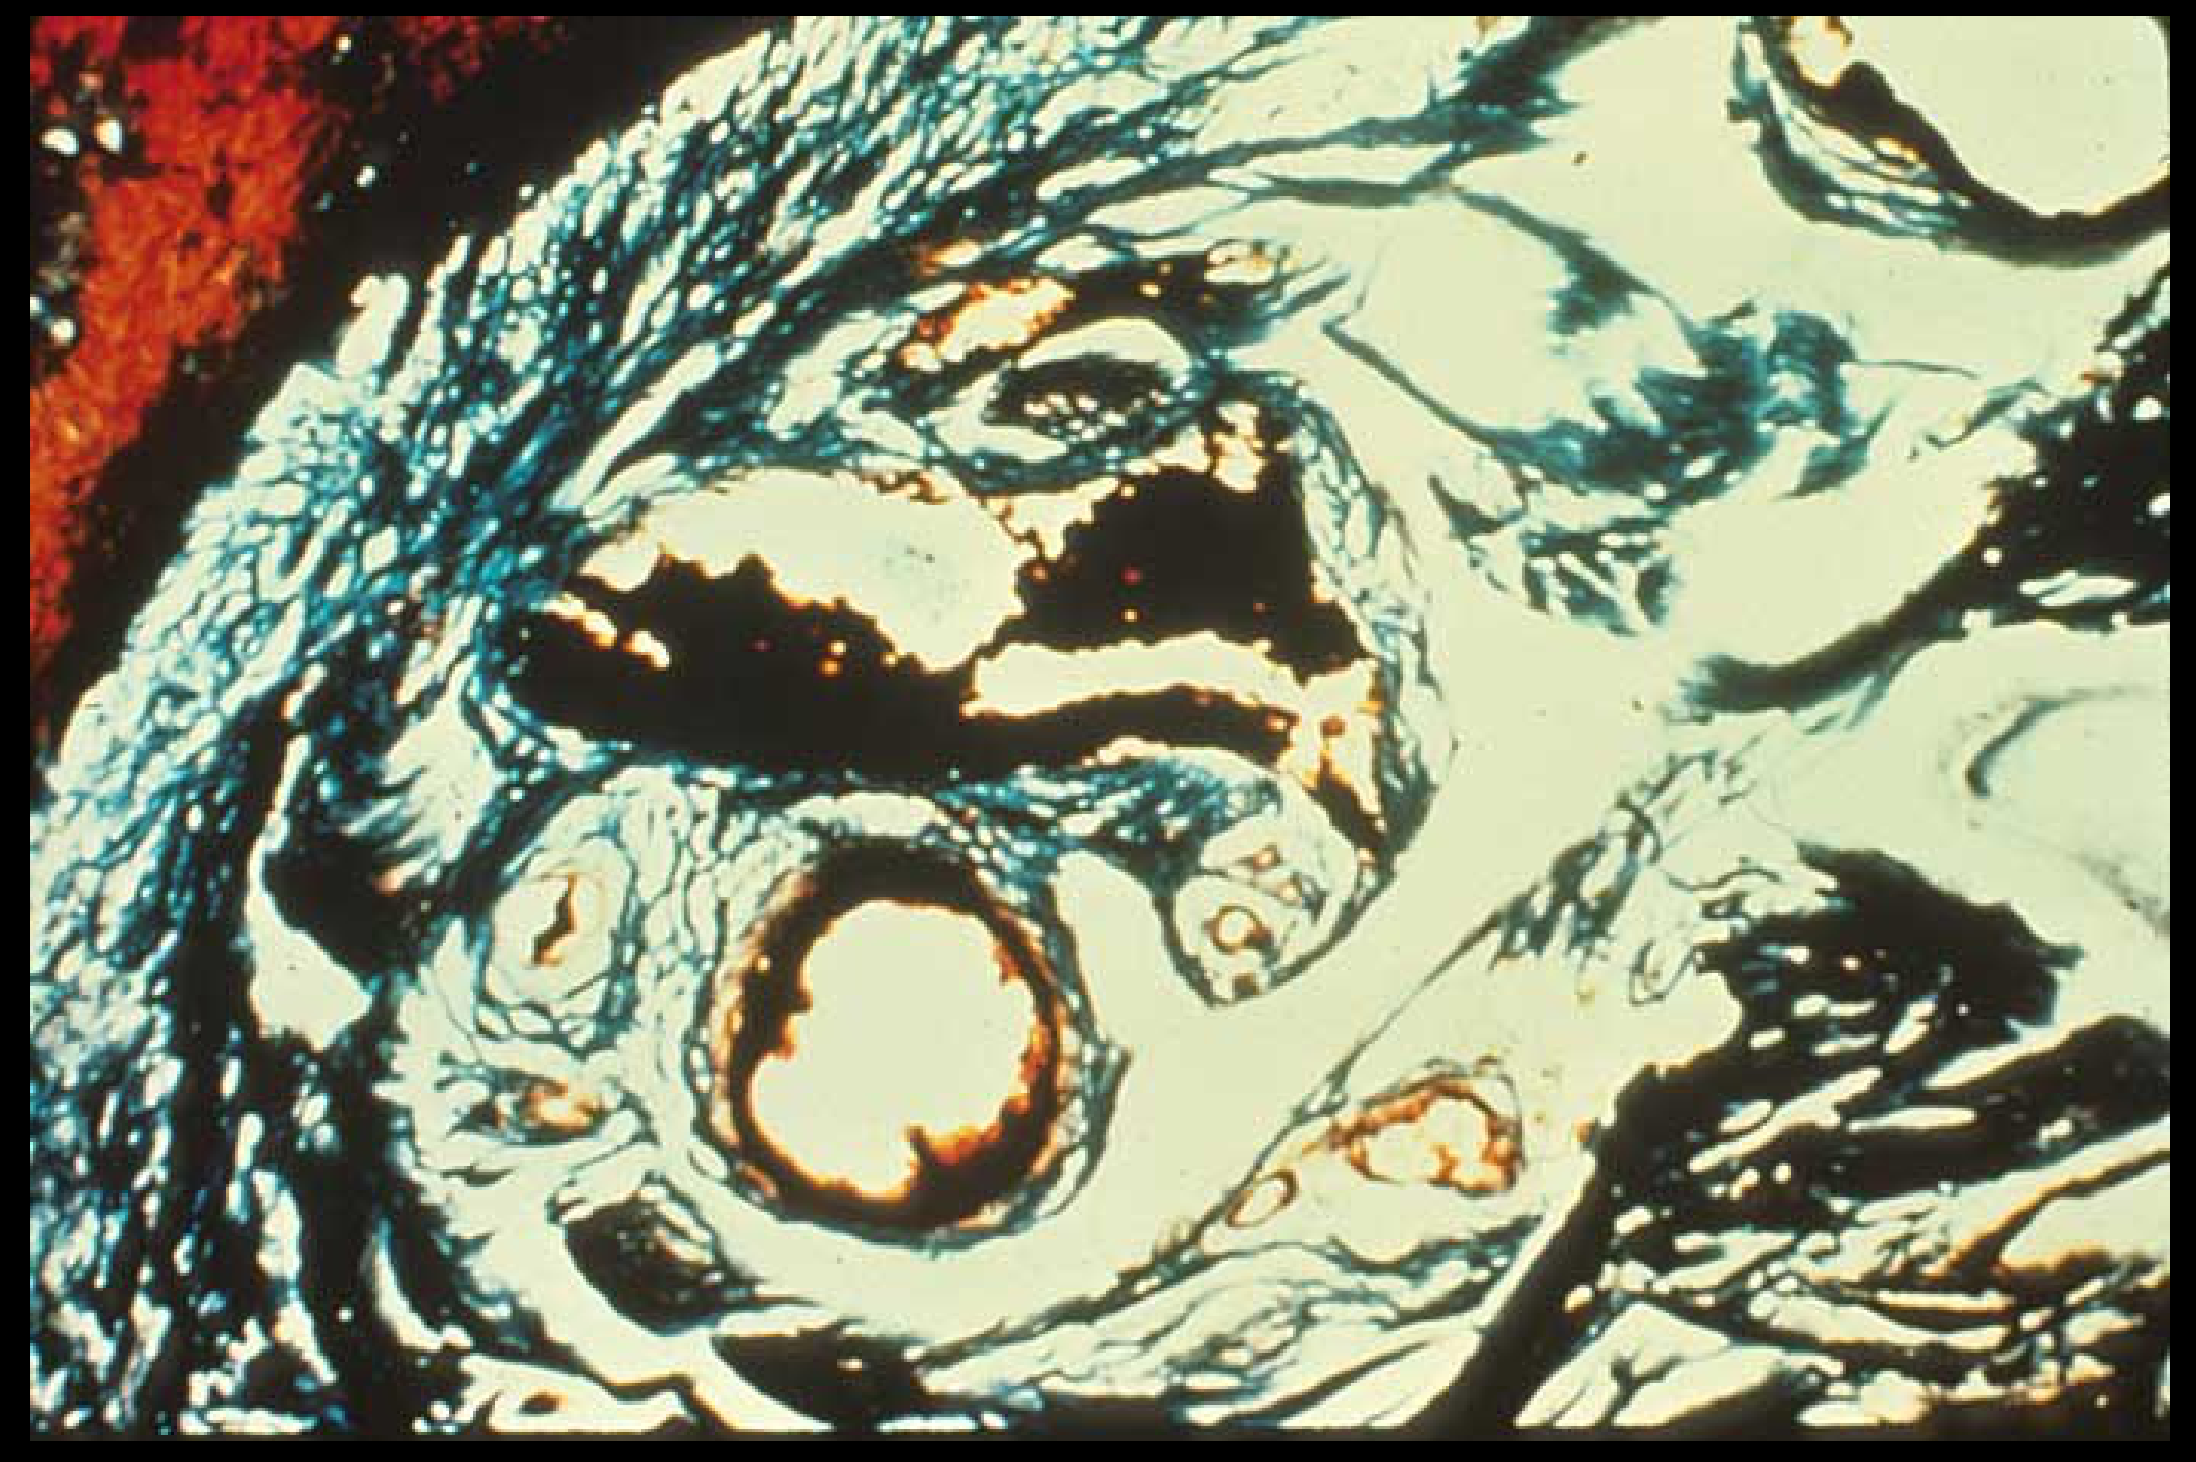
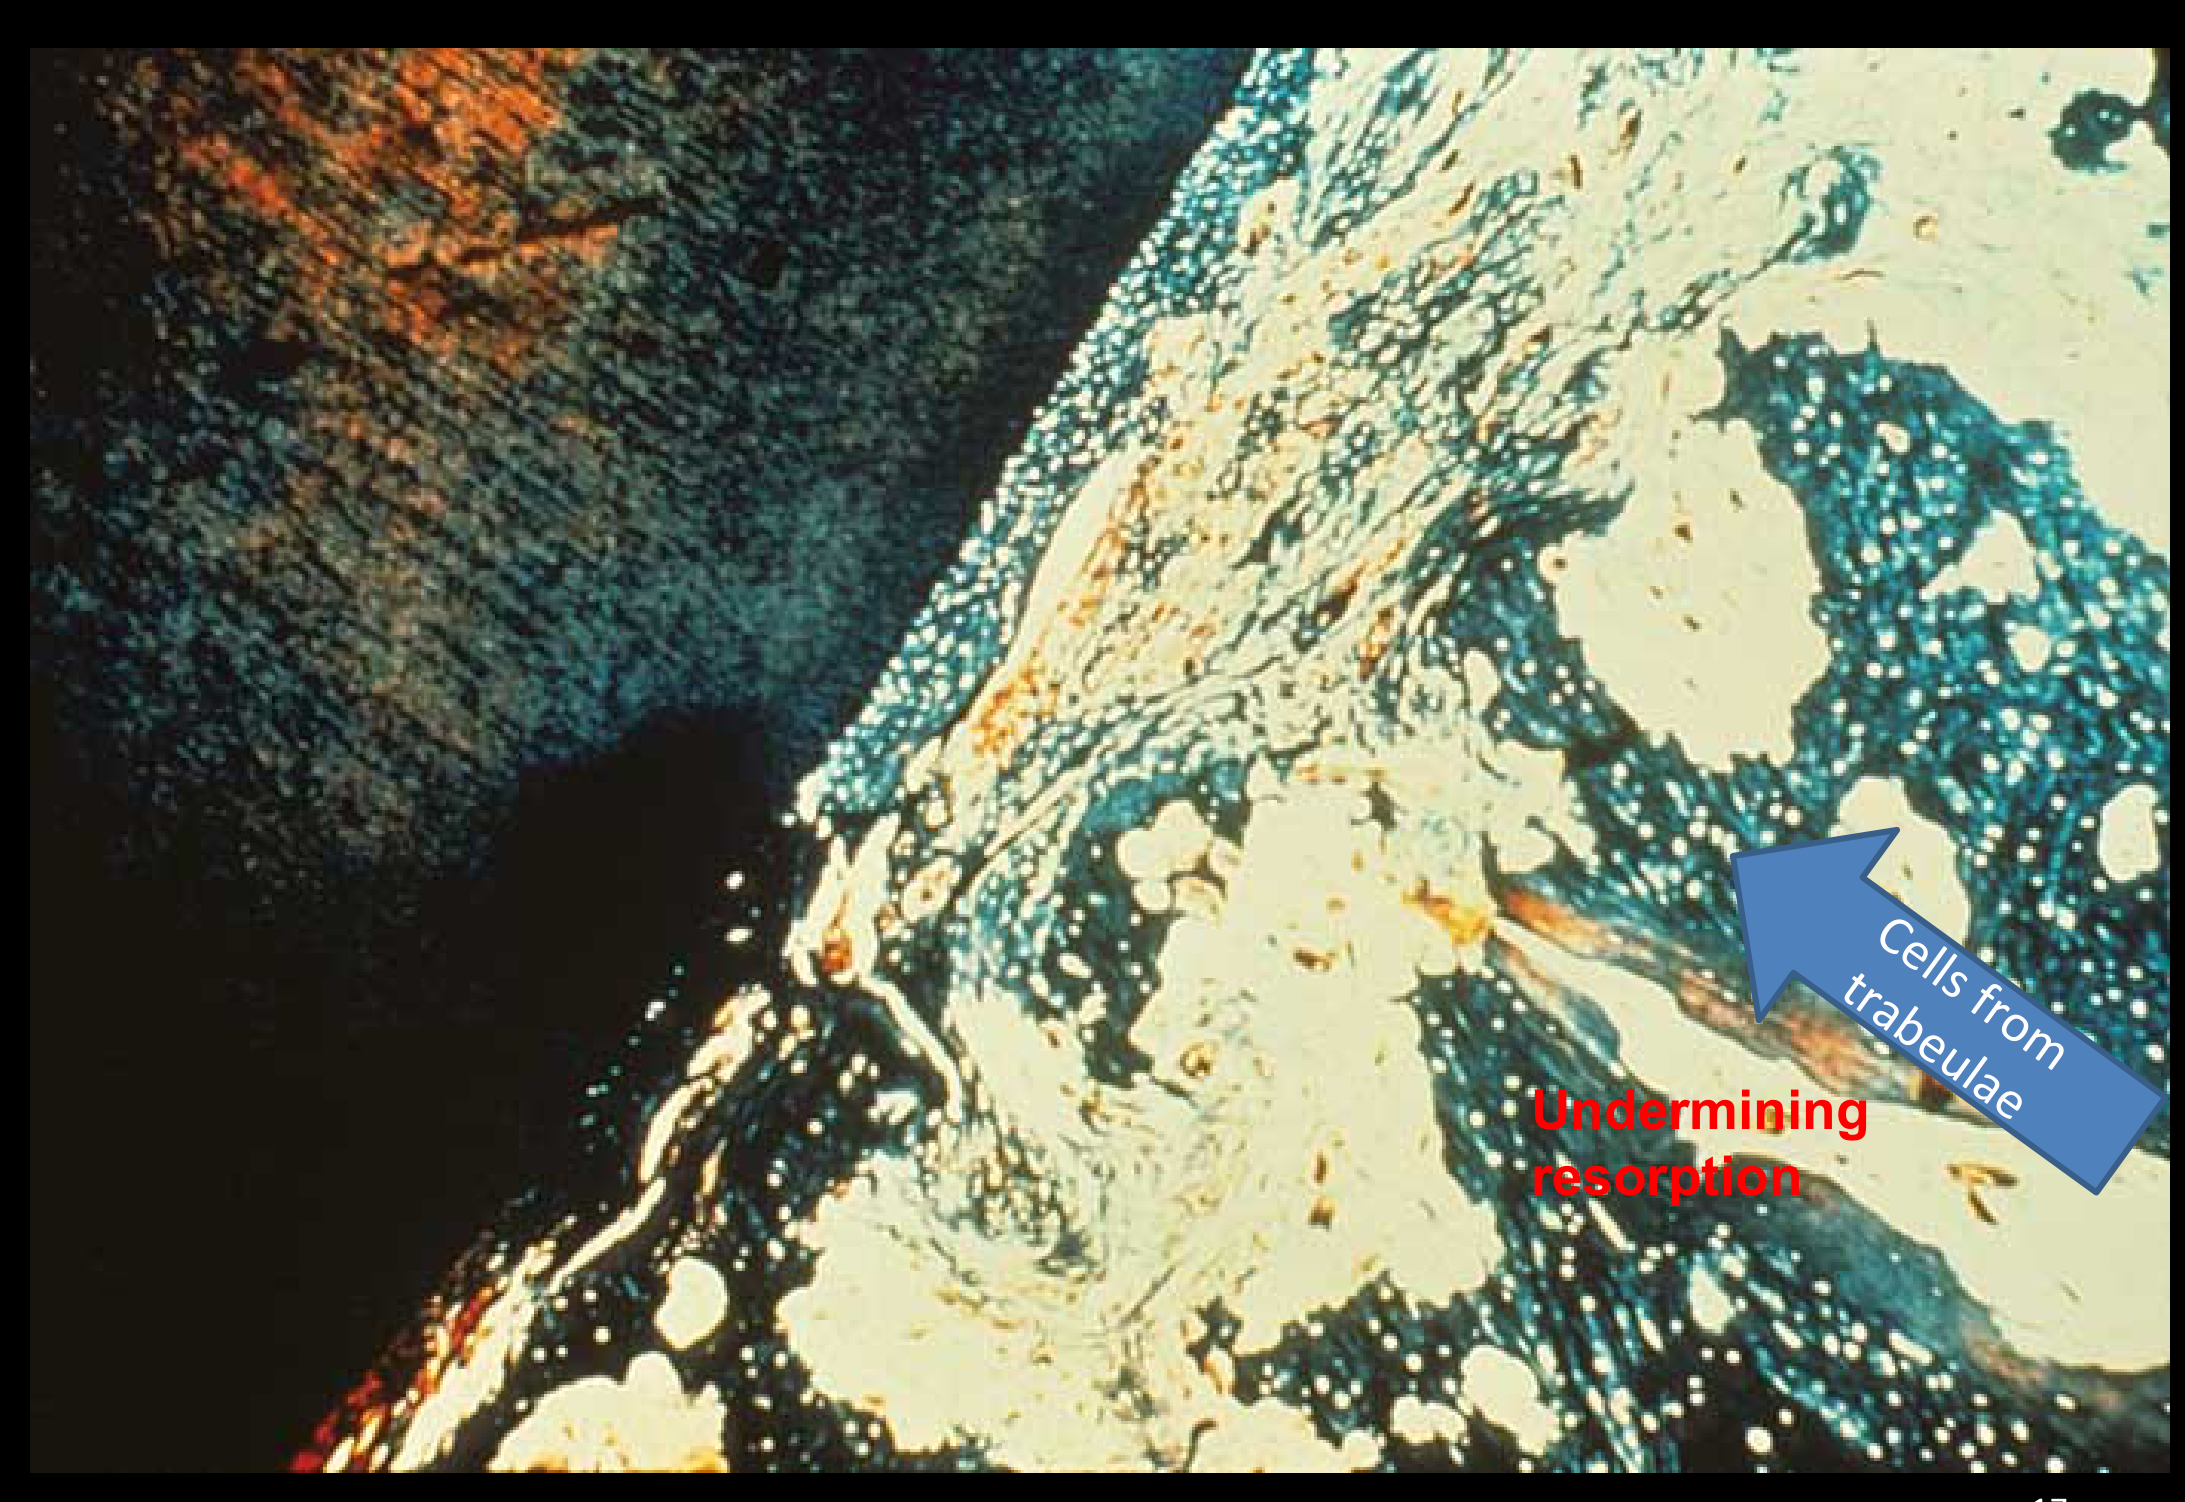
Undermining Resorption1617
- Cells from trabeculae
- PDL necrotic — no viable cells
cells from trabeculae
Lecturer — Undermining Resorption
When the periodontal ligament is completely compressed, resorption cannot proceed normally from the periodontal-ligament side. Resorption therefore proceeds through undermining resorption, with cells coming from bone rather than the periodontal ligament; this delays tooth movement while the ligament is rebuilt.
 |  |
Role of Biologic Electricity in Alveolar Bone Maintenance and Turnover18
- Discuss the role of biologic electricity in maintenance and turnover of alveolar bone.
The Piezoelectric Effect19
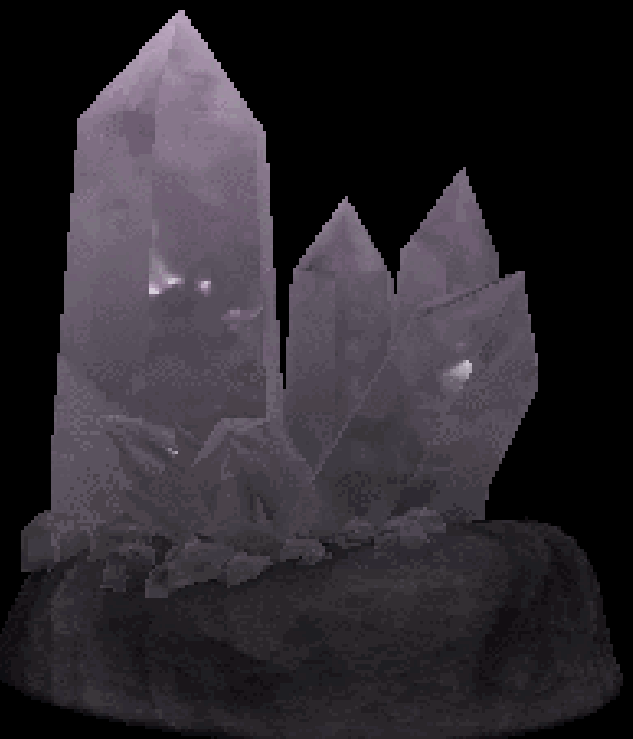
Changing the shape of a crystalline material causes an electrical current flow.
Lecturer — Piezoelectric Signaling
Rapid loading bends or loads alveolar bone and changes the orientation of electrons through its crystalline structure, producing a very small electric current. This electrical change can affect cell-membrane balance and cell differentiation before there is enough time for periodontal-ligament fluid to drain.
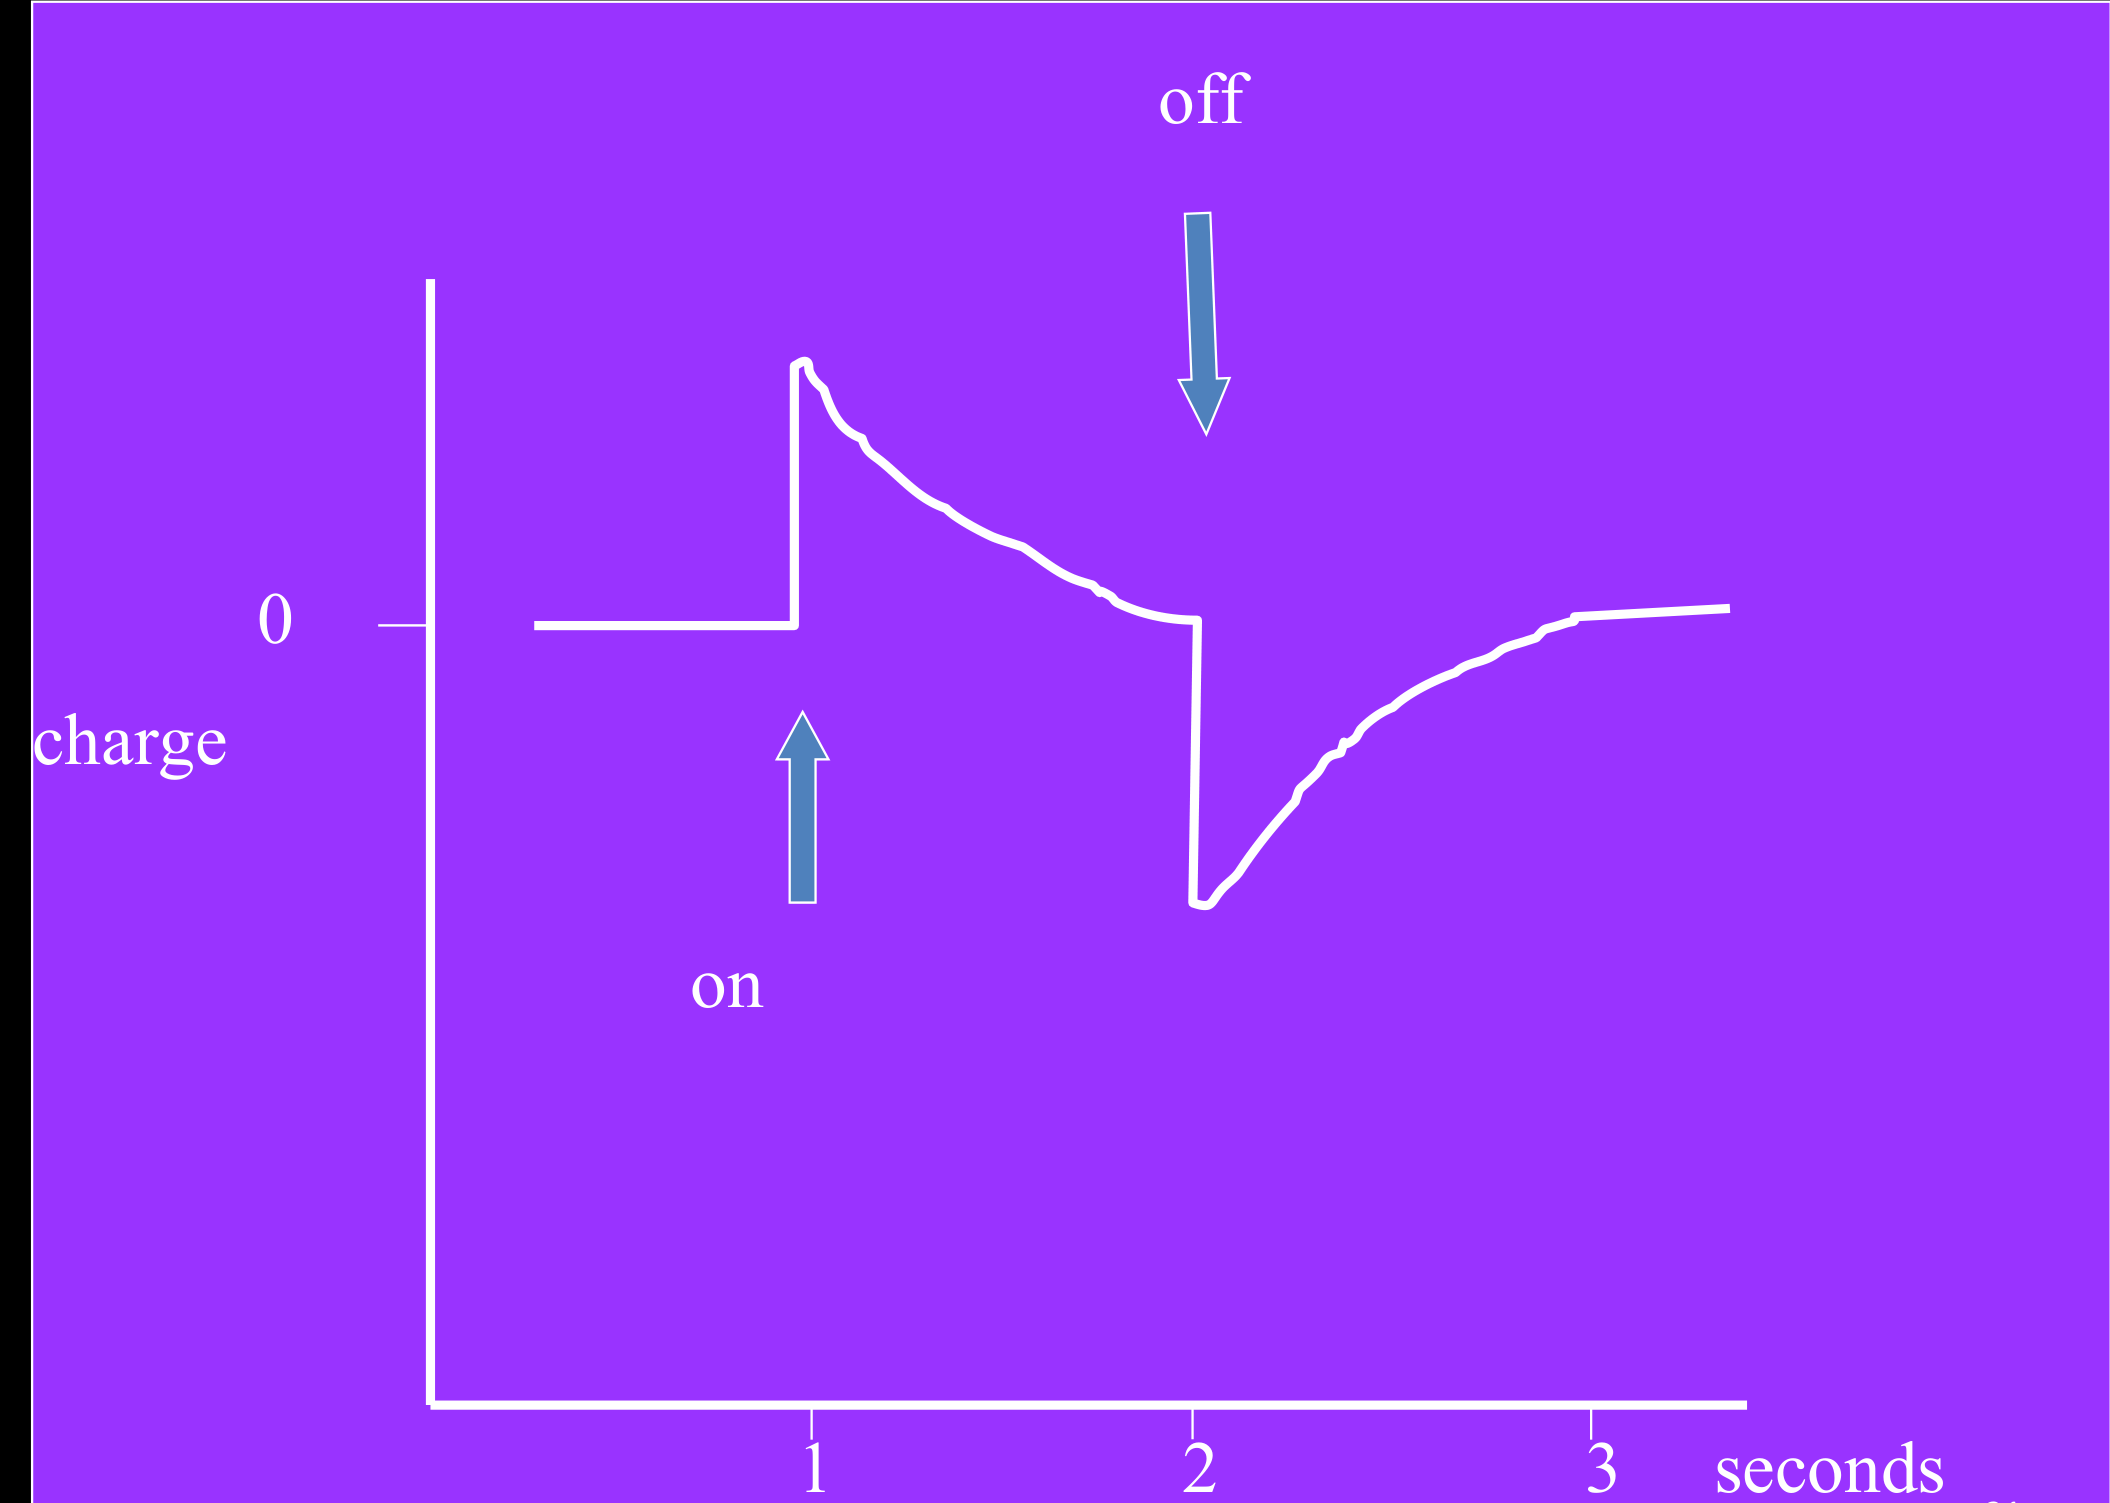
Piezoelectricity in Bone2021
Source
- Bone mineral
- Collagen
Effect
- Rhythmic pulses of electric pulses during function (chewing, walking etc.)
- Important in order to maintain mineralisation
 |  |
Periodontal Ligament as a Shock Absorber22
Time course of events: heavy biting pressure — periodontal ligament as a shock absorber
- Milliseconds — fluid incompressible in periodontal ligament
- Seconds — fluid leaking out
- < Minute — fluid gone: pain
Lecturer — Pain Medication Timing
Medication intended to reduce pain should be prescribed approximately 15 minutes before the appointment to block prostaglandin release involved in the initial pain response. Taking it several minutes after the procedure does not prevent the initial trigger.
Relationship of Orthodontic Force Levels to Anchorage23
- Describe the relationship of orthodontic force levels to anchorage.
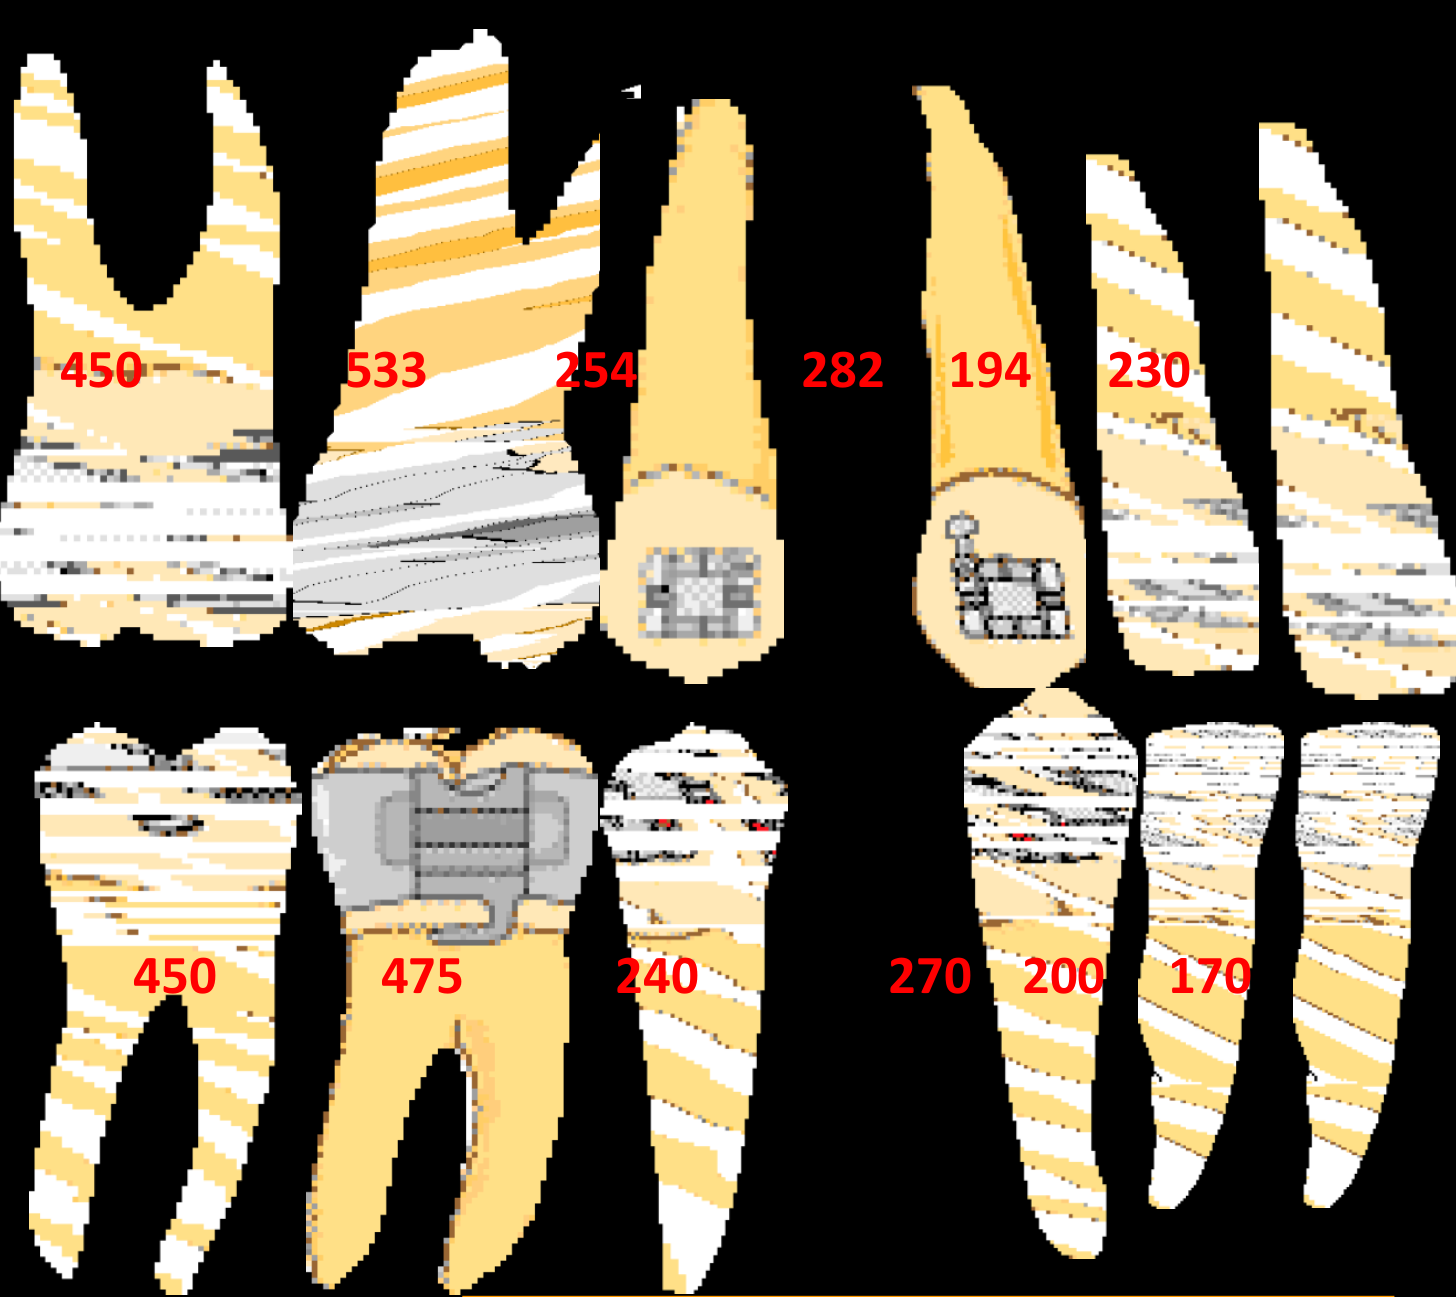
Anchorage as Resistance to Unwanted Tooth Movement2425
Anchorage: resistance to unwanted tooth movement.
450 533 254 282 194 230
450 475 240 270 200 170
Lecturer — Anchorage Units
Anchorage is quantified by root surface area, the amount of root surface covered by bone, and the periodontal-ligament surface area involved. Teeth with larger or multiple roots resist movement more, and joining several teeth increases the anchorage unit; for example, posterior teeth can be combined to retract canines and then incisors after extractions.
Types of Anchorage26272829303132
- Simple
- Reciprocal
- Reinforced
- Stationary
Simple anchorage
Reciprocal anchorage
Reinforced anchorage
Stationary anchorage
Lecturer — Anchorage Types
The anchorage types differ in how much movement is expected within the connected unit.
- Simple anchorage connects teeth with unequal resistance, so the tooth with lower anchorage moves more.
- Reciprocal anchorage connects teeth with similar resistance, so both move reciprocally.
- Reinforced anchorage adds teeth to increase resistance.
- Stationary anchorage applies force closer to the anchorage unit’s centre of resistance to encourage bodily movement and reduce its displacement.
Part 3: Mechanical Principles in Controlling Orthodontic Force
Learning Objectives for Mechanical Principles33
Be sure that you are able to:
- Define and apply the principles of anchorage in appliance design to control and minimize unwanted tooth movement.
- Describe and recognize different types of removable orthodontic appliances in the following categories: (a) functional appliances; (b) Crozat; (c) Hawley type; and (d) Clear Aligner Therapy.
- Describe and make correct appliance designs of the active Hawley type with specific recommendations for these components: (a) active; (b) retention; (c) connector; and (d) reactive or anchorage.
- Select the correct wire size for active and retentive elements of active Hawley type appliances.
- Define and explain the biomechanical principles that pertain to orthodontics, specifically the meaning of terms such as “force”, “moment”, “fulcrum”, “center of rotation”, and “anchorage” as applied to biomechanics.
- Demonstrate the relationship between wire size, strength, stiffness and the force produced for a given deflection.
- Explain the difference between tipping and bodily tooth movement, and how an applied force can produce either.
Types of Removable Orthodontic Appliances34
Describe and recognize different types of removable orthodontic appliances in the following categories:
- (a) functional appliances
- (b) Crozat
- (c) Hawley type
- (d) Clear Aligner Therapy
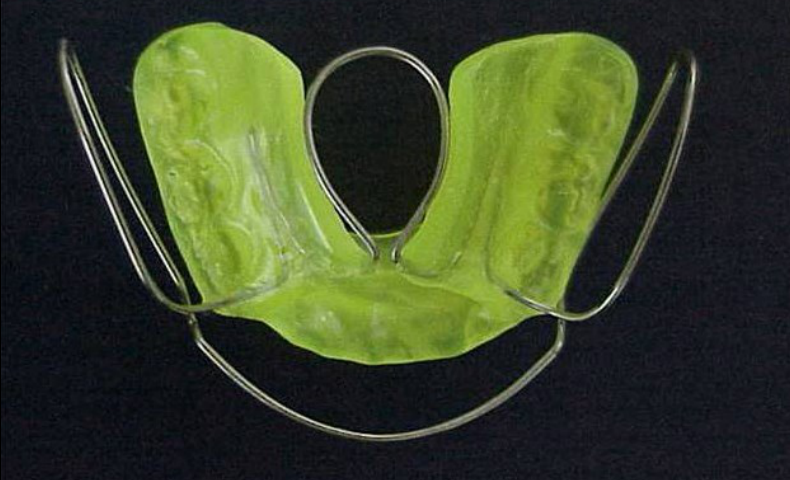 | 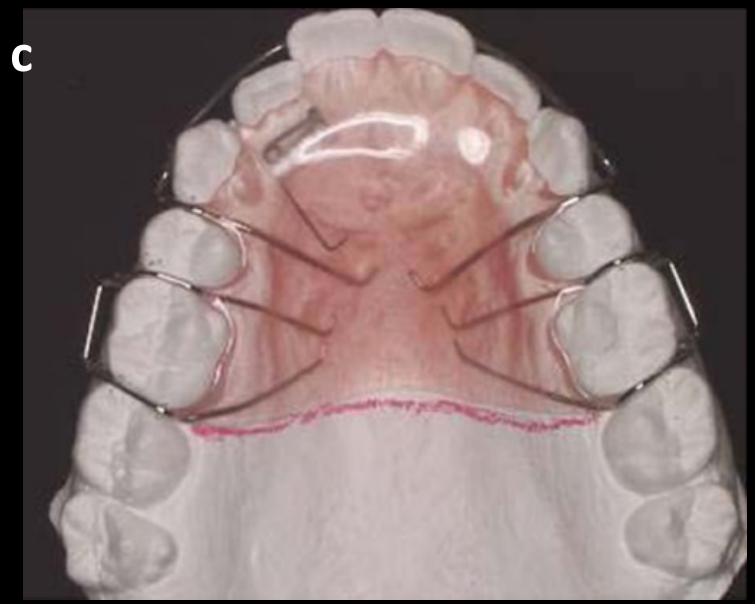 |
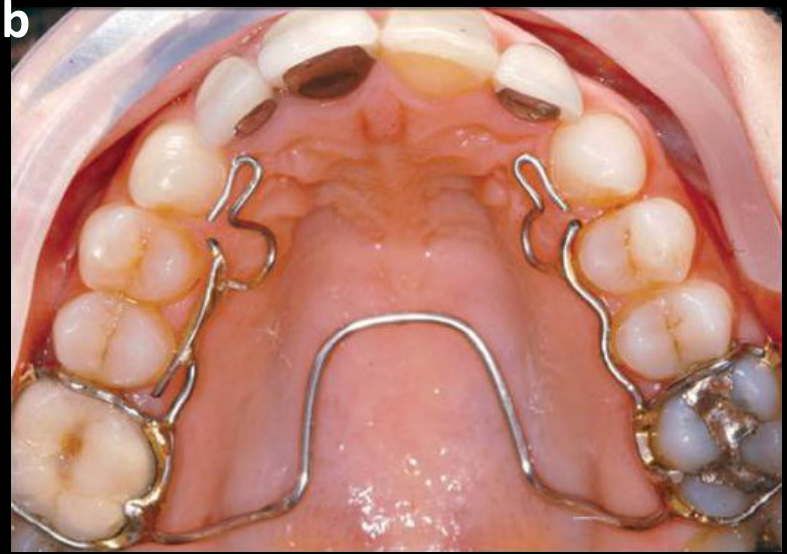 | 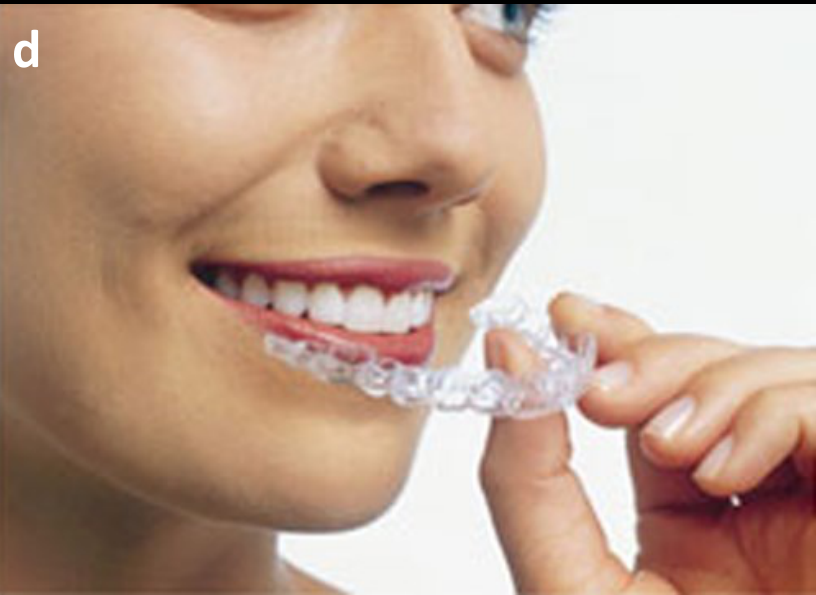 |
Designing the Active Hawley Appliance35
Describe and make correct appliance designs of the active Hawley type with specific recommendations for these components: (a) active; (b) retention; (c) connector; and (d) reactive or anchorage.
Select the correct wire size for active and retentive elements of active Hawley type appliances:
- Lab Bow: 0.7–0.8 mm
- Adams clasp: molars 0.7 mm; premolars 0.6 mm
- Finger spring: guarded 0.6 mm; unguarded 0.7 mm
- Ball clasp: 0.7 mm
- C clasp: 0.7 mm
Lecturer — Finger Spring Design
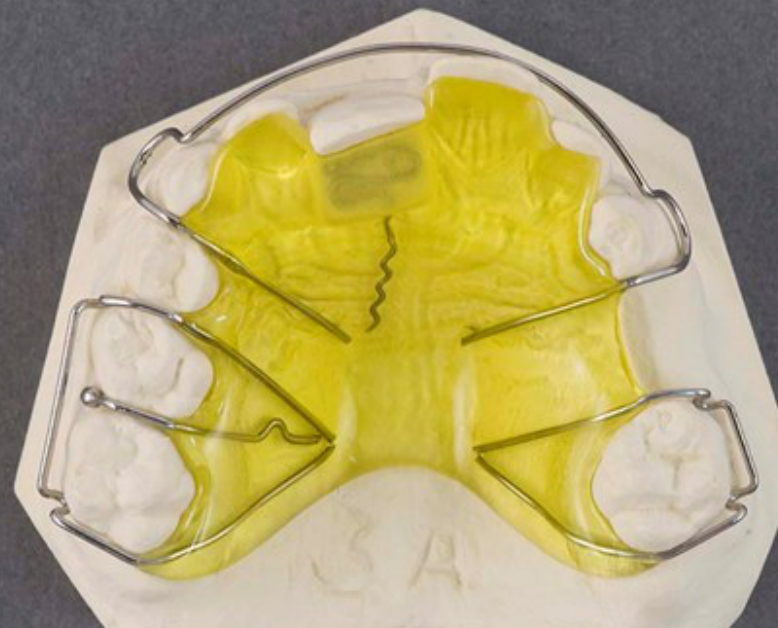
The active Hawley appliance described was designed to correct an anterior crossbite of a central incisor.
- The finger spring may be positioned beneath or outside the acrylic and contains two helices.
- Activation involves pulling the relevant wire segment downward toward the cervical part of the incisor.
- Stainless steel is used because nickel-titanium wire cannot be bent to produce this design.
- A smaller 0.6 or 0.7 mm stainless-steel wire increases resilience and allows force release over a longer period.
- Patients are usually reviewed every second week so that the spring can be reactivated.
Biomechanical Principles: Force, Moment, and Anchorage
Define and explain the biomechanical principles that pertain to orthodontics, specifically the meaning of terms such as “force”, “moment”, “fulcrum”, “center of rotation”, and “anchorage” as applied to biomechanics.
Force and Point of Application36
- Force — that action of one body on another body which causes or tends to cause a change in shape or motion or both of the second body; measured in g or g/cm²
- Point of application (where)
- Magnitude (size, Newtons)
- Sense (direction)
Centre of Resistance37
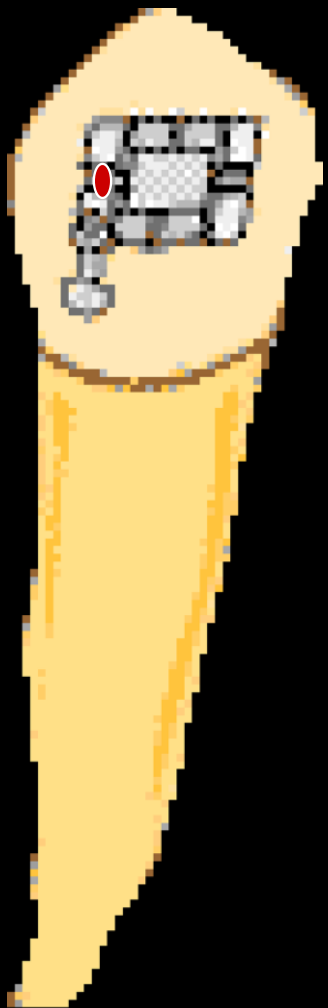
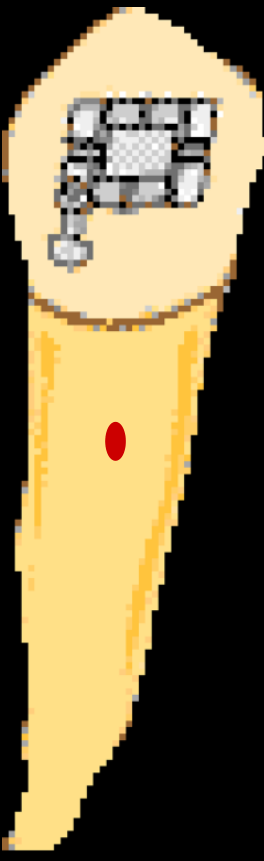
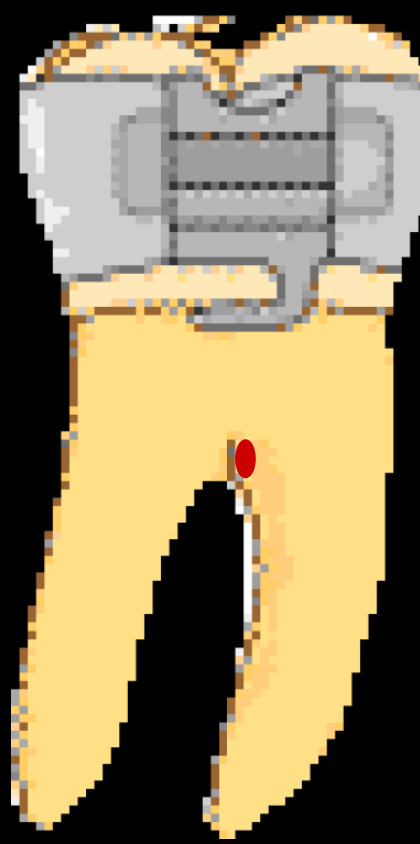
To complete the description of a force, we need to define it in relation to the centre of resistance of the tooth.
- Burstone: from the apex, usually 2/3 of the root length and just above the furcation on molars.
 |  |
Moments and Couples38394041
-
Moment = tendency to rotate
-
Couple = two equal and opposite, non-colinear, parallel forces
- Pure rotation around the centre of rotation (CR)
Figure: four 10 g forces shown acting on the tooth.
Moment = F × d (g.mm)
Figure: force F applied at distance d from the centre of resistance — uncontrolled tipping.
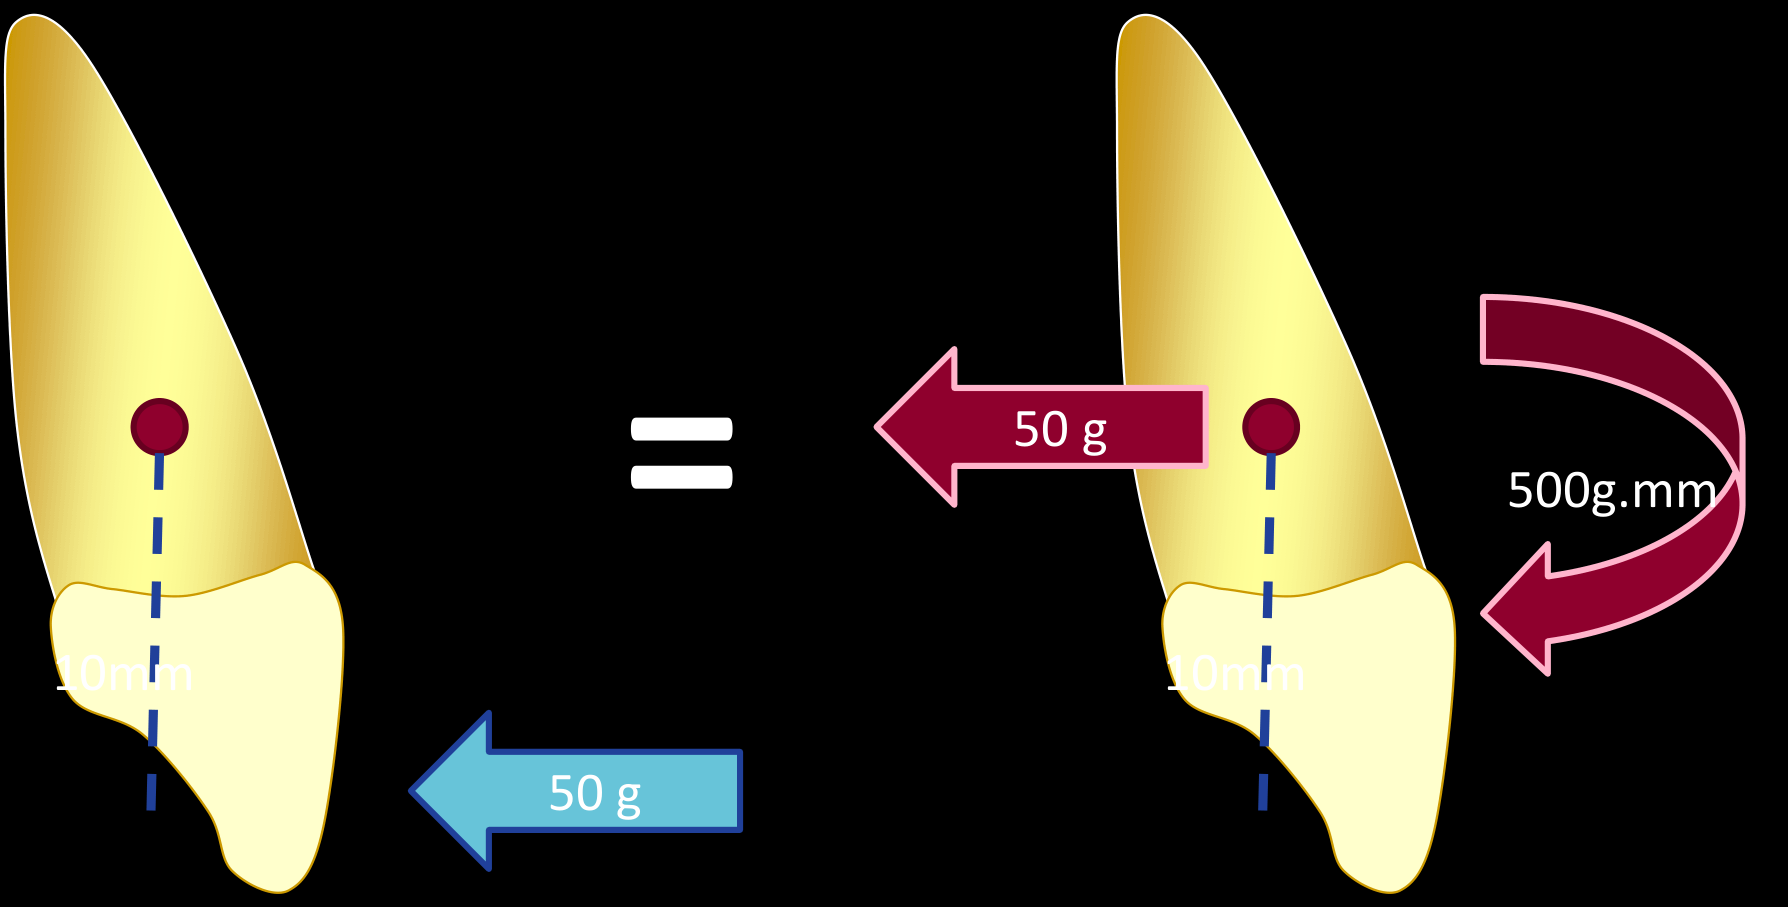
Applying Couples for Tooth Movement424344
How do we apply couples?
Bodily movement:
- Moment = F × d (g.mm)
- Equal couple, opposite direction
A force applied at the centre of resistance produces compression. Add this couple (a force with a couple) — what will happen?
Lecturer — Controlling Tipping
Applying force at the bracket rather than at the centre of resistance produces uncontrolled tipping, with one region of the periodontal ligament compressed and the opposite region placed under tension.
- A rectangular wire engaged in a rectangular bracket slot produces an additional moment.
- Twisting the wire or incorporating torsion in the bracket creates an opposing moment, allowing bodily movement without placing the bracket at the centre of resistance.
- A more controlled movement produces compression on one side and traction on the other.
Centre of Rotation45464748
- Another method to describe tooth movement
Uncontrolled tipping
Lecturer — Centre of Rotation
The centre of rotation is the point that does not move during a particular tooth movement, whereas the centre of resistance is the point through which a force would produce bodily movement.
- During controlled tipping, the centre of rotation is positioned near the apex of the incisor.
- The amount of torque must be individualized because a central incisor requires a different amount of torque from a lateral incisor.
Wire Size, Strength, Stiffness, and Deflection
Demonstrate the relationship between wire size, strength, stiffness and the force produced for a given deflection.
Effect of Changing Wire Size49
if you double the diameter of the wire:
- 8 times as STRONG
- 16 times as STIFF
- Will bend ½ as far
Lecturer — Wire Resilience
Stainless steel is relatively stiff, so loops and helices are incorporated to increase the length of wire available for bending.
- A 0.6 mm stainless-steel wire provides greater resilience than a thicker wire and can be compressed and released without a permanent bend.
- Rectangular wires such as 16 × 22, 19 × 25, and 21 × 25 engage differently in the bracket slot.
- Increasing the thickness of a rectangular wire increases torque or rotational control, whereas round wire does not fully engage the rectangular slot.
Effect of Changing Wire Length50
if you make a finger spring twice as long:
- 1/2 as STRONG
- 8 times as springy
- Will bend 4 times as far
Lecturer — Spring Construction
Orthodontic springs use multiple loops or helices and reduced-diameter stainless-steel wire to provide greater resilience and a more sustained release of force.
- If wire length is increased while diameter is reduced, stiffness is reduced further and resilience is increased.
- The objective is to produce a spring that can release an appropriate force over a longer period.
Summary of Mechanical Principles51
Be sure that you are able to:
- Define and apply the principles of anchorage in appliance design to control and minimize unwanted tooth movement.
- Describe and recognize different types of removable orthodontic appliances in the following categories: (a) functional appliances; (b) Crozat; (c) Hawley type; and (d) Clear Aligner Therapy.
- Describe and make correct appliance designs of the active Hawley type with specific recommendations for these components: (a) active; (b) retention; (c) connector; and (d) reactive or anchorage.
- Select the correct wire size for active and retentive elements of active Hawley type appliances.
- Define and explain the biomechanical principles that pertain to orthodontics, specifically the meaning of terms such as “force”, “moment”, “fulcrum”, “center of rotation”, and “anchorage” as applied to biomechanics.
- Demonstrate the relationship between wire size, strength, stiffness and the force produced for a given deflection.
- Explain the difference between tipping and bodily tooth movement, and how an applied force can produce either.
Part 4: Orthodontic Anchorage and Controlled Tooth Movement
Be sure that you are able to:
- Describe the reaction of a tooth to a single force placed against the crown.
- Describe the reaction of a tooth to a two-force system placed against the crown as a function of the moment-to-force ratio.
- Indicate the changes in orthodontic forces and moments needed for successful movement of a tooth that has lost alveolar bone support (as from previous periodontal disease).
- Describe the adaptations in the contemporary edgewise appliance to reduce in-out (first order) bends in arch wires.
- Describe the adaptations in the contemporary edgewise appliance to reduce angulation (second order) bends in arch wires.
- Describe the adaptations in the contemporary edgewise appliance to reduce torque (third order) bends in rectangular arch wires.
Lecturer — Tooth Force Systems
A single force applied away from the centre of resistance produces a moment and causes tipping. A couple uses opposing forces to generate a controlled rotational effect.
- Rectangular wires engaged in rectangular slots create a couple that can counteract the tipping moment.
- The combination of the bracket force and the opposing moment can produce bodily movement.
- Compression occurs on one side of the periodontal ligament, while traction occurs on the opposite side.
Tooth Response to Single and Two-Force Systems52
DONE
Force Adjustments for Teeth With Reduced Bone Support53
- Indicate the changes in orthodontic forces and moments needed for successful movement of a tooth that has lost alveolar bone support (as from previous periodontal disease).
- Lighter forces
- Biological
- Larger couples
Lecturer — Reduced Bone Support
Periodontal bone loss moves the centre of resistance apically, increasing the distance between the bracket and the centre of resistance. Applying the same force at the bracket therefore produces a larger moment and a greater rotational effect.
- The force must be individualized according to the remaining bone support.
- Progressively lighter forces are used in patients undergoing periodontal treatment.
Design of the Straightwire Appliance54
-
Describe the adaptations in the contemporary edgewise appliance to reduce in-out (first order) bends in arch wires.
-
Describe the adaptations in the contemporary edgewise appliance to reduce angulation (second order) bends in arch wires.
-
Describe the adaptations in the contemporary edgewise appliance to reduce torque (third order) bends in rectangular arch wires.
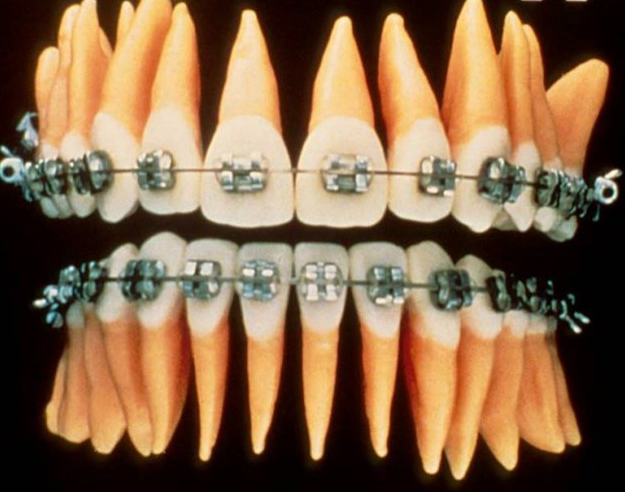
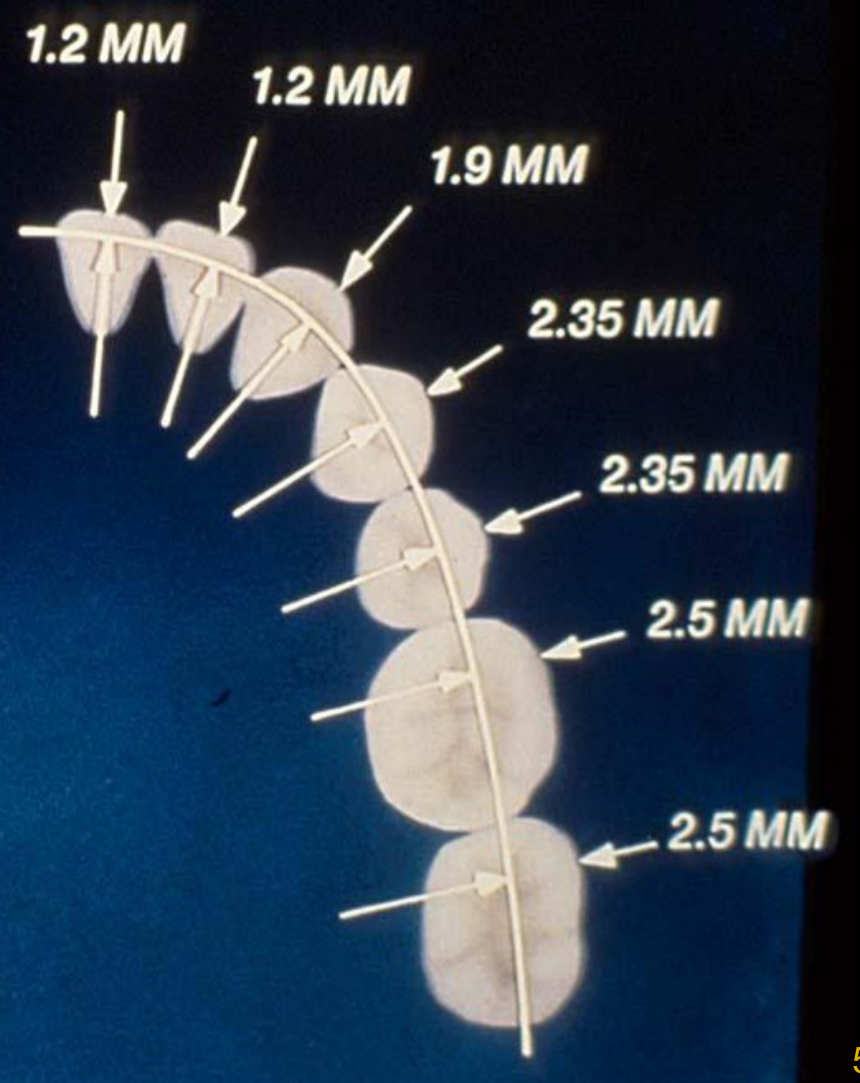
First Order: Reducing In-Out Bends55
- Describe the adaptations in the contemporary edgewise appliance to reduce in-out (first order) bends in arch wires.
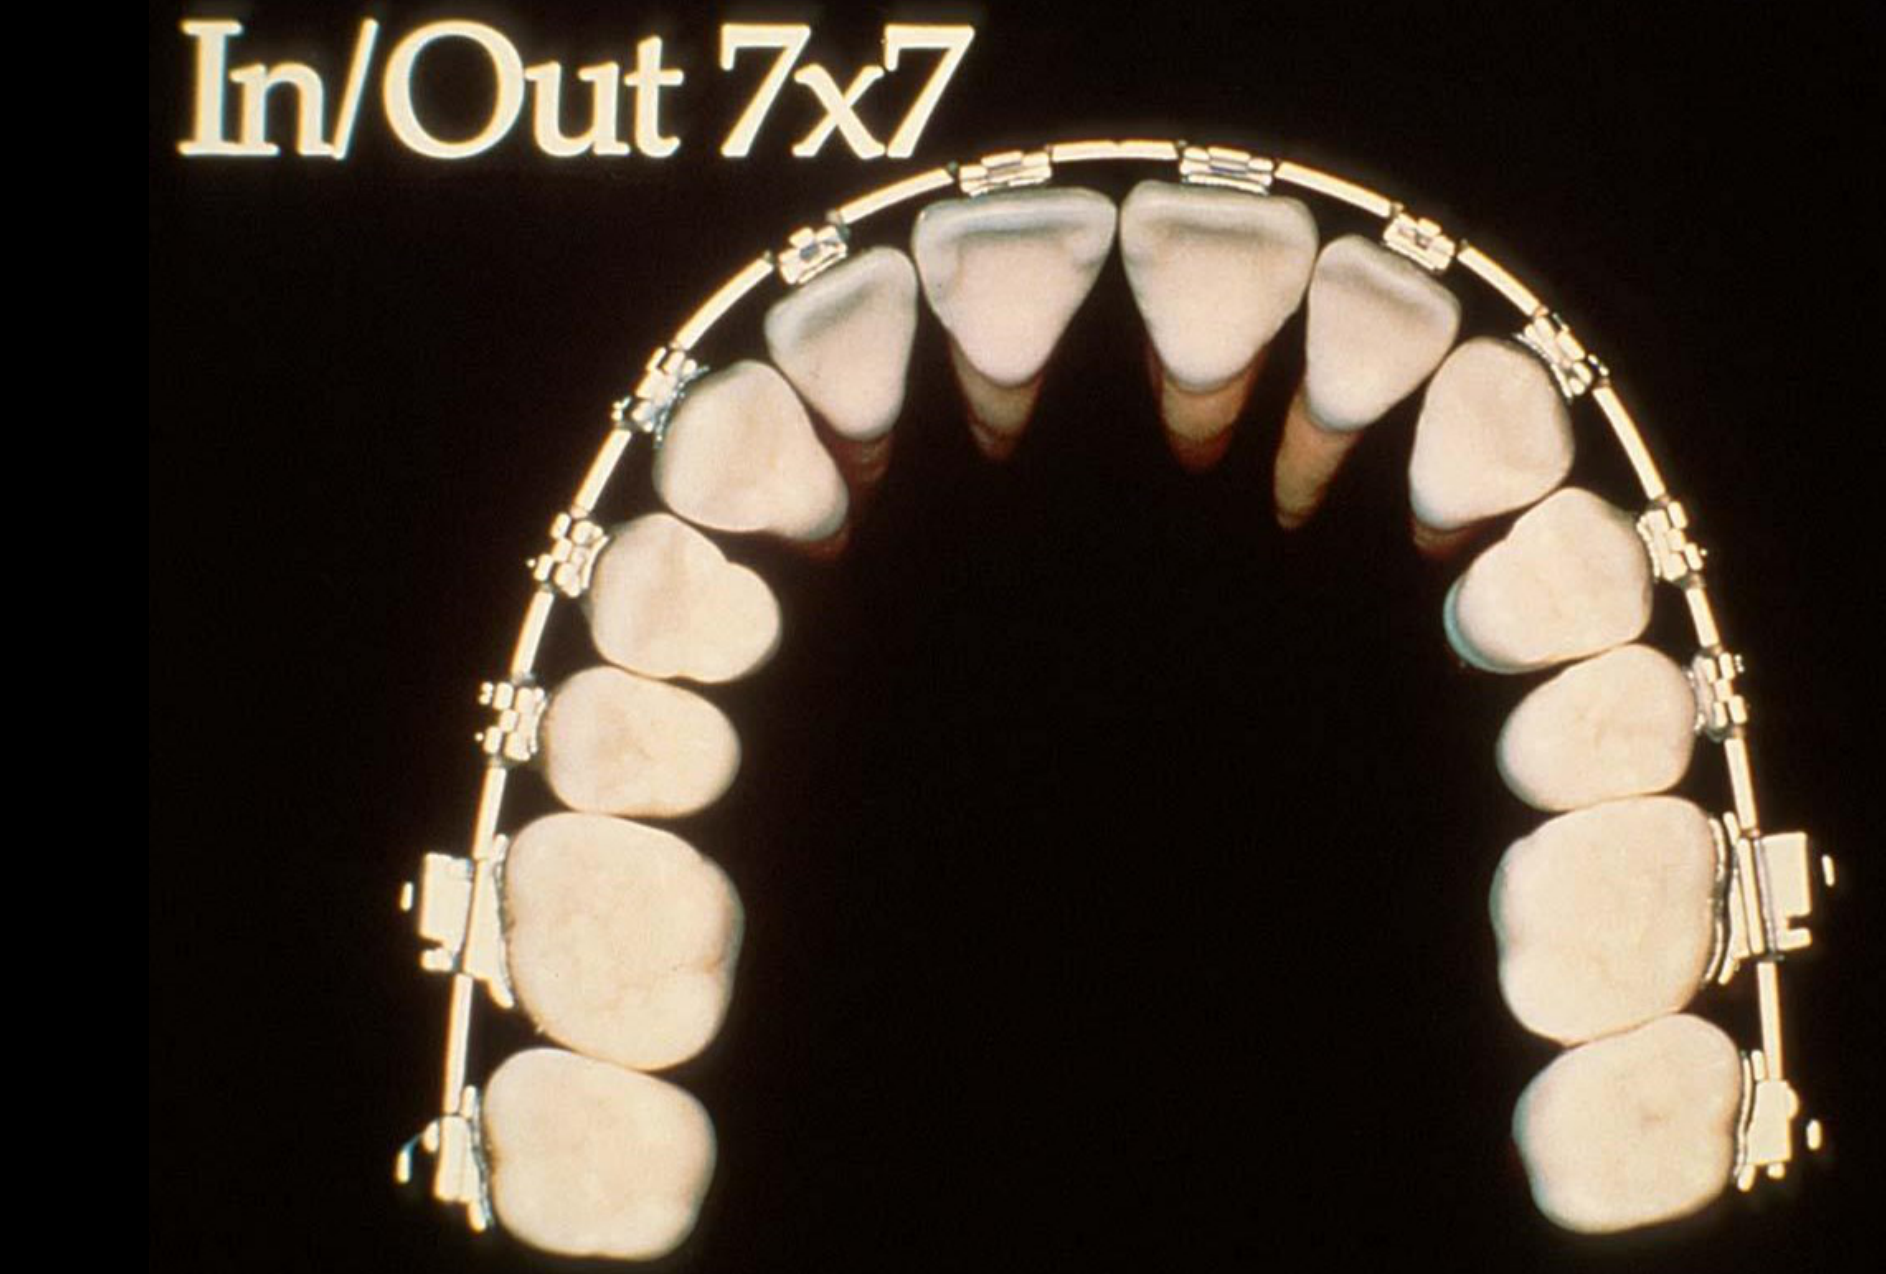
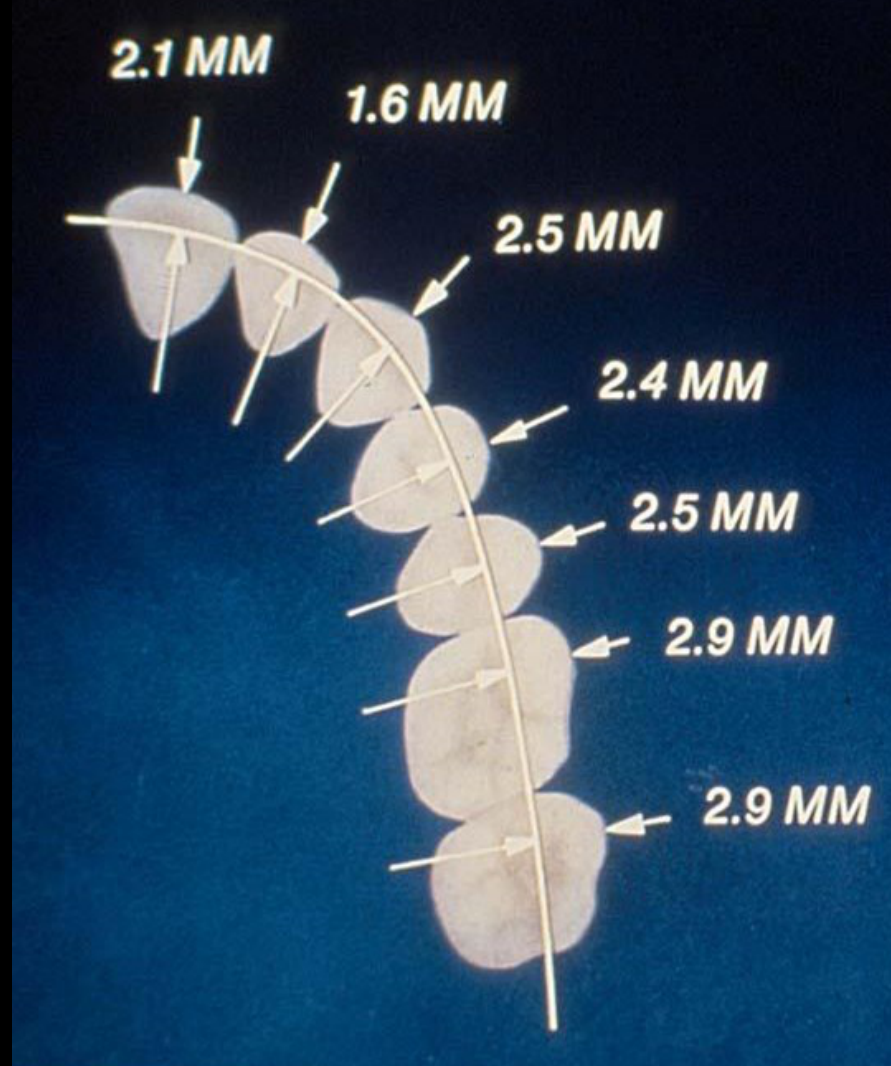
Precise In/Out Measurements56
- Describe the adaptations in the contemporary edgewise appliance to reduce in-out (first order) bends in arch wires.
Lecturer — Straightwire Design
A straightwire appliance allows the wire to be used with no routine bends because much of the required individualization is built into the brackets and tubes. These compensations reflect differences in the position and thickness of the teeth across the arch, although individual bends may still be needed during finishing.
Lecturer — First-Order Compensation
First-order bends compensate for differences in the buccolingual position of the teeth. In a parabolic arch, the distance between the wire and the brackets changes across the arch, so the bracket base or molar tube incorporates features such as a lateral-incisor inset and canine and first-molar offsets.
 |  |
Second Order: Reducing Angulation Bends
- Describe the adaptations in the contemporary edgewise appliance to reduce angulation (second order) bends in arch wires.
Lecturer — Second-Order Angulation
Second-order bends relate to the mesiodistal inclination of teeth, and the corresponding angulation is incorporated into the bracket system. The bracket slot therefore contains a specific angulation rather than zero angulation, although finishing adjustments remain necessary when the standard value is not exact for an individual patient.
Standard Angulations57
- 90°
- 5° 5° 2° 2° 11° 9° 5°
- 2° 2° 2° 2° 5° 2° 2°
- 90°
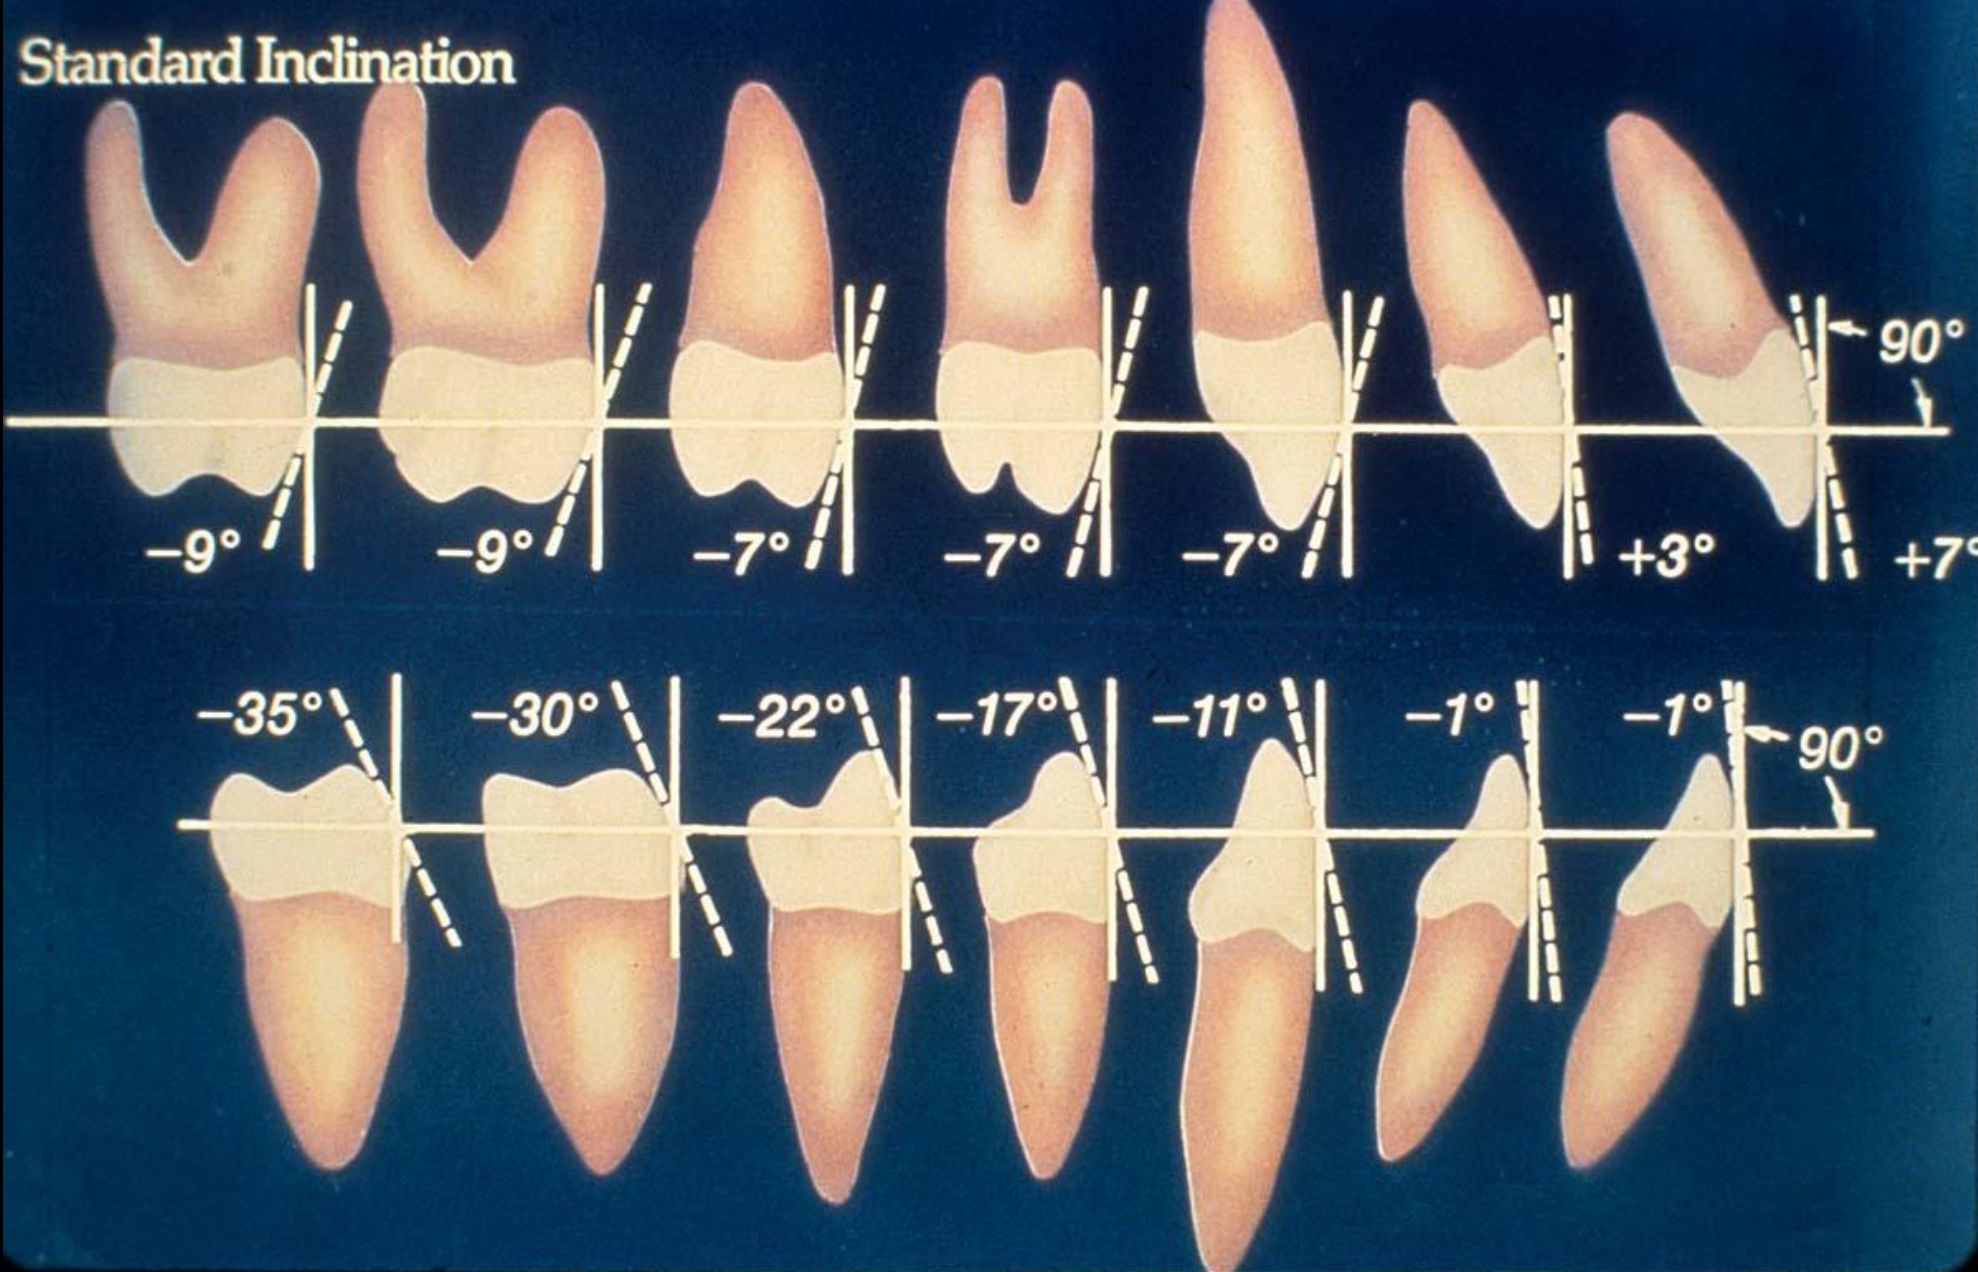
Lecturer — Third-Order Torque
Third-order bends control the rotational relationship between the tooth and rectangular archwire. Torque can be added by twisting the archwire or built into the bracket; rectangular wires are needed because round wires cannot adequately engage the slot to control torque.
- Different rectangular wire sizes provide different levels of engagement and torque control.
- The amount of torque is individualized according to the type of tooth, its anchorage, and the desired movement.
- Straightwire brackets incorporate third-order torque, although case-specific finishing bends may still be required.
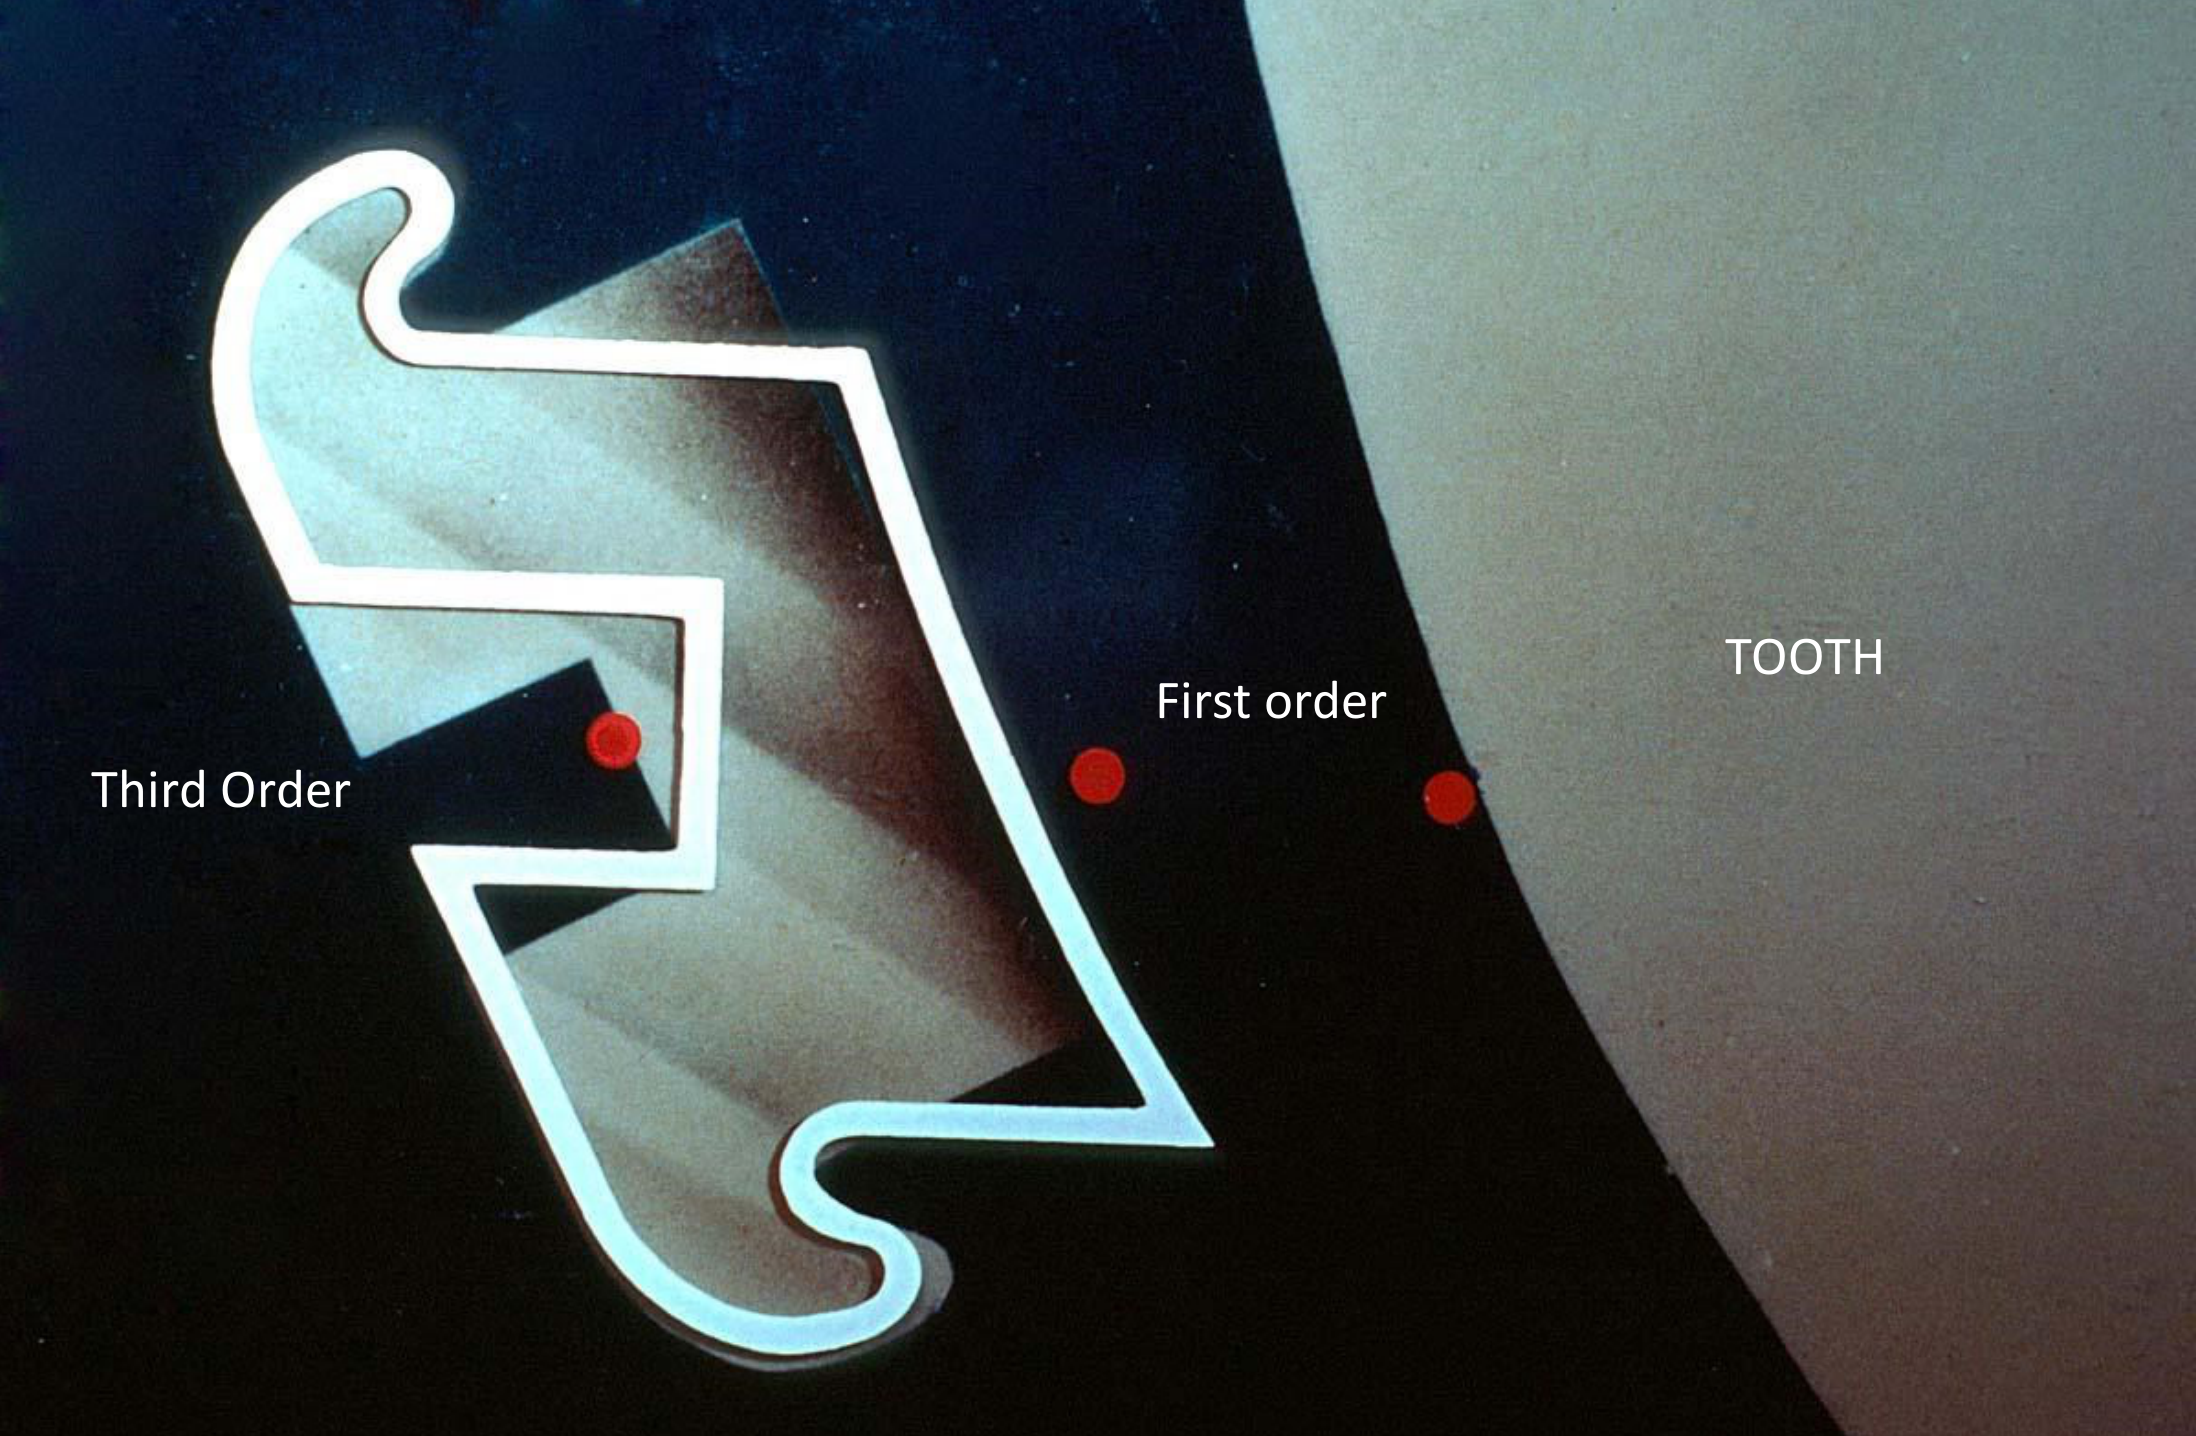
Third Order: Reducing Torque Bends5859
- Describe the adaptations in the contemporary edgewise appliance to reduce torque (third order) bends in rectangular arch wires.
- -9° -9° -7° -7° -7° +3° +7° 90°
- -35° -30° -22° -17° -11° -1° -1° 90°
Third Order
First order
TOOTH
 |  |
Clinical Cases
Case: Histological micrographs of PDL necrosis and undermining resorption
Question
Scenario: Histological micrographs are presented to illustrate the tissue response of the periodontal ligament (PDL) and alveolar bone to heavy orthodontic forces.
What’s shown: Tissue sections showing the PDL and bone, with specific inking highlighting areas of pressure, squished PDL tissue, and bone resorption.
Consider: Identify the histological features visible in the micrographs and explain how they relate to the biological response to heavy orthodontic force.
Answer
Observations:
- Specific inking highlights an area where blood vessels have been completely shut off due to heavy pressure.
- The PDL is completely squished with no viable cells remaining.
- Undermining resorption of the adjacent bone is visible.
Reasoning: Heavy orthodontic pressure causes a total shut-off of blood flow, leading to sterile necrosis (hyalinization) of the PDL. Because the differentiated cells within the PDL are destroyed, direct bone resorption cannot occur. Instead, cells must be recruited from the bone itself to perform undermining resorption, which takes significantly more time and delays tooth movement.
Takeaway: Heavy orthodontic forces can cause sterile necrosis (hyalinization) of the PDL due to blood vessel shut-off, necessitating undermining resorption and significantly delaying tooth movement; therefore, force levels must be carefully controlled to prevent this.
Case: Removable appliance design for anterior crossbite
Question
Scenario: A removable orthodontic appliance is presented as an example of correct appliance design to illustrate its components and biomechanics.
What’s shown: A removable appliance featuring an acrylic plate, various clasps, and a spring positioned underneath the acrylic.
Consider: Identify the components of the appliance, explain how it achieves its corrective effect and retention, and describe the material and activation of the spring.
Answer
Observations:
- The appliance includes an Adams clasp, a ball clasp, and a Hawley-type clasp.
- A finger spring with two helices is located underneath the acrylic plate.
- The spring is fabricated from 0.6 or 0.7 mm stainless steel wire.
- The device is designed to correct an anterior crossbite of a central incisor.
Reasoning:
- The spring applies the corrective force when activated by pulling the wire down onto the cervical part of the incisor.
- Stainless steel is used instead of NiTi because it can be bent to achieve the required design and provides the resilience needed to release a more constant force over time.
- Retention is achieved by the clasps engaging the teeth (e.g., the Adams clasp typically engages the first molars, while a lab bow clasp engages the canines and central incisors) to keep the plate in position against the active force of the spring.
- If a patient has an increased overjet with flared incisors, the lab bow can be activated to retrocline them, provided the posterior retention is adequately balanced so the plate does not dislodge during function.
Outcome:
- The patient is reviewed every second week to reactivate the spring.
Takeaway:
- When designing a removable appliance, the active force generated by the spring must be carefully balanced with adequate retention from the clasps to ensure the device remains securely in place during function.
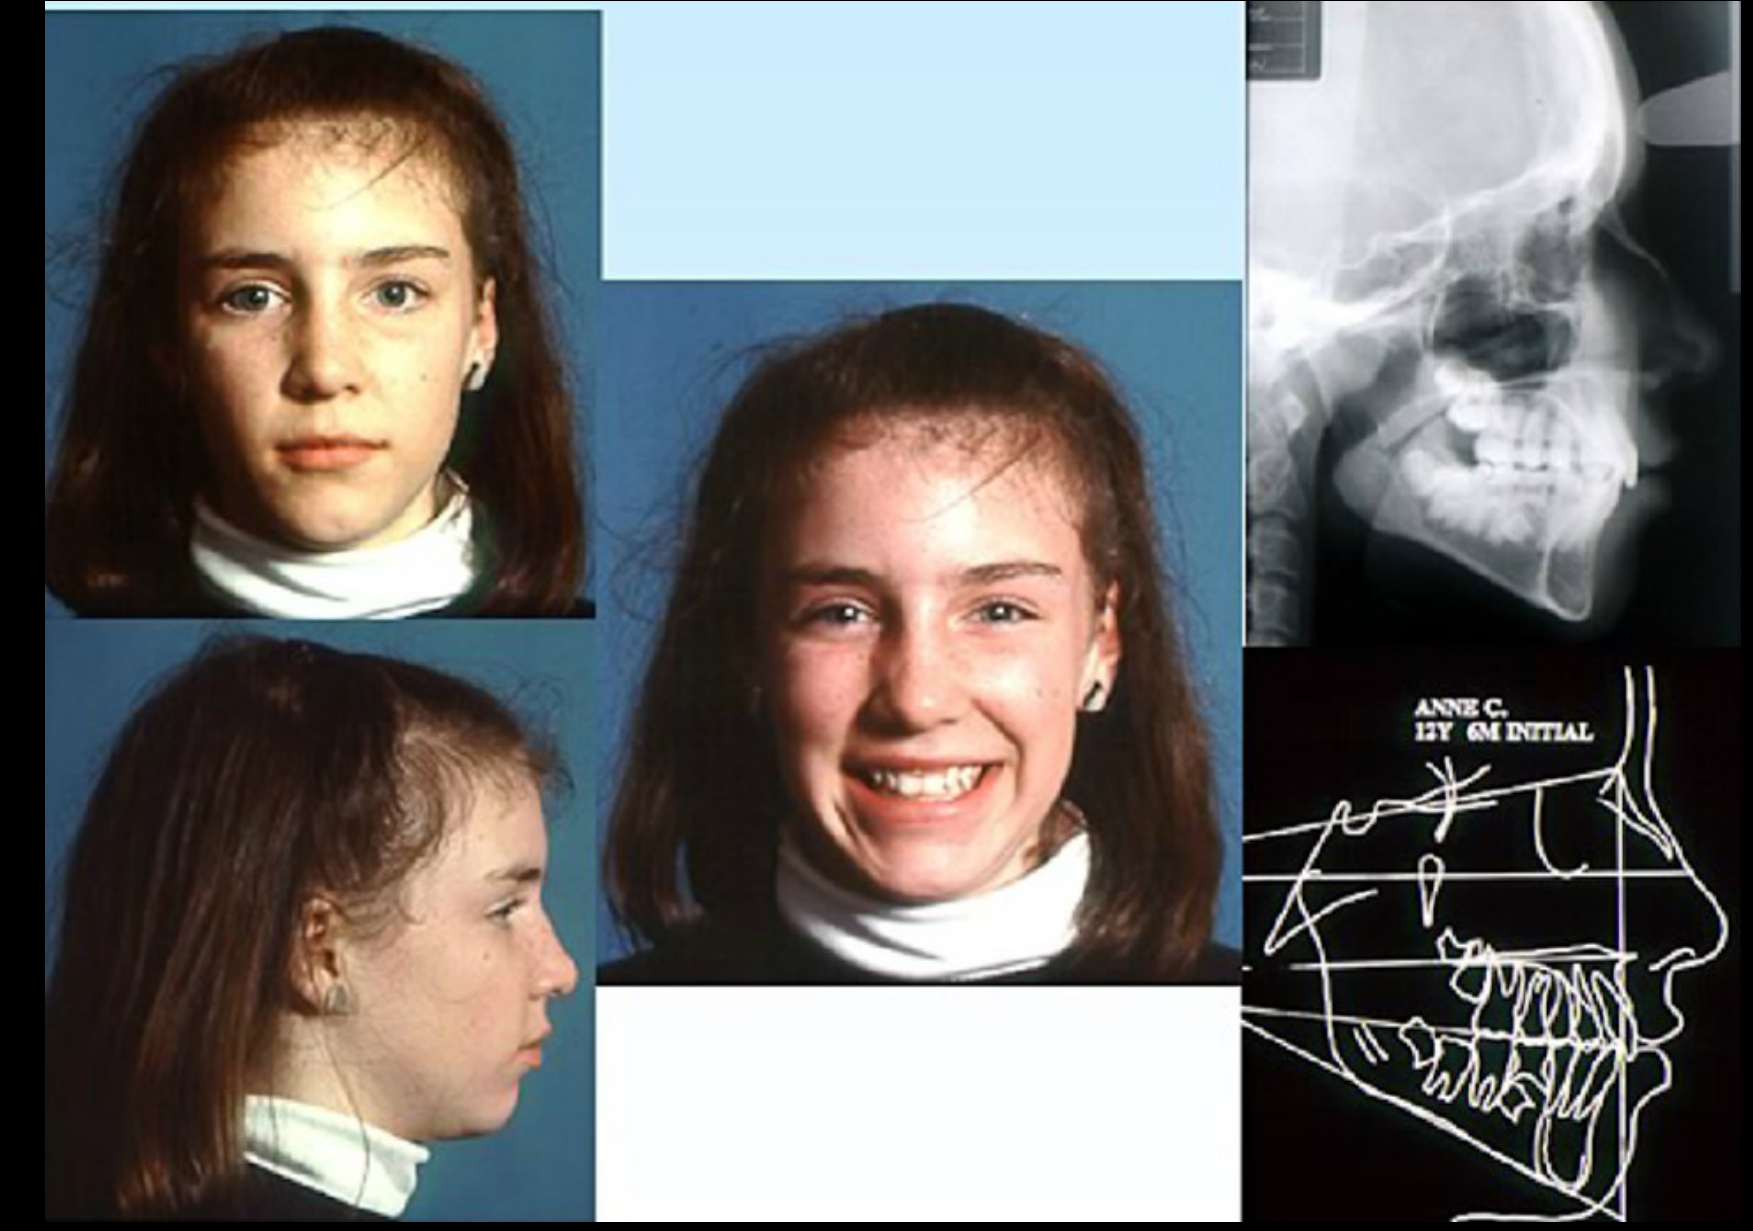
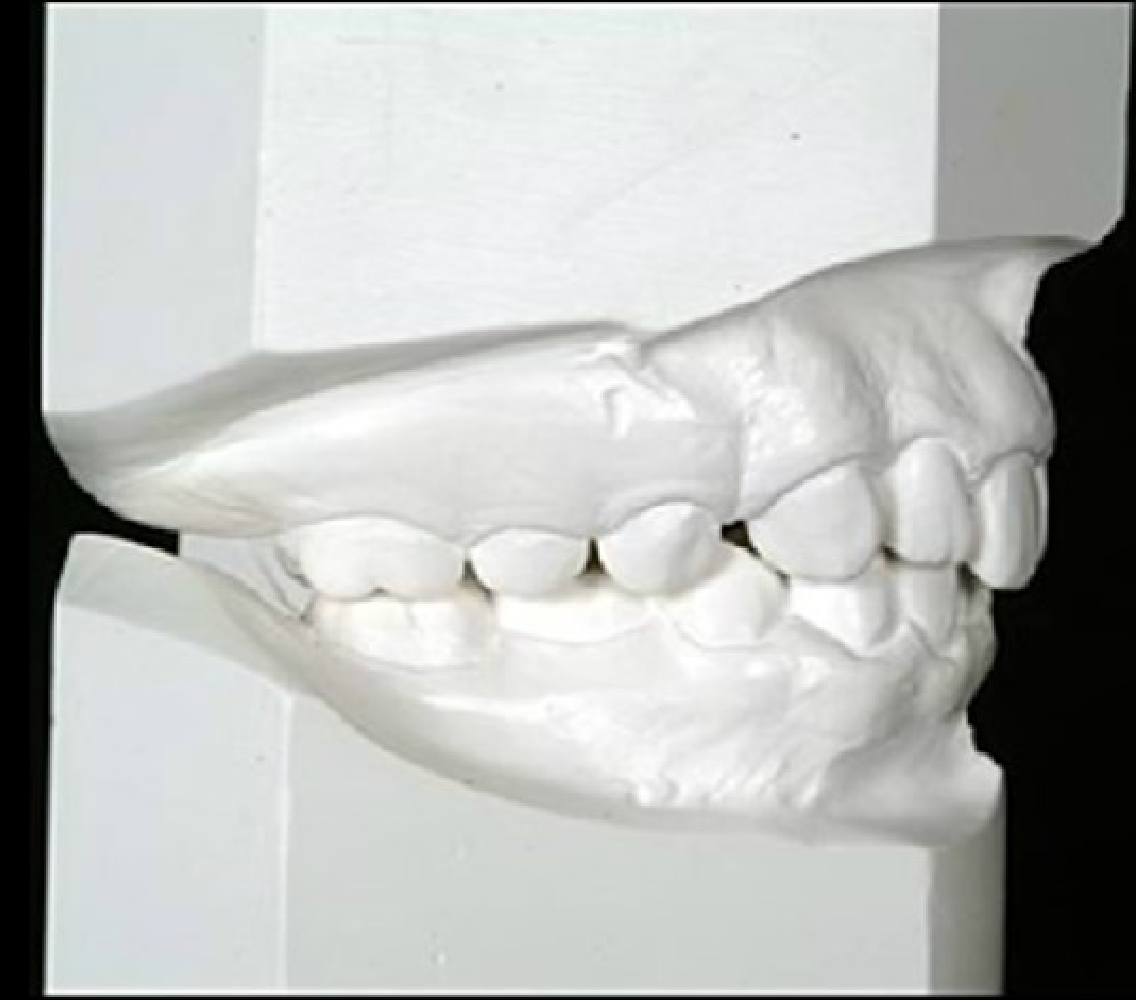
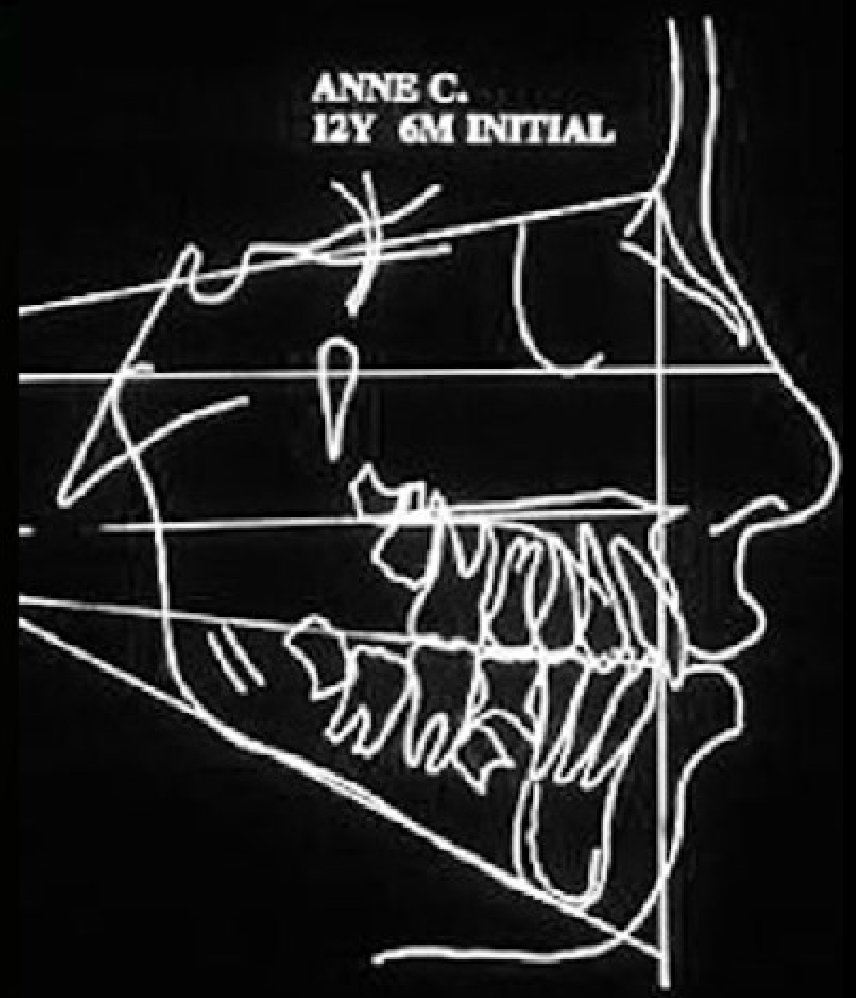
Case: Anne C., 12Y 6M female, initial records for esthetic and vertical assessment
Question
- Looking at Anne C.’s initial facial photographs, lateral cephalogram and tracing, how does her malocclusion affect her lips and soft-tissue profile?
- What do her study cast and cephalometric tracing show about her vertical relationship?
Answer
Not stated in the lecture.
From the lecture slides
Esthetic Impact of Malocclusion5
Anne C., 12Y 6M, initial
Vertical Relationships8
Anne C., 12Y 6M, initial
 |  |
Footnotes
-
Original PDF page 1: L3 3A Level III UnitA(1), p.1 ↩
-
Original PDF page 2: L3 3A Level III UnitA(1), p.2 ↩
-
Original PDF page 3: L3 3A Level III UnitA(1), p.3 ↩
-
Original PDF page 4: L3 3A Level III UnitA(1), p.4 ↩
-
Original PDF page 5: L3 3A Level III UnitA(1), p.5 ↩ ↩2
-
Original PDF page 6: L3 3A Level III UnitA(1), p.6 ↩
-
Original PDF page 7: L3 3A Level III UnitA(1), p.7 ↩
-
Original PDF page 8: L3 3A Level III UnitA(1), p.8 ↩ ↩2
-
Original PDF page 9: L3 3A Level III UnitA(1), p.9 ↩
-
Original PDF page 10: L3 3A Level III UnitA(1), p.10 ↩
-
Original PDF page 13: L3 3A Level III UnitA(1), p.13 ↩
-
Original PDF page 11: L3 3A Level III UnitA(1), p.11 ↩
-
Original PDF page 12: L3 3A Level III UnitA(1), p.12 ↩
-
Original PDF page 14: L3 3A Level III UnitA(1), p.14 ↩
-
Original PDF page 15: L3 3A Level III UnitA(1), p.15 ↩
-
Original PDF page 16: L3 3A Level III UnitA(1), p.16 ↩
-
Original PDF page 17: L3 3A Level III UnitA(1), p.17 ↩
-
Original PDF page 18: L3 3A Level III UnitA(1), p.18 ↩
-
Original PDF page 19: L3 3A Level III UnitA(1), p.19 ↩
-
Original PDF page 20: L3 3A Level III UnitA(1), p.20 ↩
-
Original PDF page 21: L3 3A Level III UnitA(1), p.21 ↩
-
Original PDF page 22: L3 3A Level III UnitA(1), p.22 ↩
-
Original PDF page 23: L3 3A Level III UnitA(1), p.23 ↩
-
Original PDF page 24: L3 3A Level III UnitA(1), p.24 ↩
-
Original PDF page 25: L3 3A Level III UnitA(1), p.25 ↩
-
Original PDF page 26: L3 3A Level III UnitA(1), p.26 ↩
-
Original PDF page 27: L3 3A Level III UnitA(1), p.27 ↩
-
Original PDF page 28: L3 3A Level III UnitA(1), p.28 ↩
-
Original PDF page 29: L3 3A Level III UnitA(1), p.29 ↩
-
Original PDF page 30: L3 3A Level III UnitA(1), p.30 ↩
-
Original PDF page 31: L3 3A Level III UnitA(1), p.31 ↩
-
Original PDF page 32: L3 3A Level III UnitA(1), p.32 ↩
-
Original PDF page 33: L3 3A Level III UnitA(1), p.33 ↩
-
Original PDF page 34: L3 3A Level III UnitA(1), p.34 ↩
-
Original PDF page 35: L3 3A Level III UnitA(1), p.35 ↩
-
Original PDF page 36: L3 3A Level III UnitA(1), p.36 ↩
-
Original PDF page 37: L3 3A Level III UnitA(1), p.37 ↩
-
Original PDF page 38: L3 3A Level III UnitA(1), p.38 ↩
-
Original PDF page 39: L3 3A Level III UnitA(1), p.39 ↩
-
Original PDF page 40: L3 3A Level III UnitA(1), p.40 ↩
-
Original PDF page 41: L3 3A Level III UnitA(1), p.41 ↩
-
Original PDF page 42: L3 3A Level III UnitA(1), p.42 ↩
-
Original PDF page 43: L3 3A Level III UnitA(1), p.43 ↩
-
Original PDF page 44: L3 3A Level III UnitA(1), p.44 ↩
-
Original PDF page 45: L3 3A Level III UnitA(1), p.45 ↩
-
Original PDF page 46: L3 3A Level III UnitA(1), p.46 ↩
-
Original PDF page 47: L3 3A Level III UnitA(1), p.47 ↩
-
Original PDF page 48: L3 3A Level III UnitA(1), p.48 ↩
-
Original PDF page 49: L3 3A Level III UnitA(1), p.49 ↩
-
Original PDF page 50: L3 3A Level III UnitA(1), p.50 ↩
-
Original PDF page 51: L3 3A Level III UnitA(1), p.51 ↩
-
Original PDF page 52: L3 3A Level III UnitA(1), p.52 ↩
-
Original PDF page 53: L3 3A Level III UnitA(1), p.53 ↩
-
Original PDF page 54: L3 3A Level III UnitA(1), p.54 ↩
-
Original PDF page 56: L3 3A Level III UnitA(1), p.56 ↩
-
Original PDF page 55: L3 3A Level III UnitA(1), p.55 ↩
-
Original PDF page 57: L3 3A Level III UnitA(1), p.57 ↩
-
Original PDF page 58: L3 3A Level III UnitA(1), p.58 ↩
-
Original PDF page 59: L3 3A Level III UnitA(1), p.59 ↩