Treatment Timing and Extractions1
Growth and Development — Level IV Unit A, B & C
The University of Western Australia
When Should Orthodontic Treatment Start2
Depends on the malocclusion:
- Class I
- Class II
- Class III
- Posterior x-bites
- Impacted canines
Lecturer — Treatment Timing
Treatment timing also depends on the amount of crowding, the skeletal cause of the malocclusion, the stage of dental development, the patient’s growth status, and psychological or quality-of-life concerns.
- Treatment should not begin merely because the patient or parents are concerned; timing must allow the orthodontist to bond the necessary teeth and use developmental space effectively.
Class I Treatment Timing
Crowding Severity Guidelines34
- Mild crowding or spacing?
- Treatment should start in the permanent dentition
- Why?
- Moderate to severe crowding?
- When the primary 2nd molars are ready to exfoliate (late mixed dentition)
- Why?
- So we can use the leeway space to alleviate crowding
Lecturer — Mild Crowding
Mild crowding can often be managed later without extractions. Three to four millimeters of space, and sometimes up to five millimeters, may be managed with limited expansion, interproximal reduction, or other minor space-management procedures; bonding before the canines erupt may leave treatment incomplete because not all teeth can be included.
Lecturer — Leeway Space Timing
An OPG can be used to assess premolar development. When approximately two-thirds of the premolar roots have developed, the premolars are beginning to erupt and resorb the primary molar roots; this is the time to consider placing a lingual arch, before premolar eruption or mesial drift of the permanent molars causes the opportunity to be lost.
- Severe crowding?
- Depends on the severity
- Early treatment with serial extraction is an option
If you see more than 7mm of crowding in the mixed dentition, refer to orthodontist
 |  |
Serial Extraction567
-
10 mm of crowding in both arches
- Normal facial proportions (Class I with good vertical thirds)
- Phase 2 treatment will likely be needed
- Why?
- Alignment is improved but not perfect
- Some extraction space remains
- Overbite is usually increased
- Why?
Lecturer — Serial Extraction Follow-up
Serial extraction does not complete orthodontic treatment. A second phase may be needed to close residual spaces, correct tooth inclinations, establish parallel roots, and improve the canine relationship; the canines and premolars may erupt convergently or with residual space remaining.
How would we perform serial extraction? (Sequence of extraction)
- A typical sequence is to extract the primary canines, then the primary first molars, then the primary second molars, and finally the first premolars when their roots are sufficiently developed and they are ready to erupt.
Candidate Evaluation and Case Examples89101112
Space Regaining With Partial Fixed Appliances13
Case moved — see Case: Space regaining for established lower midline shift
Premature Loss of Primary Canines14
- When a mandibular primary canine is lost prematurely and the lower midline shifts, consider extracting the contra-lateral primary canine and place a LLHA
- OR refer to an orthodontist to make the decision.
Lecturer — Bilateral Canine Extraction
Bilateral extraction does not guarantee enough space for the premolars or permanent canines; its primary purpose is to distribute anterior crowding relief symmetrically and preserve the midline. If the midline shift is already established, partial braces and a push coil may be needed to reopen space and correct the deviation.
Class II Malocclusion
Timing of Treatment1516
When is the best time to treat these patients?
- Start during the adolescent growth spurt, and
- End treatment about the time the growth spurt ends
Timing of Treatment17
The UNC studies showed that early Class II treatment was:
- No more effective than later treatment … and …
- Considerably less efficient
Lecturer — Growth Timing
Growth modification is most favorable around the peak of the growth spurt, specifically between cervical vertebral maturation stages CS3 and CS4.
- The peak lasts approximately one year.
- Treatment during this period can reduce overall treatment time, maximize efficiency, reduce the cooperation required, and address the skeletal problem during a short period of favorable growth.
- Poor cooperation during this period may lengthen treatment and make the intended result more difficult to achieve.
- The North Carolina comparison found that an initial treatment phase was no more effective than one later phase and was less efficient because it increased total treatment time.
When is early treatment for Class II malocclusion indicated?
-
Psychological problems produced by teasing, etc.
-
Trauma to teeth or soft tissue
-
Severe problems
-
Significant overjet, difficulty closing the mouth, or increased trauma risk to protruding incisors
Growth Modification Options18
What treatment options do we have?
- Headgear
- Herbst (fixed functional appliance)
- Functional appliances — Activator, Frankel, Twin Blocks
Lecturer — Appliance Selection
Treatment choice depends on the location of the skeletal problem.
- When the maxilla is protrusive and the mandible is acceptable or still growing, headgear restricts forward maxillary growth while the mandible continues growing.
- When the mandible is deficient, a functional appliance postures it forward and produces remodeling and redirection of growth rather than creating new mandibular growth.
- Functional appliances may be removable, such as a twin block, or fixed, such as a Herbst appliance. In early treatment, a twin block may be suitable because the patient is not yet wearing braces.
Headgear and Herbst Appliances19202122
Does headgear work?
Mandibular Growth — STOP
Headgear restricts the growth of the maxilla and allows the differential mandibular growth to catch up.
Lecturer — Headgear Effects
Headgear can produce a substantial improvement in overjet even without braces, with the most favorable results expected when it is used around the growth peak.
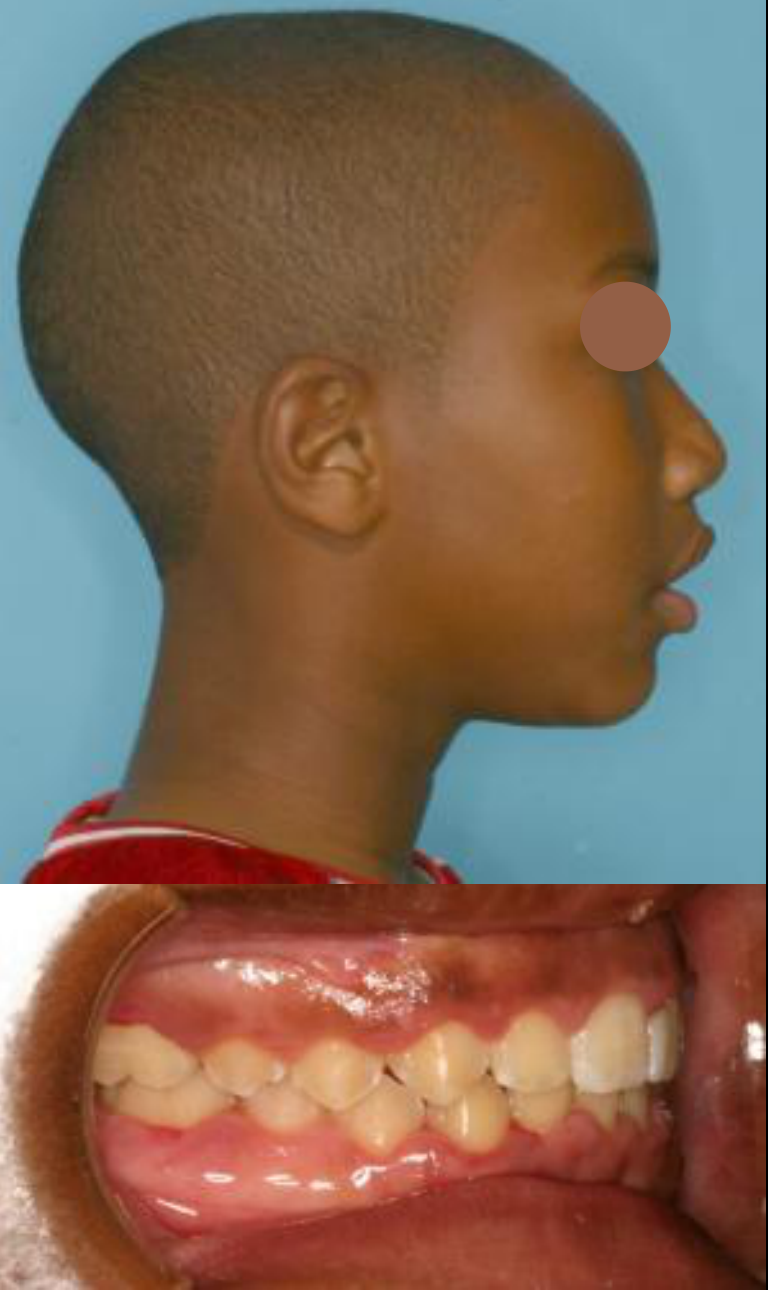
Headgear treatment
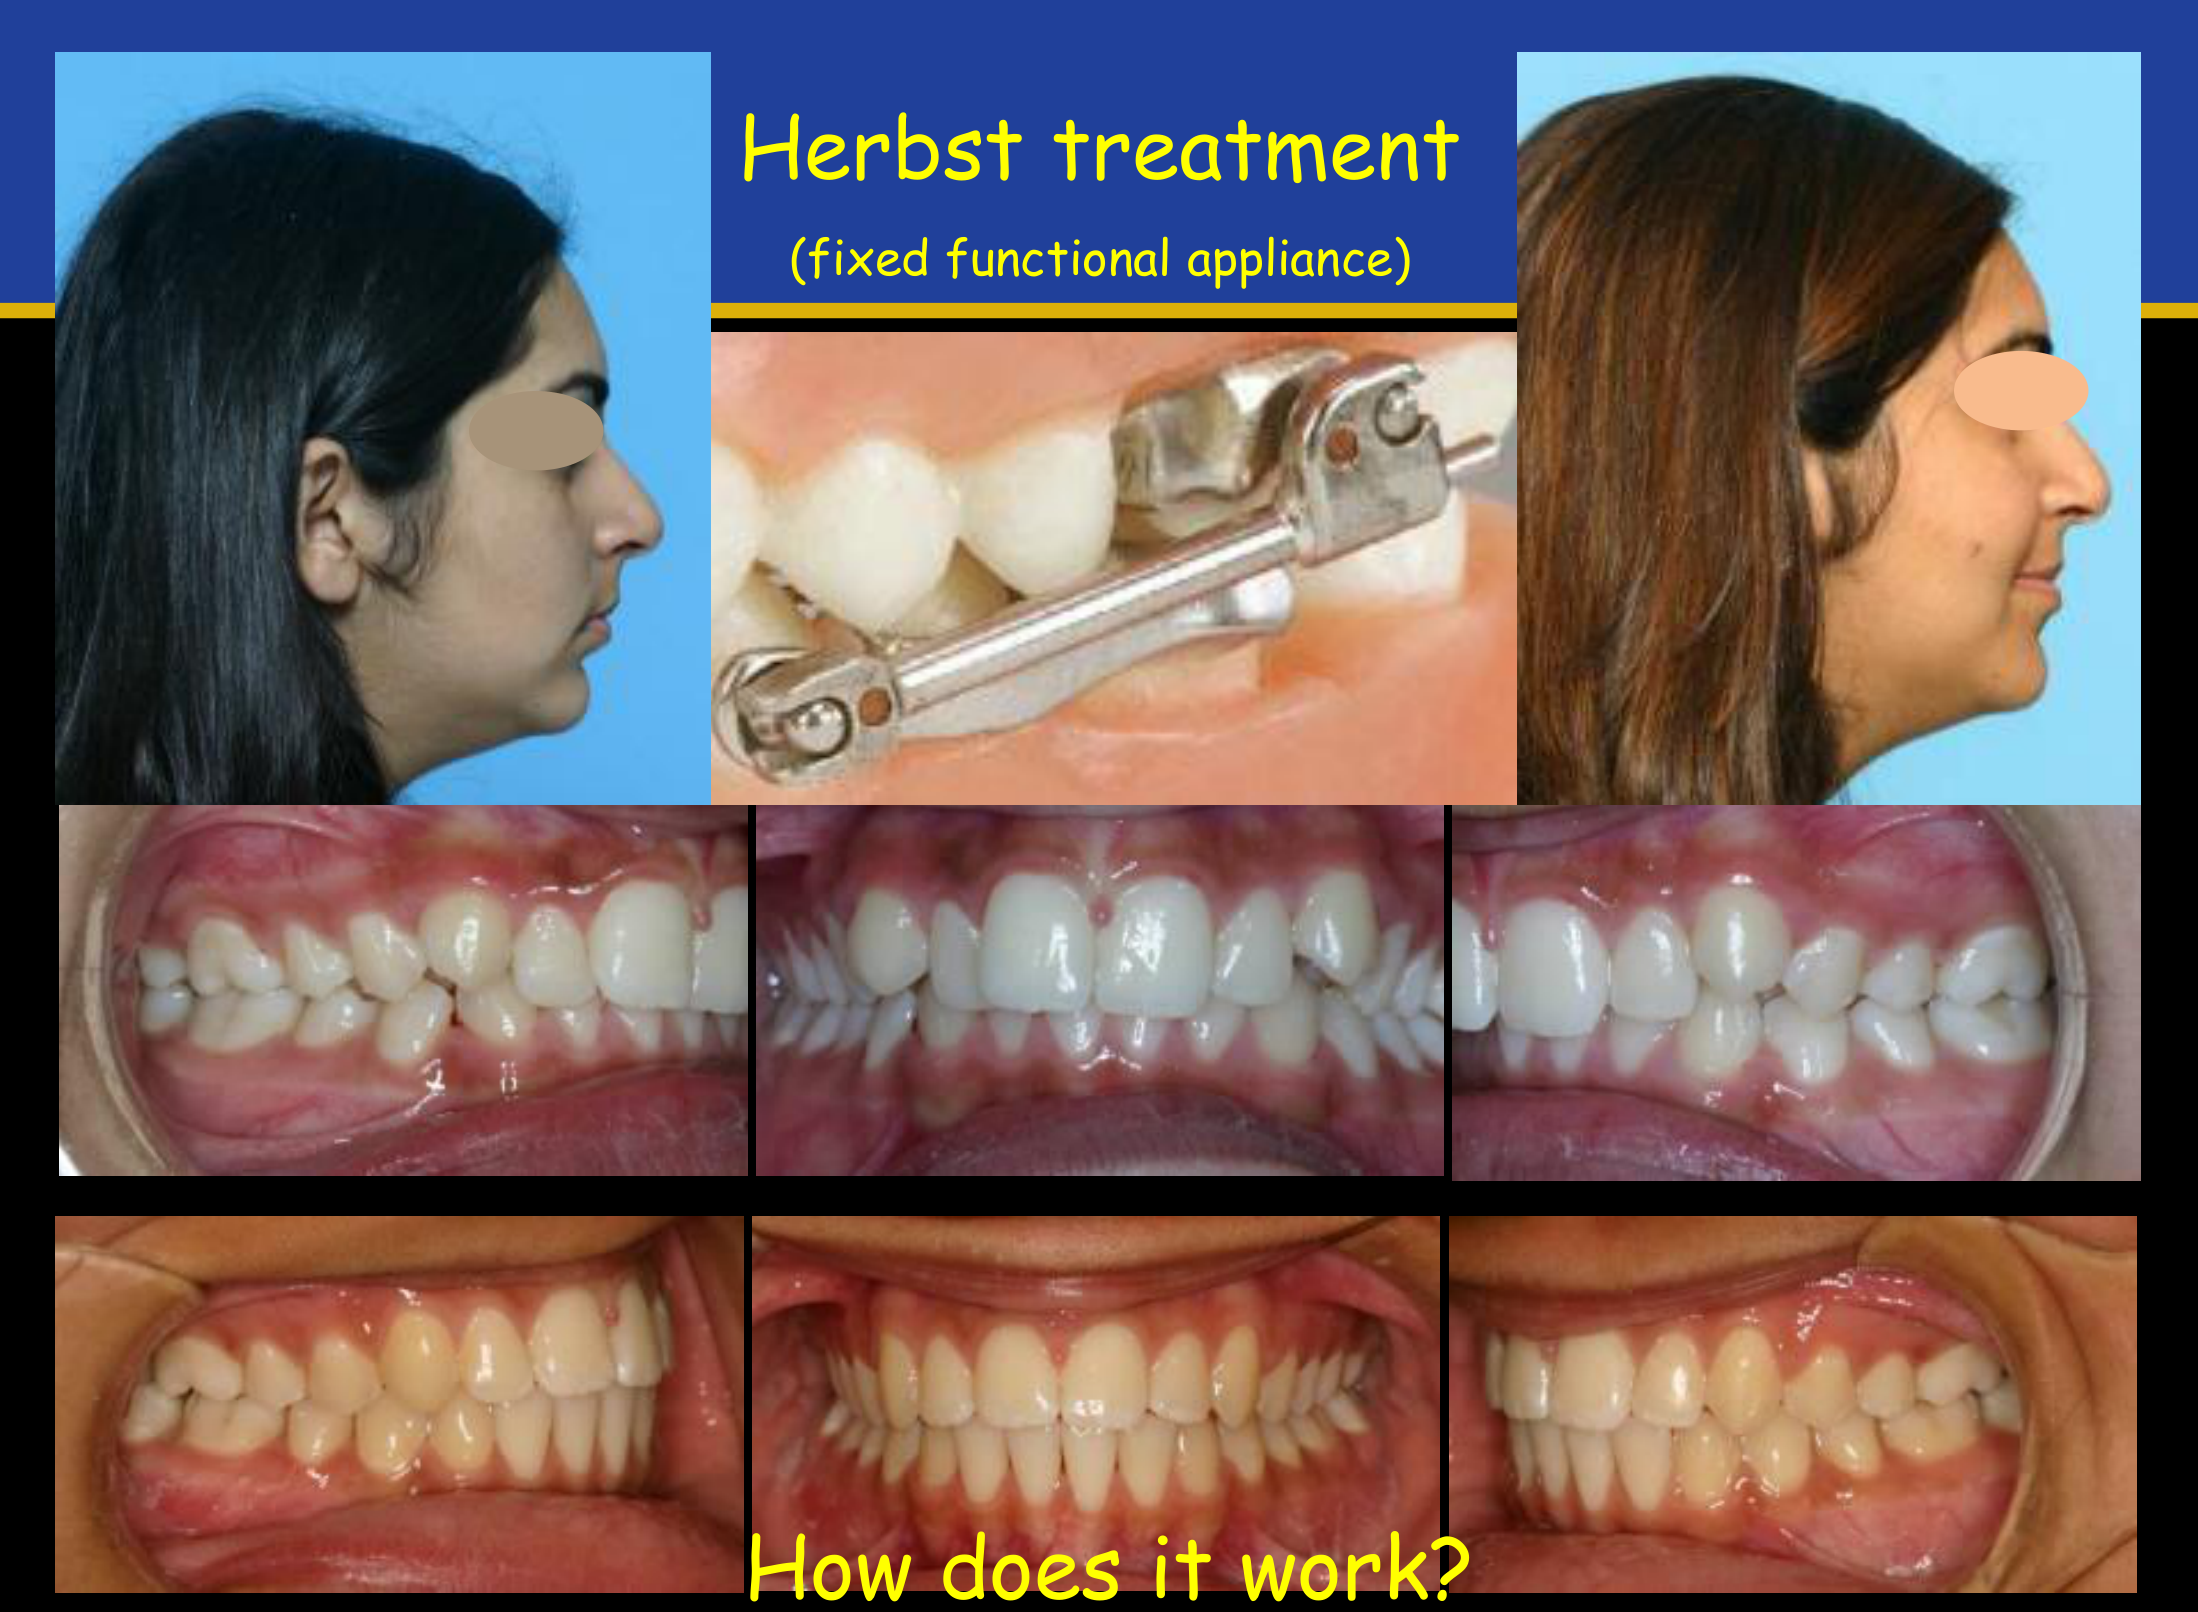
Herbst treatment (fixed functional appliance)
How does it work?
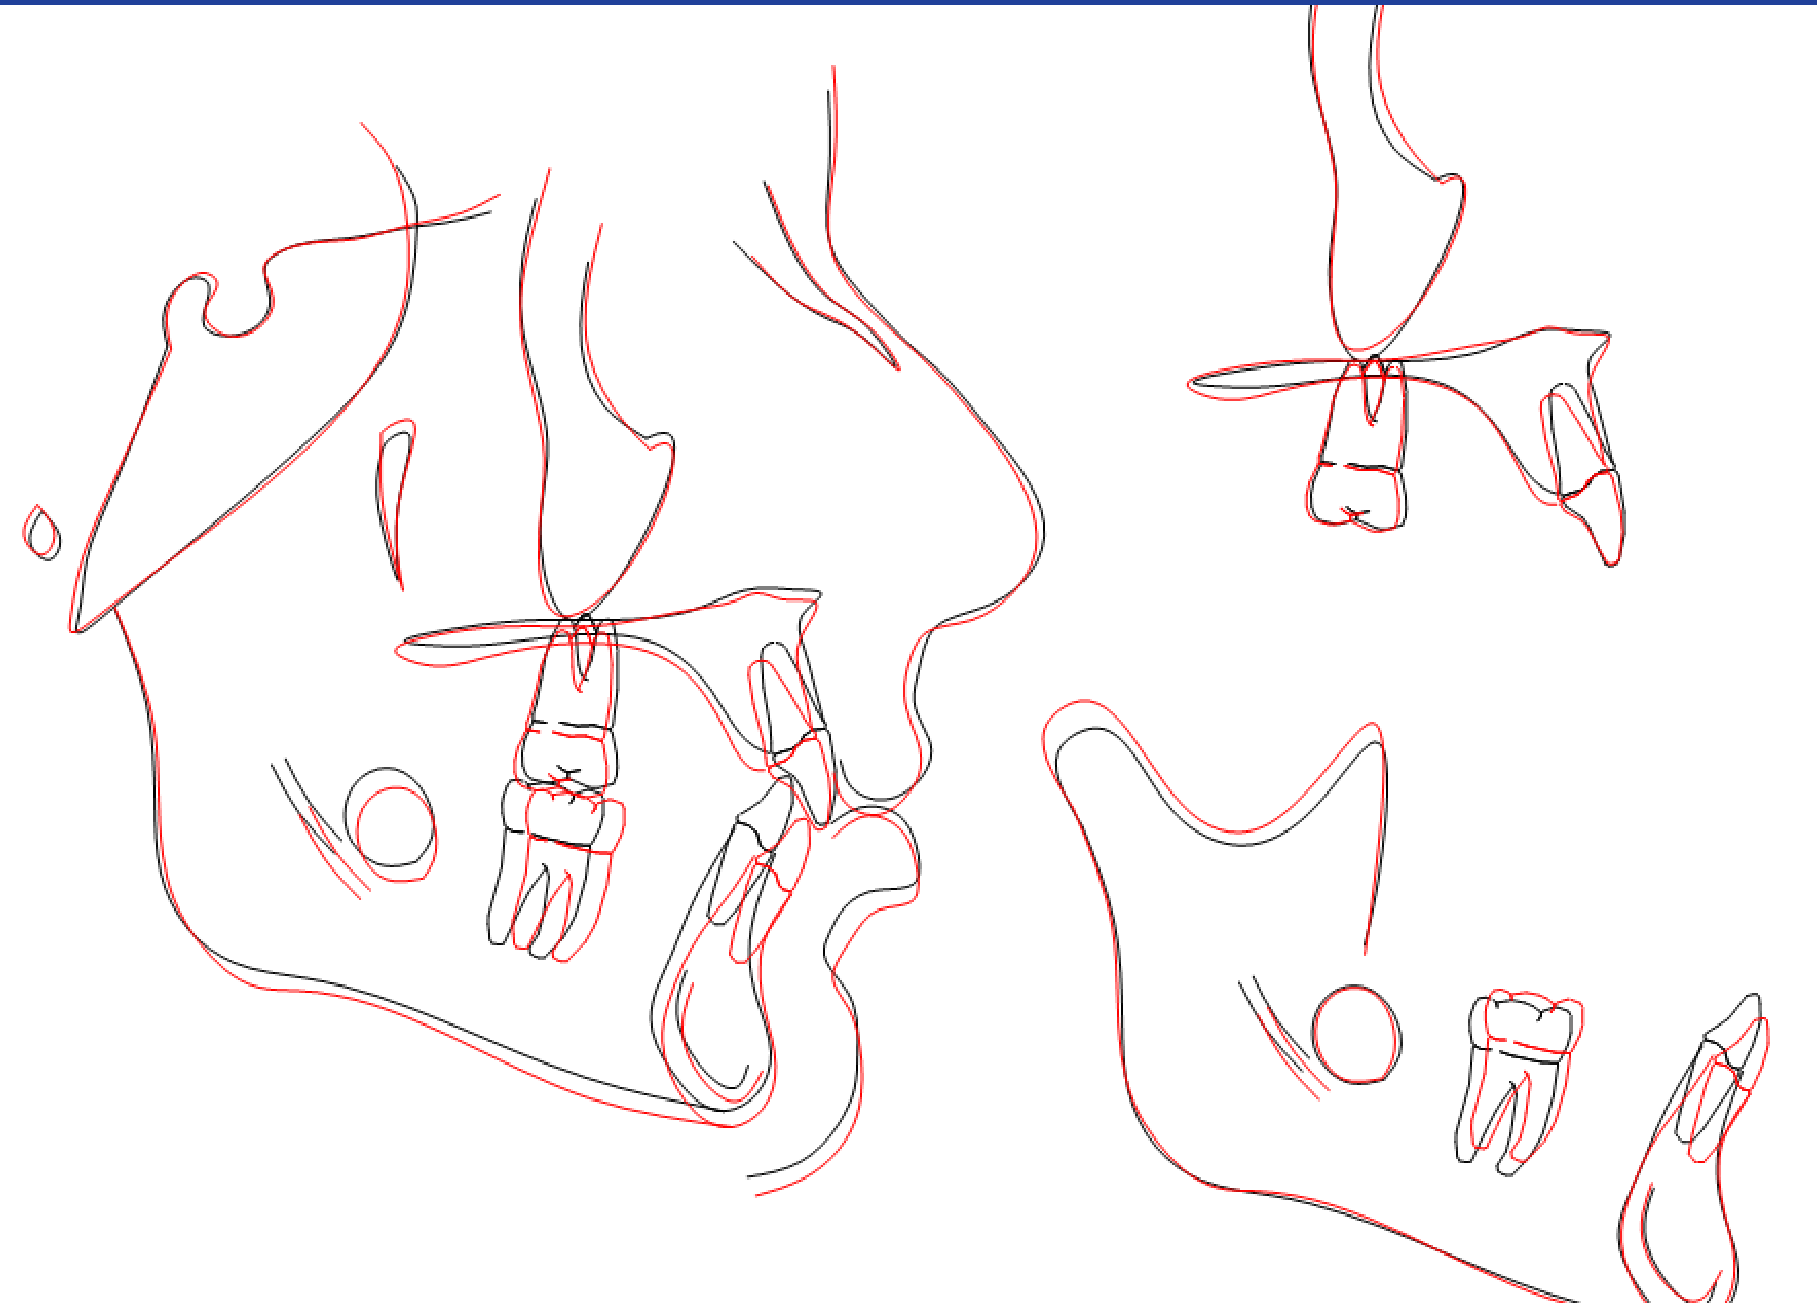
What changes do you see?
Lecturer — Herbst Mechanics
The Herbst appliance holds the mandible forward using pistons that connect the upper molar region to the lower jaw.
- It produces remodeling in the anterior part of the glenoid fossa and redirects growth rather than creating growth.
- Changes may include forward mandibular positioning, condylar remodeling, and some lower incisor proclination.
- The described case showed primarily anteroposterior correction without substantial vertical mandibular rotation.
Class III Malocclusion23
What are the different forms of skeletal Class III malocclusion?
- Retrusive Maxilla
- Prognathic Mandible
- Combination Maxilla & Mandible
Retrusive Maxilla242526
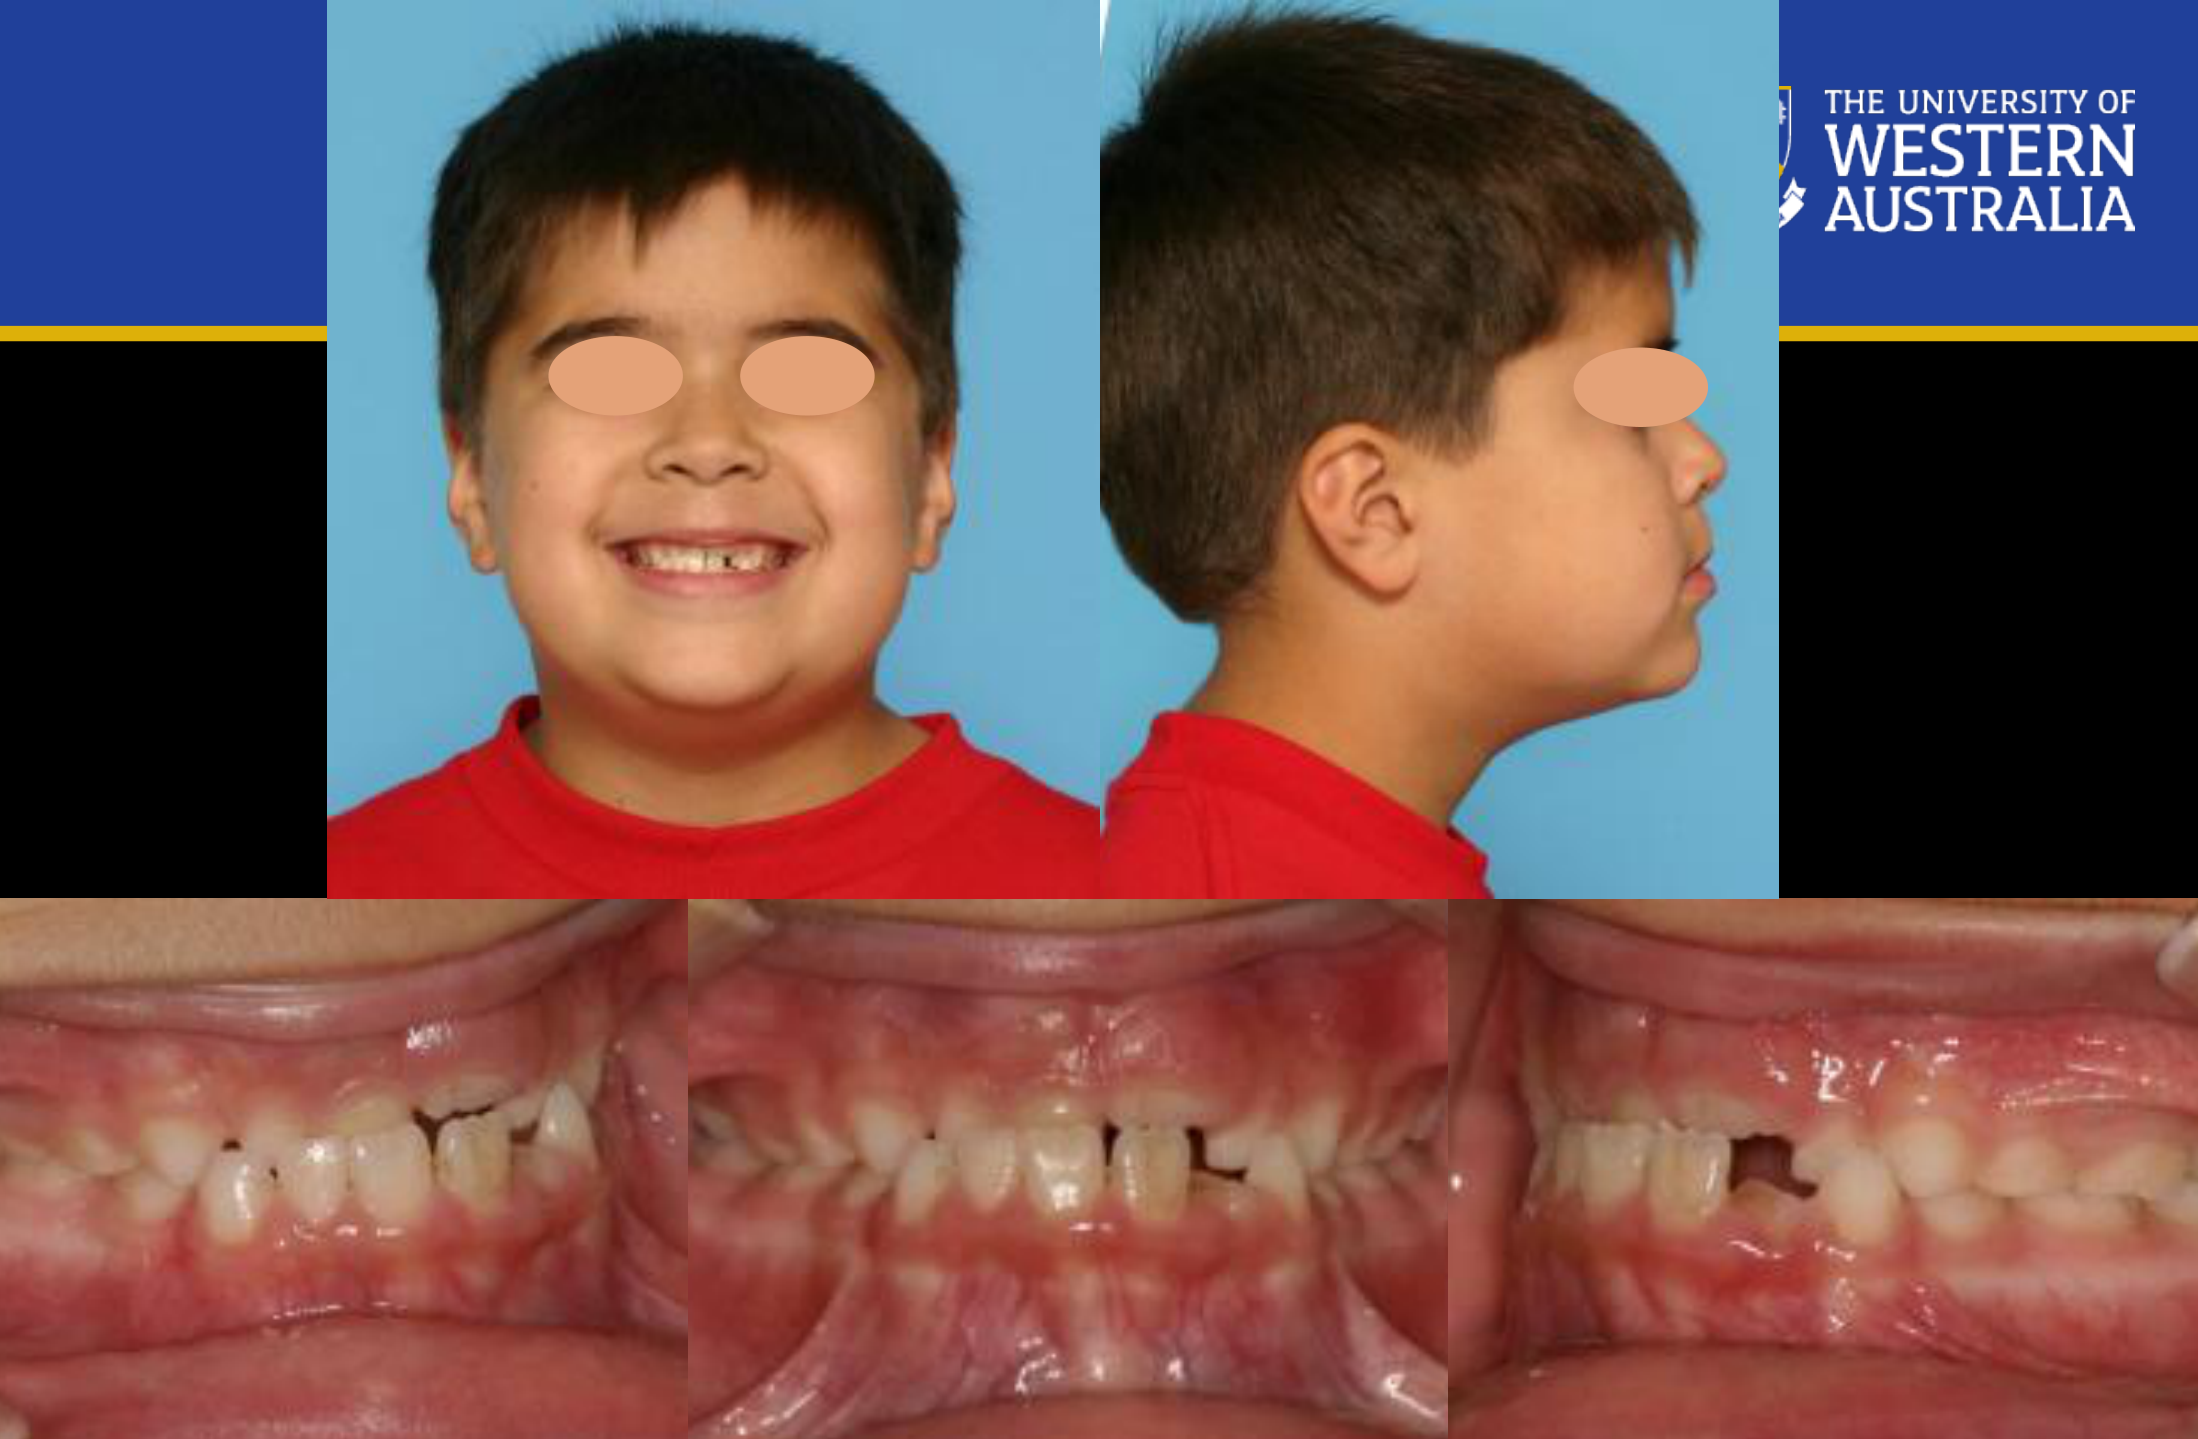
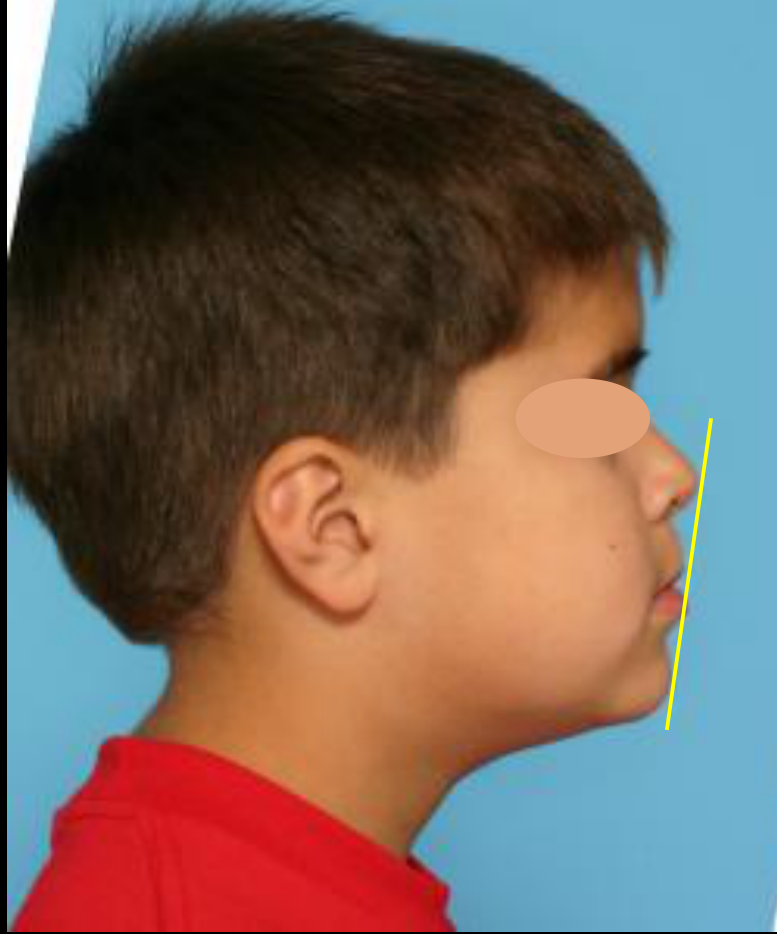
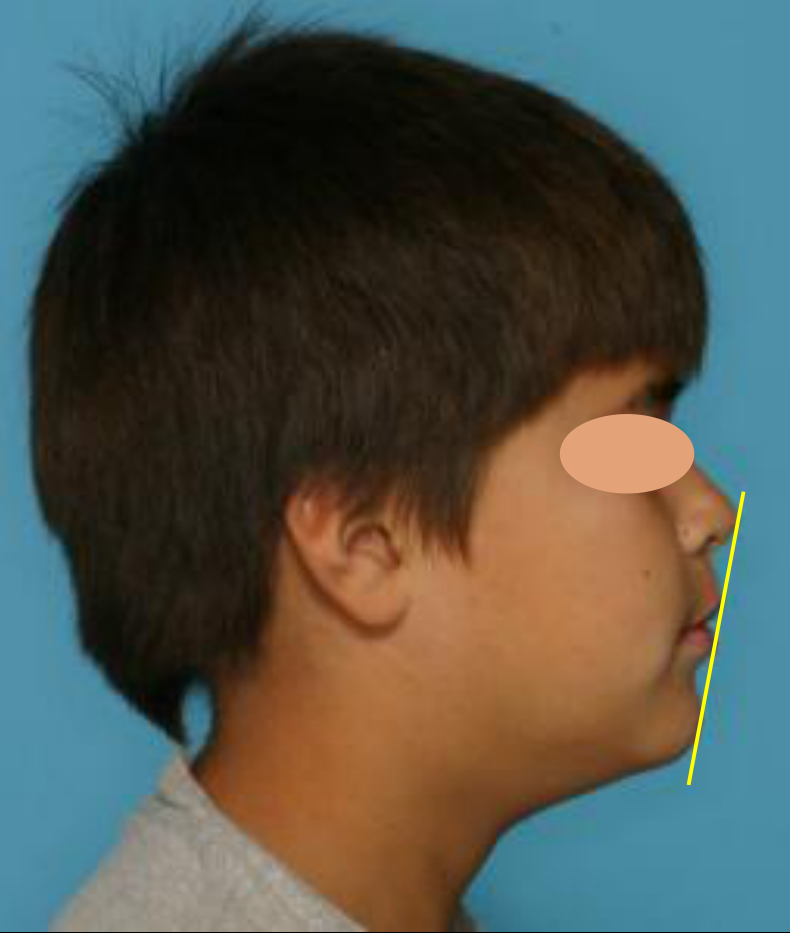
When do you treat/refer?27
Treatment is more effective if initiated during pre-adolescence (around age 7-10*)
How do we treat this patient?
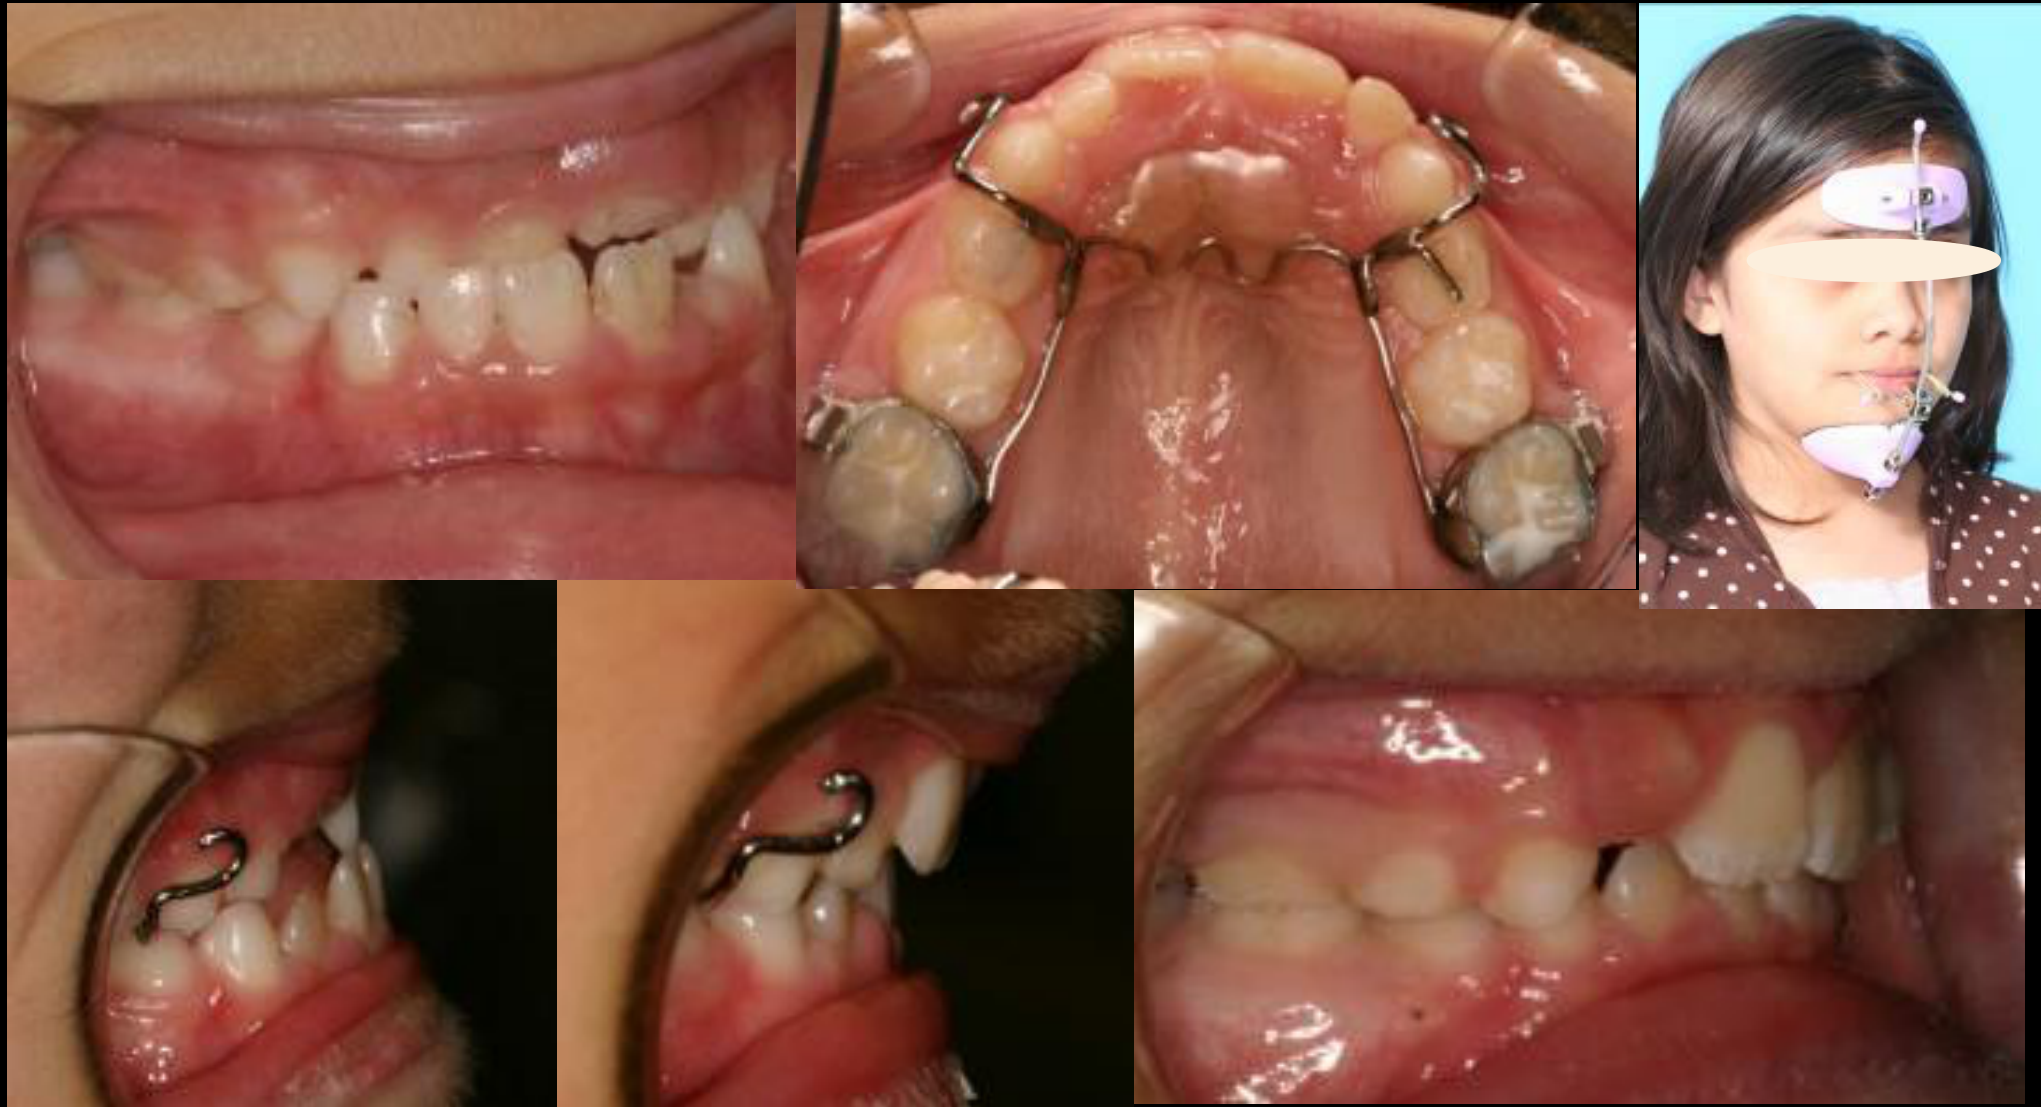
Maxillary Protraction - reverse-pull Headgear or Protraction Facemask
Lecturer — Maxillary Protraction
Maxillary protraction is commonly combined with rapid maxillary expansion and elastics.
- Rapid expansion opens the circummaxillary sutures before orthopedic protraction.
- Orthopedic forces of approximately 400 to 500 grams per side were described.
- The maxilla should be overcorrected to a positive overjet of approximately five to six millimeters because relapse and later mandibular growth can reduce the initial correction.
- Approximately 30% relapse was mentioned for this type of treatment.
Reverse Pull headgear protracts the Maxilla and tips the teeth forward
Lecturer — Face Mask Forces
Face-mask force is applied below the center of resistance of the maxilla.
- This can rotate the maxilla forward, produce clockwise rotation of the mandible, and increase the vertical dimension.
- The preferred age for beginning face-mask treatment was described as approximately eight years old, which is why early referral is important.
Class III
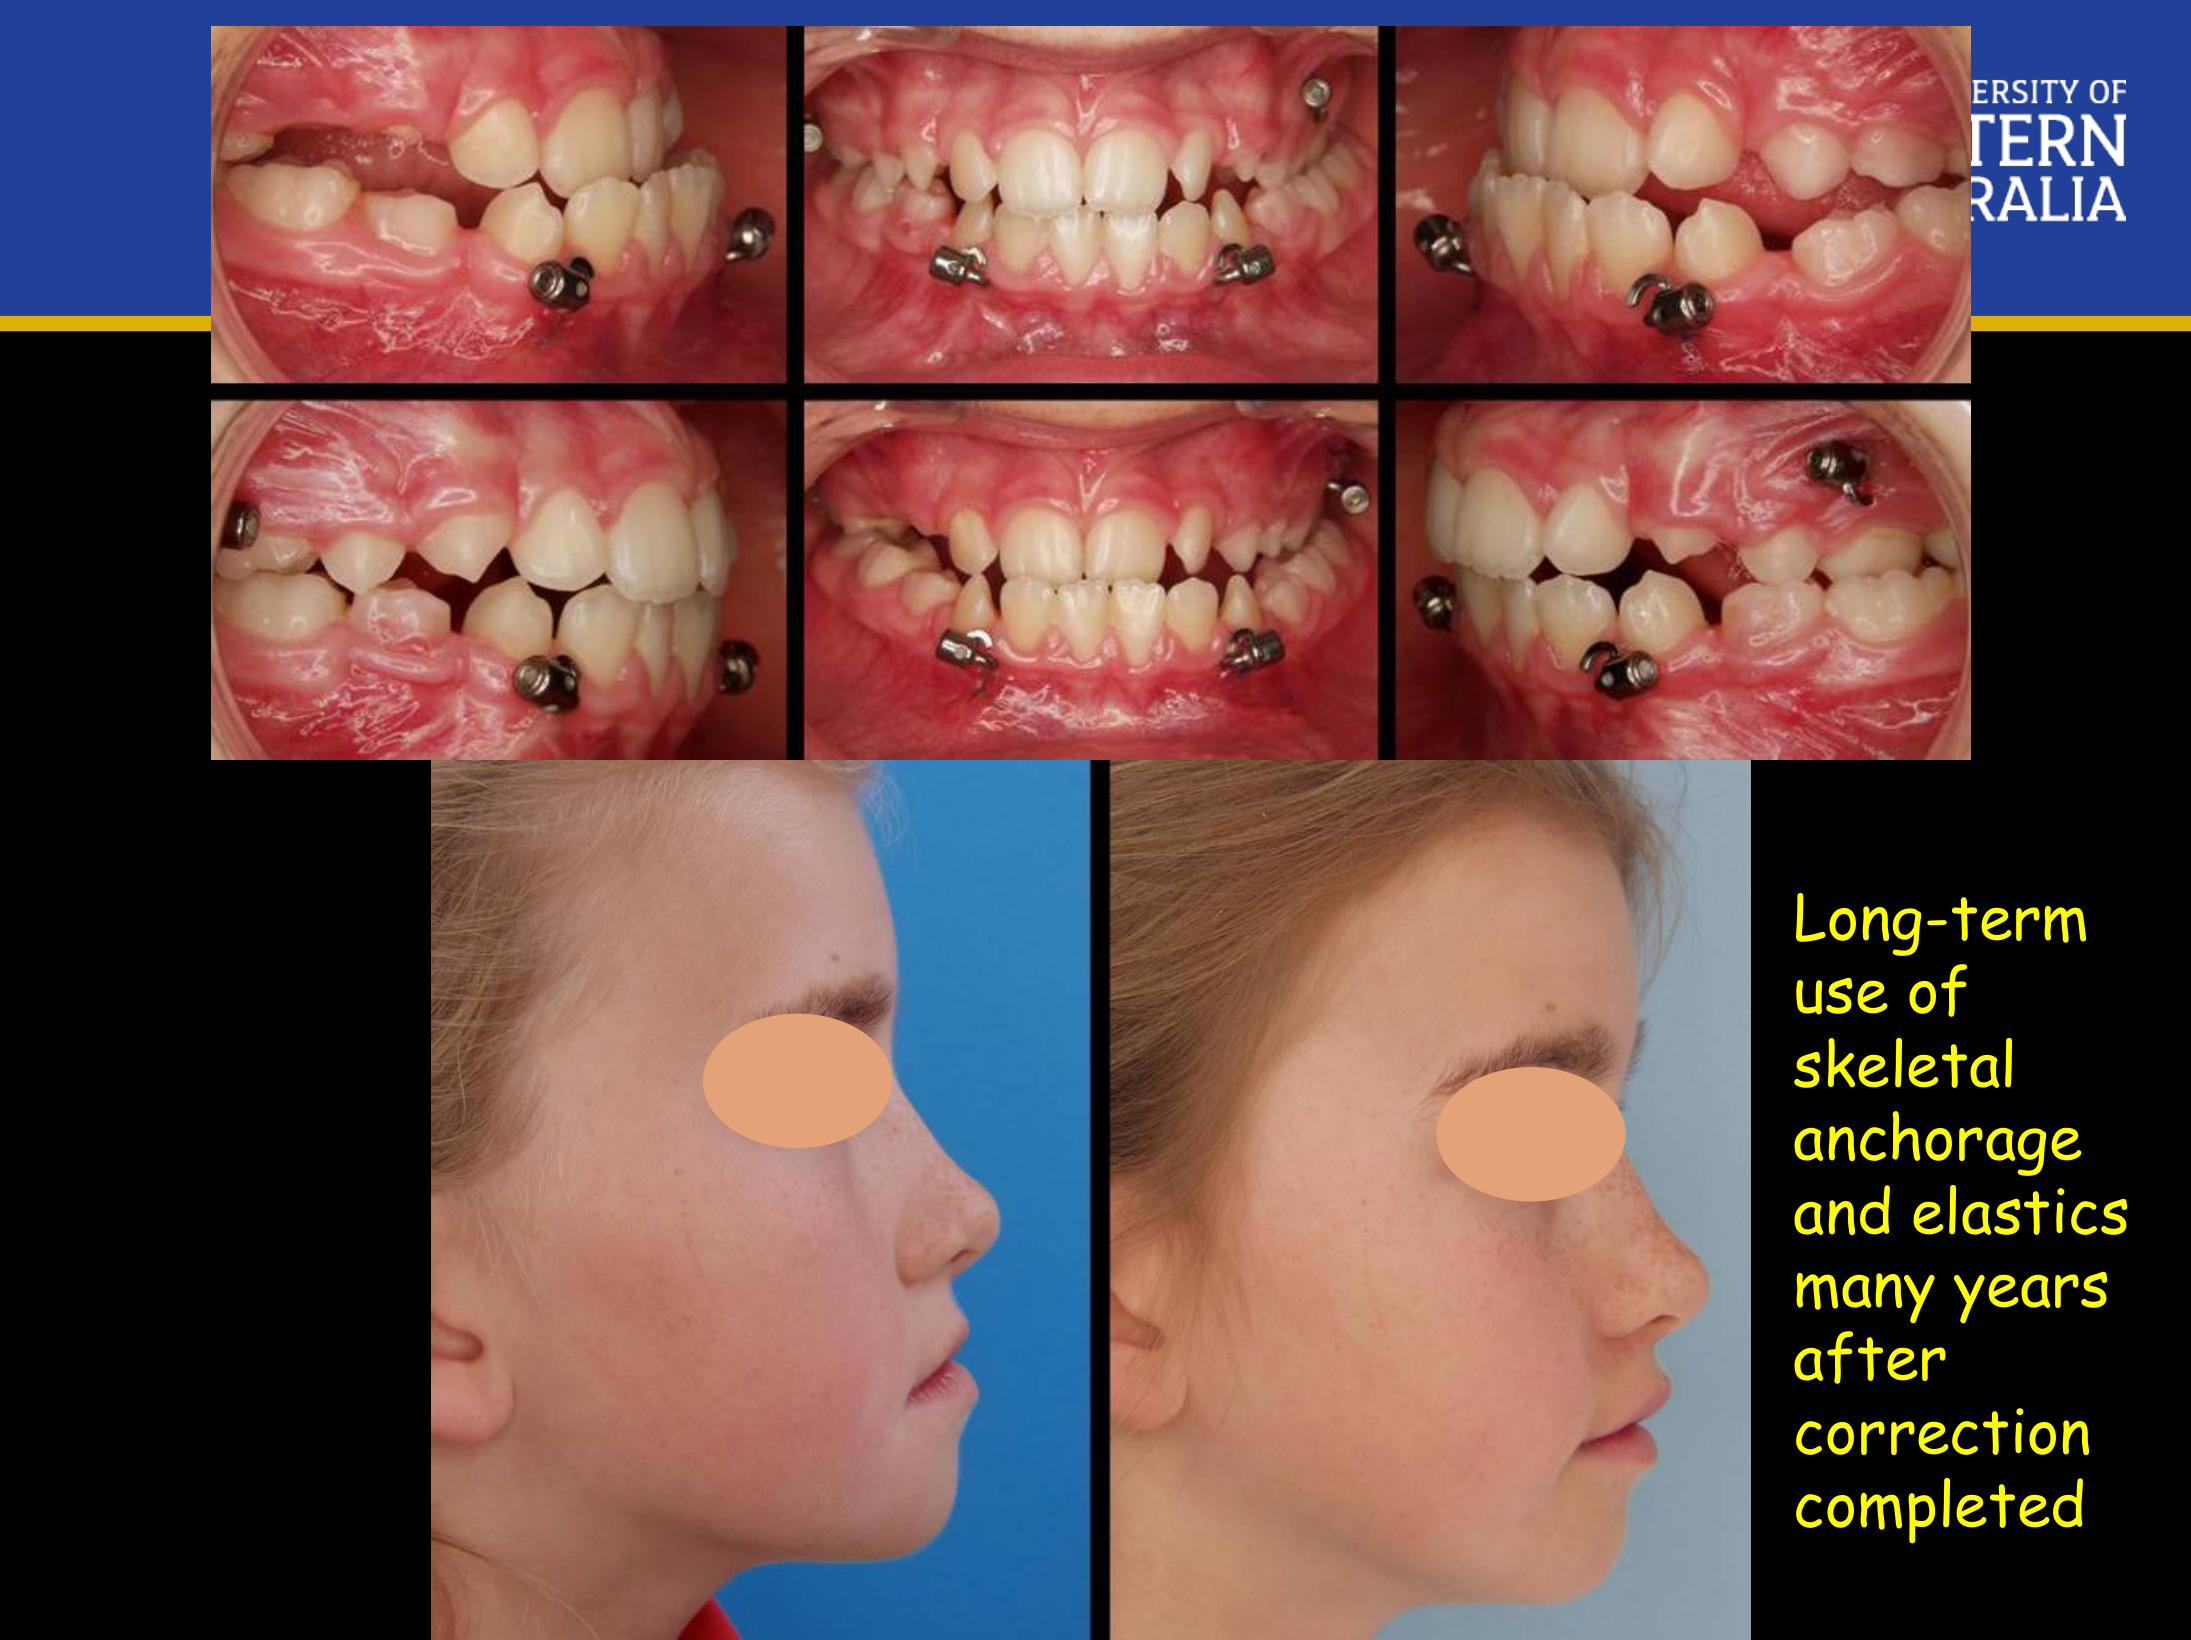
Skeletal Anchorage for Class III2829
- New technique to treat Class III malocclusion
- Most effective when initiated between ages of 10 to 13
- Gives more favorable orthopedic changes without dentoalveolar compensation
- No cumbersome extra-oral headgear
- Use of skeletal anchorage and elastics
Long-term use of skeletal anchorage and elastics many years after correction completed
Lecturer — Skeletal Anchorage
A screw-based approach with elastics was described as an alternative method for maxillary protraction.
- It may provide some remodeling in the glenoid fossa, but the primary expected result is protrusion of the maxilla.
- Parents may be reluctant to accept permanent screws and elastic wear, making the approach difficult to implement in routine practice.
- Relapse was described as a significant concern.
Prognathic Mandible30
When do you treat/refer?31
- Treatment should be delayed to late adolescence/cessation of growth
Why?
- The mandible tends to grow longer
- The mandible does not stop growing at the end of the adolescent growth spurt
Lecturer — Late Mandibular Growth
A prognathic mandible may continue growing after the growth spurt and even into university age, and this late growth is difficult to predict.
- A patient may finish treatment with an acceptable result and return several years later with a recurrent Class III relationship because the mandible continued growing.
- There is no reliable growth-blocking treatment described; definitive correction generally requires surgery after growth has slowed or ended.
- Follow-up uses lateral cephalometric radiographs approximately one year apart. Monitoring may continue to approximately 18 or 19 years of age for male patients and may begin somewhat earlier, around 16 years of age, for female patients.
1 year post surgery
Mandibular Prognathism - the lower jaw tends to grow longer and stops growing later
Crossbites32
Functional Shift?
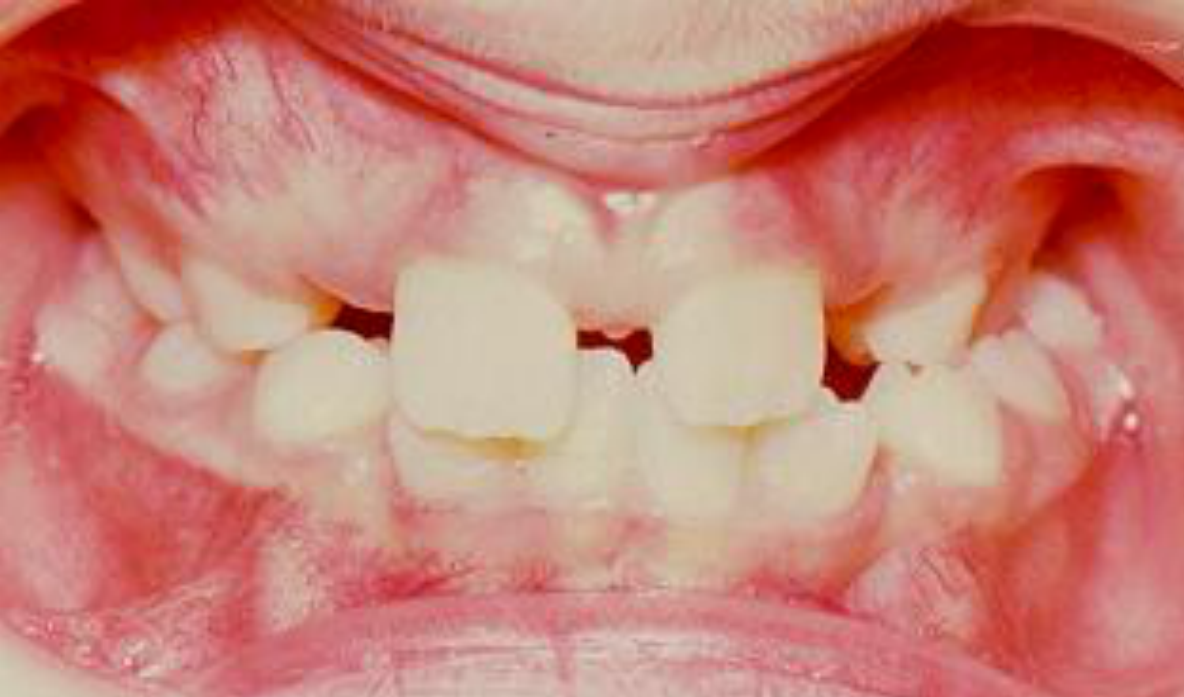
Functional Shift and Expansion3334
Treat crossbites with a function shift early to eliminate the shift
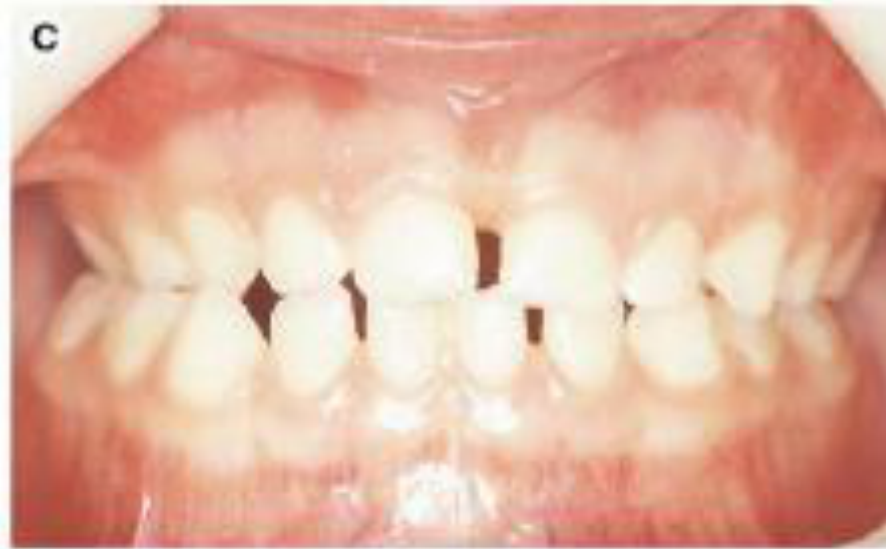
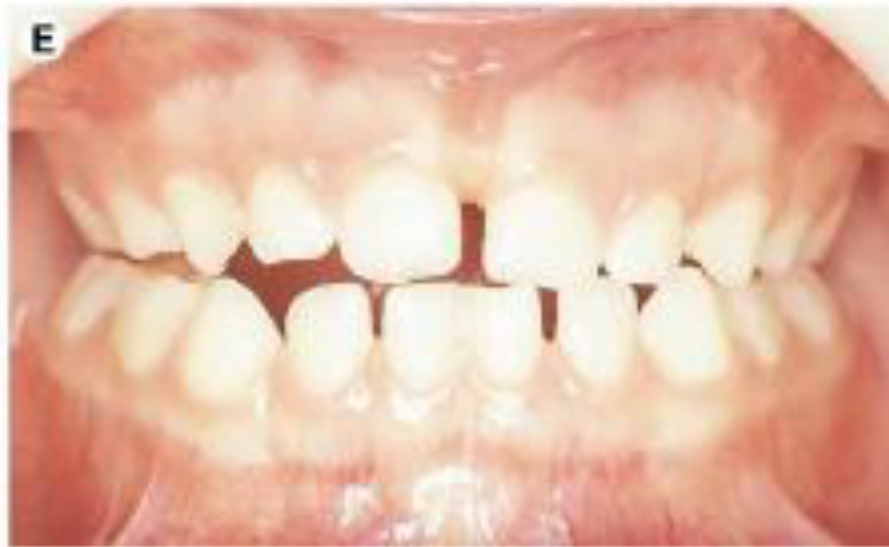
Maxillary expansion is used to resolve the posterior x-bite.
-
For dental x-bites, the treatment of choice is to expand the arch by tipping the teeth.
-
For skeletal x-bites, sutural expansion is recommended.
-
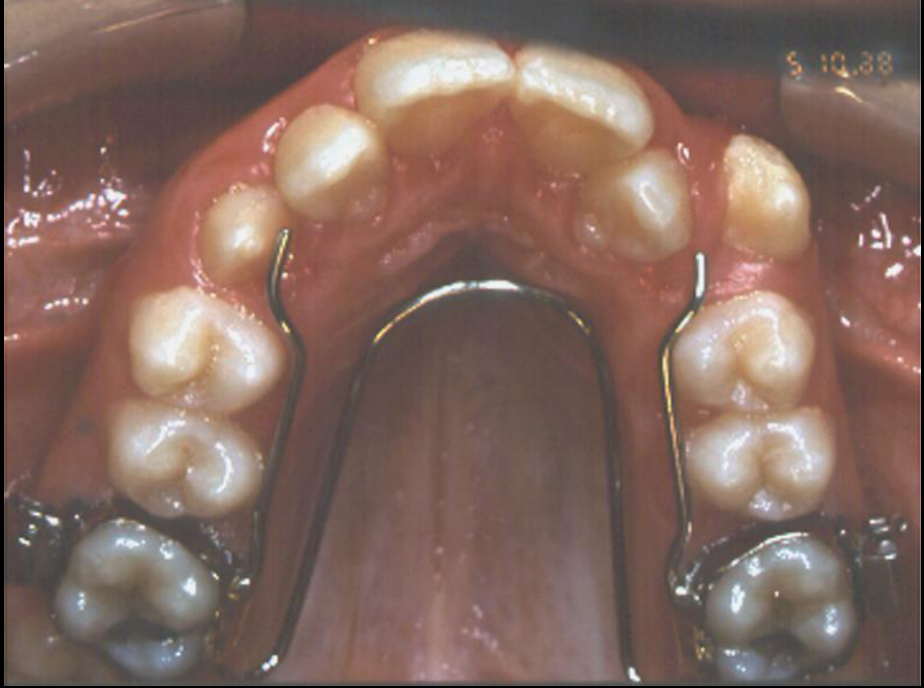
A double-arch appliance can be used when the correction is primarily dental, moving the affected molars buccally rather than widening the midpalatal suture.
Lecturer — Functional Shift
The first question when evaluating a crossbite is whether a functional shift is present. If a shift exists, treatment should begin promptly to eliminate the shift and establish a more stable mandibular position.
- A rapid maxillary expander can address a skeletal transverse deficiency when the maxilla is significantly narrow.
Lecturer — Expansion Control
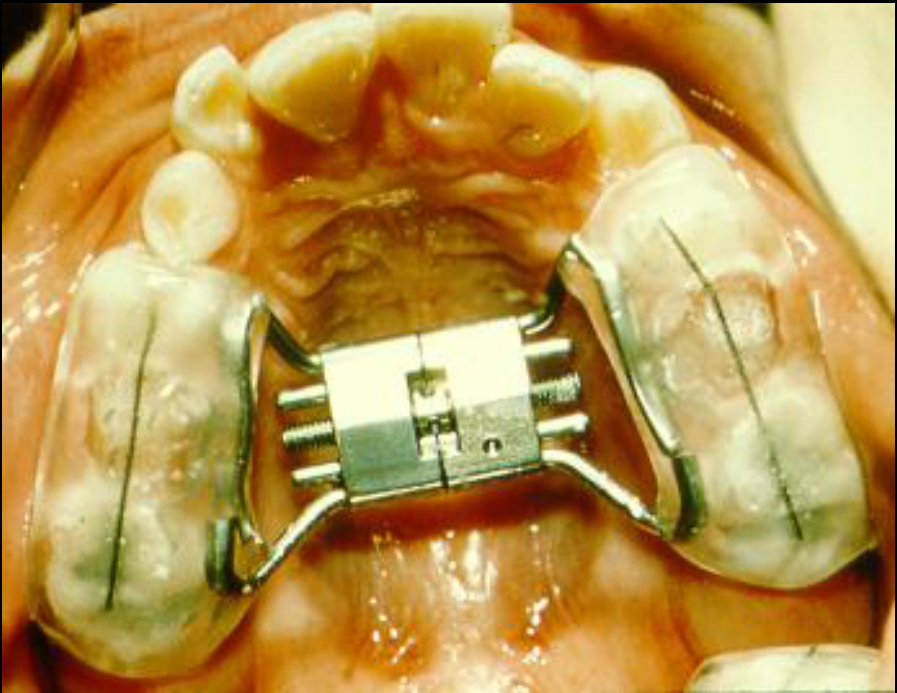
Encapsulation of the posterior teeth may reduce molar tipping and limit unwanted clockwise mandibular rotation, particularly in a hyperdivergent patient.
- The goal is to transfer more of the correction to suture opening rather than dental tipping.
 |  |
 |  |
Crossbite Treatment Guidelines35
Class I
- Mild crowding: Wait until the permanent dentition
- Mod to Severe crowding: Late mixed dentition before the Es exfoliate
- Severe Crowding: Refer to an orthodontist
Class II
- During the adolescent growth spurt
Class III
- Maxillary Retrusion: Pre-adolescence (7-10)
- Mandibular Prognathism: late adolescence / when the mand stops growing
Crossbite
- With functional shift: Treat early to eliminate the shift
- Without functional shift: Can delay to the permanent dentition
Extractions and Camouflage
What are the two reasons for extracting teeth in routine orthodontic treatment?
- Correction of crowding/protrusion (Class I)
- Camouflage (Class II or Class III)
Indications and Epidemiologic Data363738
Epidemiologic Data for Malocclusion from NHANES III — Key Points39
-
About half the population have well-aligned incisors; 15% are so crowded that extractions are probably required for treatment.
-
The lecture stated that approximately 45% of patients have a normal occlusion without significant problems, while approximately 15% have malocclusions requiring some intervention.
How do we evaluate protrusion?
Why extract teeth on a non-crowded case?
Lecturer — Treatment Planning
Extraction planning should consider more than intraoral occlusion. The goal is to balance facial aesthetics, occlusal stability, function, and relapse prevention; when the skeletal pattern is stable and the facial appearance improves, preserving some premolars may be preferable to extracting them solely for an ideal molar relationship.
Class II Camouflage4041
 |  |
What Does Camouflage Mean?42
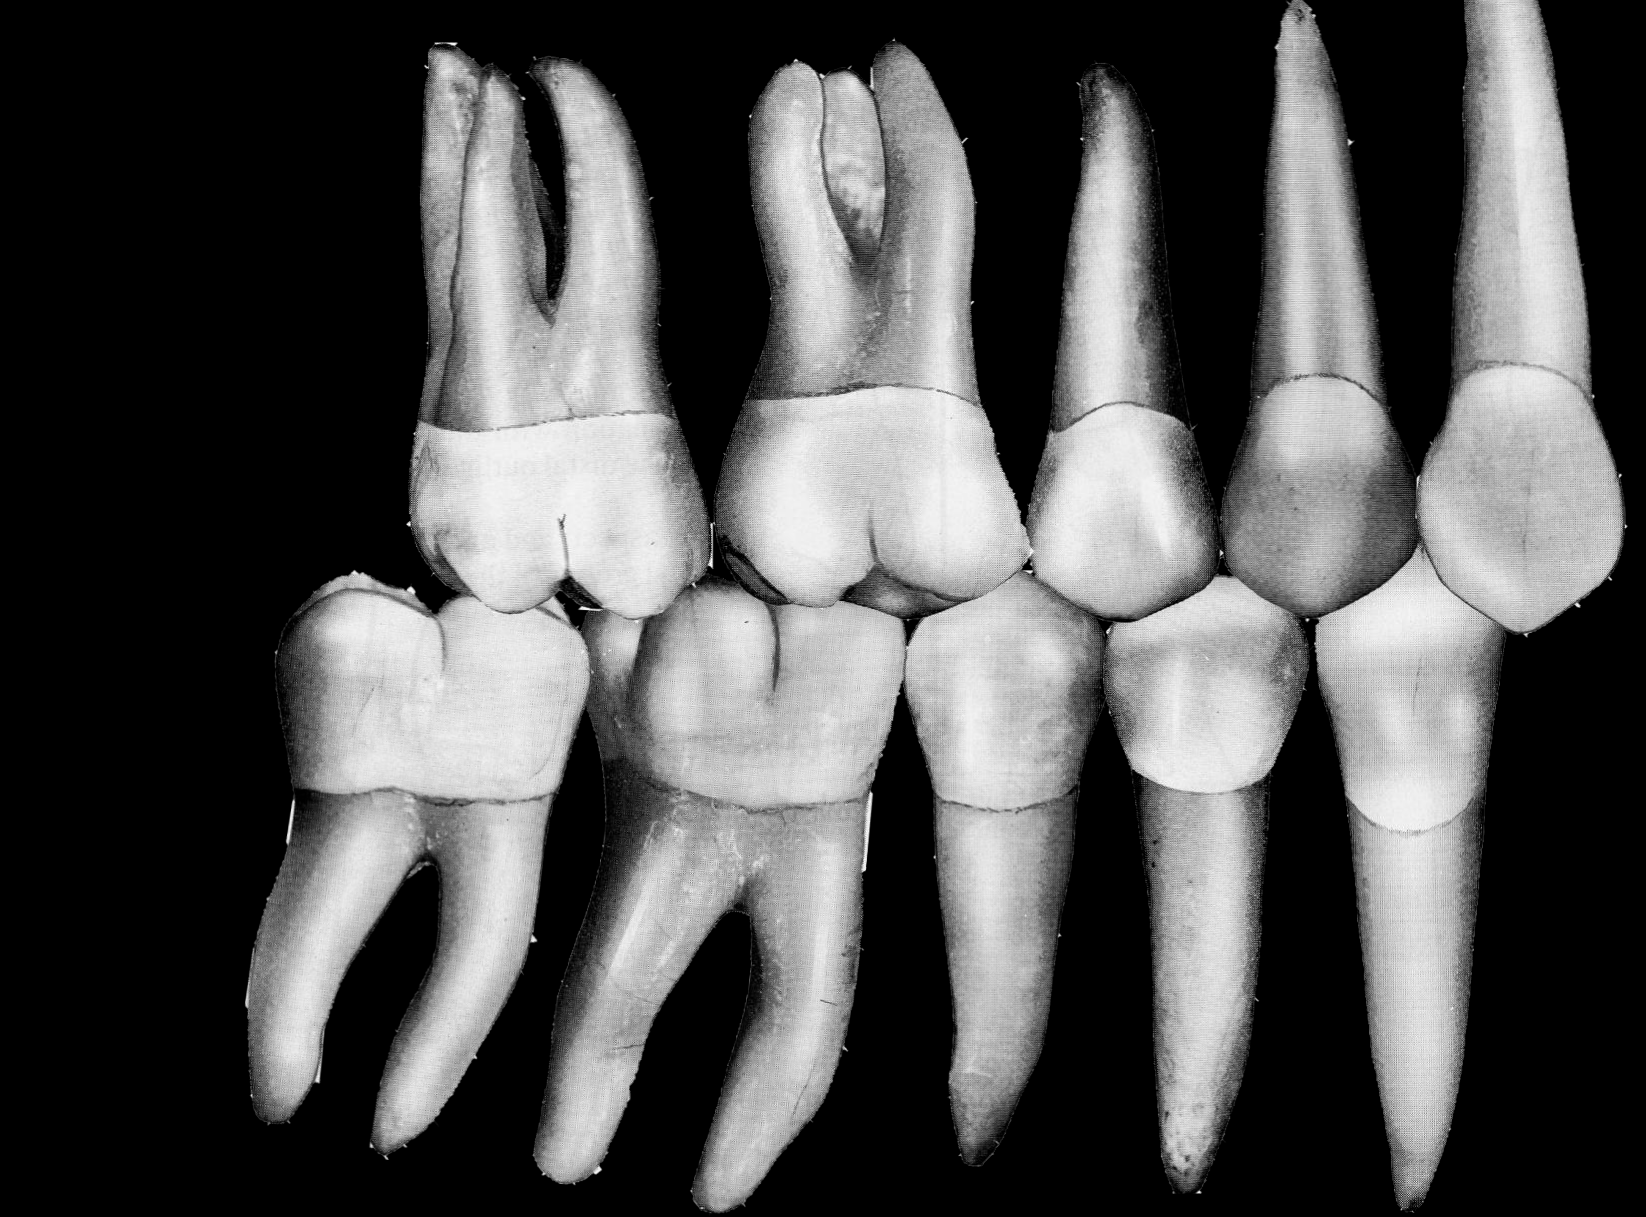
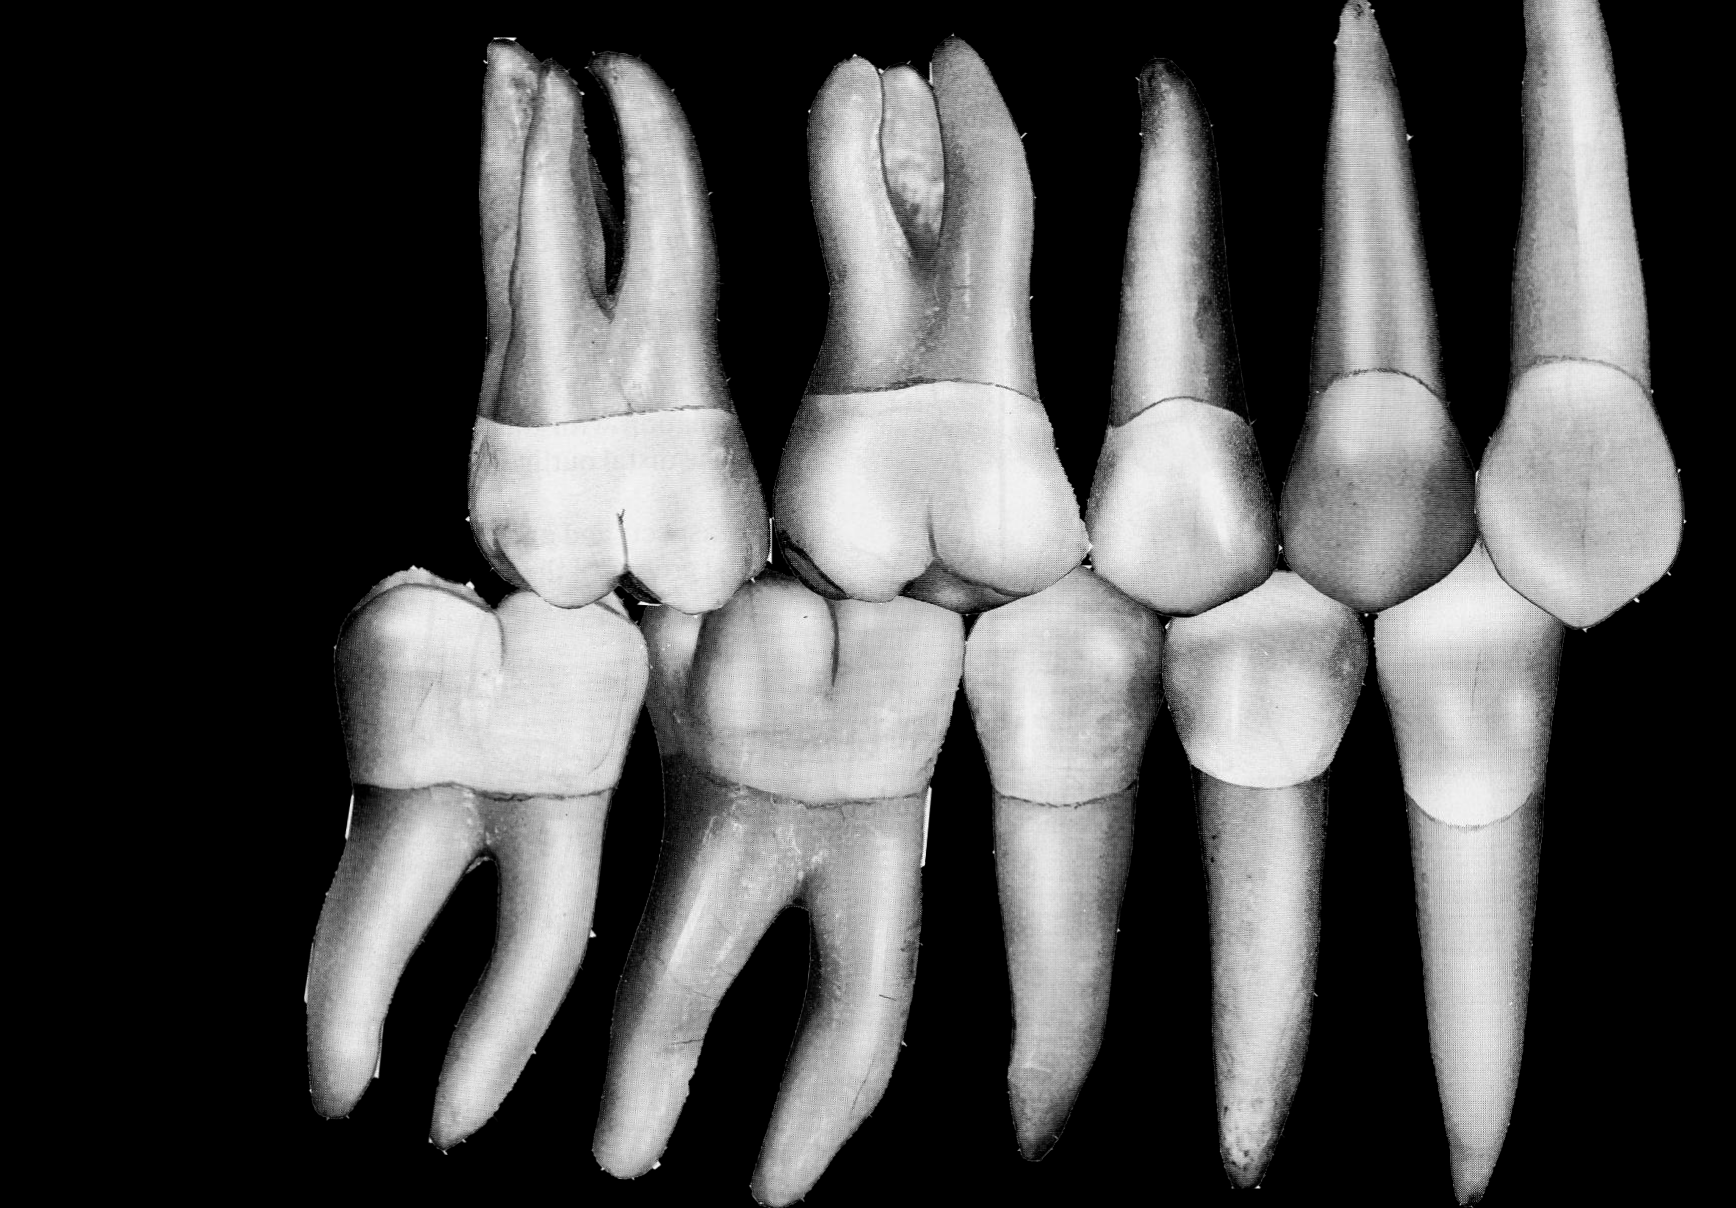
To correct the malocclusion while making the underlying skeletal problem less apparent.
Case moved — see Case: Class II profile camouflage with extractions
How Do We Camouflage a Class II Skeletal Malocclusion?
Extractions:
- U4s — for moderate cases
- U4s/L5s — for mild cases
Extractions — 2 premolars
Extractions — U4s, L5s
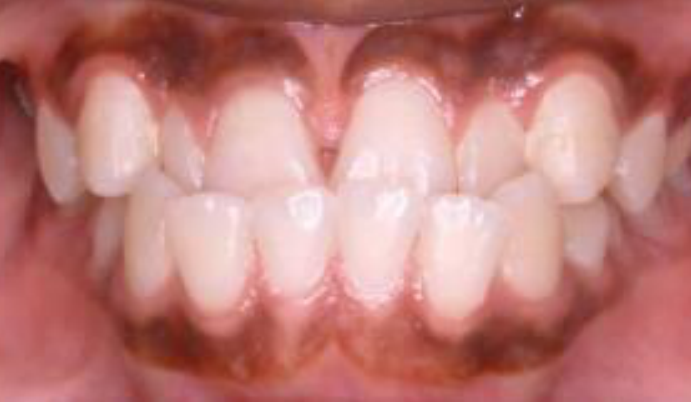
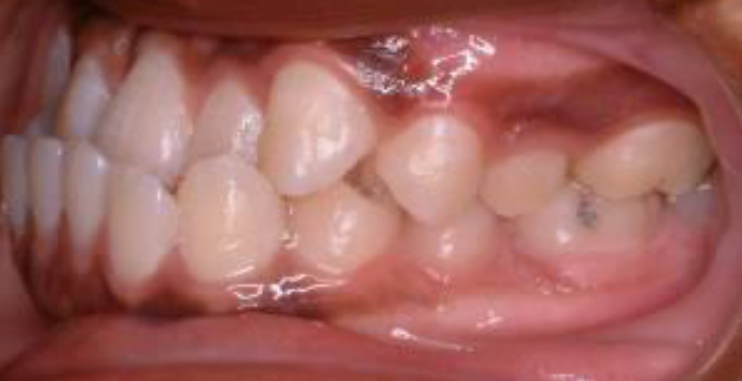
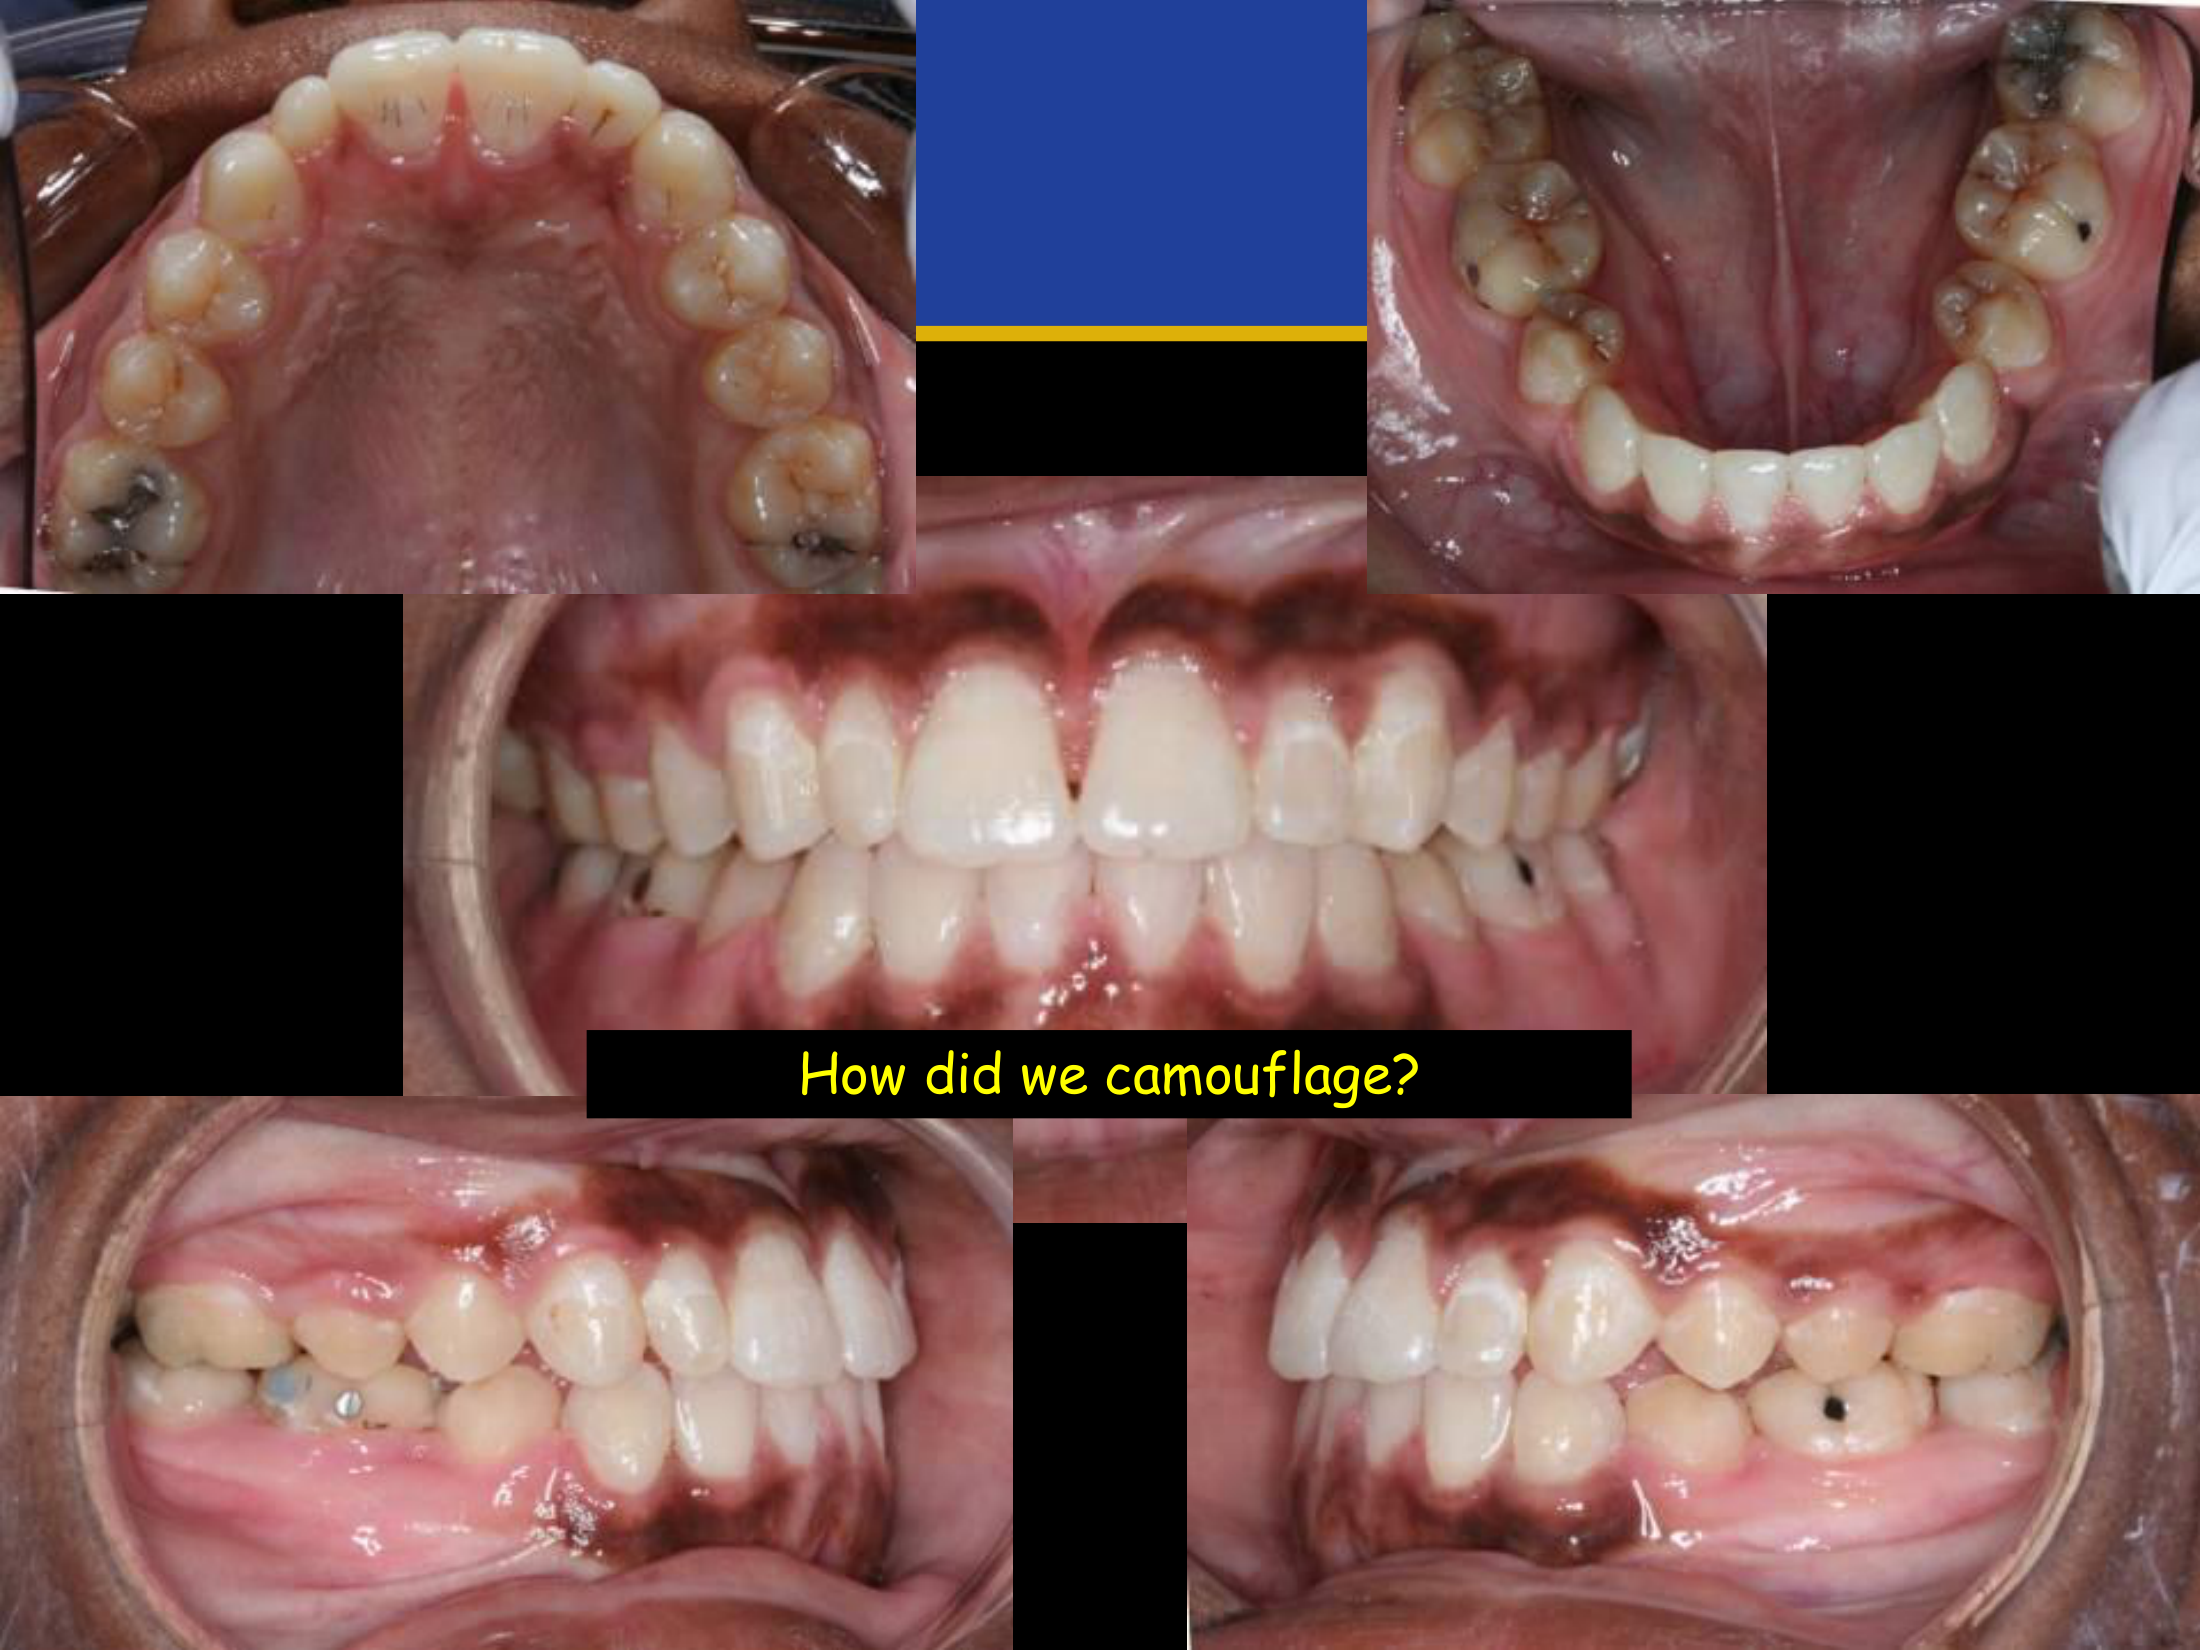
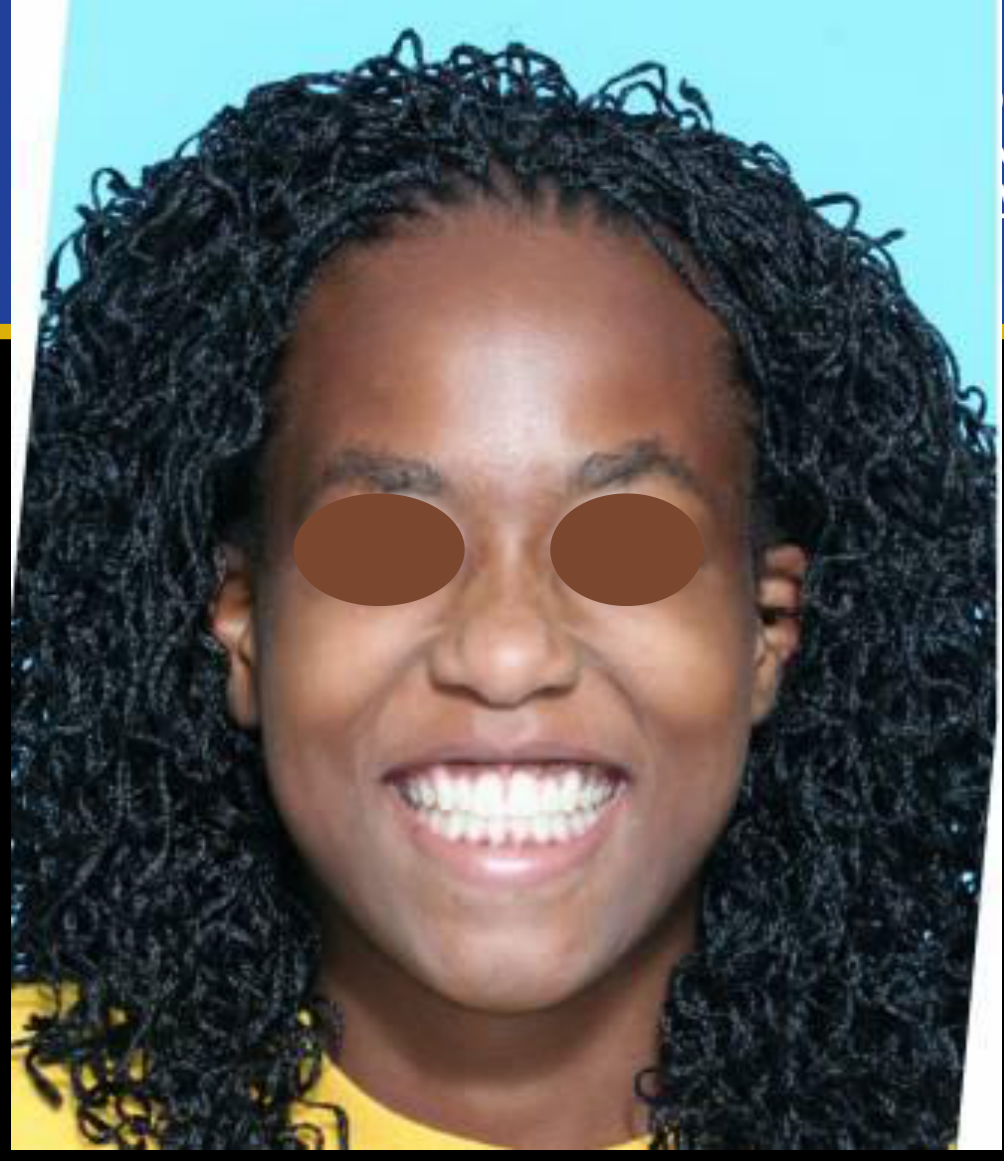
Class III Camouflage43444546
Extractions47
- L1 — for mild cases
- U5s/L4s
- L4s — for moderate cases
What are our options?
How did we camouflage?
Make sure you review why the trend in extractions changed.
Lecturer — Class III Camouflage
In a Class III relationship with a negative overjet, lower first premolars are commonly extracted so the lower incisors can be retracted.
- Lower first premolars alone may correct the overjet but leave the lower incisors somewhat proclined.
- Combining lower first-premolar and upper second-premolar extractions can allow the upper first molars to move into a Class I relationship, although the upper second premolars may not fit ideally with the lower first molars.
- The preferred approach described was often extraction of four premolars, using lower first rather than lower second premolars.
- In a described case, the upper incisors were already proclined as compensation; lower first-premolar extraction reversed the negative overjet, improved facial aesthetics, but left imperfect posterior interdigitation.
- The choice between lower first- and second-premolar extraction depends on the individual case, with profile and facial-aesthetic improvement prioritized over a perfect Class I relationship when necessary.
Scope of Practice Disclaimer48
At the end of this course you DO NOT have the didactic knowledge or clinical skills to treat comprehensive orthodontic cases.
Clinical Cases
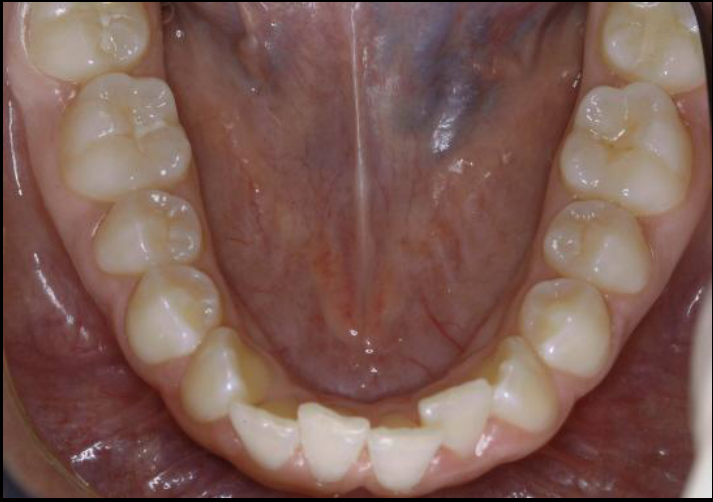
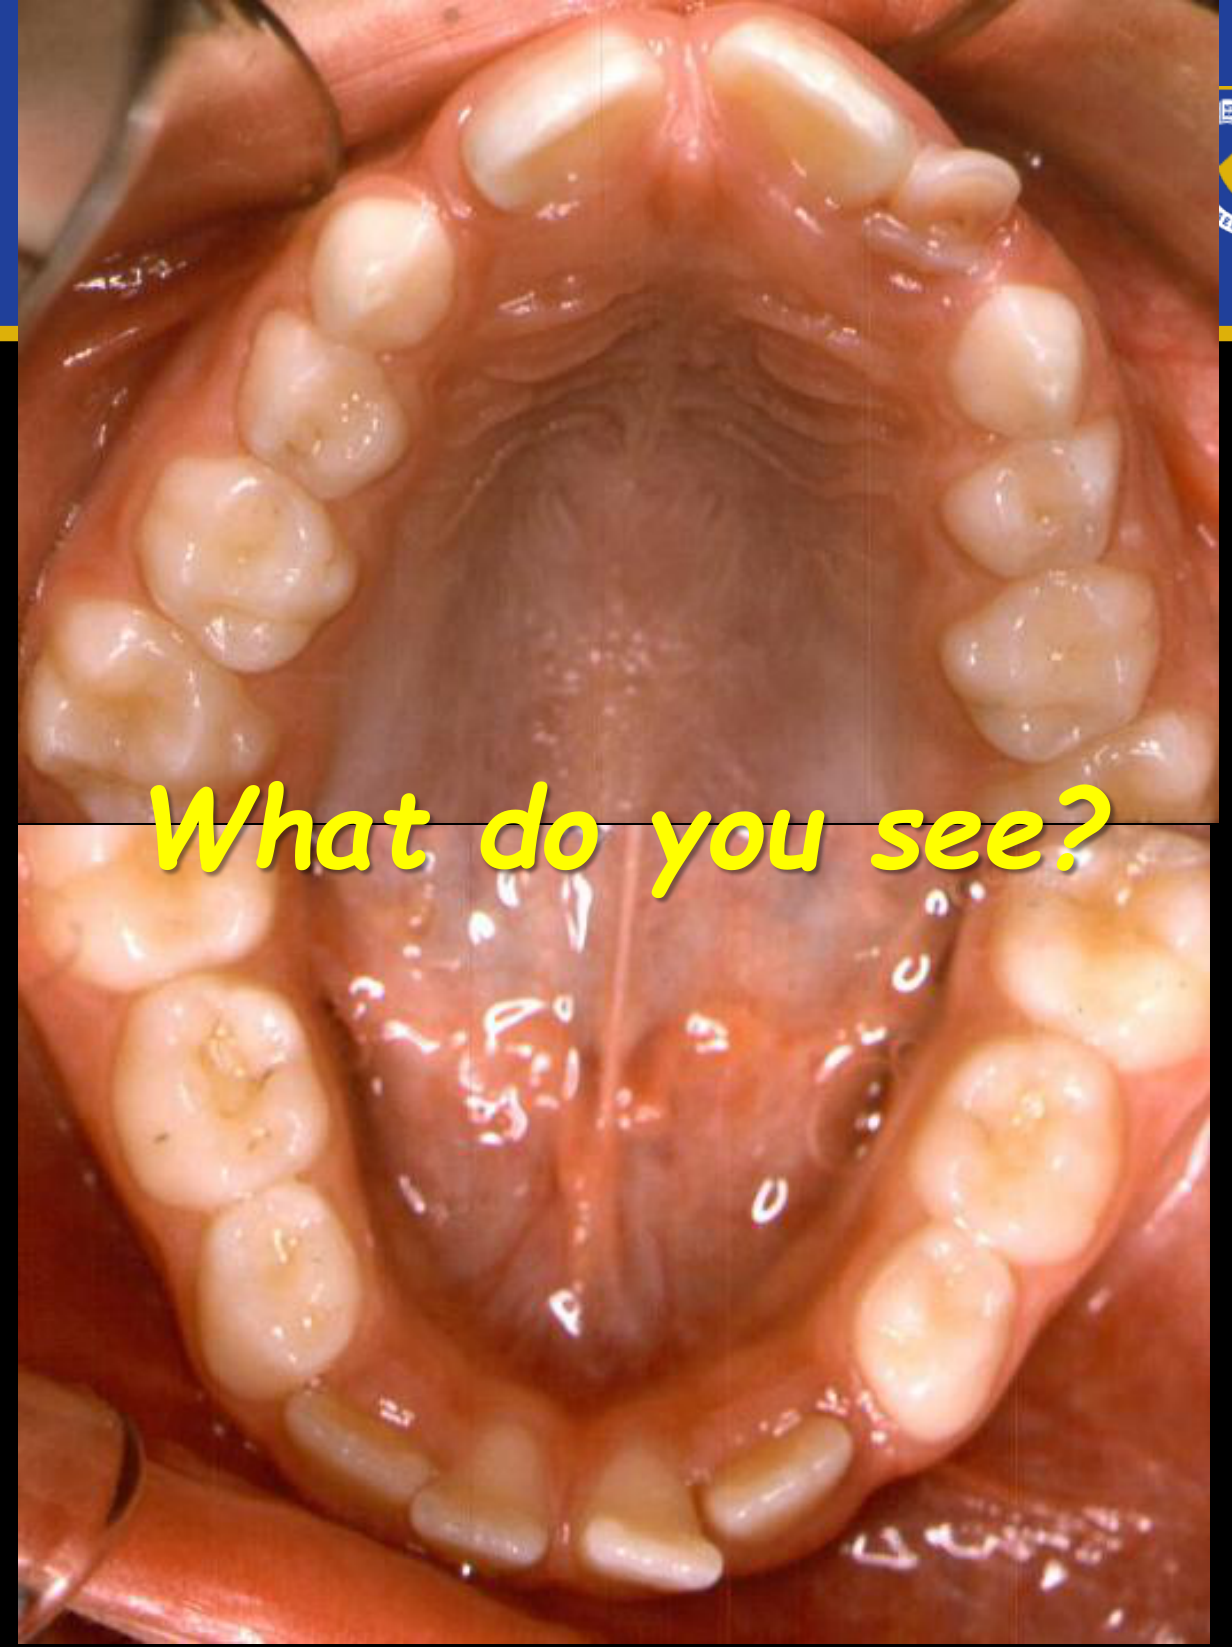
Case: Class I malocclusion with severe crowding, intraoral photographs
Question
Scenario: A patient with a Class I molar relationship and severe crowding is evaluated for orthodontic treatment timing and management.
What’s shown: Intraoral photographs showing an occlusal view and the mandibular dental arch. The central incisors are erupted with no space, the lateral incisors are larger, and there is no space for the canines.
Consider: How to manage the severe crowding and utilize available space for alignment.
Answer
Observations:
- Class I molar relationship.
- Central incisors are erupted with no space.
- Lateral incisors are larger, leaving no space for the canines.
- Severe crowding (up to 7-8 mm).
- Ample space is available in the leeway space.
Reasoning:
- For mild crowding, treatment can wait until the permanent dentition.
- For severe crowding, early intervention is needed to utilize the leeway space before the first permanent molars drift.
- A lower lingual arch can be used to hold the molars and redirect the leeway space to alleviate the crowding, potentially avoiding extractions.
- Timing is critical; the appliance should be prepared when the premolars have two-thirds root development, before the primary molars are lost or molars drift.
Outcome:
- Early treatment with a lingual arch to redirect the leeway space, which can significantly amend the case and potentially avoid extractions.
Takeaway:
- In Class I malocclusions with severe crowding, early intervention with a lingual arch can utilize the leeway space to resolve crowding and potentially avoid extractions, provided it is timed correctly before molar drift occurs.
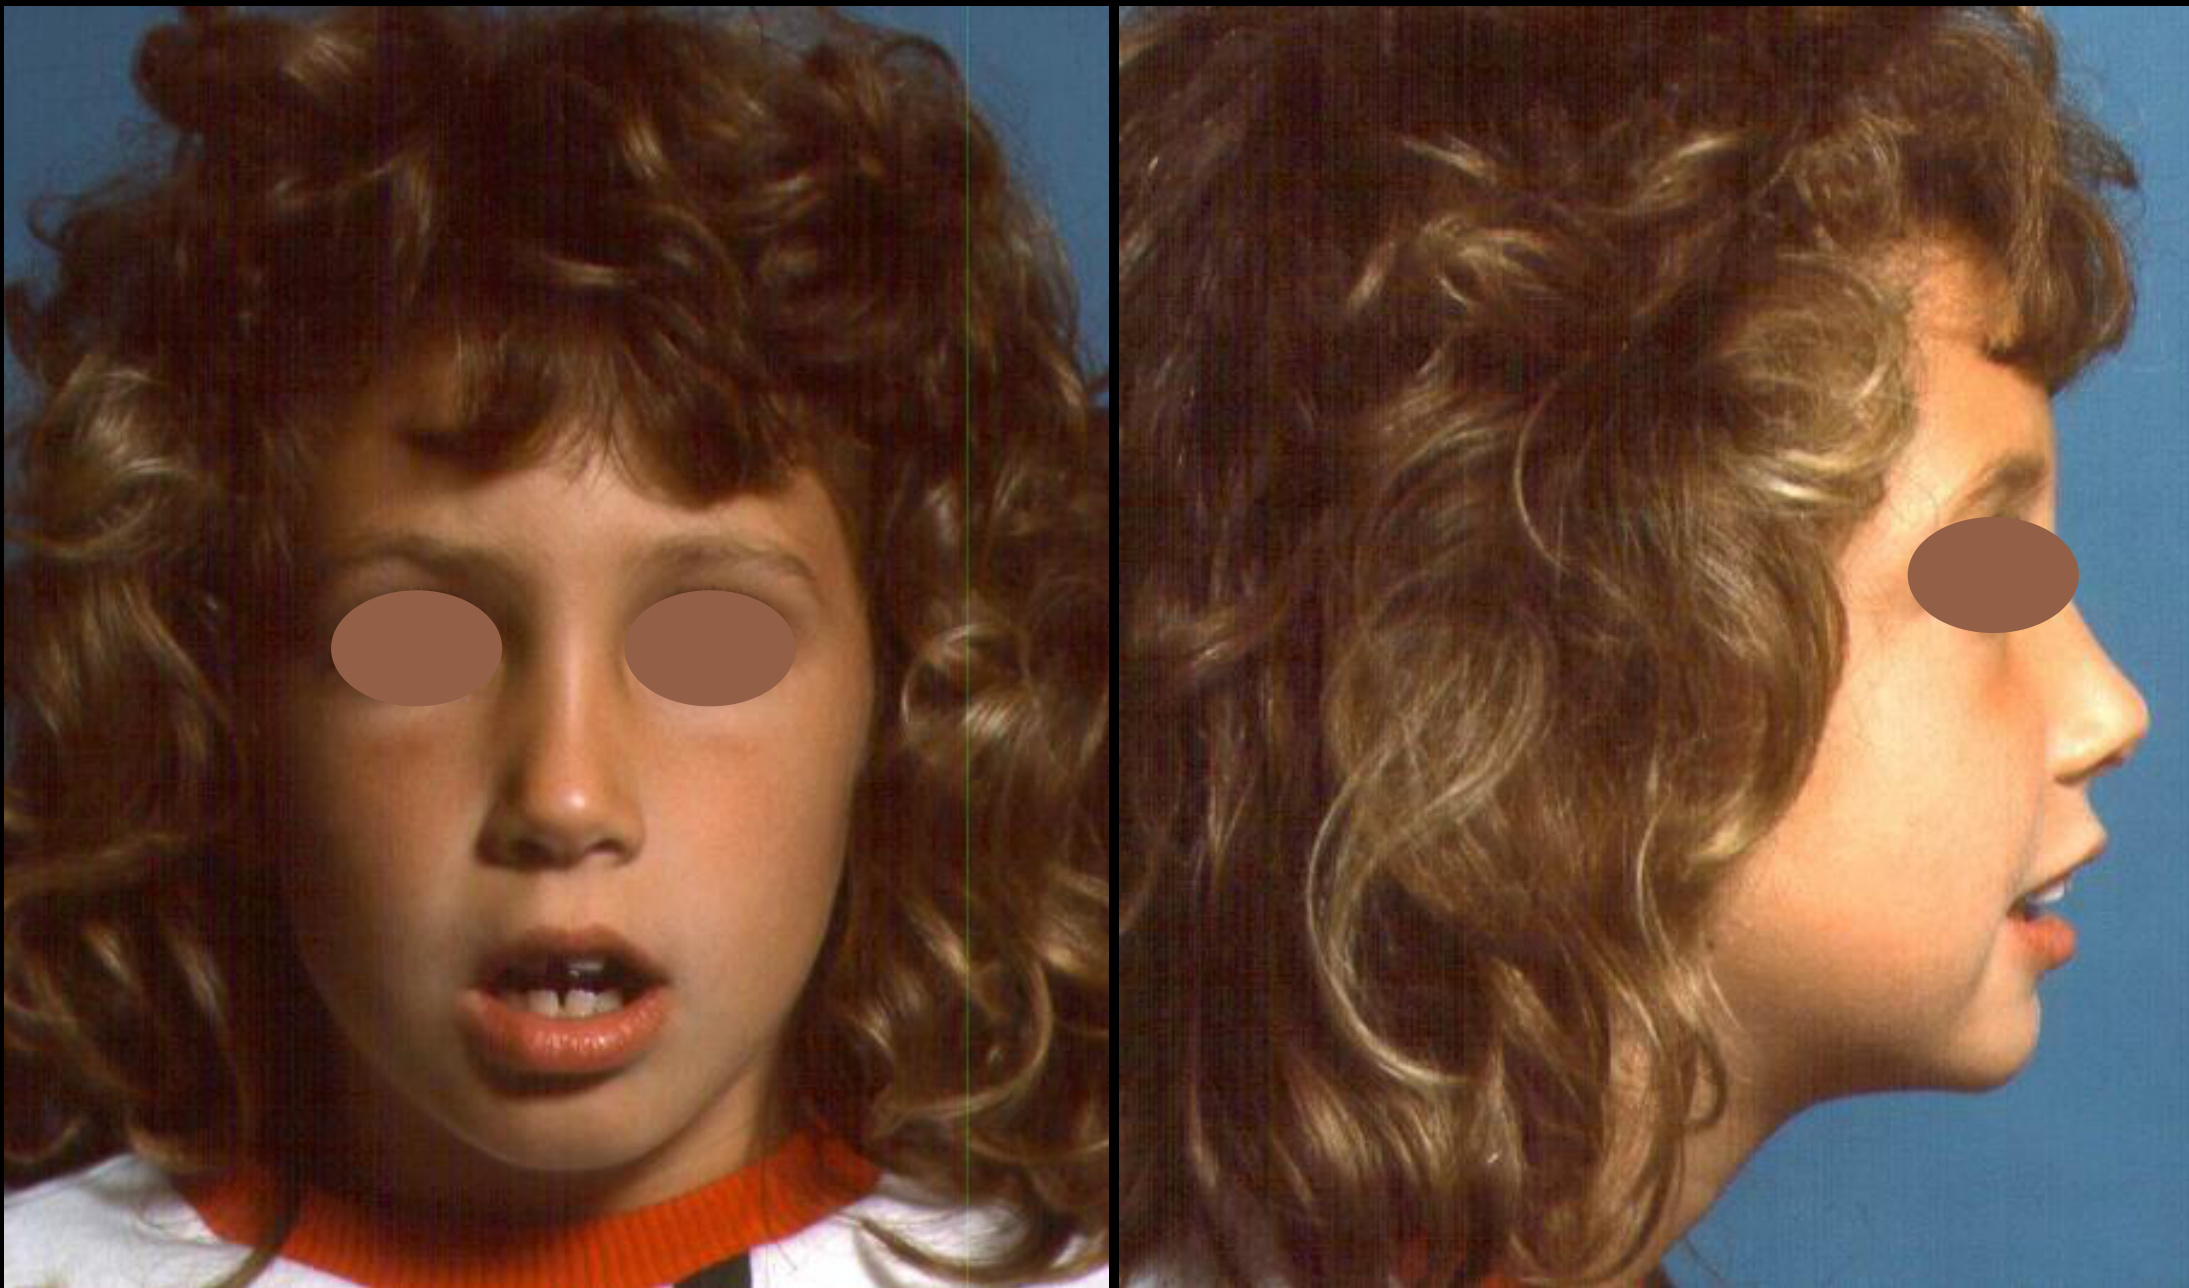
Case: Patient with severe crowding and uplifted nose evaluated for serial extraction
Question
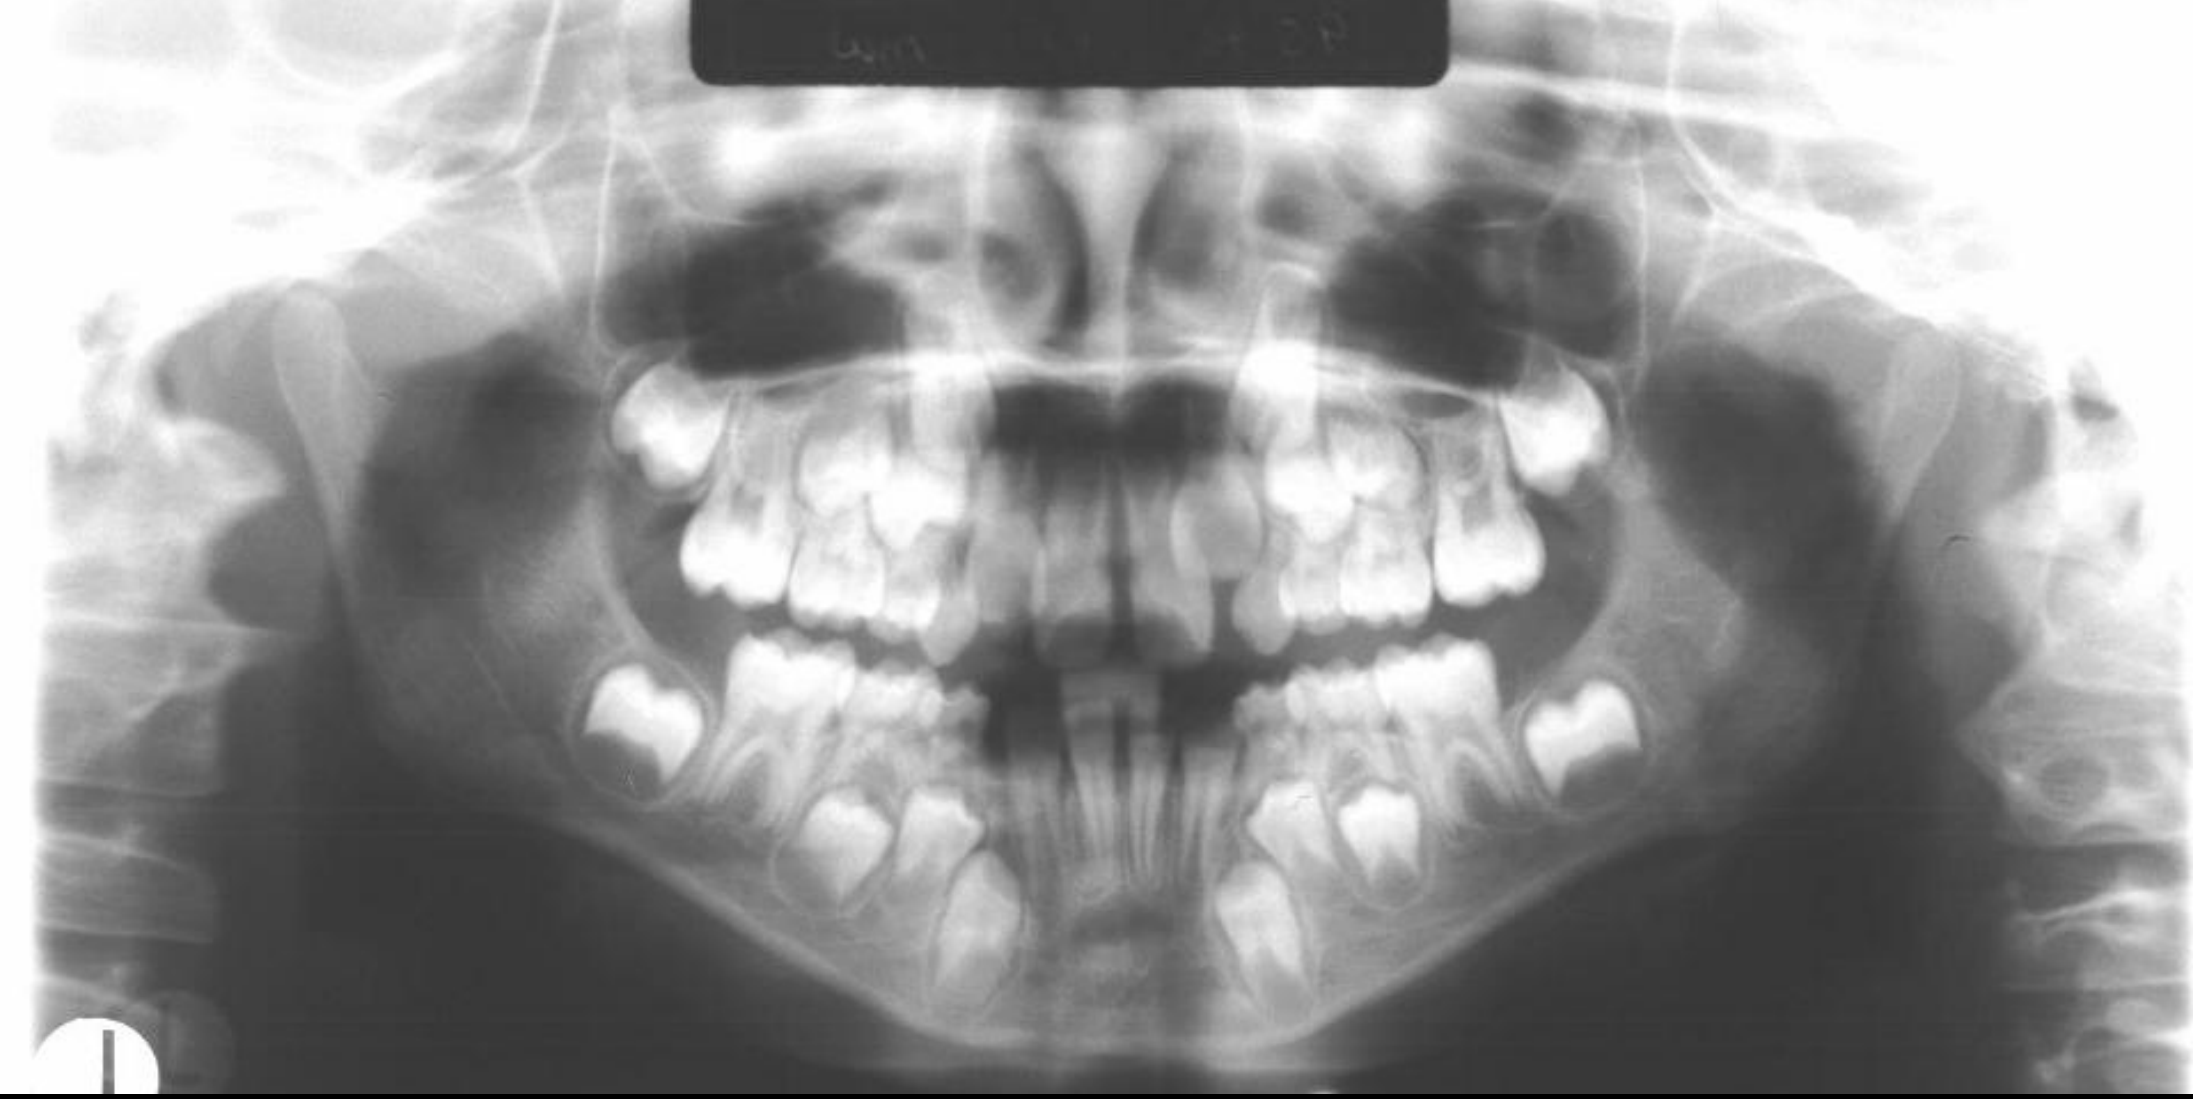
Scenario: A female patient presents for orthodontic assessment with a convex profile, incompetent lips, and an uplifted nose. Intraoral examination reveals severe crowding with no space for the lateral incisors to erupt.
What’s shown: Clinical photographs of the patient’s profile and intraoral occlusal views, followed by a panoramic radiograph (OPG). The profile shows a convex shape and an uplifted nose. The intraoral photos show a low labial frenum, diastemas, and lateral incisors that are nearly twice the size of the centrals, with no space for eruption. The OPG shows a blocked lower lateral incisor and a palatally located upper lateral incisor.
Consider: How would you assess this patient’s facial and intraoral features, and what is the proposed step-by-step serial extraction plan to manage the severe crowding and prevent impactions?
Answer
Observations:
- Profile: Convex profile, incompetent lips, and an uplifted nose (which must be considered in planning, as maxillary advancement could worsen the nasal appearance).
- Intraoral: Low labial frenum insertion, diastemas, and severe crowding with absolutely no space for the lateral incisors. The lateral incisors are almost double the size of the centrals and are in contact with the primary canines.
- OPG: Lack of space in both arches. One lower lateral incisor has erupted while the other is blocked. An upper lateral incisor is palatally located.
Reasoning:
- The immediate objective is to provide space to prevent blockage and impaction of the permanent teeth.
- The first step in serial extraction is to extract primary teeth (the lecturer named the lower Ds, or even the upper Cs) to allow the lateral incisors to erupt.
- The patient must be followed up with annual OPGs to monitor eruption.
- When the second premolars are expected to erupt, an OPG is taken. If the first and second premolars are blocking each other or if there is ectopic eruption, the first premolars are extracted.
- In this patient, the lower first premolars will likely erupt faster than the lower permanent canines, and the upper first premolars will also erupt earlier, confirming the need to eventually extract the first premolars.
Outcome:
- The proposed plan is to extract primary teeth (lower Ds or upper Cs) to allow lateral incisor eruption, followed by monitoring and eventual extraction of the first premolars as part of a serial extraction protocol.
Takeaway:
- In cases of severe crowding with no space for lateral incisors, serial extraction (starting with primary canines) is used to provide immediate space and prevent impactions, with careful consideration of facial profile features like an uplifted nose during overall treatment planning.
From the lecture slides
What do you see?
Is she a good candidate for serial extraction?
How do you decide if serial extractions is an appropriate treatment?
- Refer to an orthodontist and let them make that decision for you
Lecturer — Serial Extraction Candidates
Serial extraction is most appropriate for severe crowding with a Class I relationship, normal facial proportions, a normal overbite, and a vertically balanced facial pattern.
- A deep overbite is unfavorable because extraction treatment can produce counterclockwise mandibular rotation and worsen the overbite.
- The extraction should solve crowding without removing so much space that the molars cannot be managed in a Class I relationship.
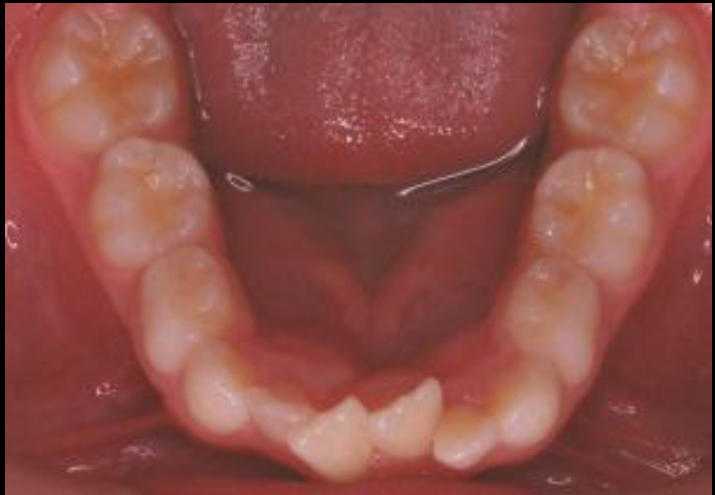
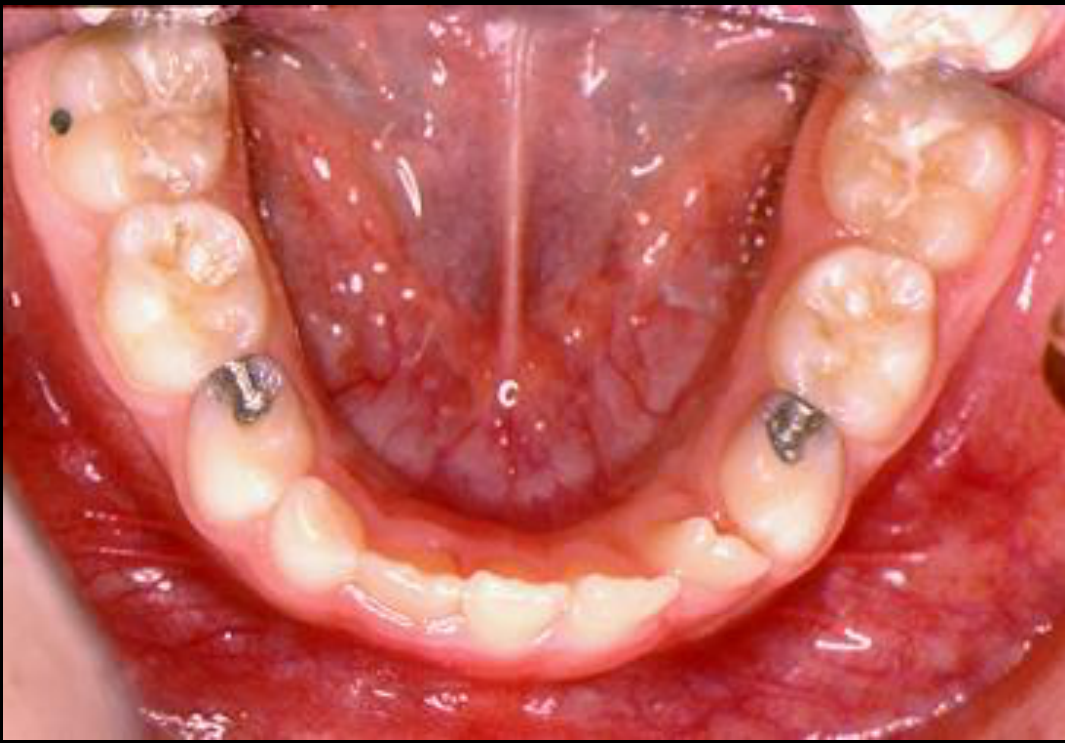
Case: Lower midline shift after early loss of a primary canine without a balancing extraction
Question
Scenario: A patient who never visited a dentist lost a lower primary canine prematurely, and no balancing extraction was done.
What’s shown: A clinical photograph showing an occlusal view of the mandibular arch.
Consider: What is the problem observed, and what is the recommended management?
Answer
Observations:
- The lower primary canine was lost prematurely.
- The lateral incisor on the left side has occupied the space due to anterior crowding.
- A lower midline shift to the left is developing or established.
Reasoning: The unbalanced premature loss of the primary canine in the presence of anterior crowding allowed the lateral incisor to drift into the space, pulling the midline to the left.
Outcome: It is recommended to extract the primary canine on the right side and place a lingual arch to maintain molar position and prevent further shift. If the midline shift is already established, partial braces are required to reopen the space.
Takeaway: After premature loss of a primary canine in a crowded arch, extracting the contralateral primary canine prevents lateral incisors from occupying the space and causing a midline shift; established shifts require partial braces for space regaining.
From the lecture slides
What will happen if we do nothing?
What do you see?
What should be done?
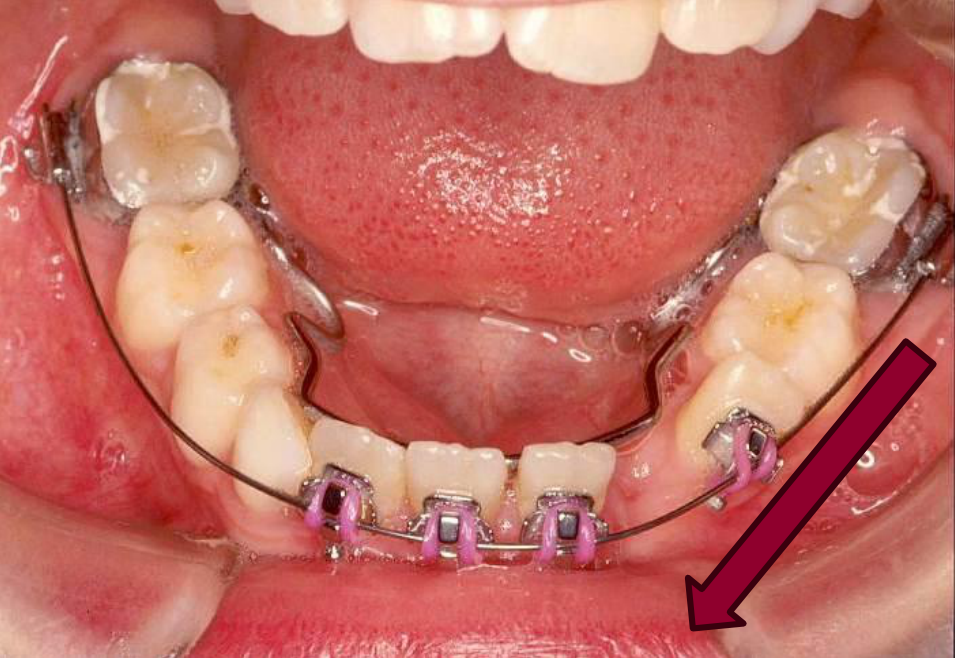
Case: Space regaining for established lower midline shift
Question
Scenario: An analogous situation to the previous case, where a patient presents with an established lower midline deviation and requires space regaining.
What’s shown: A clinical intraoral photograph showing the mandibular arch fitted with a lingual arch and partial fixed appliances with a push coil.
Consider: How can the lower midline deviation be corrected in this scenario?
Answer
Observations:
- The mandibular arch is fitted with a lingual arch.
- Partial fixed appliances (braces) are in place.
- A push coil is placed in the arch.
Reasoning: By extracting the primary canines and utilizing a push coil with partial braces, space can be actively regained to correct the midline deviation and bring the lateral incisor back to its proper position.
Outcome: The lower midline deviation is corrected.
Takeaway: When a lower midline shift is already established, partial fixed appliances with a push coil can be used to regain space and correct the deviation.
From the lecture slides
Space regaining with partial fixed appliances?
Not the same patient
Lecturer — Space Regaining
Space regaining should generally be limited to approximately three or four millimeters in severe serial-extraction cases. Regaining more space may make the second phase more difficult, create an unfavorable eruption pattern, or require the space to be removed again through premolar extraction.
- When space has been lost because of premature canine loss and midline shift, a push coil on a partial fixed appliance can reopen the space and correct the lower midline deviation.
Case: Headgear treatment, before and after clinical photos
Question
Scenario: A patient undergoes early treatment for a skeletal discrepancy using a removable appliance.
What’s shown: Clinical photographs showing the patient’s facial profile before and after the first phase of treatment.
Consider: What are the observed changes following the first phase of treatment?
Answer
Observations:
- A very good catch-up of the overjet.
- No significant change in the facial profile.
Reasoning: The treatment was completed using only headgear, without braces, timed around the peak of the growth spurt to achieve a quick first phase and reduce the overjet.
Outcome: The overjet was successfully reduced using headgear alone, which addresses the skeletal problem and makes the anticipated second phase of treatment easier.
Takeaway: Headgear can effectively reduce overjet in Class II malocclusions during the first phase of treatment, even if profile changes are minimal.
Case: Herbst appliance treatment, superimpositions
Question
Scenario: A patient is treated with a fixed functional appliance for a lower jaw discrepancy.
What’s shown: Superimpositions or tracings (black for before, red for after) showing the dental and skeletal changes.
Consider: What skeletal and dental changes are observed following the use of the appliance?
Answer
Observations:
- Protrusion of the lower incisors.
- Minimal vertical rotation of the mandible.
- Primarily an anteroposterior relationship change.
- Remodeling of the condyle.
Reasoning: The fixed functional appliance (Herbst) connects the upper first molars to the canine area, pushing the mandible forward. This redirects growth and causes remodeling of the anterior wall of the glenoid fossa, solving the mandibular deficiency primarily in the anteroposterior dimension without significant vertical rotation.
Outcome: The mandibular deficiency was resolved through condylar remodeling and forward positioning of the mandible.
Takeaway: Fixed functional appliances like the Herbst appliance correct mandibular deficiencies primarily through anteroposterior changes and condylar remodeling, with minimal vertical rotation.
Case: Dental crossbite with functional shift, treated with a double arch
Question
Scenario: A patient presenting with a crossbite and an associated functional shift.
What’s shown: Intraoral photographs showing a double arch appliance in place.
Consider: What is the mechanism of action of this appliance, and what type of crossbite is it indicated for?
Answer
Observations:
- The double arch appliance is in place.
- The treatment achieves dental changes by moving the molars slightly buccally.
- There is no widening of the midline suture.
Reasoning: The crossbite is purely dental (e.g., edge-to-edge or localized) rather than a true skeletal narrow maxilla. Therefore, the goal is to eliminate the functional shift and achieve dental compensation by tipping the teeth buccally, rather than attempting skeletal sutural expansion.
Outcome: The functional shift is eliminated and the dental crossbite is corrected by moving the molars buccally.
Takeaway: A double arch appliance is an effective treatment for dental crossbites with a functional shift, achieving dental compensation without skeletal sutural expansion.
Case: Skeletal crossbite in a hyperdivergent patient
Question
Scenario: A hyperdivergent patient presenting with a severe skeletal crossbite requiring expansion.
What’s shown: An encapsulated expander with jack screws.
Consider: Why was this specific type of expander chosen for this patient?
Answer
Observations:
- The expander is encapsulated, covering the teeth.
- Jack screws are used for activation.
Reasoning: In a hyperdivergent patient, conventional expansion would cause buccal tipping of the molars, leading to an undesirable clockwise rotation of the mandible and increased vertical dimension. The encapsulation restricts this molar tipping, directing the orthopedic force to open the midpalatal suture instead.
Outcome: The midpalatal suture is opened with minimal molar tipping, preventing adverse clockwise mandibular rotation.
Takeaway: Encapsulated expanders are indicated for hyperdivergent patients with skeletal crossbites to prevent molar tipping and avoid worsening the vertical dimension through clockwise mandibular rotation.
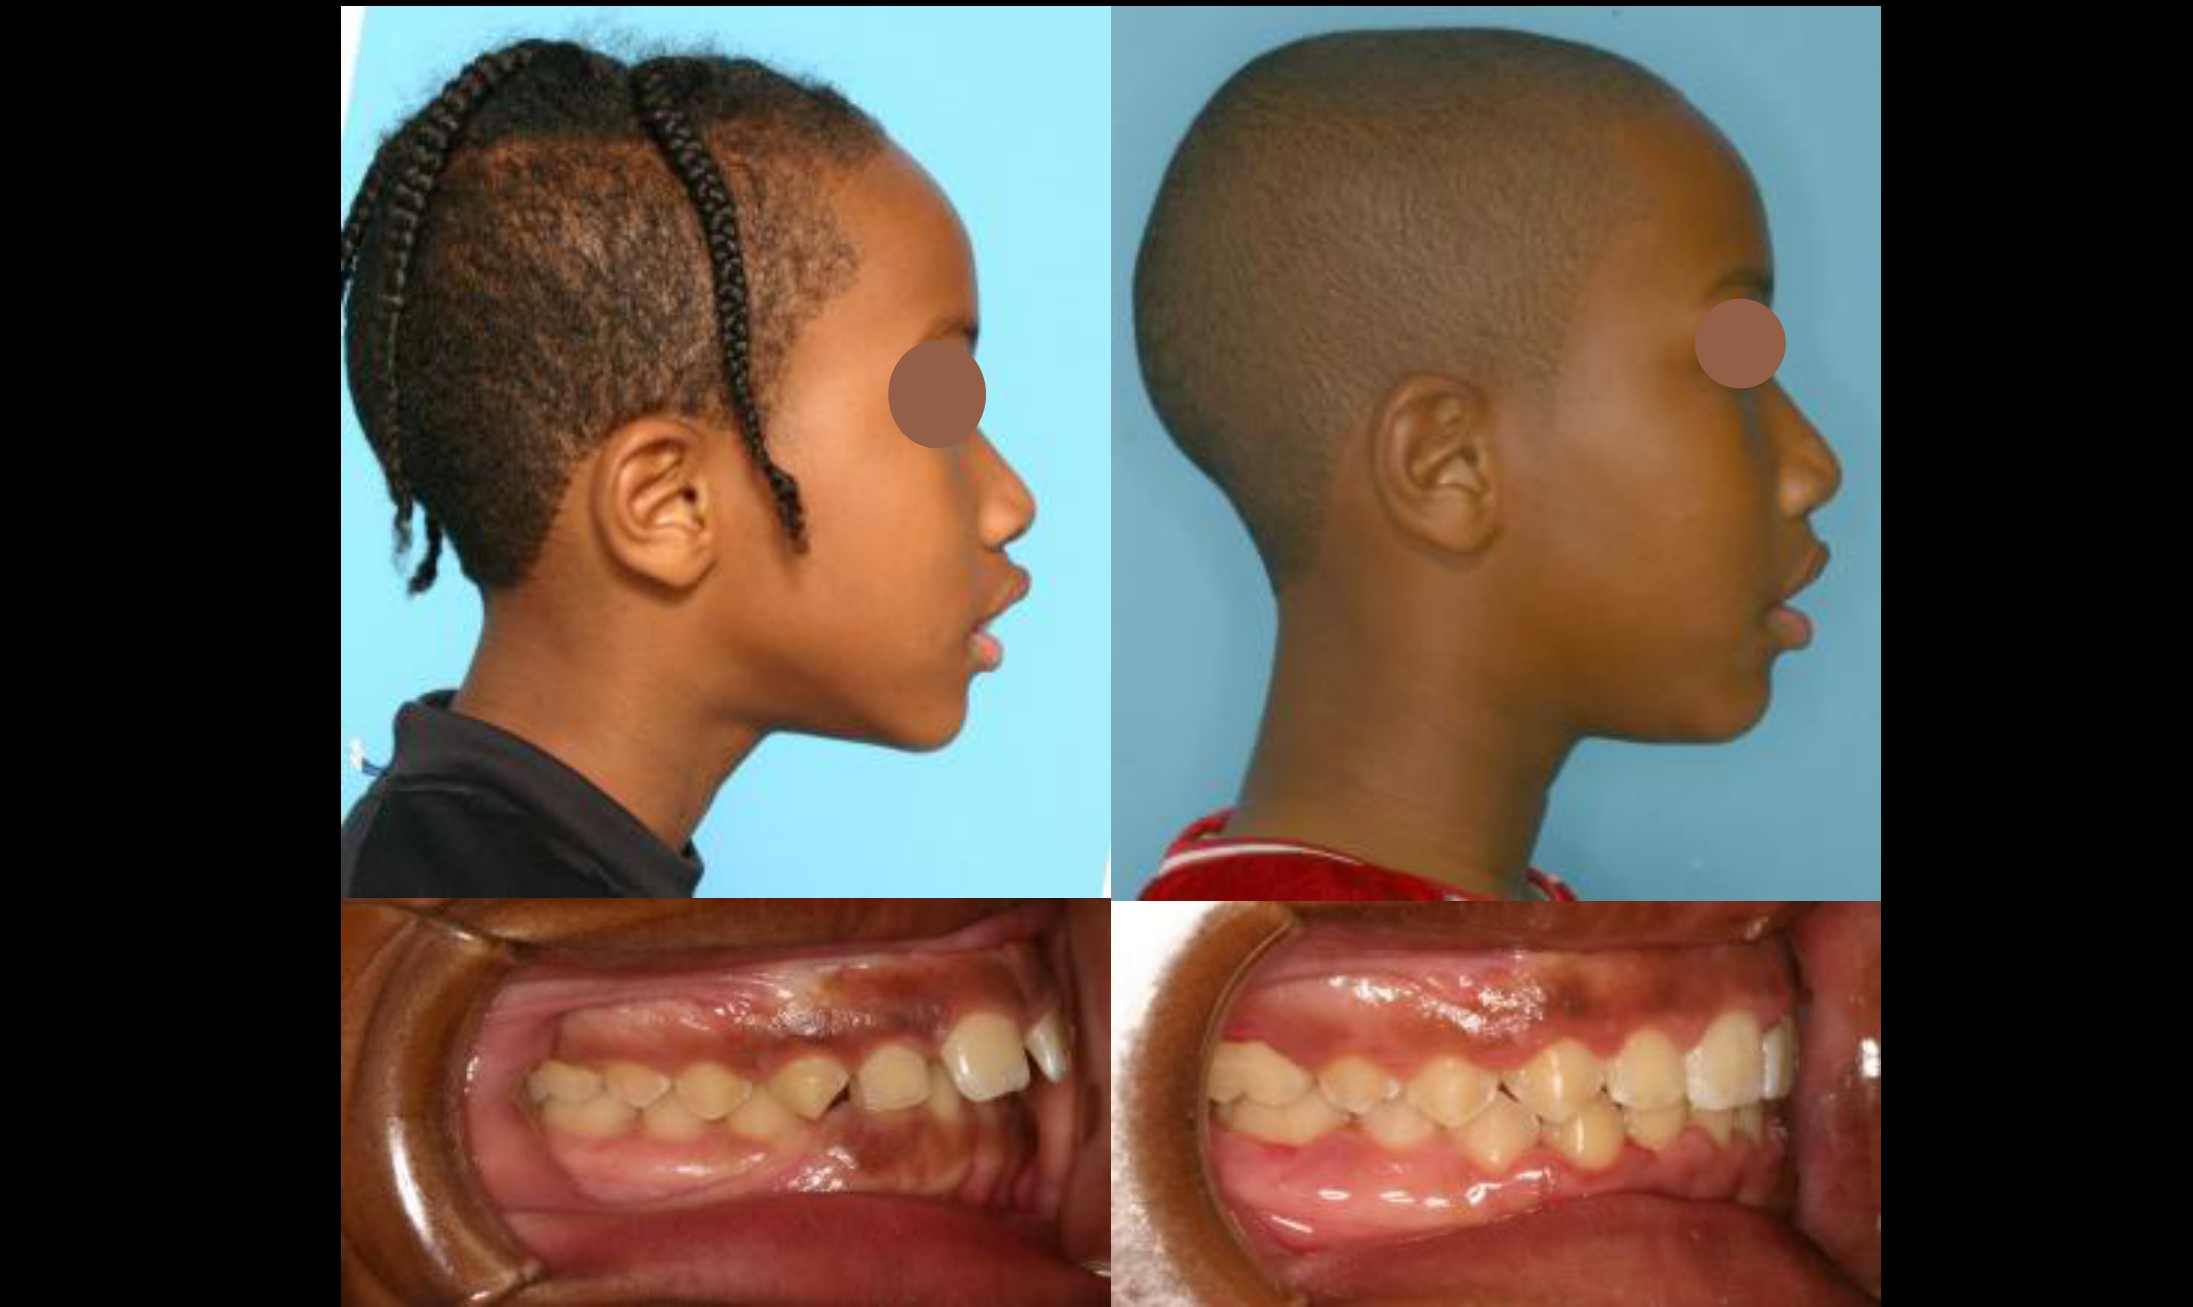
Case: Class III retrusive maxilla, before and after treatment
Question
Scenario: A patient with a well-established Class III malocclusion due to a retrusive maxilla.
What’s shown: Before and after clinical photographs of the patient’s profile and anterior dentition.
Consider: Evaluate the treatment outcome based on the clinical changes.
Answer
Observations:
- The anterior crossbite has been corrected.
- There is a slight improvement in the upper facial profile.
Reasoning: The patient presented with a retrusive maxilla and an anterior crossbite. Orthopedic treatment (such as a face mask and rapid maxillary expansion) was utilized to protract the maxilla and correct the crossbite, resulting in the observed profile improvements.
Outcome: The anterior crossbite was successfully corrected, and a slight improvement in the upper profile was achieved.
Takeaway: Orthopedic treatment for a retrusive maxilla can effectively correct anterior crossbites and improve the facial profile, though overcorrection is often necessary to account for potential relapse and continued growth.
Case: Class II profile camouflage with extractions
Question
Scenario: A patient presents with a Class II skeletal profile and protrusion, but without dental crowding.
What’s shown: Clinical photographs of the patient’s profile, incisors, and overjet, along with before and after images showing the results of treatment.
Consider: Why extract teeth in a non-crowded case, and how does this approach improve the Class II profile?
Answer
Observations:
- The patient has no crowding but presents with a protruded profile and increased overjet.
- Before and after images show correction of the upper lip protrusion and an improved nasolabial angle.
- Treatment involved the extraction of upper first premolars to retract the canines and incisors.
Reasoning: The underlying skeletal Class II problem is compensated for (camouflaged) by extracting upper first premolars. This creates space to retract the anterior teeth, reducing the overjet and improving the soft tissue profile and aesthetics, even though the final occlusion finishes in a Class II relationship.
Outcome: The patient’s profile and aesthetics were improved, with correction of the upper lip protrusion and nasolabial angle, finishing in a Class II occlusion.
Takeaway: Extractions can be used for camouflage in non-crowded Class II cases to improve facial aesthetics and profile, prioritizing facial improvement over achieving a Class I occlusion.
From the lecture slides
Class II Camouflage Case
A patient had no significant crowding, protruding incisors, excessive overjet, and a Class II facial profile.
- Extraction and incisor retraction improved upper lip protrusion, the nasal angle, and the overall facial profile.
- The maxilla and underlying skeletal problem were not changed; the improvement resulted from dental compensation.
- In Class II camouflage, upper incisors may be retracted or lower incisors moved to reduce the overjet, but camouflage is appropriate only when the skeletal discrepancy is not too severe.
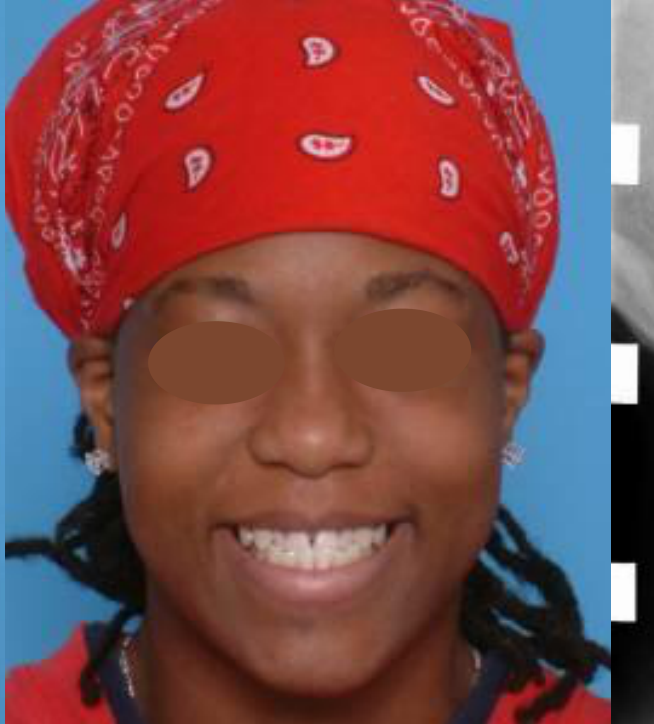
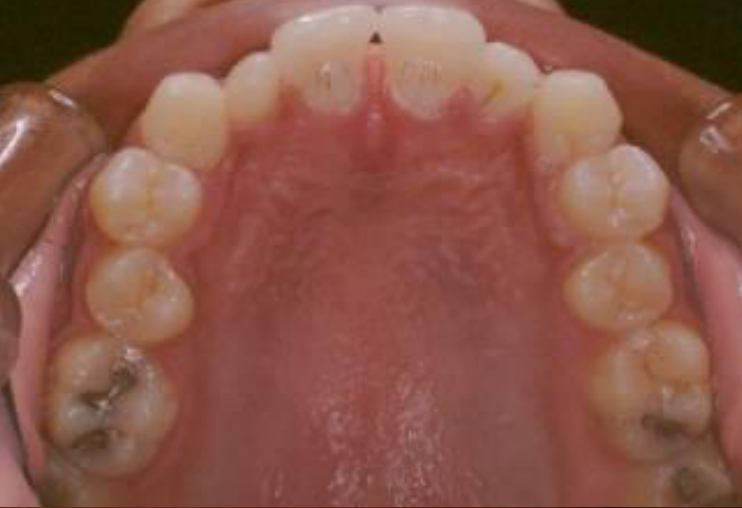
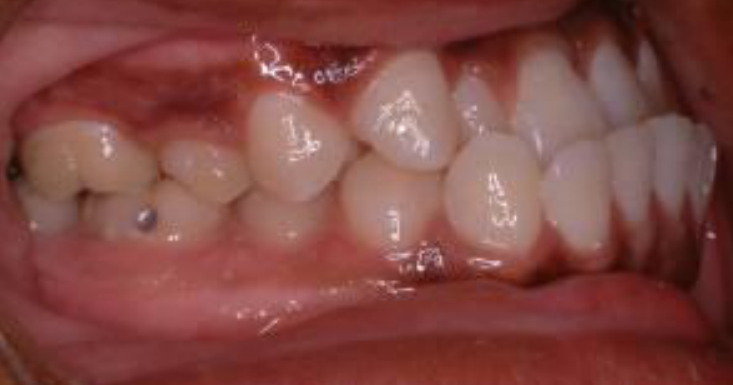
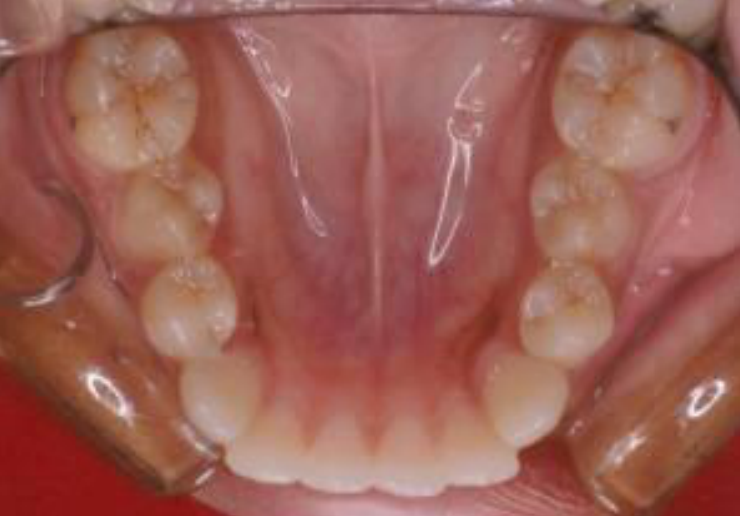
Case: Class III camouflage with lower premolar extractions
Question
Scenario: A patient presents with a Class III skeletal relationship, a negative overjet, and proclined incisors attempting to compensate.
What’s shown: Clinical photographs showing a frontal portrait, occlusal views of the Class III relationship and negative overjet, and before and after facial images.
Consider: How can extractions be used to camouflage a Class III malocclusion, and what are the limitations of this approach?
Answer
Observations:
- The patient has a Class III relationship with a negative overjet and proclined upper and lower incisors.
- Treatment involved the extraction of the lower first premolars.
- Before and after photos show an improved facial profile.
Reasoning: Extracting the lower first premolars provides space to reverse the negative overjet and improve the aesthetic profile. However, because the lower incisors were already proclined, they cannot be completely corrected and remain somewhat proclined. Additionally, achieving ideal interdigitation is difficult because the lower second premolar does not sit properly with the lower first molar. Alternatively, extracting the lower second premolars could allow bringing the lower first molar forward to engage in a Class I relationship, but this varies from case to case.
Outcome: The negative overjet was reversed and the facial profile was aesthetically improved, though the lower incisors remained slightly proclined and the interdigitation was not ideal.
Takeaway: In Class III camouflage, extracting lower first premolars can successfully improve the profile and reverse a negative overjet, but perfect incisor inclination and ideal interdigitation may not be fully achievable.
Footnotes
-
Original PDF page 1: L9.2 Level IV UnitB,C and treatment timing, p.1 ↩
-
Original PDF page 2: L9.2 Level IV UnitB,C and treatment timing, p.2 ↩
-
Original PDF page 3: L9.2 Level IV UnitB,C and treatment timing, p.3 ↩
-
Original PDF page 4: L9.2 Level IV UnitB,C and treatment timing, p.4 ↩
-
Original PDF page 5: L9.2 Level IV UnitB,C and treatment timing, p.5 ↩
-
Original PDF page 6: L9.2 Level IV UnitB,C and treatment timing, p.6 ↩
-
Original PDF page 7: L9.2 Level IV UnitB,C and treatment timing, p.7 ↩
-
Original PDF page 8: L9.2 Level IV UnitB,C and treatment timing, p.8 ↩
-
Original PDF page 9: L9.2 Level IV UnitB,C and treatment timing, p.9 ↩
-
Original PDF page 10: L9.2 Level IV UnitB,C and treatment timing, p.10 ↩
-
Original PDF page 11: L9.2 Level IV UnitB,C and treatment timing, p.11 ↩
-
Original PDF page 12: L9.2 Level IV UnitB,C and treatment timing, p.12 ↩
-
Original PDF page 13: L9.2 Level IV UnitB,C and treatment timing, p.13 ↩
-
Original PDF page 14: L9.2 Level IV UnitB,C and treatment timing, p.14 ↩
-
Original PDF page 16: L9.2 Level IV UnitB,C and treatment timing, p.16 ↩
-
Original PDF page 17: L9.2 Level IV UnitB,C and treatment timing, p.17 ↩
-
Original PDF page 15: L9.2 Level IV UnitB,C and treatment timing, p.15 ↩
-
Original PDF page 18: L9.2 Level IV UnitB,C and treatment timing, p.18 ↩
-
Original PDF page 19: L9.2 Level IV UnitB,C and treatment timing, p.19 ↩
-
Original PDF page 20: L9.2 Level IV UnitB,C and treatment timing, p.20 ↩
-
Original PDF page 21: L9.2 Level IV UnitB,C and treatment timing, p.21 ↩
-
Original PDF page 22: L9.2 Level IV UnitB,C and treatment timing, p.22 ↩
-
Original PDF page 23: L9.2 Level IV UnitB,C and treatment timing, p.23 ↩
-
Original PDF page 25: L9.2 Level IV UnitB,C and treatment timing, p.25 ↩
-
Original PDF page 26: L9.2 Level IV UnitB,C and treatment timing, p.26 ↩
-
Original PDF page 27: L9.2 Level IV UnitB,C and treatment timing, p.27 ↩
-
Original PDF page 24: L9.2 Level IV UnitB,C and treatment timing, p.24 ↩
-
Original PDF page 28: L9.2 Level IV UnitB,C and treatment timing, p.28 ↩
-
Original PDF page 29: L9.2 Level IV UnitB,C and treatment timing, p.29 ↩
-
Original PDF page 31: L9.2 Level IV UnitB,C and treatment timing, p.31 ↩
-
Original PDF page 30: L9.2 Level IV UnitB,C and treatment timing, p.30 ↩
-
Original PDF page 32: L9.2 Level IV UnitB,C and treatment timing, p.32 ↩
-
Original PDF page 33: L9.2 Level IV UnitB,C and treatment timing, p.33 ↩
-
Original PDF page 34: L9.2 Level IV UnitB,C and treatment timing, p.34 ↩
-
Original PDF page 35: L9.2 Level IV UnitB,C and treatment timing, p.35 ↩
-
Original PDF page 36: L9.2 Level IV UnitB,C and treatment timing, p.36 ↩
-
Original PDF page 38: L9.2 Level IV UnitB,C and treatment timing, p.38 ↩
-
Original PDF page 39: L9.2 Level IV UnitB,C and treatment timing, p.39 ↩
-
Original PDF page 37: L9.2 Level IV UnitB,C and treatment timing, p.37 ↩
-
Original PDF page 41: L9.2 Level IV UnitB,C and treatment timing, p.41 ↩
-
Original PDF page 42: L9.2 Level IV UnitB,C and treatment timing, p.42 ↩
-
Original PDF page 40: L9.2 Level IV UnitB,C and treatment timing, p.40 ↩
-
Original PDF page 44: L9.2 Level IV UnitB,C and treatment timing, p.44 ↩
-
Original PDF page 45: L9.2 Level IV UnitB,C and treatment timing, p.45 ↩
-
Original PDF page 46: L9.2 Level IV UnitB,C and treatment timing, p.46 ↩
-
Original PDF page 47: L9.2 Level IV UnitB,C and treatment timing, p.47 ↩
-
Original PDF page 43: L9.2 Level IV UnitB,C and treatment timing, p.43 ↩
-
Original PDF page 48: L9.2 Level IV UnitB,C and treatment timing, p.48 ↩