Crown Template
Chairside Form 26 for a full-coverage crown on [tooth __], [material: PFM / all-ceramic / zirconia / gold]. Paste-ready appointment steps extracted from Clinical Sequence for Crowns; reduction depths from OCHWA Crown Reduction Guidelines.
Two signatures required
Form 26 = reconstructive phase. You need 2 signatures — prosth specialist AND clinic coordinators. No aesthetic work on this form.
Design & material
- Material:
[PFM / all-ceramic (lithium disilicate) / zirconia / gold]— decide before the prep visit and prescribe to the lab. - Margin design by material: chamfer for gold/metal (0.5–1 mm); shoulder / modified shoulder for ceramic (all-ceramic 1 mm; PFM 1.5 mm — cannot be a chamfer or feather edge where porcelain bulk is needed).
- Taper: total occlusal convergence 6–12° (TOC = 2 × taper); the shorter the walls, the more parallel they must be.
- Reduction depths: by material × arch × surface → OCHWA Crown Reduction Guidelines.
Appointment 1 — Prep & impression
- Local anaesthesia (buccal + palatal/lingual infiltration ± block)
- Shade BEFORE prep — Vita 3D Master; tooth wet, natural/daylight light, neutral background; quick glances; record incisal/middle/cervical thirds + in-between shades (e.g. A1.5)
- (a prepped, air-dried tooth dehydrates and reads a false, too-light shade — F8 Try in)
- Opposing-arch alginate while LA takes effect
- Putty key / silicone index off study model or wax-up — take two: one intact for the provisional, one sectioned buccolingually as a reduction guide
- Tooth prep by zone — depths → OCHWA Crown Reduction Guidelines:
- occlusal reduction (depth grooves; deeper on the functional cusp; + functional cusp bevel)
- axial reduction, buccal + lingual, two planes each
- interproximal (into embrasures, do not touch the adjacent tooth)
- margin by material (see Design & material)
- margin placement: supragingival where possible; if subgingival, intracrevicular max ~0.7 mm
- auxiliary grooves/boxes only if retention is poor (1 mm deep, 1 mm above margin, mid-buccal, parallel to path of insertion)
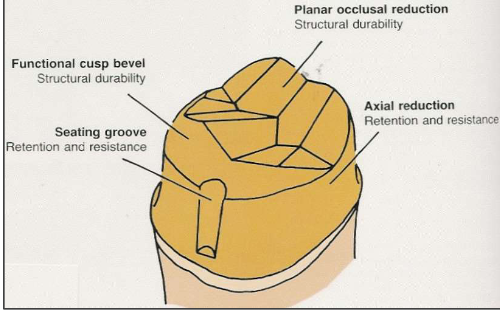
- Check prep: undercuts — view from directly above, one eye closed (all margins visible); clearance — verify with the sectioned putty index in centric + excursion; margin smooth/continuous by explorer/probe
- Fabricate provisional BEFORE the impression (Luxatemp / Protemp bis-acryl in the intact putty key) — so the patient leaves with a temp even if the impression must be retaken (F8 Try in)
- Retraction — double cord (F6 Soft Tissue Impressions): thin cord (000/00) deep below the margin, stays in during the impression; larger cord (0/1) on top, ~5 min, removed just before injecting; wet cords in astringent (aluminium chloride)
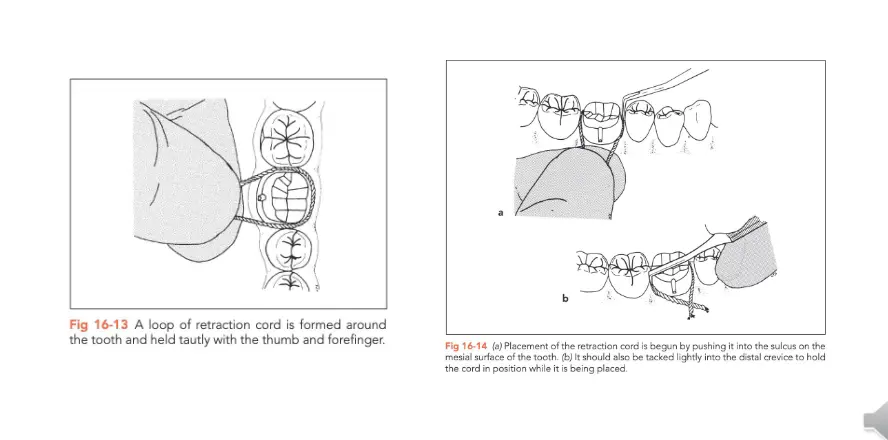
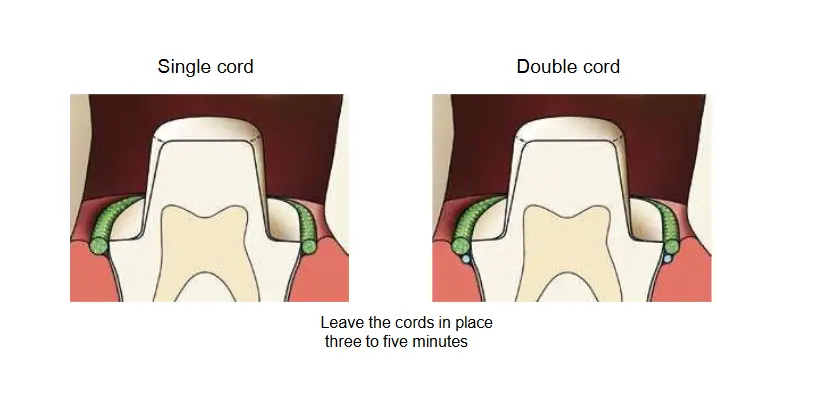
- Impression — dual-phase PVS: light body on prep/margins, heavy body in the custom tray (adhesive applied 15 min prior); remove the top cord immediately before syringing; seat back-to-front, hold to full set
- Inspect impression: all margins clear, 3–4 mm beyond the margin, no bubbles/drags/pulls, tray not showing through
- Opposing alginate (if not already taken) + bite registration with Regisil (record at MIP for a conformative case)
- Provisional cemented with TempoCem / Tempbond — eugenol-FREE if the definitive will be resin-bonded; remove excess at the rubbery stage, floss contacts; check occlusion after cementing
- Post-op: temp is weak — avoid sticky/hard foods that side; floss out sideways, not up through the contact
- Dispatch to lab: impression, opposing model, bite reg, shade + characterisation, restoration material, lab slip
+1.5 — On receiving labwork (before Appt 2)
Check on the die/master cast: stability, retention, occlusion, aesthetics, contacts, seating on die, internal fit and margins. Do this 1–2 working days before the appointment so the lab can correct.
- Die + opposing model: pouring defects, over-trimming, fracture, wear
- Internal surface: no blebs/nodules; touches die at margins only; slightly loose (die spacer), NOT friction-tight
- Margins: no open margins, overhangs, underextensions
- External: contour, shade, texture — lab delivered what was requested
Appointment 2 — Try-in & cementation
- LA if required; remove provisional (wiggle; section B→L to the cement layer if too retentive); clean all temp cement with ultrasonic scaler + pumice; warn re aspiration (assistant secures the crown)
- Seat in order: proximal contact → internal fit → marginal fit (a crown cannot fully seat if the contacts are tight — F8 Try in)
- proximal: floss passes with resistance/“click”; adjust one side at a time; never create an open contact (open → back to lab)
- internal: Fit Checker / light body / Occlude spray; relieve high spots with a diamond
- marginal: gap ~100 µm borderline; adjust overhang from the external surface only; under-extended/open → remake
- Assess seated crown: stability (no rock/rotate) → contour (adjust + polish before cementing) → occlusion (fully seated first; shim stock 8 µm + articulating paper — blue = centric, red = eccentric; crown holds shim equal to adjacent teeth) → aesthetics
- Patient-approval gate: show in a mirror, get explicit approval before cementing (if unsure anteriorly → temp-cement to “test drive”)
- Cement by material (always follow the manufacturer technique card — F7 Cements, DMD2 L3 - Biomaterials Dental Cements):
- Zirconia / PFM: self-adhesive RelyX Unicem 2 or MDP resin Panavia F 2.0 (PFM adds Alloy Primer; zirconia = airborne abrasion ~1 bar, no silane, 10-MDP cement)
- Glass-ceramic (lithium disilicate / feldspathic): adhesive Variolink Esthetic LC — HF etch intaglio (e.max 20 s) + Monobond Plus silane (react 60 s, don’t rinse)
- Full gold: water-based (zinc phosphate)
- After try-in, decontaminate the intaglio with Ivoclean / Katana Cleaner
- Isolation: rubber dam (e.g. 13A/12A clamp) for resin/adhesive cementation
- Excess removal: tack cure 2 s → plastic instrument buccal/lingual; interproximal — floss pulled out to the side, never up through the contact; Liquid Strip at margins → final cure 10 s/surface
- Post-cementation bitewing — check for subgingival cement remnants, remove any
- Recheck occlusion (cement layer can leave the crown high) — minor adjust, re-polish adjusted ceramic/metal
- OHI + crown-care advice
Review (~1–2 weeks)
- Re-evaluate occlusion (patient was numb at insertion — unreliable proprioception then — F8 Try in)
- Fine-tune contacts/shape/height for comfort and function
- Check function + health of the surrounding gingival tissues
Copy-pastable checklist
CROWN — [tooth __] — [material: PFM / all-ceramic / zirconia / gold]

APPOINTMENT 1 — Prep & impression
- LA (buccal + palatal/lingual infiltration +/- block)
- Shade BEFORE prep — Vita 3D Master, tooth wet, daylight, quick glances; record thirds + in-between (e.g. A1.5)
- Opposing alginate while LA takes effect
- Putty key x2 (one intact for temp, one sectioned as reduction guide)
- Prep by zone — depths per OCHWA Crown Reduction Guidelines:
    occlusal (deeper on functional cusp + functional cusp bevel)
    axial B + L, two planes each
    interproximal (do not touch adjacent)
    margin: chamfer for gold, shoulder/modified shoulder for ceramic
    supragingival where possible; if subgingival, intracrevicular max ~0.7 mm
- Check prep: undercuts (view from above, one eye closed), clearance (sectioned putty key), margin smooth
- Fabricate provisional BEFORE impression (Luxatemp/Protemp in intact putty key)
- Double cord: thin 000/00 stays in; larger 0/1 removed just before injecting; wet in astringent
- Impression — dual-phase PVS: light body on margins, heavy body in tray; remove top cord first; seat back-to-front
- Inspect: all margins clear, 3-4 mm beyond margin, no bubbles/drags, tray not showing through
- Opposing alginate + bite reg (Regisil; MIP for conformative)
- Cement provisional TempoCem/Tempbond (eugenol-FREE if resin-bonding definitive); check occlusion
- Post-op: temp is weak; avoid sticky/hard foods; floss out sideways
- Lab dispatch: impression, opposing, bite reg, shade + characterisation, MATERIAL, lab slip

+1.5 LAB CHECK (before Appt 2)
- Die + opposing: pouring defects, over-trim, fracture, wear
- Internal: no blebs; touches die at margins only; slightly loose (die spacer), not friction-tight
- Margins: no open margins/overhangs/underextensions
- External: contour, shade, texture as requested; occlusion on articulator

APPOINTMENT 2 — Try-in & cementation
- LA if needed; remove provisional (wiggle; section B->L if retentive); clean cement (ultrasonic + pumice)
- Seat IN ORDER: proximal -> internal -> marginal
    proximal: floss with resistance/"click"; adjust one side at a time; never open the contact
    internal: Fit Checker / Occlude spray; relieve high spots with diamond
    marginal: ~100 um gap borderline; adjust overhang from EXTERNAL surface only; open/underextended -> remake
- Assess seated: stability -> contour (adjust + polish) -> occlusion (8 um shim; blue centric / red eccentric) -> aesthetics
- PATIENT APPROVAL before cementing (unsure anteriorly -> temp cement to test-drive)
- Cement by material (follow manufacturer card):
    zirconia/PFM: RelyX Unicem 2 self-adhesive or Panavia F 2.0 (PFM + Alloy Primer; zirconia abrade ~1 bar, no silane)
    glass-ceramic: Variolink Esthetic LC — HF etch (e.max 20 s) + Monobond Plus (react 60 s, don't rinse)
    gold: zinc phosphate
    decontaminate intaglio after try-in: Ivoclean / Katana Cleaner
- Isolation: rubber dam (13A/12A clamp) for resin cementation
- Excess: tack cure 2 s -> plastic instrument; floss out sideways; Liquid Strip at margins -> final cure 10 s/surface
- Post-cementation bitewing for subgingival cement
- Recheck occlusion; re-polish adjusted surfaces
- OHI + crown-care advice

REVIEW (~1-2 weeks)
- Re-evaluate occlusion (patient was numb at insertion)
- Fine-tune contacts/shape/height
- Check function + gingival health