Crown with Post and Core Template
Chairside Form 26 for a crown on an endodontically treated tooth on [tooth __], [material: PFM / all-ceramic / zirconia / gold]. Two pathways: Pathway A = direct/prefabricated post + chairside core (folded into the prep visit); Pathway B = cast post & core (extra impression + try-in visit). Post/core content extracted from L3 Post and core fabrication techniques and L4 RETT Online.
Two signatures required
Form 26 = reconstructive phase. You need 2 signatures — prosth specialist AND clinic coordinators. No aesthetic work on this form.
Scope
This sheet covers the post & core-specific steps only. Crown preparation, definitive impression, provisional and crown cementation are not duplicated — follow Crown Template / Clinical Sequence for Crowns. Full post-and-core protocol (post length/width, GP removal, cast techniques, cementation, failure modes): L3 Post and core fabrication techniques and L4 RETT Online.
Ferrule gate — check BEFORE committing to a post
A ferrule = a 360° collar of sound dentine encircled by the crown margin, coronal to the prep shoulder. It, not the post, does the mechanical work (L1 Introduction To RETT).
- Height: minimum 1.5–2 mm of sound tooth structure above the margin
- Width (dentine thickness): remaining dentine 1–2 mm
- Coronal-to-crest: 4–5 mm above bone crest = 2–3 mm biologic width + 1.5–2 mm ferrule
- Ideal is 360°, but an incomplete ferrule beats no ferrule; on maxillary incisors the palatal ferrule matters most
- Inadequate/absent ferrule → do NOT just proceed. Options, in order: (1) reassess restorability (poor crown-root ratio, cracks, inadequate perio → extraction may be better); (2) surgical crown lengthening; (3) orthodontic extrusion
- 0 ferrule remaining = non-restorable (L4 RETT Online)
Decide the crown type before the post & core
Prep the coronal tooth for the definitive crown type before fabricating the post & core — “Each type of restoration requires different amounts of tooth reduction, and the form of the tooth preparation varies considerably” (35 Chapter 35 Contemporary Restoration of Endodontically Treated Teeth).
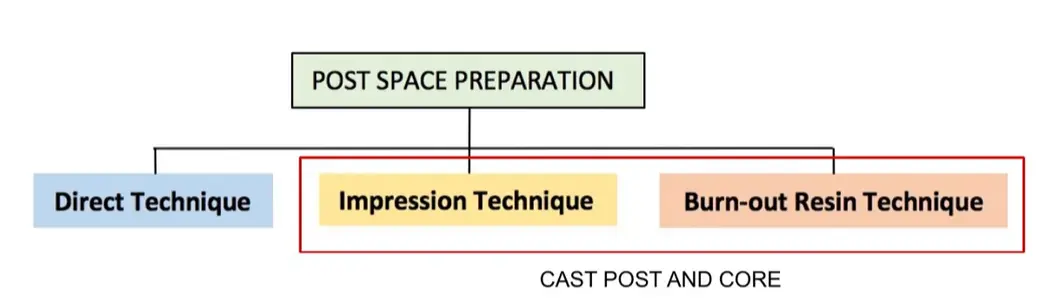
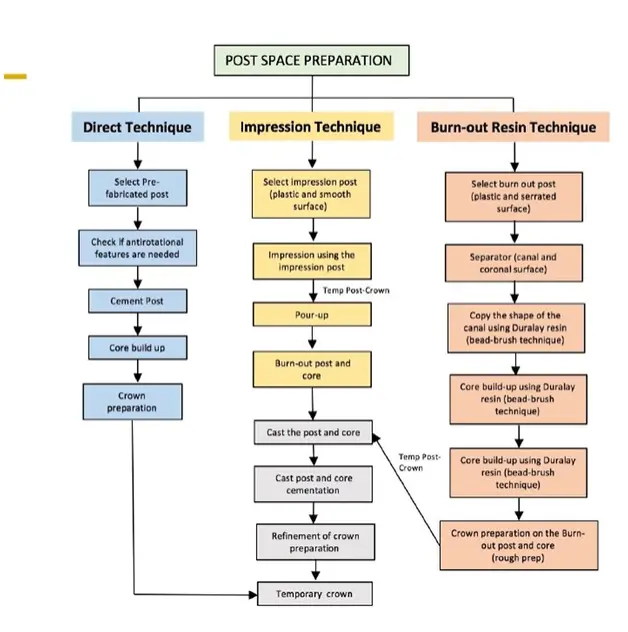
Pathway A — Direct (prefabricated post + chairside core)
Post + core folded into the crown-prep visit — 0 extra appointments (L4 RETT Online).
Appointment 1 — Post space, core, then crown prep (same visit)
- Confirm plan, local anaesthesia, rubber dam
- Confirm endodontic readiness first: adequate apical seal, no sinus/exudate/percussion tenderness, radiographic periapical stability
- Post space prep: remove GP with heated plugger / Gates-Glidden / ParaPost drill to planned length; retain ≥4–5 mm apical GP seal; post ≤ ⅓ root width; PA to verify
- Try fibre post — diameter matching the final drill; confirm passive seating and length (shorten apical end so the coronal end is buried in the core); do not over-enlarge the canal
- Adhesive core build-up: clean/dry canal (paper points), etch/prime canal walls, cement post with dual-cure resin, avoid overfill / “pumping” / hydraulic wedging, single seating path; let cement reach full set (~10 min) before building the core; build composite core to crown form incrementally
- → Crown prep onward per Crown Template / Clinical Sequence for Crowns (reduction, impression, provisional — not duplicated here)
Appointment 2 — Crown try-in & cementation per Crown Template.
Pathway B — Cast post & core
Post space and cementation occur in different sessions; a temporary post crown is required between them (L4 RETT Online).
Appointment 1 — Post space prep + pattern/impression + temporary post crown
- LA, rubber dam, confirm endodontic readiness
- Post space prep as above (retain apical GP seal; remove internal undercuts — required so the cast pattern draws)
- Coronal prep: remove undercuts, rough crown prep, establish ferrule + positive horizontal stop
- Capture the pattern by one of:
- Impression technique — seat plastic impression post, light-body PVS into the dried canal, heavy/medium body in the tray, single-snap removal (lab pours, burns out, casts); or
- Direct burn-out resin pattern — separator to canal/coronal surfaces, copy the canal with Duralay / pattern resin (bead-brush), build core, repeat in-and-out until fully polymerised so it doesn’t lock in undercuts
- Temporary post crown — temp post + resin crown as a single unit, passive canal fit, temp cement kept shallow (not deep in the canal), light/out of occlusion in excursions, margins closed
- Lab casts the post & core
Appointment 2 — Cast try-in, cement, then crown prep + crown impression
- Remove temp; clean the post space of all temp cement/debris (especially the coronal third)
- Try-in cast post — passive, fully seated fit; never force; verify path of insertion; fit-checker for high spots; PA if any doubt. A fully passive seat prevents hydraulic wedging → vertical root fracture on cementation
- Cement (resin / RMGI / zinc phosphate per isolation & post material): coat canal walls with a lentulo, avoid overfill, single steady path, no pumping; do not disturb until full set
- Refine crown prep only after the cement has fully set
- Crown impression → new provisional → hand to Crown Template
Appointment 3 — Crown try-in & cementation per Crown Template.
Same-visit crown impression vs a separate visit
L4 RETT Online advises against taking the final crown impression/scan in the same appointment as cast-post cementation (to reduce micro-movement and debonding). Following that strictly, the crown impression moves to a separate visit (cast pathway = +2 visits vs Pathway A). The structure above takes the impression at Appt 2 (+1 visit). Decide per case.
Copy-pastable checklist
Pathway A — direct post + chairside core
POST & CORE (direct) + CROWN — [tooth __] — [material]
FERRULE CHECK — 1.5-2 mm sound dentine height, 1-2 mm wall, 4-5 mm coronal to crest, 360 ideal; inadequate -> reassess restorability / crown lengthening / ortho extrusion

APPOINTMENT 1 — Post space, core & crown prep (same visit)
- Confirm plan, LA, rubber dam
- Confirm endo readiness: apical seal, no sinus/exudate/percussion, PA stable
- Post space prep: remove GP to length, RETAIN >=4-5 mm apical GP; post <= 1/3 root width; PA to verify
- Try fibre post: passive seat + length; coronal end buried in core; do not over-enlarge canal
- Adhesive core: dry canal (paper points), etch/prime, cement post (dual-cure resin), no pumping/wedging; full set ~10 min; build composite core to crown form
- Crown prep + impression + provisional per Crown Template

APPOINTMENT 2 — Crown try-in & cementation
- Crown try-in + cement per Crown Template
Pathway B — cast post & core
POST & CORE (cast) + CROWN — [tooth __] — [material]
FERRULE CHECK — 1.5-2 mm sound dentine height, 1-2 mm wall, 4-5 mm coronal to crest, 360 ideal; inadequate -> reassess / crown lengthening / ortho extrusion

APPOINTMENT 1 — Post space + pattern/impression + temp post crown
- LA, rubber dam, confirm endo readiness
- Post space prep (retain apical GP; REMOVE internal undercuts so cast draws)
- Coronal prep: remove undercuts, rough crown prep, establish ferrule + positive stop
- Capture pattern (one of):
    impression post + light-body PVS in canal, heavy body in tray, single-snap; OR
    direct Duralay/pattern resin (separator, bead-brush, in-and-out until fully set so it doesn't lock)
- Temp post crown as single unit; passive fit; temp cement shallow; light/out of excursions
- Lab casts post & core

APPOINTMENT 2 — Cast try-in, cement, crown prep & impression
- Remove temp; clean post space of all cement/debris (esp coronal third)
- Try-in cast post PASSIVE, fully seated; never force; fit-checker; PA if doubt (passive seat prevents hydraulic wedging -> root fracture)
- Cement (resin / RMGI / zinc phosphate): lentulo, no overfill, single path, no pumping; leave to full set
- Refine crown prep after cement fully set
- Crown impression + new provisional per Crown Template
- NOTE: L4 RETT advises crown impression at a SEPARATE visit (reduce micro-movement) -> +2 visits; decide per case

APPOINTMENT 3 — Crown try-in & cementation
- Crown try-in + cement per Crown Template