Survey Crown — Form 26 (Crown Prep)
Chairside Form 26 for a PFM survey crown on [tooth __] — the crown-prep procedure itself (not the full RPD sequence). Copy-pastable appointment steps below.
Two signatures required
Form 26 = reconstructive phase. You need 2 signatures — prosth specialist AND clinic coordinators. No aesthetic work on this form.
Design & material (survey crown)
A survey crown is contoured to receive the RPD: built-in rest seat, guide plane, correct height of contour and undercut. Aim for metal-on-metal where the clasp engages.
- Keep the rest seat + coping (clasp/rest contact) in metal — avoids over-reduction; porcelain cut-back on the buccal only.
- Size the built-in undercut to the framework alloy: CoCr 0.25 mm, cast gold / wrought wire 0.50 mm, stainless steel 0.75 mm (L6 Dental Surveyor).
- Allow extra occlusal reduction for the rest-seat metal thickness.
When in the RPD it's made
Decided at the diagnostic survey & design; made and cemented before the master impression and framework — the framework is surveyed and cast against the finished crown (Clinical Sequence for Partial Dentures).
Appointment 1 — Tooth investigation & prep
- Local anaesthesia
- Shade selection and crown design (rest seat / guide plane / undercut for the RPD)
- Putty key off the study model (records pre-op contour)
- Remove existing crown/restoration
- Assess remaining tooth structure and restorability
- Composite core build-up under rubber dam
- Tooth prep for PFM crown — reduce by zone (see schematic): occlusal ~2.0 mm (1.5 mm functional cusp bevel), axial 1.0–1.2 mm at 6–10° taper, margin facial shoulder 1.0–1.2 mm / lingual chamfer + metal collar
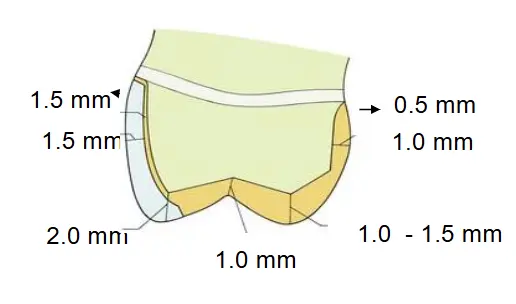
- Retraction — double cord technique
- Secondary impression: light body on tooth, heavy body in tray
- Bite registration with Regisil
- Temporary with Luxatemp, cement with TempoCem
- Check occlusion
+1.5 — On receiving labwork (before Appt 2)
Check on the die/master cast: stability, retention, occlusion, aesthetics, contacts, seating on die, internal fit and margins.
Appointment 2 — Try-in & cementation
- Remove temporary crown and clean remaining cement with pumice
- Check contacts, seating, margins, stability, retention and contour
- Check occlusion and aesthetics
- If no problems → cement with RelyX under rubber dam (13A clamp), then remove dam
- Check occlusion
- Post-op instructions and OHI
Clinical Stages and Authorisation
Each stage requires date, signature, and clinical code (2 signatures — prosth specialist + clinic coordinator).
- DISCUSSION (design, abutment, mounting needs) — date / sign / code:
- FORM 26 signed – CC — date / sign / code:
- PREP and FINAL IMPRESSION — date / sign / code:
- TRY IN (die/master cast check) — date / sign / code:
- INSERTION (cementation) — date / sign / code:
Authorisation
- Procedure Outline Authorised by:
- Clinician ID:
- Date: