The big picture
Clinical Workflow for Indirect Restorations (Crowns): Overview
1.0 Phase 1: Assessment and Treatment Planning
1.1. Initial Consultation: Perform a comprehensive clinical examination.
1.2. Diagnostics: Obtain diagnostic models and any other necessary records. 1.3. Treatment Plan: Synthesize all diagnostic information to formulate an appropriate treatment plan. This includes revisiting indications and contraindications for crown placement in detail. 1.4. Consent: Present the treatment plan to the patient, clearly explaining all potential risks and consequences of all options. Obtain informed consent before proceeding with any irreversible treatment. Note: Treatment planning is the most crucial part of the entire process.
2.0 Phase 2: Preparation and Impression
2.1. Tooth Preparation: Prepare the tooth according to the requirements of the selected restoration. 2.2. Final Impression: Take a final impression of the prepared tooth. This can be a physical impression or a digital scan. 2.3. Laboratory Communication: Send the impression and complete lab prescription to the dental laboratory for fabrication of the permanent crown (e.g., via CAD/CAM or other techniques).
3.0 Phase 3: Try-In and Evaluation
3.1. Restoration Try-In: At the insertion appointment, fit the permanent crown on the tooth. 3.2. Clinical Evaluation:
-
Verify the accuracy of the marginal fit.
-
Assess contacts and occlusion.
-
Ensure all other fit parameters are satisfactory.
3.3. Patient Approval: Show the patient the crown. Confirm they are happy with the final shape and shade.
4.0 Phase 4: Cementation
4.1. Final Cementation: Once both the clinician and patient are satisfied with the restoration, proceed with permanent cementation. 4.2. (Refer to separate clinical protocols for detailed cementation procedures).
5.0 Phase 5: Post-Operative Review
5.1. Schedule Review: Book a review appointment for the patient, typically 1-2 weeks after cementation. 5.2. Assess Occlusion: The review is essential for re-evaluating the patient’s occlusion. The patient may have been numb during the insertion appointment and unable to provide accurate feedback. 5.3. Adjustments: If necessary, make final adjustments to the occlusion, shape, or height of the tooth to ensure comfort and proper function.
Treatment planning12
- Assessing the tooth (+assessing all the dentition and the patient)
- Individual tooth assessment:
- Restorability: Use periapical (PA) radiographs to assess the periapical status and remaining tooth structure. Any prerequisite treatments (e.g., endodontics, periodontal therapy) must be completed and stabilized first.
- Long-term prognosis: Evaluate if saving the tooth is worthwhile in the long run. Factors like extensive subgingival loss of tooth structure can compromise the prognosis even with a perfect crown.
- Dentition and patient assessment:
- Holistic approach: A tooth cannot be treated in isolation. Control phases (e.g., periodontal and caries control) must be completed before restorative work.
- Complex cases: If a patient has generalized wear or requires complex oral rehabilitation (e.g., increasing the vertical dimension of occlusion – VDO), a single crown may need to be planned as part of a larger, comprehensive treatment plan. Placing a single crown first could lead to it being cut off and remade later.
- Patient management: Assess the patient’s ability to tolerate the procedure and their expectations. Unrealistic expectations (e.g., wanting a smile to look exactly as it did decades ago) can lead to dissatisfaction. It is crucial to manage these expectations or refer the patient if necessary.
Why does a tooth need a crown?
Considerations for a crown:
- Extensive destruction of tooth structure: To protect a tooth from uncontrolled fracture, especially when:
- A cusp is lost.
- A restoration covers three or more surfaces.
- Large amalgam restorations are present, which may hide developing cracks.
Anecdote
A patient fractured a premolar (15) with a small MO composite down to the bone level, rendering it non-restorable. A crown could have potentially prevented this.
- Failure of direct restorations: When direct composite restorations repeatedly fail due to a patient’s heavy occlusal forces or wear. Ceramic materials like zirconia offer much higher fracture toughness.
- Enhanced retention: A full crown provides significantly more retention and resistance form compared to onlays or direct fillings.
- Control of external contour: A crown allows for complete control over the tooth’s shape, which is essential for creating a survey crown to act as an abutment for a removable partial denture clasp.
- Destruction of tooth structure
- Aesthetics
- Plaque control/moisture control
- Retention
Patient communication
Patient communication
- Explain the steps of the procedure to the patient, including the long appointment time, the need to reduce the tooth, taking impressions, and the use of a temporary crown.
- Inform them that the temporary crown is not strong and is cemented with temporary cement so it can be removed. This manages expectations if it comes loose.
- Tell the about 10% of the teeth will have pulp issues , which means it might need endo
Principles of tooth preparations3
ABUTMENT TOOTH
-
Principles of tooth preparation
-
Partial or complete preparation
-
A crown can be designed as a survey crown to provide ideal contours (guide planes, undercuts) for a removable partial denture (RPD) clasp, improving the stability and retention of the prosthesis. → [!warning] Clinical Scenario
For an elderly patient with an existing RPD, crowning an abutment tooth is complex. It would require retrofitting the crown to the existing denture, which is difficult. It may be better to wait until the patient needs a new denture.
“Between 3 and 25% of teeth prepared for full coverage crowns will lose vital pulp functions within 15–20 years, with previously compromised teeth faring worse than those that are more intact”
Case Study: Would you Crown this tooth?
Some pearls of wisdom:
- Carry out all investigations that COULD potentially change your treatment plan
- Not every tooth NEEDS a crown even if it meets the indications (It depends on the combination of unique clinical factors)
- Think about if your treatment is really going to benefit the patient (weighing against the financial+time commitments of the patient)
Preparation stage456
-
Before patient arrives:
- Decide on material of choice. Why is that material the best?
- Approval of treatment plan (more on this later)
- Wax up of tooth if any modifications required for existing tooth + putty key
-
Putty key fabrication: Create a putty key on a dental cast for a more accurate and easier fabrication of the provisional restoration.
-
Day of preparation:
-
Confirm treatment & anesthetize: Confirm the plan with the patient and administer local anesthetic.
-
Pre-operative records: Take a new opposing model or putty key if any changes have occurred since the initial records.
-
Shade selection: Select the shade before preparing and dehydrating the tooth.
-
Tooth preparation: Prepare the tooth according to the material guidelines.
-
Check preparation: Ensure sufficient occlusal clearance and no undercuts.
-
Provisional restoration: Fabricate the provisional crown before taking the final impression. This ensures the patient can leave with a temporary if the impression needs to be retaken.
-
Impression: Use retraction cord or a product like Exposil for soft tissue management, then take the final impression. Remember to remove the retraction cord immediately after.
-
Temporization: Cement the provisional restoration with temporary cement.
- Bring patient in, confirm treatment with them quickly, make sure they know what’s happening
- Administer LA. (If you don’t have up-to-date opposing model because you did other restorative work since the diagnostic model, then take new impression. If you don’t have putty key, do it now)
- Prep tooth according to guidelines for the correct materials. Check for undercuts and sufficient occlusal clearance
- Make provisional restoration
- Retraction cord + expasyl
- Impressions, remove retraction cord!
- Temporise
-
Clinical sequence7
Shade selection8
Several methods of shade selection:
-
Shade tabs (different methodologies)
-
Digital shade selection (may be built into intra-oral scanners)
-
Send patient to lab
-
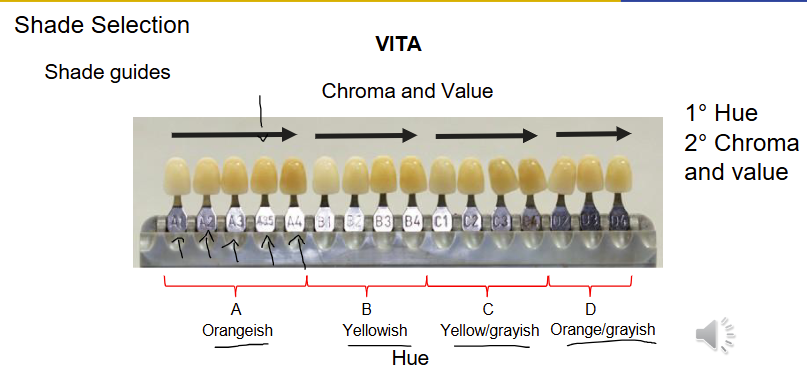
Hue: the particular variety of a color.
- e.g. Blue, red, green, yellow, etc.
-
Chroma (saturation): the intensity of a hue.
-
Value: the relative lightness or darkness of a color
Shade guides9101112
VITA plan classic
- A simpler system with 16 shades, grouped by hue (A-reddish, B-yellowish, C-greyish, D-reddish-grey).
- The process is to first select the hue family (e.g., ‘A’) and then choose the specific chroma/value combination (e.g., A1, A2, A3).
- Limitation: Less precise as chroma and value are locked together.
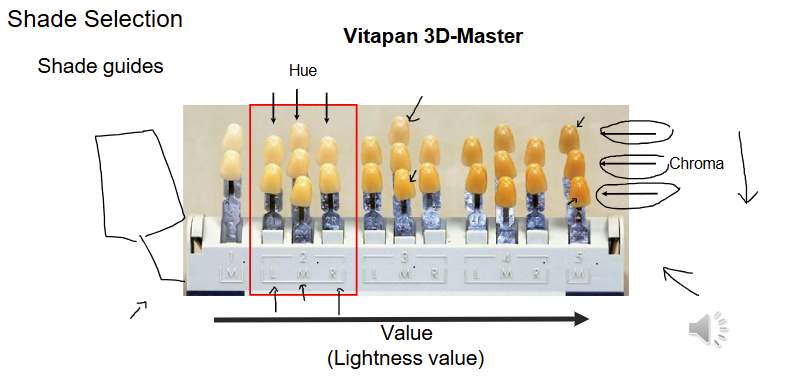
Vitapan 3D-Master
- A more complex and accurate system.
- The recommended process is Value → Chroma → Hue.
- Value: Select the correct value group (tabs are arranged from light to dark, 1-5).
- Chroma: Within that group, determine the chroma (intensity) this is the different rows .
- Hue: Finally, select the hue (L-lighter/yellower, M-medium, R-redder).
Tips for Shade Taking
- Perform before tooth preparation to avoid dehydration.
- Use quick glances to avoid fatiguing the eye’s cone cells.
- Communicate with the lab for custom needs, such as in-between shades (e.g., A1.5) or different shades for different parts of the tooth (e.g., cervical vs. incisal).
Digital Systems131415161718
TRIOS intra-oral scanner (3Shape)
In vivo tooth-color measurement with a new 3D intraoral scanning system in comparison to conventional digital and visual color determination methods.
- Key Findings (Mehl et al. 2017):
- There are negligible clinical differences between conventional shade determination methods (Vita 3D Master) and the 3Shape Trios intra-oral scanner.
- No significant difference was found between various digital systems (Trios, Vita Easyshade, SpectroShade).
Try-in procedure19
Evaluation:
- Seating, fitting, contact points
- this to look out for before seeing the patient : - is the shade correct - crown not cemented to implant
Systematic approach
- Evaluation of the crown on the die
- Seating the crown on the prepared tooth
- Assessment of the seated crown
Evaluation of crown on the die2021
Aims:
- Detection of fabrication errors (laboratory related) prior to the clinical appointment
- Save critical chair time
- Anticipation of problems before clinical appointment
- Consider good lighting and magnification
- In case of problem, consult with the dental laboratory
Assess the die and opposing model22
- Poor pouring
- Overtrimming
- Fracture
- Scratches
- Wear
- Ensure the lab has not over-trimmed the die around the margin, which could lead to an inaccurate (under-extended) crown margin.
Internal surface:23
-
Casting problems: air bubbles
-
Casting nodules or blebs
-
Ideally, the casting should touch the die at the margins only
-
Die spacer
- Note the presence of die spacer, a layer painted on the die to create space for cement. Because of this, the crown should fit slightly loosely on the die, not with a tight, friction fit.
Overall fit and resistance:24
- Looseness
- Excessive gap
- Proximal contact areas
Marginal fit:
- Open margins
- Overhangs or underextensions
External surface25
- Appearance (restoration design)
- Contour
- Shade
- Rough or smooth (polished)
- Ensure the lab has delivered what was requested.
Anecdote
Examples of lab errors caught at this stage include receiving a crown with a hole in it or an implant crown that wasn’t cemented to its abutment.
Occlusion (articulator)26
- Centric contacts
- Eccentric contacts
- Interferences
Insert appointment:
- Bring patient in, administer LA if required
- Remove temporary crown. Can sometimes wiggle it off. If not possible, carefully section temp crown and break the temporary.
- Clean off temporary cement with ultrasonic scaler
- Try-in
Seating the crown27
Remove the provisional restoration28
-
Excavator, sickle probe
-
Hemostat, Backhaus forceps, pliers
-
Crown remover:
- Back-action crown remover
- Automatic crown remover
- Richwill crown remover
-
Gently use a plastic instrument or artery forceps with gauze.
-
If it is firmly stuck, the crown may need to be sectioned: cut a groove through the buccal/occlusal/lingual surfaces and use an instrument to wedge the two halves apart.
-
Thoroughly clean all temporary cement from the tooth preparation using an ultrasonic scaler.
Ideal crown
-
Easily seated
-
Stable
-
Accurate occlusal contact
-
Adequate proximal contacts
-
Accurate marginal fit
-
Aesthetic
-
The crown should seat on the prepared tooth without forcing
-
If it is not seating, possible causes may involve:
-
Single crown
- Proximal contacts
- Internal fit
- Inaccurate margins/over extensions
- Retained temporary cements
- Trapped gingival tissue
Try-in
Order to check: a) Proximal contact b) Internal fit c) Marginal fit
Proximal contacts29303132
-
Assess tightness with dental floss
-
There should be some tightness but not too difficult
-
Articulating paper (20 μm), marking liquid (Accufilm), sprays (occlude)
-
The shim stock (8 μm) should just pass through the contact
-
Minor adjustment at a time
-
If the contacts are open, return to the laboratory for material addition
-
Assessment:
- Place the crown and hold it with finger pressure.
- Use dental floss; it should pass through with resistance and a ‘click.’
-
Adjustment:
- If contacts are too heavy, adjust the marked areas with a fine diamond bur. Make minor adjustments and re-check frequently.
- Do not create an open contact.
Should be at the same location as the natural proximal contacts
Internal fit333435
-
► The restoration should seat completely without interference of the occlusal or axial surfaces
-
► The fitting surface should be checked and adjusted accordingly
- Disclosing medium (Fit Checker, LB impression material)
- Spraying thin layer of aerosol indicator (Occlude)
-
► The relief can be achieved with a diamond bur
-
Assessment:
- If the crown rocks or doesn’t seat fully, there may be an internal high spot.
- Use a disclosing medium like Fit Checker or an occlusal spray on the internal surface. Seat the crown, remove it, and inspect. Areas where the medium has been completely wiped away are high spots.
Fit Checker application
- Penetrated areas of the medium indicate high spots
- Can be adjusted accordingly
If crown fits the model well but does not seat in the mouth, consider problems with impression Caused by:
- Early impression removal
- Distortion of impression
- Latex contamination
Marginal fit363738394041
- Should be as accurate as possible
- Poor marginal adaptation:
- Gap (100 micron is the borderline for acceptability)
- Overhang
- Under extension
- Ledge
| Ideal | Overextended | Underextended | Overhang | Open margin |
|---|---|---|---|---|
Effects of open margins:
- Sensitivity
- Dissolution of cement
- Plaque retention
- Caries
- Gingival inflammation
▶ Poor marginal fit can be due to inability to read the finish line by the technician
-
Overhangs/overextension: can be adjusted
-
Underextension: may require remake
-
Gap: require remake
-
Adjustment:
- Overhangs can be carefully adjusted from the external surface only. Adjusting from the internal surface will create a gap.
- Under-extensions or open margins cannot be fixed chairside and require a remake.
Adjust overextended margins or overhangs from the external surface, not the fitting surface
Assessment of the seated crown424344
Aims
- ► Check
- Stability
- Contour
- Occlusion
- Aesthetics
- ► Confirm the suitability for cementation
Stability45
-
Restoration should not rotate when the force is applied
-
Instability causes failure in function (mainly in cementation)
-
this is mainly due to internal surface misfit -caused by distortion in impression or fabrication process
Contour46
-
► Improper contour may impair gingival health and affect the natural appearance
-
► They must be adjusted before cementation
-
The axial contours should mimic a natural tooth to protect the gingiva.
-
Avoid over-contouring, which creates plaque traps.
Occlusion47
-
The crown should be fully seated
-
Major adjustments should be done prior to cementation
-
Minor adjustments can be completed after cementation
-
Inadequate occlusal contacts can be caused by
- Poor occlusal recording
- Poor articulation
-
Goal: Achieve evenly distributed contacts that match the adjacent teeth. The adjacent teeth should still hold shim stock or mark with articulating paper.
Shim stock assessment48
-
The shim stock will determine if an occlusal contact is present
-
Assess the occlusion on all teeth with and without the prosthesis
-
Assess the occlusion on the crown
-
Posterior teeth: The crown and adjacent teeth should all hold the shim stock firmly.
-
Anterior teeth: The crown should lightly hold shim stock, consistent with the other anterior teeth. Analysis of Active Oral Tactile Sensitivity in Individuals with Complete Natural Dentition
-
Key findings (Anastacio et al. 2021):
- Natural dentition can perceive a thickness difference as small as 12 μm.
- There is no difference in tactile sensitivity between the right and left sides.
Articulating paper assessment49505152
-
Mark heavy contacts or interferences in centric and eccentric
-
Articulating paper will locate the contact area
-
Use different colors for different movements
-
Adjust until the marks on the crown are of similar intensity to those on adjacent teeth.
-
Dark articulating paper (blues) for CR or maximal intercuspation position
-
Lighter articulating paper (red) for eccentric position
-
Premature contact (centric)
- Adjust grooves or cusp inclines
- Never the tip of cusp
-
Interferences (eccentric)
- Adjust cusp inclines
- Tip of cusps if necessary
The prosthesis thickness should be measured Thickness gauge (Svensen Gauge) In some cases the opposing tooth can be adjusted
- Completed adjustment
- Well distributed occlusal contacts
- Posterior teeth: the prosthesis and the remaining dentition should have the same occlusal contact and hold shim stock
- Anterior teeth: the prosthesis should lightly hold shim stock if other anterior teeth do
Aesthetics535455565758596061626364656667686970
-
Patient approval should be obtained prior to cementation
-
Shade and morphology
- Lighter shade: can be stained and glazed
- Darker shade: should be cut back and followed by new ceramic application
-
Modify the morphology with diamond burs and soflex discs
- Send back for glazing
-
Consider temporary cementation
-
Patient approval: Always show the patient the crown in a mirror and get their explicit approval before cementation.
-
Adjustments:
- Minor contouring (e.g., shortening) can be done chairside.
- A shade that is too light can sometimes be stained and re-glazed.
- A shade that is too dark, or a tooth that is too short, requires a remake.
-
If the patient is uncertain, especially for anterior teeth, consider cementing the crown with temporary cement. This allows them to ‘test drive’ the aesthetics for a week before final cementation, avoiding the difficult process of cutting off a permanently cemented crown.
Finishing and polishing7172
Important
Any areas of the ceramic that have been adjusted with a bur must be thoroughly polished to restore a smooth surface. A rough surface will feel uncomfortable and can cause wear on the opposing teeth.
- Metal: rubber polishing wheels and points
- Ceramic: Rough ceramic will wear the opposing teeth
- Composite finishing rubber burs
- Rubber cup and diamond polishing paste
- Or send to laboratory for reglazing
Systematic approach73
- Evaluation of the restoration on the die a) Die and opposing model b) Internal surface of restoration c) Restoration on the model (die)
- Seating the crown on the prepared tooth a) Proximal contact b) Internal fit c) Marginal fit
Rationale
This sequence must be followed in order to correctly diagnose any fitting issues. A crown cannot seat fully if the proximal contacts are too tight.
- Assessment of the seated crown a) Stability b) Contour c) Occlusion d) Aesthetics
Conclusion
The lecture emphasizes that a successful crown delivery relies on a systematic, step-by-step evaluation. By following the prescribed order (proximal contacts → internal fit → marginal fit → stability, occlusion, aesthetics), clinicians can efficiently diagnose and resolve issues without creating new problems. The foundation for a good-fitting crown is a high-quality preparation and an accurate impression.
Footnotes
-
Original PDF page 4: F8 Tryin, p.4 ↩
-
Original PDF page 5: F8 Tryin, p.5 ↩
-
Original PDF page 6: F8 Tryin, p.6 ↩
-
Original PDF page 10: F8 Tryin, p.10 ↩
-
Original PDF page 11: F8 Tryin, p.11 ↩
-
Original PDF page 12: F8 Tryin, p.12 ↩
-
Original PDF page 13: F8 Tryin, p.13 ↩
-
Original PDF page 14: F8 Tryin, p.14 ↩
-
Original PDF page 15: F8 Tryin, p.15 ↩
-
Original PDF page 16: F8 Tryin, p.16 ↩
-
Original PDF page 17: F8 Tryin, p.17 ↩
-
Original PDF page 18: F8 Tryin, p.18 ↩
-
Original PDF page 19: F8 Tryin, p.19 ↩
-
Original PDF page 20: F8 Tryin, p.20 ↩
-
Original PDF page 21: F8 Tryin, p.21 ↩
-
Original PDF page 22: F8 Tryin, p.22 ↩
-
Original PDF page 23: F8 Tryin, p.23 ↩
-
Original PDF page 24: F8 Tryin, p.24 ↩
-
Original PDF page 25: F8 Tryin, p.25 ↩
-
Original PDF page 26: F8 Tryin, p.26 ↩
-
Original PDF page 27: F8 Tryin, p.27 ↩
-
Original PDF page 28: F8 Tryin, p.28 ↩
-
Original PDF page 29: F8 Tryin, p.29 ↩
-
Original PDF page 30: F8 Tryin, p.30 ↩
-
Original PDF page 31: F8 Tryin, p.31 ↩
-
Original PDF page 32: F8 Tryin, p.32 ↩
-
Original PDF page 33: F8 Tryin, p.33 ↩
-
Original PDF page 34: F8 Tryin, p.34 ↩
-
Original PDF page 35: F8 Tryin, p.35 ↩
-
Original PDF page 36: F8 Tryin, p.36 ↩
-
Original PDF page 37: F8 Tryin, p.37 ↩
-
Original PDF page 38: F8 Tryin, p.38 ↩
-
Original PDF page 39: F8 Tryin, p.39 ↩
-
Original PDF page 40: F8 Tryin, p.40 ↩
-
Original PDF page 41: F8 Tryin, p.41 ↩
-
Original PDF page 42: F8 Tryin, p.42 ↩
-
Original PDF page 43: F8 Tryin, p.43 ↩
-
Original PDF page 44: F8 Tryin, p.44 ↩
-
Original PDF page 45: F8 Tryin, p.45 ↩
-
Original PDF page 46: F8 Tryin, p.46 ↩
-
Original PDF page 47: F8 Tryin, p.47 ↩
-
Original PDF page 48: F8 Tryin, p.48 ↩
-
Original PDF page 49: F8 Tryin, p.49 ↩
-
Original PDF page 50: F8 Tryin, p.50 ↩
-
Original PDF page 51: F8 Tryin, p.51 ↩
-
Original PDF page 52: F8 Tryin, p.52 ↩
-
Original PDF page 53: F8 Tryin, p.53 ↩
-
Original PDF page 54: F8 Tryin, p.54 ↩
-
Original PDF page 55: F8 Tryin, p.55 ↩
-
Original PDF page 56: F8 Tryin, p.56 ↩
-
Original PDF page 57: F8 Tryin, p.57 ↩
-
Original PDF page 58: F8 Tryin, p.58 ↩
-
Original PDF page 59: F8 Tryin, p.59 ↩
-
Original PDF page 60: F8 Tryin, p.60 ↩
-
Original PDF page 61: F8 Tryin, p.61 ↩
-
Original PDF page 62: F8 Tryin, p.62 ↩
-
Original PDF page 63: F8 Tryin, p.63 ↩
-
Original PDF page 64: F8 Tryin, p.64 ↩
-
Original PDF page 65: F8 Tryin, p.65 ↩
-
Original PDF page 66: F8 Tryin, p.66 ↩
-
Original PDF page 67: F8 Tryin, p.67 ↩
-
Original PDF page 68: F8 Tryin, p.68 ↩
-
Original PDF page 69: F8 Tryin, p.69 ↩
-
Original PDF page 70: F8 Tryin, p.70 ↩
-
Original PDF page 71: F8 Tryin, p.71 ↩
-
Original PDF page 72: F8 Tryin, p.72 ↩
-
Original PDF page 73: F8 Tryin, p.73 ↩
-
Original PDF page 74: F8 Tryin, p.74 ↩
-
Original PDF page 75: F8 Tryin, p.75 ↩
-
Original PDF page 76: F8 Tryin, p.76 ↩
-
Original PDF page 77: F8 Tryin, p.77 ↩
-
Original PDF page 78: F8 Tryin, p.78 ↩
-
Original PDF page 79: F8 Tryin, p.79 ↩